Overview
The Vega runtime Operations Builder lets Creators configure logic for Vega-compatible components. The Operations Builder configuration process is divided into two parts: events and operations. Events are facts about what has happened in the Runtime, and decides when an operation executes. For example, when using the Operations Builder in a Button component, setting the event to On Click causes an operation to execute when an end-user clicks the button. Operations perform a specific function when an event occurs. For example, performing a Table Add Row operation that adds a new row to a Vega Table when the end-user clicks a button.
To learn more about how the Operations Builder works, view our Introduction to Operations Builder article.
Configuring with the Operations Builder Tool
Depending on the type of component, the Operations Builder is accessible in one of two ways. You can access the Operations Builder in non-logic components using the component's canvas toolbar. You can also access the Operations Builder in the Initializer component from the Outputs table.
The Runtime Version must be set to Vega (2.0) to use the Operations Builder with Vega-compatible components. Or, use Cross-Runtime Support in a Panel component to access the Operations Builder in the Centauri runtime.
Configuring Operations in Non-Logic Components
Configuring the Operations Builder is a multi-step process that begins with selecting an event, then configuring operations for that event. Once you've configured at least one operation, the Operations Builder tool lets you edit existing configurations, add additional events and operations, and adjust the order of execution.
To access the Operations Builder, the moduleRuntime Version setting must be set to Vega (2.0), or, the component must be in a Vega-enabled Panel component.
To learn more about Centauri and Vega-supported components, view our Introduction to Vega article.
To configure operations in a component:
In the Module Builder, open the settings of a Vega-supported component.
Navigate to the component's Actions settings.
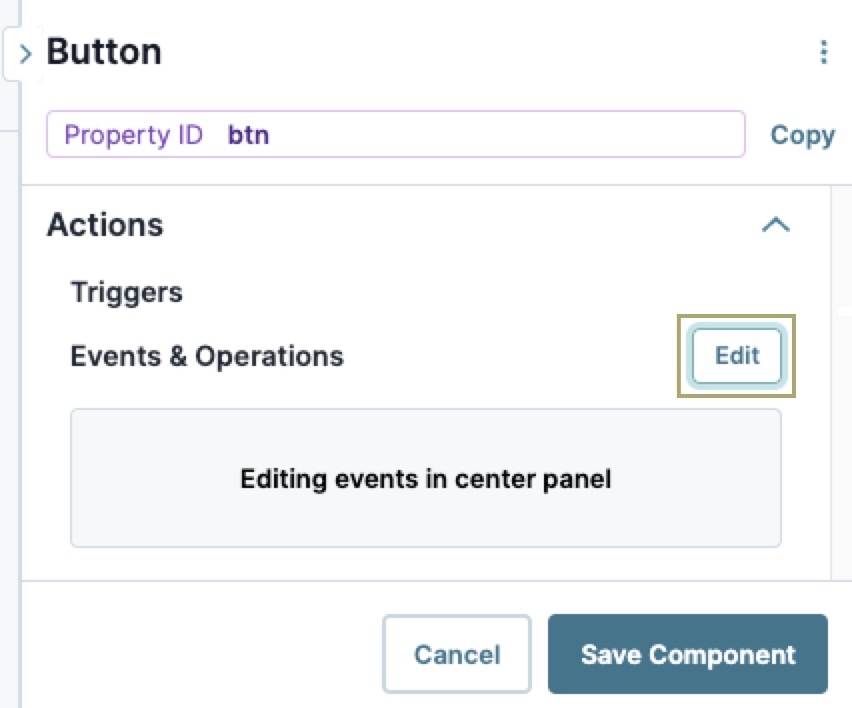
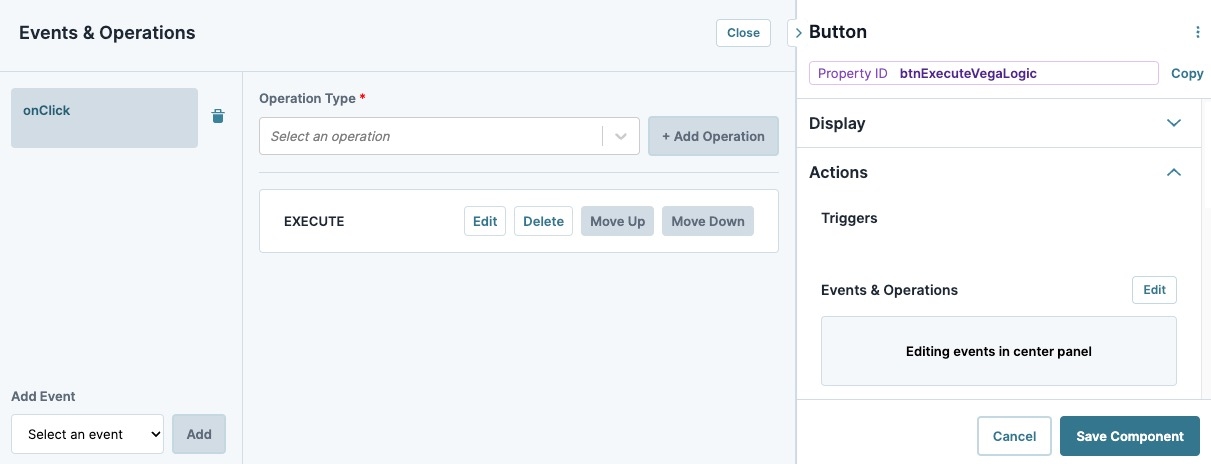
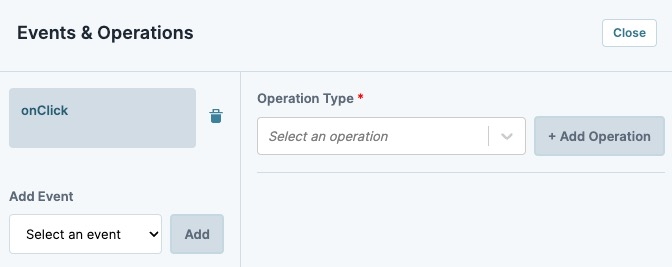
To the right of Events & Operations, click Edit. The Operations Builder displays.
In the Select an Event ▾ field, enter or select an event from the list.
To see a list of events and their descriptions, view our Operations Builder Events Reference list.
Click Add. The Operation Type configuration menu displays.
In the Operation Type field, enter or select an operation to execute when the event occurs.
Depending on the operation, configure the remaining fields. Settings marked with an asterisk must be completed before you can save the operation.
Click Save. The operation displays in the Operations Builder configuration window as a new row. The Operation Type and Operation Summary values display inside the row.
(Optional) To configure another operation for the same event, select or enter a new operation from the Operation Type drop-down.
(Optional) To configure another event, enter or select an event from the Select an Event | ▾ field.
Click Save Component.
Save your module.
Preview the functionality in Express View.
Configuring Operations in the Initializer Component
Unlike non-logic components, the Initializer component's Operations Builder event is set by the Trigger Type setting. Each row in the Initializer component's Outputs table uses the same event determined by the Trigger type. But, multiple operations can be assigned to that event.
Regardless of the Trigger Type setting, triggering the Initializer component also executes any operations configured in the Outputs table.
To configure operations in an Initializer component:
Drag and drop an Initializer component onto the canvas. Or, open the configuration menu of an existing Initializer component.
Navigate to the Actions settings.
Under Outputs table's Property ID field, enter or select the Property ID you want to execute an operation against.
A Property ID is not required for a Vega Operation.
In the Type field, enter or select vegaOperation.
In the Value field, paste the operation’s JSON.
Click Save Component to close the Initializer component's configuration menu.
Save your module.
Preview the functionality in Express View.
Customizing Operations using the Operations Builder Data Editor
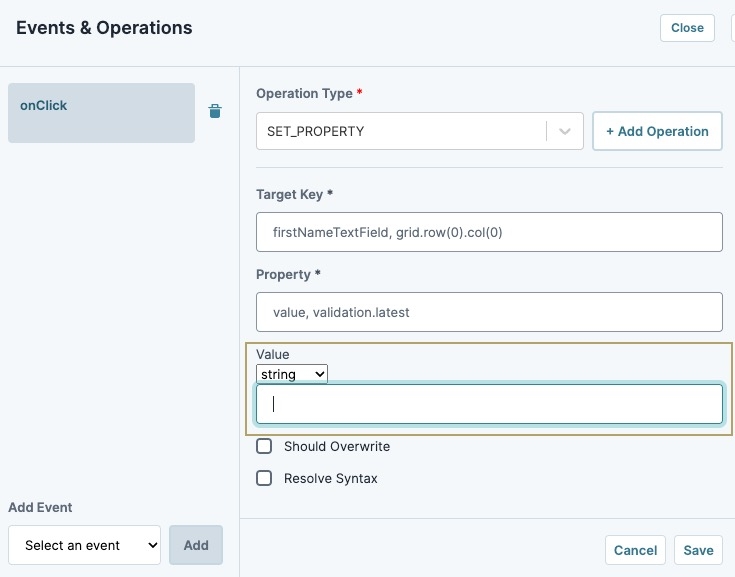
Some operations might contain open-ended parameters that require using the Data Editor to manipulate. For example, the Value field in Set Property operation enables Creators to input data of any type.
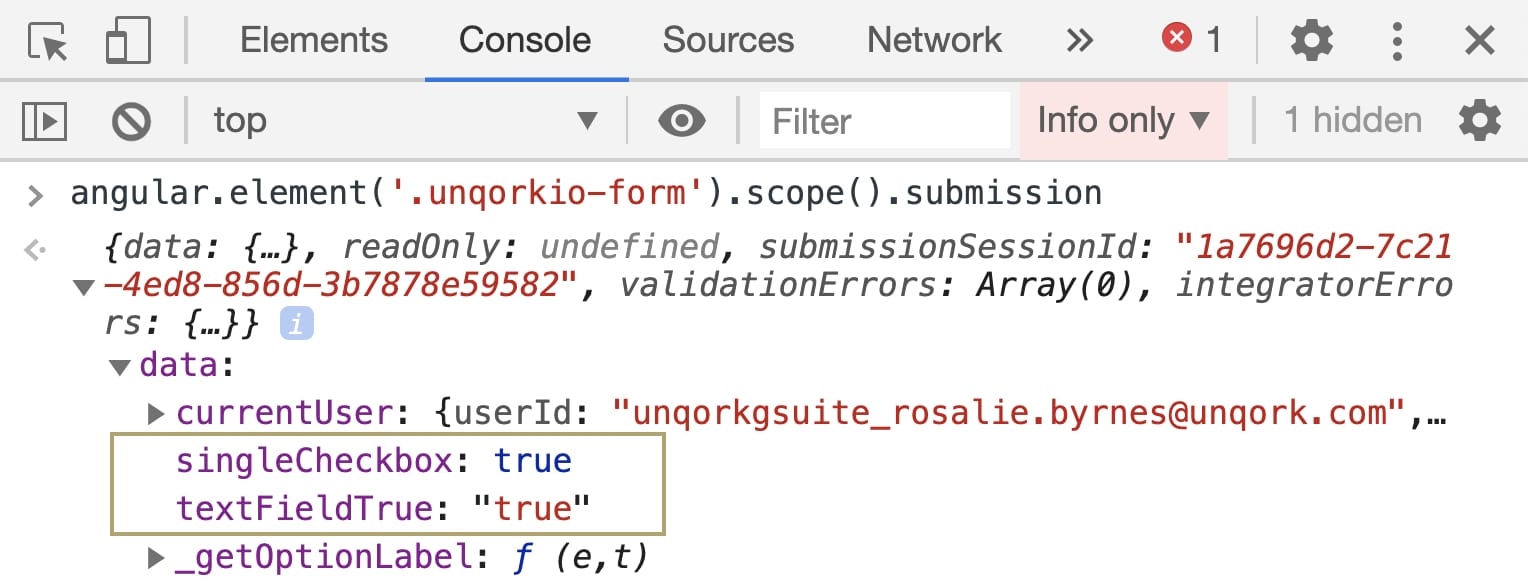
Because the Data Editor does not assume a specific data type, Creators must be exact when entering data. For example, in the image below, the ![]() Single Checkbox component singleCheckbox key shows a Boolean value of true. In contrast, the Text Field component textFieldTrue shows how entering true into the component's field stores data as a string that reads "true". The use of quotation marks dictates which data type is Boolean or Strings. Failure to use the right data type might cause long term issues for your application.
Single Checkbox component singleCheckbox key shows a Boolean value of true. In contrast, the Text Field component textFieldTrue shows how entering true into the component's field stores data as a string that reads "true". The use of quotation marks dictates which data type is Boolean or Strings. Failure to use the right data type might cause long term issues for your application.
When using the Data Editor, its important to consider how the following data types and structures are used:
Data Type | Example | Description |
|---|---|---|
Boolean | true false | A Boolean value can only be true, or false. Unlike the string data type, it does not enclose its values in quotation marks. |
String | "true" "false" | A String value contains text, numbers, letters, symbols, and spaces. Strings use double quotation marks "" to differentiate values from other data types. |
Number | 5 | A Number's value can only be a numerical integer or decimal values. The Number data type does not use quotation marks. |
Array | [“apple”,”pear”] | An array is encased by brackets []. Arrays store multiple values in a single variable. Values in array can be any of the following:
|
Object | | An object is a type of data structure that represents a single, self-contained entity. The object acts as a container for the characteristics of that entity. These characteristics store as key/value pairs in the object. The value of one of those key/value pairs can itself be an object or an array. Objects encase data using curly brackets |
Example Event and Operation Combination
The Operations Builder offers endless combinations between events and operations. In this example, an end-user needs to add additional rows to a table. You'll use the Operations Builder to configure a Button component to add a new row on button-click.
Pre-Configuration
For this example, set the Runtime Version to Vega (2.0). This enables the Operations Builder for use with all Vega-supported components.
To change the runtime in the Module Builder:
Above the Module Builder, navigate to the Runtime Version setting.
From the Runtime Version drop-down, select Vega (2.0).
Configure the Vega Table Component
Configure a Vega Table component with fields the end-user must complete. Then, you'll configure a Button component using the Operations Builder.
In the Module Builder, drop and drop a Vega Table component onto the canvas.
In the Property ID field, enter
clientsTable.From the View Type drop-down, select Form.
Click Save Component.
Configure the Text Field Components
Drag and drop two Text Field components onto the canvas, placing them inside the
clientsTableVega Table component.In the Property ID and Label Text fields of each component, enter the following:
Property ID
Label Text
firstName
First Name
lastName
Last Name
Click Save Component for each component as you add it.
Configure the Button Component
Configure a Button component to execute the Add a Row operation when it emits the On Click event. When end-users click the button, it adds a row to the bottom of the clientsTable Vega Table component.
Drag and drop a Button component onto the canvas, placing it below the
clientsTableVega Table component.In the Property ID field, enter btnCreateRow.
In the Label Text field, enter
Add Row.Navigate to the Actions settings.
Set the Action Type to Event.
Navigate to the Events & Operations setting.
Click Edit. The Operations Builder modal displays.
In the Select an Event | ▾ field, enter or select the On Click event.
Click Add. The Operation Type configuration menu displays.
In the Operation Type field, enter or select
Table Add Row.In the Target Key field, enter or select
clientsTable.In the Target Index* field, set String to Number.
In the field to the right of the Number field, enter
1.Click Save to close the New Operation window. The operation displays in the Operations Builder configuration window as a new row. The Operation Type and Operation Summary values display inside the row.
Click Save Component to close the Operations Builder modal.
Save your module.
Preview the functionality in Express View.
Observing Events and Operations in Console
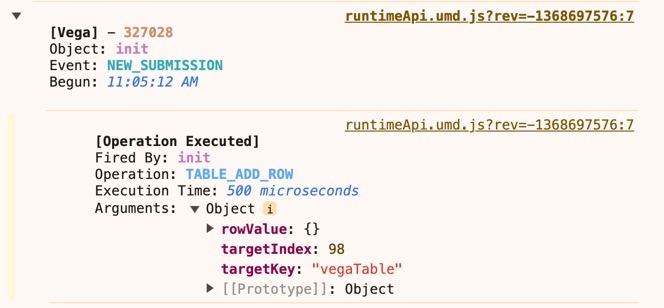
In the Express View DevTools Console, you can view the initiation and execution of events and operations. In the image below, the init Initializer emits the New Submission event. The Table Add Row operation fires when the event occurs. The Arguments's Object corresponds to the Operations fields, and the values set using the Operations Builder.
Events and operations only display in non-production environments.
Overview
The Vega runtime Operations Builder lets Creators configure logic for Vega-compatible components. The Operations Builder configuration process is divided into two parts: events and operations. Events are facts about what has happened in the Runtime, and decides when an operation executes. For example, when using the Operations Builder in a Button component, setting the event to On Click causes an operation to execute when an end-user clicks the button. Operations perform a specific function when an event occurs. For example, performing a Table Add Row operation that adds a new row to a Vega Table when the end-user clicks a button.
To learn more about how the Operations Builder works, view our Introduction to Operations Builder article.
Configuring with the Operations Builder Tool
Depending on the type of component, the Operations Builder is accessible in one of two ways. You can access the Operations Builder in non-logic components using the component's canvas toolbar. You can also access the Operations Builder in the Initializer component from the Outputs table.
The Runtime Version must be set to Vega (2.0) to use the Operations Builder with Vega-compatible components. Or, use Cross-Runtime Support in a Panel component to access the Operations Builder in the Centauri runtime.
Configuring Operations in Non-Logic Components
Configuring the Operations Builder is a multi-step process that begins with selecting an event, then configuring operations for that event. Once you've configured at least one operation, the Operations Builder tool lets you edit existing configurations, add additional events and operations, and adjust the order of execution.
To learn more about Centauri and Vega-supported components, view our Introduction to Vega article.
To configure operations in a component:
In the Module Builder, hover over a Vega-compatible component.
A 6-button toolbar displays above the component on hover-over.
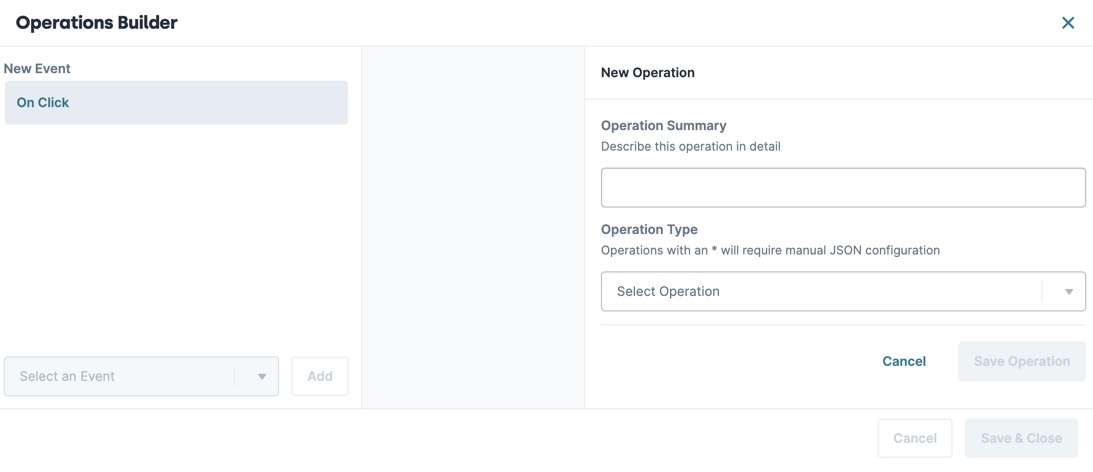
Click the (Operations Builder) button. The Operations Builder modal displays.
In the Select an Event | ▾ field, enter or select an event from the list.
To see a list of events and their descriptions, view our Operations Builder Events Reference list.
Click Add. The New Operation configuration menu displays.
In the Operation Summary field, enter a description of what the operation will do.
In the Operation Type field, enter or select an operation to execute when the event occurs.
Depending on the operation, configure the remaining fields. Settings marked with an asterisk must be completed before you can save the operation.
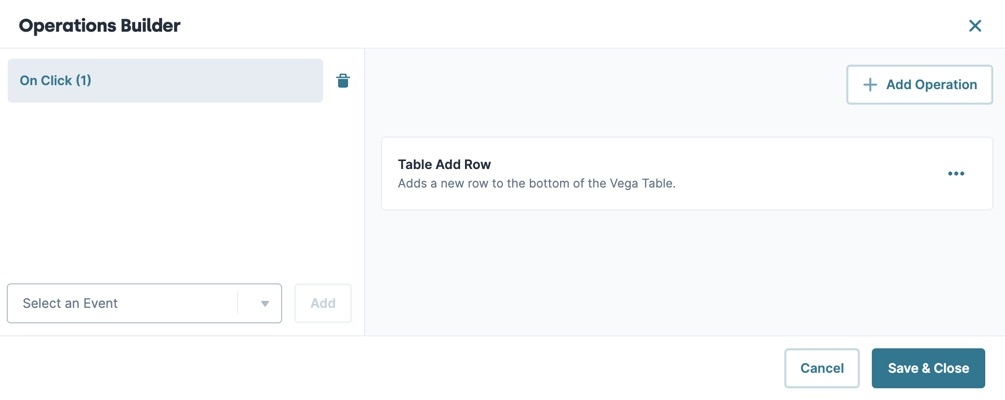
Click Save Operation. The operation displays in the Operations Builder configuration window as a new row. The Operation Type and Operation Summary values display inside the row.
(Optional) To configure another operation for the same event, click + Add Operation.
(Optional) To configure another event, enter or select an event from the Select an Event | ▾ field.
Click Save & Close.
Save your module.
Preview the functionality in Express View.
Configuring Operations in the Initializer Component
Unlike non-logic components, the Initializer component's Operations Builder event is set by the Trigger Type setting. Each row in the Initializer component's Outputs table uses the same event determined by the Trigger type. But, multiple operations can be assigned to that event.
Regardless of the Trigger Type setting, triggering the Initializer component also executes any operations configured in the Outputs table.
To configure operations in an Initializer component:
Drag and drop an Initializer component onto the canvas. Or, open the configuration menu of an existing Initializer component.
In the component's navigation menu, select
.png) Actions.
Actions.Under Outputs table's Property ID field, enter or select the Property ID you want to execute an operation against.
A Property ID is not required for a Vega Operation.
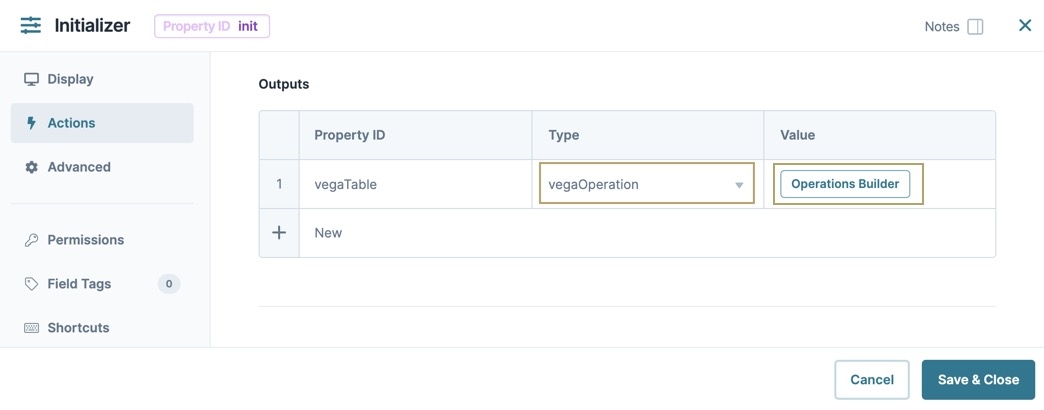
In the Type field, enter or select vegaOperation. In the Value field, the Operations Builder button displays.
If a value already exists in the Value field, and it is not a compatible Vega operation, then an error icon displays. To fix this issue, change the Type to a different value. Then, remove the existing value in the Value field. Set the Type value back to vegaOperation to display the Operations Builder button.
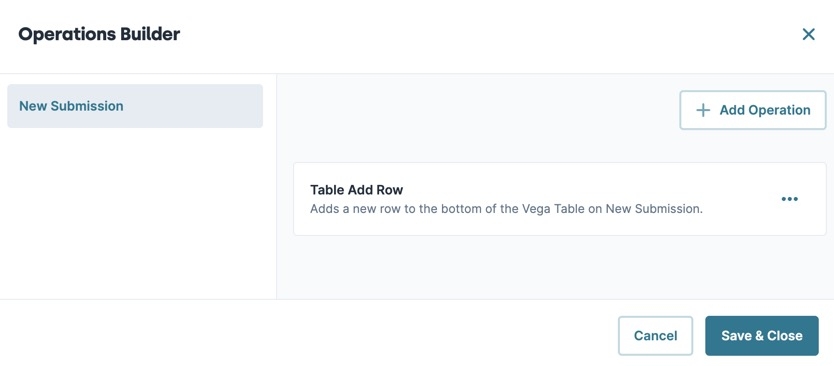
Click Operations Builder. The Operations Builder modal displays.
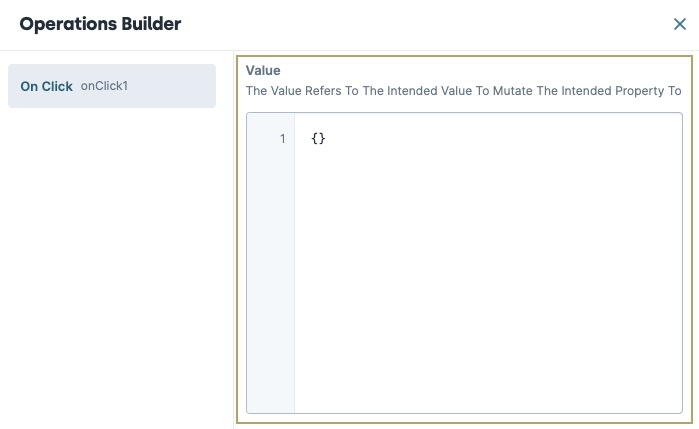
In the Operation Summary field, enter a description of what the operation will do.
In the Operation Type field, enter or select an operation to execute when the event occurs.
Depending on the operation, configure the remaining fields. Settings marked with an asterisk must be completed before you can save the operation.
Click Save Operation. The operation displays in the Operations Builder configuration window as a new row. The Operation Type and Summary display inside the row.
(Optional) To configure another operation for the same event, click + Add Operation.
Click Save & Close to close the Operations Builder modal.
Click Save & Close to close the Initializer component's configuration menu.
Save your module.
Preview the functionality in Express View.
Customizing Operations using the Operations Builder Data Editor
Some operations might contain open-ended parameters that require using the Data Editor to manipulate. For example, the Value field in Set Property operation enables Creators to input data of any type.
Because the Data Editor does not assume a specific data type, Creators must be exact when entering data. For example, in the image below, the ![]() Single Checkbox component singleCheckbox key shows a Boolean value of true. In contrast, the Text Field component textFieldTrue shows how entering true into the component's field stores data as a string that reads "true". The use of quotation marks dictates which data type is Boolean or . Failure to use the right data type might cause long term issues for your application.
Single Checkbox component singleCheckbox key shows a Boolean value of true. In contrast, the Text Field component textFieldTrue shows how entering true into the component's field stores data as a string that reads "true". The use of quotation marks dictates which data type is Boolean or . Failure to use the right data type might cause long term issues for your application.
When using the Data Editor, its important to consider how the following data types and structures are used:
Data Type | Example | Description |
|---|---|---|
Boolean | true false | A Boolean value can only be true, or false. Unlike the string data type, it does not enclose its values in quotation marks. |
String | "true" "false" | A String value contains text, numbers, letters, symbols, and spaces. Strings use double quotation marks "" to differentiate values from other data types. |
Number | 5 | A Number's value can only be a numerical integer or decimal values. The Number data type does not use quotation marks. |
Array |
| An array is encased by brackets []. Arrays store multiple values in a single variable. Values in array can be any of the following:
|
Object | | An object is a type of data structure that represents a single, self-contained entity. The object acts as a container for the characteristics of that entity. These characteristics store as key/value pairs in the object. The value of one of those key/value pairs can itself be an object or an array. Objects encase data using curly bracket |
Example Event and Operation Combination
The Operations Builder offers endless combinations between events and operations. In this example, an end-user needs to add additional rows to a table. You'll use the Operations Builder to configure a Button component to add a new row on button-click.
Configure the Vega Table Component
Configure a Vega Table component with fields the end-user must complete. Then, you'll configure a Button component using the Operations Builder.
In the Module Builder, drop and drop a Vega Table component onto the canvas.
In the Property ID field, enter clientsTable.
From the View Type drop-down, select Form.
Click Save & Close.
Configure the Text Field Components
Drag and drop two Text Field components onto the canvas, placing them inside the clientsTable Vega Table component.
In the Property ID and Label Text fields of each component, enter the following:
Property ID
Label Text
firstName
First Name
lastName
Last Name
Save & Close each component as you add it.
Configure the Button Component
Configure a Button component to execute the Add a Row operation when it emits the On Click event. When end-users click the button, it adds a row to the bottom of the clientsTable Vega Table component.
Drag and drop a
.png) Button component onto the canvas, placing it below the clientsTable Vega Table component.
Button component onto the canvas, placing it below the clientsTable Vega Table component.In the Property ID field, enter btnCreateRow.
In the Label Text field, enter
Add Row.In the component's configuration menu, select
.png) Actions.
Actions.Set the Action Type to Event.
Click Save & Close.
Hover over the
.png) Button component.
Button component.A 6-button toolbar displays above the component on hover-over.
Click the (Operations Builder) button. The Operations Builder displays.
In the Select an Event | ▾ field, enter or select the On Click event.
Click Add. The New Operation configuration menu displays.
In the Operation Summary field, enter
Add a new row to the bottom of the clientsTable Vega Table.In the Operation Type field, enter or select
Table Add Row.In the Target Key field, enter or select
clientsTable.In the Target Index* field, set String to Number.
In the field to the right of the Number field, enter
1.Click Save Operation to close the New Operation window. The operation displays in the Operations Builder configuration window as a new row. The Operation Type and Operation Summary values display inside the row.
Click Save & Close to close the Operations Builder modal.
Save your module.
Preview the functionality in Express View.
Observing Events and Operations in Console
In the Express View DevTools Console, you can view the initiation and execution of events and operations. In the image below, the init Initializer emits the New Submission event. The Table Add Row operation fires when the event occurs. The Arguments's Object corresponds to the Operations fields, and the values set using the Operations Builder.
Events and operations only display in non-production environments.
Best Practices and Limitations
You can configure multiple events and operations in a single component. You can also configure a single event to fire multiple operations. Each operation configured for an event executes synchronously. Events are discrete and independent of each other.
In the Initializer component's configuration menu, use the Output table's Property ID field as a reference for what the operations are targeting. For example, if you are using Vega Table operations, enter the Vega Table component's Property ID in the Output table's Property ID field.
The Initializer component synchronously executes a single row containing multiple operations. However, multiple rows of operations might not execute synchronously.
Operations can execute components that do not use the Operations Builder. For example, an operation can trigger a Data Workflow component.
