Overview
Shared elements include modules and reference data. Shared elements work with Workspaces Role-Based Access Control (WSRBAC) to limit which modules, data collections and workspaces creators can access. Other applications can also reference shared elements. For example, you can share an API module with other applications, rather than recreating the module for each.
To learn more about WSRBAC, view our Workspaces Role-Based Access Control (WSRBAC) article.
With Shared Elements and WSRBAC, you can:
Share elements to specific applications or workspaces.
Share elements to the Environment.
Make an API module accessible to specific applications or workspaces.
The Workspaces RBAC EAP (early access program) doesn't include sharing workflows. However, you can share modules that are a part of a workflow.
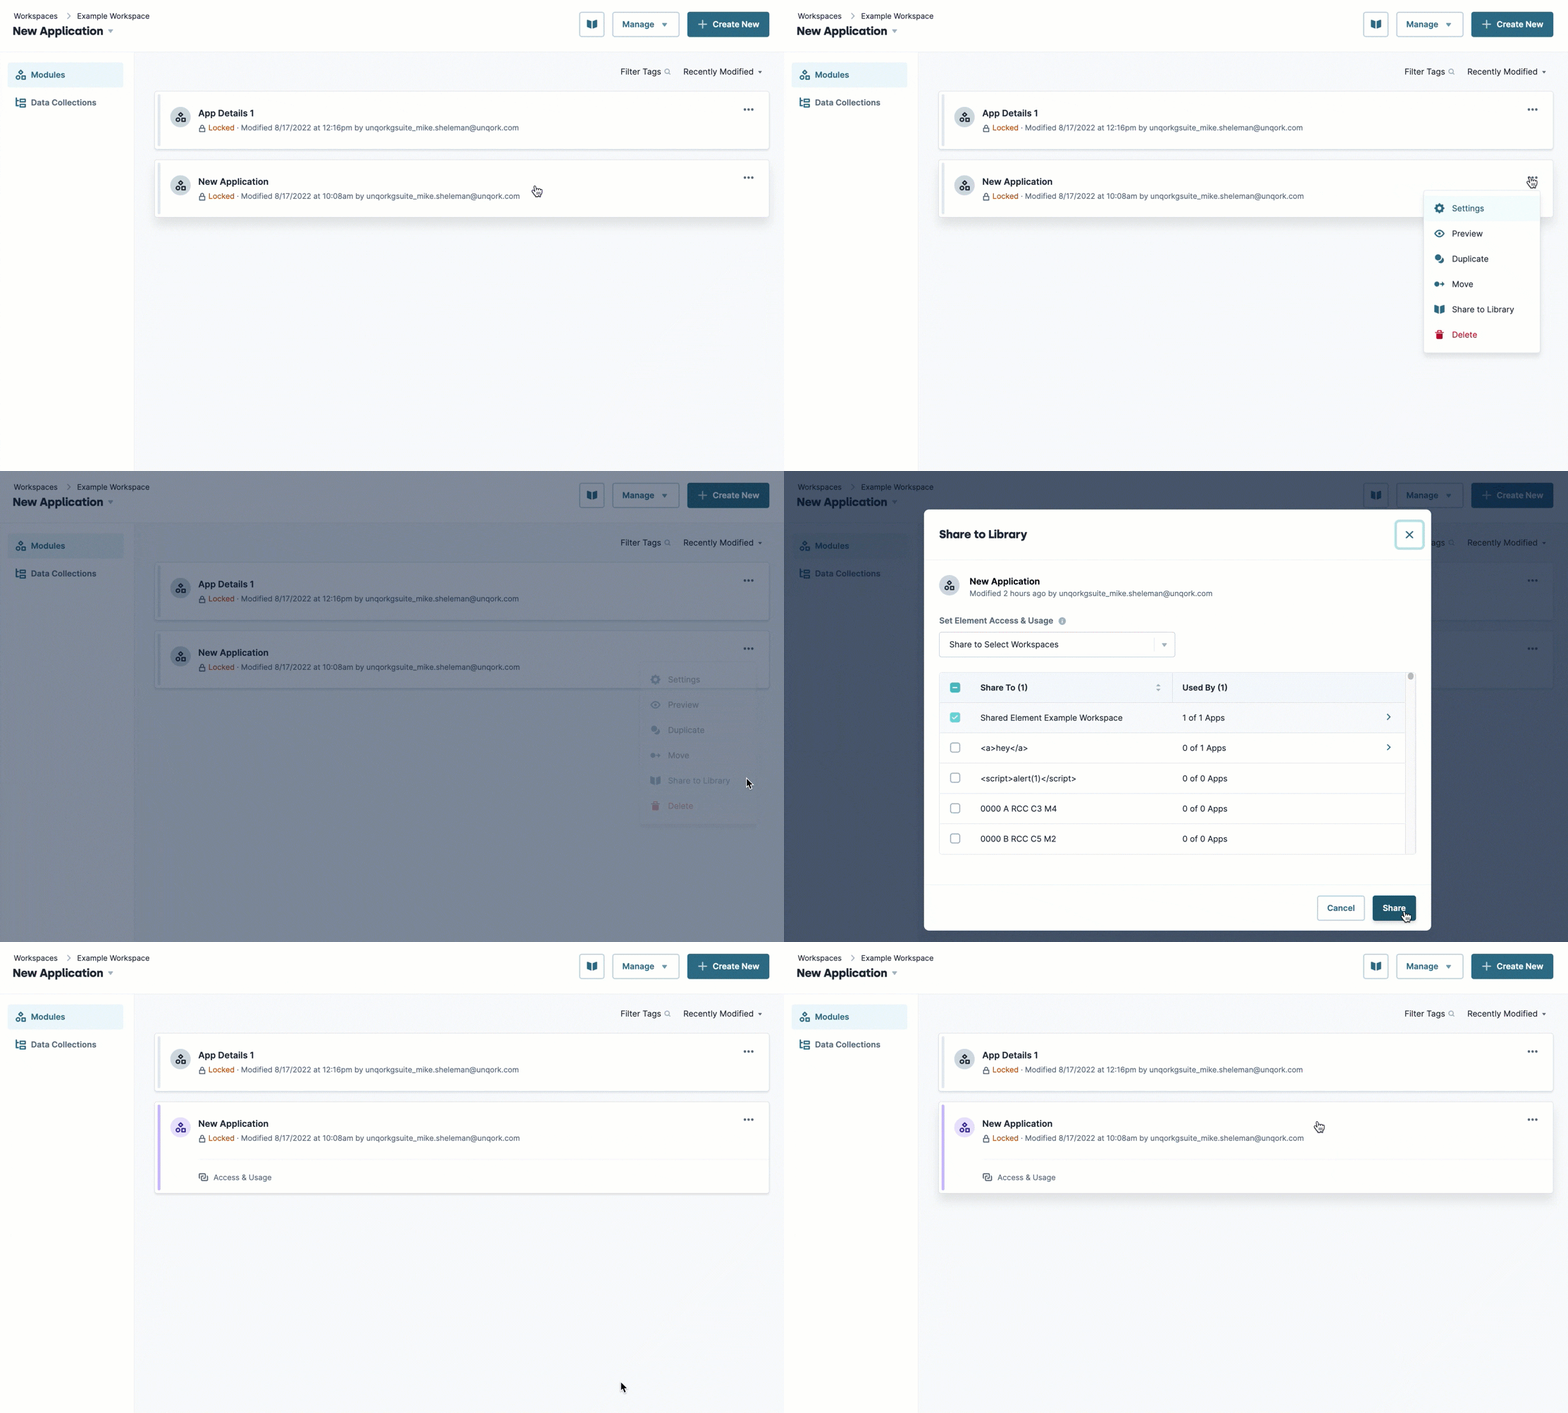
Sharing Elements to a Workspace, Application, or Environment
Sharing an element makes it accessible to other workspaces and applications. When sharing an element to an application, users assigned to those workspaces can see and edit the element based on their WSRBAC role. Sharing elements to an application displays it in the app's module or data collection list. Sharing an element to only the workspace does not display it in an application's module or data collection list. However, users can reference a shared element inside the workspace. Any element, whether currently shared or not, can be referenced by another element using remote execution or importing.
Sharing Elements to an Application or Workspace
Users with access to the application's workspace can see or edit elements shared at the application level. Elements shared in a workspace are not accessible by the application's element list, but can be referenced by other elements in the workspace.
To share an element to a workspace or application:
On the Workspaces page, click View Workspace for the workspace containing the element you want to share.
Find the application containing the element and click View App.
Click the Modules or Data Collections tab based on the element you want to share.
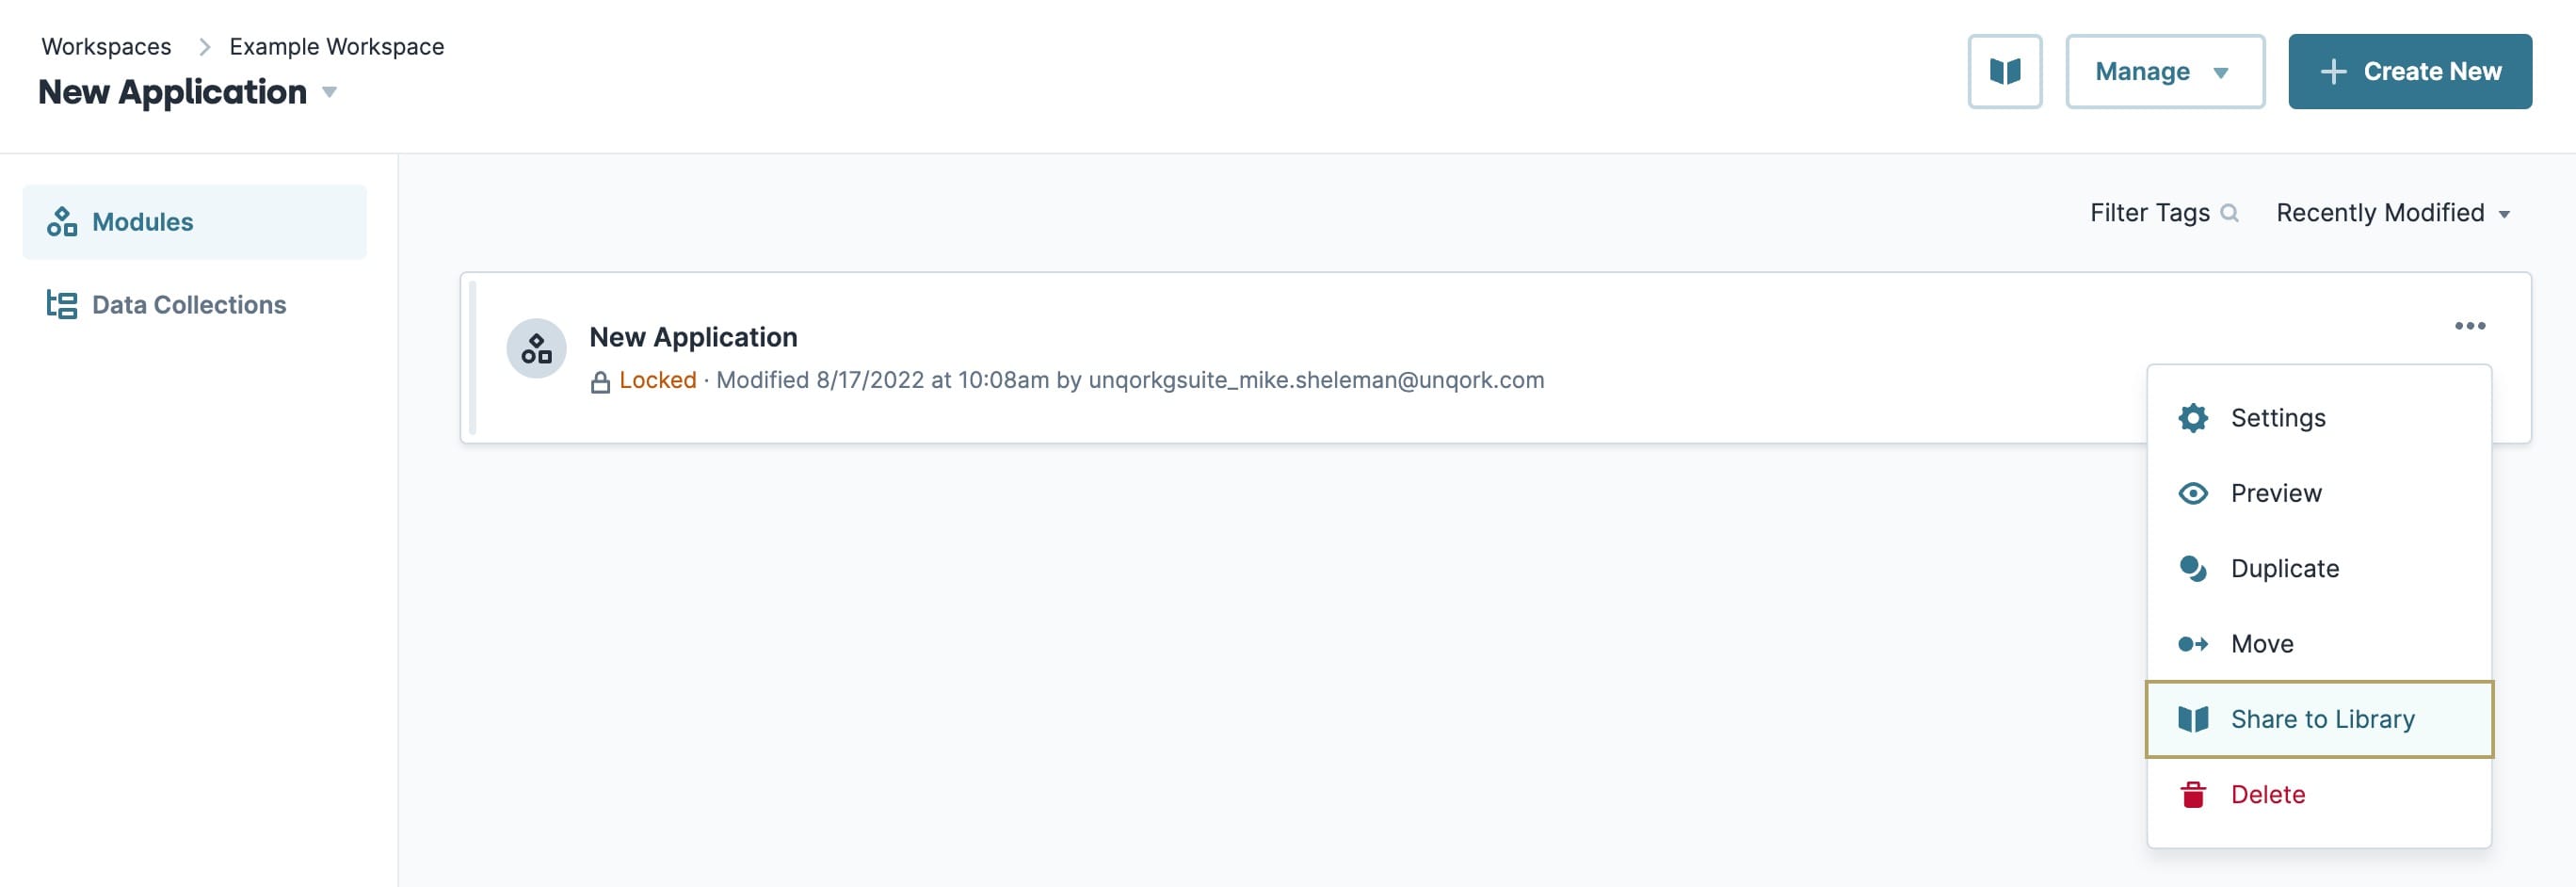
Find the element to be shared and click the ellipsis (...).
Click Share to Library.
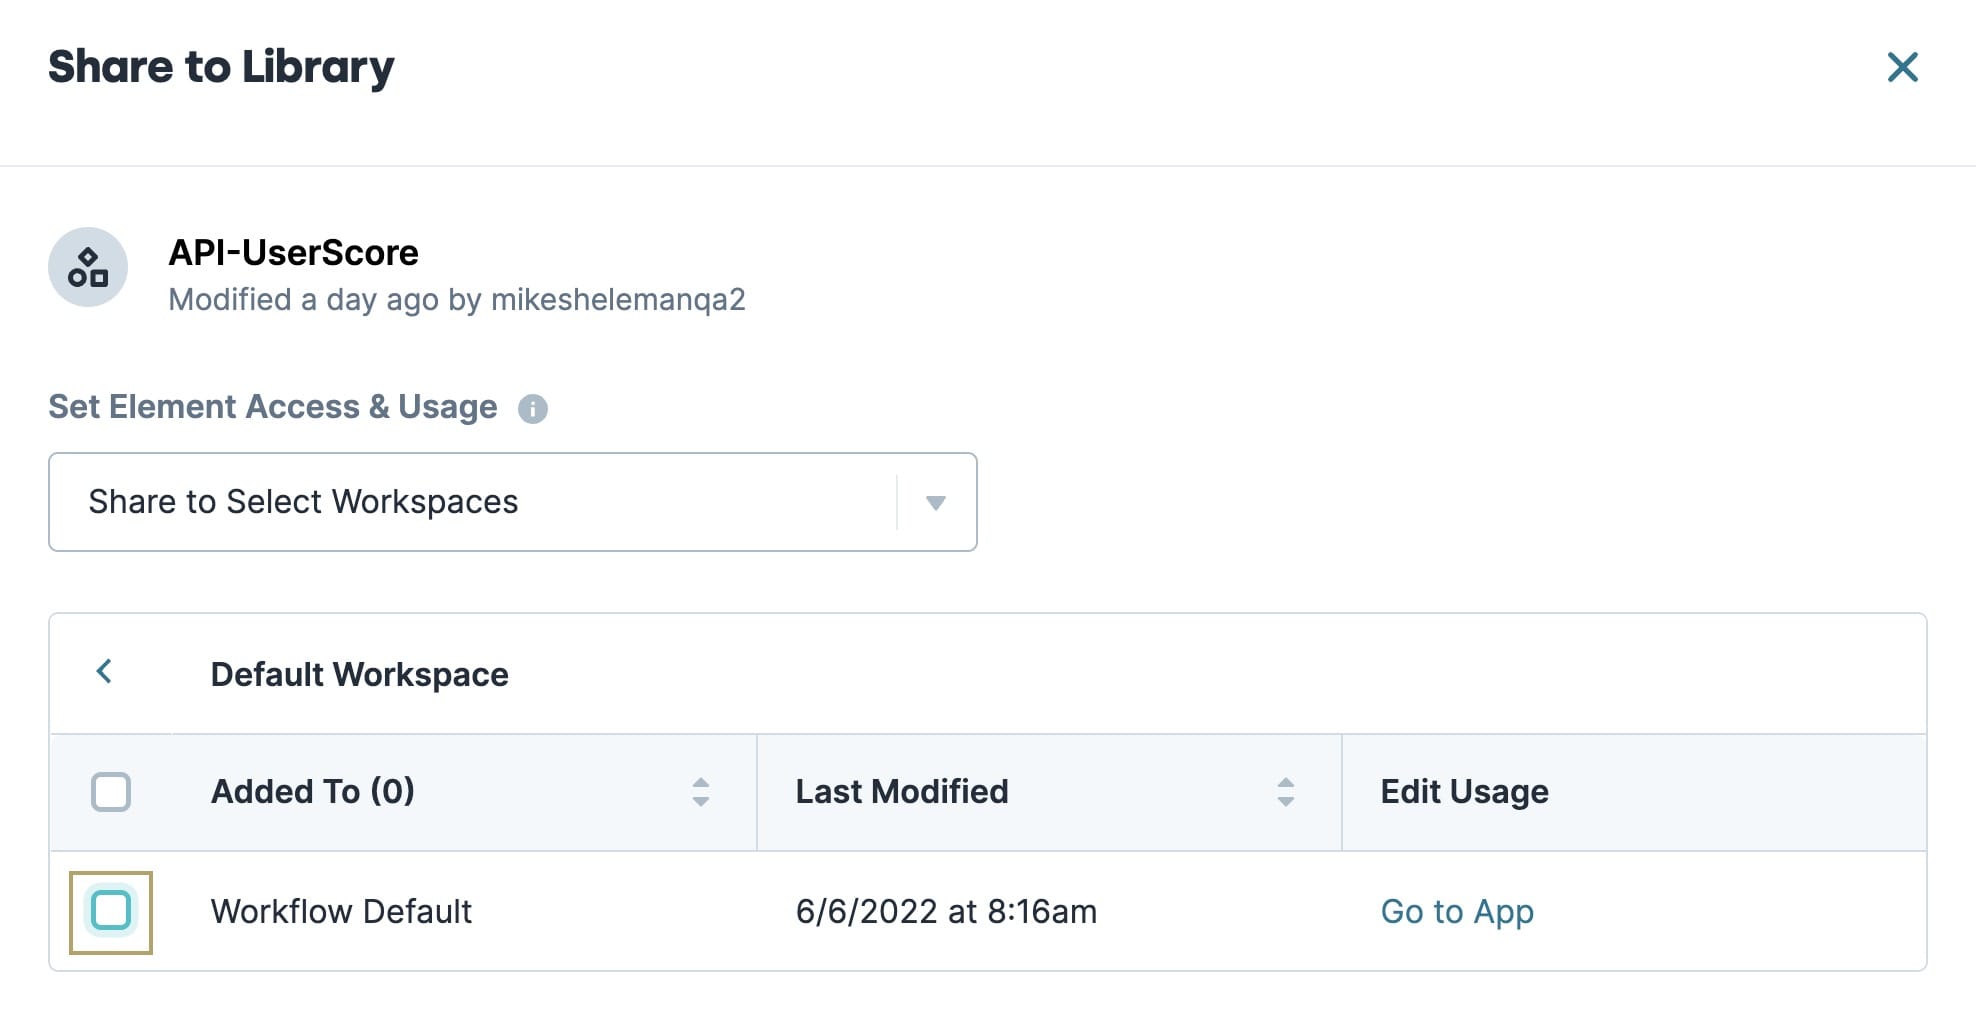
On the Share to Library modal, click the workspace name you intend to share the element with.
Click the check box next to an application.
To share an element with an entire environment, view the steps in the Share an Element to the Environment section below.
Click Share. The element card updates to show the (
 ) Access & Usage icon.
Sharing an Element to the Environment
Sharing an element to the environment is similar to sharing it with workspaces. The only difference is sharing to anenvironment makes the element available to all workspaces. Only Administrators can share elements to an environment.
To share an element to the environment:
On the Workspaces page, click View Workspace for the workspace containing the element you intend to share.
Find the application containing the element and click View App.
Click the Modules or Data Collections tab based on the element you want to share.
Find the element to be shared and click the ellipsis (...).
Click Share to Library.
In the Set Element Access & Usage drop-down, select Share to Environment.
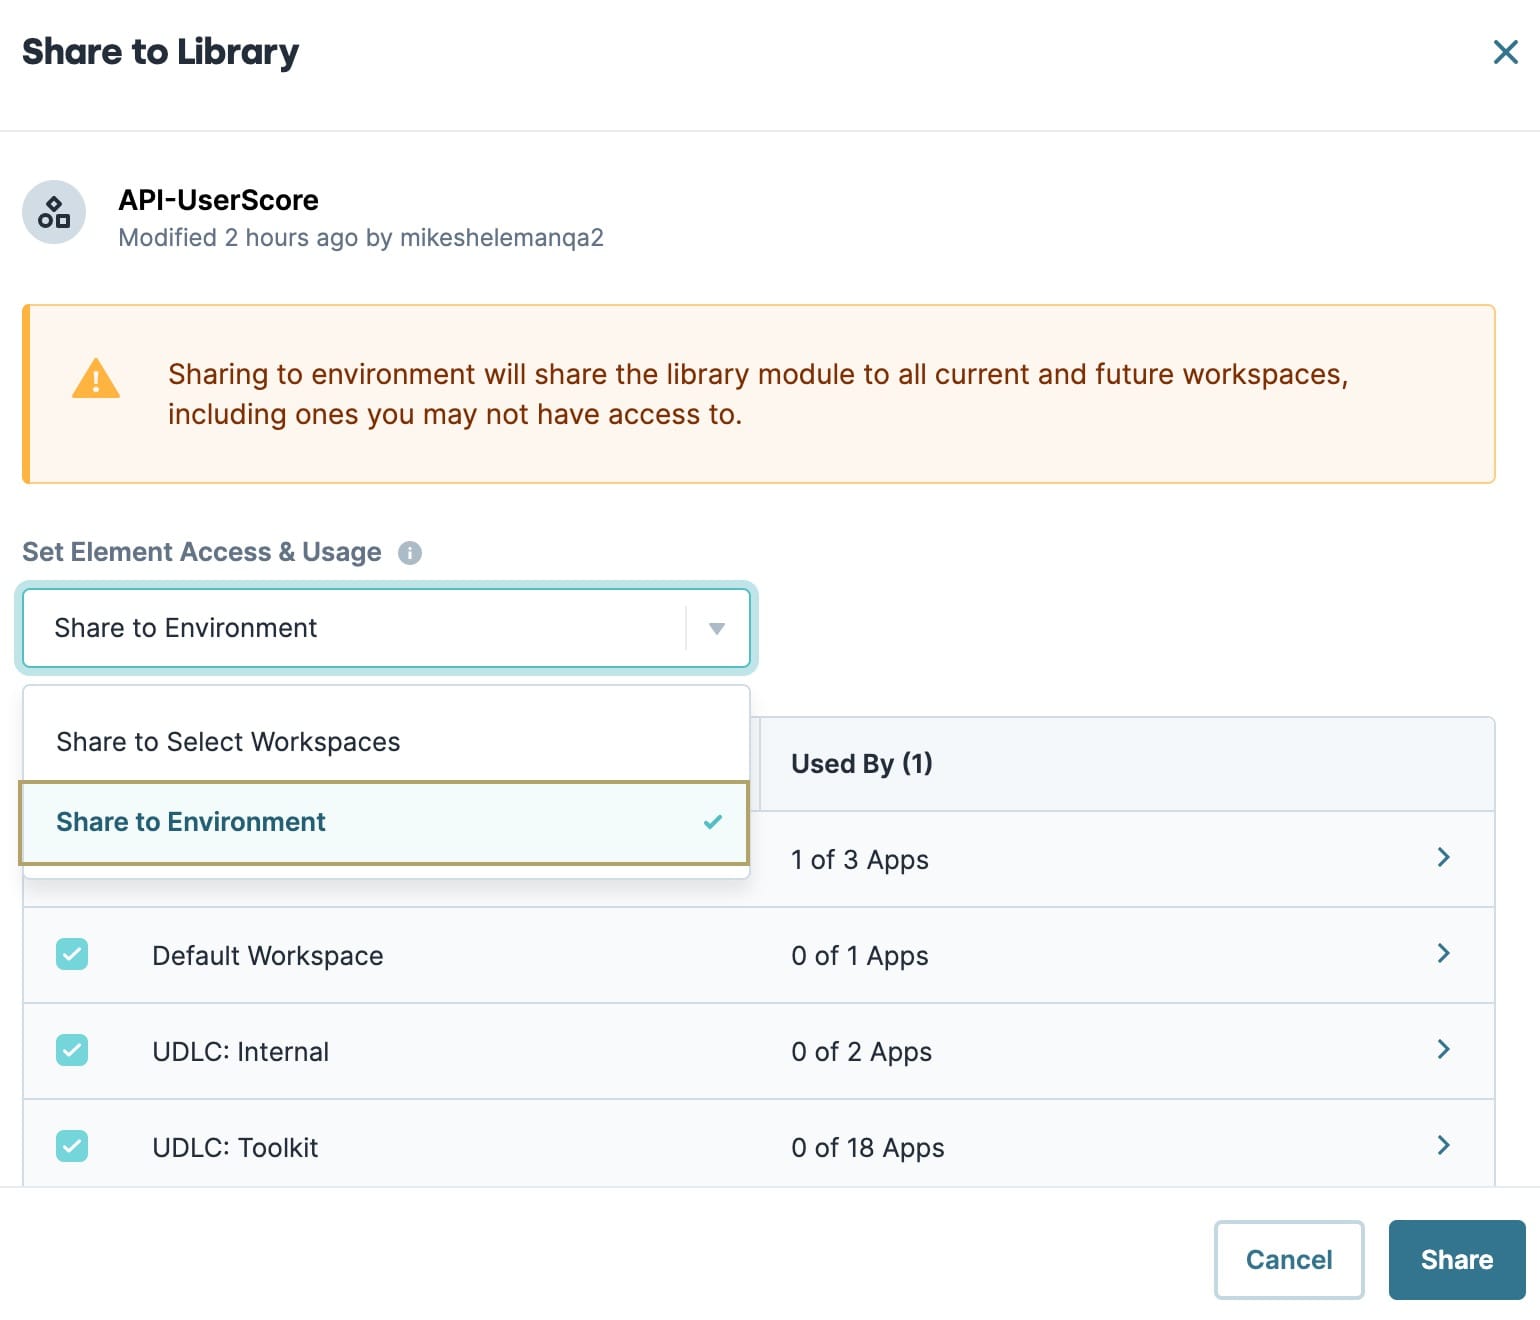
Click Share. The element card displays the (
 ) Access & Usage icon.
Elements shared only to an environment don't display in application lists. However, elements shared to an environment can be referenced by other elements in the environment.
Navigating the Access & Usage Configuration Window
Access & Usage controls shared element (module and data collections) access across workspaces and applications. This is helpful if multiple teams need access to a shared element as part of their workspace. Once an element is shared, the Access & Usage setting becomes available on the element's card.
The Access & Usage configuration window displays a list of all workspaces in the environment, including which workspaces or applications and element is shared with. Access & Usage starts in View mode. You can switch to Edit mode if you're assigned the Can Manage role.
To view access and usage settings:
On the Workspaces page, click View Workspace for the workspace containing the element you intend to share.
Find the application containing the shared element and click View App.
Click the Modules or Data Collections tab of the element you want to view.
Find the shared element and click Access & Usage.

Access & Usage (View Mode)
On trigger, the Access & Usage modal opens and lists all workspaces in the environment. Here you can elect to share an element to one or many workspaces.
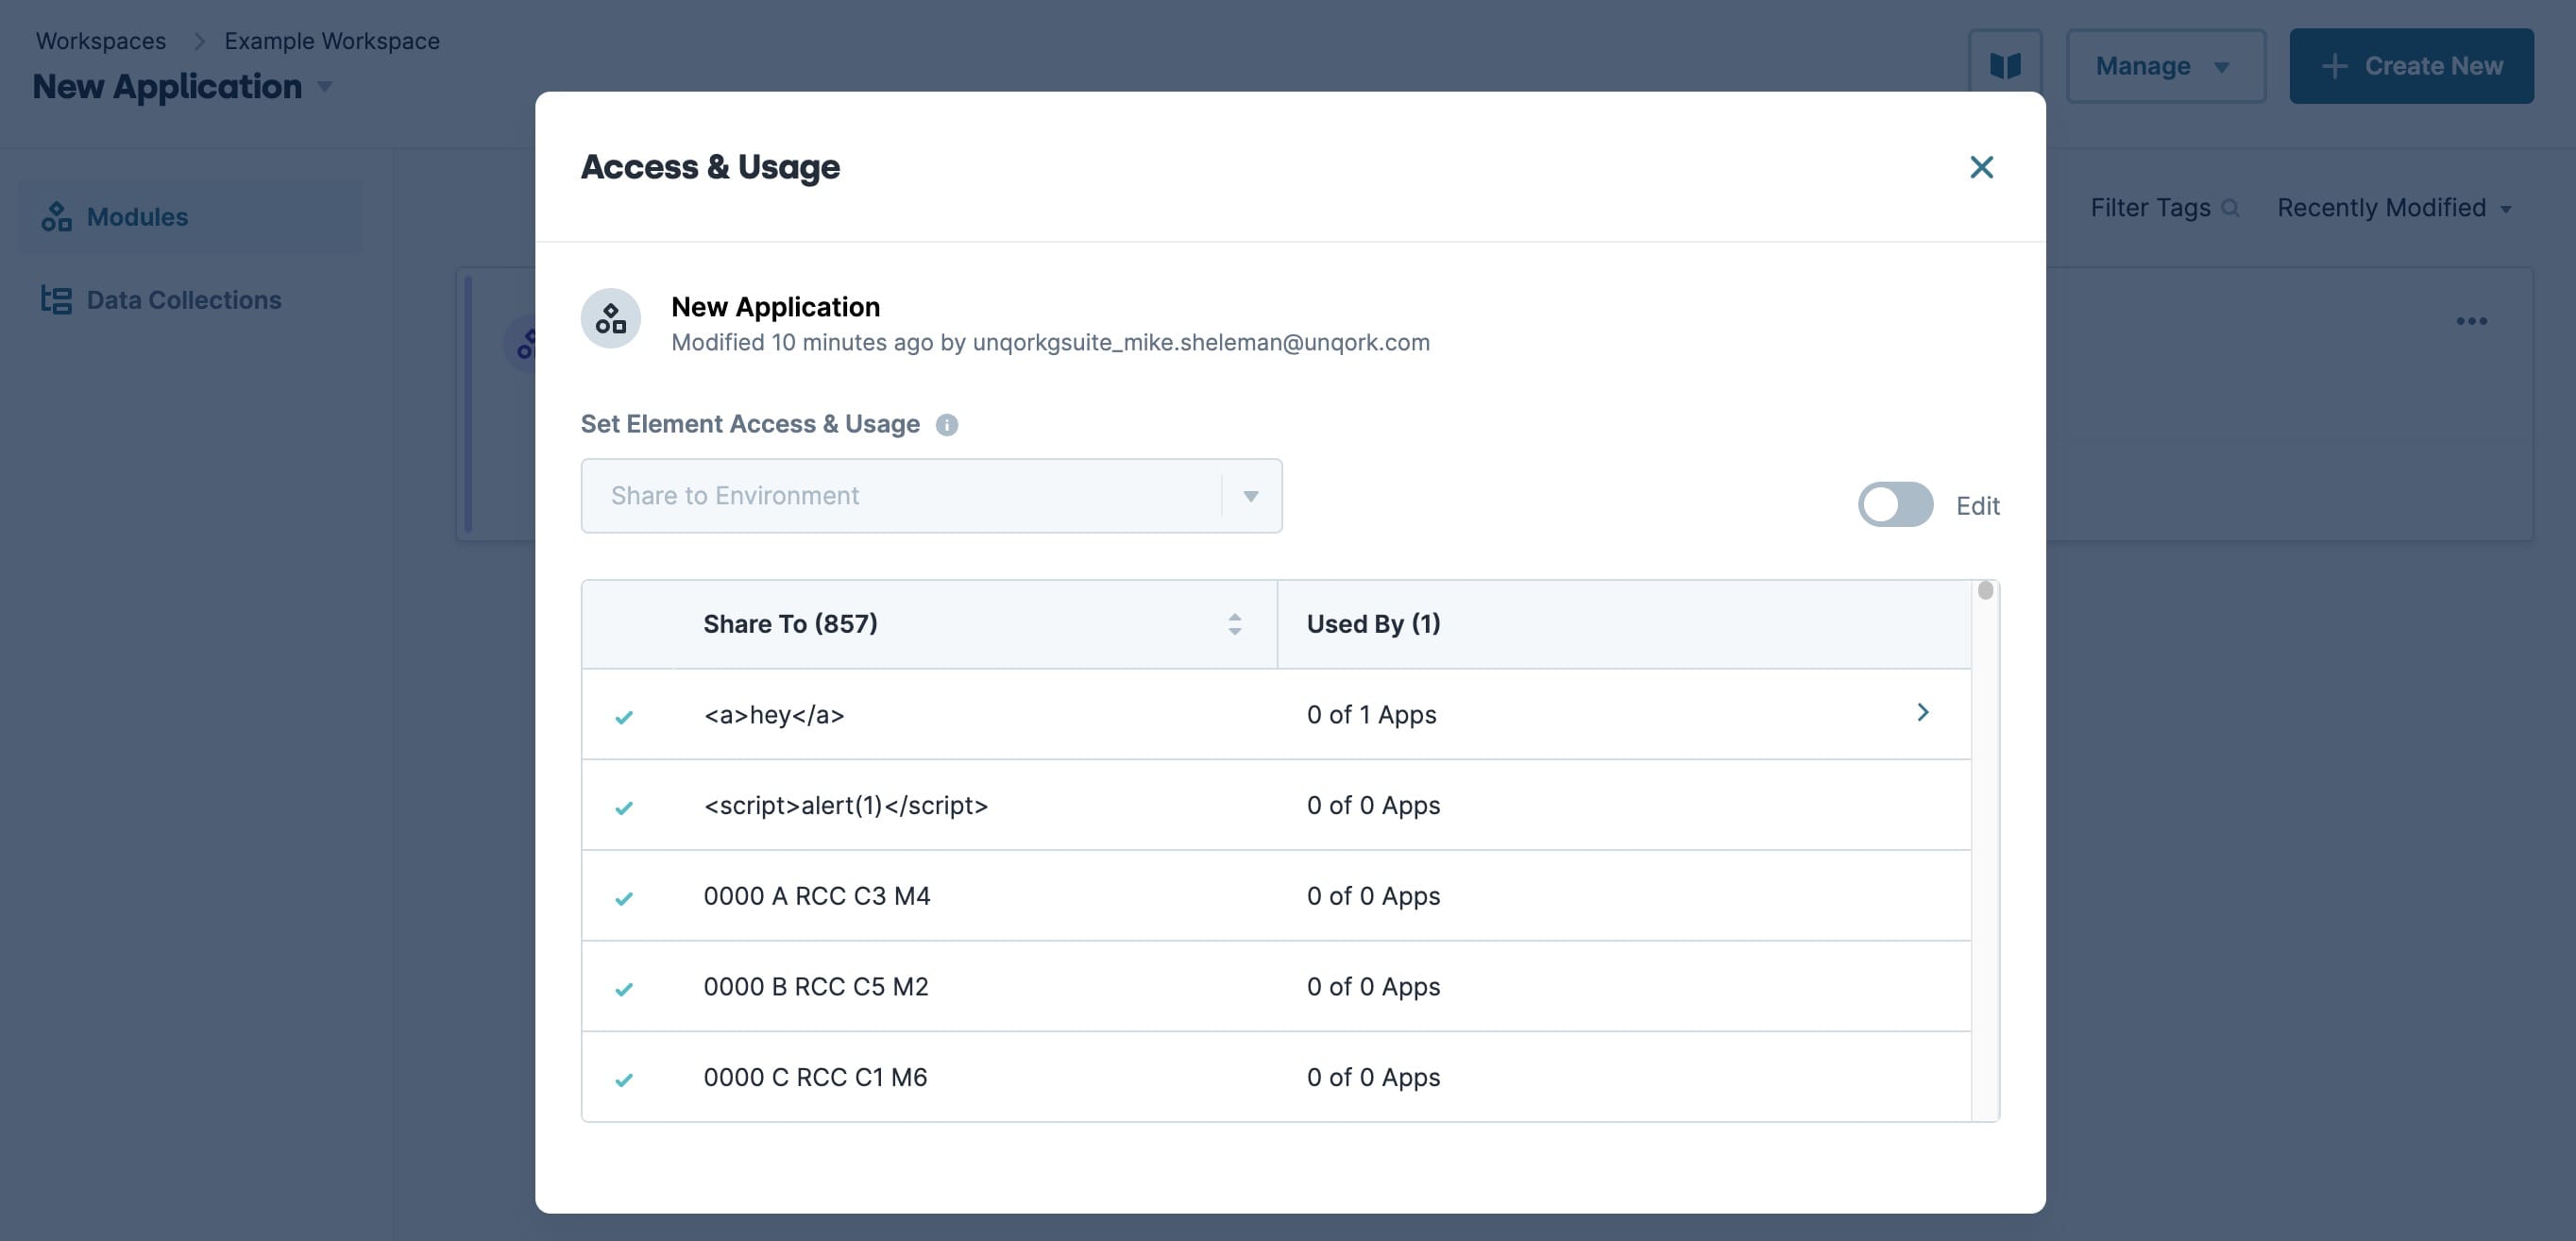
Setting | Description |
|---|---|
Edit toggle | Enables or disables editing Access & Usage settings for the shared element. Enable the Can Manage role first to enable the Edit toggle. |
Set Element Access and Usage | Disabled in View mode. For more information on this setting, visit Access & Usage (Edit Mode). |
Workspace / Application List | Displays all workspaces in the environment. Each workspace row shows if an element is shared with it, and how many apps the element is shared with. Selecting a workspace name displays the applications associated with that workspace. |
Shared Column | Displays workspaces and applications the element has been shared with. |
Share To (x) | Displays the list of available workspaces. The value in parenthesis is the total amount of workspaces the element is shared with. Clicking on a workspace name takes you to its list of applications. |
Used By (x) | Displays total apps for each workspace, and how many of those apps the element is shared with. The value in parenthesis is the total amount of applications the element is shared to.
|
(>) Sub-Level Arrow | Click to display the application list for the workspace. |
Access & Usage (Edit Mode)
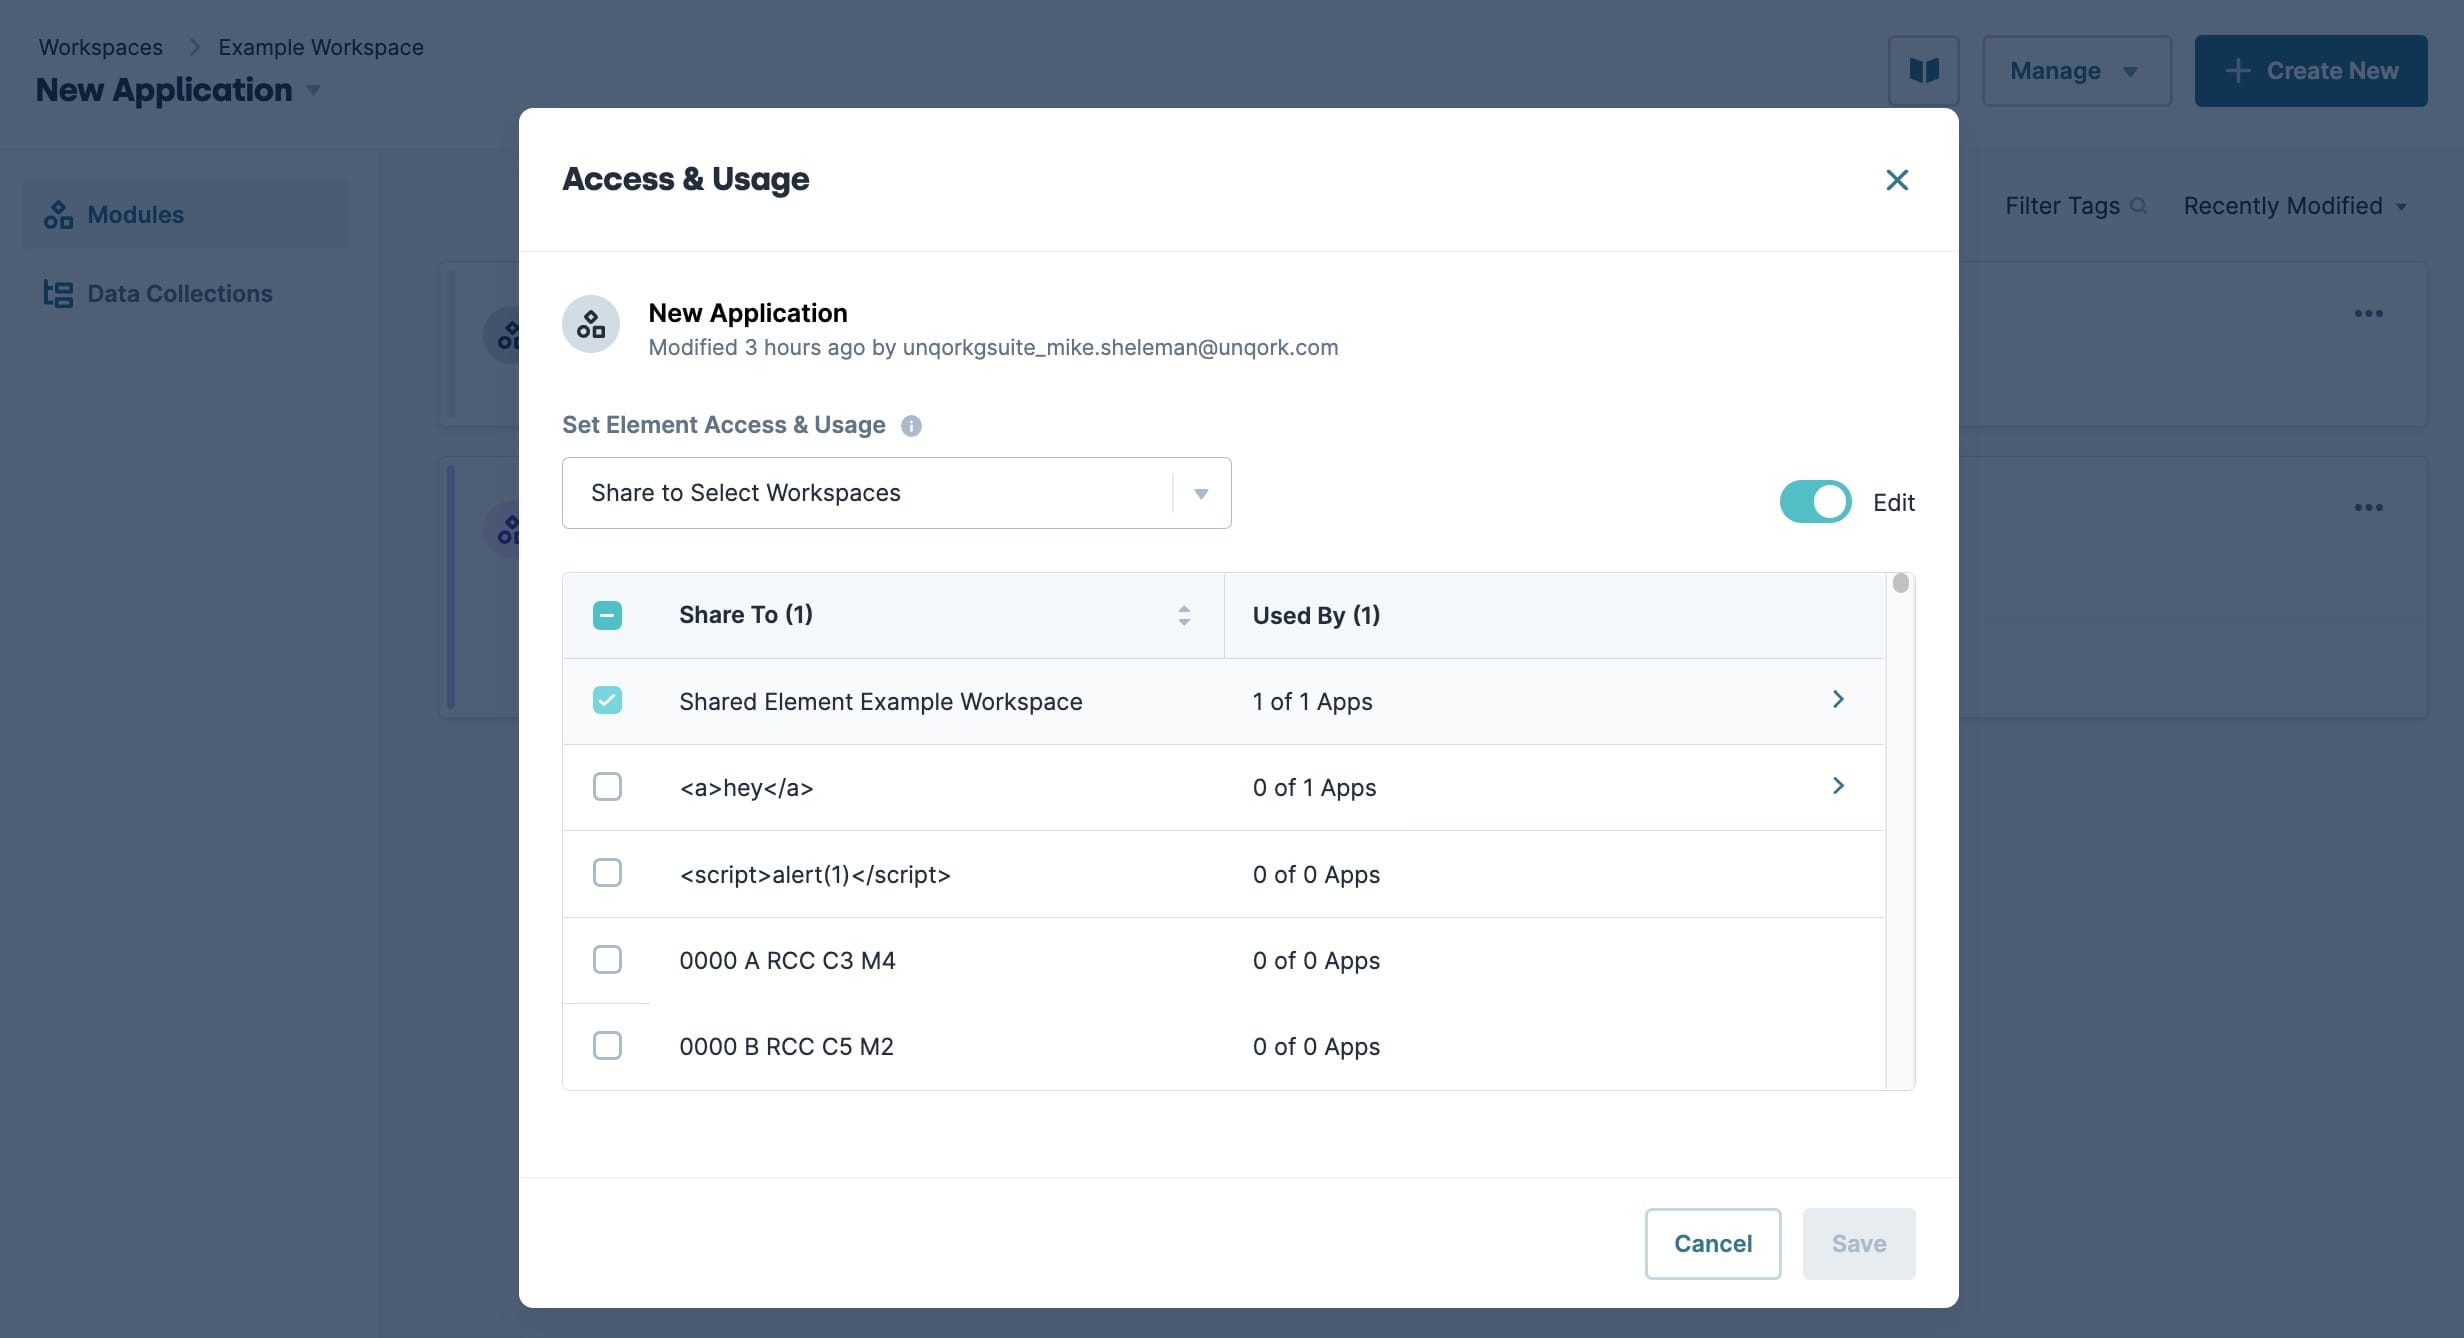
Setting | Description |
|---|---|
Edit button | Enables or disables editing Access & Usage settings for the element. Enable the Can Manage role first to enable the Edit toggle. |
Set Element Access and Usage | Specifies how the element is shared. Choices include:
|
Workspace / Application List | Displays all workspaces in the environment. Each workspace row indicates if the element is shared with it, and how many apps the element is shared with. Clicking a workspace name displays the applications for that workspace. |
Cancel button | Discards unsaved changes. On the first click, a warning appears. The second click cancels any changes. |
Save button | Saves all changes made in the Access & Usage modal. |
Workspace List | Displays all workspaces in the environment. Each workspace row shows if an element is shared with it, and how many apps the element is shared with. Selecting a workspace name displays the applications associated with that workspace. |
Shared column | The Shared column displays which workspaces the application is currently being shared with. The following actions can be performed in the Shared column:
|
Share To (x) | Displays the list of available workspaces. The value in parenthesis is the total amount of workspaces the element is shared to. Clicking on a workspace name takes you to its list of applications. |
Used By (x) | Displays total apps for each workspace, and how many of those apps the element has been shared to. The value in parenthesis is the total amount of applications the element is shared to.
|
(>) Sub-Level Arrow | Click to display the application list for the workspace. |
Editing a Shared Element's Access and Usage Settings
To modify the level of access and usage for a shared element, use the Access and Usage settings.
Adding a Shared Element to a Workspace or Application
To add a shared element to a workspace or application:
On the Workspaces page, click View Workspace for the workspace containing the element you intend to share.
Find the application containing the element and click View App.
Click the Modules or Data Collections tab.
Find the shared module or data collection and click (
 ) Access & Usage.
Click Edit.
From the Set Element Access & Usage drop-down, select Share to Select Workspaces.
In the Workspaces list, click the workspace you want to share the element with. The Applications list loads.
Next to the application you want to share the element with, click the (
.png) ) Check Box (Not Shared).
) Check Box (Not Shared).Click Save.
Disconnecting a Shared Element From a Workspace or Application
To disconnect a shared element from a workspace or application:
On the Workspaces page, click View Workspace for the workspace containing the element you intend to unshare.
Find the application containing the element and click View App.
Click the Modules or Data Collections.
Find the shared element and click (
 ) Access & Usage.
Click Edit.
From the Set Element Access & Usage drop-down, select Share to Select Workspaces.
In the Workspaces list, click the workspace you want to disconnect the element from. The Applications list loads.
Next to the application, click the (
.png) ) Check Box (Shared) to disconnect the element.
) Check Box (Shared) to disconnect the element.Click Save.
Unsharing a Shared Element from the Environment
Unsharing an element disconnects it from all workspaces it's been shared with. To unshare a element using the method below, first disconnect the element from all applications.
To unshare an element from all workspaces but the original:
On the Workspaces page, click View Workspace for the workspace containing the element you wantto unshare.
Find the application containing the element and click View App.
Click the Modules or Data Collections.
Find the shared element and click (
 ) Access & Usage.
Click Edit.
From the Set Element Access & Usage drop-down, select Unshare from Library.
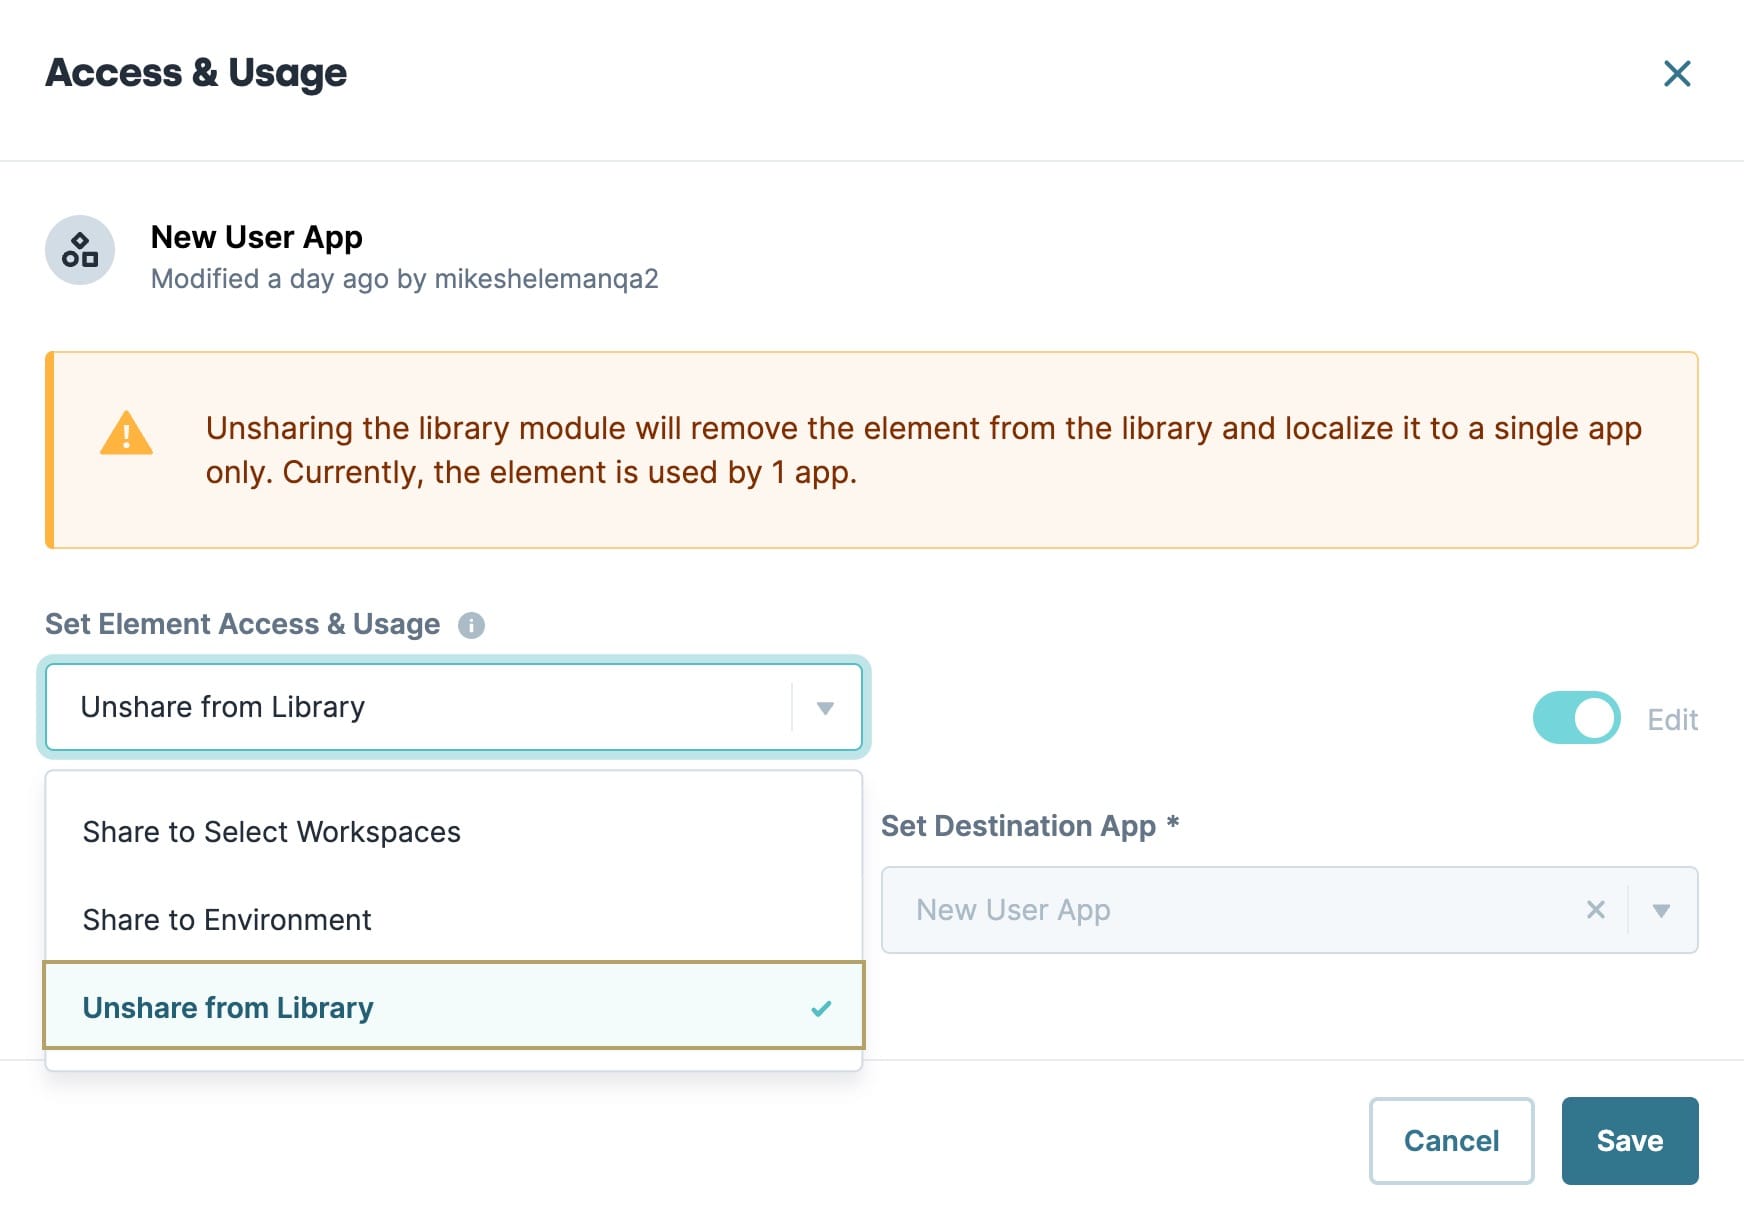
Click Save.