User Registration and Management Template
About this Configuration Guide
This guide covers setting up the User Registration and Management application template. Using this guide, you'll explore how each section of this template works. You'll learn how to install the template in your environment and how to build an application from it. Plus, we'll walk you through how to set up RBAC (role-based access control) for your application. This way, you can rest easy knowing that the right people have the right access to your application.
This application template has 3 sections, and each section has a front-facing Express View module. The rest of the modules work together behind-the-scenes to give the Express View modules their functionality. Each back-end module executes server-side and uses an API (application programming interface). We'll go into each of the sections and modules in more detail. For now, here's a chart with the architectural layout of these sections and modules:
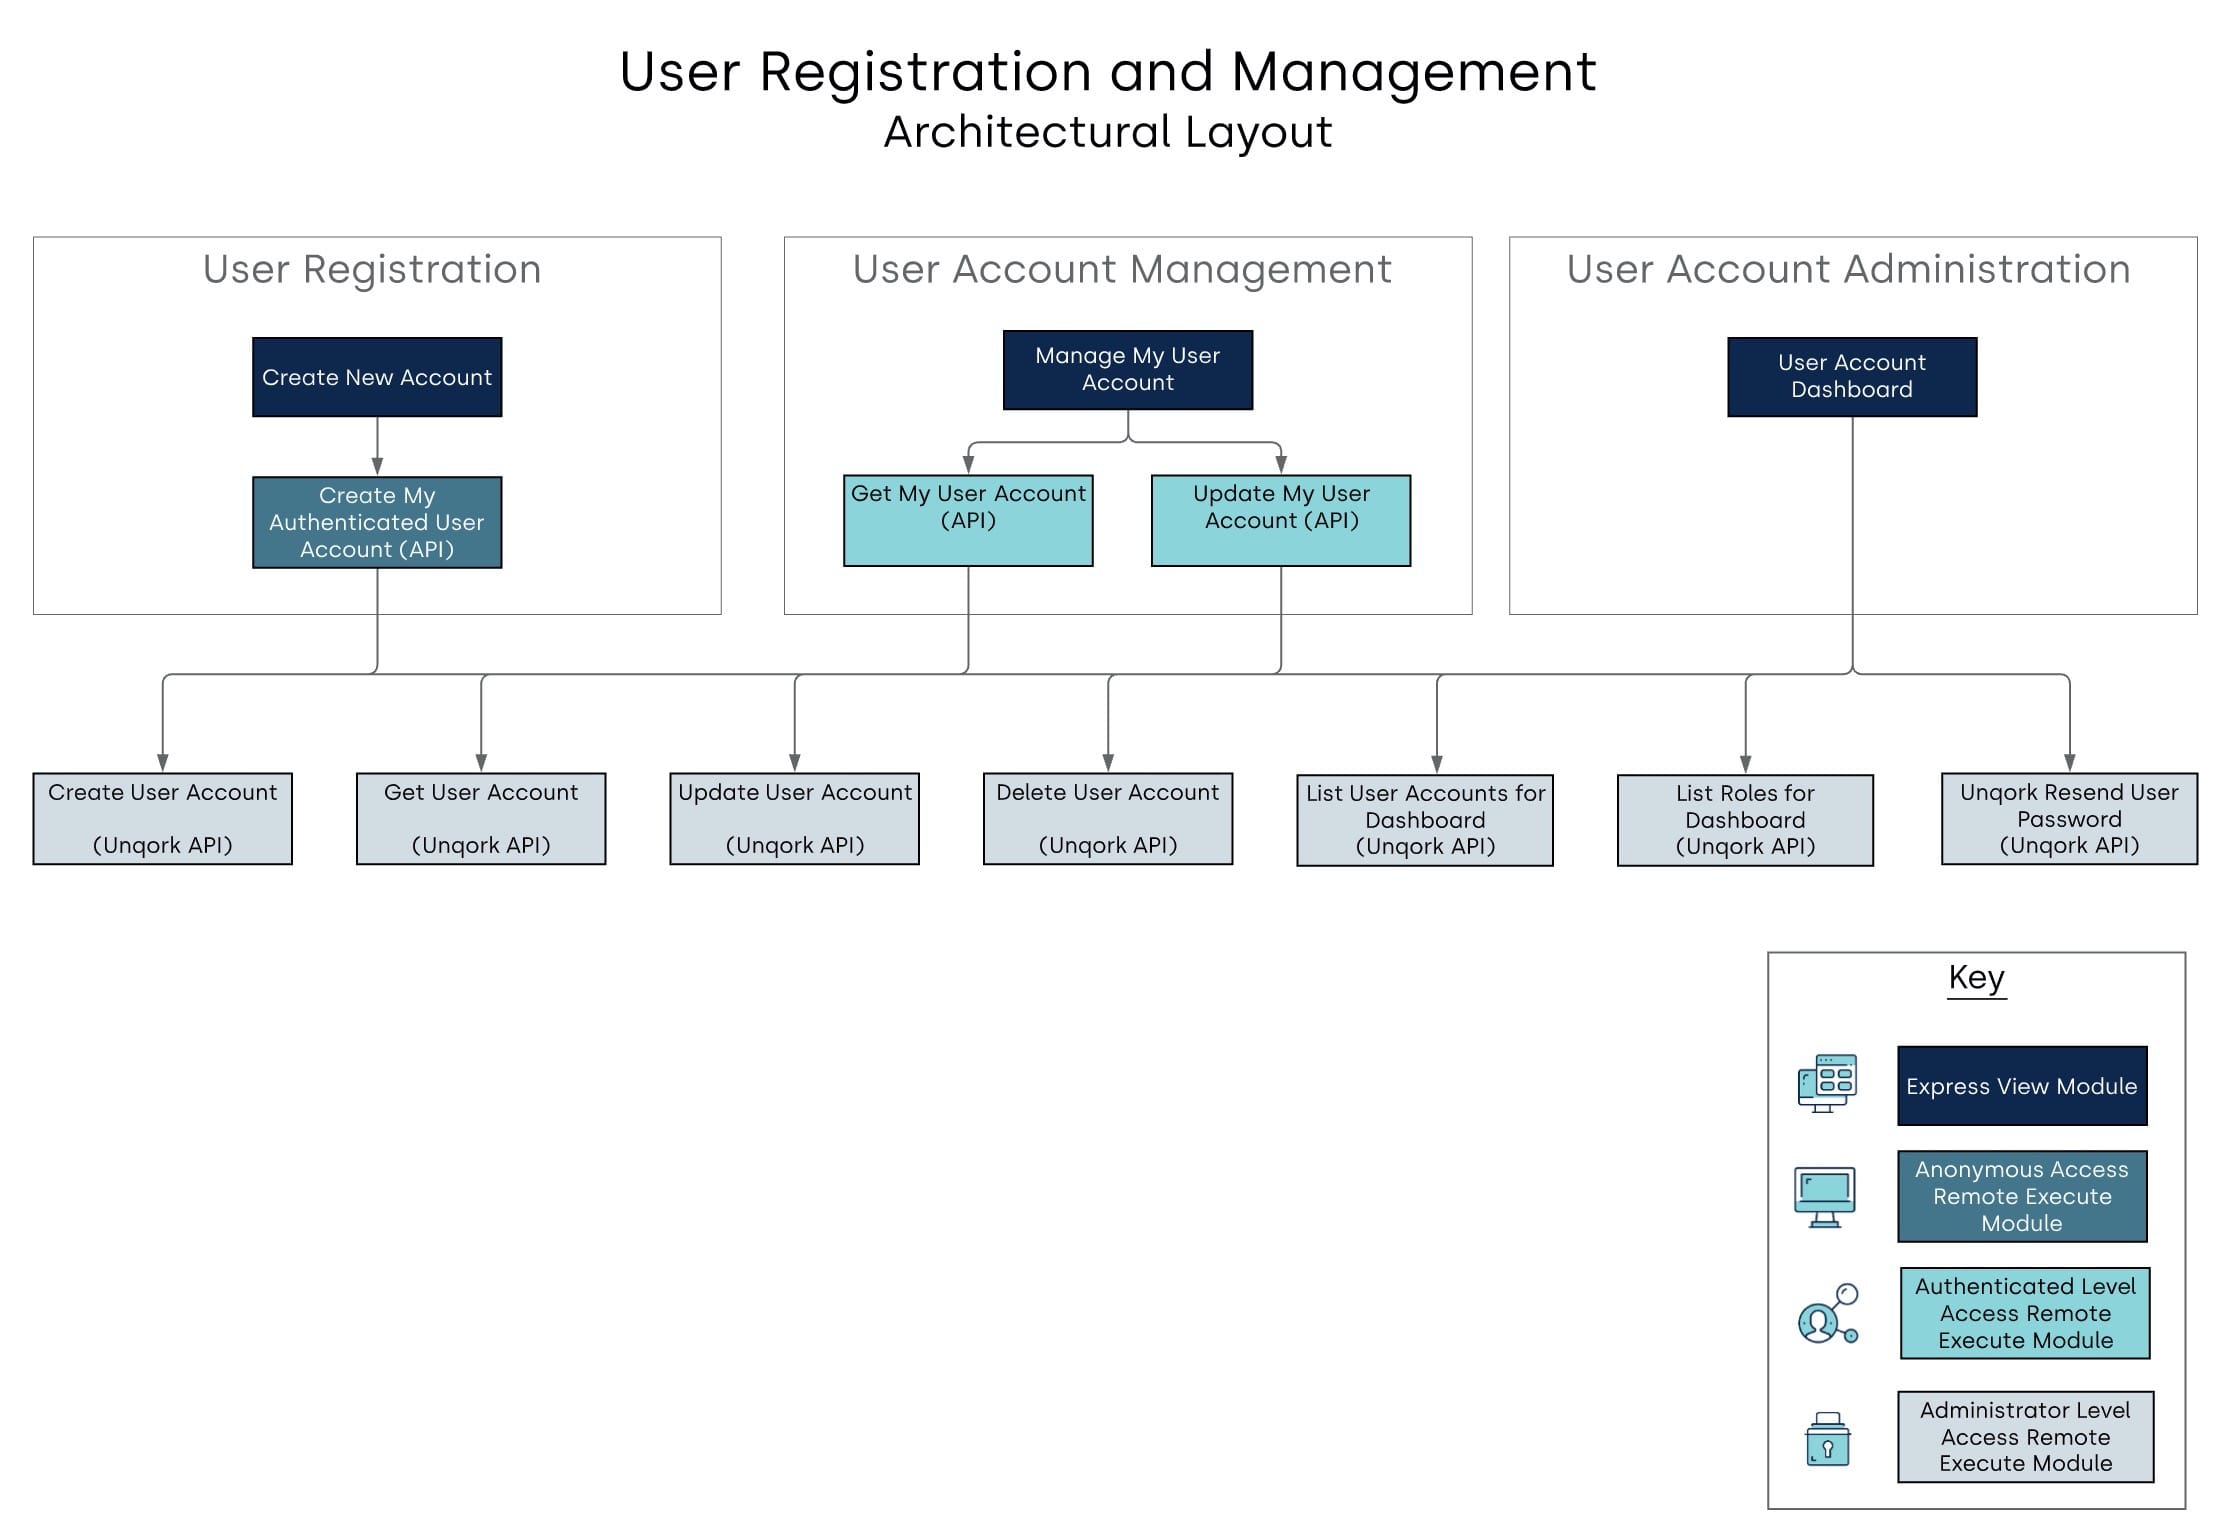
And here's a high-level overview of the 3 sections and their modules:
| # | Section | Description |
|---|---|---|
| 1 |
User Registration |
This is where your end-users enter their information and create an account. This section of the application uses the following 3 modules:
As designed, the User Registration: Create New Account page flows to the User Account Management: Manage My User Account page. If you want your login page to flow to a different page, you have the option to customize your application. Take a look at our Customizing the Template section. |
| 2 |
User Account Management |
After login, this is the application's default landing page. End-users can update their own account information on this page. This section uses the following 5 modules:
|
| 3 |
User Account Administration |
From this dashboard, administrators can create, delete, update users, and resend temporary passwords. This section is unique in that it also uses 3 Unqork API modules that the other 2 sections use. In this section, these 3 modules let you create, retrieve, and update user accounts. The re-purposed modules are:
In addition to the other API modules, the User Account Administration section uses the following 5 modules:
|
All images used in this guide are for illustrative purposes only. Images are subject to change without notice. All images were correct at the time of publication.
Overview
The User Registration and Management template simplifies end-user registration, login, and account management. The template makes it easy for end-users to register for your application. Plus, once logged in, end-users can manage their own account details. You no longer need to set up and maintain accounts for every end-user. This application template is a great option if your application doesn't rely on:
-
SSO (single sign-on).
-
A client directory.
-
Another user management system.
This application has front-end modules and back-end modules. The 3 front-end modules are the ones your end-users interact with in Express View. The back-end modules remain behind-the-scenes and give your front-end modules their functionality. Great news: the application is already fully functional. Your main job is to update RBAC to make sure the right people have access to the right modules.
Features
With this application template, you can:
-
Open your application to the world, making it easy for new users to sign up.
-
Improve your end-users' experience. They can manage and update their personal information directly from your application.
-
Conveniently manage your users from your application.
Requirements
To use this application template, you must complete RBAC (role-based access control) setup so the right people can access your modules.
What You’ll Learn
In this guide, you’ll learn:
-
How to remove the application template from your environment.
-
How to delete your User Registration and Management application.
Adding the Application Template
Adding the Template to Your Environment
The User Registration and Management template is available from the Unqork Marketplace. Unqork templates will help you quickly create beautiful, complex applications.
To add the template to your environment:
| 1. | Click Marketplace at the top right of the Unqork Designer Platform. |
You can access the Marketplace at any time by visiting https://marketplace.unqork.io/.
| 2. | Enter User Registration in the Search the Marketplace field. |
| 3. | Click on the User Registration tile. |
| 4. | Click Add to Environment. |
| 5. | Click Install Template. |
If you aren't logged in, you'll see a field for Environment URL and a Login button. Enter your environment's URL where you want to install the template. For example: [environmentname.unqork.io]. Then, click Login.
Now, you can now use your newly installed template to create an application!
Creating an Application from the Template
After you've added the template to your environment from Marketplace, you can use it to create an application.
To create an application from the User Registration and Management template:
| 1. | Click Library at the top right of the Unqork Designer Platform. |
| 2. | Find the User Registration template tile. |
If the template isn't listed, head over to the Marketplace to install it in your environment. You can access the Marketplace at any time by visiting https://marketplace.unqork.io/.
| 3. | Click Create App from Template. |
| 4. | Choose your workspace from the Workspace drop-down. |
| 5. | Enter your unique App Name. The App Path auto-fills as you type your App Name. |
| 6. | If you want a different App Path, enter it in the App Path field. |
| 7. | Select a preview style from the Style drop-down. A style specifies your application’s appearance in Express View. If left blank, your application uses your environment's default style. |
You'll notice the App Type and App Entrypoint are grayed out. The template automatically takes care of these for you!
| 8. | Click Create App. |
The application opens in the workspace you specified. You'll land on the Modules tab of your application, which lists all 13 modules. And remember, you must configure RBAC for each module before you use your application.
Your new application should look something like this:
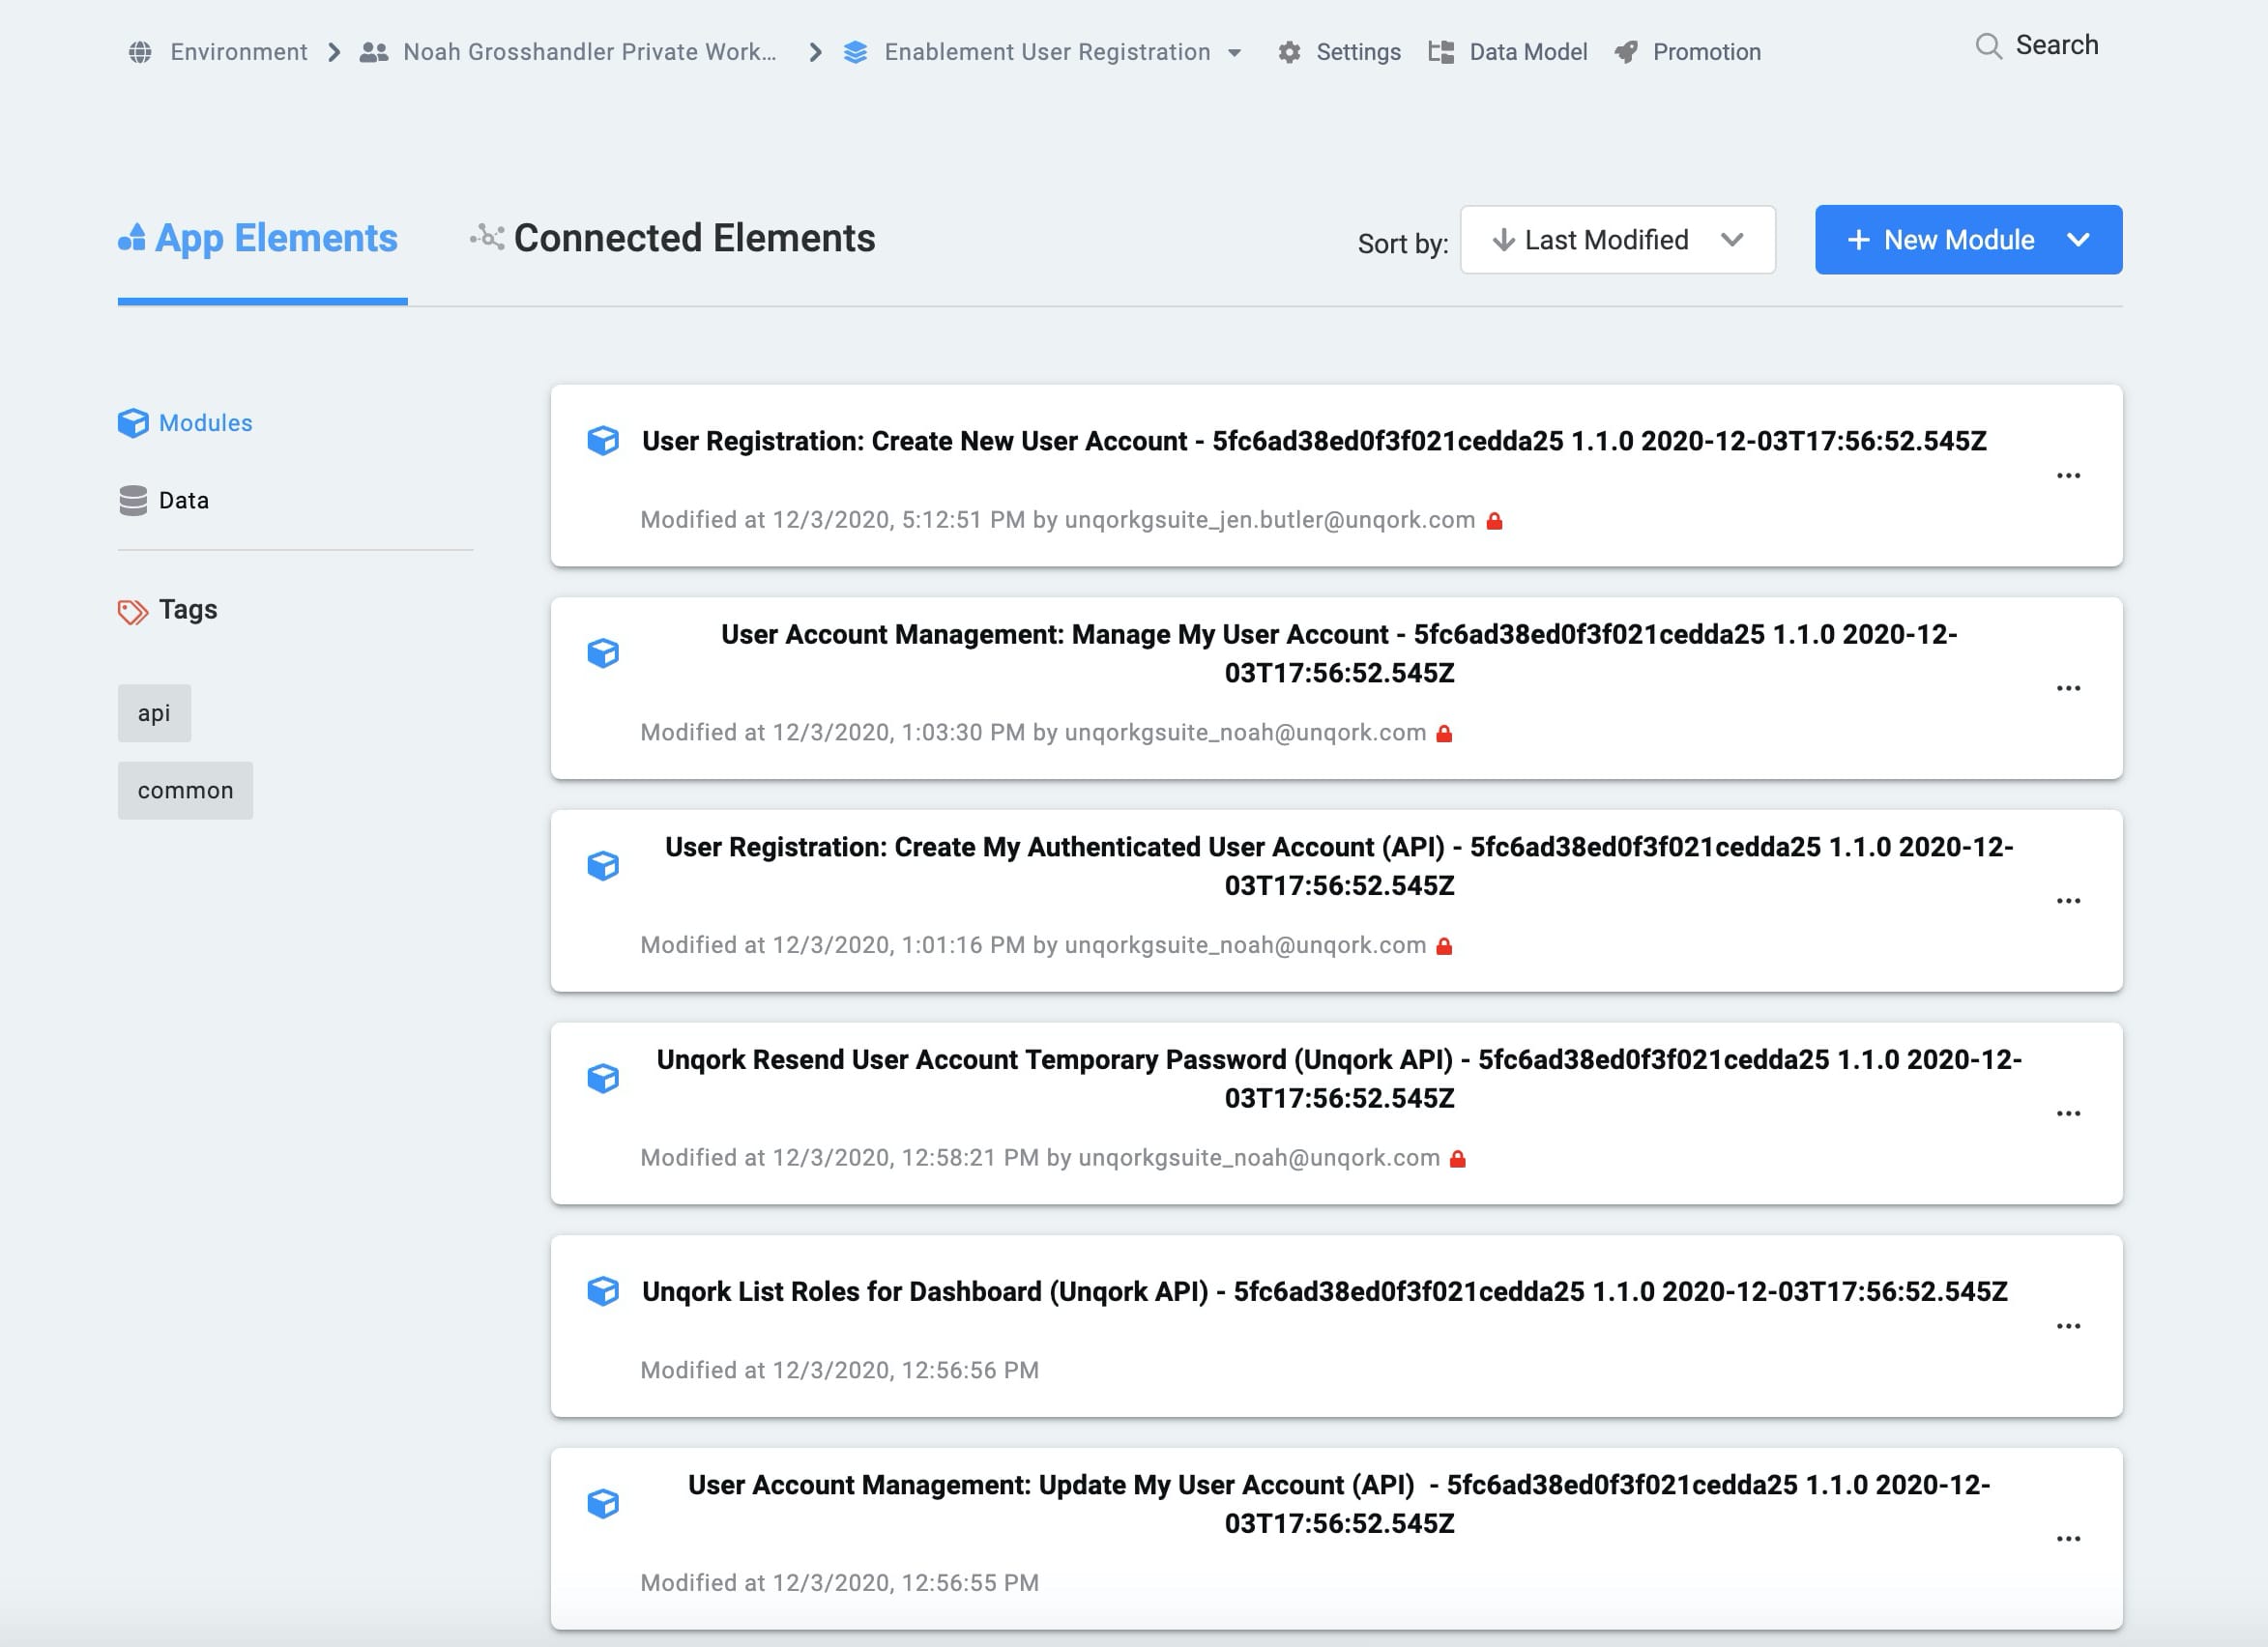
When you create an application from the template, your module names will also automatically include the template ID and a time stamp. This prevents any duplicate module paths. You're welcome to change module names at any time to best fit your needs.
How the Application Template Works
The User Registration and Management template has 3 sections and 13 modules. The modules work together to give the sections functionality. The sections each have 1 front-facing module that your end-users interact with in Express View. Below, we'll cover how the sections and modules work together to create your application's functionality.
How the User Registration Section Works
First, let's look at the User Registration section. The front-facing module for this section is User Registration: Create New Account. This page is where anonymous end-users enter their information and create an account. This section of the application uses the following 3 modules:
| # | Module | Description |
|---|---|---|
| 1 |
User Registration: Create New Account |
This is the front-end module that your end-users see in Express View. This is the first page of the application, where new users enter their information. |
| 2 |
User Registration: Create My Authenticated User Account (API) |
This back-end module acts as an intermediary layer between the Create New Account Express View module and the back-end Create User Account (Unqork API) module. The API takes the new account request from the anonymous user. From there, it translates the request into an administrator-level request for the Unqork Create User Account (Unqork API) module. |
| 3 |
Unqork Create User Account (Unqork API) |
This back-end module's API can create users of any role, including an administrator role. This is why we have the Create My Authenticated User Account (API) module as a buffer between the front-end module and this back-end API. |
Here's how the front-end User Registration: Create New User Account module looks in Express View:
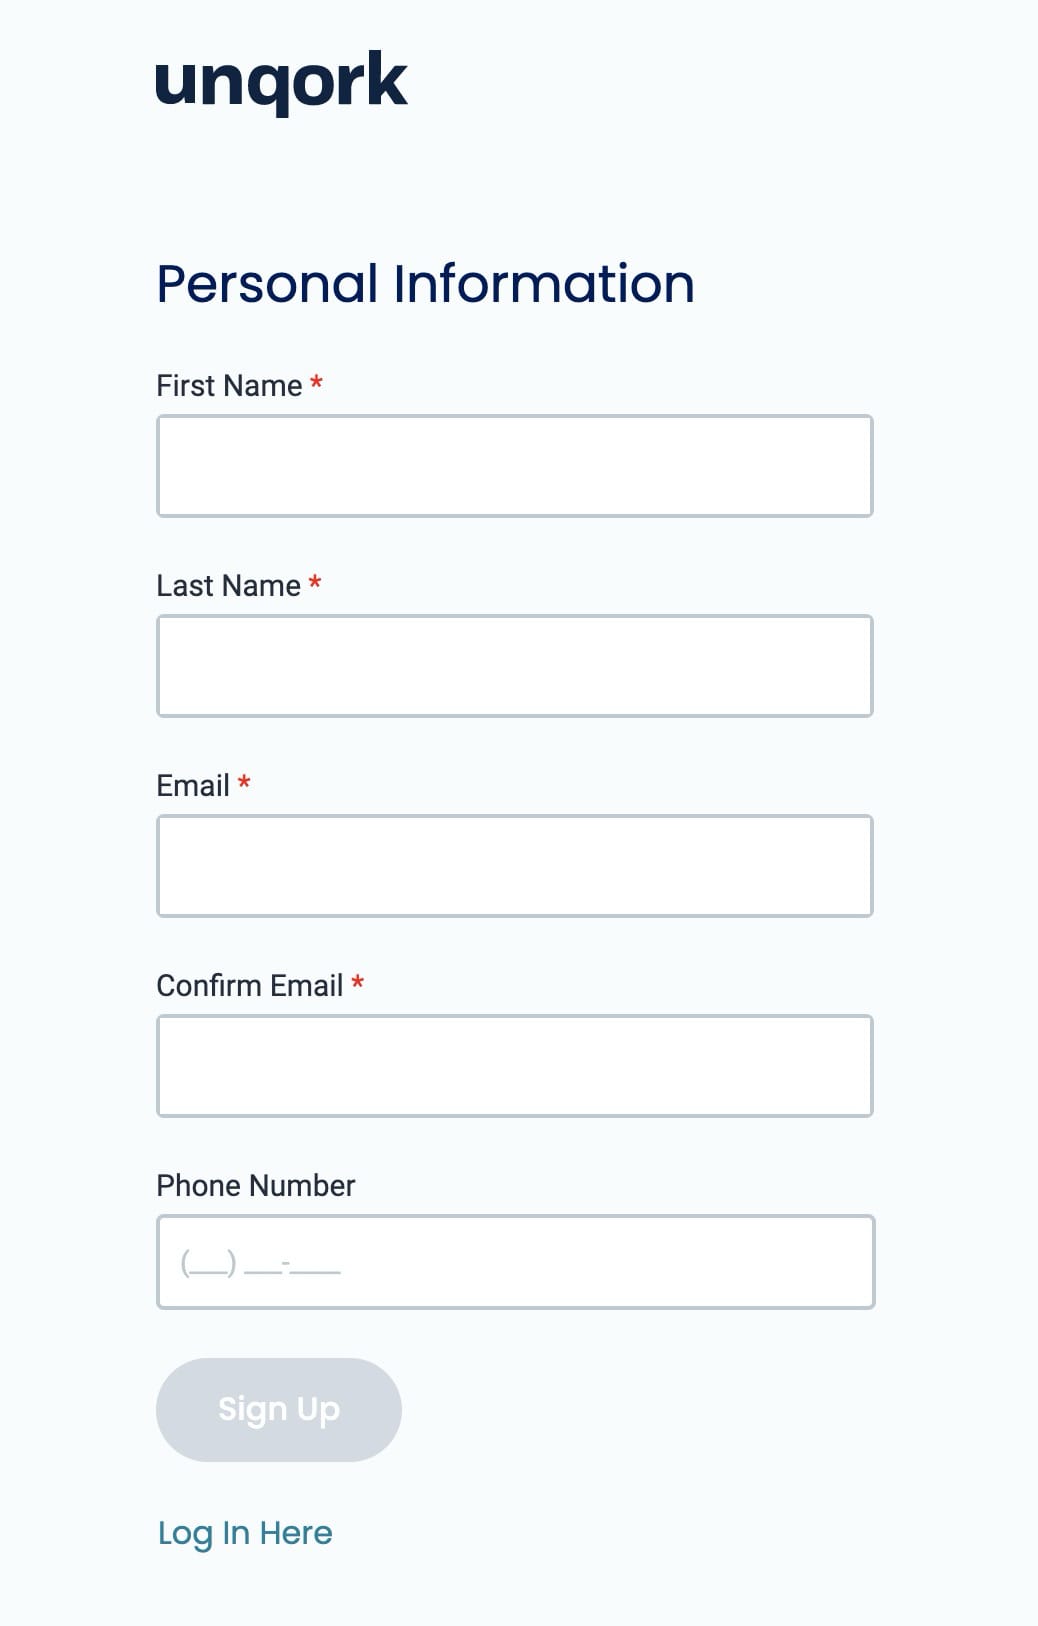
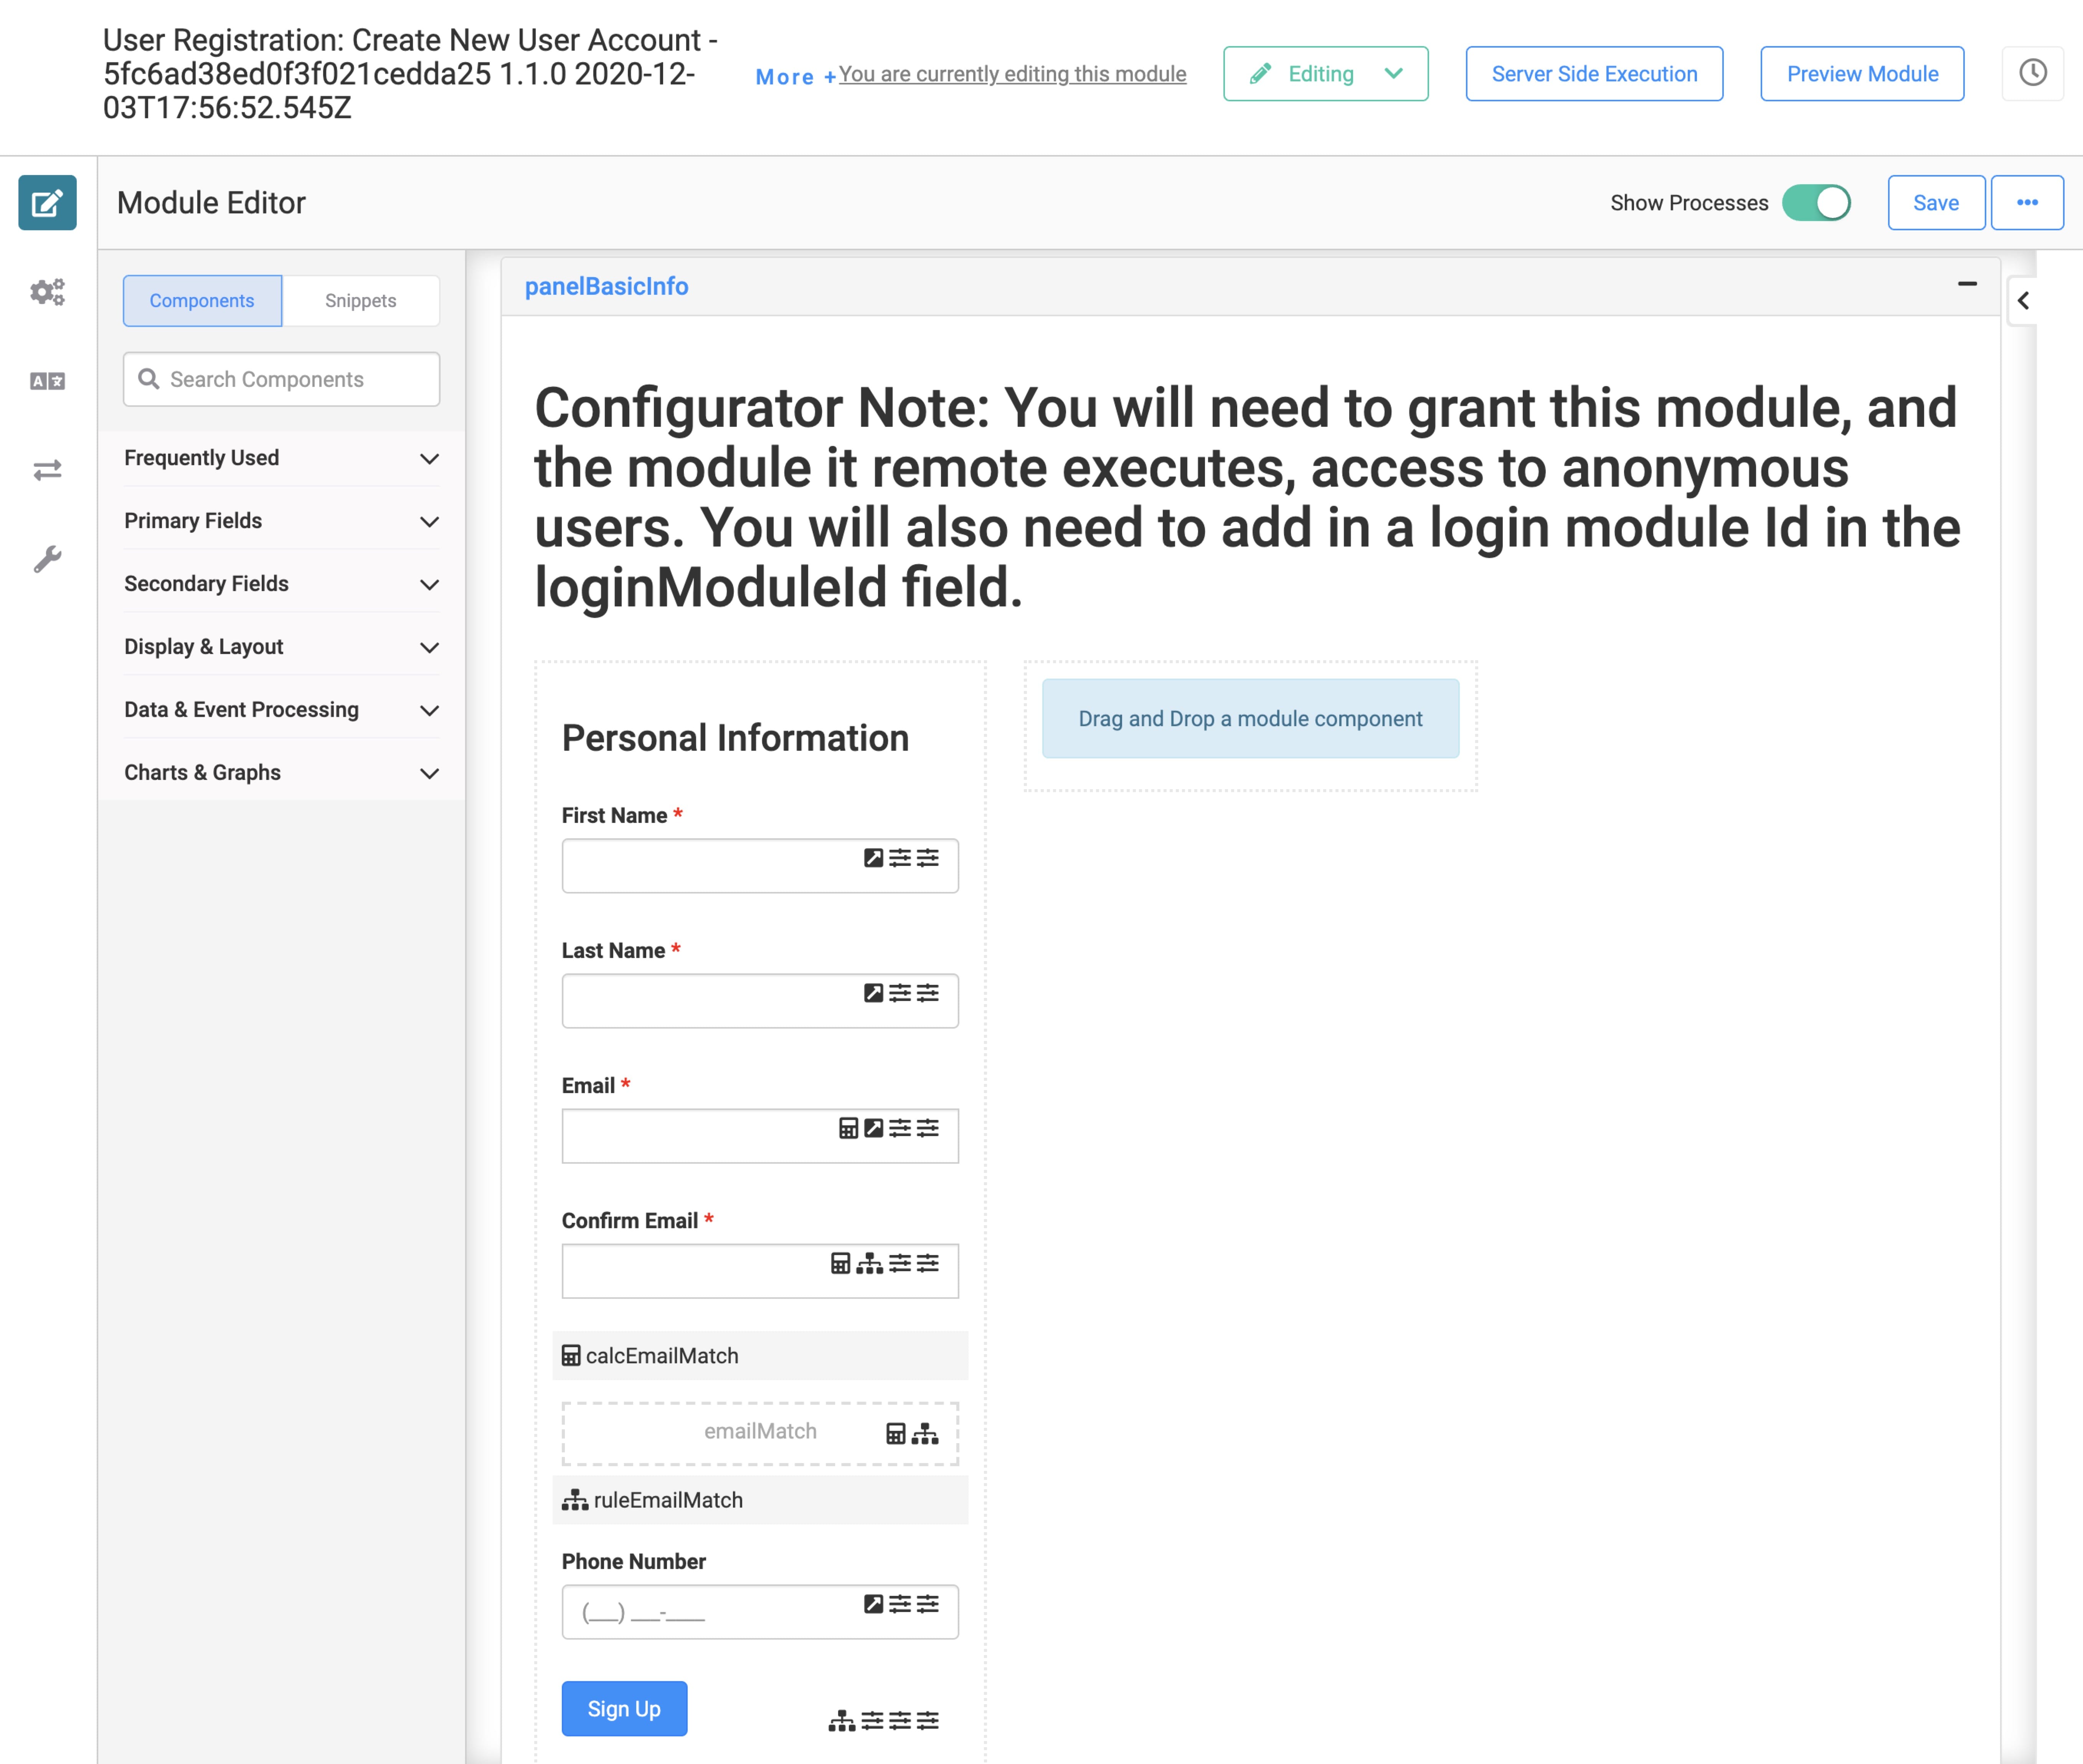
And, here's how the User Registration: Create New User Account module looks in the Module Builder:
How the User Account Management Section Works
Next, let's look at the User Account Management section. The front-facing module for this section is User Account Management: Manage My User Account. This page is where your end-users can update their account information. This section of the application uses the following 5 modules:
| # | Module | Description |
|---|---|---|
| 1 |
User Account Management: Manage My User Account |
This is a front-end module that your end-users see in Express View. This is where your end-users can view and update their account information. |
| 2 |
User Account Management: Get My User Account (API) |
This back-end module acts as an intermediary layer between the front-end Manage My User Account module and the back-end Unqork Get User Account (Unqork API) module. To get an end-user's information, this API parses the userId of the user requesting their information. From there, it uses that ID and translates the request into an administrator-level request for the Unqork Get User Account (Unqork API). This step ensures end-users can only retrieve their own information. |
| 3 |
Unqork Get User Account (Unqork API) |
This back-end module can get information for any end-user's account. Since this is a power we only want for administrators, we have the Get My User Account (API) module as a buffer between the front-end Manage My User Account module and this back-end module. |
| 4 |
User Account Management: Update My User Account (API) |
This back-end module acts as an intermediary layer between the front-end Manage My User Account module and the back-end Unqork Update User Account (Unqork API) module. To update an end-user's information, this API parses the userId of the user submitting the update request. From there, it uses that ID and translates the request into an administrator-level request for the Unqork Update User Account (Unqork API). This step ensures end-users can only update their own information. |
| 5 |
Unqork Update User Account (Unqork API) |
This back-end module can update information for any end-user's account. Since this is a power we only want for administrators, we have the Update My User Account (API) module as a buffer between the front-end module and this back-end module. |
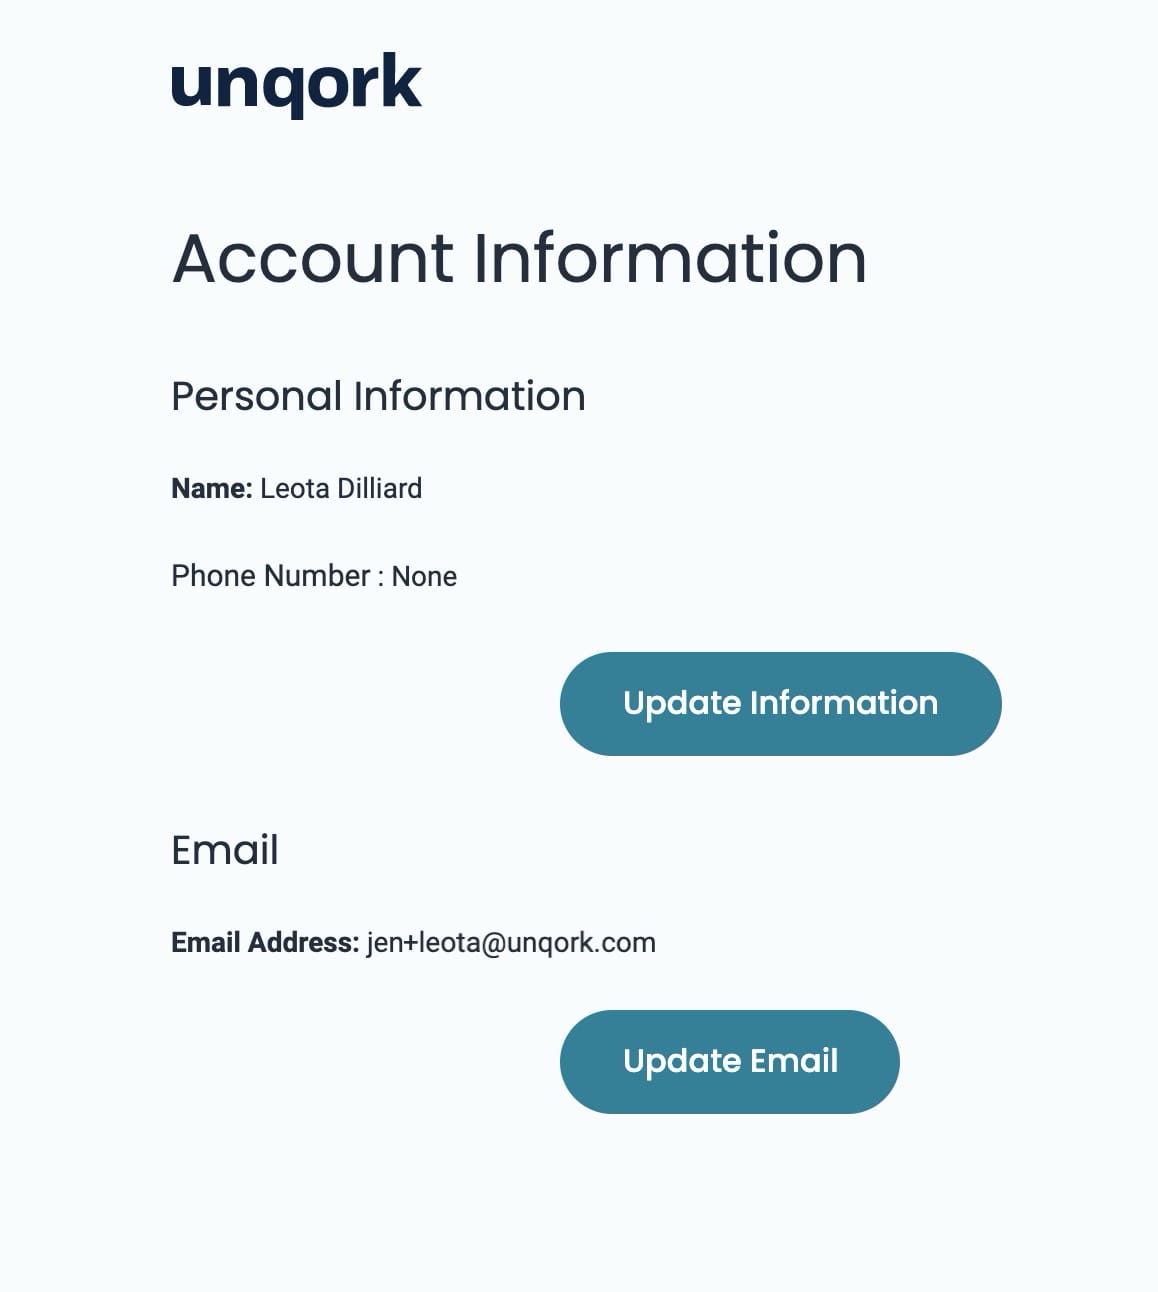
Here's how the front-end User Account Management: Manage My User Account module looks in Express View:
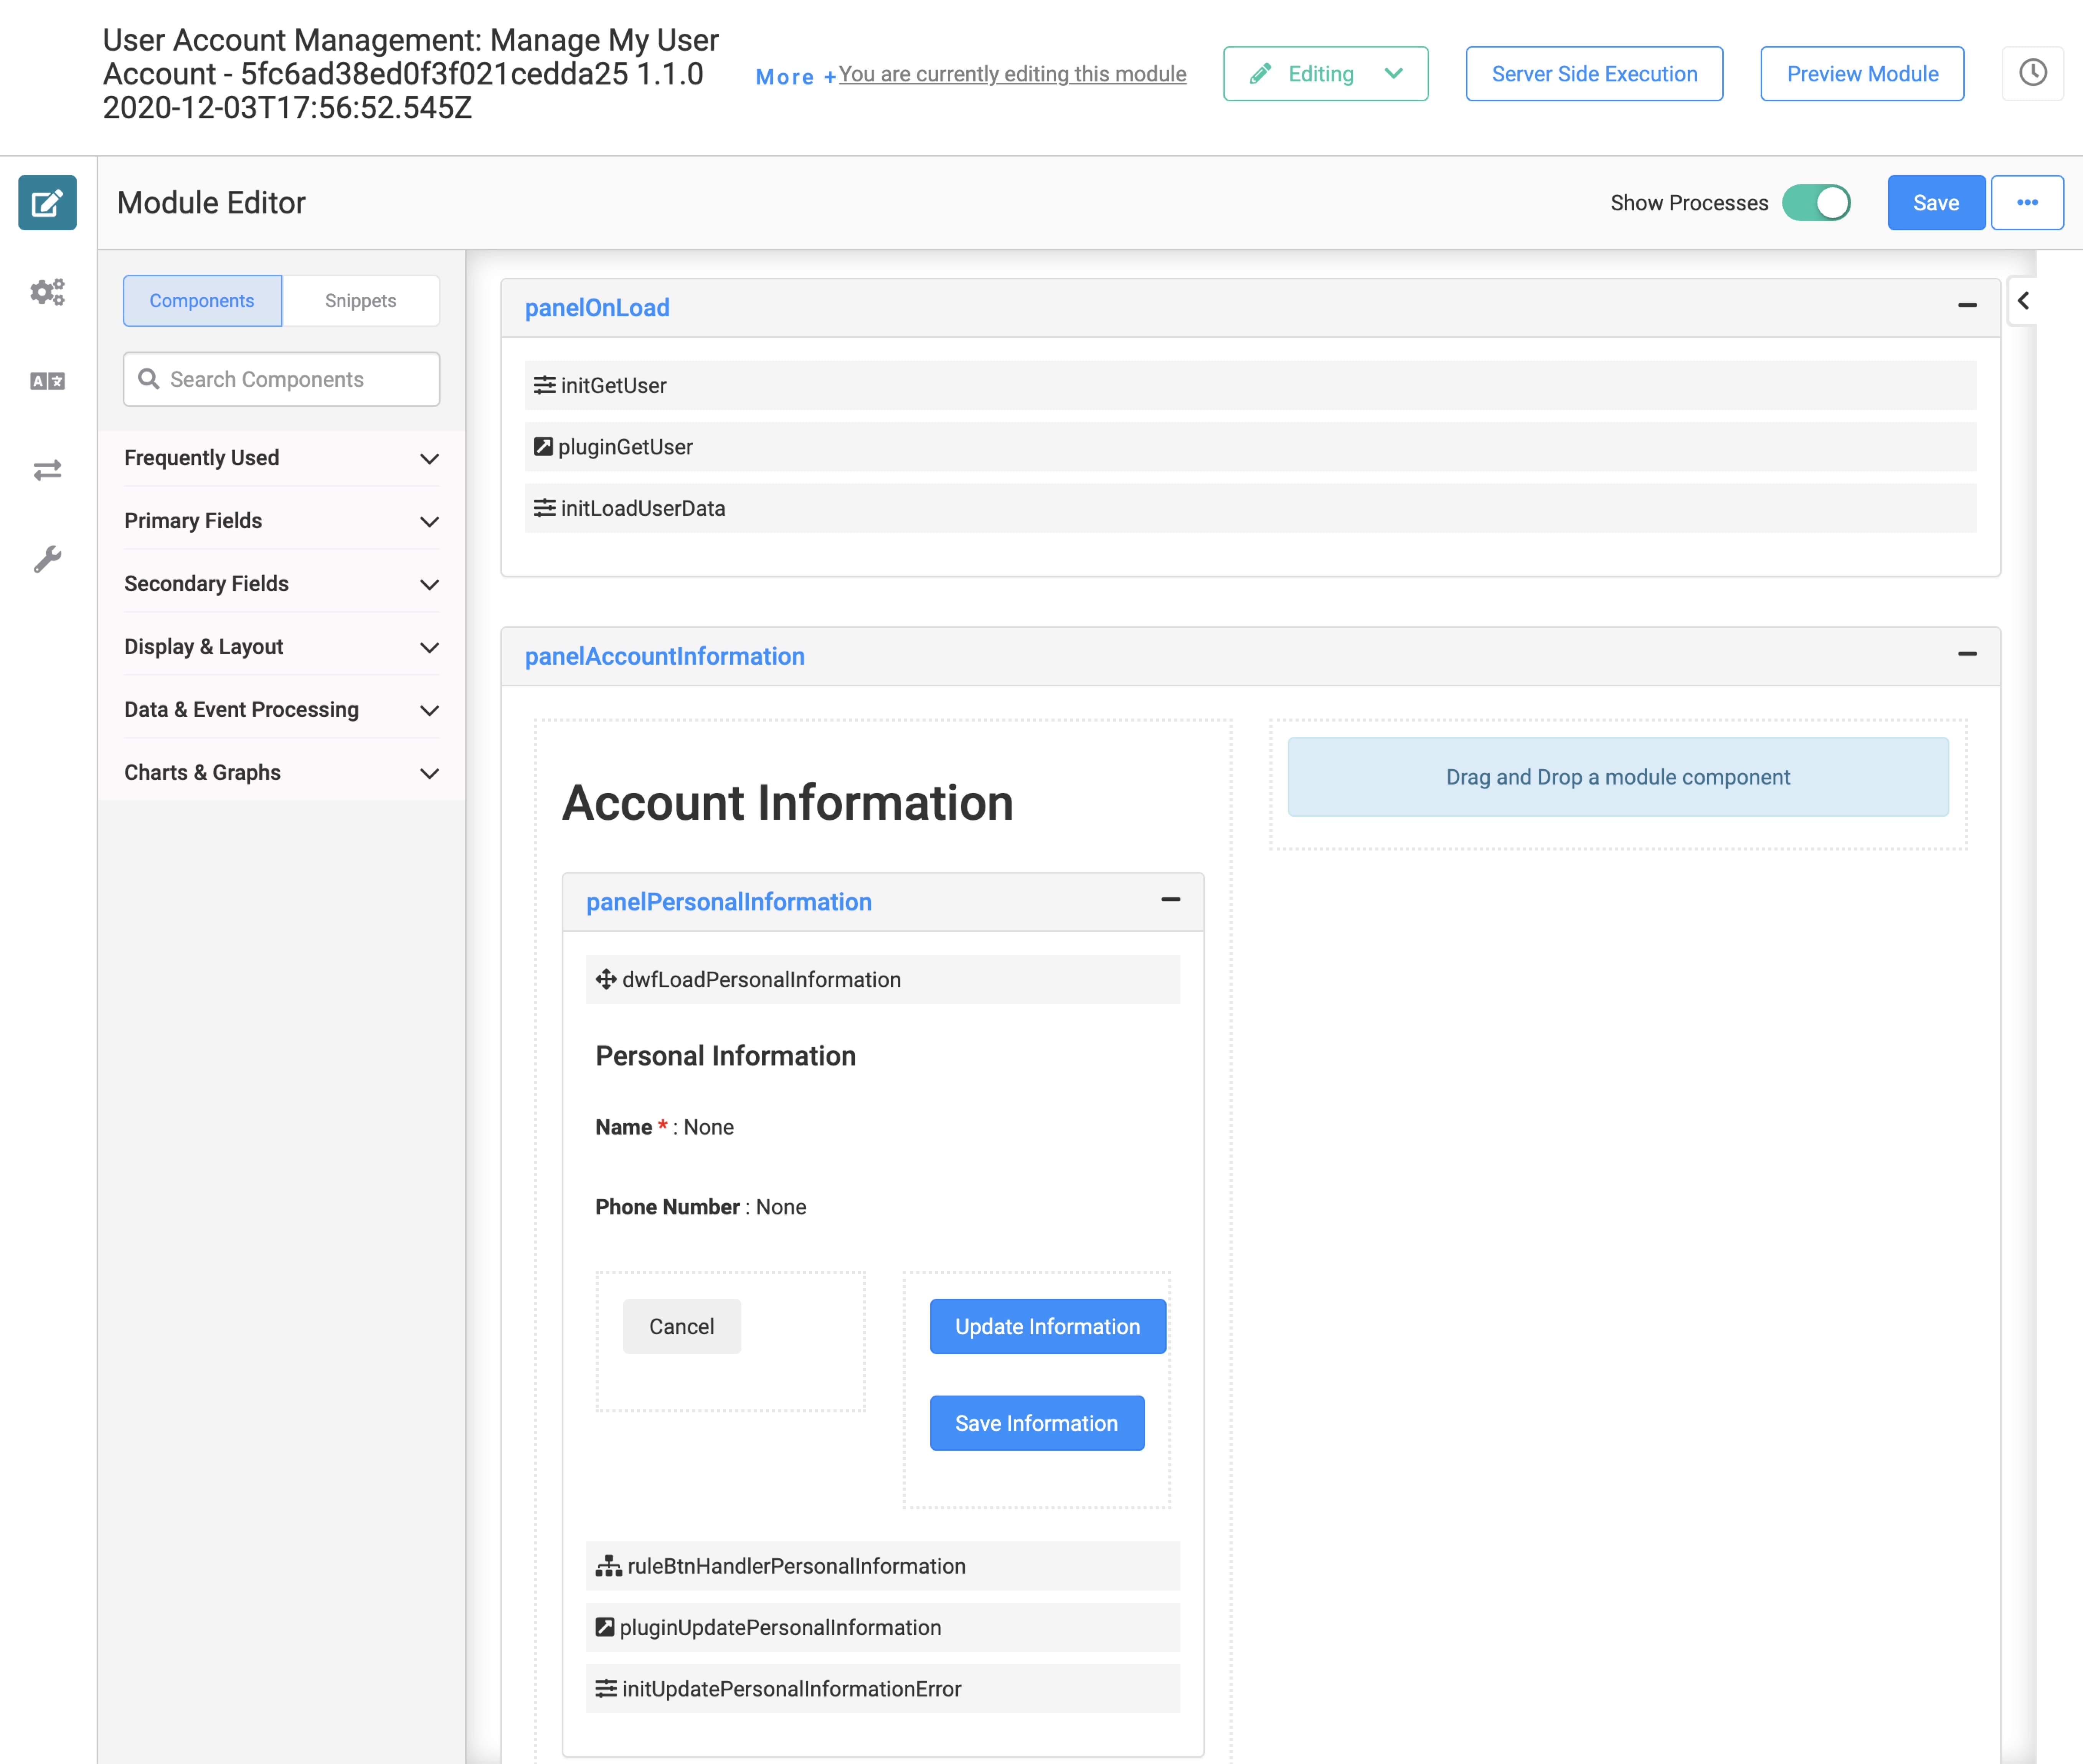
And, here's how the front-end User Account Management: Manage My User Account module looks in the Module Builder:
How the User Account Administration Section Works
Next, let's look at the User Account Administration section. The front-facing module for this section is User Account Administration: User Account Dashboard. From this dashboard, administrators can create, delete, update users, and resend passwords. This page has the functionality of the previous 2 sections. Plus, it adds the ability to delete a user account and resend temporary passwords. Lastly, it organizes all functions in a user-friendly dashboard. So, it's easy for administrators to do all administrative actions from one location.
This section is unique in that it also uses the Unqork API modules that the other 2 sections use. If you've read about the modules in User Registration and User Account Management, you'll see that the back-end API modules get re-purposed here!
The User Account Administration section uses the following 8 modules:
| # | Module | Description |
|---|---|---|
| 1 |
User Account Administration: User Account Dashboard |
This is a front-end module with a dashboard that your end-users see in Express View. The end-user must have an administrator-level role to access this module. From this one page, administrators can create, delete, and update end-user accounts. You can also resend a temporary password to a new user. |
| 2 |
Unqork List User Accounts for Dashboard (Unqork API) |
This back-end API module returns a list of all the users in your environment. Or, if you input search criteria in your dashboard, the module returns a list of users who match the criteria. The list populates the dashboard. |
| 3 |
Unqork List Roles for Dashboard (API) |
This back-end API module returns a list of all the roles in your environment. |
| 4 |
Unqork Create User Account (Unqork API) |
If this name looks familiar, you’re right! This back-end API module also works with the User Registration section. On this dashboard page, it lets you create an account for an end-user. |
| 5 |
Unqork Get User Account (Unqork API) |
If this name looks familiar, you’re right again! This back-end API module also works with the Account Management section. On this dashboard page, it lets you retrieve end-user account information. |
| 6 |
Unqork Update User Account (Unqork API) |
Here's another blast from the past. This back-end API module also works with Account Management. On this dashboard page, it lets you update end-user account information. |
| 7 |
Unqork Delete User Account (Unqork API) |
This back-end API module lets you delete an end-user's account. A deleted user can no longer access your application. |
| 8 |
Unqork Resend User Password (API) |
This back-end API module lets you resend a temporary password to a new user who has yet to log in. |
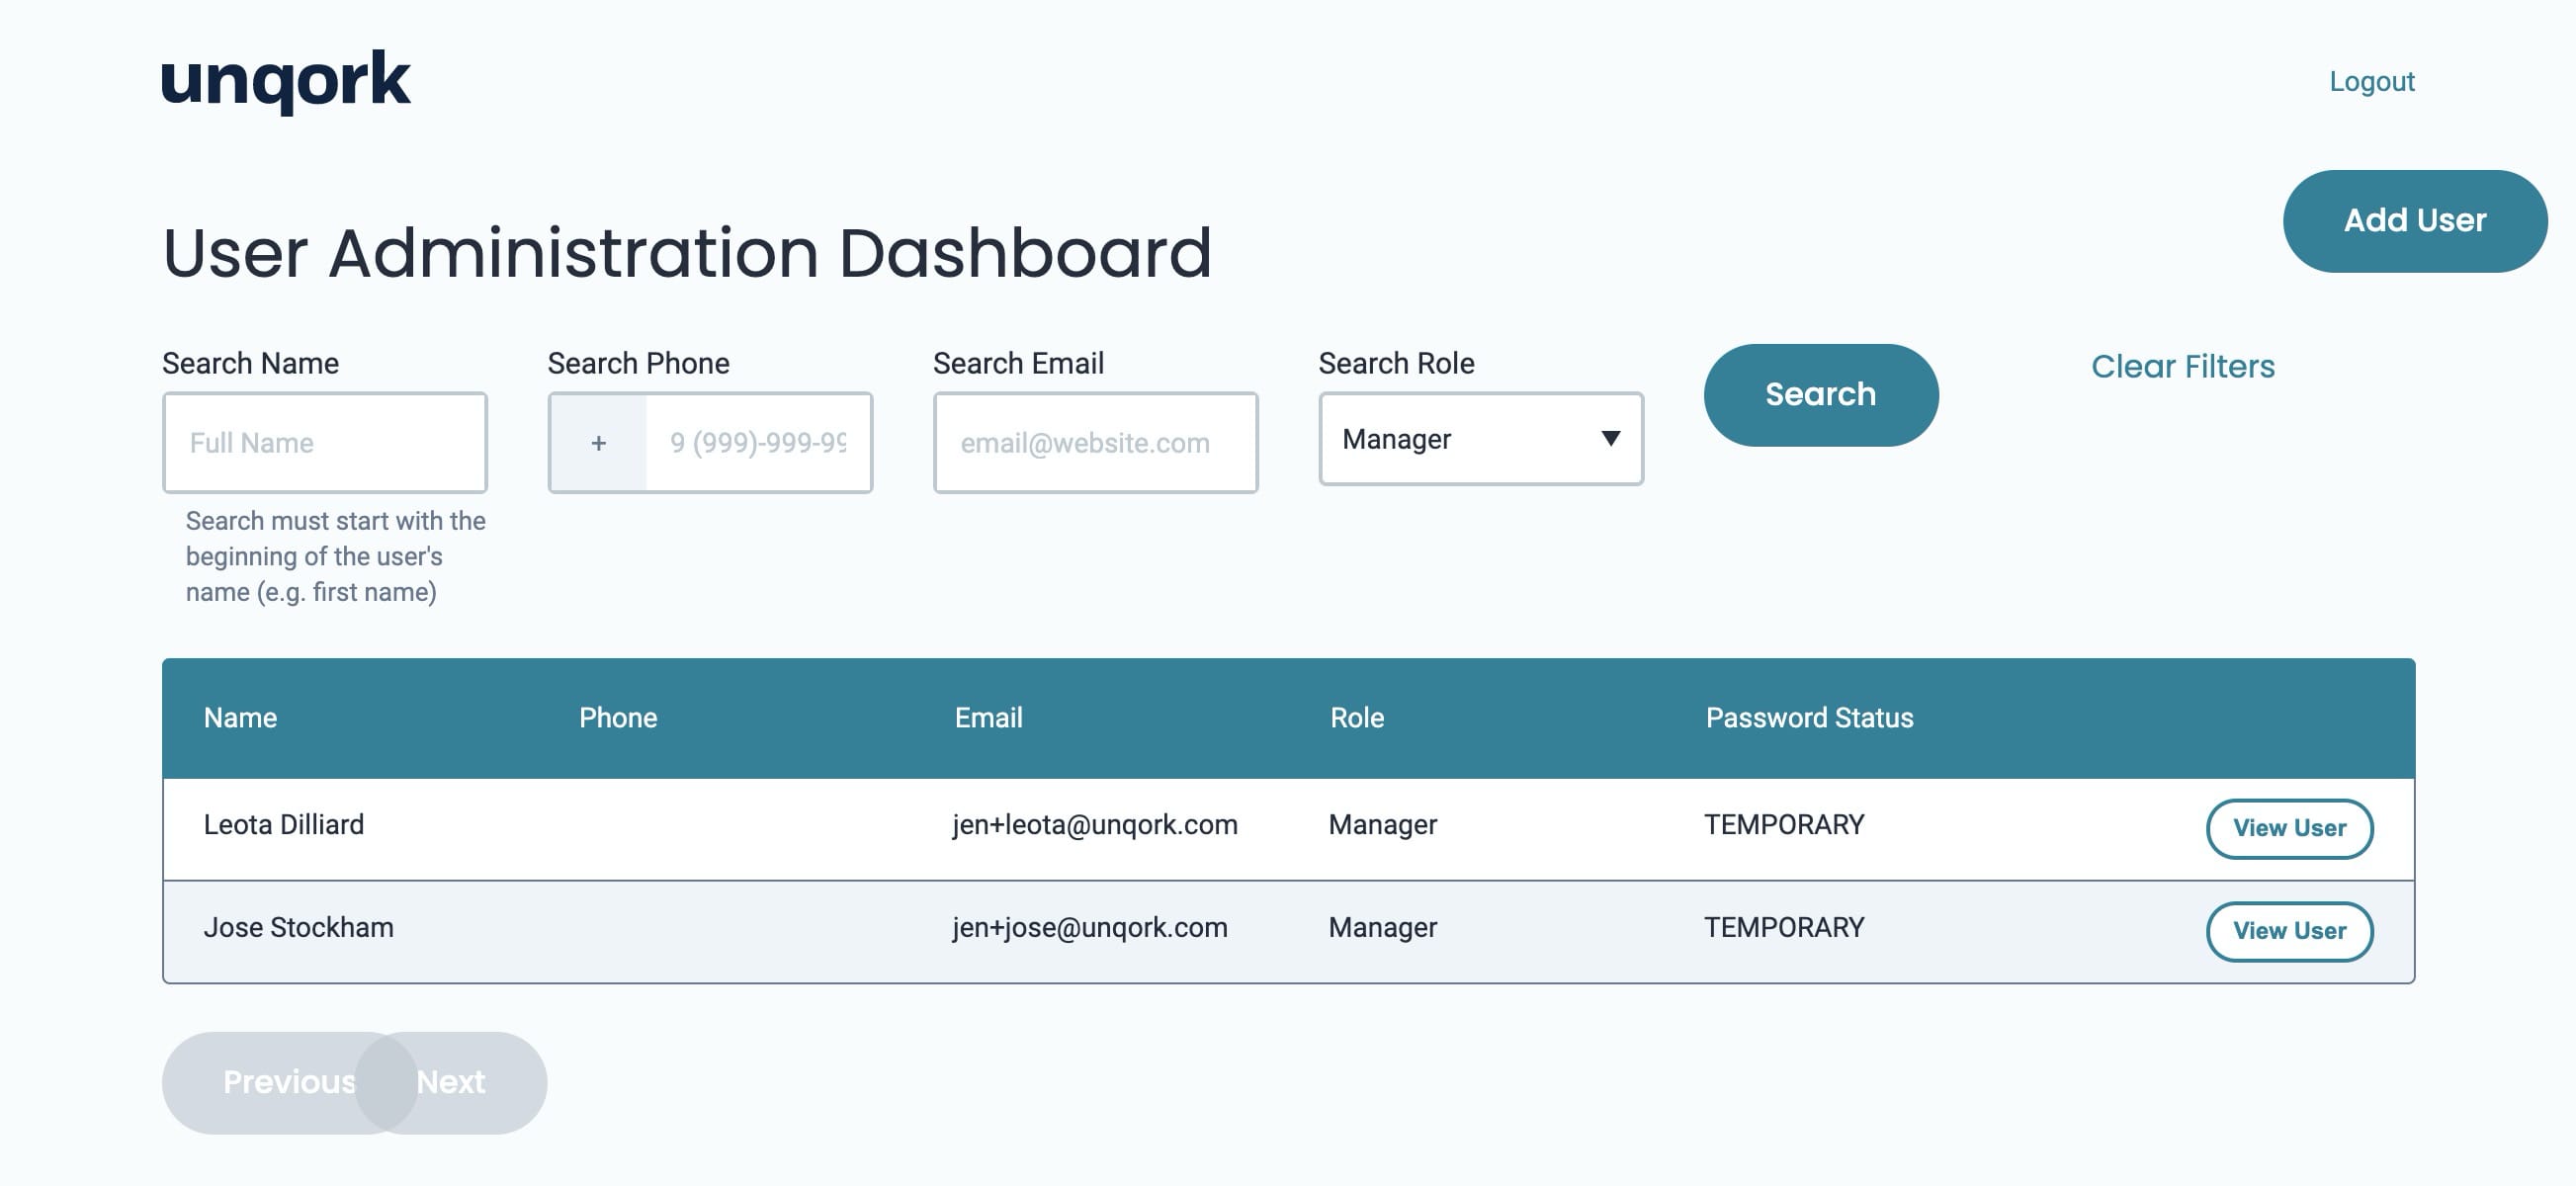
Here's how the front-end User Account Administration: User Account Dashboard module looks in Express View:
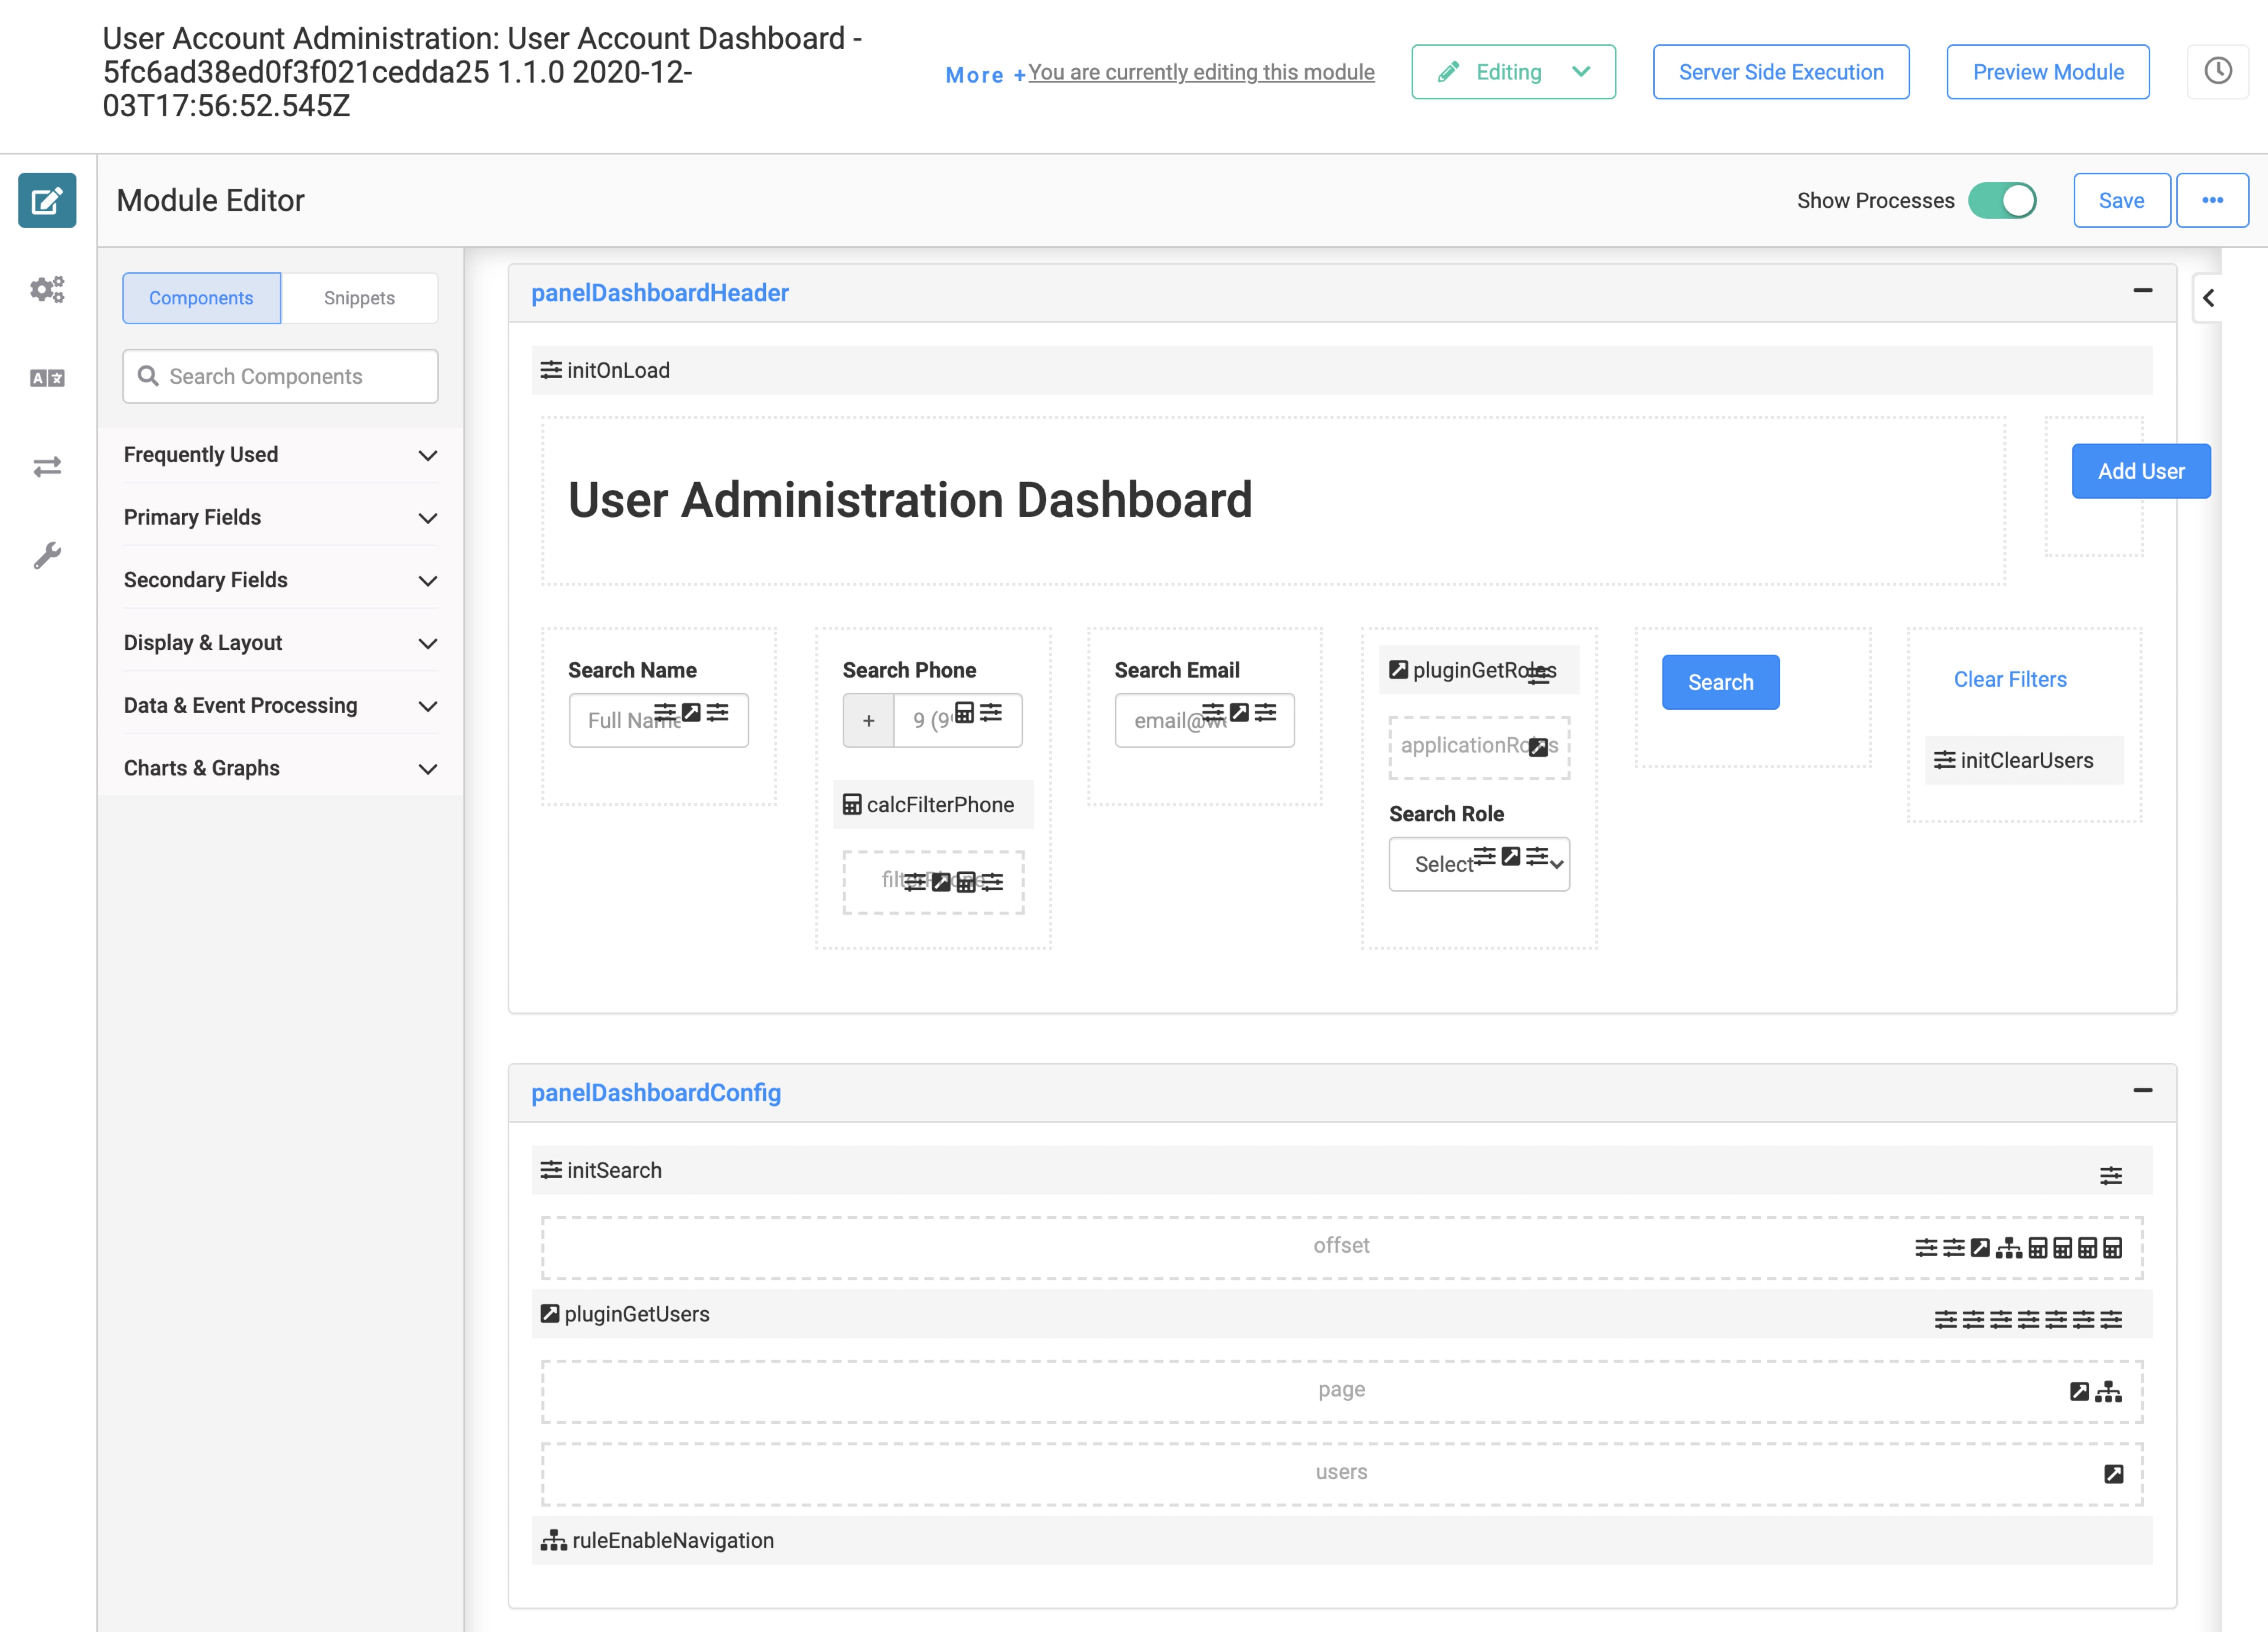
And, here's how the front-end User Account Administration: User Account Dashboard module looks in the Module Builder:
Now that you have a high-level idea of how these modules and sections work together, let's talk about RBAC.
How Does RBAC Work in This Template?
Since every customer's needs are different, templates don't have any RBAC (role-based access control) set up. This way, you can plan out and configure your RBAC in a way that makes sense for you and your business. RBAC is the most secure way to make sure that users have the right permissions in your application. For the User Registration and Management template, you'll work with module-level RBAC. Let's go over a quick refresher on RBAC and how it'll work for your User Registration and Management application.
You'll need to set up RBAC for each module in your User Registration and Management application. Talk with your Solutions Architect about the best RBAC plan for your needs.
Module-Level RBAC
Module-level RBAC is unique because it lets you can overwrite a role's default permission for a module. Changes to permissions at the module-level do not impact other modules. So, ensure you customize each module as needed.
In Module Builder settings, you'll set Customize RBAC for the Module to (ON). A grid displays displaying a list of all module permissions in your environment. By default, each role is set to Inherit. Inherit means that the role's access in this module is the same as at the environment-level. You can change this access to No Access, Read-Only, Write, or Inherit.
In the User Registration and Management application, you'll set up each module a bit differently. The User Registration: Create My Account module, for example, must have anonymous access enabled. This way, new users can access the module in Express View and sign up for an account. The User Account Administration: User Account Dashboard, on the other hand, should only be accessible by admin-level users.
Let's look further at the main types of access, or RBAC permissions.
Types of RBAC Permissions
You get to choose what access or abilities you want each user role to have. For example, giving a customer full or partial access. In RBAC, you have five permission types:
| Access Level | Description |
|---|---|
|
No Access |
An end-user End-users, also known as Express Users, are the individuals accessing an application through Express View. In most cases, end-users are the customers using the product. cannot access your application, module, or component. |
|
Read-Only |
An end-user can view but cannot write or engage with your application, module, or component. |
|
Write |
An end-user has full access to write and engage with your application, module, or component. |
|
Inherit |
This permission is available at the module and component-level only. The module or component inherits permissions from their parent. For example, let's say a Text Field component lives inside a Panel component. The Text Field would inherit the permissions set up in that Panel component. The highest level component in a module would inherit permissions from the module. Modules would inherit permissions from the environment-level role defaults. |
|
Obfuscate |
This permission type is available at the component-level only. Information entered into a field with this permission gets replaced by asterisks in your submission data instead of what your end-user entered. Obfuscate is great for social security numbers or PII Personal Identifiable Information (PII) is any representation of information that permits the identity of an individual to whom the information applies to be reasonably inferred by either direct or indirect means. (personally identifiable information) you don't want certain end-users seeing. |
Let's take a closer look at what you'll need to configure for each section.
Configuring the Application Template
To make your application secure, you'll need to set up RBAC for each module. For a refresher, make sure to read the How Does RBAC Work in This Template? section of this article.
An important note before we get started: there are many ways you can set up RBAC. For instance, say you create a role called Manager and want them to have access to the dashboard. You can make those adjustments in your RBAC settings. To keep things simple, the following configuration steps will walk you through one potential RBAC model. Talk with your Solutions Architect about the best RBAC model for your needs.
To adjust your module-level RBAC, you'll work with the Module Builder Settings tab. To access this tab, click the  (Settings) icon in the left sidebar menu of the Module Builder.
Let's take a look at the RBAC settings you'll use during this application's RBAC configuration:
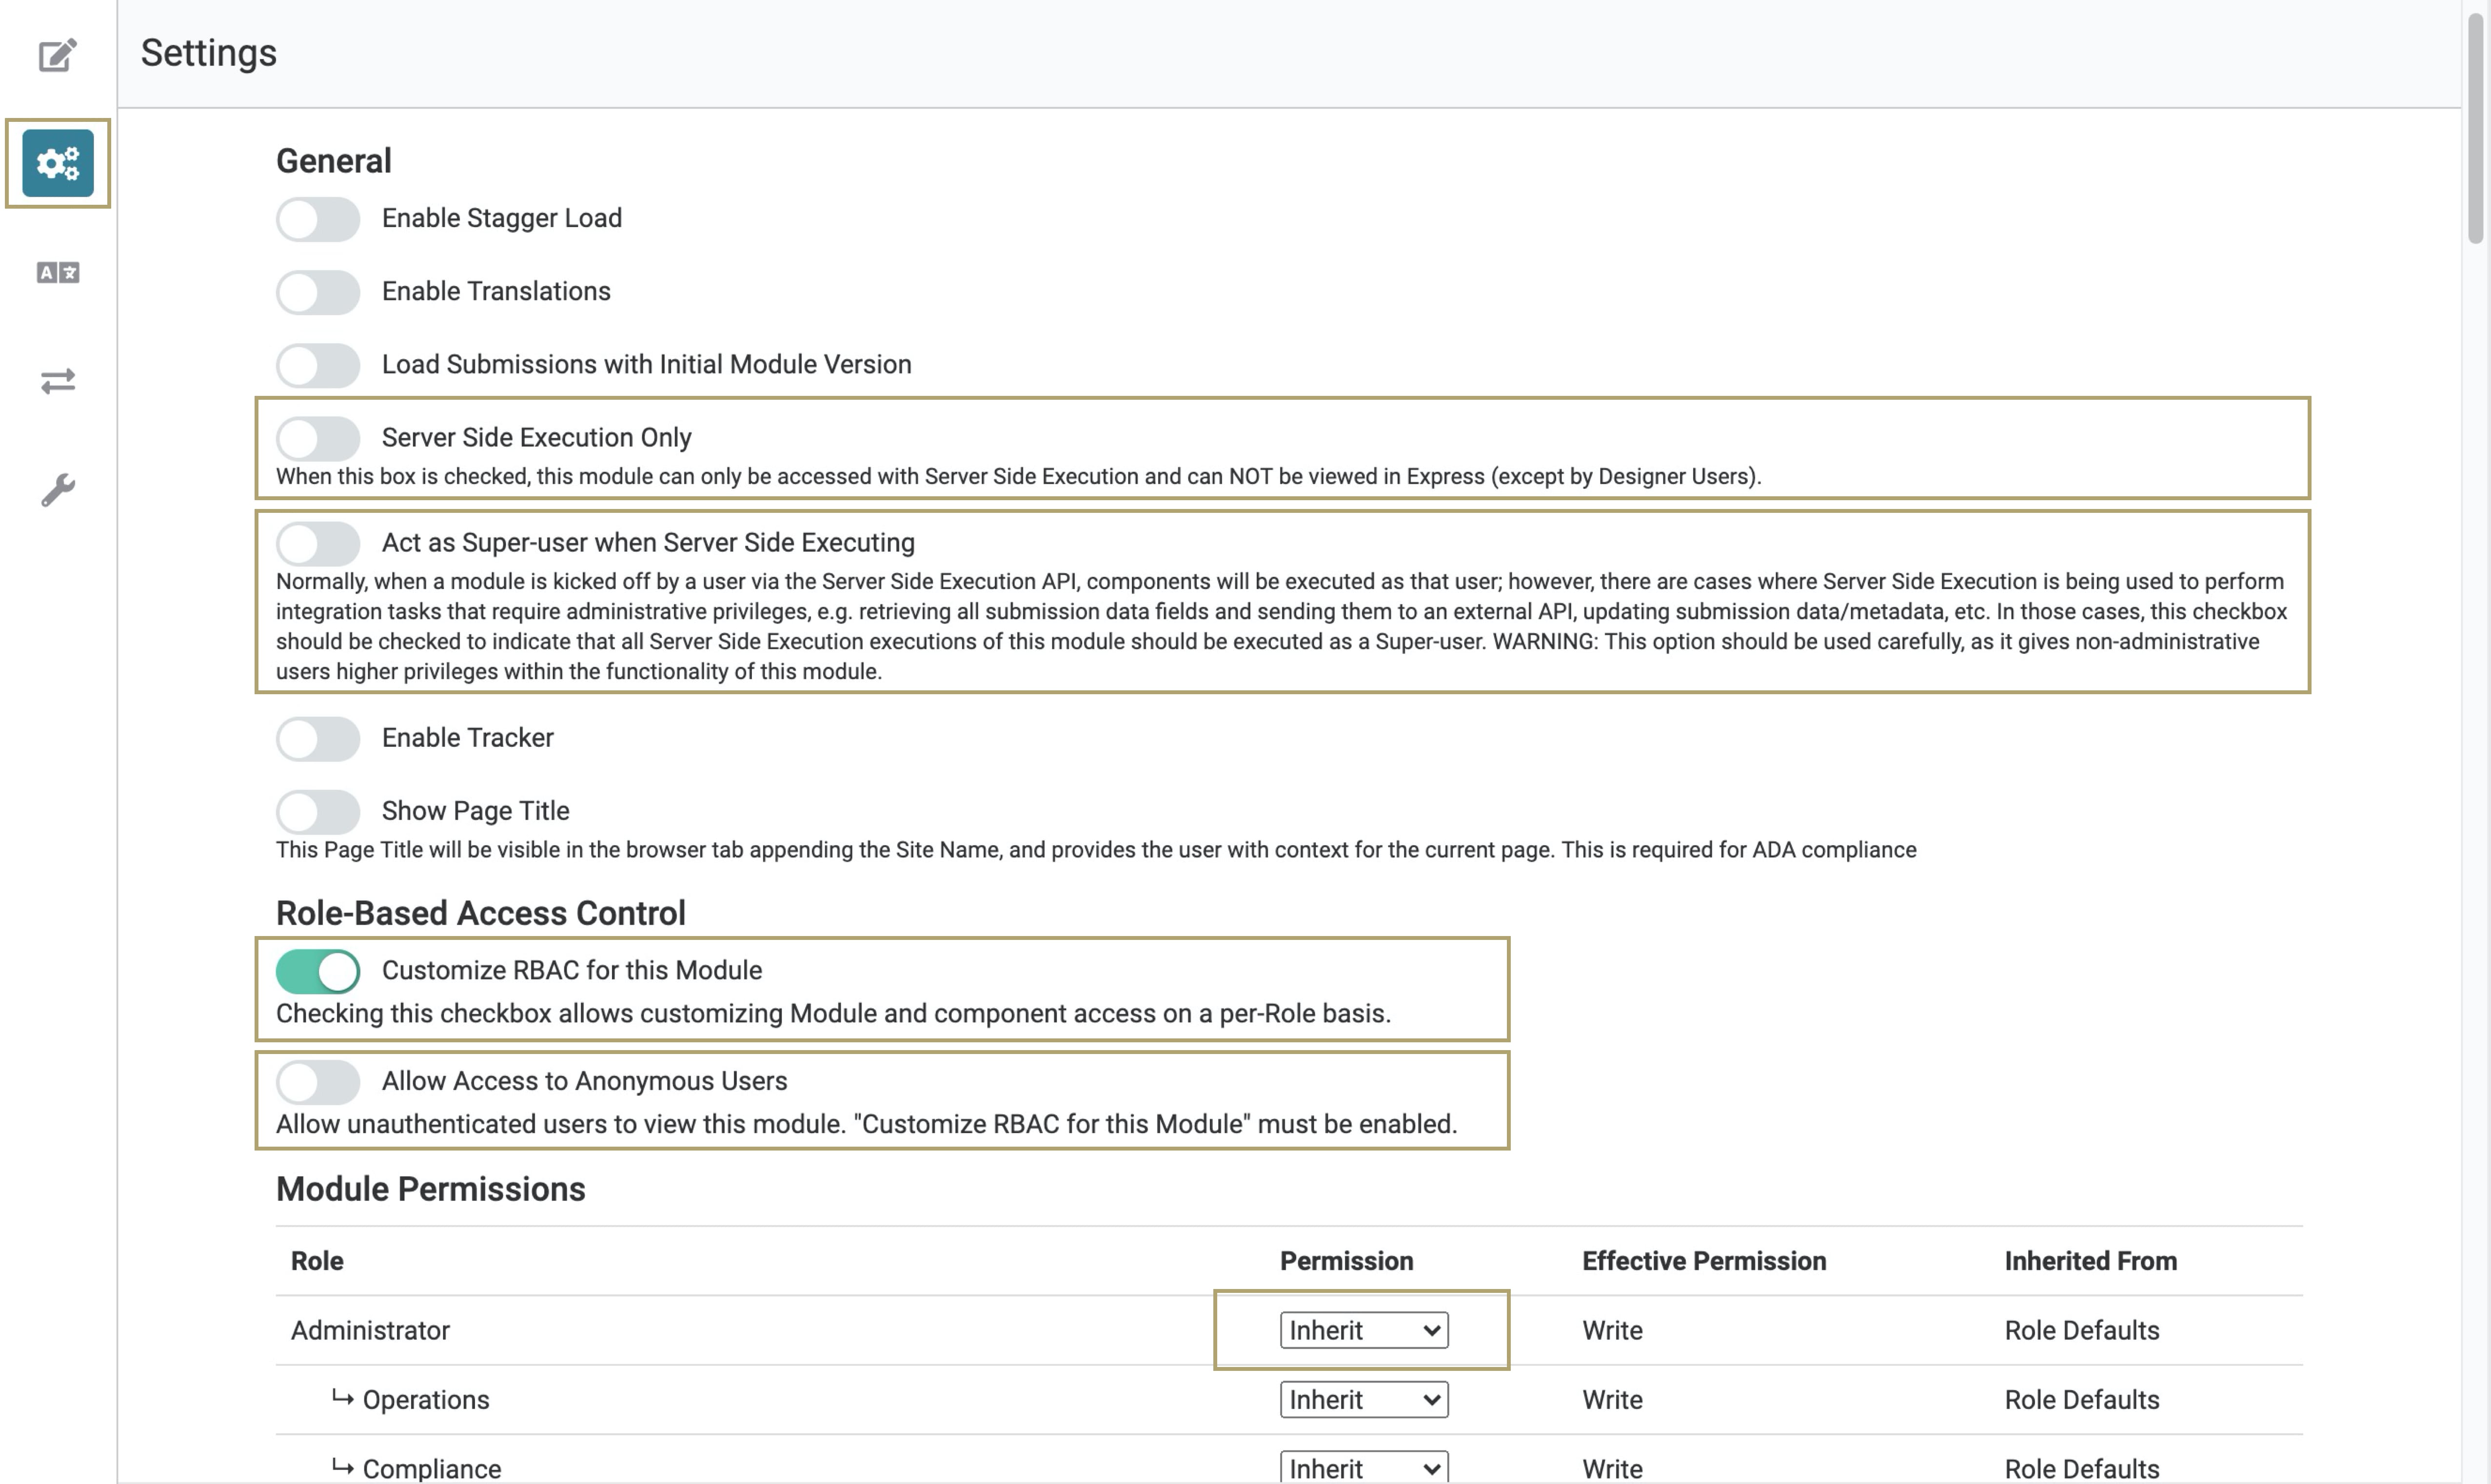
Here's a description of each RBAC setting and how they impact your modules:
| Setting | Description |
|---|---|
|
Settings (Gear) Button |
Clicking this takes you to your module's settings. This is where you'll configure module-level RBAC. |
|
Server Side Execution Only Toggle |
When ON, this module will execute remotely, which means it executes on an internal Unqork server. By default, the template's front-end modules have this toggle OFF. For back-end API modules, the template defaults this toggle to ON. |
|
Act as Super-User when Server Side Executing Toggle |
When ON, your module’s server-side executions have Super-user permissions. Super-user permissions override all other RBAC permissions. This means the module can take a non-admin request and translate it into an administrator-level request. You'll often use this setting in intermediary modules when the front-end and back-end modules have different permissions. |
|
Customize RBAC for this Module Toggle |
When ON, the settings screen will show a module permissions list with all roles in your environment. From there, you can adjust permissions for each role. Toggling this to ON also gives you access to the Allow Access to Anonymous Users toggle. |
|
Allow Access to Anonymous Users Toggle |
When ON, anonymous users can access your module. An example of when you'll use this setting is in the User Registration: Create New Account module. Anonymous users need access to this module so they can create their new account. So, you'll adjust the module's settings to allow access to anonymous users. This setting only shows after toggling the Customize RBAC for the Module to ON. |
|
Permission Drop-down |
Before you change any permissions, each role has Inherit as the permission. Inherit means that the role's access in this module is the same as the environment-level. You can change this access to No Access, Read-Only, Write, or keep it as Inherit. This setting only shows after toggling the Customize RBAC for the Module to ON. |
Ready to set up your module-level RBAC? Let's get started.
User Registration Configuration
The User Registration section uses 3 modules. These 3 modules work together so that anonymous end-users can create their own accounts. As a refresher, here are the 3 modules involved in User Registration:
-
User Registration: Create New Account
-
User Registration: Create My Authenticated User Account (API)
-
Unqork Create User Account (Unqork API)
You'll customize RBAC for each module to make sure the right people have the right permissions. Let's dive in!
Configuring the User Registration: Create My Account Module
This module is the landing page for new visitors to your application. This page is where your end-users start their registration journey. You'll see an HTML component with a helpful reminder about the configuration steps for this module. Anonymous users need access to this module so they can create their new account. So, you'll adjust the module's settings to allow access to anonymous users.
Configuring RBAC
First, you’ll configure RBAC for this module.
| 1. | Open the User Registration: Create My Account module in the Module Builder. |
| 2. | Click the (Settings) icon in the left sidebar menu. |
| 3. | Set the Customize RBAC for this Module toggle to ON. |
| 4. | Set the Allow Access to Anonymous Users toggle to ON. |
| 5. | For the Anonymous role, select Write from the Permission drop-down. |
| 6. | Click Save Settings. |
| 7. | Save your module. |
Deleting the HTML Component
Once you've set up RBAC, you can go ahead and delete the HTML reminder. This way, your end-users won't see it in Express View!
| 1. | Hover over the htmlWarming HTML component. |
A 5-button toolbar appears above the component on hover-over.
| 2. | Click the  (Remove) button. (Remove) button. |
| 3. | Save your module. |
Configuring the User Registration: Create My User (API) Module
This back-end module acts as an intermediary layer between the Create New Account Express View module and the back-end Create User Account (Unqork API) module. It takes the new account request from the anonymous user. Then, it translates the request into an administrator-level request for the Unqork Create User Account (Unqork API) module. It does this thanks to the Act as Super-user when Server Side Executing setting.
We want this module to execute remotely, which means executing on an internal Unqork server. This is the template's default setting for API modules. But, as a best practice, we recommend verifying each module's settings when setting up RBAC.
During configuration, you'll adjust the module's settings to allow access to anonymous users. This adjustment lets this module receive the new account request from the User Registration: Create New Account module.
Configuring RBAC
Now, you’ll configure RBAC for this module.
| 1. | Open the User Registration: Create My User (API) module in the Module Builder. |
| 2. | Click the (Settings) icon in the left sidebar menu. |
| 3. | Verify that the Server Side Execution Only toggle is ON. |
This is the template's default setting for API modules. But, as a best practice, we recommend verifying each module's settings when setting up RBAC.
| 4. | Set the Act as Super-user when Server Side Executing toggle to ON. |
| 5. | Set the Customize RBAC for the Module toggle to ON. |
| 6. | Set the Allow Access to Anonymous Users toggle to ON. |
| 7. | For the Anonymous role, select Write from the Permission drop-down |
| 8. | Click Save Settings. |
| 9. | Save your module. |
Configuring the User Registration: Unqork Create User Account (Unqork API) Module
This back-end API module can create users of any role, including an administrator role. This is why you must set up RBAC so that only administrator-level roles have access to this module. Otherwise, anonymous users could assign themselves an administrator role!
Configuring RBAC
Next, you’ll configure RBAC for this module.
| 1. | Open the User Registration: Unqork Create User Account (Unqork API) module in the Module Builder. |
| 2. | Click the (Settings) icon in the left sidebar menu. |
| 3. | Verify that the Server Side Execution Only toggle is ON. |
This is the template's default setting for API modules. But, as a best practice, we recommend verifying each module's settings when setting up RBAC.
| 4. | Set the Customize RBAC for the Module toggle to ON. |
| 5. | For your administrator-level role(s), select Inherit from the Permission drop-down. |
| 6. | For all other roles, select No Access from the Permission drop-down. |
| 7. | Click Save Settings. |
| 8. | Save your module. |
User Account Management Configuration
The User Account Management section uses 5 modules. These modules work together so that end-users can retrieve and update their user account information. This section uses the following 5 modules:
-
User Account Management: Manage My User Account
-
User Account Management: Get My User Account (API)
-
Unqork Get User Account (Unqork API)
-
User Account Management: Update My User Account (API)
-
Unqork Update User Account (Unqork API)
The only configuration needed for this section is to set up RBAC.
Configuring the User Account Management: Manage My User Account Module
This module is the landing page once end-users log in to their accounts. From this page, they can view and update their account information.
Configuring RBAC
Next, you’ll configure RBAC for this module.
| 1. | Open the User Account Management: Manage My User Account module in the Module Builder. |
| 2. | Click the (Settings) icon in the left sidebar menu. |
| 3. | Set the Customize RBAC for this Module toggle to ON. |
| 4. | For the Authenticated role, select Write from the Permission drop-down. |
If you want any of your custom roles to have Write access, you'll also set their permission drop-down to Write.
| 5. | Click Save Settings. |
| 6. | Save your module. |
Configuring the User Account Management: Get My User Account (API) Module
This back-end module's API retrieves information for the current user. It acts as an intermediary layer between the User Account Management: Manage My User Account module and the back-end Unqork Get User Account (Unqork API)module. This buffer module lets end-users retrieve their own account information.
Since this is a back-end module, you'll make sure it executes server-side. This module's API takes an authenticated request from the Manage My User Account module. Then, it translates the request into an administrator-level request for the Unqork Get User Account (Unqork API). So, you'll set this module to act as a Super-user.
Configuring RBAC
Now, it's time to set up RBAC for this module.
| 1. | Open the User Account Management: Get My User Account (API) module in the Module Builder. |
| 2. | Click the (Settings) icon in the left sidebar menu. |
| 3. | Verify that the Server Side Execution Only toggle is ON. |
This is the template's default setting for API modules. But, as a best practice, we recommend verifying each module's settings when setting up RBAC.
| 4. | Set the Act as Super-user when Server Side Executing toggle to ON. |
| 5. | Set the Customize RBAC for this Module toggle to ON. |
| 6. | For the Authenticated role, select Write from the Permission drop-down. |
If you want any of your custom roles to have Write access, you'll also set their permission drop-down to Write.
| 7. | Click Save Settings. |
| 8. | Save your module. |
Configuring the Unqork Get User Account (Unqork API) Module
This back-end module can get information for any end-user's account. Since this is a power we only want for administrators, you'll adjust the RBAC. Also, since this is a back-end module, you'll set it to execute server-side.
Configuring RBAC
| 1. | Open the Unqork Get User Account (Unqork API) module in the Module Builder. |
| 2. | Click the (Settings) icon in the left sidebar menu. |
| 3. | Verify that the Server Side Execution Only toggle is ON. |
This is the template's default setting for API modules. But, as a best practice, we recommend verifying each module's settings when setting up RBAC.
| 4. | Set the Customize RBAC for this Module toggle to ON. |
| 5. | For your administrator-level role(s), select Inherit from the Permission drop-down. |
| 6. | For all other roles, select No Access from the Permission drop-down. |
| 7. | Click Save Settings. |
| 8. | Save your module. |
Configuring the User Account Management: Update My User Account (API) Module
This back-end module acts as an intermediary layer between the front-end Manage My User Accountmodule and the back-end Unqork Update User Account (Unqork API)module. It lets the current end-user update their account information.
Since this is a back-end module, you'll make sure it executes server-side. This module's API takes an authenticated request from Manage My User Account module. Then, it translates the request into an administrator-level request for the Unqork Update User Account (Unqork API). So, you'll set this module to act as a Super-user.
Configuring RBAC
| 1. | Open the User Account Management: Update My User Account (API) module in the Module Builder. |
| 2. | Click the (Settings) icon in the left sidebar menu. |
| 3. | Verify that the Server Side Execution Only toggle is ON. |
This is the template's default setting for API modules. But, as a best practice, we recommend verifying each module's settings when setting up RBAC.
| 4. | Set the Act as Super-user when Server Side Executing toggle to ON. |
| 5. | Set the Customize RBAC for this Module toggle to ON. |
| 6. | For the Authenticated role, select Write from the Permission drop-down. |
If you want any of your custom roles to have Write access, you'll also set their permission drop-down to Write.
| 7. | Click Save Settings. |
| 8. | Save your module. |
Configuring the Unqork Update User Account (Unqork API) Module
This back-end module's API can update information for any end-user's account. Since this is a power you only want for administrators, you'll adjust the RBAC.
First, you'll set this module to execute server-side. Then, you'll adjust the access permissions to ensure only administrator-level roles can access this module.
Configuring RBAC
| 1. | Open the Unqork Update User Account (Unqork API) module in the Module Builder. |
| 2. | Click the (Settings) icon in the left sidebar menu. |
| 3. | Verify that the Server Side Execution Only toggle is ON. |
This is the template's default setting for API modules. But, as a best practice, we recommend verifying each module's settings when setting up RBAC.
| 4. | Set the Customize RBAC for this Module toggle to ON. |
| 5. | For your administrator-level role(s), select Inherit from the Permission drop-down. |
| 6. | For all other roles, select No Access from the Permission drop-down. |
| 7. | Click Save Settings. |
| 8. | Save your module. |
User Account Administration Configuration
The User Account Administration section is unique in that it also uses Unqork API modules that the other 2 sections use. This page combines the functionality of the previous 2 sections. Then, it adds the ability to delete a user account and resend temporary passwords. In addition to the other API modules, the User Account Administration section uses the following 5 modules:
-
User Account Administration: User Account Dashboard
-
Unqork List User Accounts for Dashboard (Unqork API)
-
Unqork List Roles for Dashboard (Unqork API)
-
Unqork Delete User Account (Unqork API)
- Unqork Resend User Password (API)
Now, you'll set up RBAC for each of these 5 modules.
Configuring the User Account Administration: User Account Dashboard Module
This is a front-end module with a dashboard that your administrator roles see in Express View. The end-user must have an administrator-level role to access this module.
Configuring RBAC
| 1. | Open the User Account Administration: User Account Dashboard module in the Module Builder. |
| 2. | Click the (Settings) icon in the left sidebar menu. |
| 3. | Set the Customize RBAC for this Module toggle to ON. |
| 4. | For your administrator-level role(s), select Inherit from the Permission drop-down. |
| 5. | For all other roles, select No Access from the Permission drop-down. |
| 6. | Click Save Settings. |
| 7. | Save your module. |
Configuring the Unqork List User Accounts for Dashboard (Unqork API) Module
This back-end API module returns a list of all the users in your environment. The list populates the dashboard. Since this module works behind-the-scenes as a back-end module, you'll enable server-side execution. Also, you'll set the RBAC so only administrator-level roles can access this module.
Configuring RBAC
| 1. | Open the Unqork List User Accounts for Dashboard (Unqork API) module in the Module Builder. |
| 2. | Click the (Settings) icon in the left sidebar menu. |
| 3. | Verify that the Server Side Execution Only toggle is ON. |
This is the template's default setting for API modules. But, as a best practice, we recommend verifying each module's settings when setting up RBAC.
| 4. | Set the Customize RBAC for this Module toggle to ON. |
| 5. | For your administrator-level role(s), select Inherit from the Permission drop-down. |
| 6. | For all other roles, select No Access from the Permission drop-down. |
| 7. | Click Save Settings. |
| 8. | Save your module. |
Configuring the Unqork List Roles for Dashboard (Unqork API) Module
This back-end API module returns a list of all the roles in your environment. Since this module works behind-the-scenes as a back-end module, you'll enable server-side execution. Also, you'll set the RBAC so only administrator-level roles can access this module.
Configuring RBAC
| 1. | Open the Unqork List Roles for Dashboard (Unqork API) module in the Module Builder. |
| 2. | Click the (Settings) icon in the left sidebar menu. |
| 3. | Verify that the Server Side Execution Only toggle is ON. |
This is the template's default setting for API modules. But, as a best practice, we recommend verifying each module's settings when setting up RBAC.
| 4. | Set the Customize RBAC for this Module toggle to ON. |
| 5. | For your administrator-level role(s), select Inherit from the Permission drop-down. |
| 6. | For all other roles, select No Access from the Permission drop-down. |
| 7. | Click Save Settings. |
| 8. | Save your module. |
Configuring the Unqork Delete User Account (Unqork API) Module
This back-end API module lets administrator roles delete an end-user's account. The deletion also removes the end-user from the dashboard. Just like the last 2 modules, you'll enable server-side execution. Also, you'll set the RBAC so only administrator-level roles can access this module.
Configuring RBAC
| 1. | Open the Unqork List Roles for Dashboard (Unqork API) module in the Module Builder. |
| 2. | Click the (Settings) icon in the left sidebar menu. |
| 3. | Verify that the Server Side Execution Only toggle is ON. |
This is the template's default setting for API modules. But, as a best practice, we recommend verifying each module's settings when setting up RBAC.
| 4. | Set the Customize RBAC for this Module toggle to ON. |
| 5. | For your administrator-level role(s), select Inherit from the Permission drop-down. |
| 6. | For all other roles, select No Access from the Permission drop-down. |
| 7. | Click Save Settings. |
| 8. | Save your module. |
Configuring the Unqork Resend User Password (API) Module
This back-end API module lets administrator roles resend a temporary password to your end-user. You'll turn on server-side execution and only give access to administrator-level roles.
Configuring RBAC
| 1. | Open the Unqork Resend User Password (API) module in the Module Builder. |
| 2. | Click the (Settings) icon in the left sidebar menu. |
| 3. | Verify that the Server Side Execution Only toggle is ON. |
This is the template's default setting for API modules. But, as a best practice, we recommend verifying each module's settings when setting up RBAC.
| 4. | Set the Customize RBAC for this Module toggle to ON. |
| 5. | For your administrator-level role(s), select Inherit from the Permission drop-down. |
| 6. | For all other roles, select No Access from the Permission drop-down. |
| 7. | Click Save Settings. |
| 8. | Save your module. |
Now that you have your RBAC set up, we recommend checking your work.
Testing Your RBAC Configuration
There are 2 ways to test RBAC as an administrator. The first is using the Preview Bar in Express View. The second is creating test accounts and moving through your application as a test user. Let's take a look at both options.
Testing RBAC in Express View
Each non-production environment has a corresponding Express side or Express View. You'll access this view by previewing your module. (You can preview your module by clicking the Preview button in the Module Builder.) Express View shows the user interface of your application. In Express View, there's an Express Preview Bar at the top of the page. You can use the bar's Preview As drop-down to see your application from different user roles.
To change the user role in Express View:
| 1. | Preview your module. You'll see the Express Preview Bar at the top of the page. |
| 2. | Choose a role from the Preview As drop-down. Express View updates, showing the module through the chosen role's view. |
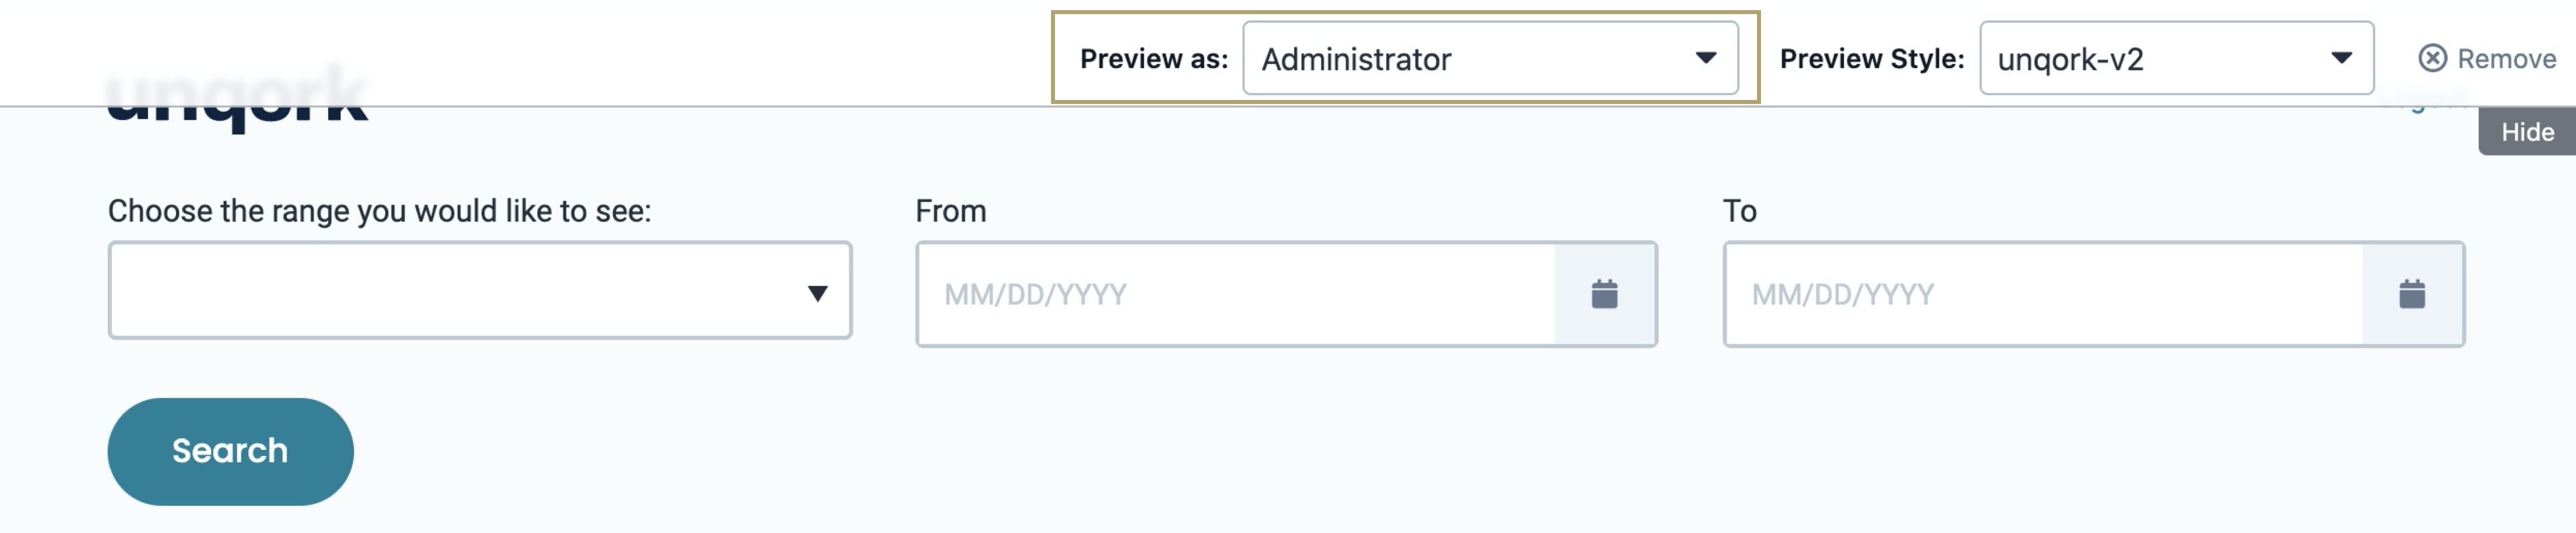
The Preview As drop-down defaults to the Administrator role, which has full access. Through this role's eyes, you can see and interact with every component in your module. As you change Preview as roles, the Express View should only reflect what you want that role to have access to.
Testing RBAC with a Test User Account
Another way to test how a role will see your application is to create a test user account. To create a test user account in Unqork, you'll need a unique email address. If you have a Gmail or Outlook account, this is easy. Enter your email address, then add a plus sign (+) and a random word or number before the @ sign. For example, let's say your email address is nocodeisfun@unqork.com. You could enter nocodeisfun+test@unqork.com. Now you have a unique email address you can use to set up your test account. Any emails sent to this alias address will actually send to your main account instead.
With your test account set up, you're ready to give it an Unqork role in your administration settings. Now you can log in to Unqork as your test user and move through your module as a particular role. You'll only see what a user with that role would see. You can create as many test accounts as you need if your application has many roles!
What happens if a role's Express View experience doesn't match the expected behavior? What if some of your end-users have access to a module that they shouldn't have access to? This tells you that there's an issue in your RBAC settings. Go back through each module and double-check your setup. As always, if you need help, reach out to your Solution Architect.
Customizing the Application Template
Aside from customizing RBAC, there's one main way you could customize this template. You can have the first login page hand off to another page instead of Account Management. You can easily set this up. All you'll do is update the Hidden component in the User Registration: Create My Account module. From there, your login page will hand off to whatever page you want.
Updating the Hidden Component
In the User Registration: Create My Account module, you'll see a Hidden component called loginModuleId. This Hidden component houses a module ID. The module ID tells your application where to send your end-users once they log in. Say you created your application from the template. This Hidden component defaults to the module ID for your Account Management.
If you want to send your end-users to a different module once they log in, you must update this Hidden component.
| 1. | Hover over the loginModuleId Hidden component. |
A 5-button toolbar appears above the component on hover-over.
| 2. | Using the toolbar, click the  (Settings) button. (Settings) button. |
| 3. | In the Data panel, enter your module ID in the Default Value field. |
This is the module you want as your end-users' landing page once they log in.
| 4. | Click Save. |
| 5. | Save your module. |
Now, when you preview your application in Express View, the User Registration section should redirect to the module you specified in the Hidden component.
Removing the Application Template
What if you no longer need this template or the application you built from it? There are 2 parts to removing this template. First, you'll uninstall it from your environment. Then you'll delete the application you created from the template. These steps are easy, and you can do them in any order.
Removing the Template from Your Environment
You might need to clean your environment and remove unused templates. The Unqork Library makes this easy. To uninstall a template from your environment:
| 1. | At the top right of the Unqork Designer Platform, click Library. |
| 2. | Find the template to uninstall. |
| 3. | Click the ellipsis (...) in the template tile header. |
| 4. | Click Uninstall Template. |
| 5. | Click Yes, Uninstall in the confirmation modal. |
You can visit the Marketplace and reinstall the template at any time.
What if you have an existing application built from this template and then uninstall the template from your environment? Your existing application remains unaffected. Also, it no longer has any ties to the template. So, let's say you reinstall a newer version of the template in the future. You can rest assured that the installation doesn't impact your existing application.
Deleting Your User Registration and Management Application
If you no longer need the application you created from your template, you can delete it. To delete your application:
| 1. | Navigate to the Apps tab from an open workspace. |
| 2. | Find the application to delete. |
| 3. | Click the ellipsis (...) in the app tile header. |
| 4. | Click Delete. |
| 5. | Retype the provided text. |
| 6. | Click Yes, Delete. |
