Client Information Template
About this Configuration Guide
This guide covers setting up the Client Information application template. Using this guide, you'll explore how the Client Information template works.
You can use this template in combination with the Investment Preferences and Fund Selection templates to build an account onboarding process. The Client Information templates lets you create, edit, and delete account and client submissions. It also lets you assign clients to an account.
To learn more about the Investment Preferences and Fund Selection templates, visit our Investment Preferences Template and Fund Selection Template articles.
Built with individual and joint accounts in mind, you can use this template to gather information needed to complete an account onboarding process. In total, this application template has 15 modules. There are two schema modules that store account and client submissions and 10 back-end API (application programming interface) modules. These 10 API modules let you create, read, update, and delete submissions in your schema modules. Five of these modules are specific to account submissions and the other five for client submissions. The template also includes two front-end admin modules that let you create and manage individual account and client submissions. Lastly, there's a main front-end admin module that lets you view client submissions based on their account. This module lets you view individual and joint accounts, as well as make any edits to account and client information.
Here's a chart with the architectural layout of these modules:
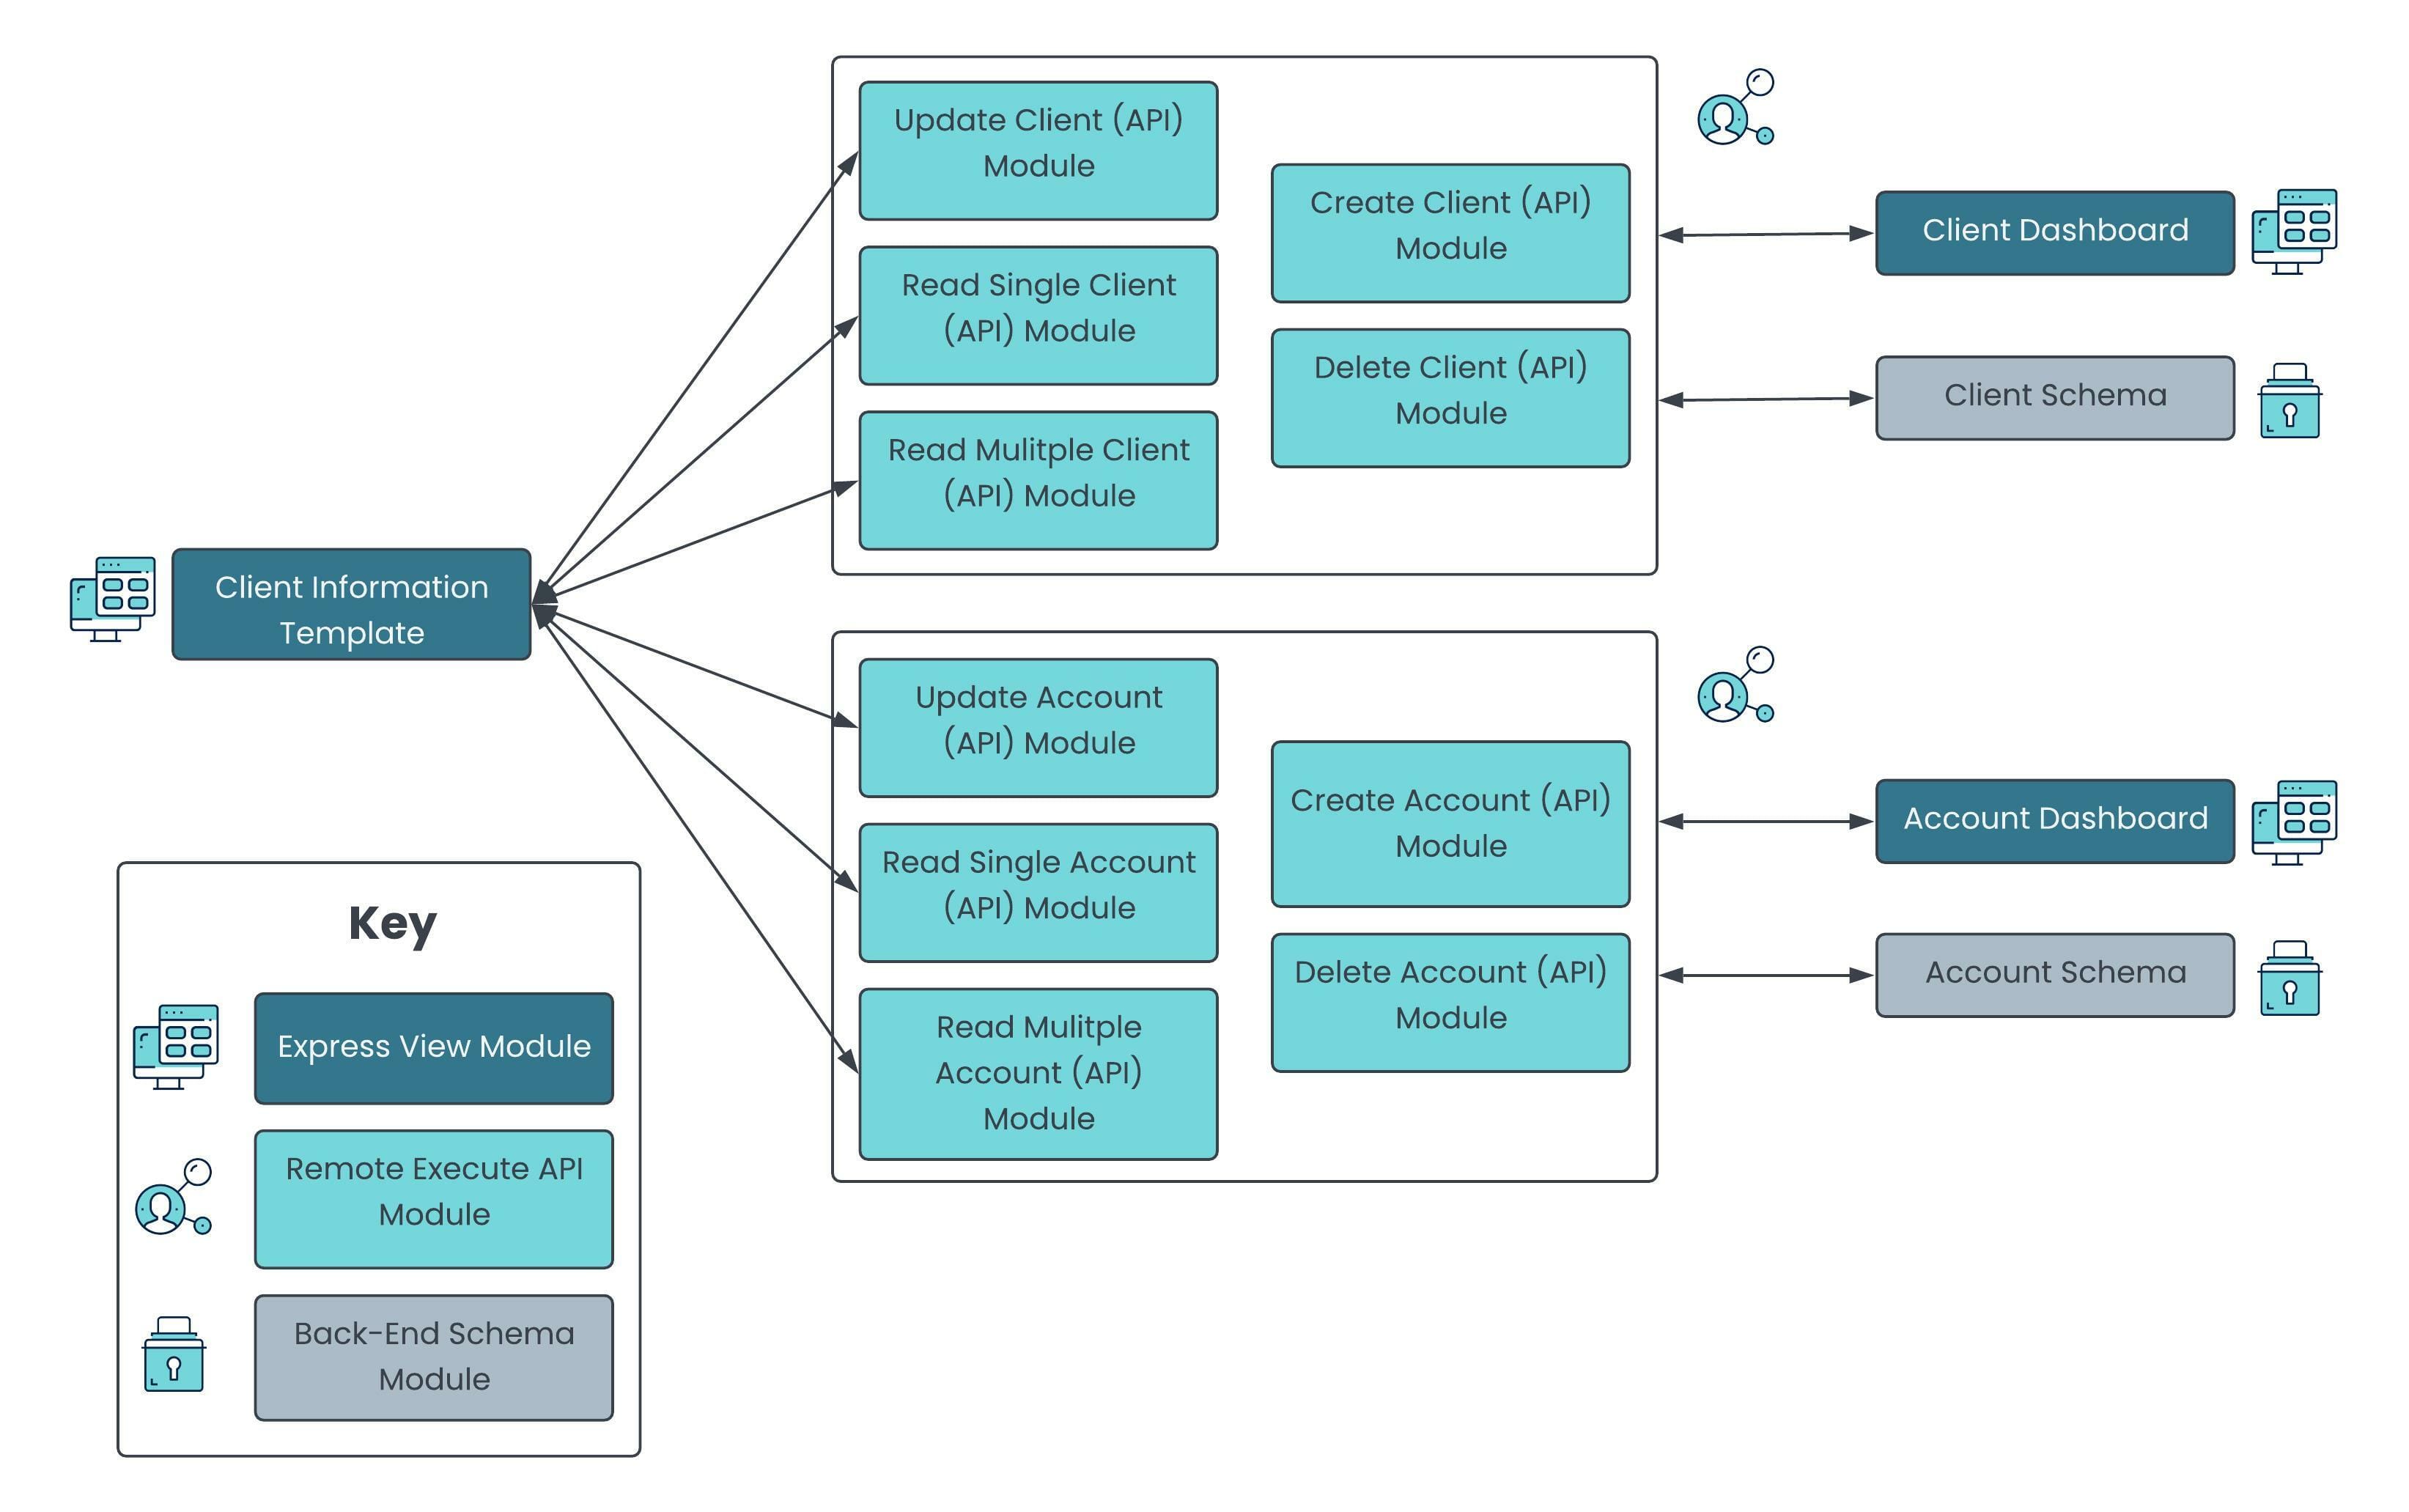
Here’s a high-level overview of the modules:
| # | Module | Description |
|---|---|---|
|
1 |
Client Info: Client Information Template |
This front-end module lets you filter for a specific account ID and view all clients associated with that account. You can also update any of the data. |
|
2 |
Client Info: Account Dashboard |
This front-end module lets you create new accounts to display on a dashboard. As configured, only account ID, account ownership, account type, and suitability score display on the dashboard. To view all client information, click the View button. |
|
3 |
Client Info: Client Dashboard |
This front-end module lets you create new clients to display on a dashboard. As configured, only the client ID, first name, last name, and email address display on the dashboard. To view all account information, click the View button. |
|
4 |
Client Info: Account (Schema) |
This schema module stores all account submission data. |
|
5 |
Client Info: Client (Schema) |
This schema module stores all client submission data. |
|
6 |
Client Info: Create Account (API) |
This API module lets you create accounts and store them in the Client Info: Account (Schema) module. |
|
7 |
Client Info: Read Single Account (API) |
This API module retrieves a specific account from the Client Info: Account (Schema) module so you can view it with the Client Info: Account Dashboard and Client Info: Client Information Template modules. |
|
8 |
Client Info: Read Multiple Accounts (API) |
This API module retrieves all accounts from the Client Info: Account (Schema) module so you can view them with the Client Info: Account Dashboard and Client Info: Client Information Template modules. |
|
9 |
Client Info: Update Account (API) |
This API module lets you edit account information and update submissions in the Client Info: Account (Schema) module. |
|
10 |
Client Info: Delete Account (API) |
This API module lets you delete accounts from the Client Info: Account (Schema) module. |
|
11 |
Client Info: Create Client (API) |
This API module lets you create clients and store them in the Client Info: Client (Schema) module. |
|
12 |
Client Info: Read Single Client (API) |
This API module retrieves a specific account from the Client Info: Client (Schema) module so you can view it with the Client Info: Client Dashboard and Client Info: Client Information Template modules. |
|
13 |
Client Info: Read Multiple Clients (API) |
This API module retrieves all accounts from the Client Info: Client (Schema) module so you can view them with the Client Info: Client Dashboard and Client Info: Client Information Template modules. |
|
14 |
Client Info: Update Client (API) |
This API module lets you edit client information and update submissions in the Client Info: Client (Schema) module. |
|
15 |
Client Info: Delete Client (API) |
This API module lets you delete clients from the Client Info: Client (Schema) module. |
All images used in this guide are for illustrative purposes only. Images are subject to change without notice. All images are correct at the time of publication.
Overview
Add and incorporate the Client Information template into an account onboarding application. You can also combine it with the Investment Preferences and Fund Selection templates to build a more robust application. This template lets you create, edit, and delete account and client submissions. It also lets you assign clients to an account. These accounts can have one or two owners, depending on the account type. This template can easily integrate into a customer relationship management application to ensure your information is always up-to-date.
This application template already consists of a basic layout to get you started. All API and schema modules follow Unqork best practices so you don't have to build from scratch.
Features
With this template, you can:
-
Create, read, update, and delete client information.
-
Create, read, update, and delete account information.
-
Manage and update accounts and client owners.
-
Incorporate it with the Investment Preferences and Fund Selection templates to build a robust account onboarding application.
Requirements
To use this template, you must:
-
Complete RBAC (role-based access control) setup so the right people can access your modules.
-
Have a clear understanding of your entity requirements and their relationships, if applicable.
What You'll Learn
In this article, you'll learn:
How the Template Works
The Client Information template is a Module Application template.
This template has 15 preconfigured modules. There are two schema modules that store all account and client submissions separately. Then, there are 10 back-end API modules that let you create, read, update, and delete account and client schema submissions. There are also two admin modules to enter account and client information. These modules display all accounts and clients on separate dashboards. Lastly, there's a main admin module that combines all accounts and clients together. This last module lets you view and manage clients by account.
How the Account and Client Schema Modules Work
These two back-end modules securely store all your submissions. The Client Info: Account (Schema) module stores your account-specific information. And the Client Info: Client (Schema) module stores your client-specific information. All the API and front-end modules directly interact with these schema modules.
When you build an application using this template, the schema modules contain various Hidden components. These prebuilt Hidden components store submission data that includes the name(s) of the account owner, account type, and beneficiaries. When you customize your application, you can add or update as many parameters as you want.
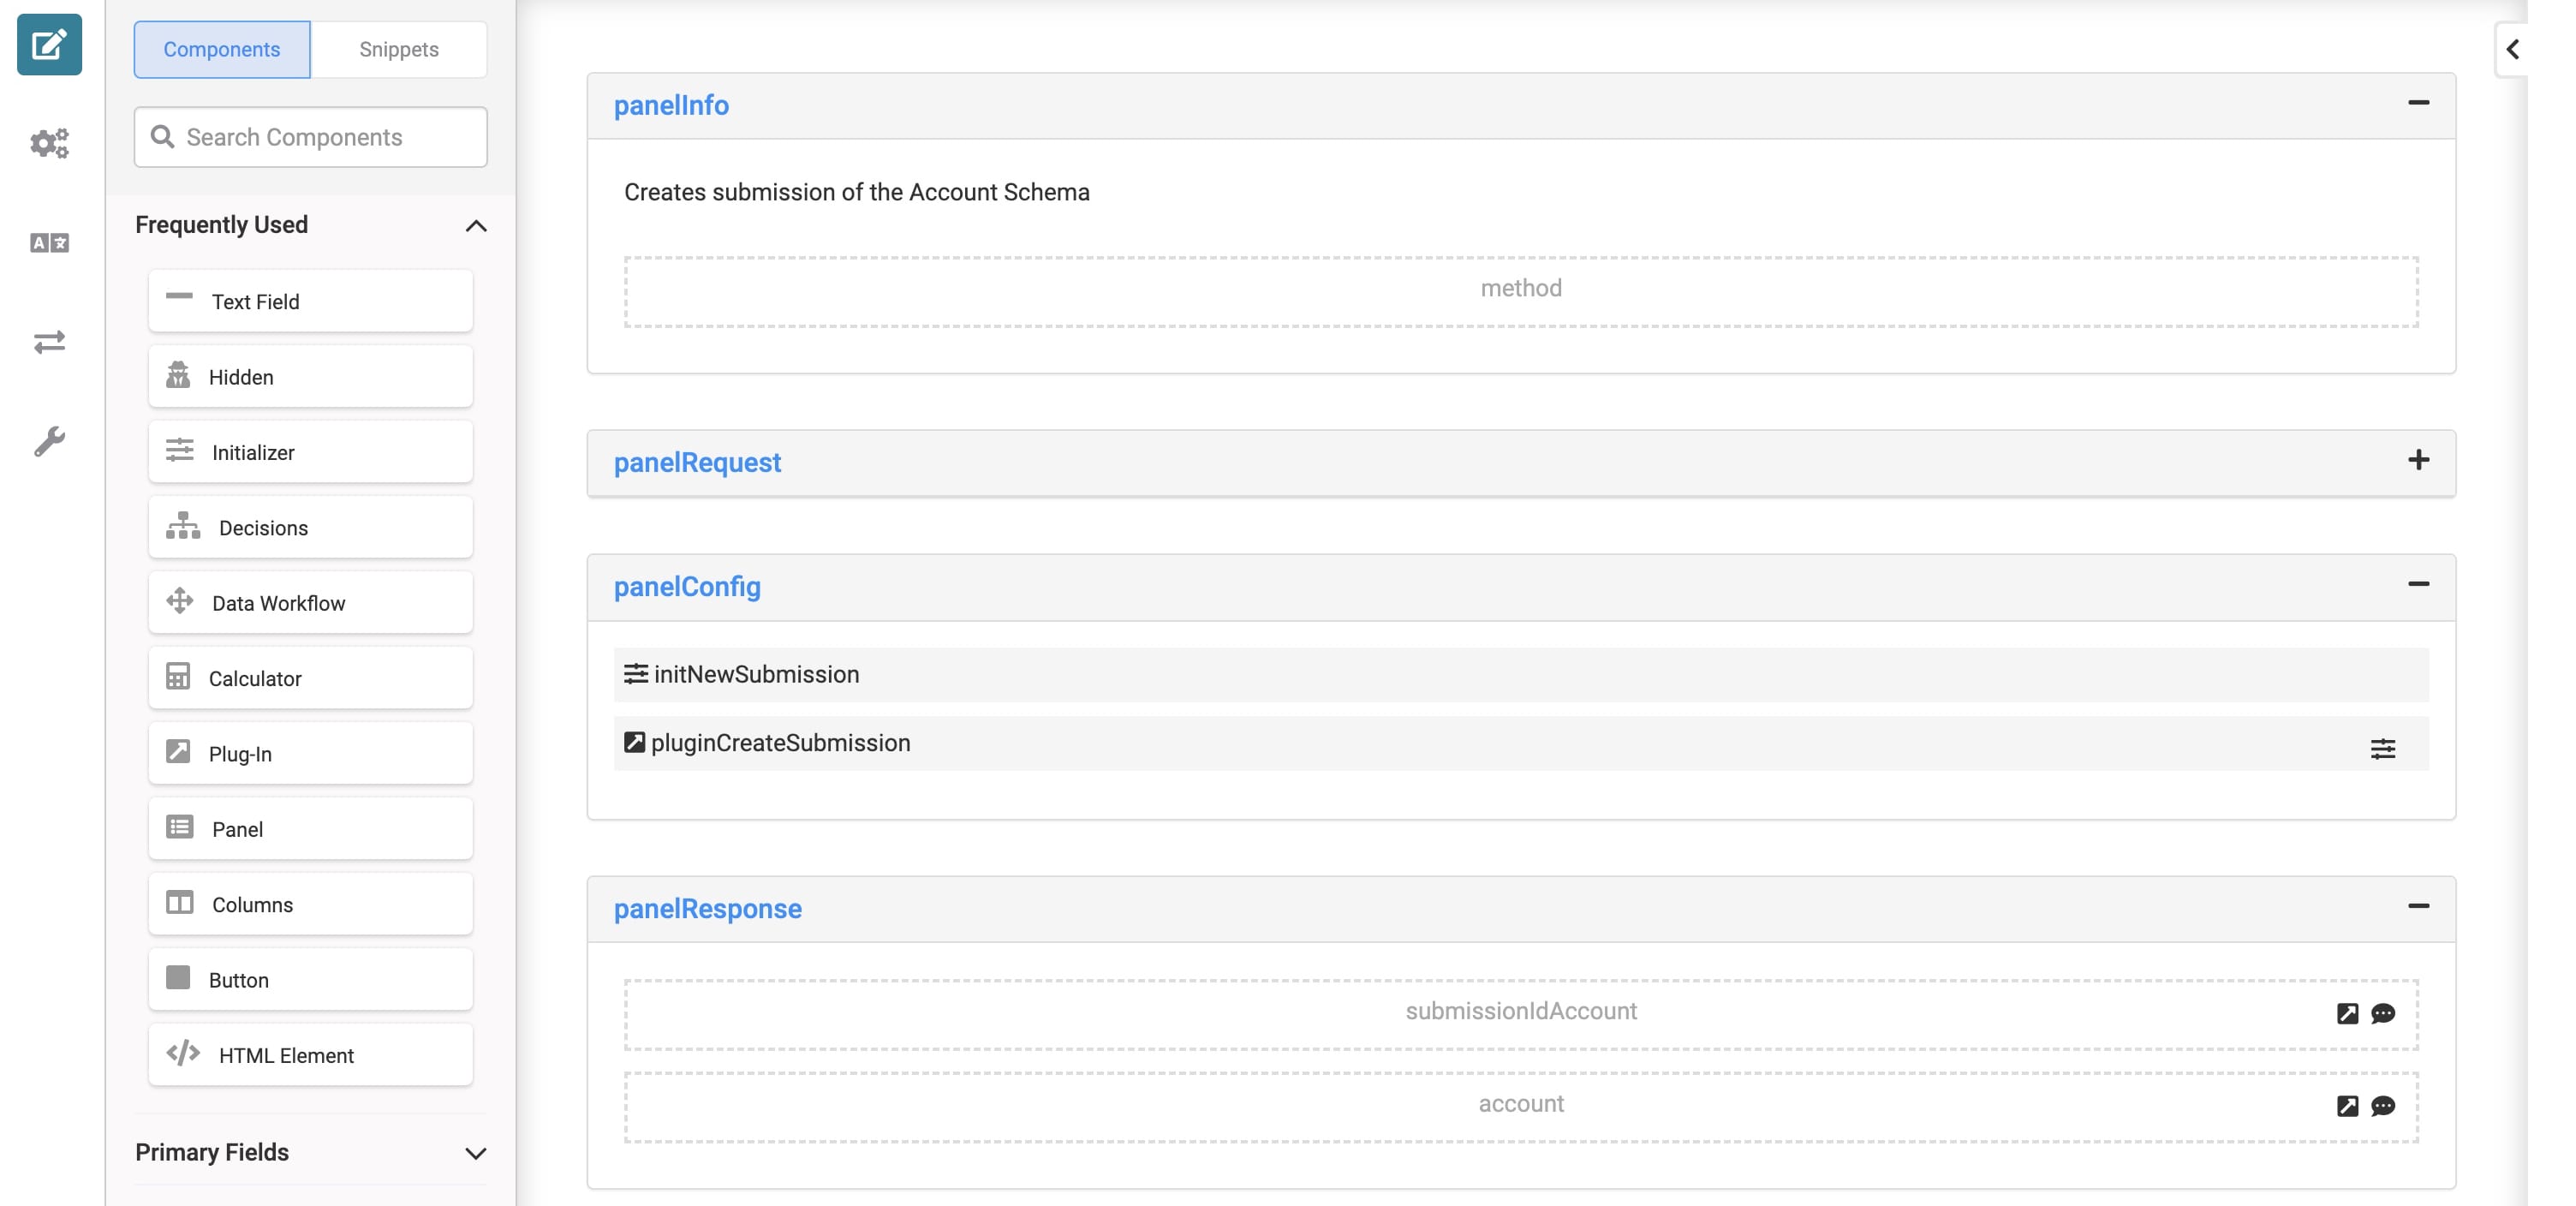
How the Create Account and Client (API) Modules Work
These API modules let you create account and client submissions and store them in their respective schema modules. You can create account and client submissions using either the Client Info: Account Dashboard or the Client Info: Client Dashboard front-end modules. Each front-end module comes with a button that, when clicked, opens a modal to enter information. This button has logic that calls the Client Info: Create Account (API) or Client Info: Create Client (API) module. Each API module has an Initializer component that triggers the module's Plug-In component. The Plug-In takes the information you entered and creates a new submission in its respective schema module.
For example, here's how the Client Info: Create Account (API) module looks in the Module Builder:
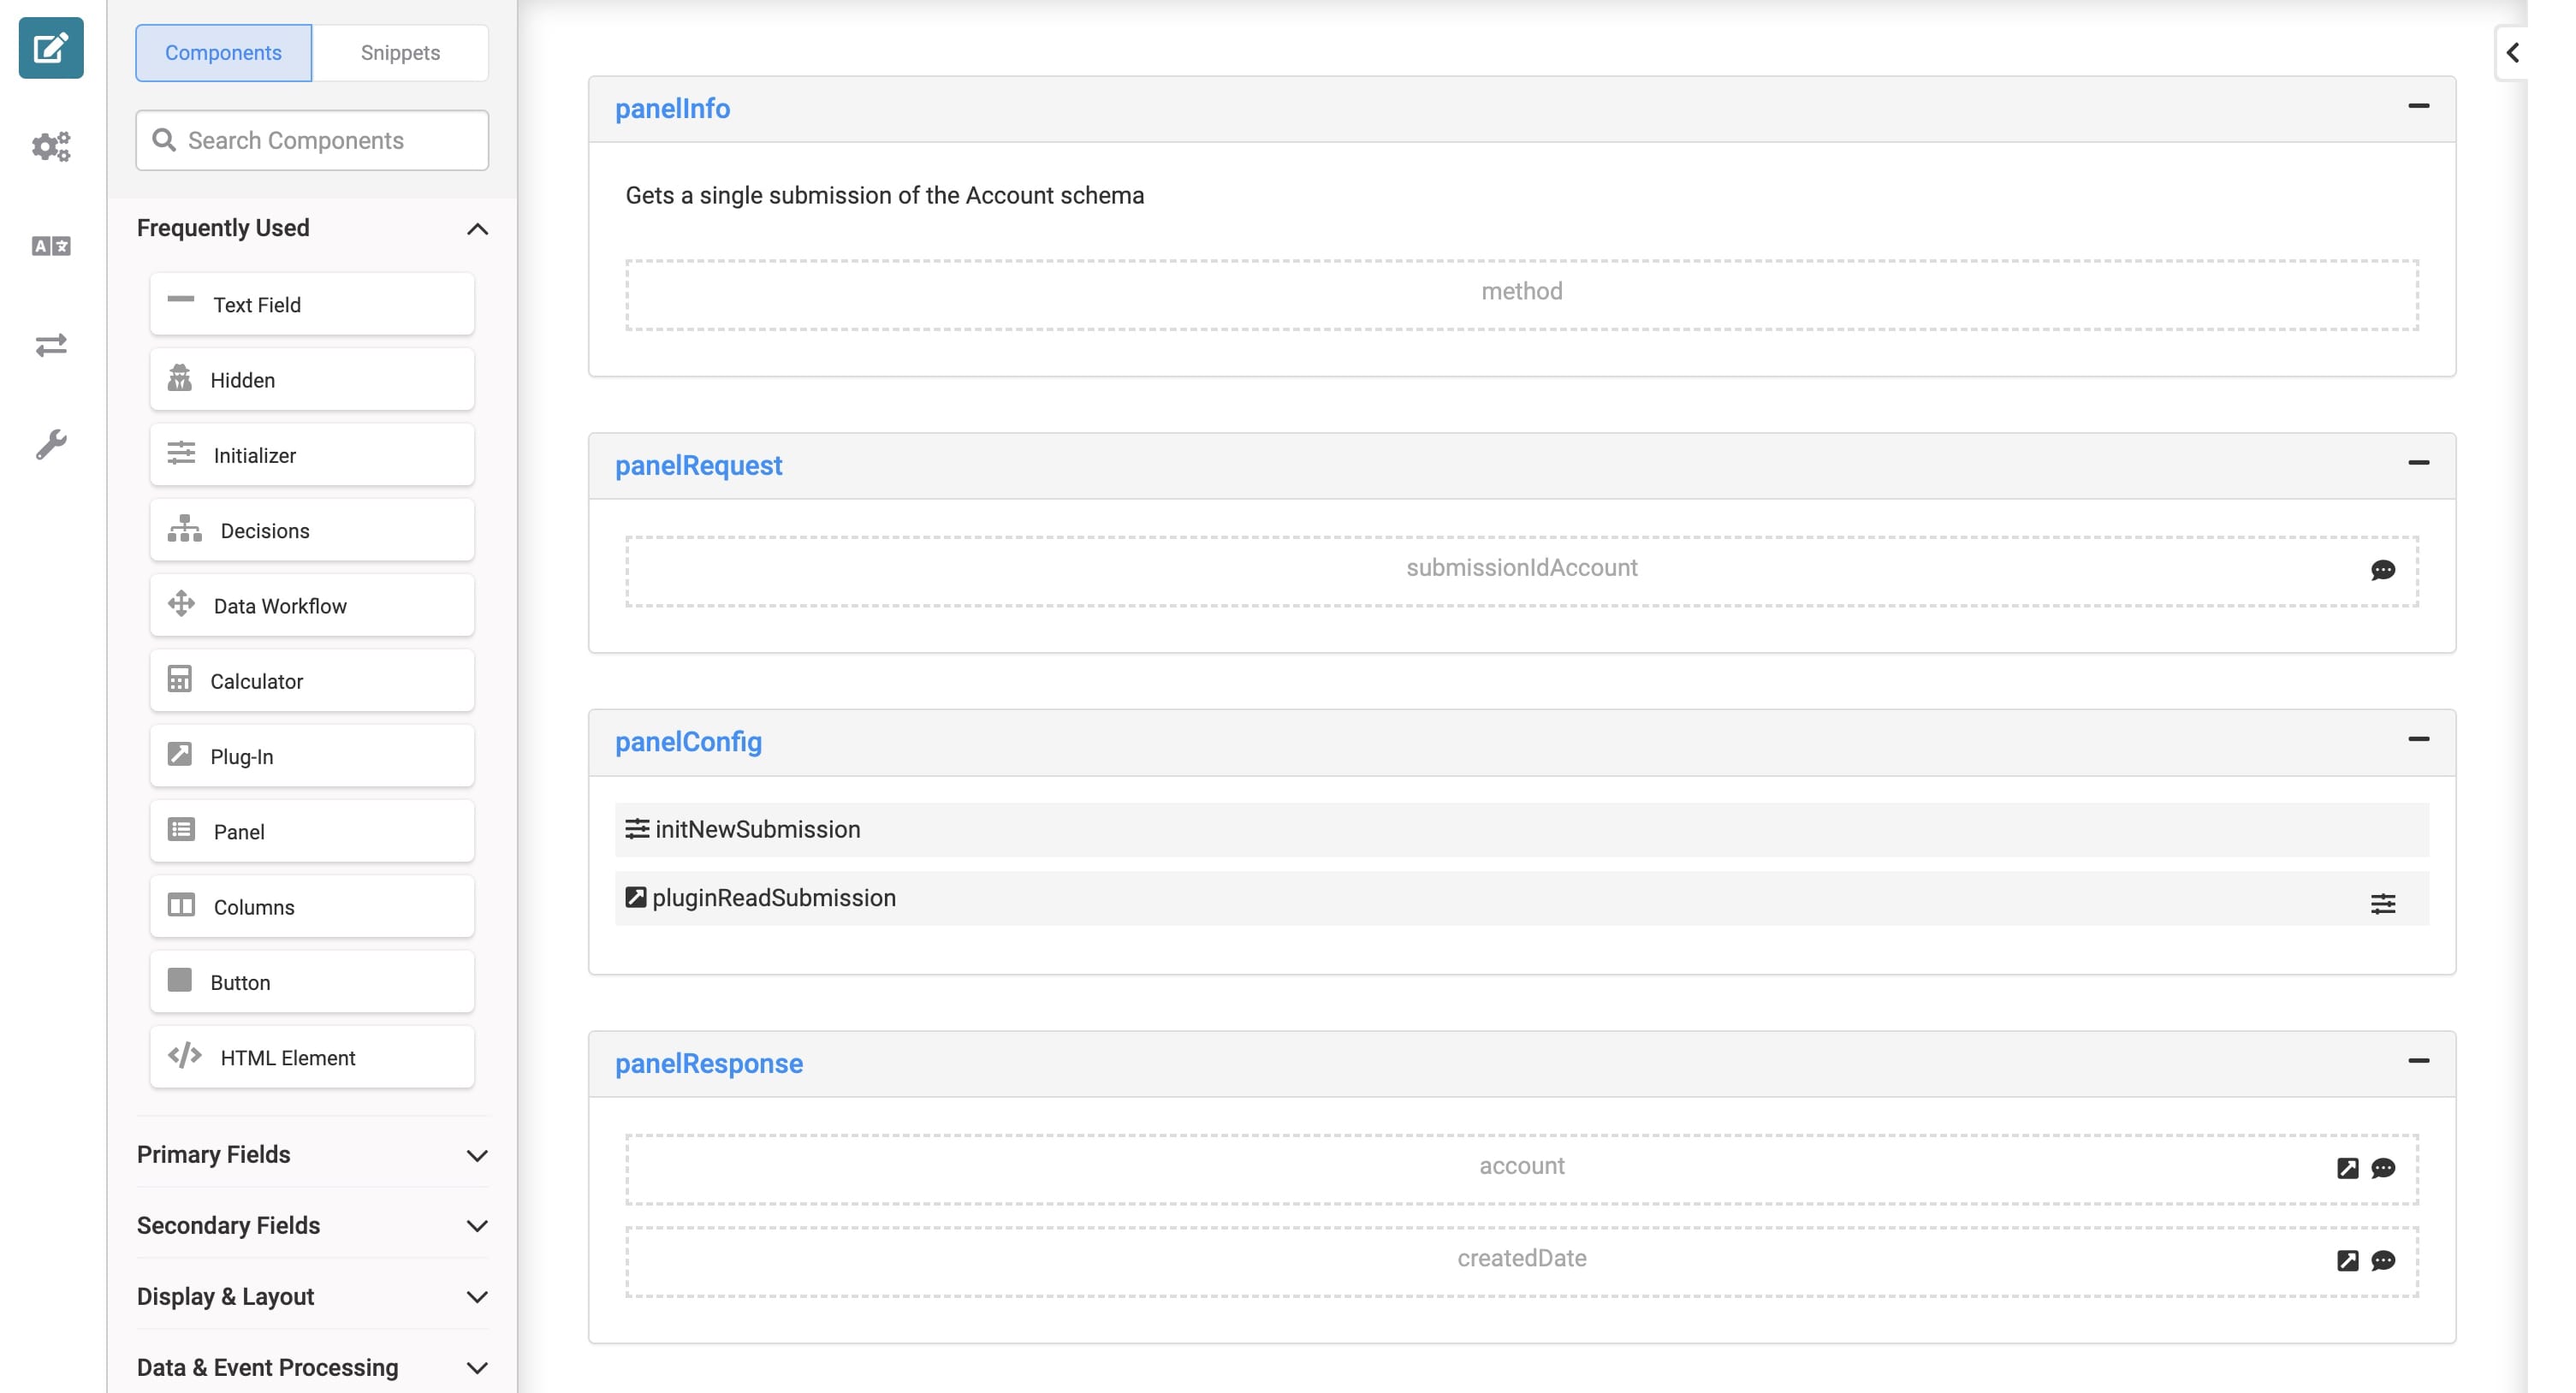
How the Read Single Account and Client (API) Modules Work
These API modules let you retrieve a specific account or client submission from its respective schema module. For example, click View in the Client Info: Account Dashboard module to open a specific account submission. This button triggers logic that passes that schema submission's ID to the Client Info: Read Single Account (API) module. This action fires the Client Info: Read Single Account (API) module's Initializer, which fires the Plug-In component. The Plug-In takes the specified submission ID and retrieves the entire data object of that submission from the Client Info: Account (Schema) module.
For example, here's how the Client Info: Read Single Account (API) module looks in the Module Builder:
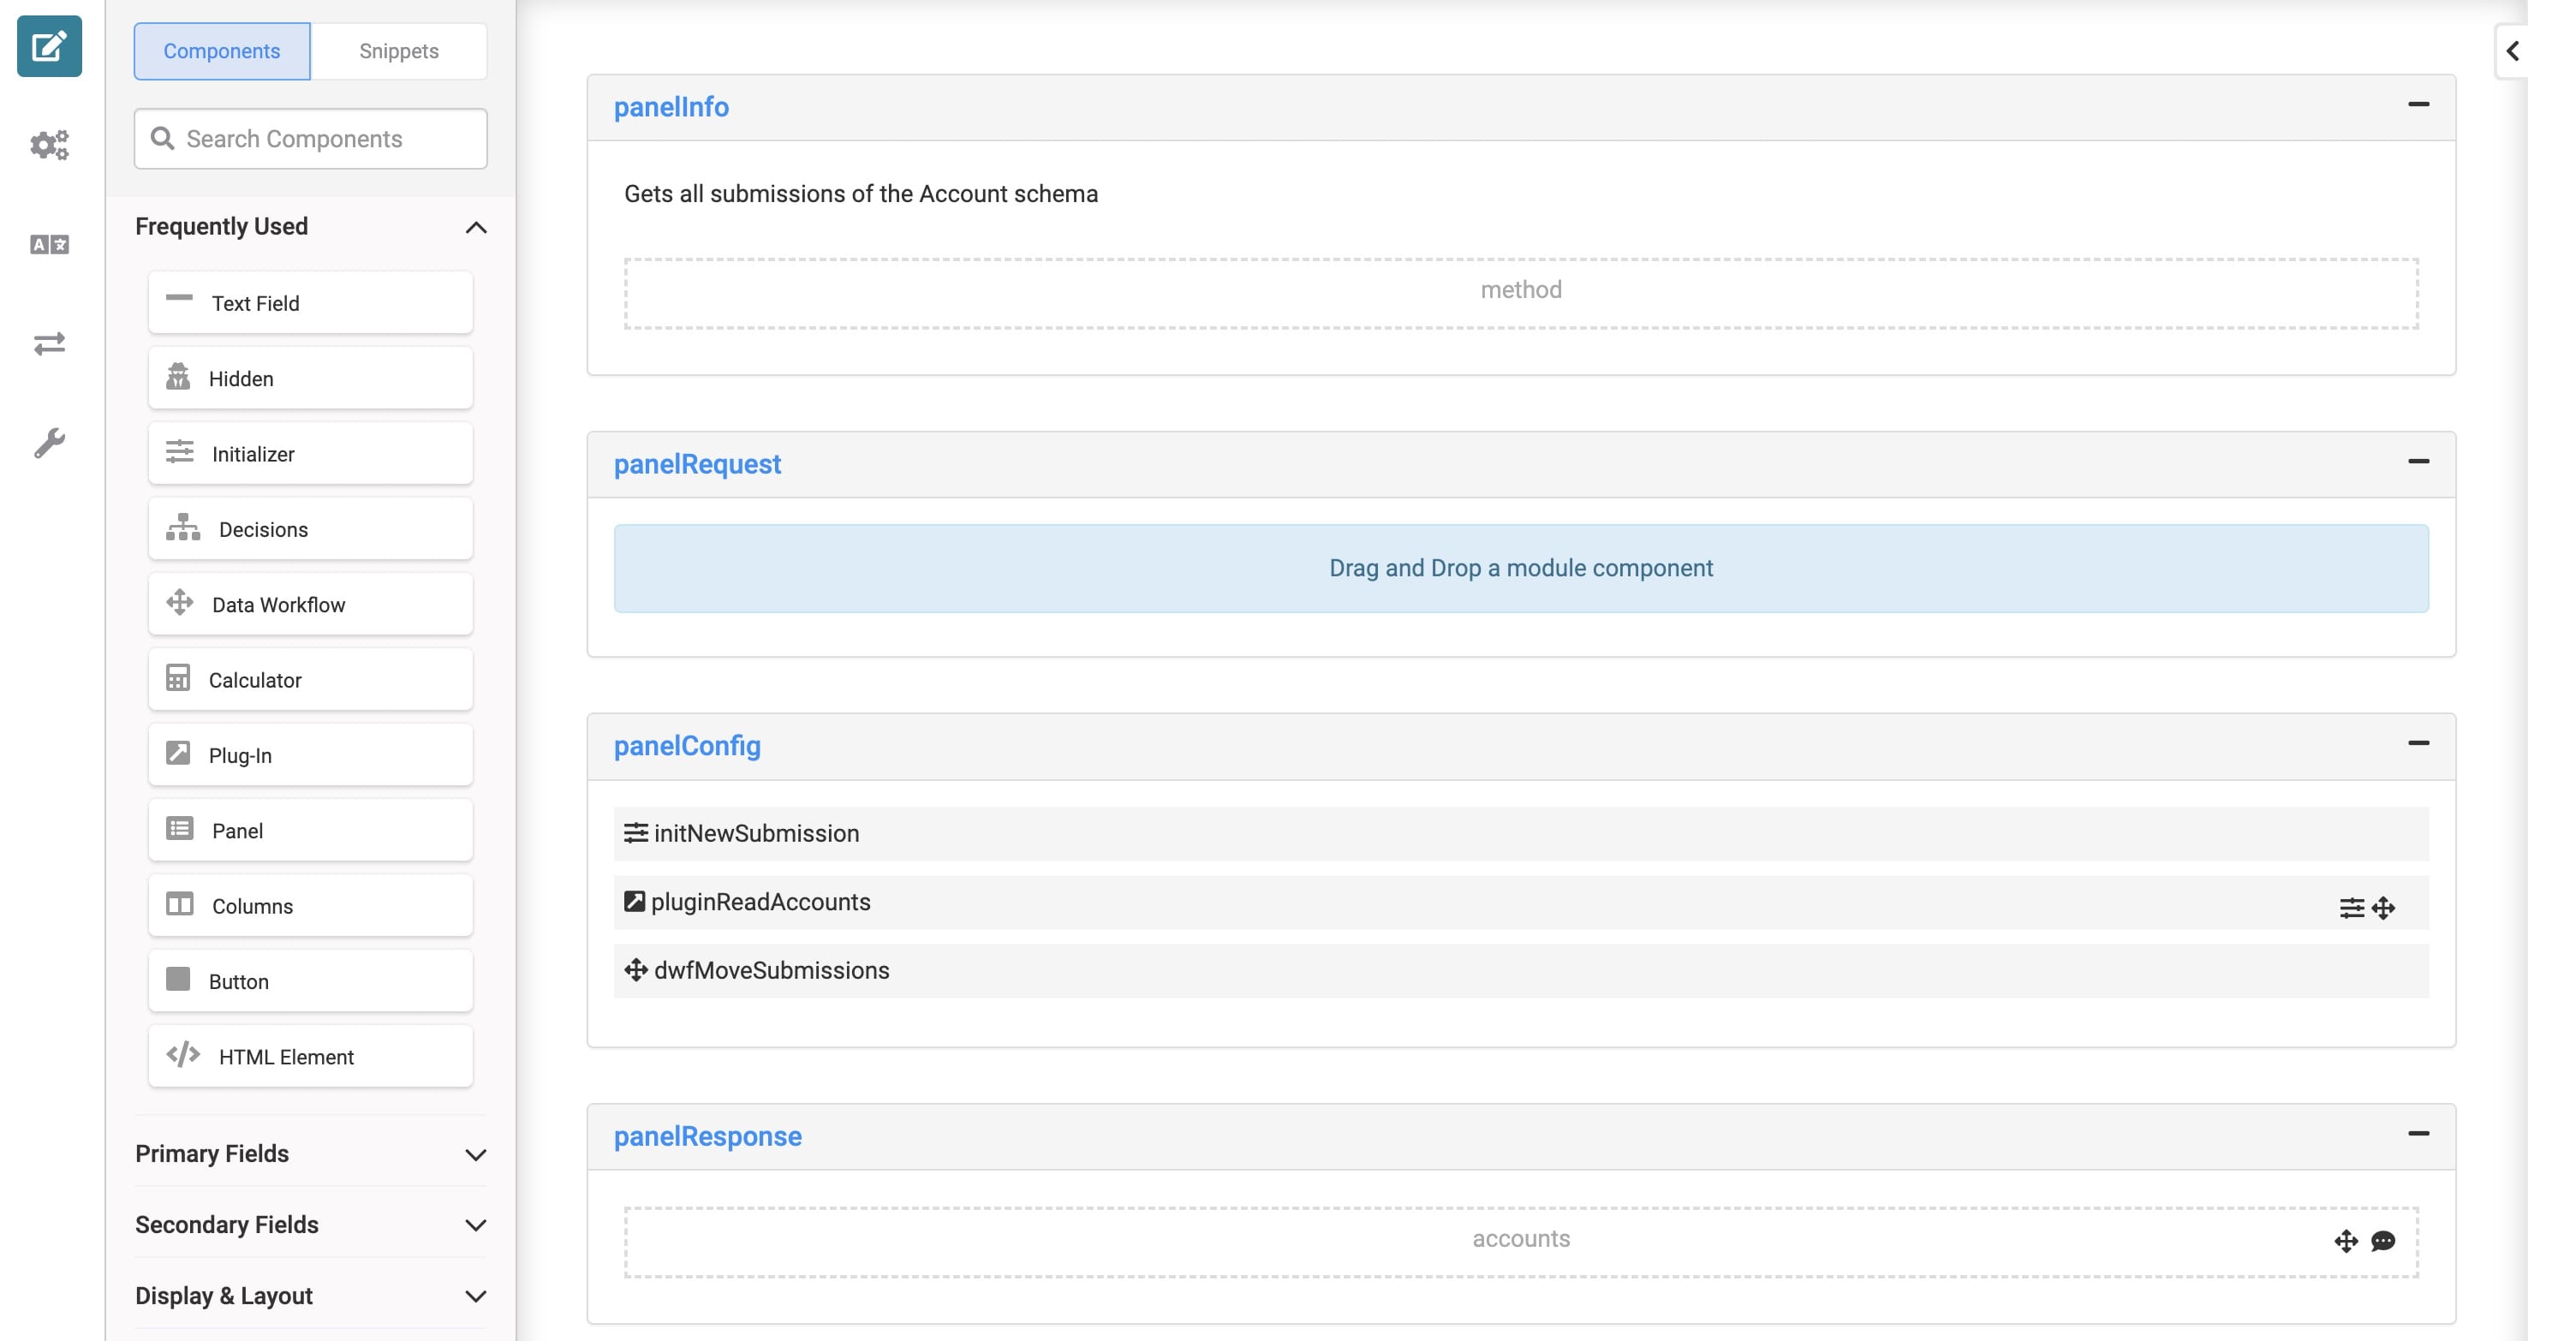
How the Read Multiple Accounts and Clients (API) Modules Work
These modules retrieve all account and client submissions and display them on their respective dashboard modules. When you load your dashboard module in Express View, an Initializer fires a Plug-In component to retrieve the submissions for that specific dashboard.
For example, here's how the Client Info: Read Multiple Accounts (API) module looks in the Module Builder:
How the Update Account and Client (API) Modules Work
These API modules let you overwrite submission information in your account and client schema modules. For example, when you click View on the Client Info: Account Dashboard, an Edit Account button displays at the bottom of the modal. This button calls the Client Info: Update Account (API) module. The module's Initializer fires the Plug-In component and updates the submission in your Client Info: Account (Schema) module.
For example, here's how the Client Info: Update Account (API) module looks in the Module Builder:

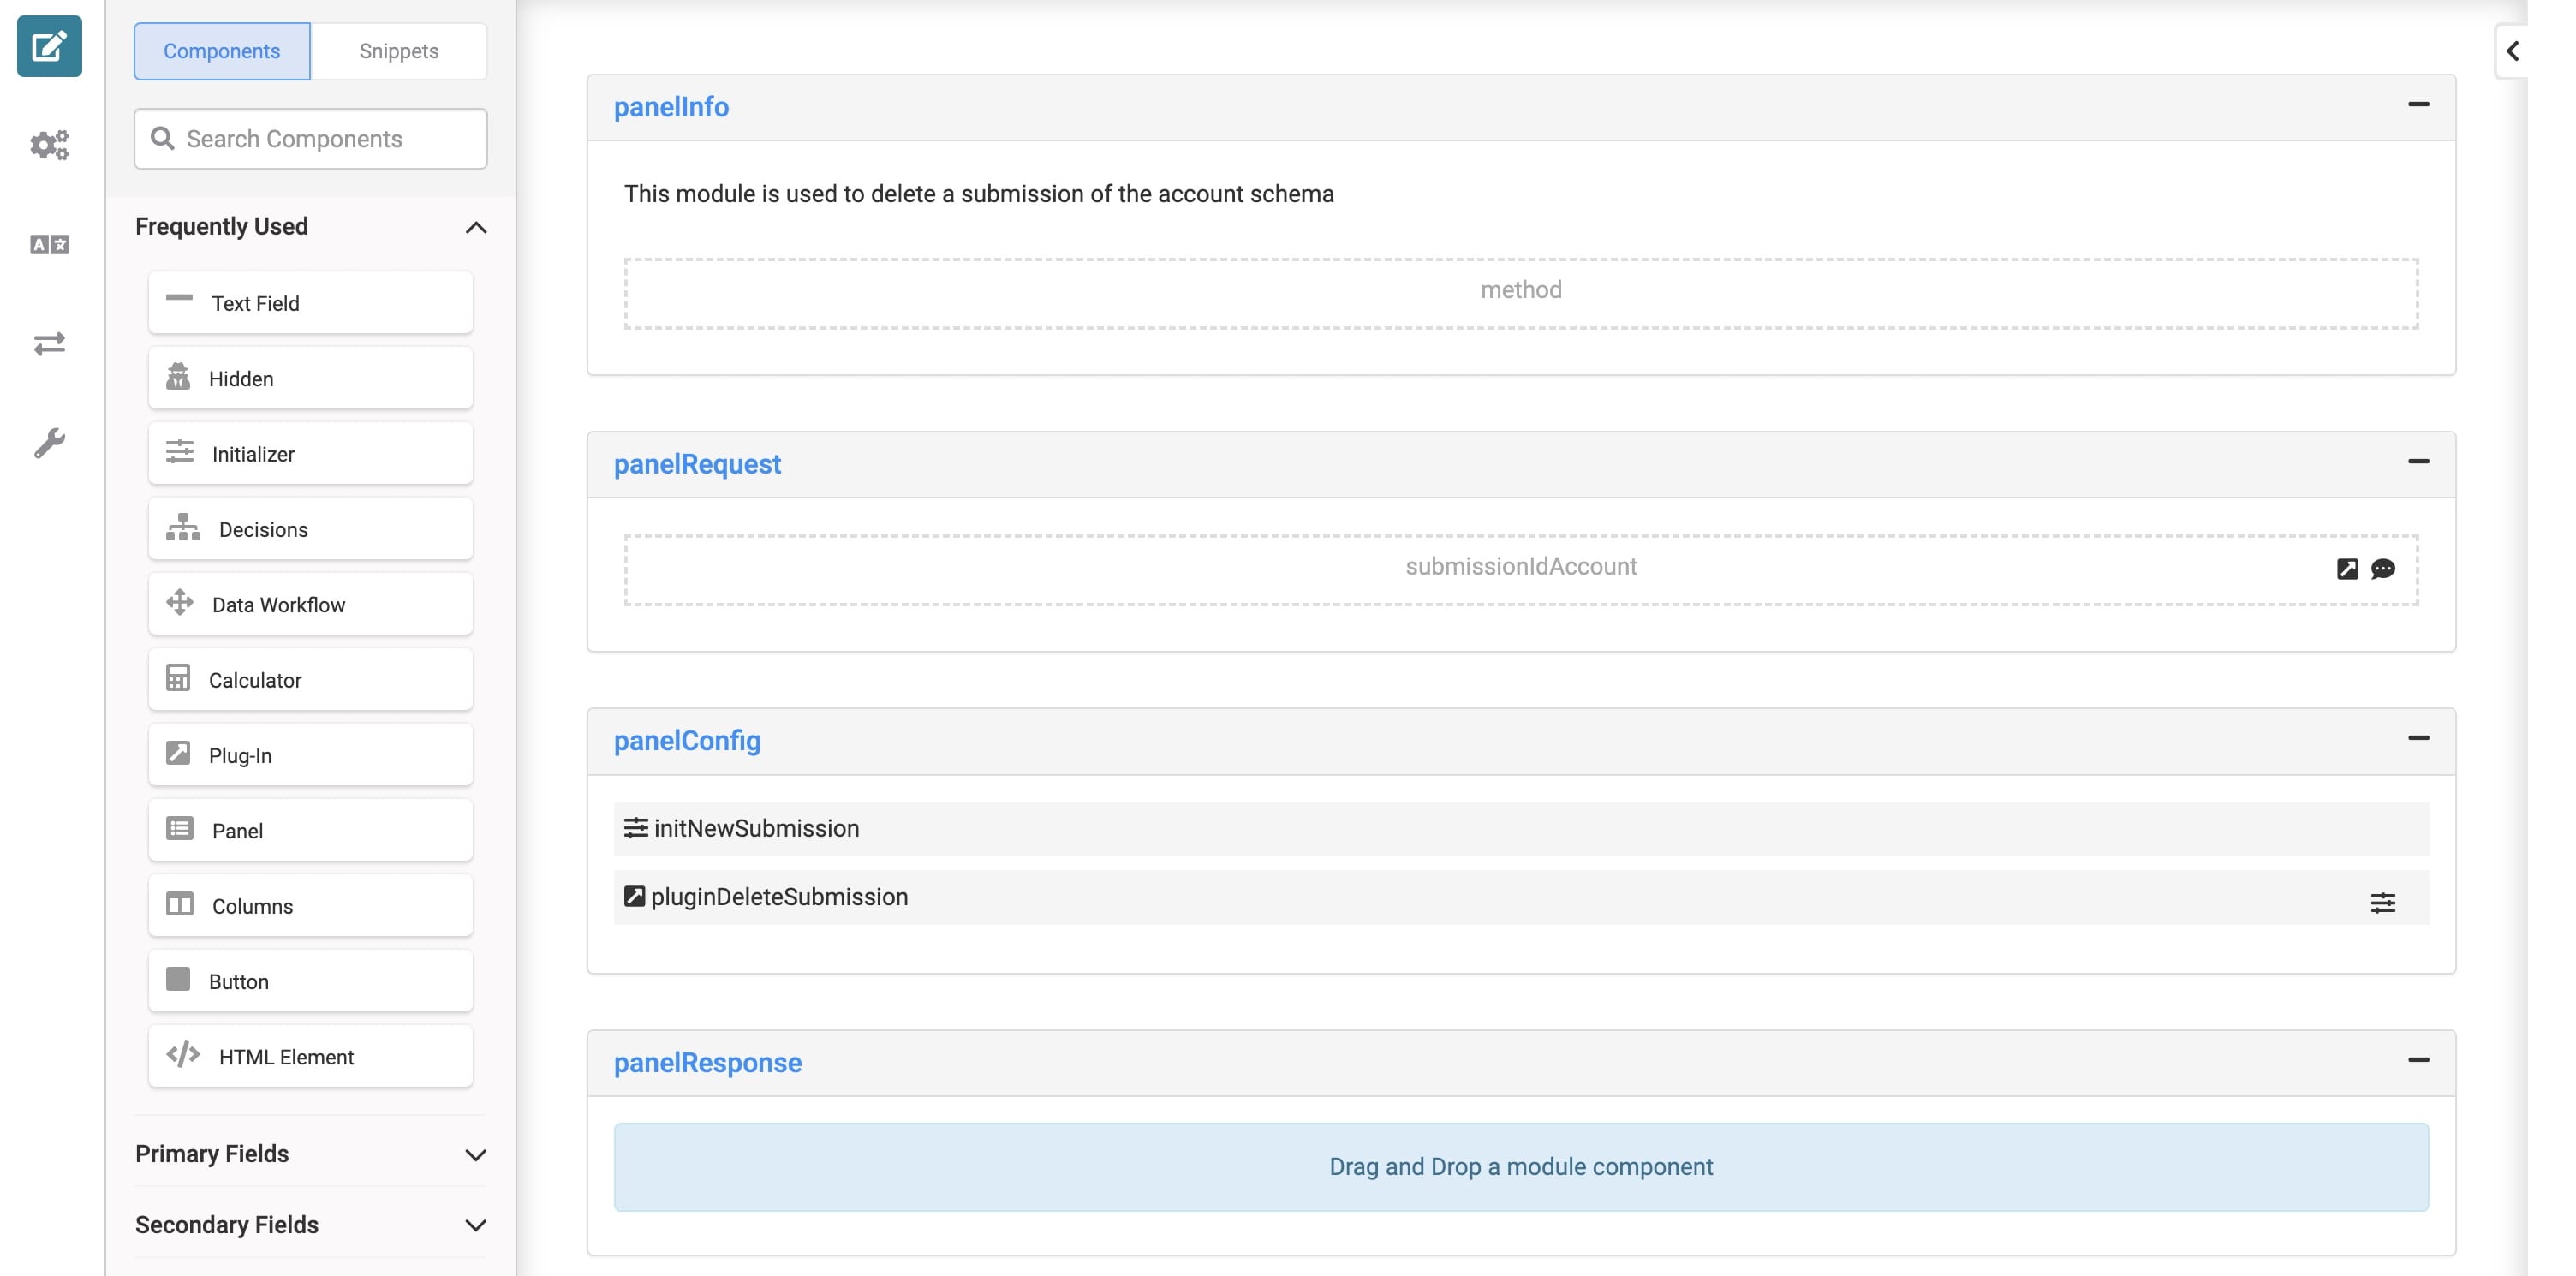
How the Delete Account and Client (API) Modules Work
These API modules let you delete submissions from your account and client schema modules. For example, when you click View on the Client Info: Account Dashboard, a Delete Account button displays at the bottom of the modal. This button calls the Client Info: Delete Account (API) module. The module's Initializer fires the Plug-In component and deletes the submission from your Client Info: Account (Schema) module.
For example, here's how the Client Info: Delete Account (API) module looks in the Module Builder:
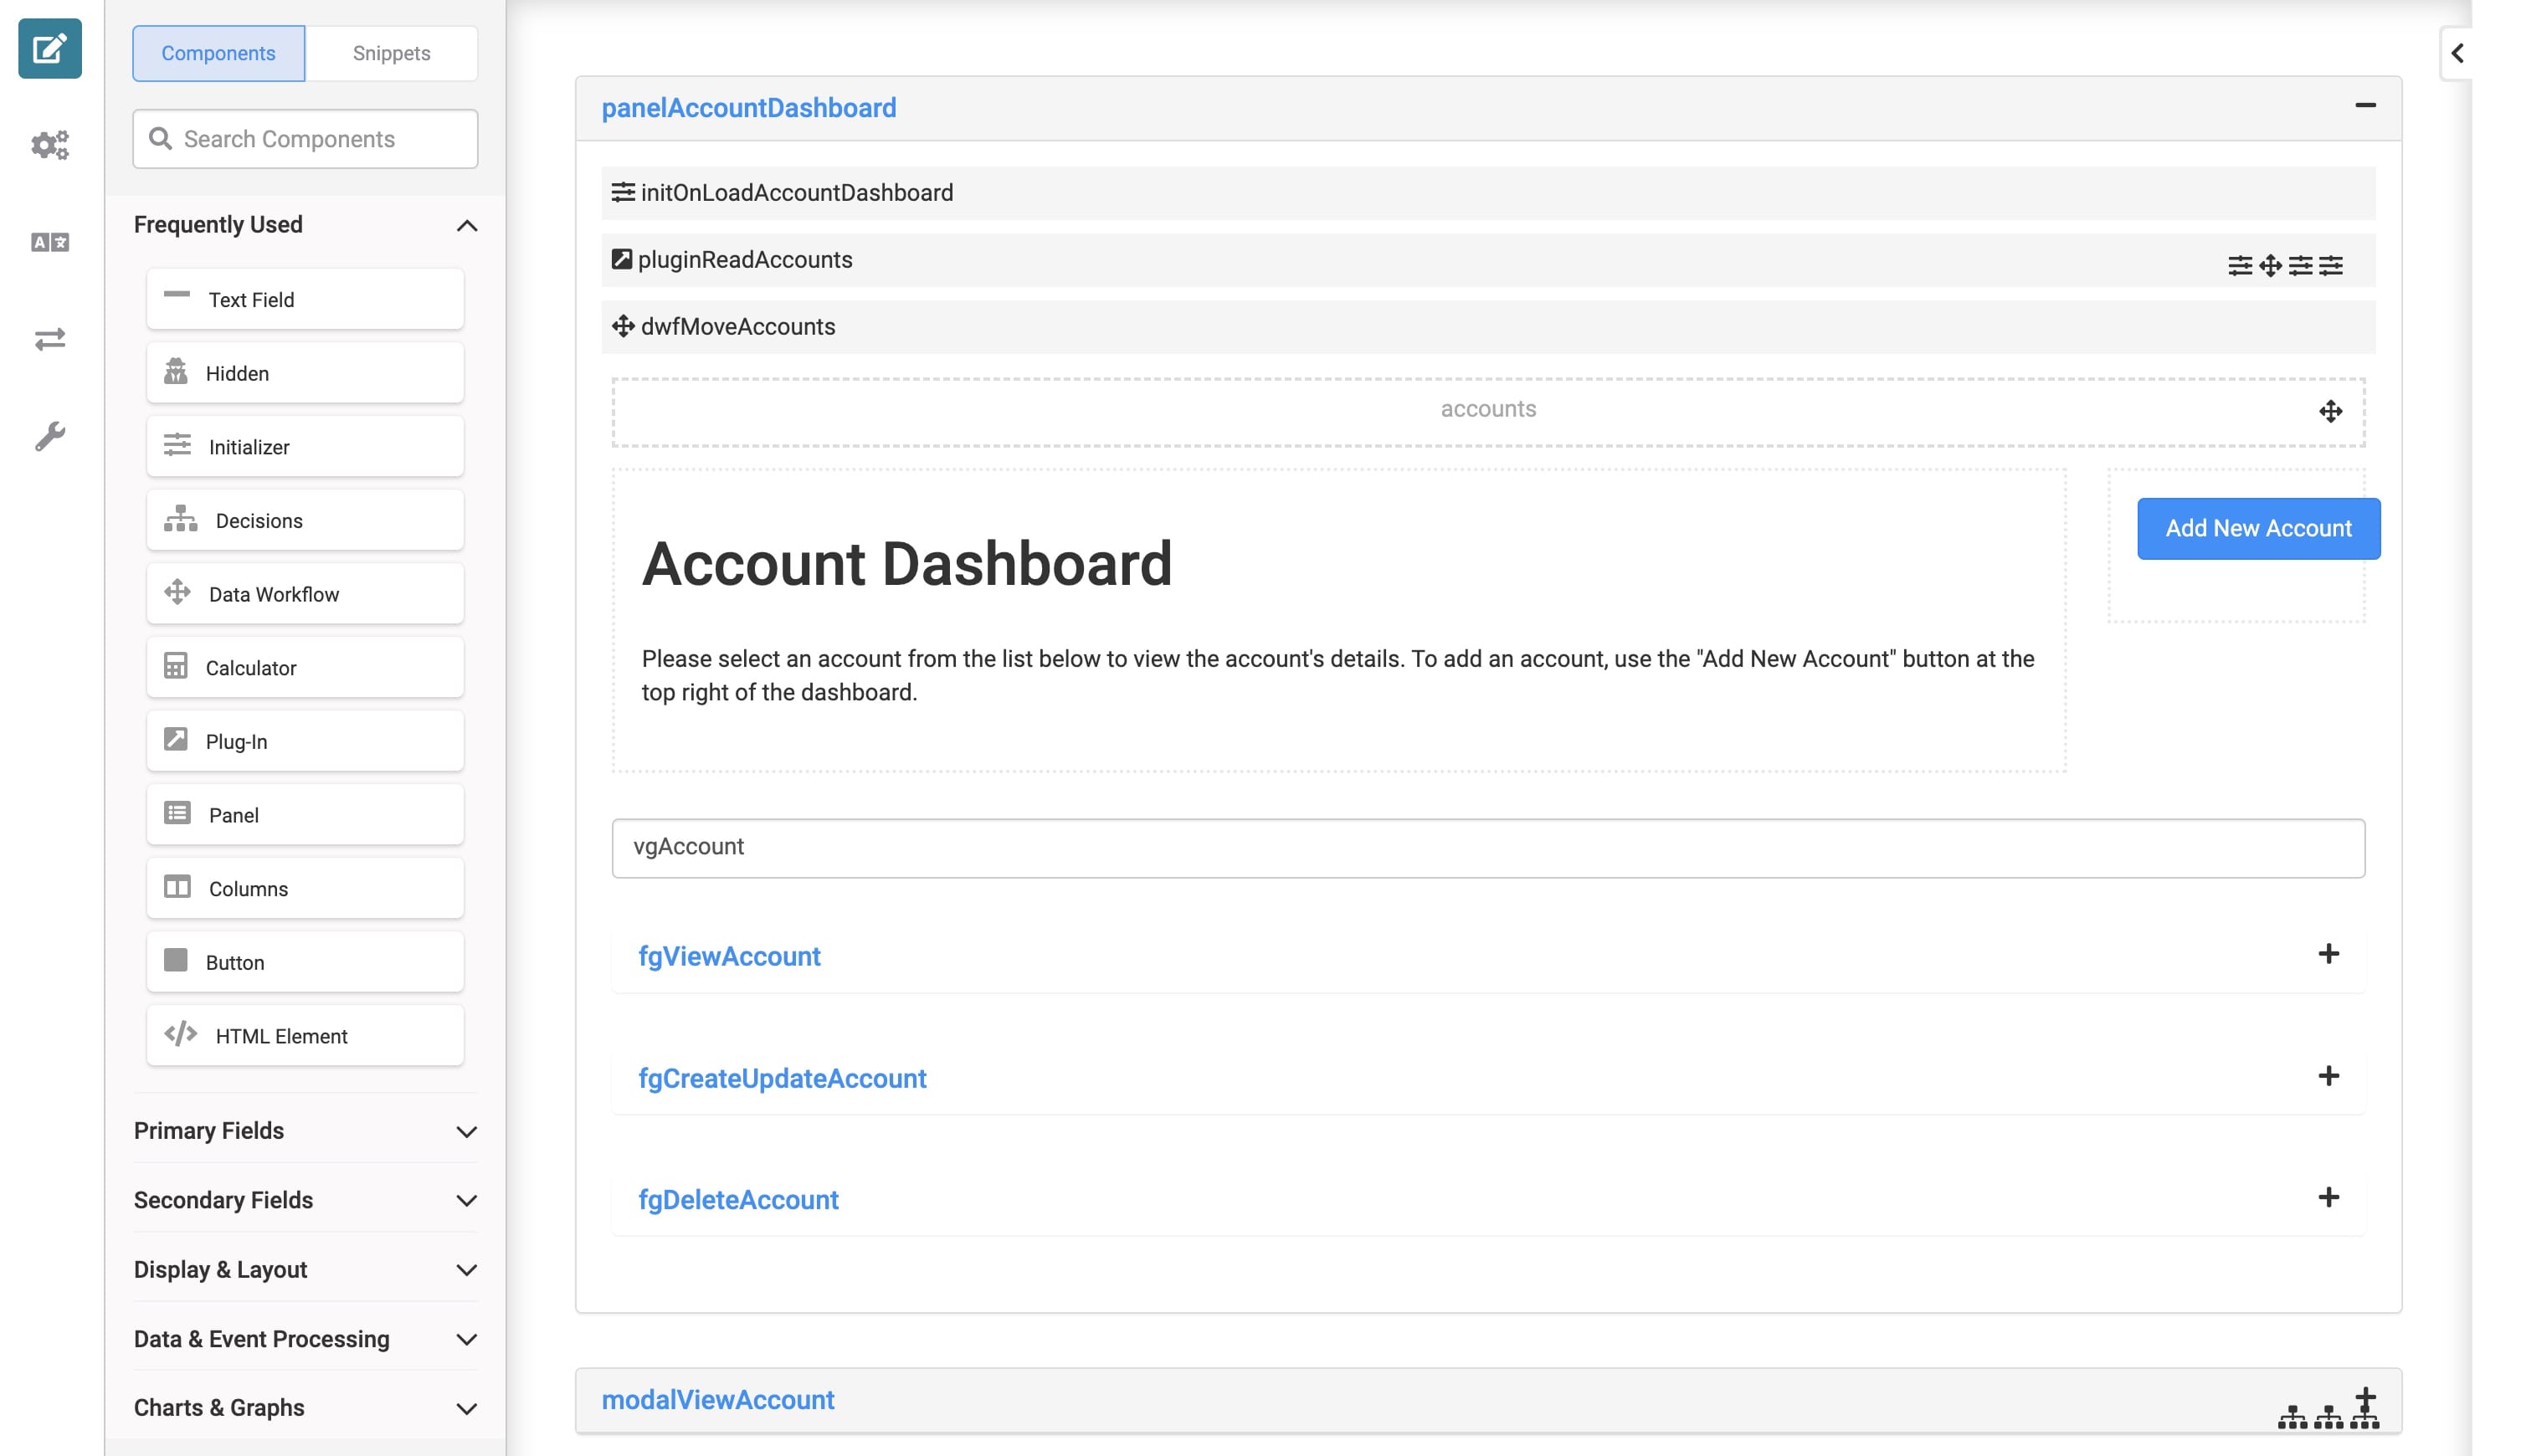
How the Account and Client Dashboard Modules Work
These two front-end admin modules let you enter account and client information. These modules communicate with all the API modules of the Client Information template. Then, those API modules connect directly to the schema modules. They work together to show the most up-to-date submissions on your dashboards.
As configured, the Client Info: Account Dashboard displays only account ID, account ownership, account type, and suitability score in Express View. And the Client Info: Client Dashboard only displays client ID, first name, last name, and email address. These dashboard modules let you add new accounts and clients if you click the Add New Account and Add New Client buttons. If you click View next to any account or client, you can view, edit, or delete submissions.
For example, here's how the Client Info: Account Dashboard module looks in the Module Builder:
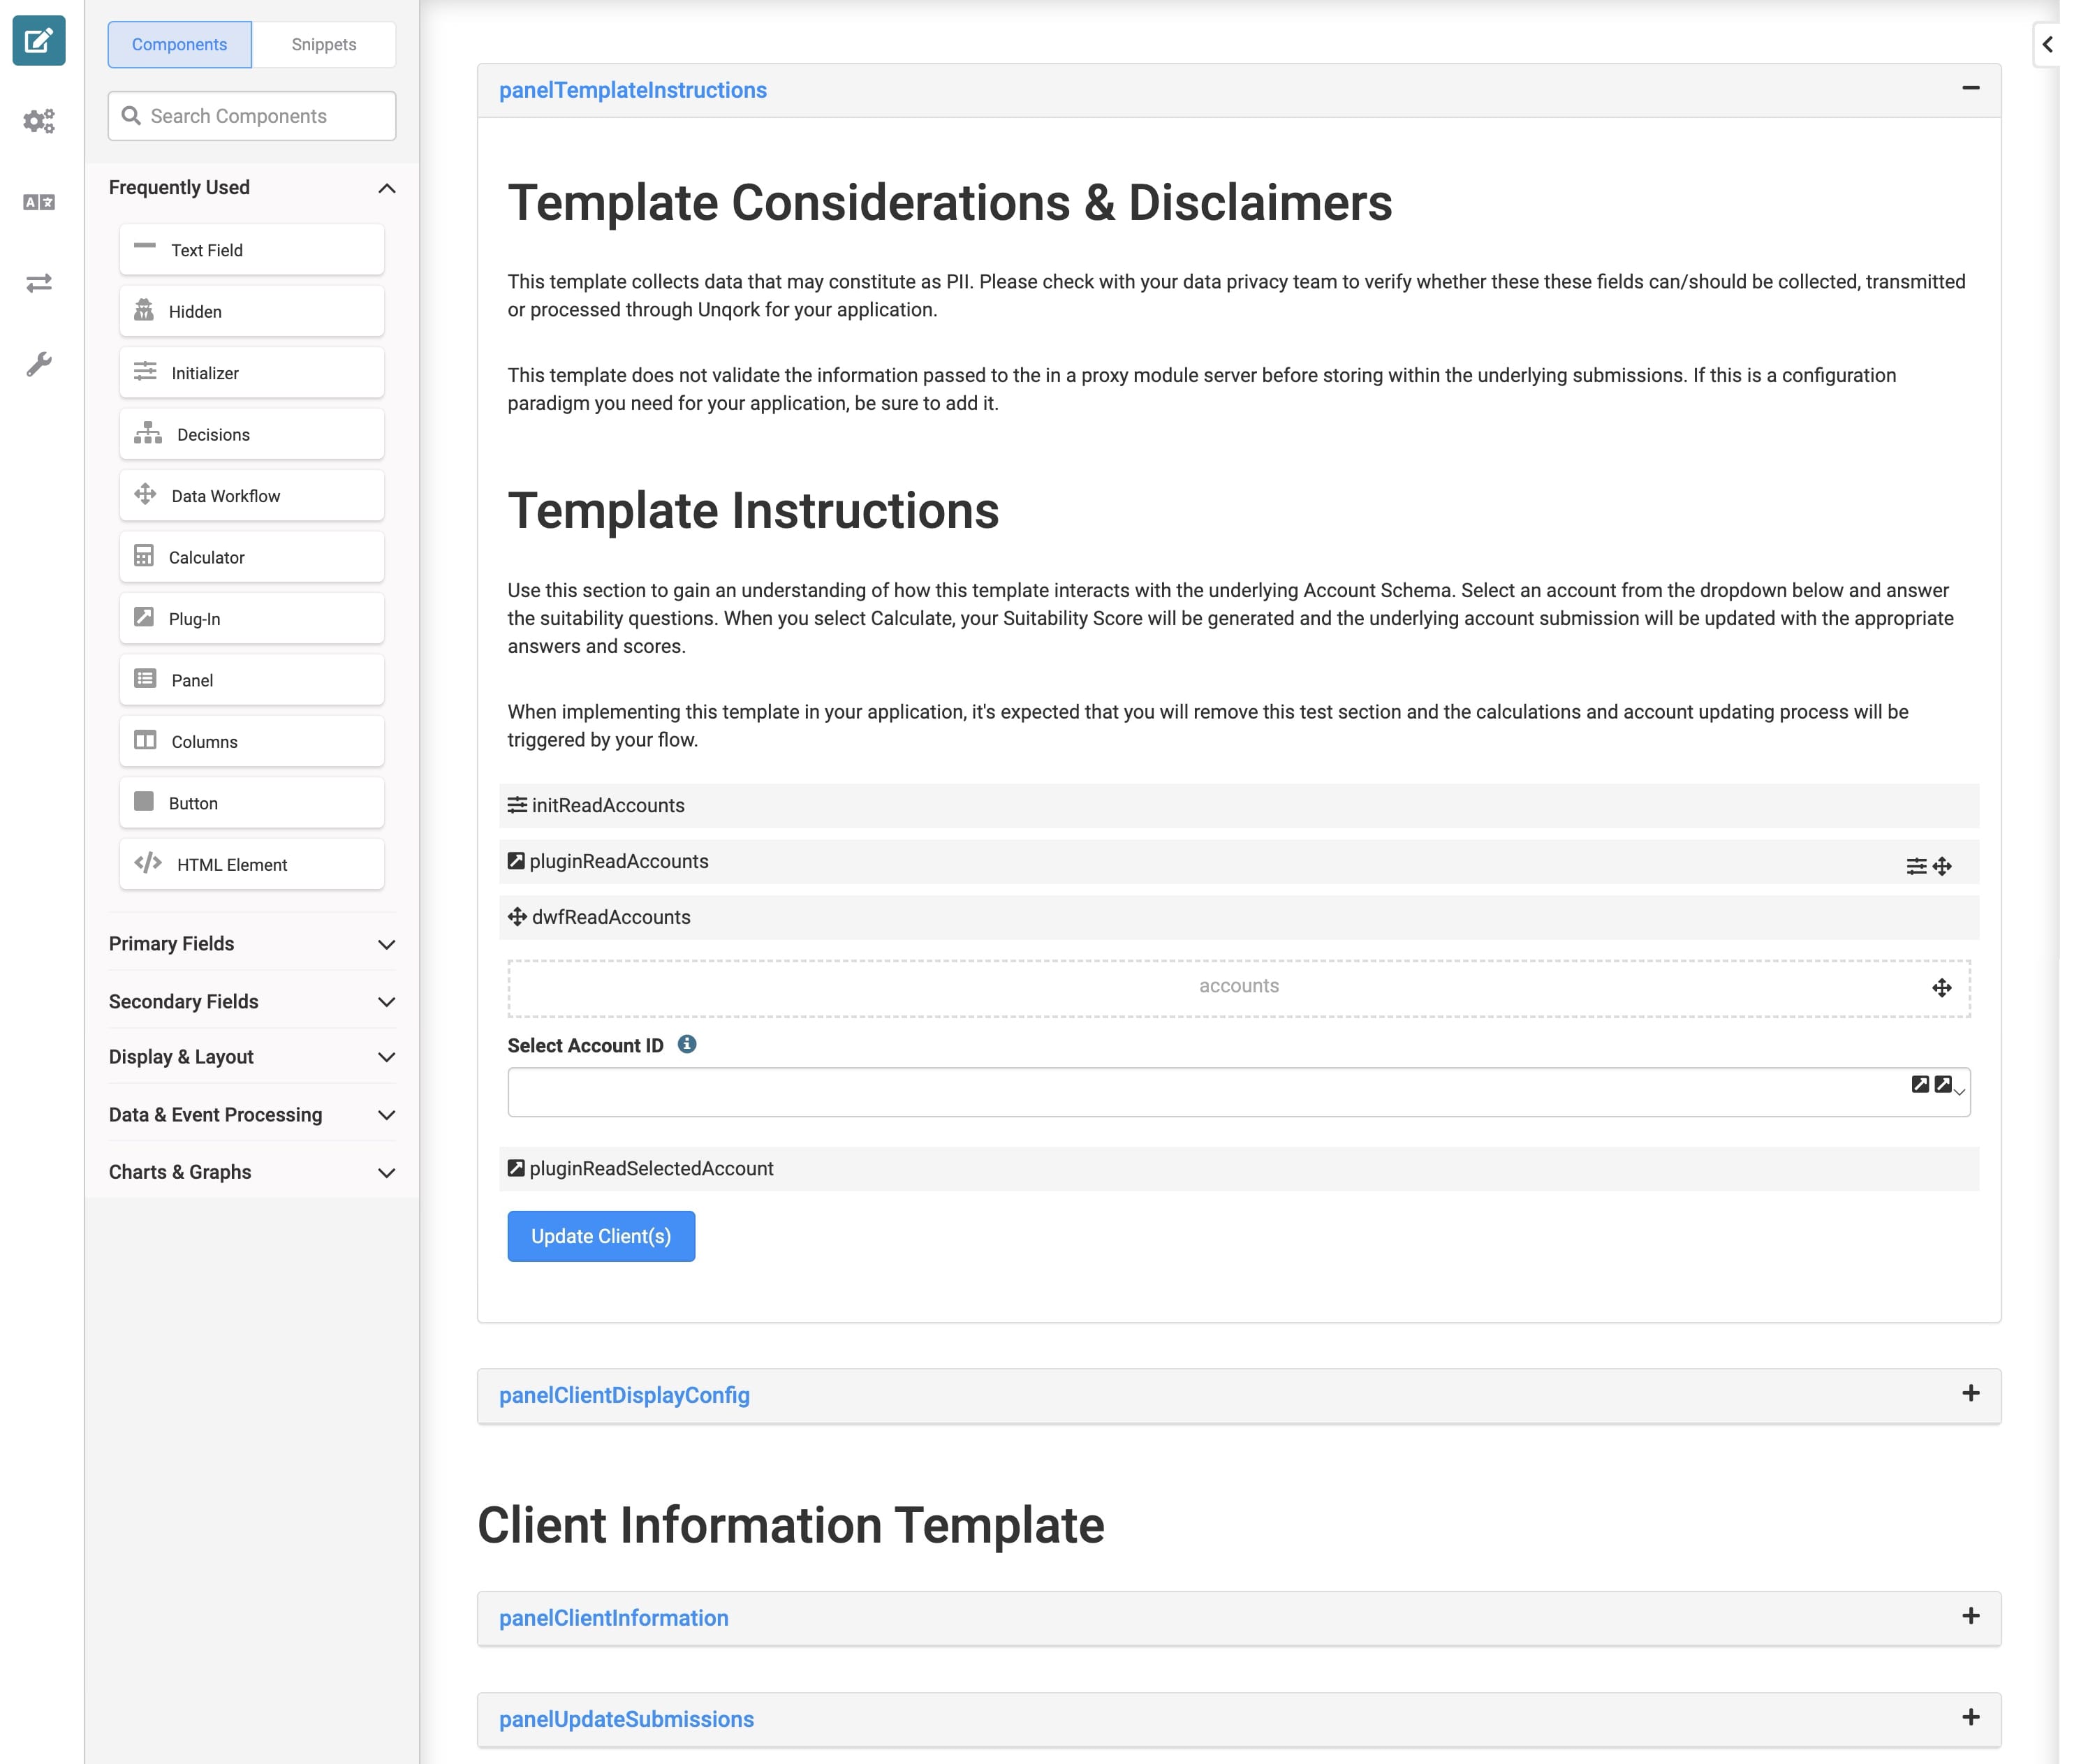
How the Client Information Template Module Works
Finally, this main front-end admin module pulls all the account and client submissions together. Filter for a specific account to display the account type, along with the client(s) associated with the account. This module displays all account and client information using various Plug-In components to trigger the read API modules. After selecting an account to view, you can make any changes to the account and client information. Making a call to all the template's update API modules lets you update all account and client submissions from this one module.
Here's how the Client Info: Client Information Template module looks in the Module Builder:
Configuring the Template
Every creator's and customer's needs are different, so this application template has no preset RBAC. That way, you can configure RBAC that makes sense for you and your customers. RBAC is the most secure way to ensure users have the correct application permissions.
Most of this application template consists of back-end functionality with API and schema modules. So, ensure your RBAC settings reflect the roles you want accessing these modules.
To learn more about Module Builder Settings, view our Module Builder Settings Sidebar Option article.
Customizing the Template
The Client Information template is a preconfigured guide for an account onboarding process. It's built specifically with individual and joint accounts in mind. You can import this module directly into your workflow or use it as a guide for your own system. You can also configure it in an application with the Investment Preferences and Fund Selection templates. Use the Client Info: Client Information Template module to ensure your configuration changes work correctly. Or, use it as your single-source admin module for making account and client submission edits.
Testing the Template
There is plenty of room to configure the Client Information templatebut by default, it's fully functional. To give you an idea of how the template works, look at this example. In this example, create a joint account with two owners.
Creating Two Clients
First, open the Client Info: Client Dashboard module in Express View. Click Add New Client and enter information to create two clients. After adding the information, click Create Client at the bottom of the modal to display those clients in the dashboard. Copy the two Client IDs for the next part. These IDs are your Primary and Joint Client submission IDs.
Creating a Joint Account
Next, create a joint account using the Client Info: Account Dashboard module.
To create a joint account for your two new clients:
| 1. | Open the Client Info: Account Dashboard module in Express View. |
| 2. | At the top-right of the dashboard, click Add New Account. |
| 3. | Set the Account Ownership as Joint. |
| 4. | Select an Account Type. |
| 5. | In the SubmissionID Primary Client field, paste the Client ID of the client you want to be the primary owner. |
| 6. | In the SubmissionID Joint Client field, paste the Client ID of the client you want to be the joint owner. |
| 7. | In the other account fields, enter any information you want. |
| 8. | Click Create Account. |
Your new account displays in the dashboard. Make a note of the Account ID for the next step.
Viewing the Joint Account and Owners
Lastly, you can use the Client Info: Client Information Template module to view and update your account and owners.
To view and edit account owners:
| 1. | Open the Client Info: Client Information Template module in Express View. |
| 2. | From the Select Account ID drop-down, select the Account ID of your new joint account. |
When you scroll down the page, a heading displays showing you that this account is a joint account. The primary owner information displays below this heading and the joint owner information displays below that. If applicable, make any changes to the client information and click Update Client(s).
Making an individual account is even easier. You only need one Client ID. From the Client Info: Account Dashboard module, select the Individual Account Ownership option. In the SubmissionID Primary Client field, enter the Client ID.
Resources
