Data Model and CRUD Application Template
About this Configuration Guide
This guide covers setting up the Data Model and CRUD application template. CRUD stands for Create, Read, Update, and Delete. Using this guide, you'll explore how each module of this template works. You'll learn how to install the template in your environment and how to build an application from it. Plus, we'll walk you through how to customize your application. This way, you can adjust your application to fit your needs.
In total, this application template has 7 modules. There's a schema module that stores submissions. Then, there are 5 back-end API modules. These work behind-the-scenes to create, read, update, delete, and list your schema submissions. On the front-end, there's a dashboard module that brings all the CRUD functions together. We'll go into each of the template's modules in more detail. For now, here's a chart with the architectural layout of these modules:
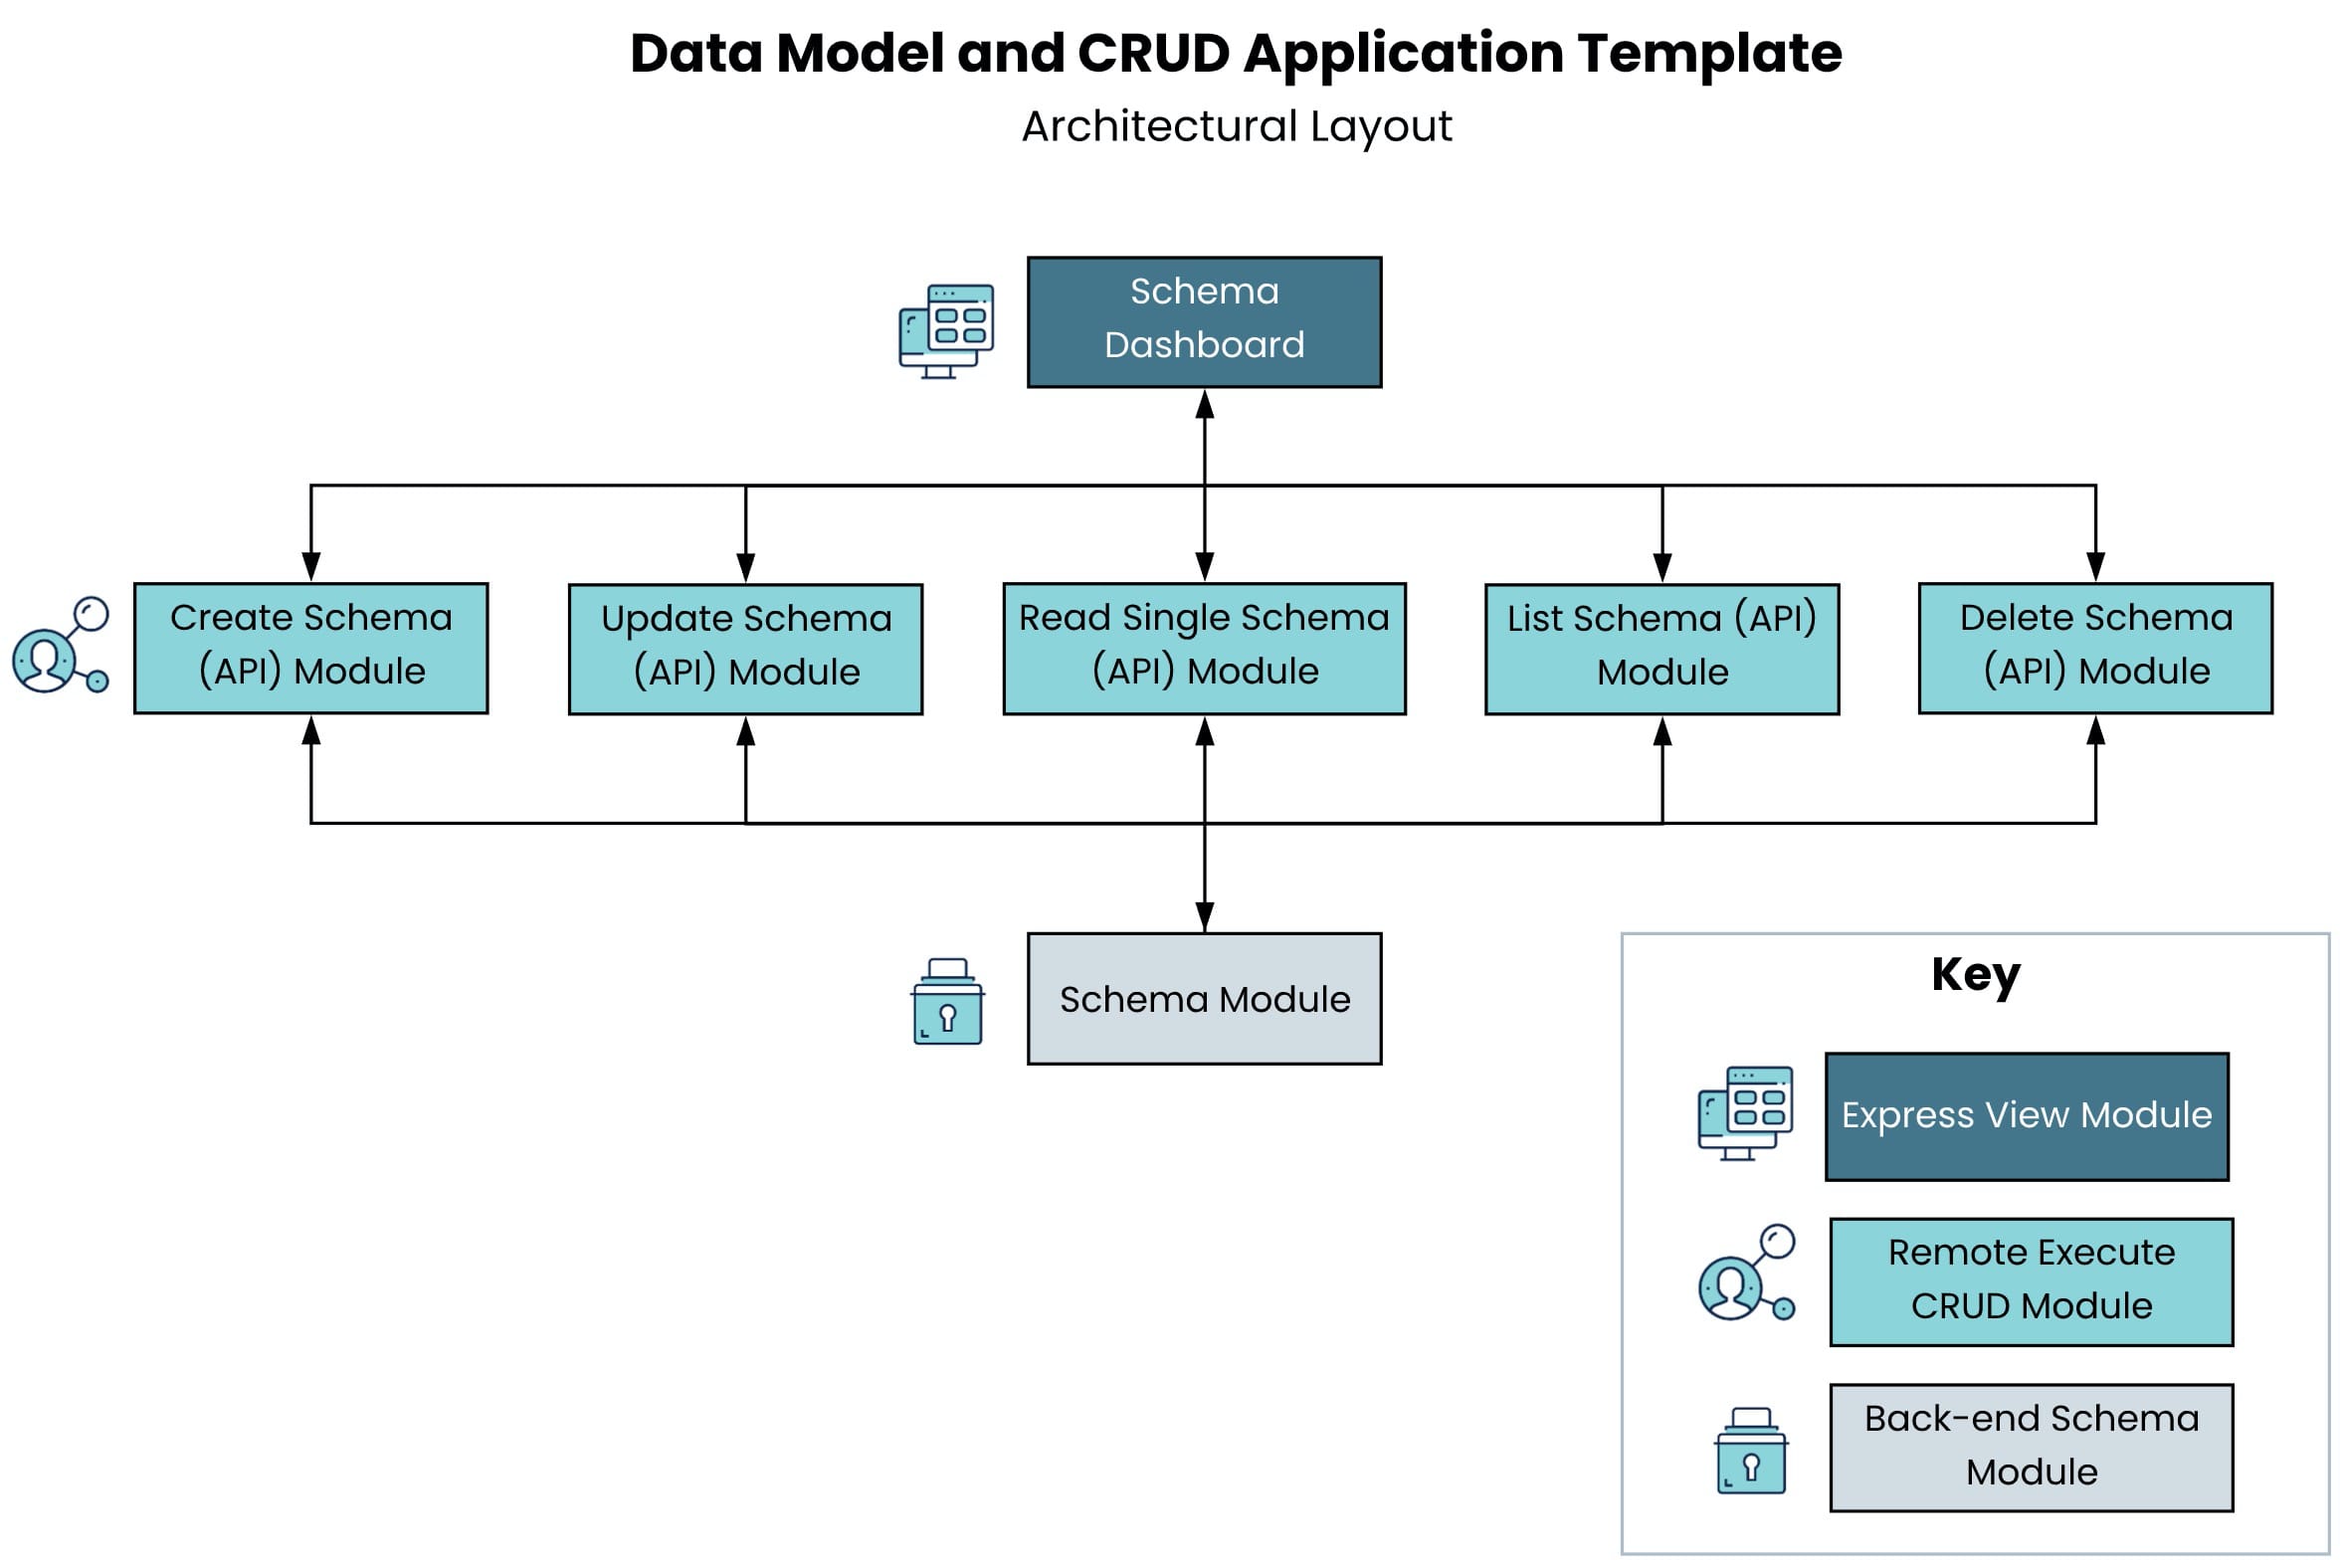
As you can see, you'll interact with the Schema Dashboard module in Express View. That module communicates with the middle layer of remote execute CRUD modules. Then, those modules access and change the data in your back-end schema module. From there, any changes automatically refresh on the front-end dashboard.
Here's a high-level overview of the 7 modules:
| # | Module | Description |
|---|---|---|
| 1 |
Schema (Schema) |
This back-end module securely stores your submissions. The Create, Read, Update, Delete, and List modules all directly interact with this module. |
| 2 |
Create Schema (API) |
This API (application programming interface) module lets you create submissions that store in your schema module. You'll access the Create option on the schema dashboard. |
| 3 |
Read Schema (API) |
This API module lets you retrieve a specified submission from the schema module. |
| 4 |
List Schema Submissions (API) |
This API module pulls multiple submissions from the schema module. From there, it populates your dashboard. To stick with the CRUD acronym, you can also call this module the "Read Multiple" module. We call it List because it uses Unqork's internal List Submissions API call. |
| 5 |
Update Schema (API) |
This API module lets you overwrite submission information in your schema module. You'll access the Update (Edit) option on the schema dashboard. |
| 6 |
Delete Schema (API) |
With this API module, you can delete a specified submission of the schema module. You'll access the Delete option on the schema dashboard. |
| 7 |
Schema Dashboard |
The final part of this application template is a simple dashboard that offers a view of your schema module's submissions. This dashboard helps you with troubleshooting as you develop. You can also use it as the foundation for a dashboard in a front-facing application. This is the only module you'll work with in Express View. The other 6 modules are back-end modules that execute server-side. |
All images used in this guide are for illustrative purposes only. Images are subject to change without notice. All images were correct at the time of publication.
Overview
The Data Model and CRUD template helps you create a schema submission model. Think of a schema model as a blueprint for the database. Or, how you plan to securely store your submission information. You'll notice the title of the application template has "data model" in it. A data model is a high-level design where you pick a framework and contents for your schema model. This application template also includes a CRUD interface. This interface lets you access and manage your schema submissions.
So, this application template already has a basic layout to get you started. Plus, we've built the template to follow Unqork's API specifications and schema specifications. This means you'll have an organized framework without having to build it from scratch!
Features
With this application template, you can:
-
Separate your data storage concerns from your user interface concerns.
-
Improve your application’s flexibility and scalability by simplifying server components.
-
Define and standardize the data in your application to empower new configurators.
Requirements
To use this application template, you must:
-
Complete RBAC (role-based access control) setup so the right people can access your modules.
-
Have a clear understanding of your entity requirements and their relationships, if applicable.
Right off-the-shelf, your application will work with Unqork's Solutions Toolbelt! This toolbelt is an extension you can install from the Chrome Web Store.
What You’ll Learn
In this article, you’ll learn:
-
How to navigate the application template's schema dashboard.
-
How to remove the application template from your environment.
Adding the Application Template
Adding the Template to Your Environment
The Data Model and CRUD template is available from the Unqork Marketplace. Unqork application templates help you quickly create beautiful, complex applications.
To add the template to your environment:
| 1. | Click Marketplace at the top right of the Unqork Designer Platform. |
You can also access the Marketplace at any time by visiting https://marketplace.unqork.io.
| 2. | Enter Data Model in the Search the Marketplace field. |
| 3. | Click on the Data Model and CRUD tile. |
| 4. | Click Add to Environment. |
| 5. | Click Install Template. |
If you aren't logged in, you'll see a field for Environment URL and a Login button. Enter your environment's URL where you want to install the template. For example: [environmentname.unqork.io]. Then, click Login.
Now, you can now use your newly installed template to create an application!
Creating an Application from the Template
After you've added the template to your environment from Marketplace, you can use it to create an application.
To create an application from the Data Model and CRUD application template:
| 1. | Click Library at the top right of the Unqork Designer Platform. |
| 2. | Find the Data Model and CRUD template tile. |
If the template isn't listed, head over to the Marketplace to install it in your environment. You can access the Marketplace at any time by visiting https://marketplace.unqork.io/#/.
| 3. | Click Create App from Template. |
| 4. | Choose the destination workspace from the Workspace drop-down. This is where your application will live once created. |
| 5. | Enter your unique App Name. The App Path auto-fills as you type your App Name. |
| 6. | If you want a different App Path, enter it in the App Path field. |
| 7. | Select a preview style from the Style drop-down. A style specifies your application’s appearance in Express View. If left blank, your application uses your environment's default style. |
You'll notice the App Type and App Entrypoint are grayed out. The template automatically takes care of these for you!
| 8. | Click Create App. |
The application opens in the workspace you specified. You'll land on the Modules tab of your application, which lists all 7 modules. Here's a handy tip! Change the name of each module to match the specific function to want it to have. This simple change can make it easier for you to navigate your application. We cover changing module names in the Customizing the Application Template section.
The list of modules in your new application should look something like this:
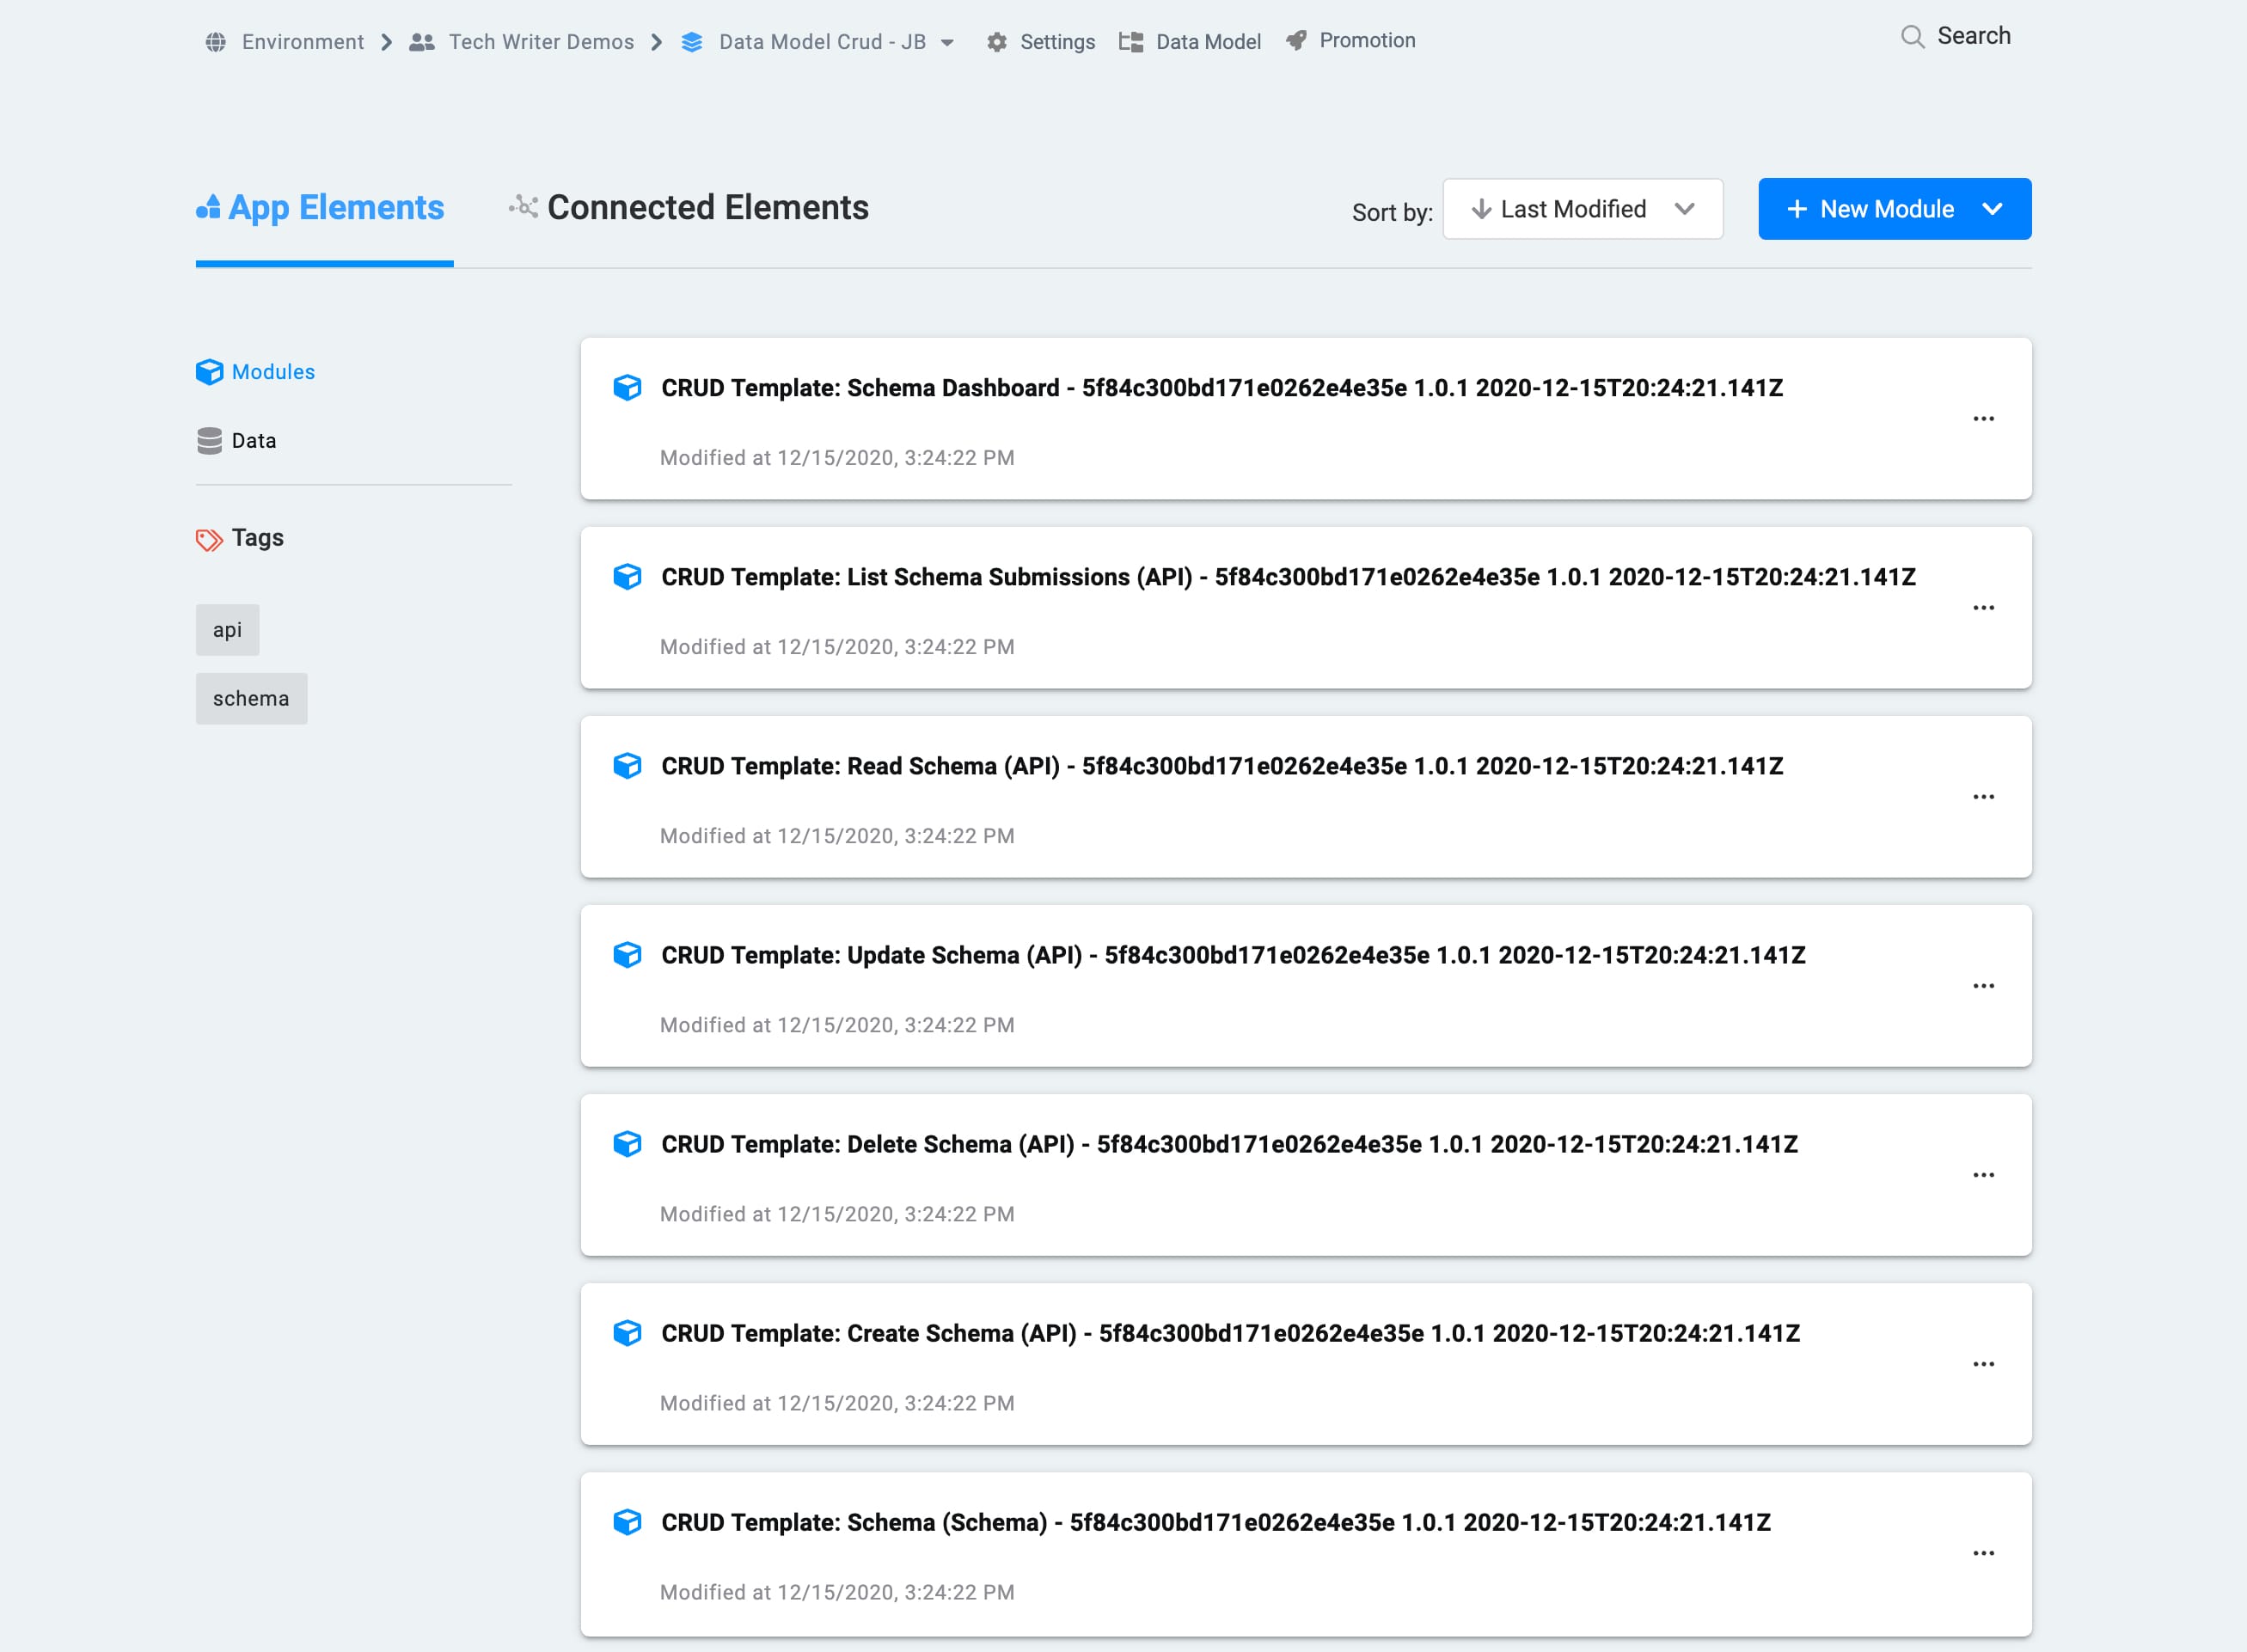
When you create an application from the template, your module names will automatically include the template ID and a time stamp. This is to prevent any duplicate module paths. You're welcome to change module names and module paths at any time.
How the Application Template Works
The Data Model and CRUD application template has 7 modules. There's a schema module that stores submissions. Then, there are 5 back-end API modules. These work behind-the-scenes so you can create, read, update, and delete your schema submissions. Finally, there's a dashboard module that brings all the CRUD functions together. First up, let's look at what a schema module is. Then, we'll dive into each module of this application template.
What is a Schema Module?
You can use schema modules to securely store submission data. And, you can set up different schema modules for different types of information. You may have 1 schema submission module in your application, or you could have multiple. For instance, let's say you had a banking application. You might have a schema module to store your client information. In that module, you may store data like Name, Address, or Phone Number. Then, you could have a separate schema module to store bank account information. This module could have data like Data Opened, Account Balance, and so on. From there, you'd build references between the 2 schema modules.
This application template comes with 1 schema module, a control layer of 5 API modules, and a front-facing dashboard module. The control layer of 5 API modules is specific to the 1 schema module. So, let's say you want multiple schema modules. In that case, you'd need a control layer of 5 API modules for each schema module. Now, let's look at how the schema module works in this application template.
How the Schema Module Works
This back-end module securely stores your submissions. The Create, Read, List, Update, and Delete modules all directly interact with this module.
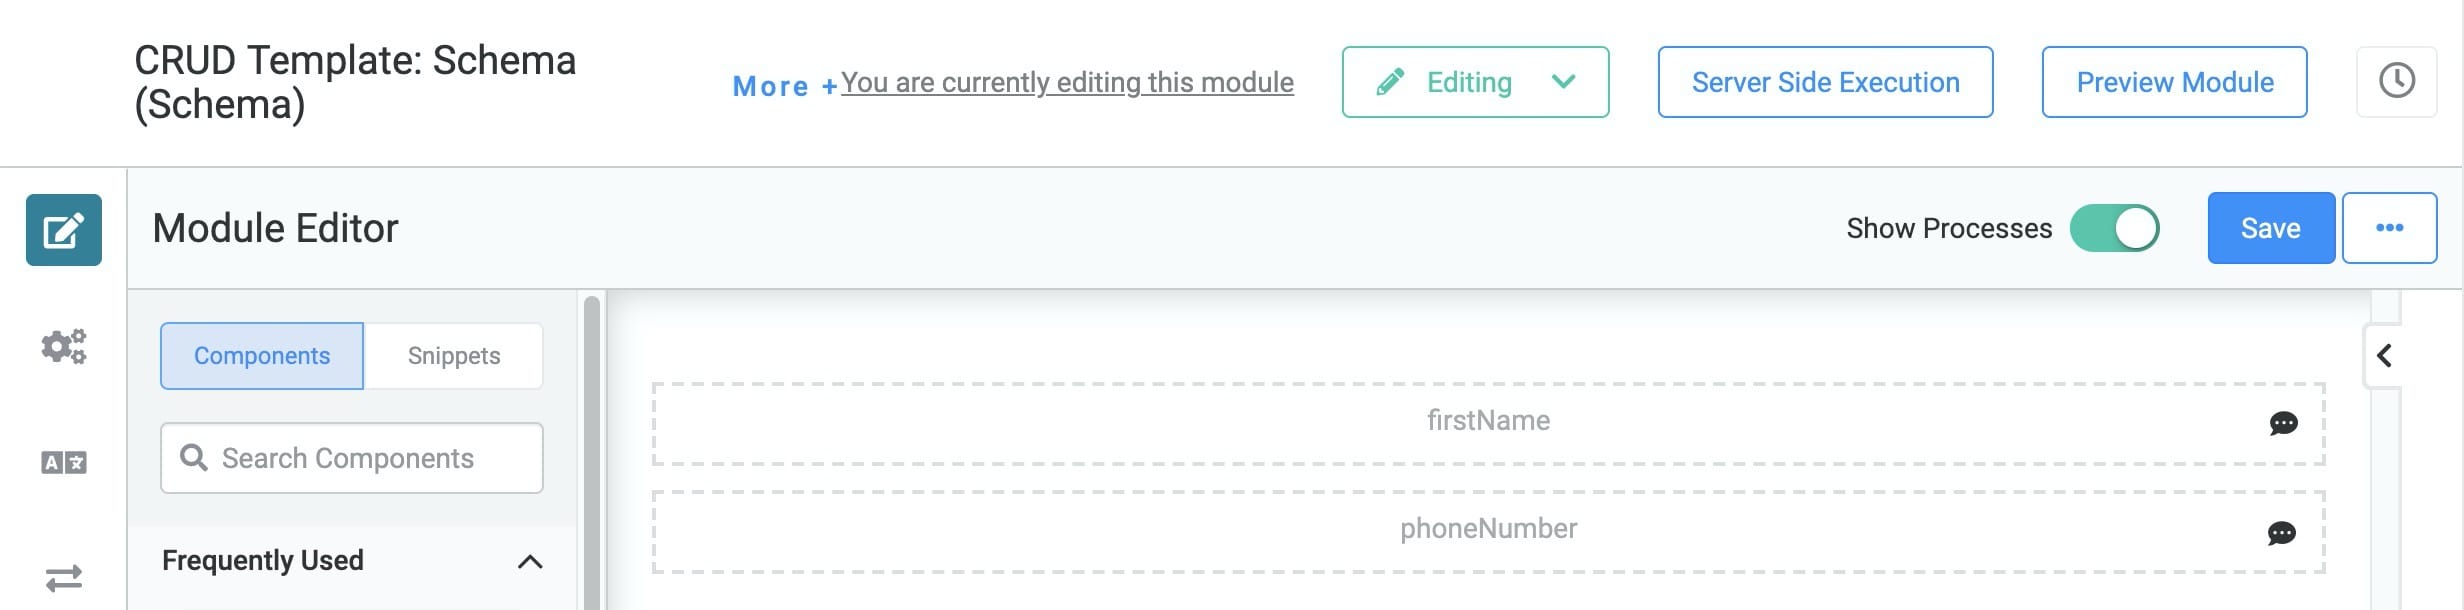
Here's how the schema module looks in the Module Builder:
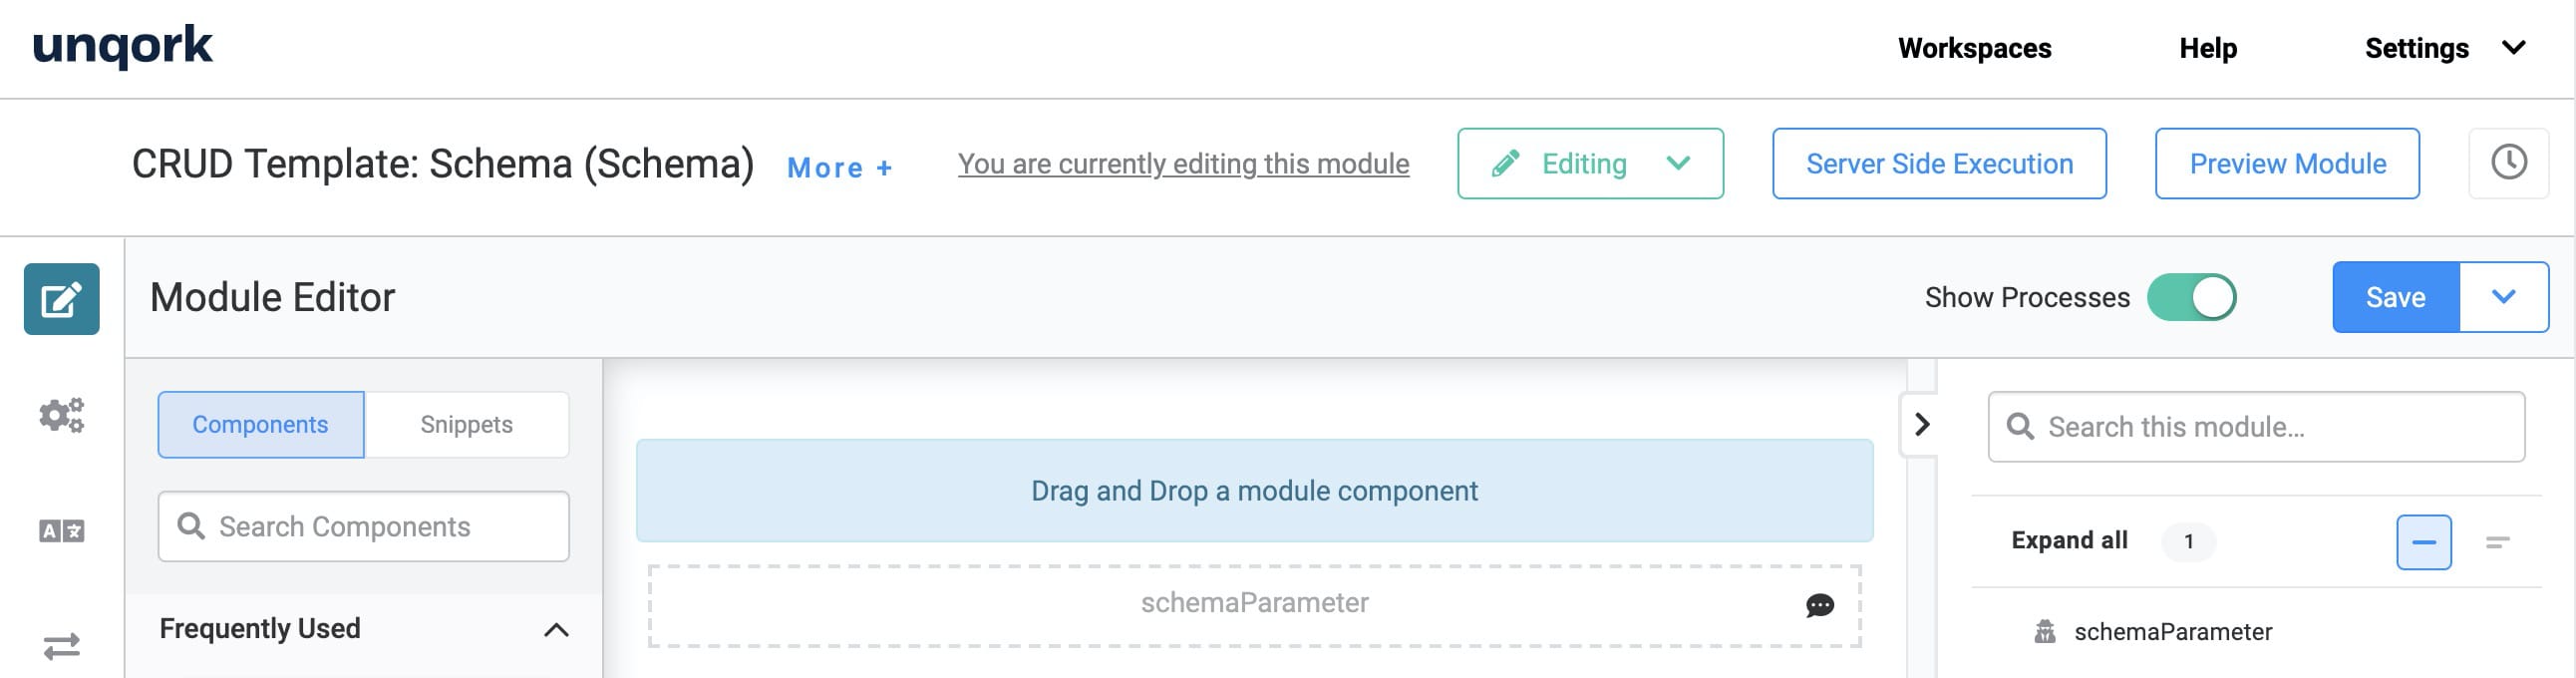
When you build your application from this template, the schema module will have 1 Hidden component called schemaParameter. When you customize your application, you can add as many parameters as you want. And, you can name them whatever you want. So, you could have Hidden components called firstName, lastName, address, and so on. We'll cover that under the Customizing the Application Template section.
How the Create Schema (API) Module Works
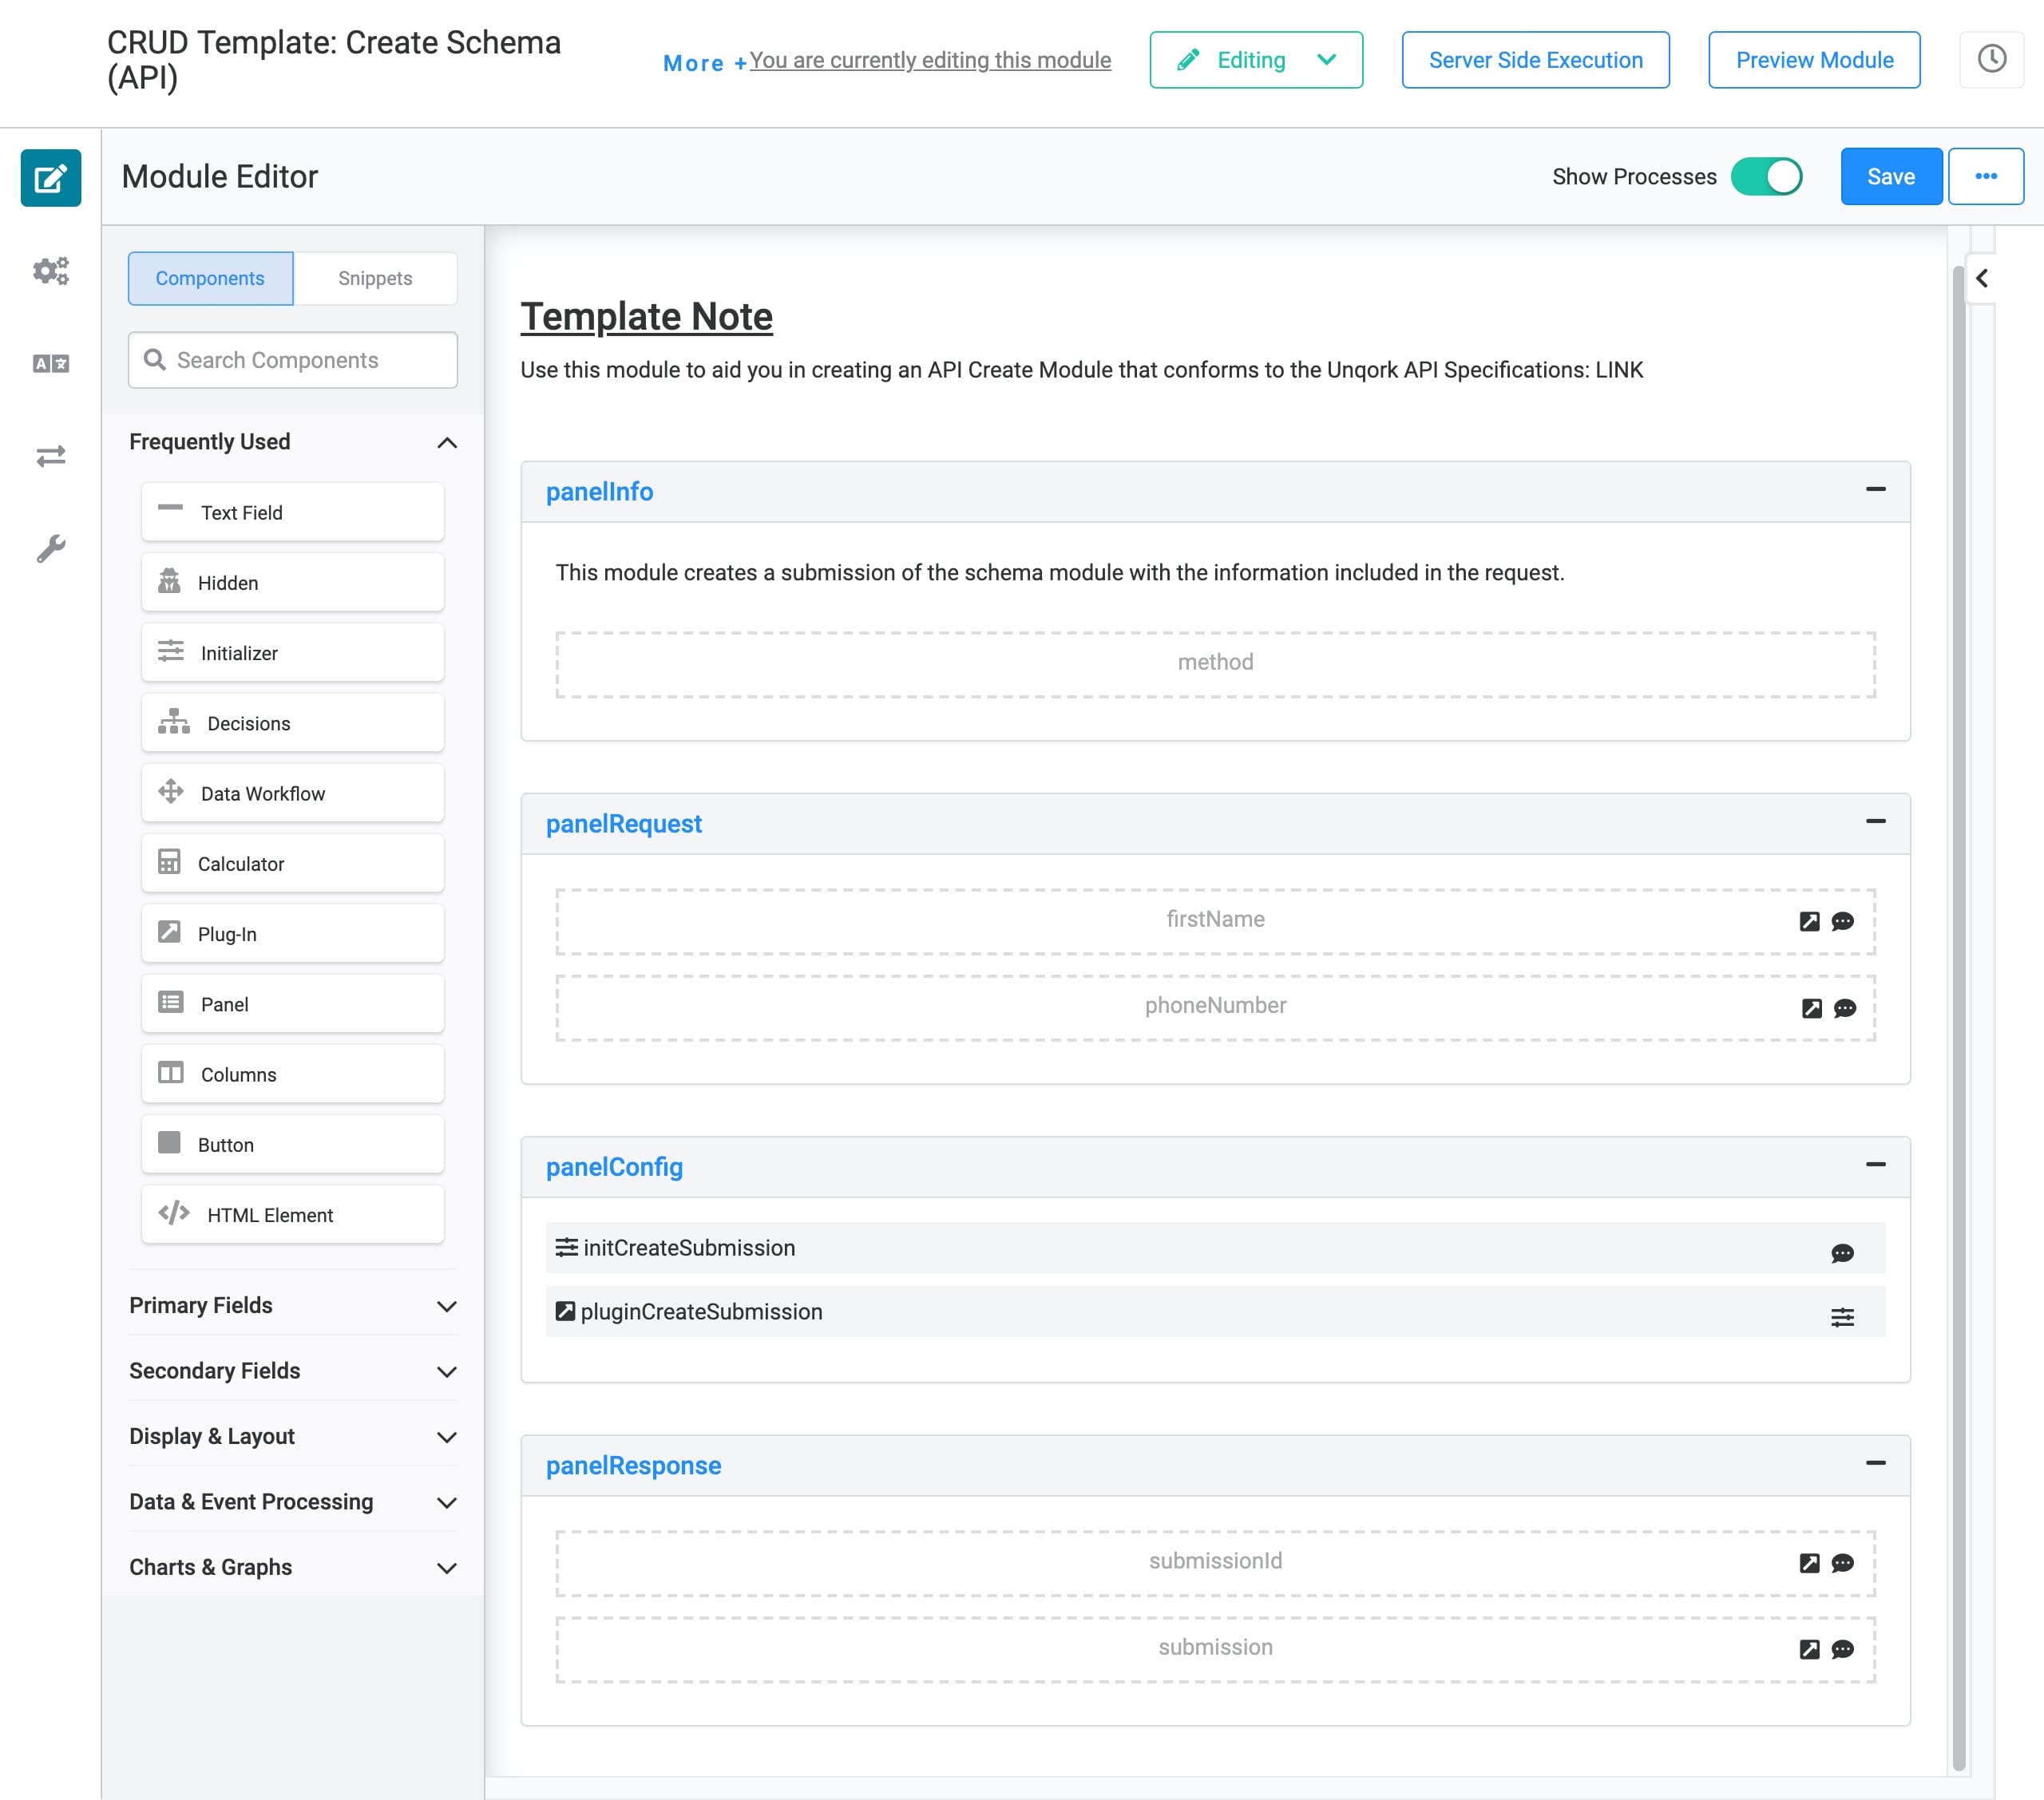
This API module lets you create submissions that store in your schema module. You'll access the Create option on your schema dashboard. When you click Create New Submission on the dashboard, a Create Submission modal opens. Then, you'll enter information in the modal and click Create. The Create button has logic that calls this Create Schema (API) module. The initCreateSubmission Initializer fires, which then triggers the pluginCreateSubmission Plug-In. This Plug-In takes the information you entered and creates a new submission in your schema module. And, all this happens right out-of-the-box.
Here's how the Create Schema (API) module looks in the Module Builder:
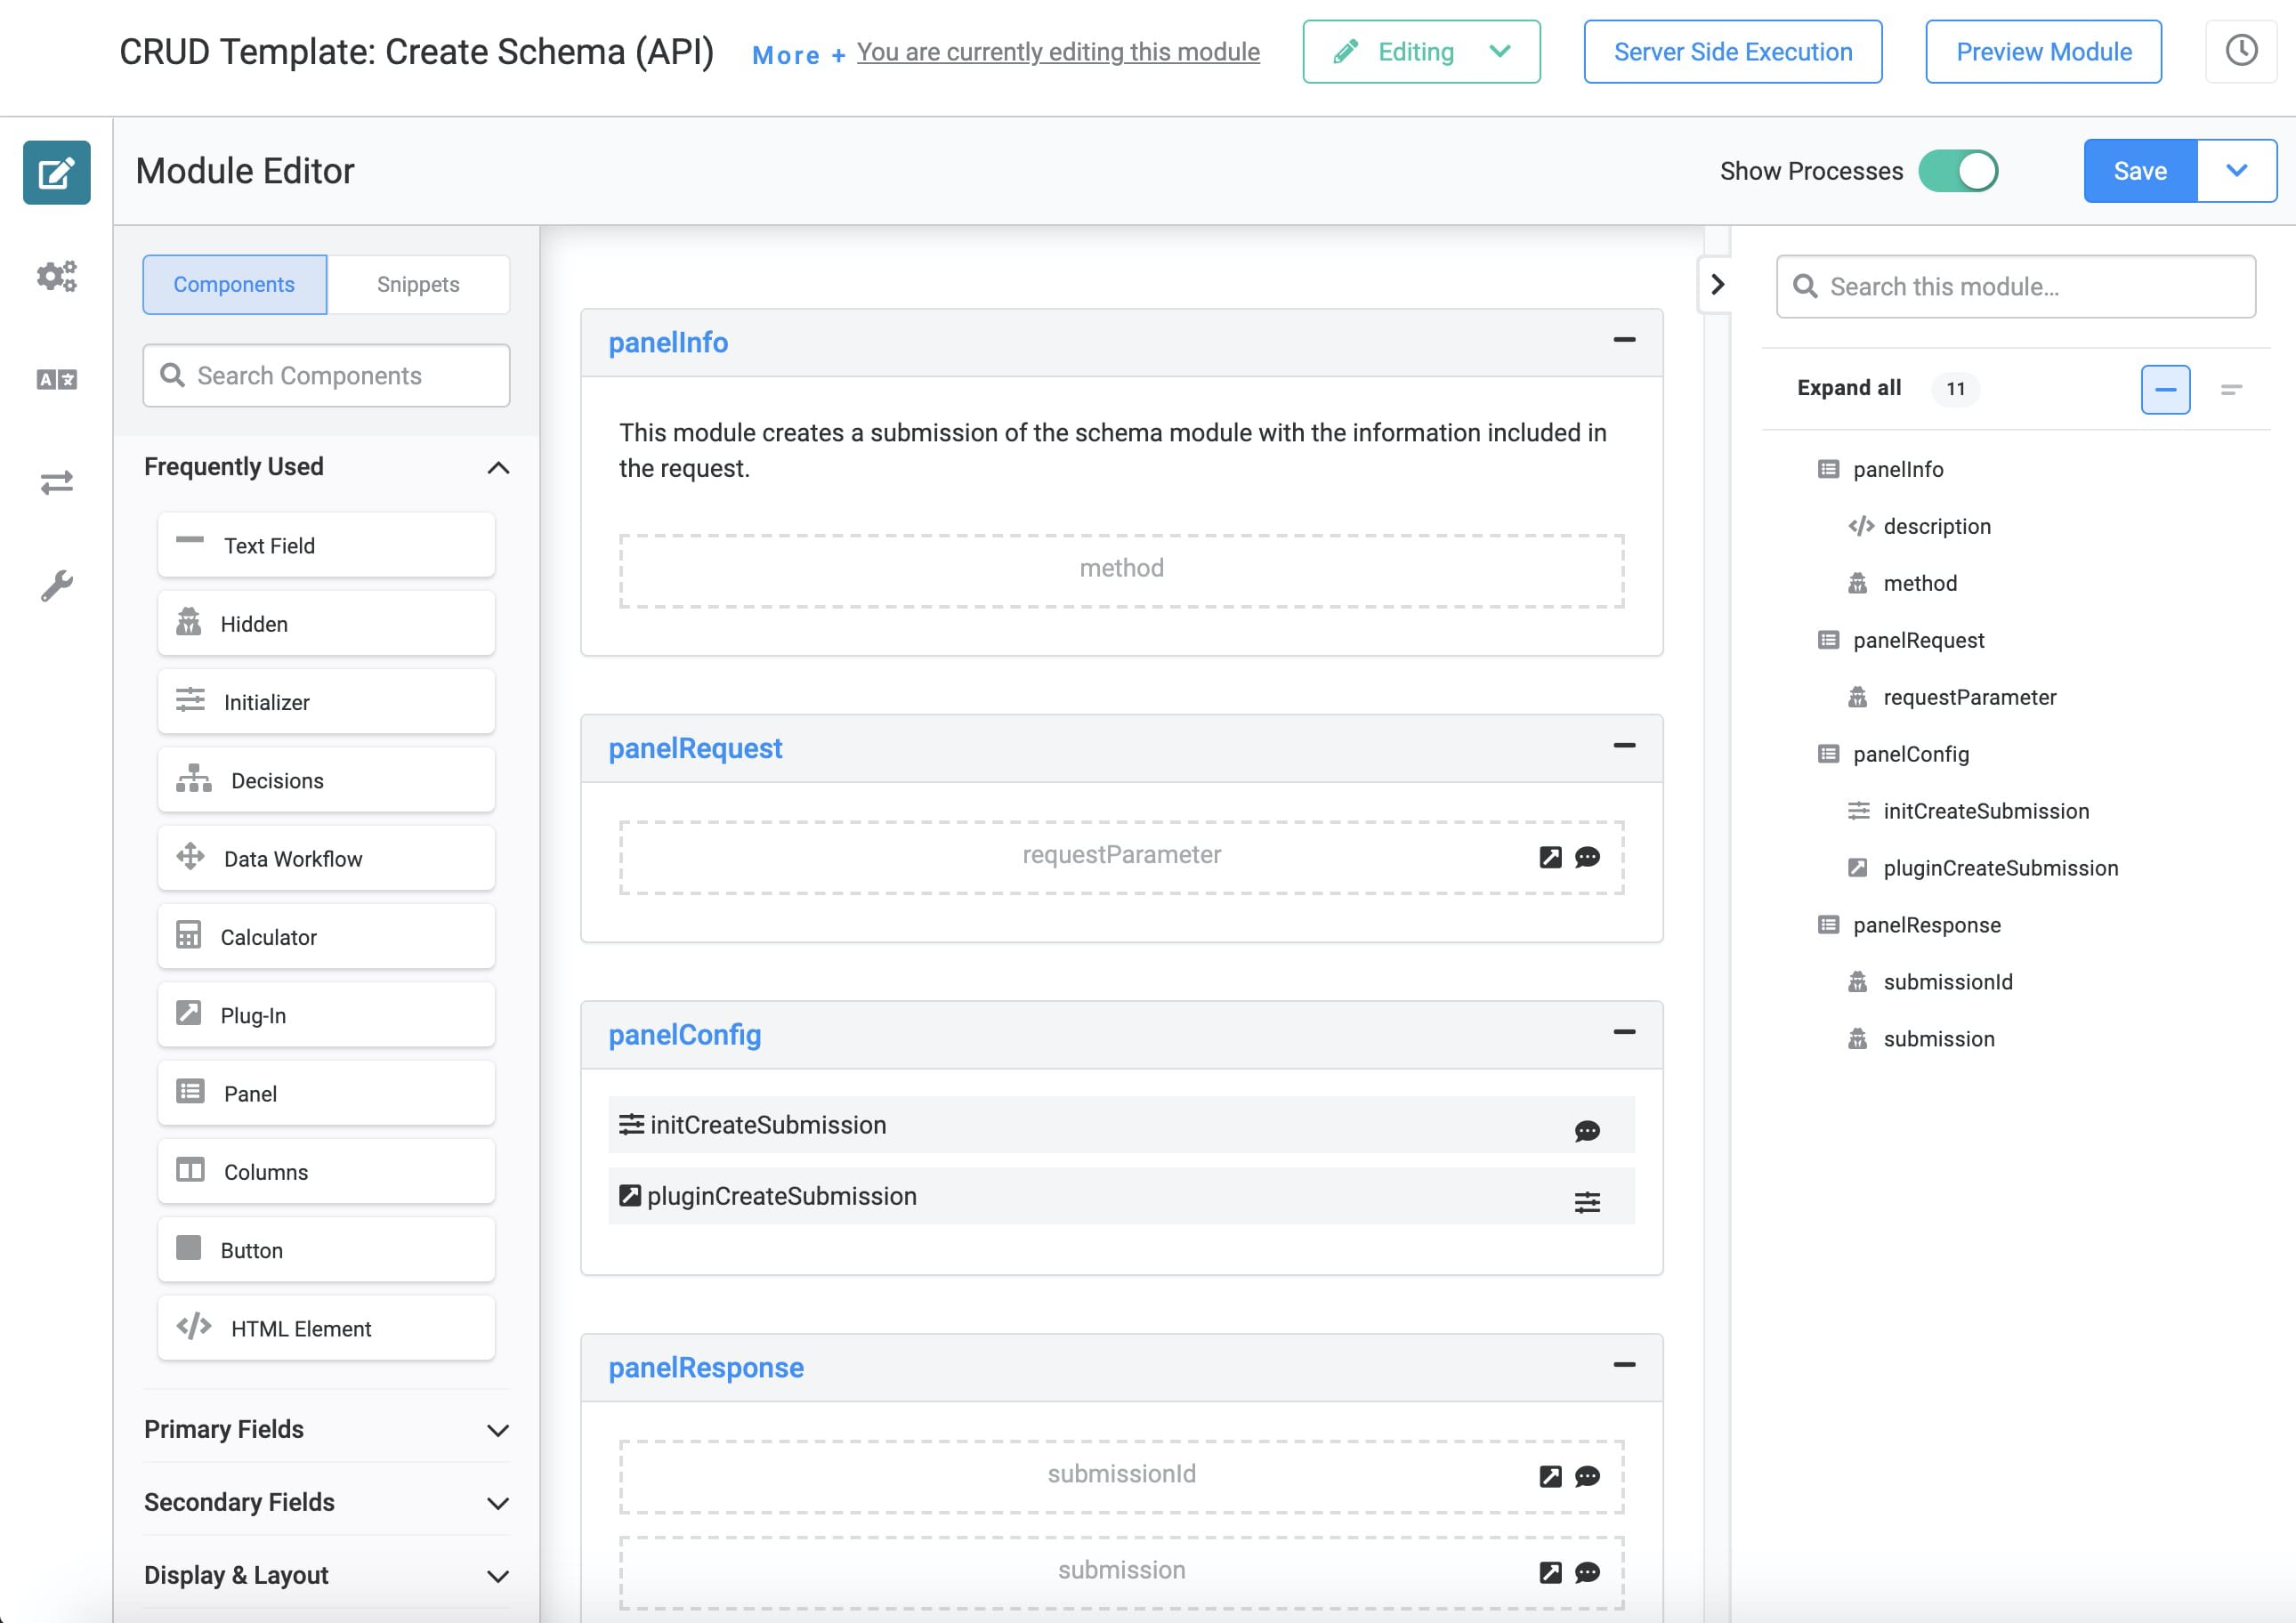
When you build your application from this template, the Create Schema (API) module comes with 1 Hidden component called requestParameter. Remember the schemaParameter Hidden component in the schema module? The Create Schema (API) module's requestParameter maps to the schemaParameter in the schema module. This is how information moves from the dashboard to the Create Schema (API) module and saves in the schema module.
When you customize your application, you can add as many parameters as you want. And, you can name them whatever you want. So, you could have Hidden components called firstName, lastName, address, and so on. We'll cover exactly how to do that under the Customizing the Application Template section.
How the Read Schema (API) Module Works
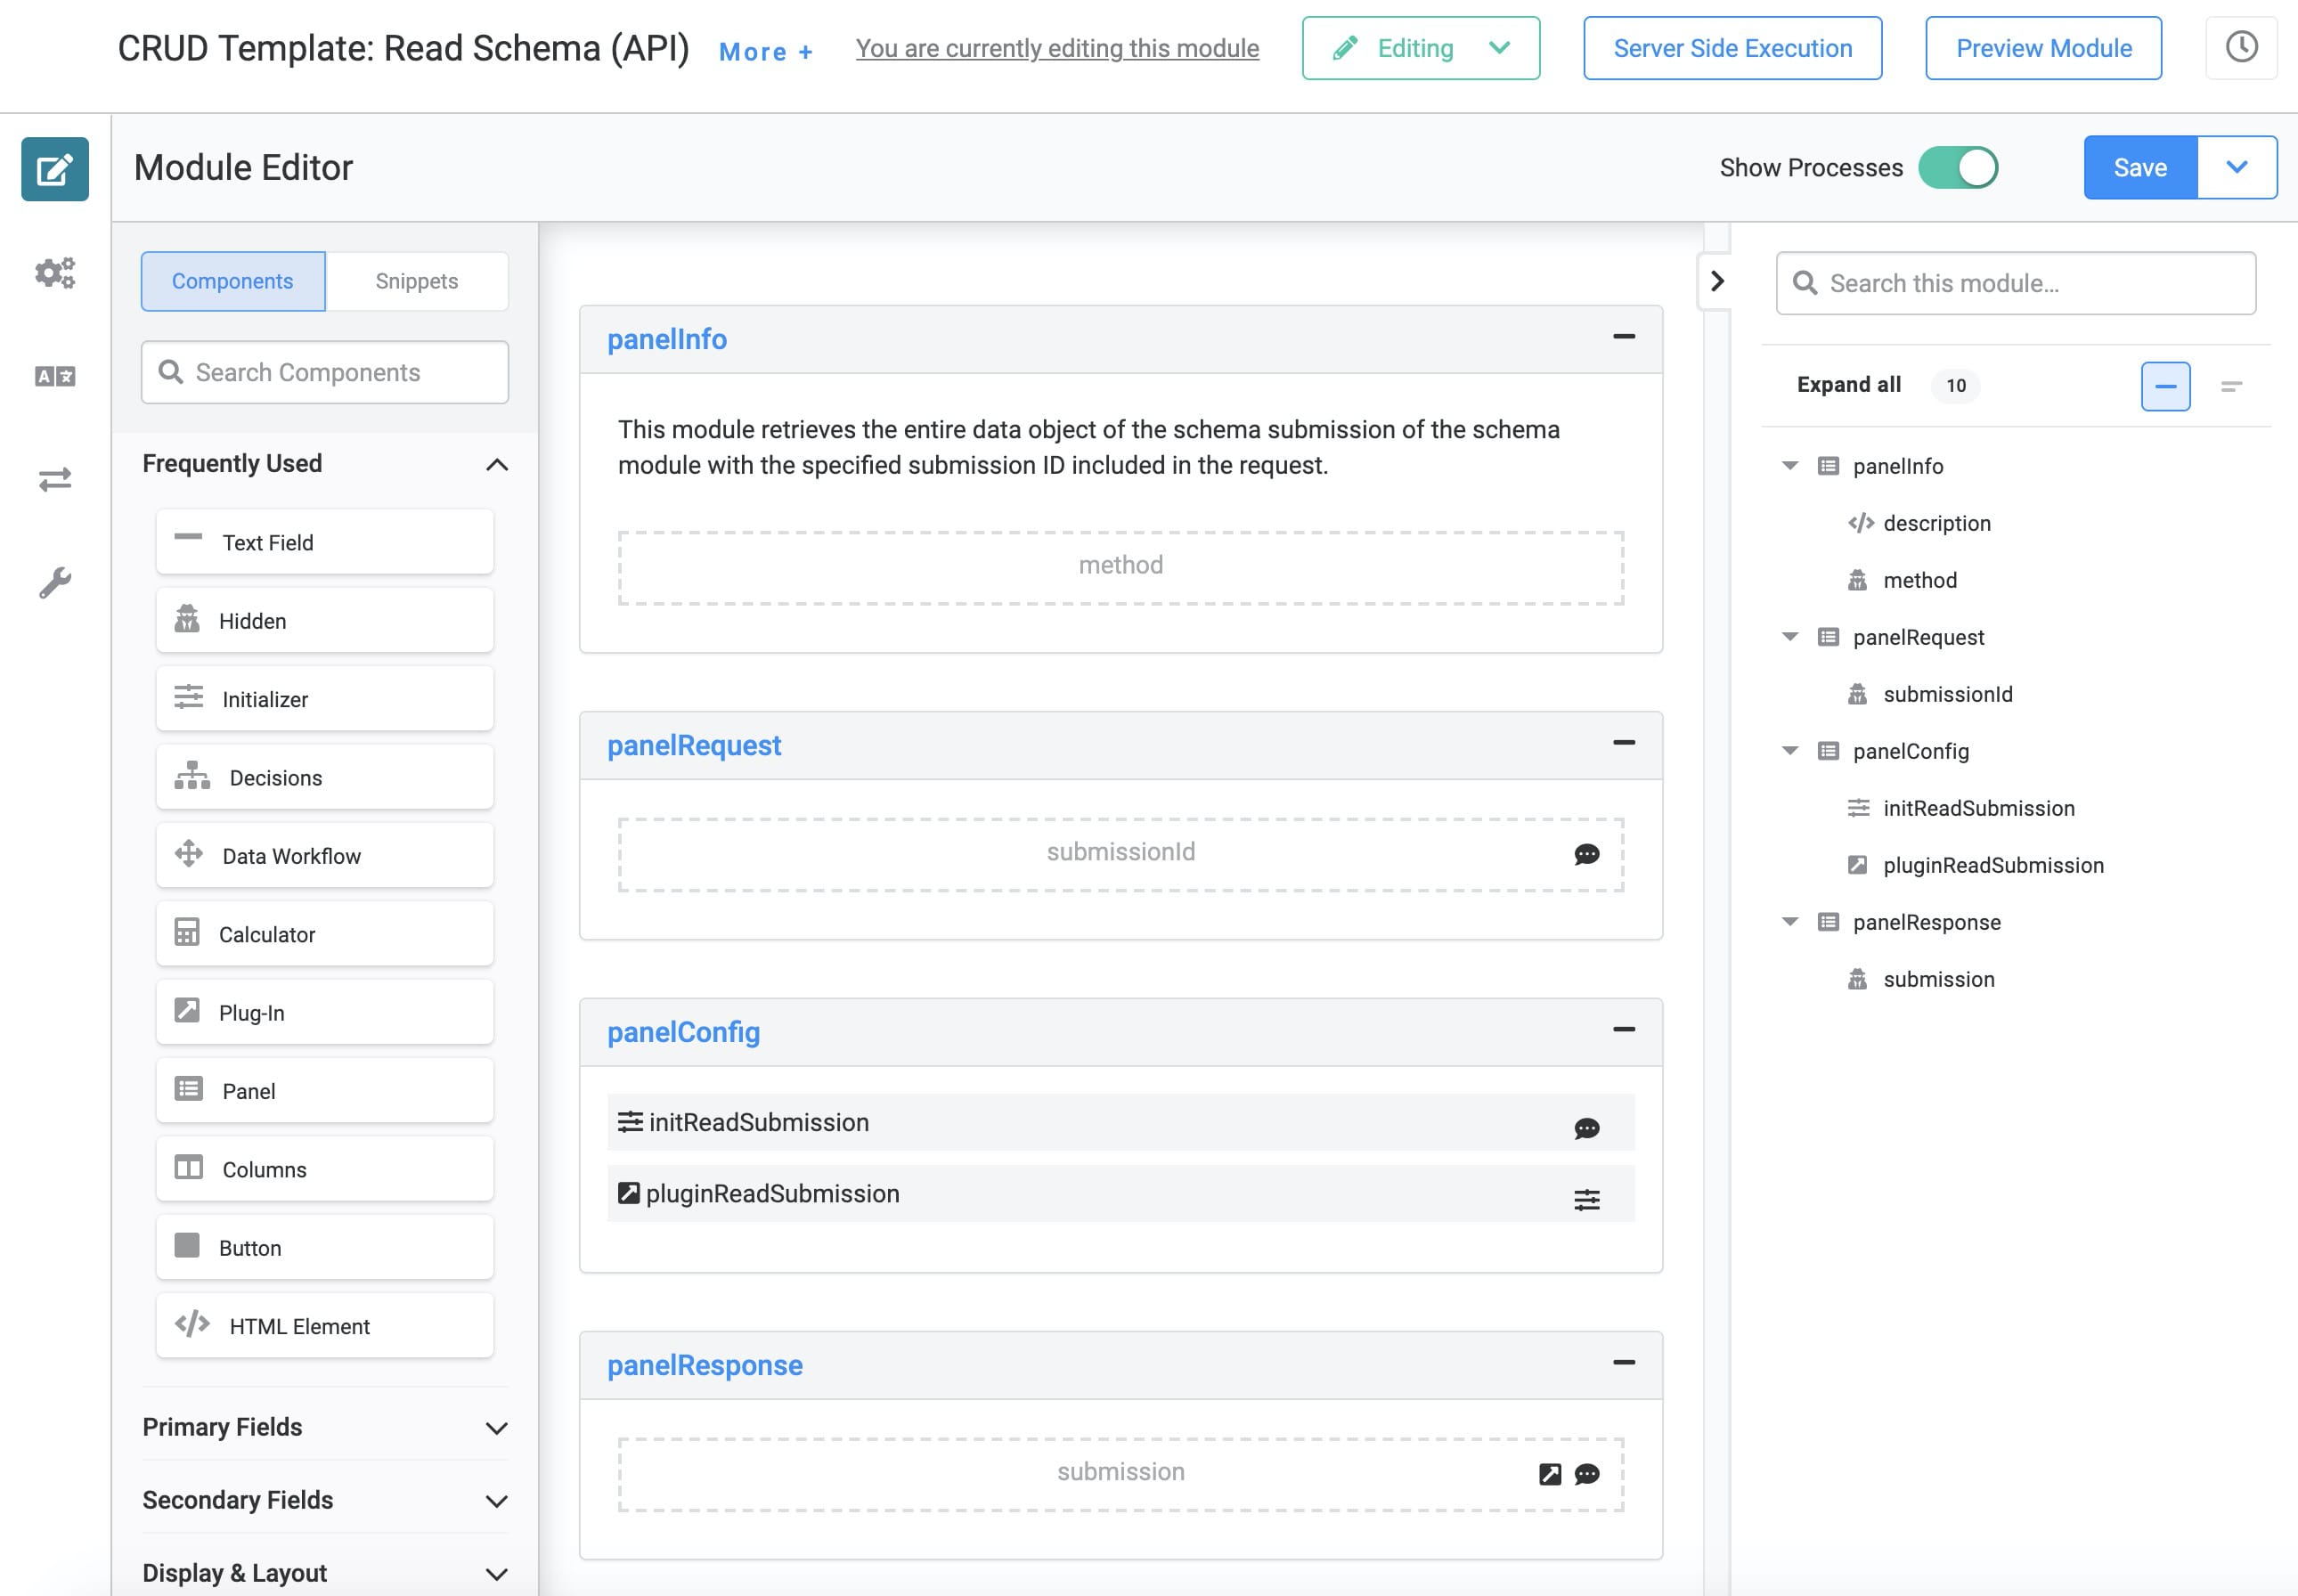
This module's API lets you retrieve a specified submission from the schema module. So, let's say you want to edit or delete a submission. From your schema dashboard, you'd click Edit Submission next to the line item you want to update. This button triggers logic that passes that schema submission's ID to the Read Schema (API) module. This fires the initReadSubmission Initializer, which fires the pluginReadSubmission Plug-In. The Plug-In takes the specified submission ID and retrieves the entire data object of that submission from the schema module.
Here's how the Read Schema (API) module looks in the Module Builder:
How the List Schema Submissions (API) Module Works
This API module pulls multiple submissions from the schema module. From there, it populates your dashboard. To stick with the R from the CRUD acronym, you can also call this module the "Read Multiple" module.
When called, this module triggers the initOnLoad Initializer. This fires the pluginGetSubmissions Plug-In, which retrieves multiple submissions from the schema module. The dwfMoveSubmissions brings the submissions into the submissions Hidden component, which maps to the dashboard.
Here's how the List Schema Submissions (API) module looks in the Module Builder:
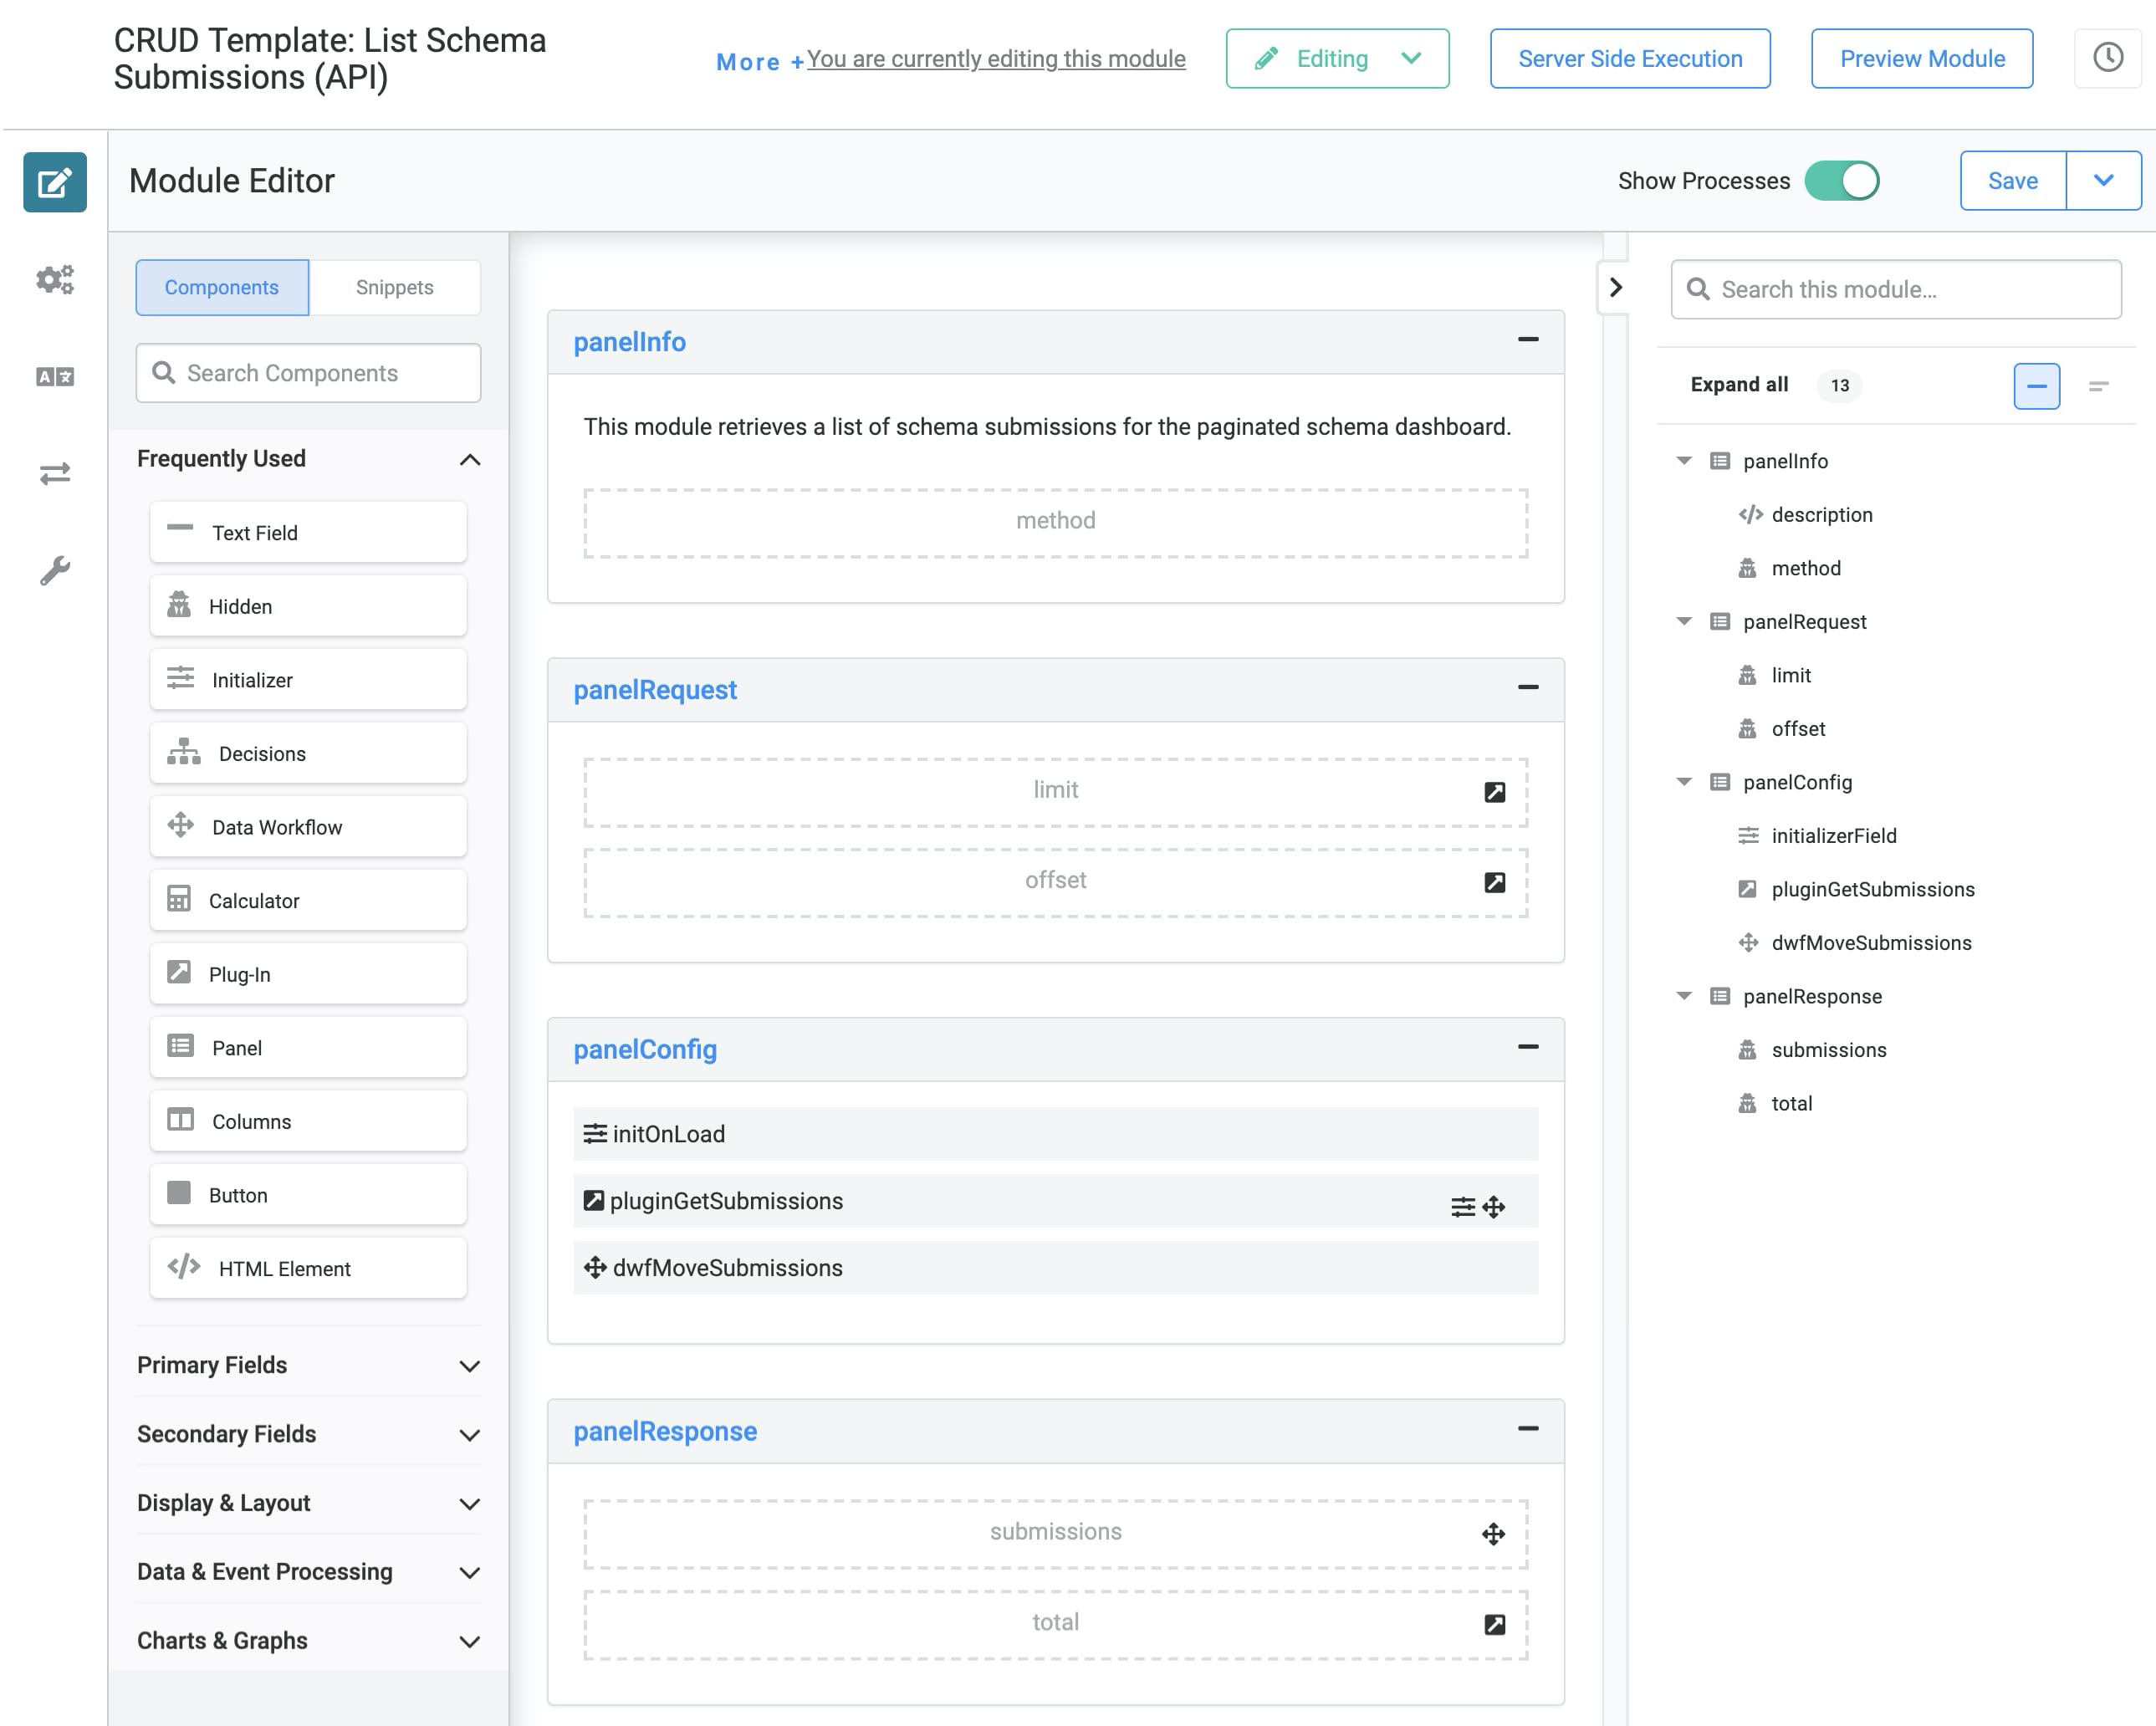
You'll notice Hidden components in the panelRequest Panel named limit and offset. These fields work with your dashboard to limit how many submissions come back at a time. This is server-side pagination, and we've already set up the configuration for you.
How the Update Schema (API) Module Works
This API module lets you overwrite submission information in your schema module. You'll access the Update (Edit Submission) option on your schema dashboard. Here's how the components and modules work together. First, the Edit Submission button calls this Update Schema (API) module. The module then fires the initUpdateSubmission Initializer. This Initializer fires the pluginUpdateSubmission Plug-In. For the grand finale, the Plug-In updates the submission in your schema module. All you have to do is click a button. The rest of the magic happens behind-the-scenes.
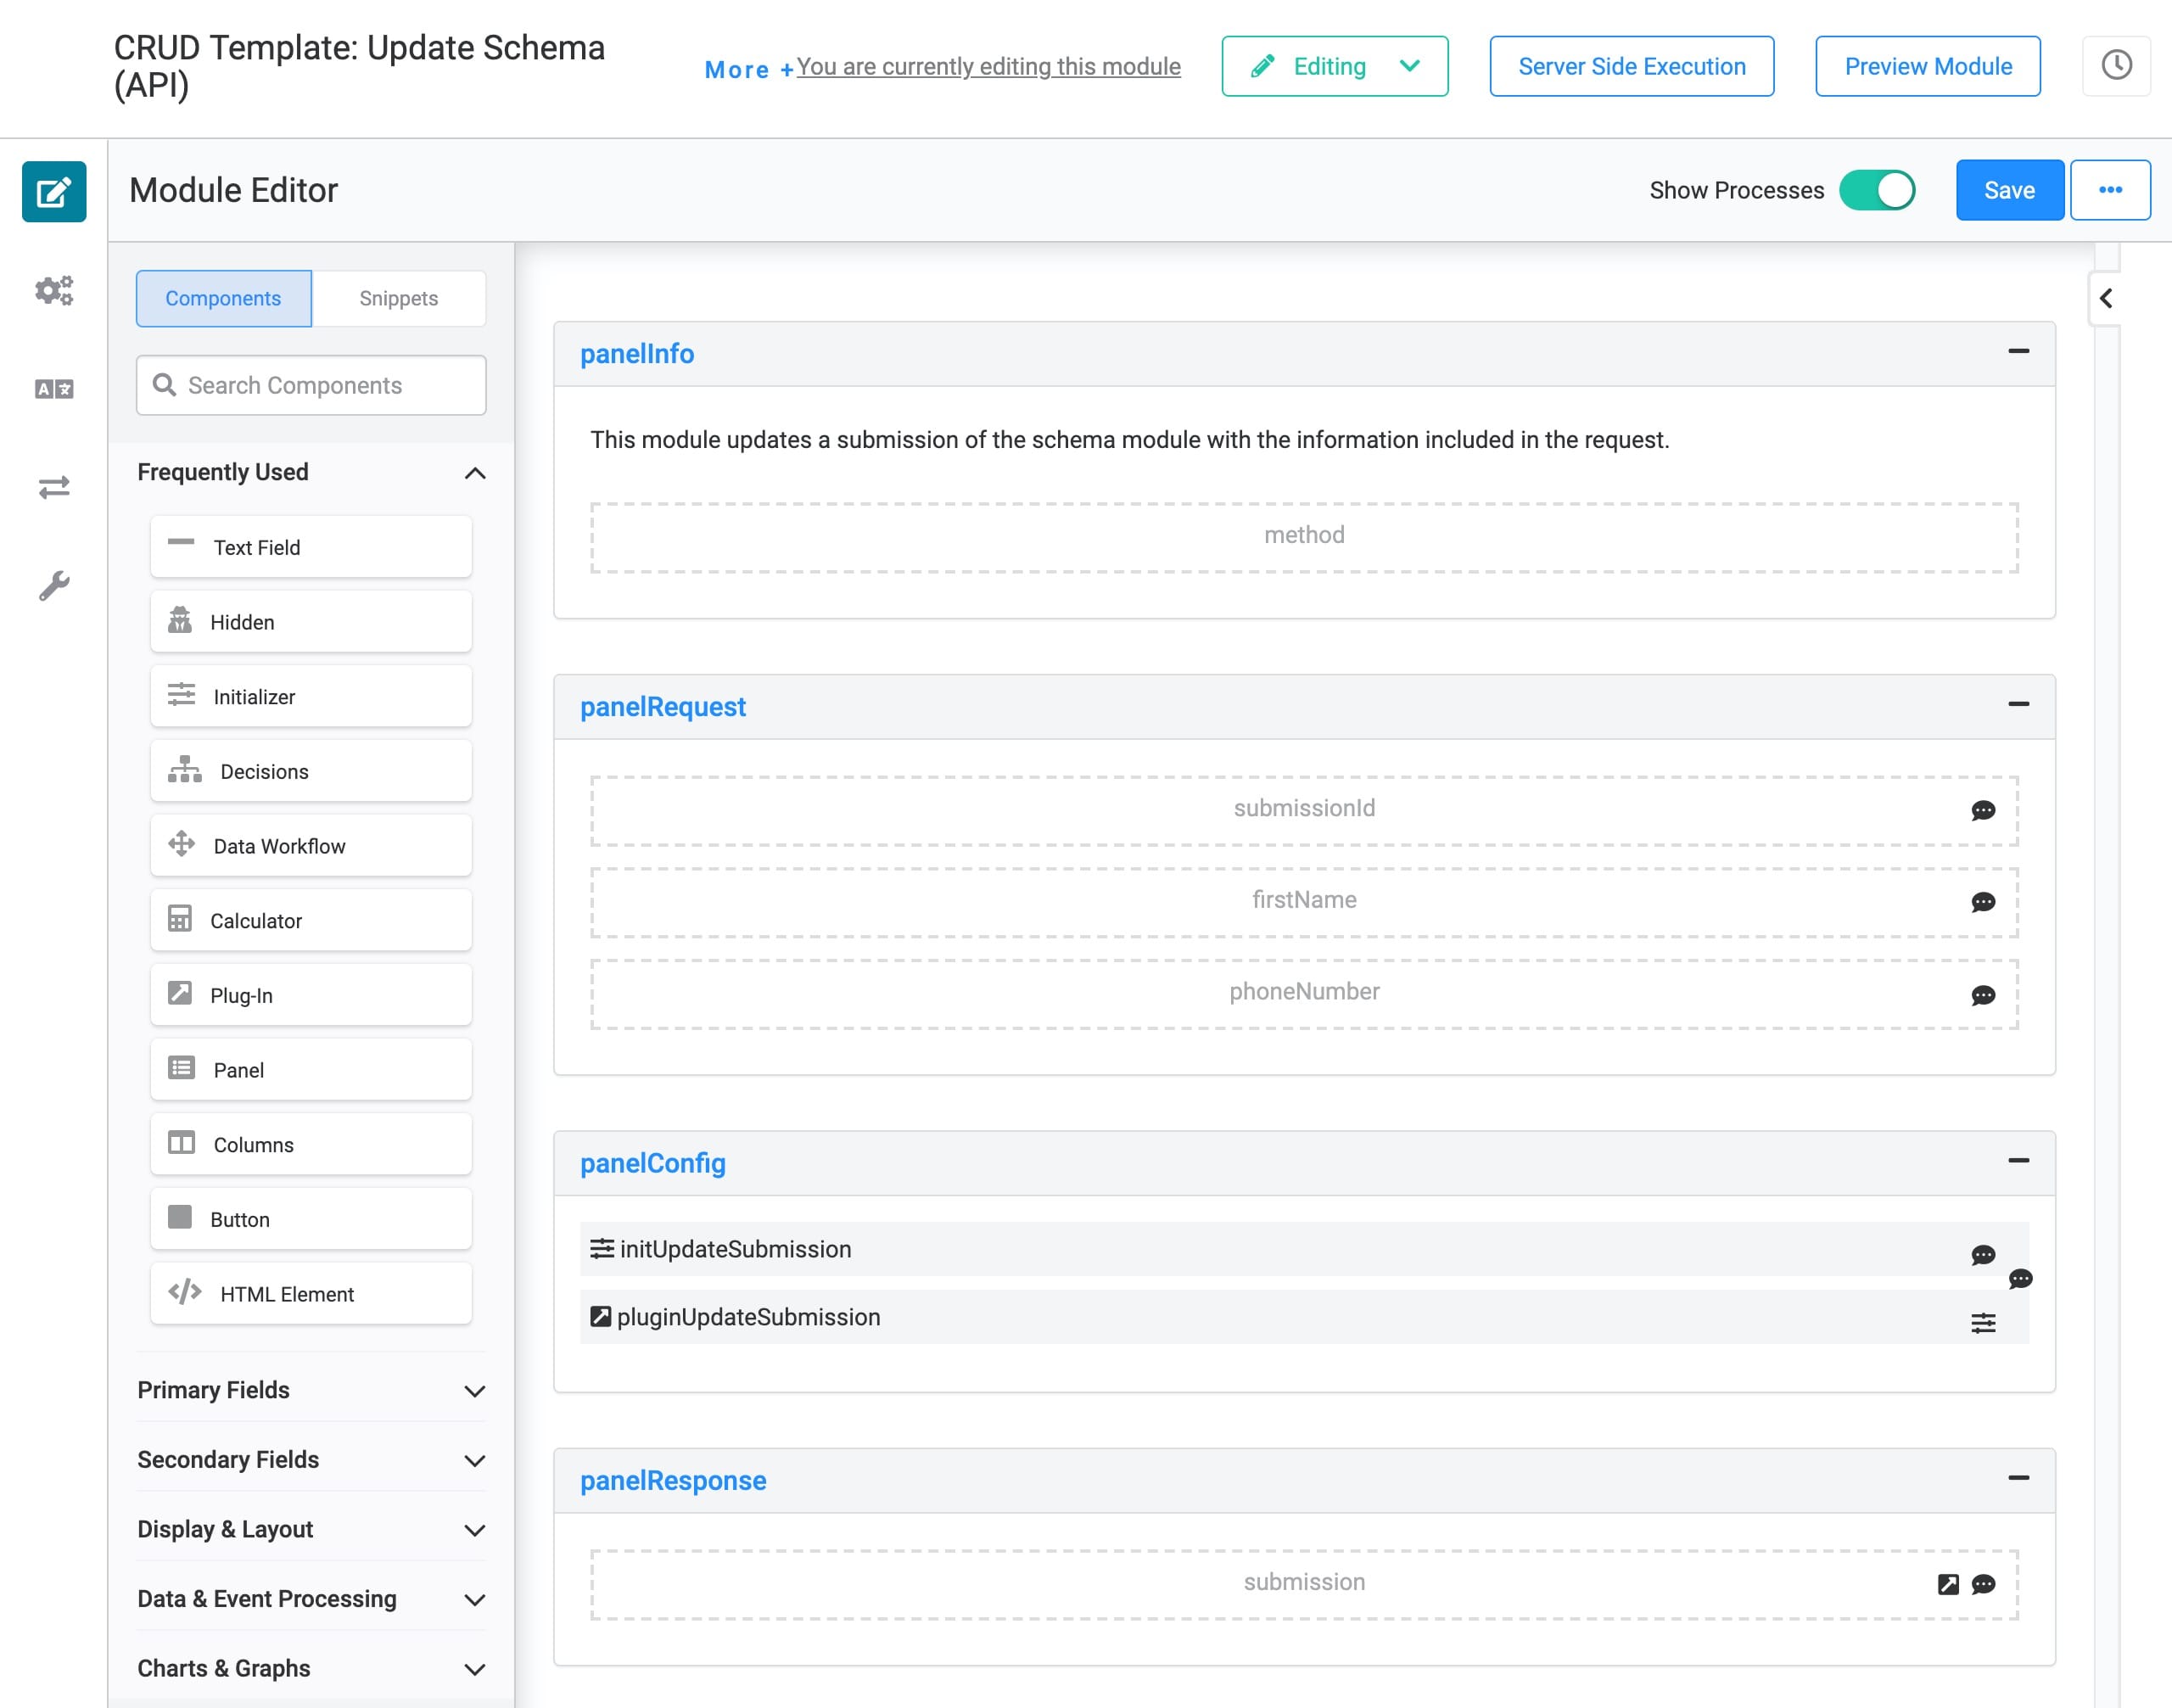
Here's how the Update Schema (API) module looks in the Module Builder:

When you build your application from this template, the Update Schema (API) module has a Hidden component called requestParameter. This requestParameter automatically maps to the schemaParameter in the schema module. This is how information overwrites the submission's existing data in the schema module. In the Customizing the Template section, you'll learn how to easily add and map your own parameters.
How the Delete Schema (API) Module Works
With this API module, you can quickly delete schema submissions. You'll access the Delete option from your schema dashboard's Edit Submission modal. The Delete button calls this Delete Schema (API) module. The API fires the initDeleteSubmission Initializer. This Initializer fires the pluginDeleteSubmission Plug-In. The Plug-In then deletes the submission from your schema module.
Here's how the Delete Schema (API) module looks in the Module Builder:

You've learned about how the CRUD API modules work. Great! Next up, let's take a look at the Express View dashboard.
How the Schema Dashboard Module Works
The final part of this application template is a simple dashboard. It offers a customizable view of your schema module's submissions. This is the only module you'll work with in Express View. This module communicates with the control layer of 5 API modules. Those API modules then connect directly with your schema module. They work together to show the most up-to-date submissions on your dashboard. From there, you can create, update, and delete submissions.
Here's how the Schema Dashboard module looks in the Module Builder:
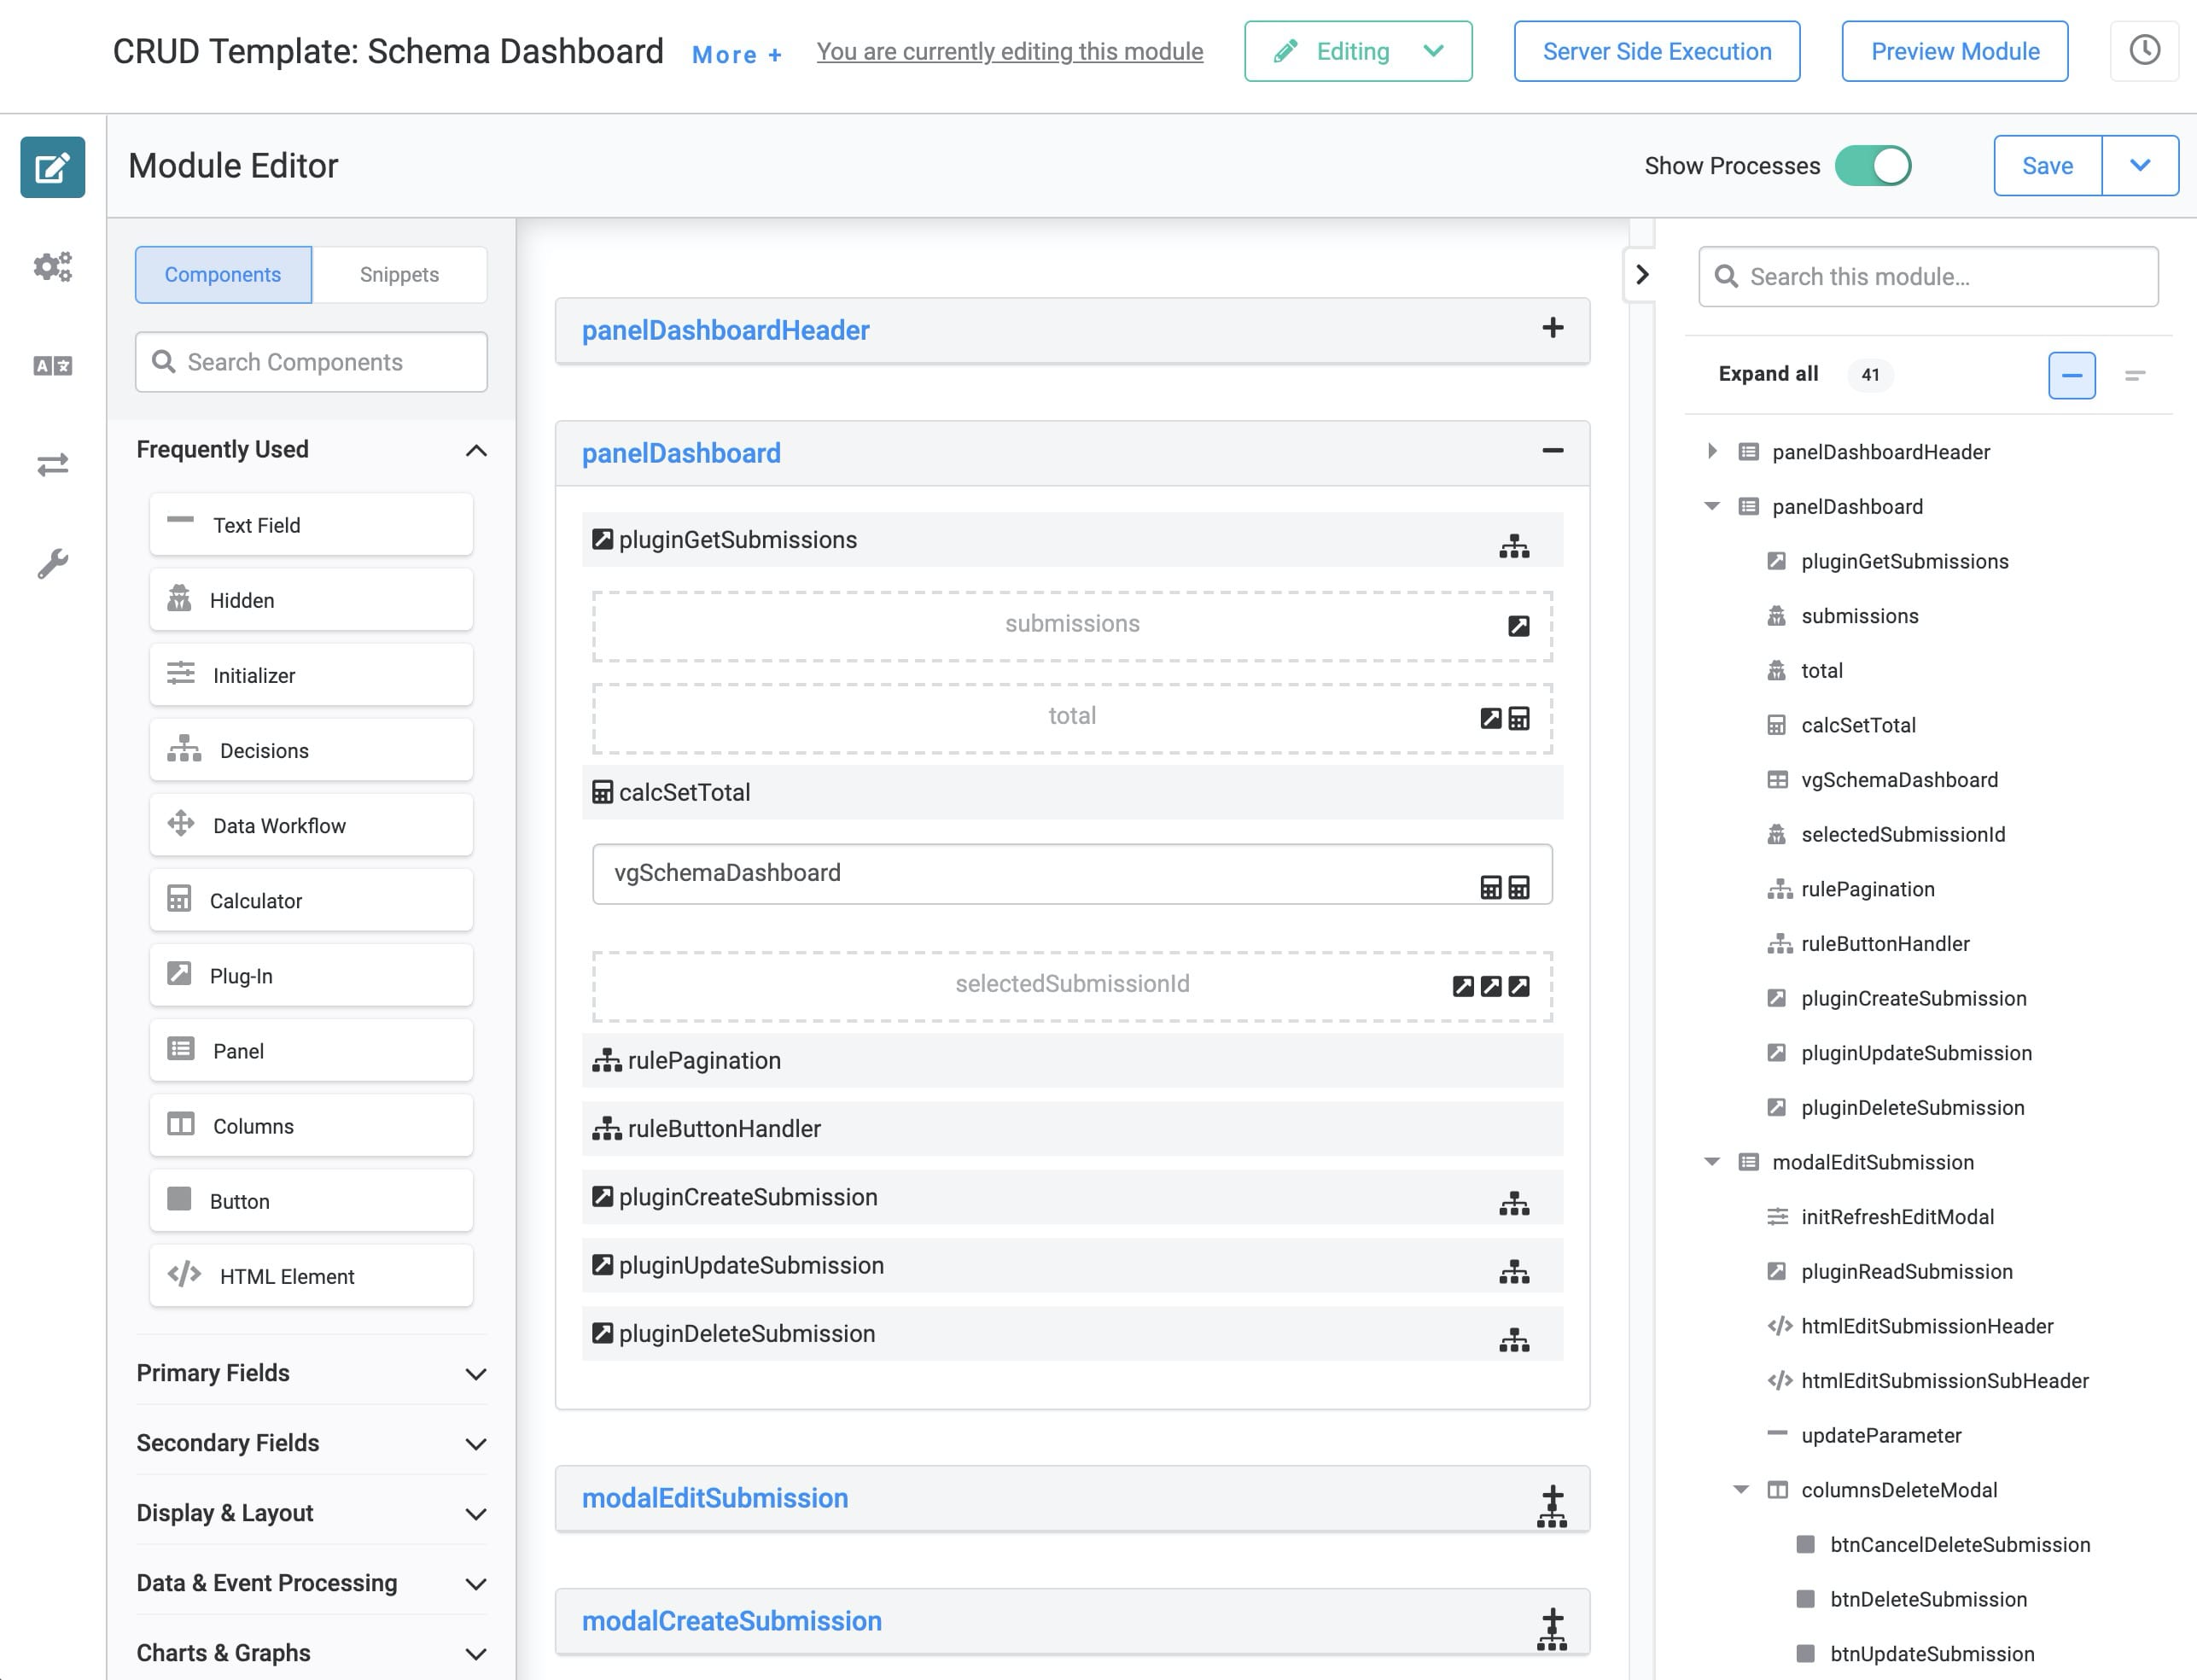
The ruleButtonHandler Decisions component runs the show in this module. When you click any button in Express View, this Decisions component fires the appropriate Plug-In. The Plug-In then calls the corresponding API module, which interacts with the schema module. And the best part? The configuration is ready-to-go.
You'll notice there are Panels called modalEditSubmission and modalCreateSubmission. These are the modals that pop up when you click Create New Submission or Edit Submission on your dashboard in Express View. Let's take a look at how these work. First, let's check out the Create Submission modal:
How the Create Submission Modal Works
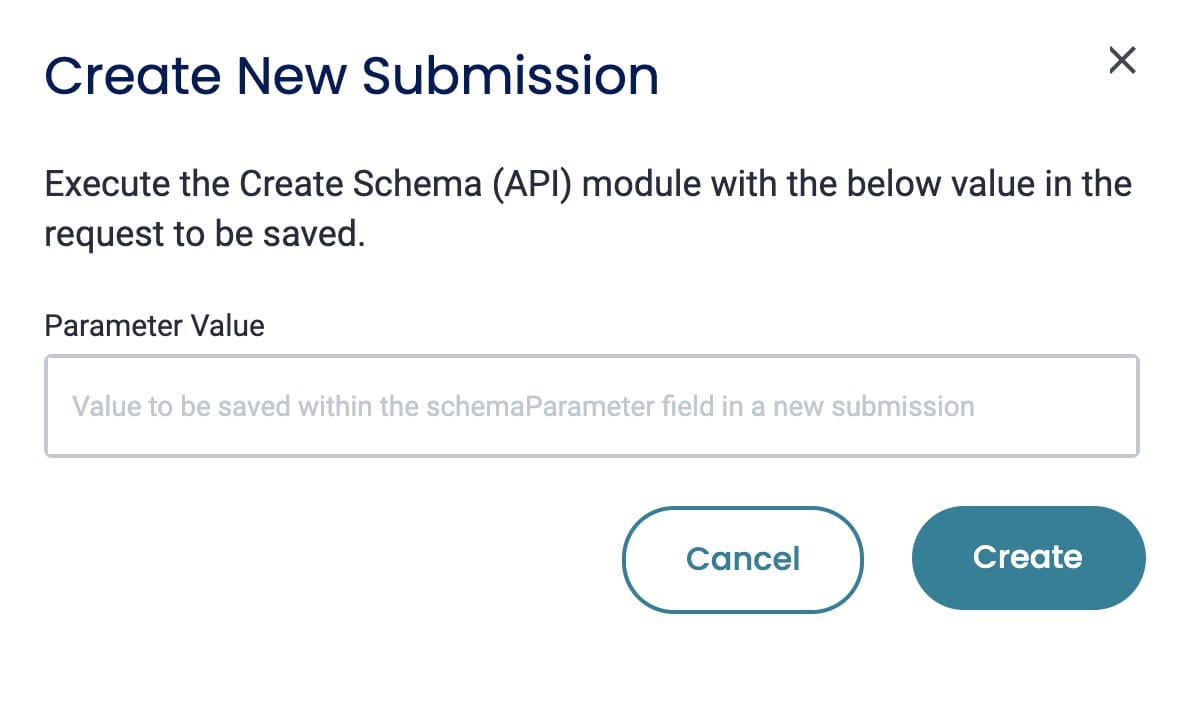
When you click the Create button on your dashboard in Express View, you'll see a pop-up modal. In that modal, you can enter the value(s) for the data you want to save with your new submission. From there, the pop-up modal's Create button fires the ruleButtonHandler Decisions component. This Decisions component fires the pluginCreateSubmission Plug-In. This Plug-In calls the Create Schema (API) module. This API stores the new submission to your schema module. And, all you have to do is click a button!
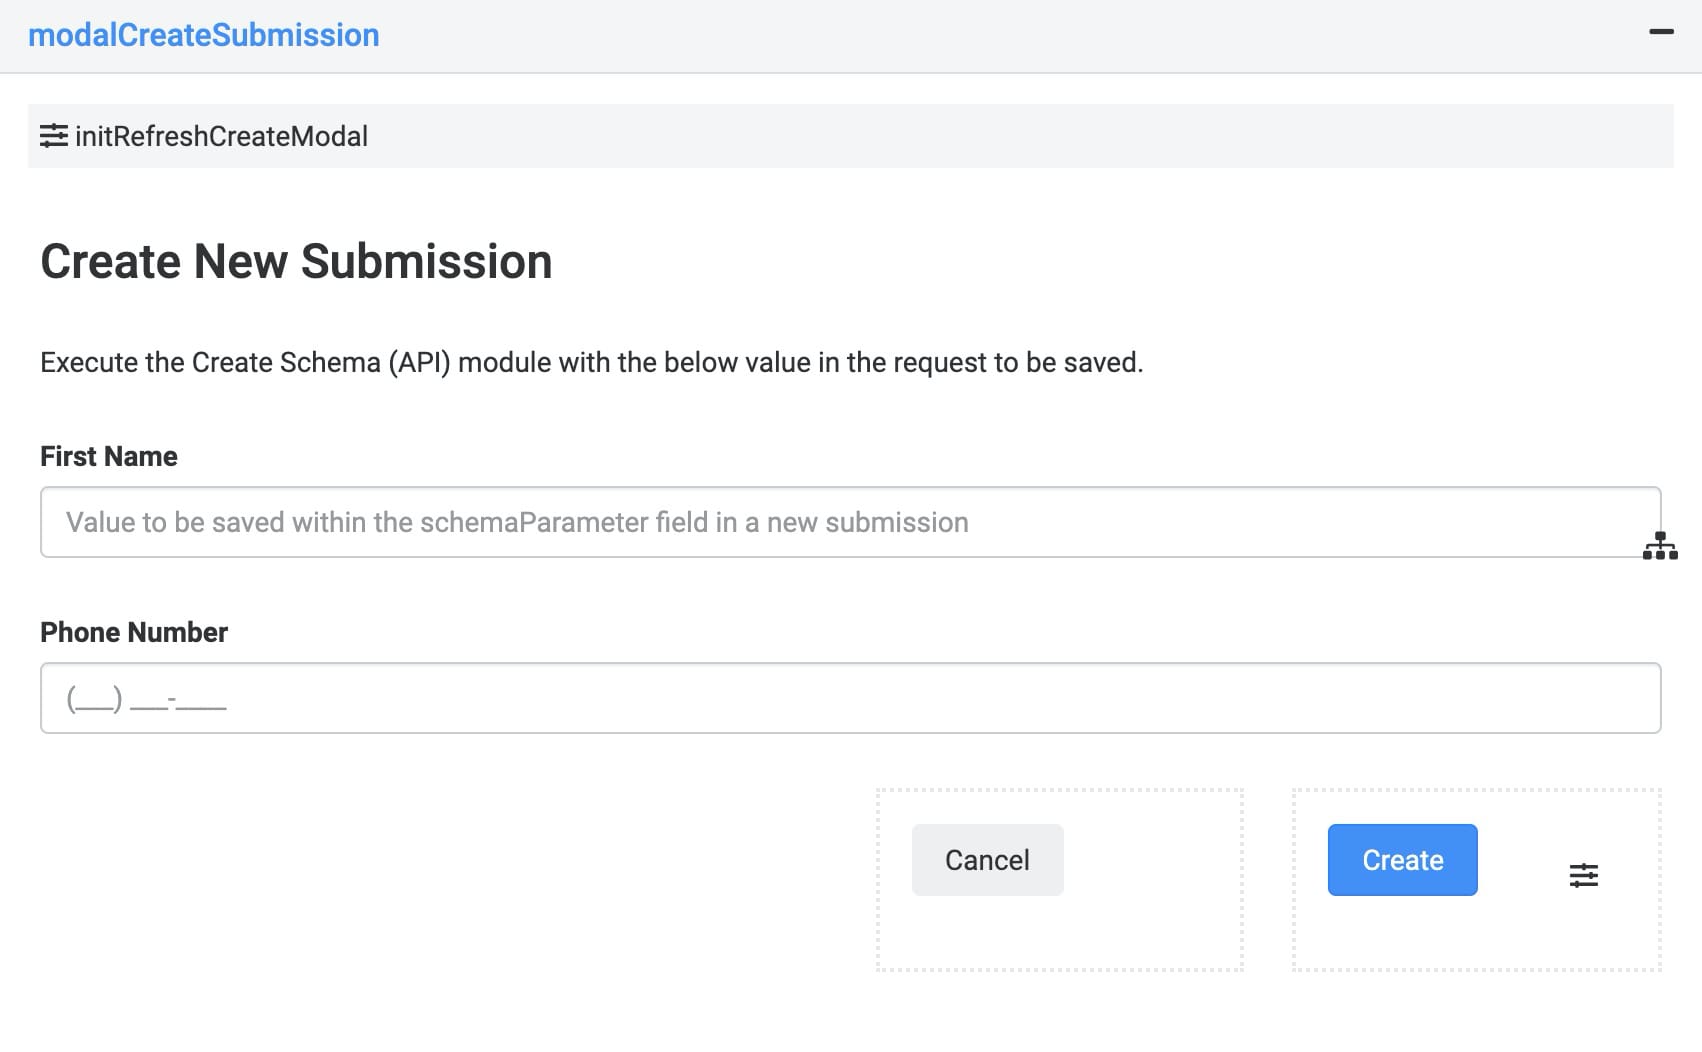
Here's how the Create Submission modal looks in Express View:
And here's how the Create Submission modal looks in the Module Builder:
.jpg)
Once you've created a new submission, your dashboard automatically refreshes in Express View. It should populate with the new submission you created! And, from there, you can update or delete your submissions. Clicking Edit Submission in Express View opens the Edit Submission modal.
You can customize the data you want to save with each new submission. We cover these customization options and more under Customizing the Application Template.
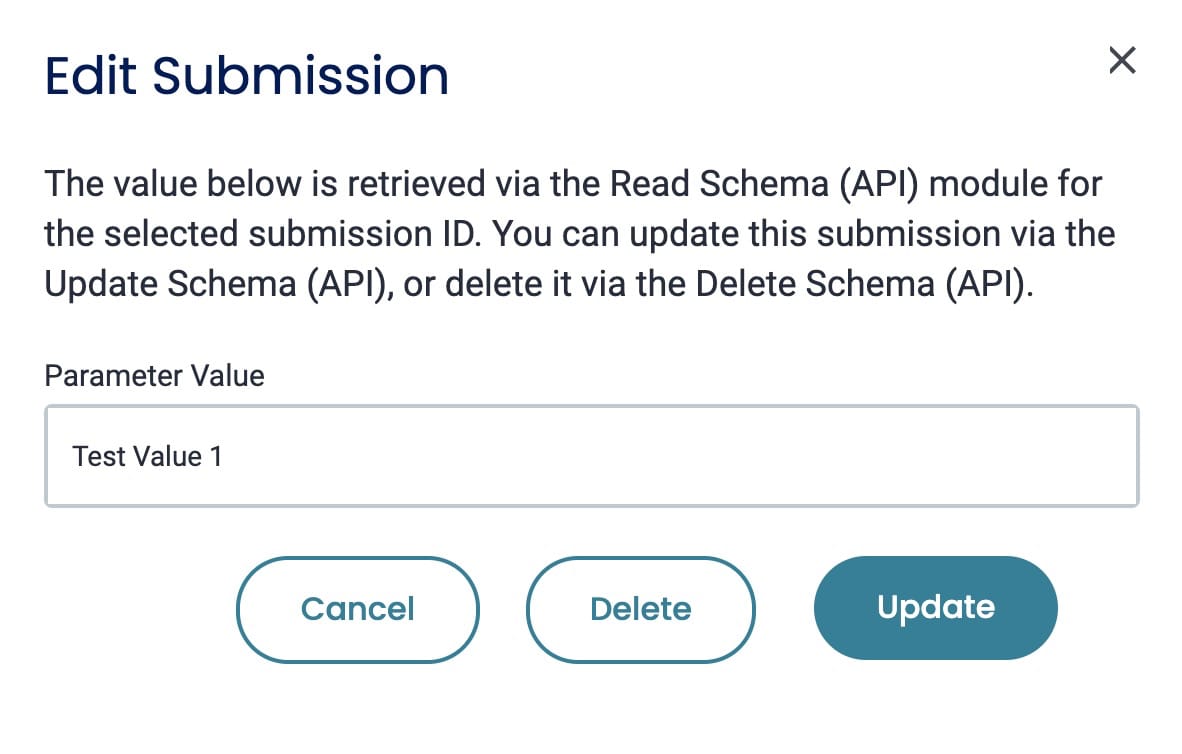
How the Edit Submission Modal Works
When you click the Edit button on your dashboard in Express View, you'll see an Edit Submission modal. In that modal, you can update the value(s) for your selected submission. Or, if you want, you can delete the submission.
Here's how the function works. Let's say you click Update. The Update button fires the ruleButtonHandler Decisions component. This Decisions component fires the pluginUpdateSubmission Plug-In. This Plug-In calls the Update Schema (API) module. That API overwrites the data in your schema module.
What if you click the Delete button instead? If you click the Delete button, the ruleButtonHandler fires the pluginDeleteSubmission Plug-In. This calls the Delete Schema (API) module. That API then deletes the selected submission from your schema module.
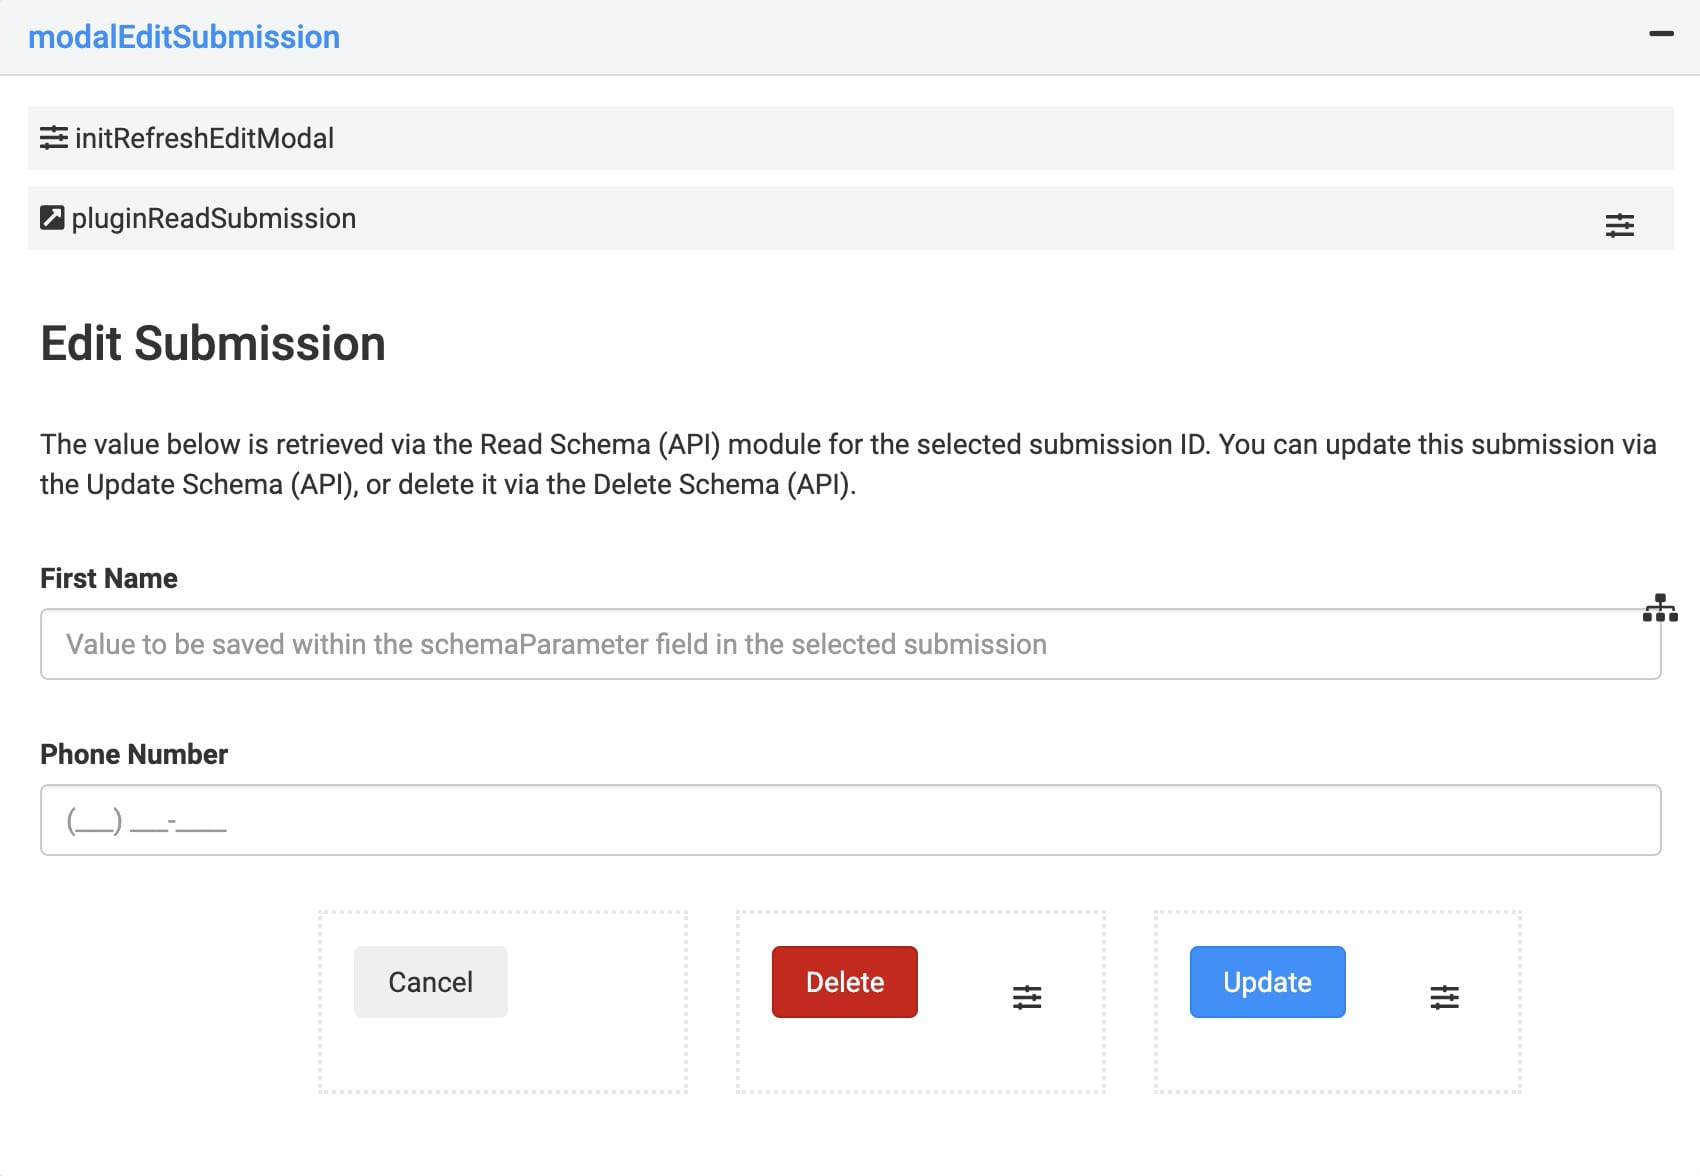
Here's how the Edit Submission modal looks in Express View:
And here's how the Edit Submission modal looks in the Module Builder:
.jpg)
Once you've deleted a submission, your dashboard automatically refreshes in Express View. The deleted submission should disappear from the dashboard.
Navigating the Schema Dashboard
The dashboard lists all your schema submissions. You'll find your dashboard on your Schema Dashboard module. From your dashboard, you can create, update, and delete submissions. You can also customize what fields show up for each submission. Don't worry. We'll cover this in the Customizing the Application Template section.
Here's an example of a schema dashboard:
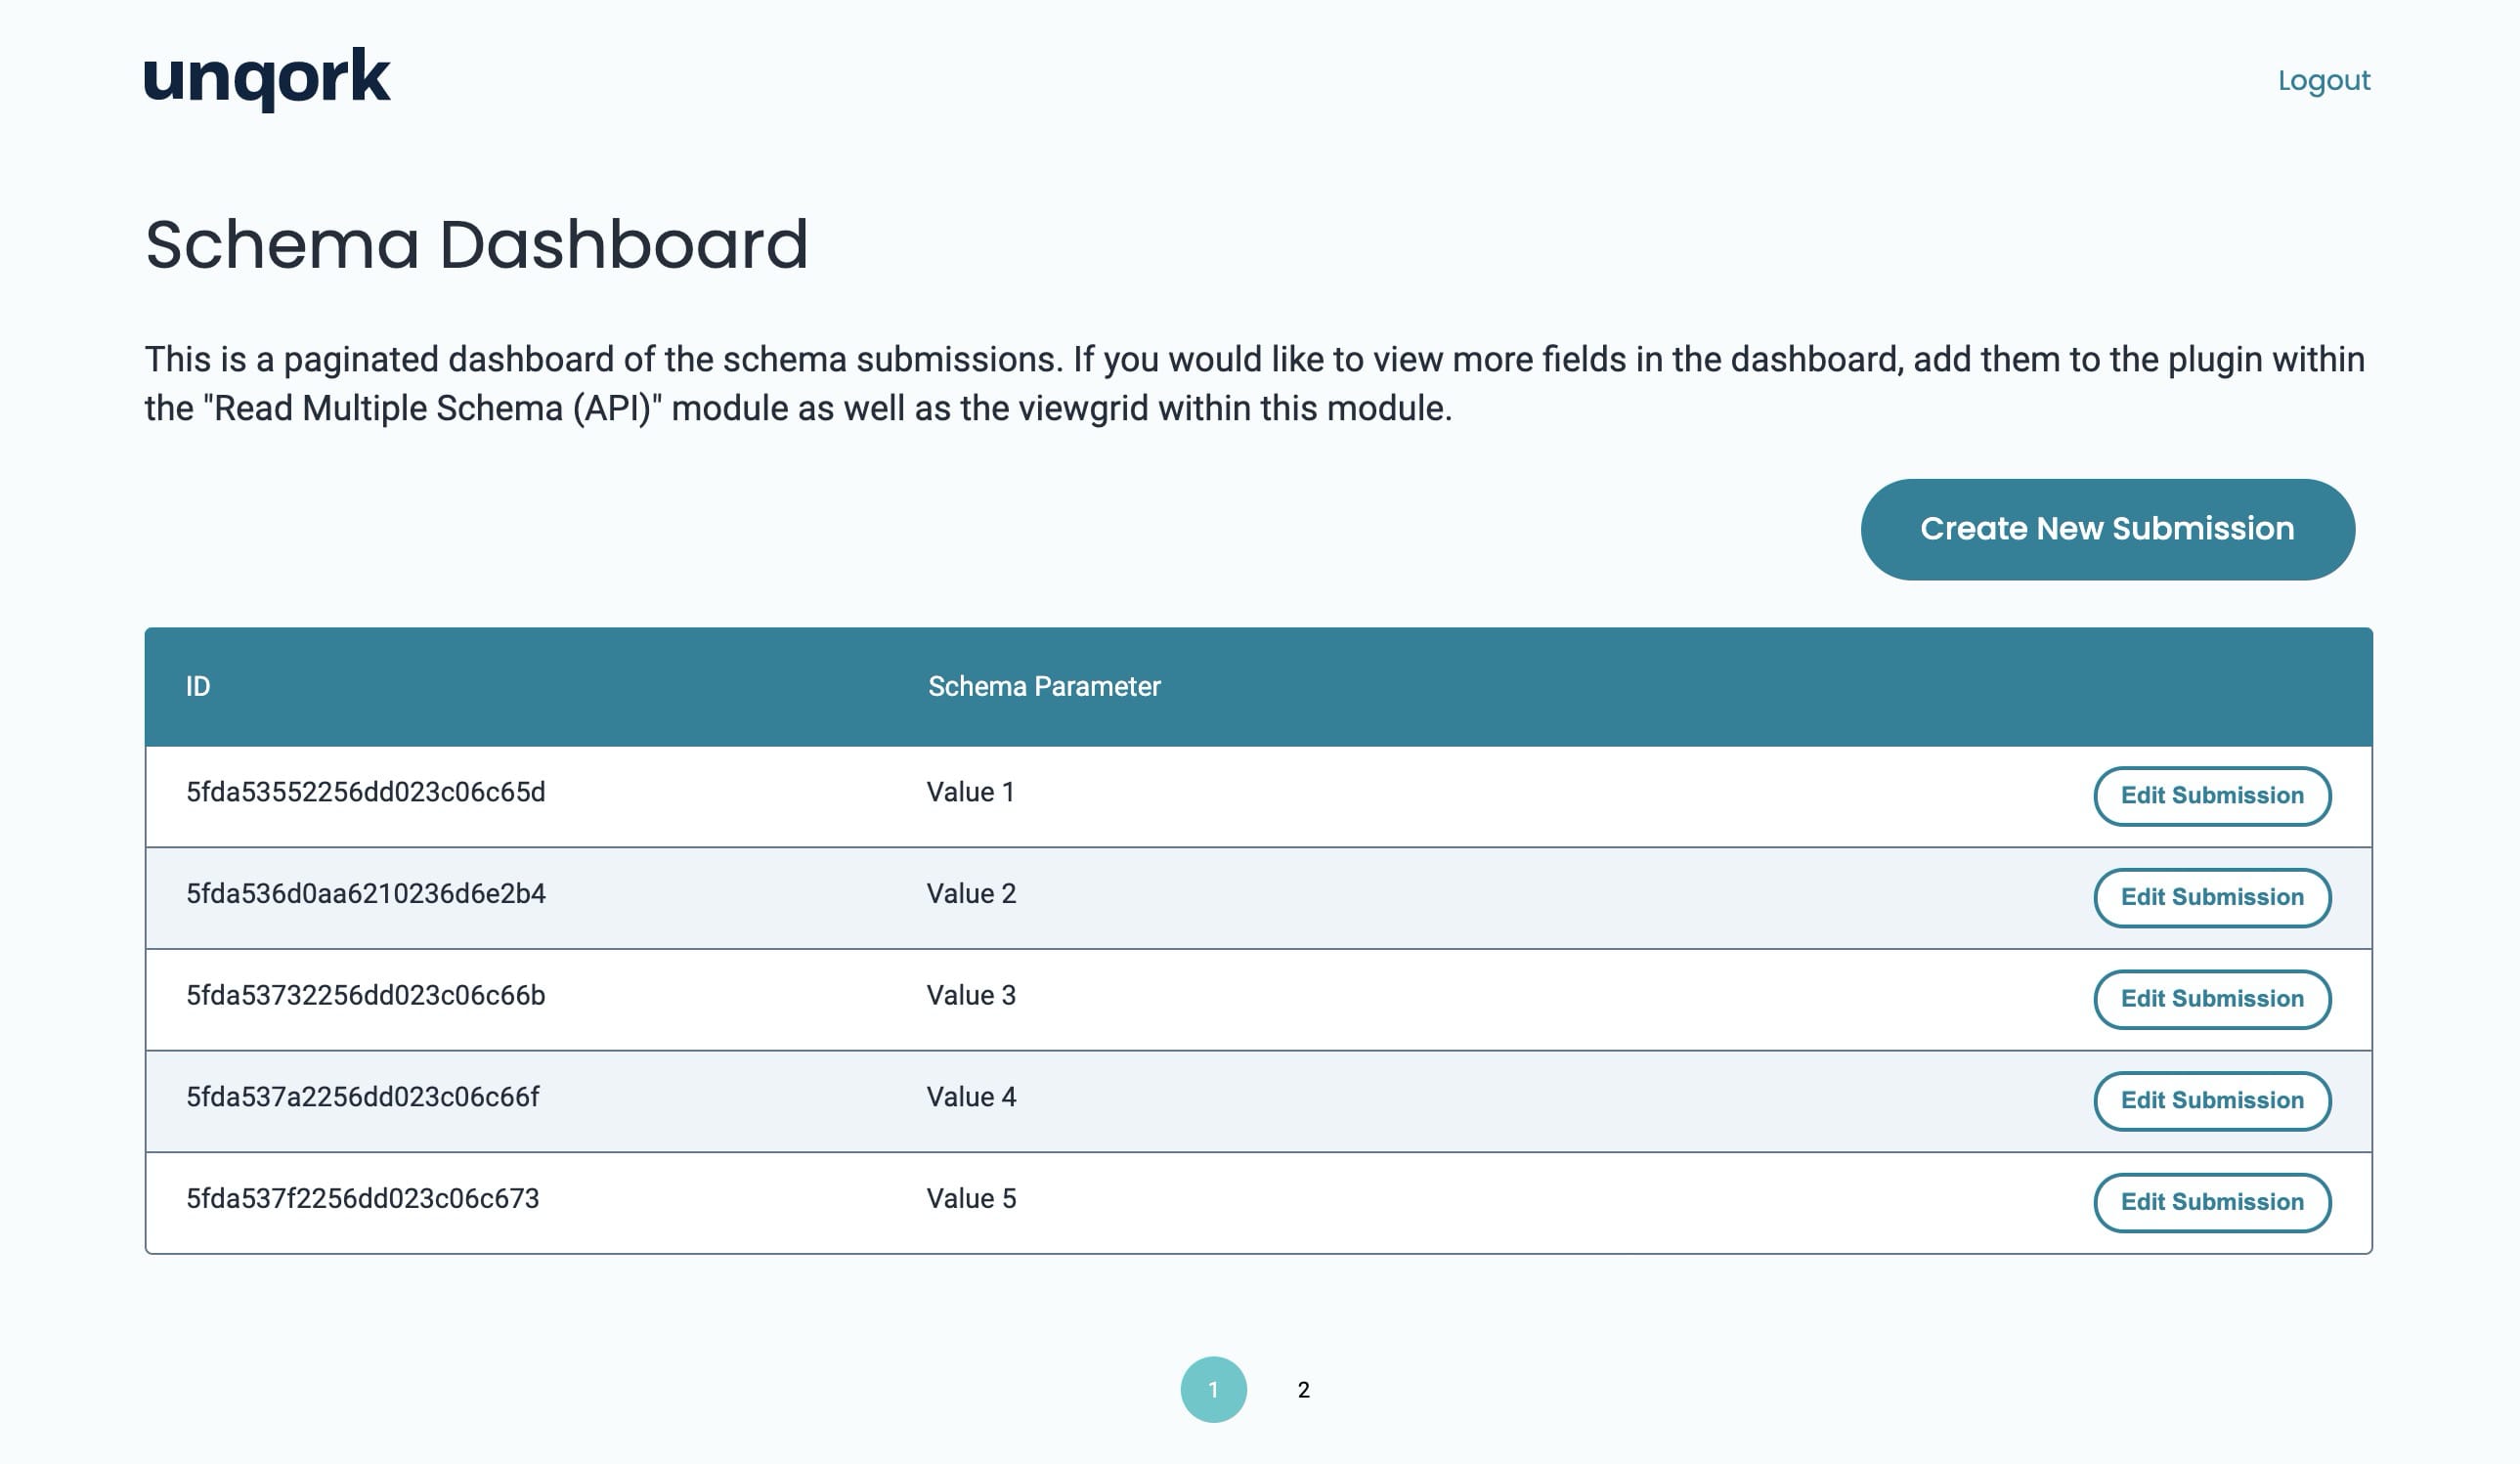
This dashboard uses server-side pagination. So, it only pulls 5 submissions at a time. When you click the next page, the dashboard pulls and loads the next 5 submissions. This prevents an overload from pulling too many submissions at once.
Let's explore the features and functions that you'll see in this dashboard:
| Setting | Description |
|---|---|
|
Create New Submission Button |
Clicking this opens the Create Submission modal. From there, you can enter value(s) for the data you want stored with your new submission. |
|
Create Button |
Once you click Create New Submission, you'll see the Create Submission modal. |
|
Cancel Button |
This button closes the Create New Submission modal. |
|
Edit Submission Button |
Clicking this opens the Edit Submission modal. From there, you can change the value(s) and click Update. Or, you can click Delete to delete the submission. |
|
Update Button |
Once you click Edit Submission, you'll see the Edit Submission modal. You can change the Parameter Value, then click Update. This saves the updated information to the submission. |
|
Delete Button |
Once you click Edit Submission, you'll see the Edit Submission modal. Clicking Delete deletes the submission. |
|
Cancel Button |
This button closes the Edit Submission modal. |
|
Navigation Buttons |
At the bottom of the dashboard, you'll see numbers indicating which page of the dashboard you're on or want to navigate to. Clicking these takes you to the previous or next pages in your dashboard. |
Configuring the Application Template
This application template works right off-the-shelf. So, there's no configuration required to make it behave as it should. However, it's best practice to set up RBAC to make sure the right people have the right access to your modules. Any other adjustments to your application will be customizations. If you're ready to customize, jump to our Customizing the Application Template section.
Setting up RBAC in This Template
Since every customer's needs are different, application templates come without any RBAC. This way, you can plan out and configure your RBAC in a way that makes sense for you and your business. RBAC is the most secure way to make sure that users have the right permissions in your application.
This application template is primarily for a back-end application. This means it's designed for you to work behind-the-scenes with the schema model and schema submissions. The only reason you'd need to update RBAC is if you want other roles to have access to any of your modules. A potential use case could be if you decide to build out a more complex dashboard to share with others.
For the Data Model and CRUD template, you would work with module-level RBAC. Let's go over a quick refresher on RBAC and how it would work for your Data Model and CRUD application.
Configuring RBAC Settings
An important note before we get started: there are many ways you can set up RBAC. Talk with your Solutions Architect about the best RBAC model for your needs. To adjust your module-level RBAC, you'll work with the Module Builder Settings tab. To access this tab, click the  (Settings) icon in the left sidebar menu of the Module Builder.
Let's take a look at the RBAC settings you could use with this application:
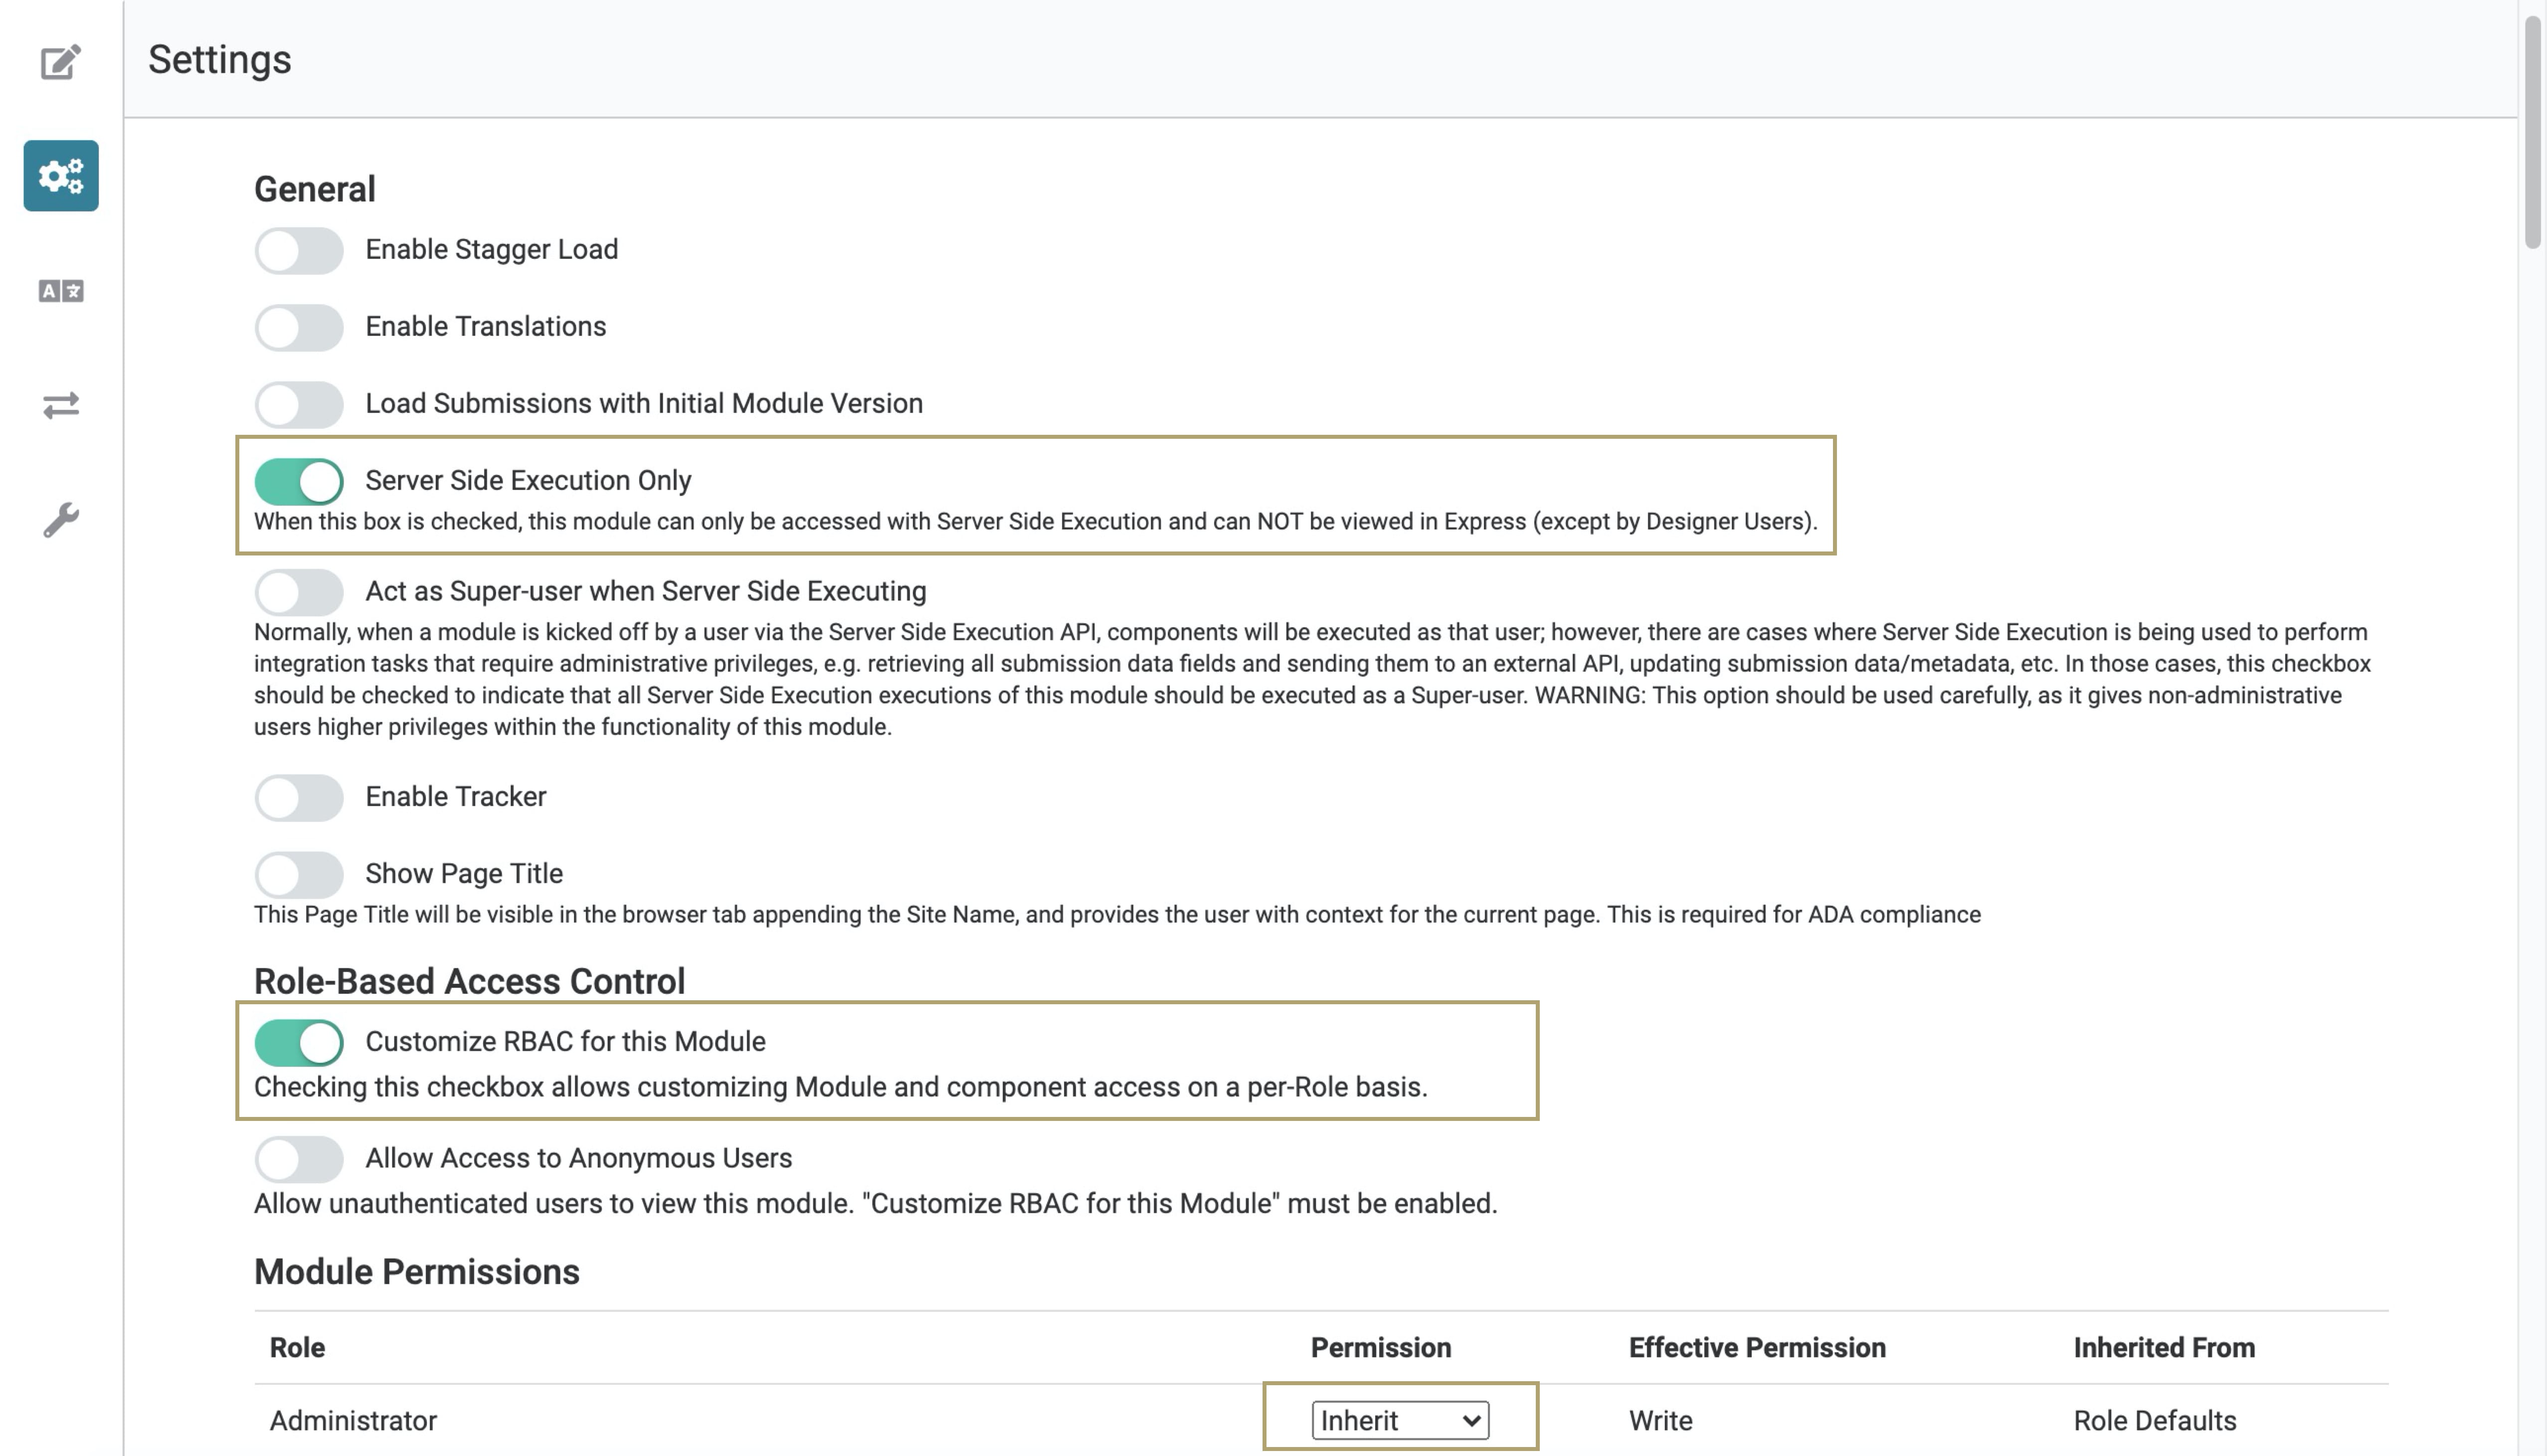
Here's a description of each RBAC setting and how they impact your modules:
| Setting | Description |
|---|---|
|
Server Side Execution Only Toggle |
When ON, this module executes remotely, which means it executes on an internal Unqork server. By default, the template's dashboard module has this toggle OFF. For back-end API modules, the template defaults this toggle to ON. |
|
Customize RBAC for this Module Toggle |
When ON, the settings screen shows a module permissions list with all roles in your environment. From there, you can adjust permissions for each role. Toggling this to ON also gives you access to the Allow Access to Anonymous Users toggle. For this application, you can ignore the Allow Access to Anonymous Users toggle. |
|
Permission Drop-down |
Before you change any permissions, each role has Inherit as the permission. Inherit means that the role's access in this module is the same as the environment-level. You can change this access to No Access, Read-Only, Write, or keep it as Inherit. This setting only shows after toggling the Customize RBAC for the Module to ON. |
Customizing the Application Template
When you create an application from this template, you’ll have a fully functional, generic, schema model. To make the application work for your use case, there are a few ways to personalize it. Here are the most common customizations:
-
Change the names of your modules.
-
Add fields to collect for each submission.
-
Change what displays on your schema dashboard.
Changing Module Names
When you create an application from the template, your module names will have a template ID and a time stamp. This prevents any duplicate module paths. Also, each module comes with a standard name explaining its basic function. So, for example, a module title could look something like: CRUD Template: Schema Dashboard - 5fd93bb9fe4b100237901812 1.0.0 2020-12-15T22:44:43.040Z. We recommend changing the module names to simplify and organize your application.
Let's say you own an insurance company and want to use your application to create claims. You could change your module names to contain the word claim. So, you could change CRUD Template: Create Schema (API) to Create Claim (API). From there, CRUD Template: Schema Dashboard could change to Claim Dashboard, and so on.
To change the name of your module:
| 1. | Open your module in the Module Builder. |
| 2. | Click and select the module title at the top of the page. |
| 3. | Enter your preferred module title. |
| 4. | Save your module. |
Adding Fields
To make the application work for your use case, you can define the fields (parameters) you want stored in the schema module. When you customize your application, you can add as many parameters as you want. And, you can name them whatever you want.
We named the modules' default Hidden components schemaParameter and requestParameter to more clearly show you how the parameters and modules communicate with each other. You can name your components anything that works for you. As long as you update the mapping correctly, your application will work.
Once you define the schema parameters, you'll need to add the same fields to the Create and Update modules. You'll also need to update your Schema Dashboard module with entry fields for these new parameters. Then, you'll update mapping to make sure the modules and components behave as expected.
Say you want each submission to have a First Name and Phone Number. Let's take a look at how you'd do that:
Adding Schema Parameters to the Schema Module
When you build your application from this template, the schema module will have 1 Hidden component called schemaParameter. You can keep this name or, if you want, you can update it.
For this use case, you'll update the Hidden component's name. Then, you'll add a second Hidden component. In the next steps, you'll update the mapping to make sure the application works the way it should.
You can add as many parameters as you want. You'll use a Hidden component for each parameter. Make sure you have the correct field tag that represents the data you want to store. Also, set the Store Data to Database toggle to ON for each new schema parameter. Lastly, add a comment in the Notes section describing the field. Then, follow the rest of the steps to update the other modules' mapping. You've got this!
You can add as many parameters as you want. You'll use a Hidden component for each parameter. Make sure you have the correct field tag that represents the data you want to store. Also, set the Store Data to Database toggle to ON for each new schema parameter. Lastly, add a comment in the Notes section describing the field. Then, follow the rest of the steps to update the other modules' mapping. You've got this!
Update the schemaParameter Hidden Component
You can keep schemaParameter as it is. Or, you can update it to something else. In this case, you'll update it to firstName. This edit takes place in your schema module in the Module Builder.
| 1. | Hover over the schemaParameter Hidden component. |
A 5-button toolbar appears above the component on hover-over.
| 2. | Using the toolbar, click the  (Settings) button. (Settings) button. |
| 3. | Enter firstName in the Property ID and Canvas Label Text. |
| 4. | Choose the Field Tag that fits your parameter. In this case, you'll choose type:string. |
Ensure that the field tag on the component represents the data you want to store. You can choose type:string, type:array, type:boolean, type:number, type:object, or type:objectId. When you first open the schemaParamater Hidden component, you'll see that it has all available field tags. This is to show you your options! To remove a field tag, hit the X button next to the word. To add a new field tag, simply type the word and hit enter or return on your keyboard.
| 5. | If you want this as a required parameter, set the Required toggle to ON. |
| 6. | Under Notes, update with a brief description of this parameter and Save the Note. |
| 7. | Click Save. |
Add a Hidden Component
Next, you'll add a Hidden Component for Phone Number.
| 1. | In the Module Builder, drag and drop a Hidden component onto your canvas. Place it below the firstName field. |
| 2. | Enter phoneNumber in the Property ID and Canvas Label Text. |
| 3. | Enter type:string as the Field Tag and hit enter or return on your keyboard. |
The Phone Number component saves a phone number as a string rather than a number. So, you'll set this Hidden component's Field Tag to type:string.
| 4. | Set the Store Data in Database toggle to ON. |
| 5. | If you want this as a required parameter, set the Required toggle to ON. |
| 6. | Under Notes, add a brief description of this parameter and Save the Note. |
| 7. | Click Save. |
| 8. | Save your module. |
Once you've updated your schema module, it should look something like this:
Next, you'll add matching request parameters to the Create Schema (API) and Update Schema (API) modules.
Adding Request Parameters to the Create Schema (API) Module
Since you've updated your schema module, you'll also update the Create Schema (API) module. The Create Schema (API) module comes standard with 1 Hidden component called requestParameter. For this use case, you'll update the Hidden component's name. Then, you'll add a second Hidden component. In the next steps, you'll update the mapping to make sure the application works the way it should.
Update the requestParameter Hidden Component
You can keep requestParameter as it is. Or, you can update it to something else. In this case, you'll update it to firstName. This edit takes place in your Create Schema (API) module in the Module Builder.
| 1. | Hover over the requestParameter Hidden component. |
A 5-button toolbar appears above the component on hover-over.
| 2. | Using the toolbar, click the (Settings) button. |
| 3. | Enter firstName in the Property ID and Canvas Label Text. |
| 4. | Choose the Field Tag that fits your parameter. In this case, you'll choose type:string. |
| 5. | If you want this as a required parameter, set the Required toggle to ON. |
| 6. | Under Notes, update with a brief description of this parameter and Save the Note. |
| 7. | Click Save. |
Add a Hidden Component
Next, you'll add a Hidden Component for Phone Number.
| 1. | In the Module Builder, drag and drop a Hidden component onto your canvas. Place it below the firstName field. |
| 2. | Enter phoneNumber in the Property ID and Canvas Label Text. |
| 3. | Enter type:string as the Field Tag and hit enter or return on your keyboard. |
| 4. | If you want this as a required parameter, set the Required toggle to ON. |
| 5. | Under Notes, enter a brief description for the parameter and Save the Note. |
| 6. | Click Save. |
| 7. | Save your module. |
You'll notice that these steps don't ask you to store data for the request parameters. You only need to store data in the database with the schema parameters. As for these request parameters, leave the Store Data in Database toggle OFF.
Once you've updated your Create Schema (API) module, it should look something like this:
Updating the Update Schema (API) Module
The Update Schema (API) module also comes with a Hidden component called requestParameter. This maps to the schemaParameter in the schema module. This mapping is how updated information overwrites the schema submission. In this module, you'll add the same request parameters that you added in the Create Schema (API) module. Give it a try!
Update the requestParameter Hidden Component
Since you changed the request parameters in the Create Schema (API) module, you'll need to mirror those changes here. In this case, you'll update the existing Hidden component to firstName. This edit takes place in your Update Schema (API) module in the Module Builder.
| 1. | Hover over the requestParameter Hidden component. |
A 5-button toolbar appears above the component on hover-over.
| 2. | Using the toolbar, click the (Settings) button. |
| 3. | Enter firstName in the Property ID and Canvas Label Text. |
| 4. | Choose the Field Tag that fits your parameter. In this case, you'll choose type:string. |
| 5. | If you want this as a required parameter, set the Required toggle to ON. |
| 6. | Under Notes, update with a brief description of this parameter and Save the Note. |
| 7. | Click Save. |
Add a Hidden Component
Next, you'll add a Hidden Component for Phone Number.
| 1. | In the Module Builder, drag and drop a Hidden component onto your canvas. Place it below the firstName field. |
| 2. | Enter phoneNumber in the Property ID and Canvas Label Text. |
| 3. | Enter type:string as the Field Tag and hit enter or return on your keyboard. |
| 4. | If you want this as a required parameter, set the Required toggle to ON. |
| 5. | Under Notes, enter a description for the parameter and Save the Note. |
| 6. | Click Save. |
| 7. | Save your module. |
You'll notice that these steps don't ask you to store data for the request parameters. You only need to store data in the database with the schema parameters. As for these request parameters, leave the Store Data in Database toggle OFF.
Once you've updated your Update Schema (API) module, it should look something like this:
Updating the Schema Dashboard Module
To create and update submissions, you'll access your schema dashboard in Express View. So, you must update the Schema Dashboard module with the new fields you added in the steps above. These updates ensure that you have the correct fields in your Create Submission modal and Edit Submission modal in Express View.
Update the schemaParameter Text Field Component in the Create Submission Modal
First, you'll update the schemaParameter Text Field component's Property ID and Label Text.
| 1. | Hover over the schemaParameter Text Field component. |
A 5-button toolbar appears above the component on hover-over.
| 2. | Using the toolbar, click the (Settings) button. |
| 3. | Enter firstName in the Property ID. |
| 4. | Enter First Name in the Label Text. |
| 5. | You can keep, delete, or change the Placeholder Text. |
| 6. | Click Save. |
Add Phone Number Component to the Create Submission Modal
Now, you'll add a Phone Number component in the Create Submission modal. When you create a new submission, this field is where you'll enter a phone number.
Make sure to choose whichever component matches the data you want to enter. For instance, if you wanted to collect addresses, use the Address component.
| 1. | Drag and drop a Phone Number component onto the canvas. Place it under the firstName Text Field component in the modalCreateSubmission Panel. |
| 2. | Enter phoneNumber in the Property ID. |
| 3. | Enter Phone Number in the Label Text. |
| 4. | Set the Store Data to Database toggle to OFF. |
| 5. | Click Save. |
Update the updateParameter Text Field Component in the Edit Submission Modal
A module can't have 2 components with the same Property ID. So, we've called this component updateParameter instead of Parameter. Having "update" at the beginning of the update fields also keeps the edit and create functions separate and makes for easier mapping.
| 1. | Hover over the updateParameter Text Field component. |
A 5-button toolbar appears above the component on hover-over.
| 2. | Using the toolbar, click the (Settings) button. |
| 3. | Enter updateFirstName in the Property ID. |
| 4. | Enter First Name in the Label Text. |
| 5. | You can keep, delete, or change the Placeholder Text. |
| 6. | Click Save. |
Add Phone Number Component to the Edit Submission Modal
This is the last step before you'll move on and update mapping.
| 1. | Drag and drop a Phone Number component onto the canvas. Place it under the updateFirstName Text Field component in the modalEditSubmission Panel. |
| 2. | Enter updatePhoneNumber in the Property ID. |
| 3. | Enter Phone Number in the Label Text. |
| 4. | Set the Store Data to Database toggle to OFF. |
| 5. | Click Save. |
| 6. | Save your module. |
Once you've updated your Schema Dashboard module, your modalCreateSubmission Panel should look something like this:
And here's how your modalEditSubmission Panel should look:
Updating Mapping in Create Schema (API) Module
The next step is to add the updated fields to your Plug-Ins in the Create, Update, and List modules. In Create and Update, you'll update the mapping between your request and schema parameters. In the List Schema (API) module, you'll update with the fields you want to retrieve for your dashboard. First, let's look at how you'll update the Create Schema (API) module.
Update the pluginCreateSubmission Plug-In
So far, you've changed the name of 1 Hidden component and added a second Hidden component. So, now you'll need to update mapping. In the Create Schema (API) module, you'll update mapping in the pluginCreateSubmission Plug-In.
| 1. | In the Module Builder, hover over the pluginCreateSubmission Plug-In component. |
A 5-button toolbar appears above the component on hover-over.
| 2. | Using the toolbar, click the (Settings) button. |
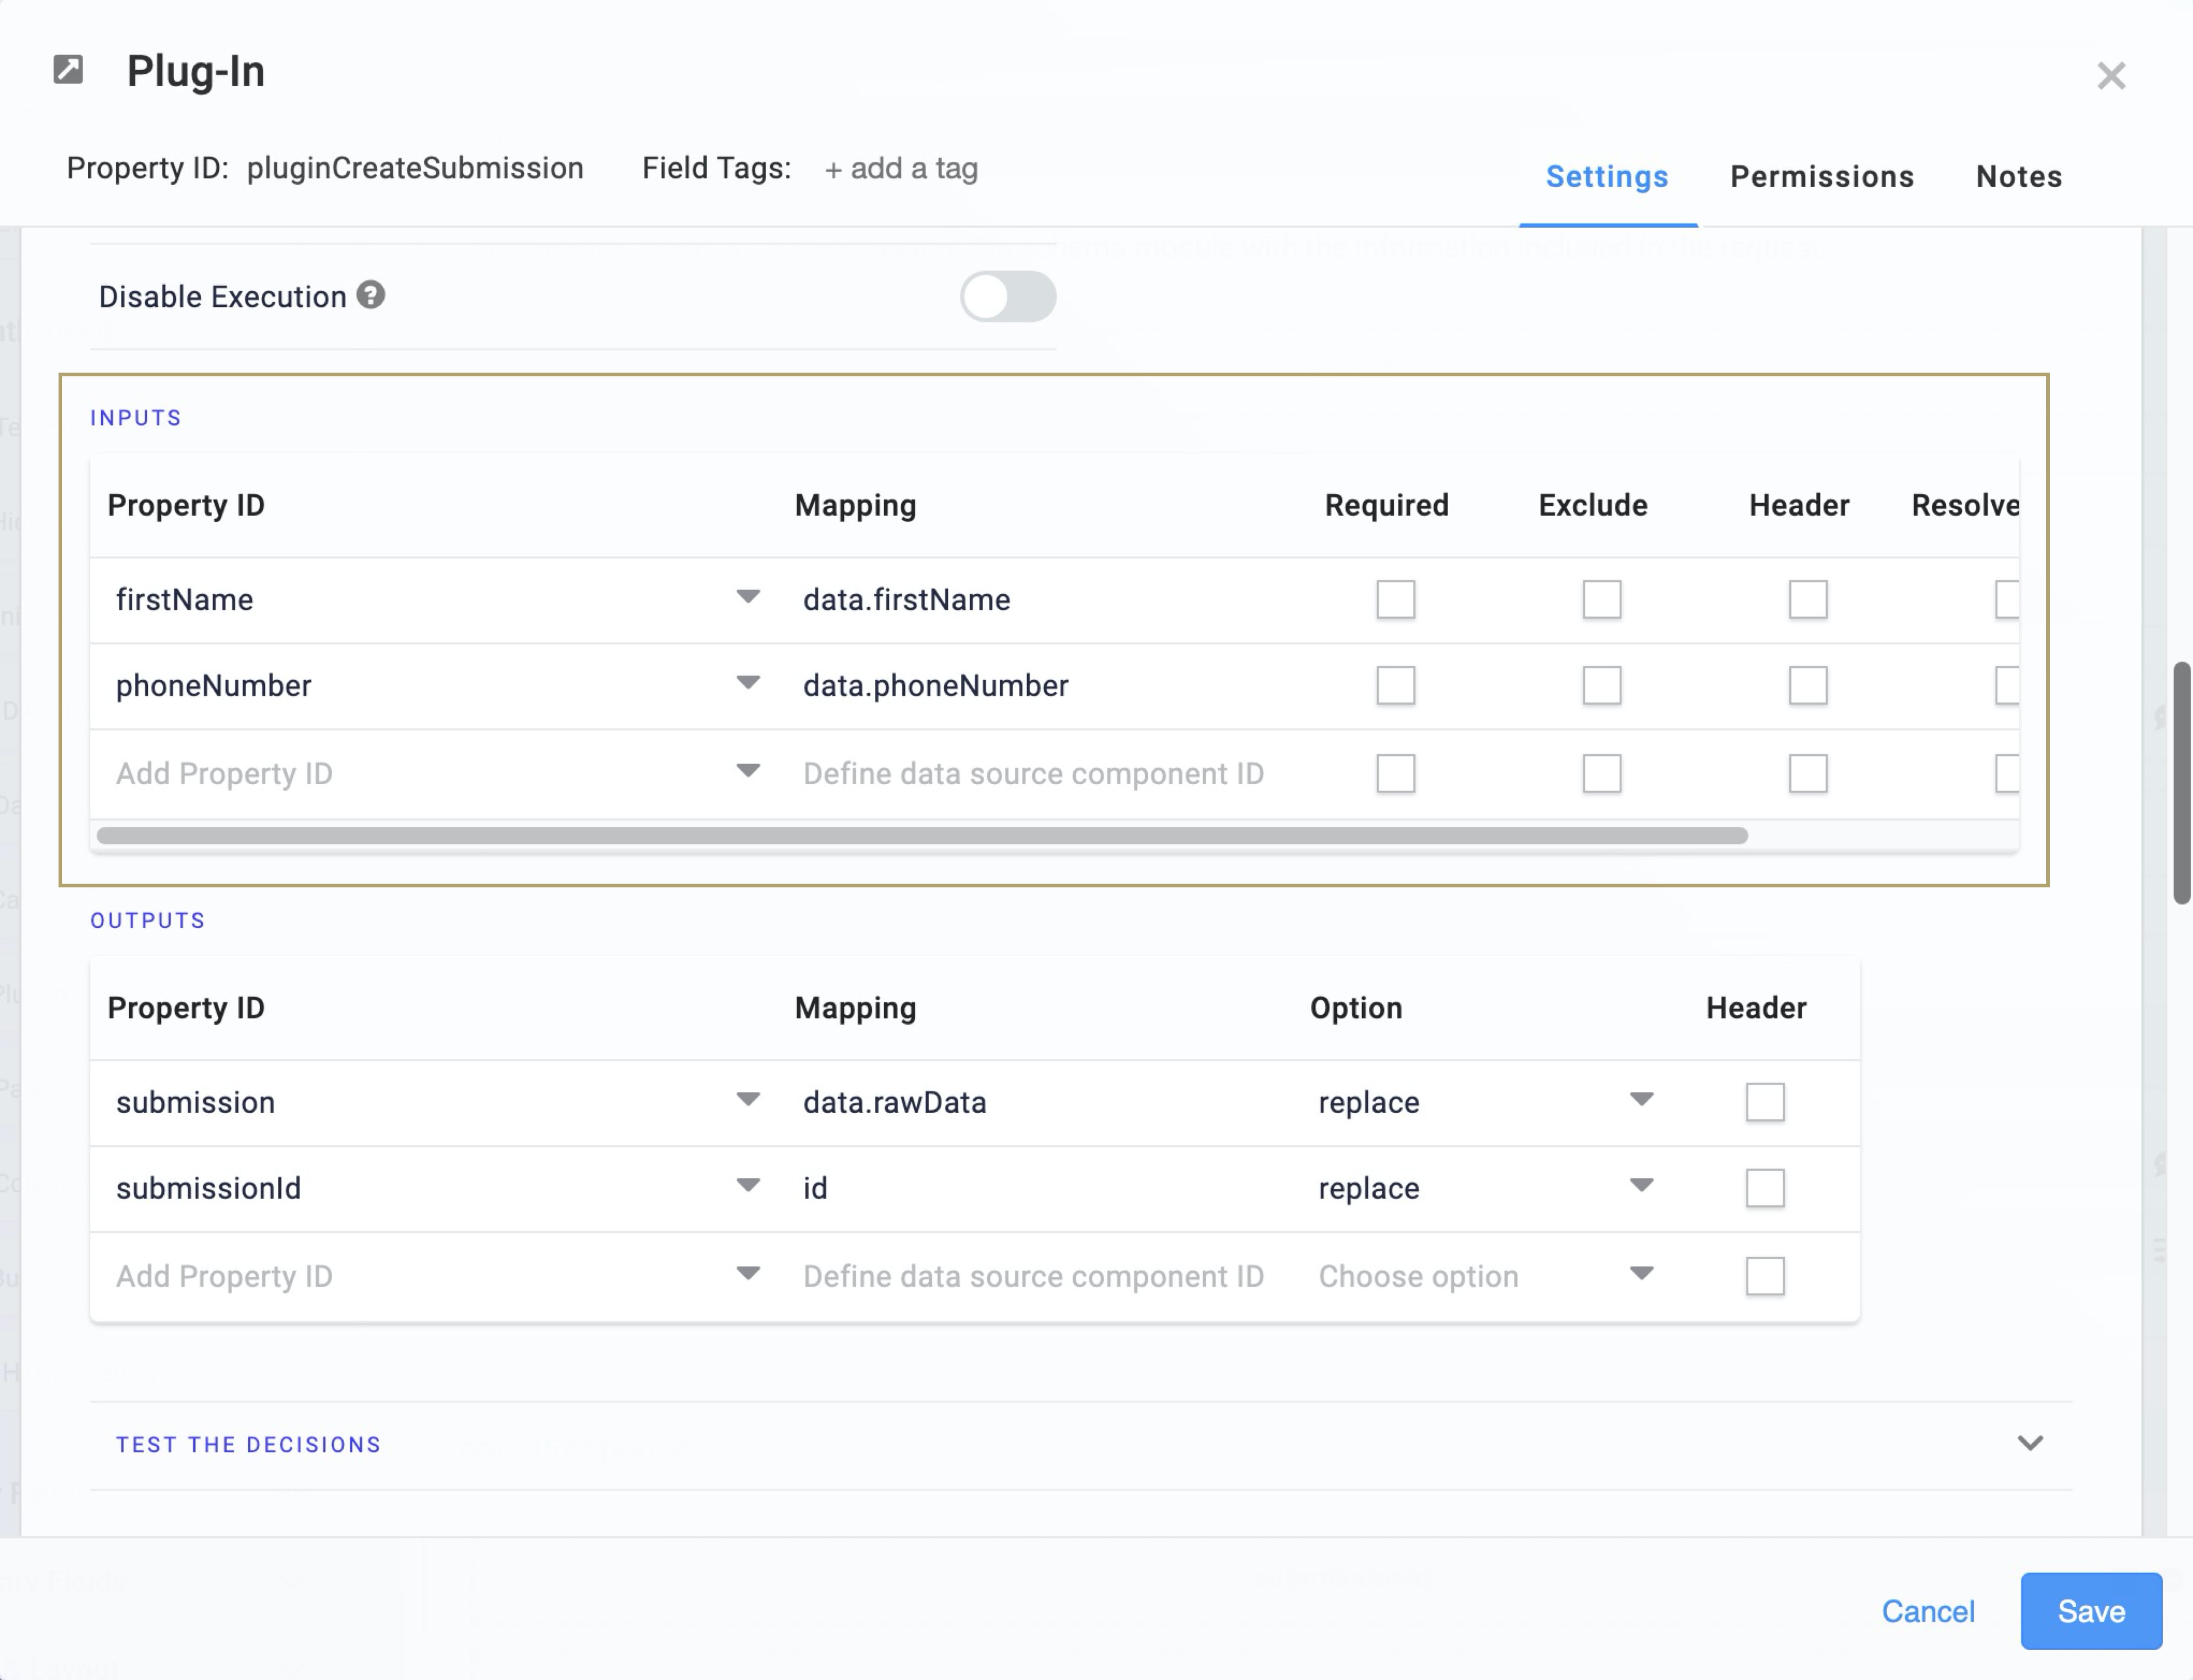
| 3. | Update the Inputs table as follows: |
|
Property ID |
Mapping |
|---|---|
|
firstName |
data.firstName |
|
phoneNumber |
data.phoneNumber |
The first column references the request parameters in your current module. The second column maps to the corresponding schema parameters in the schema module. Under this Plug-In's Data tab, you'll see that the component's default configuration maps to the schema module's ID. We've already set this up for you. So, all you have to do is update the Inputs table with your new fields.
| 4. | Click Save. |
| 5. | Save your module. |
Updating Mapping in Update Schema (API) Module
Now, let's look at how you'll update the Update Schema (API) module. This update is almost identical to what you did in the Create Schema (API) module. So, it should be pretty easy.
Update the pluginUpdateSubmission Plug-In
In the Update Schema (API) module, you'll update mapping in the pluginCreateSubmission Plug-In.
| 1. | In the Module Builder, hover over the pluginCreateSubmission Plug-In component. |
A 5-button toolbar appears above the component on hover-over.
| 2. | Using the toolbar, click the (Settings) button. |
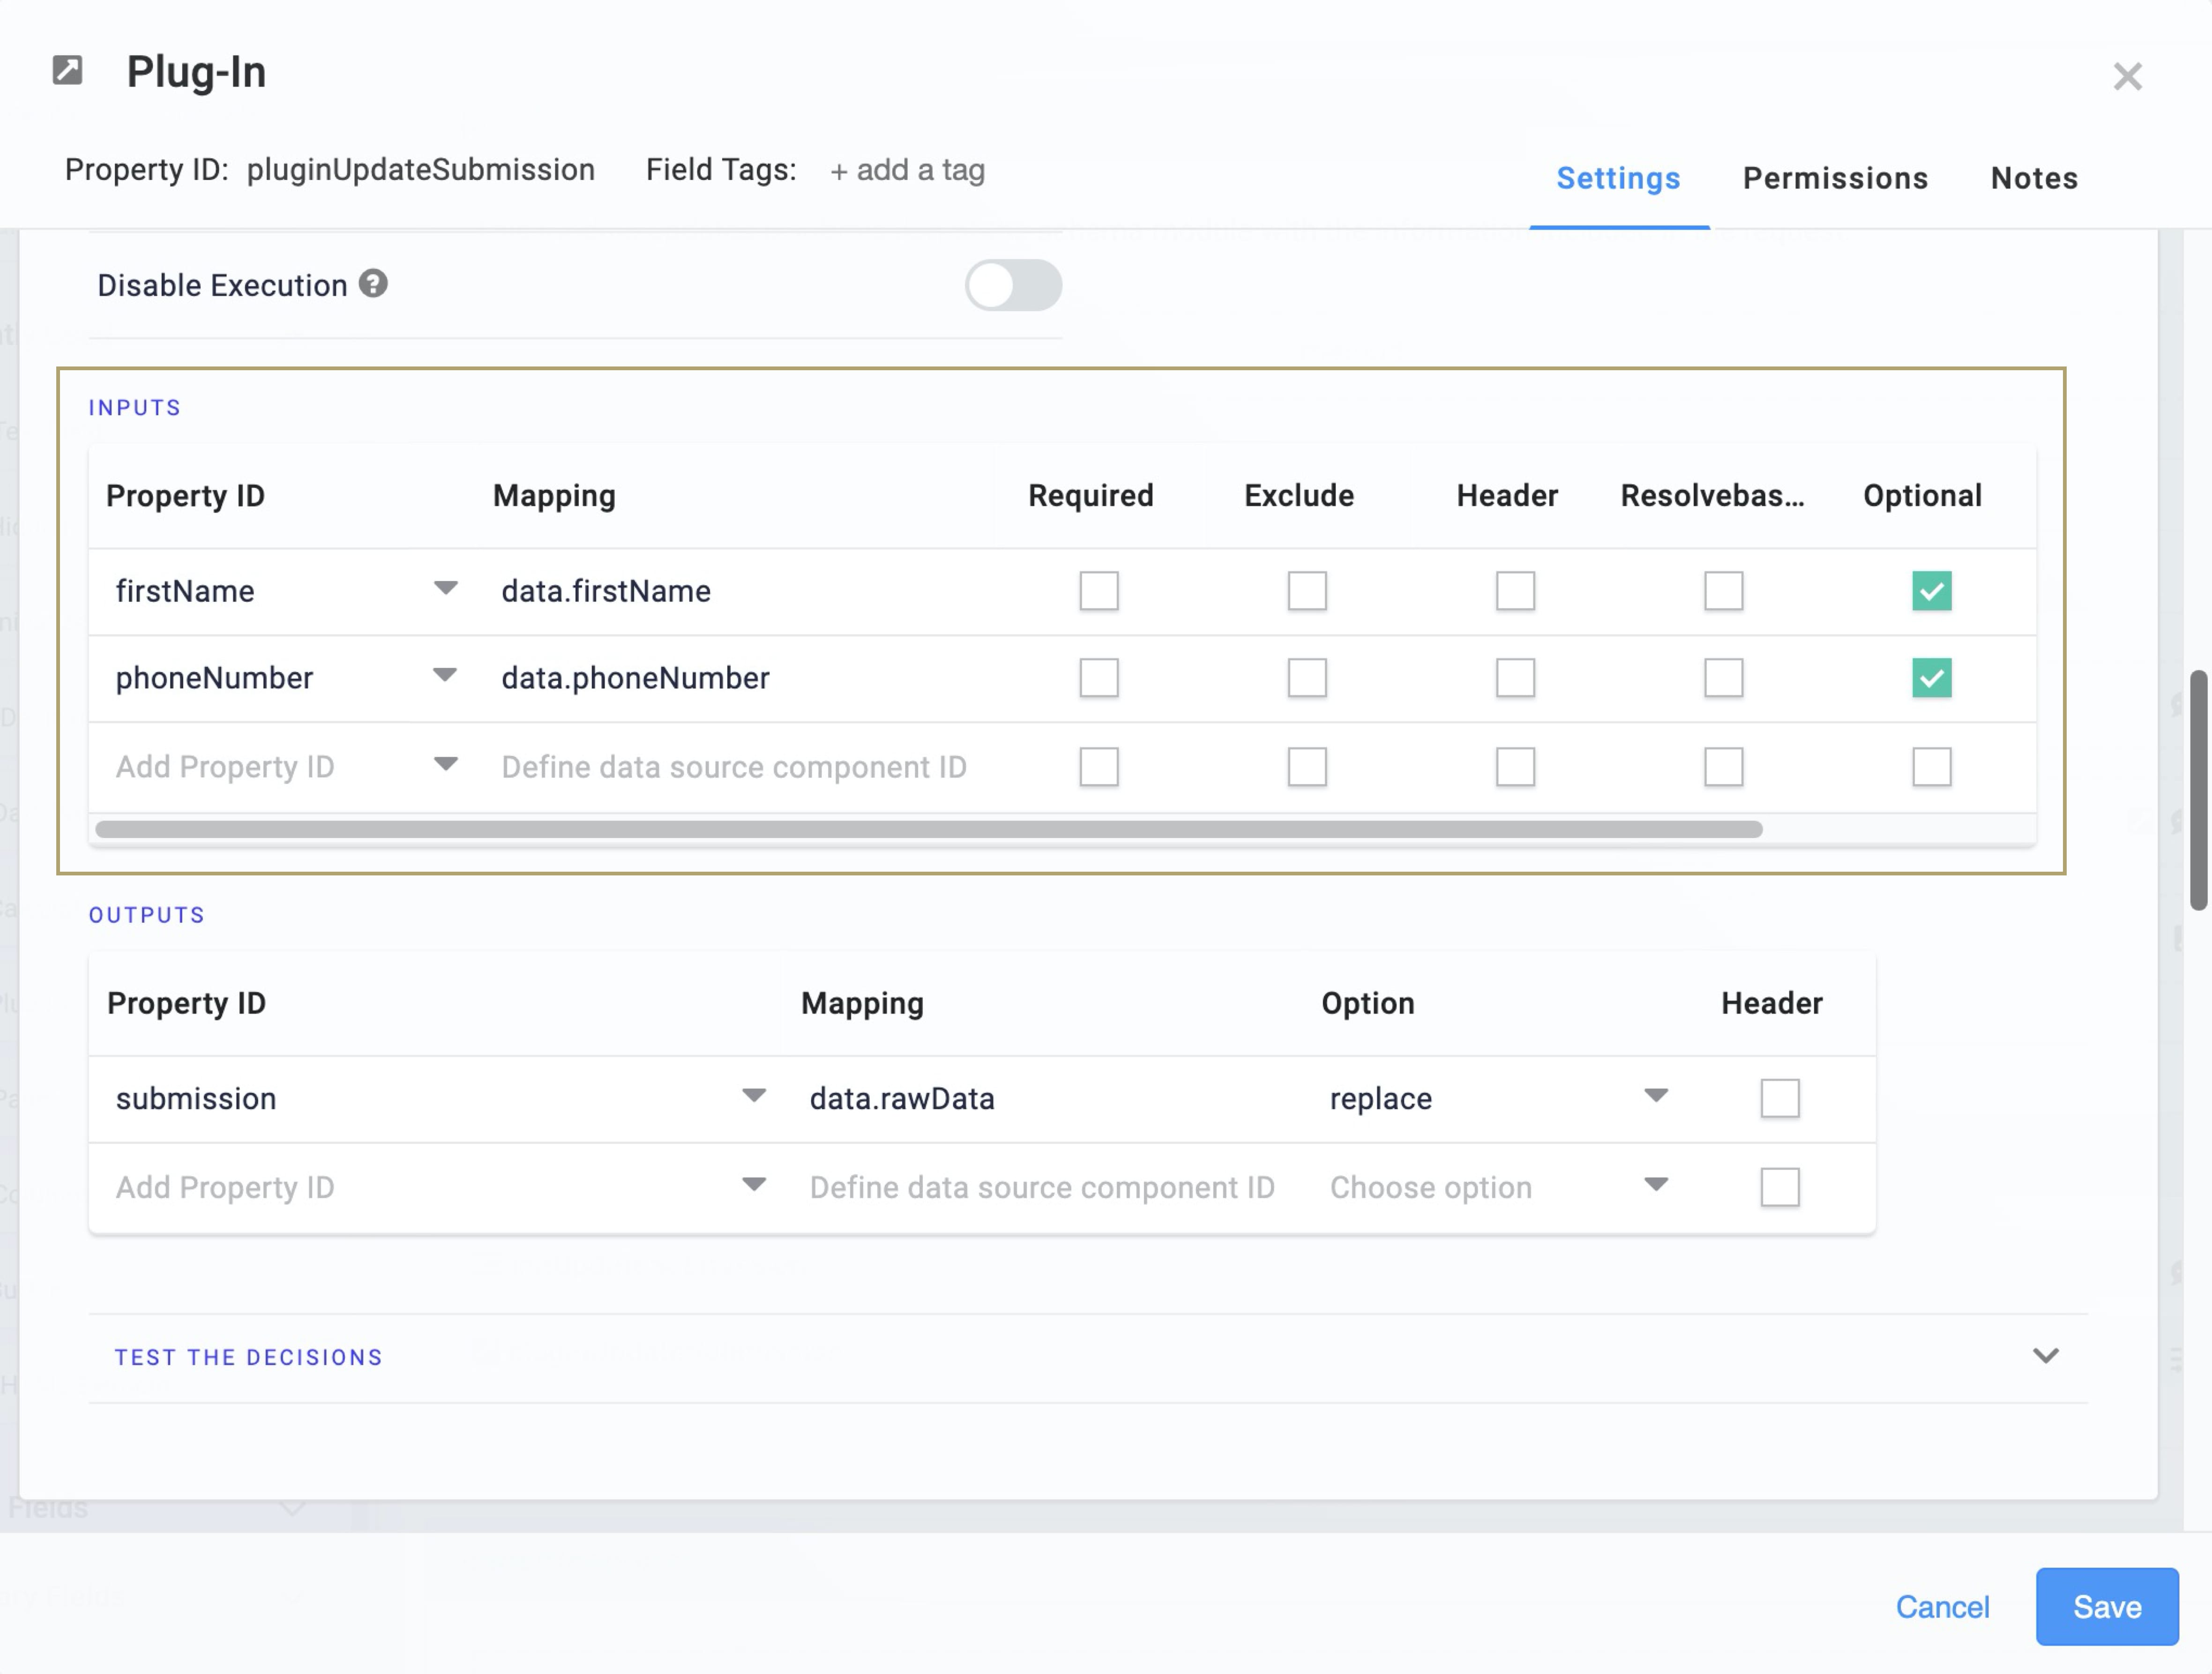
| 3. | Update the Inputs table as follows: |
|
Property ID |
Mapping |
Optional |
|---|---|---|
|
firstName |
data.firstName |
Yes (checked) |
|
phoneNumber |
data.phoneNumber |
Yes (checked) |
The first column references the request parameters in your current module. The second column maps to the corresponding schema parameters in the schema module. The component's default configuration maps to the schema module's ID. We've already set this up for you. So, all you have to do is update the Inputs table with your new fields.
We recommend setting all parameters as Optional in this Inputs table. When you set a parameter to Optional, the field only overwrites the schema submission when you enter updated information. So, marking parameters as Optional prevents unintended overwrites.
| 4. | Click Save. |
| 5. | Save your module. |
Updating Mapping in List Schema Submissions (API) Module
Now, let's look at how you'll update the List Schema Submissions (API) module. This update is different from what you did in the Create and Update modules. Remember, the List module pulls multiple submissions from your schema module. From there, it populates your dashboard. So, when you add new request and schema parameters, make sure to also update the mapping in this module.
Update the pluginGetSubmissions Plug-In
In the List Schema Submissions (API) module, you'll update mapping in the pluginGetSubmissions Plug-In. This Plug-In retrieves submissions from the schema module, which then post to your dashboard.
| 1. | In the Module Builder, hover over the pluginGetSubmissions Plug-In component. |
A 5-button toolbar appears above the component on hover-over.
| 2. | Using the toolbar, click the (Settings) button. |
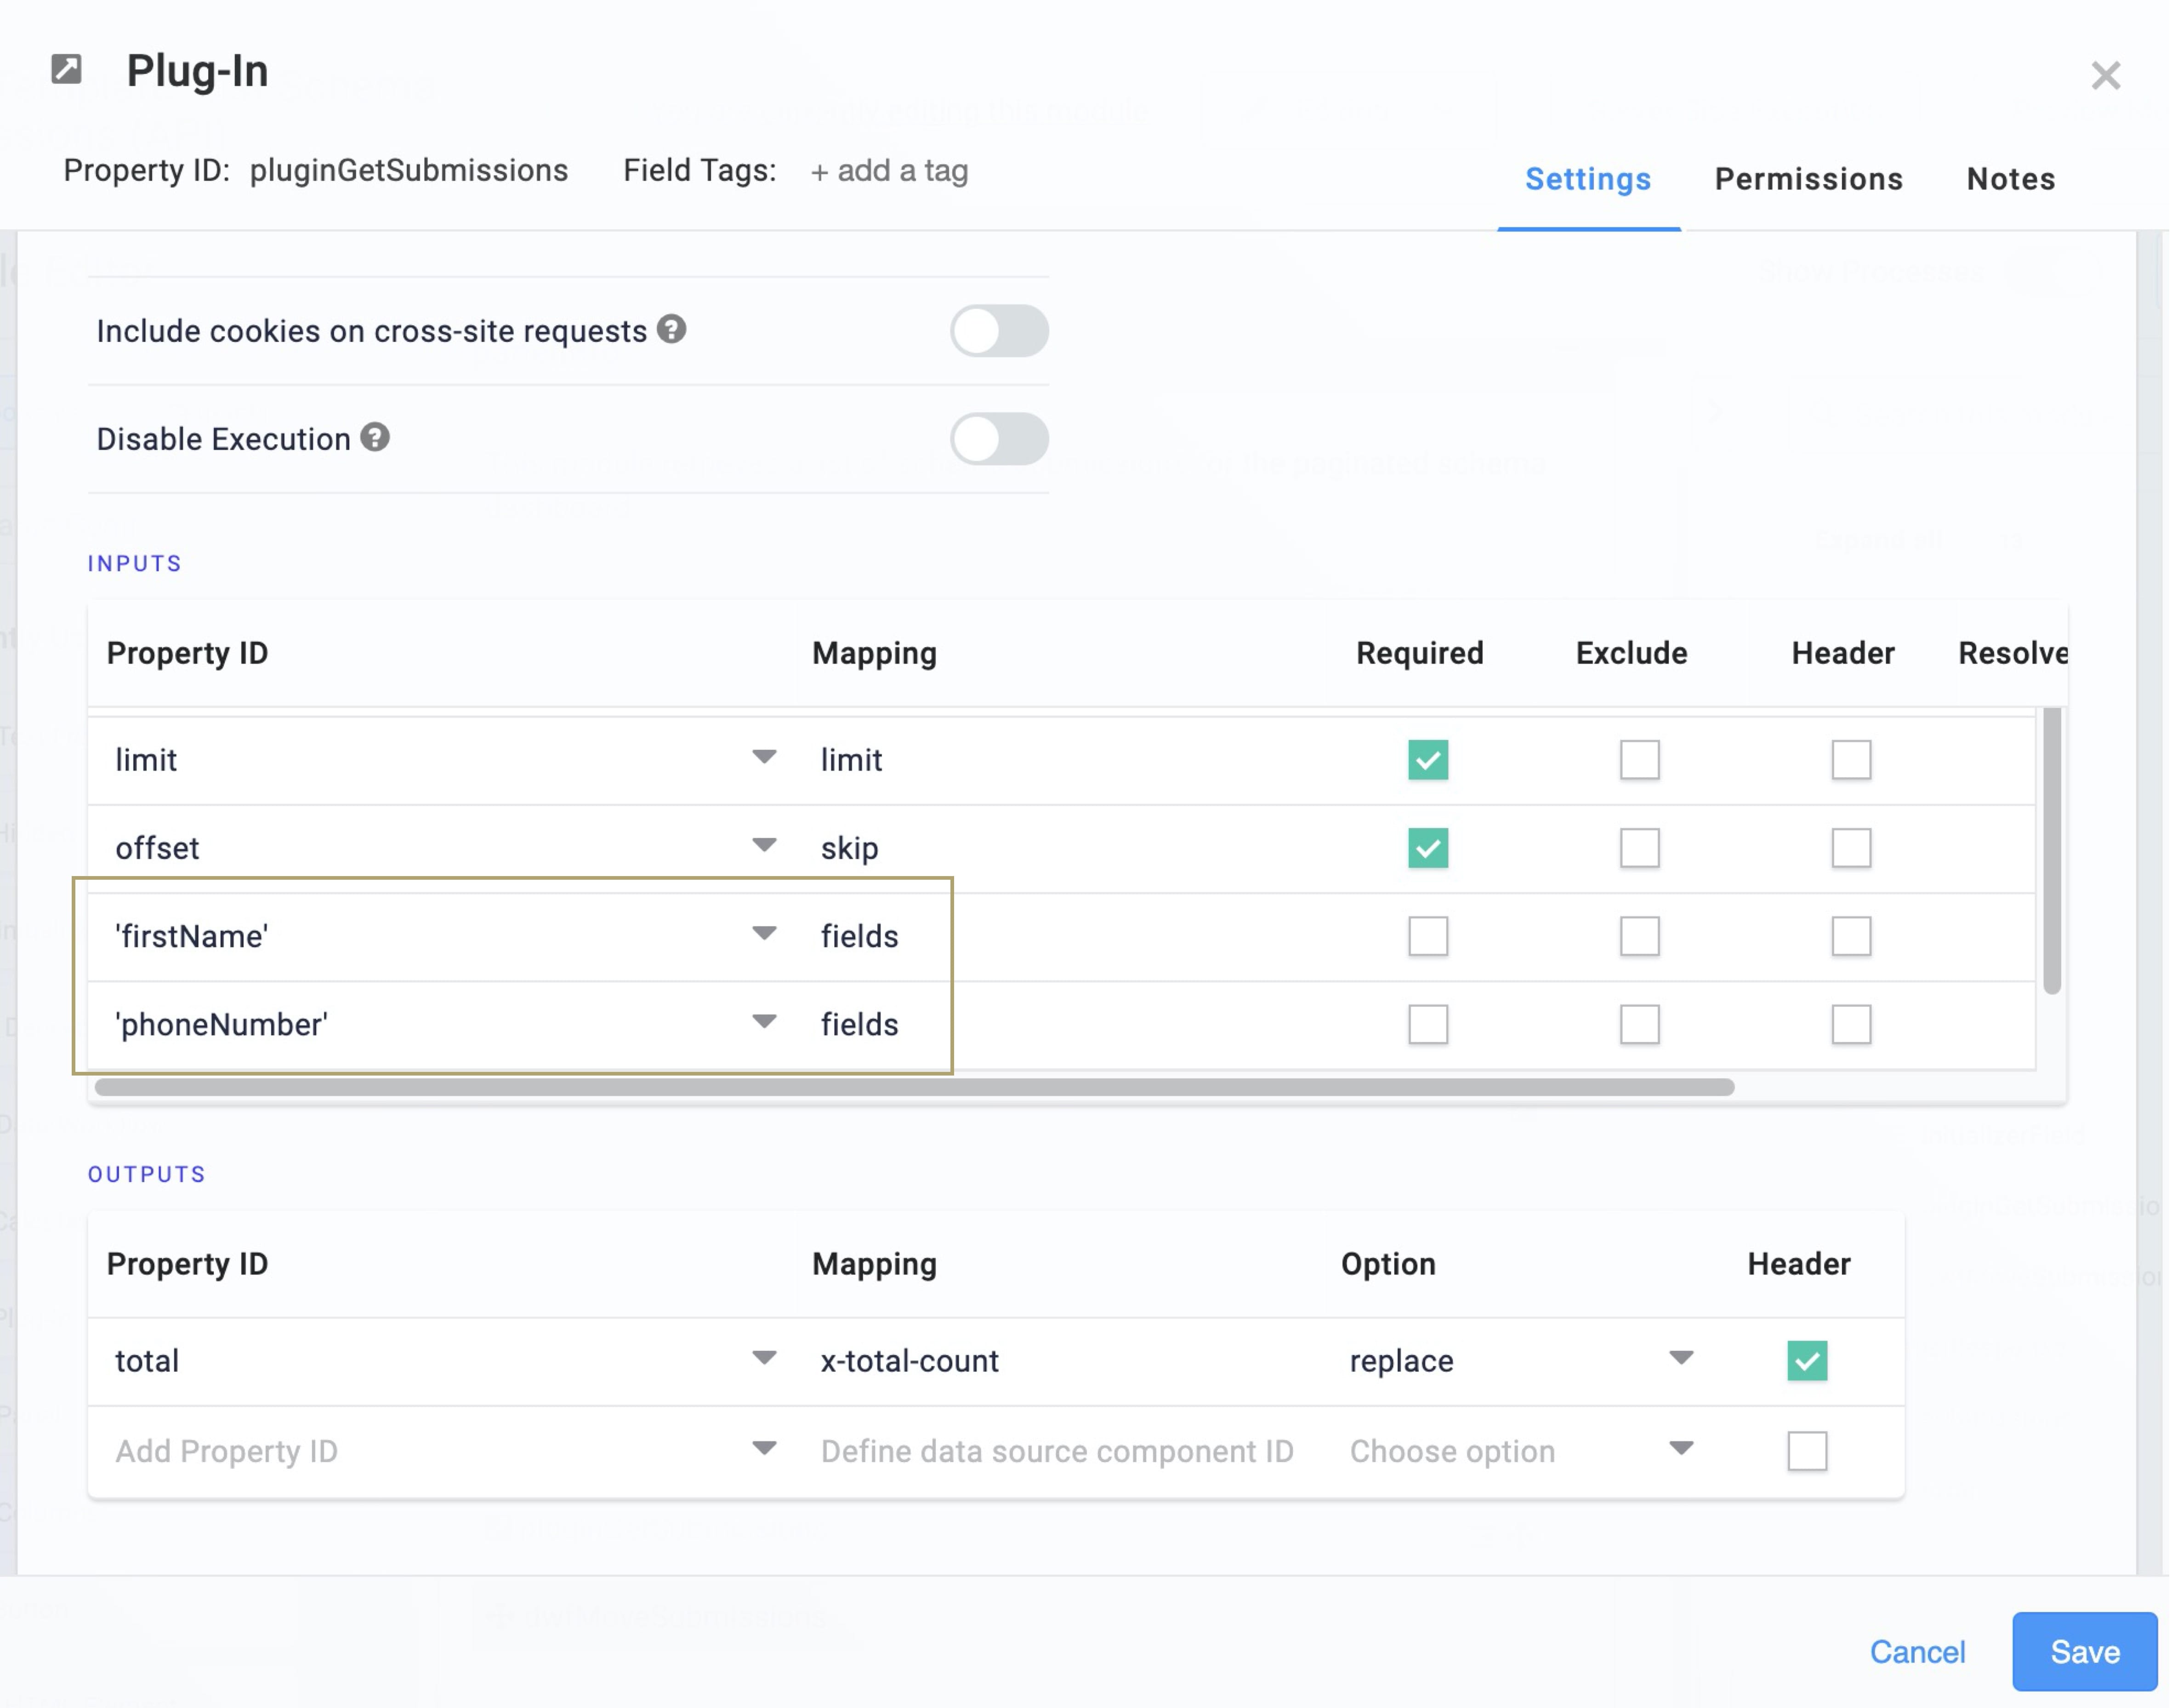
| 3. | Update the Inputs table as follows: |
| a. | Replace 'schemaParameter' with 'firstName'. |
| b. | On the next row, enter 'phoneNumber' in the Property ID. Enter fields in the Mapping. |
| 4. | Click Save. |
| 5. | Save your module. |
Updating Mapping in Schema Dashboard Module
Finally, you'll update your schema dashboard. This module has Plug-Ins that call the Create and Update APIs. So, you'll update these Plug-Ins with the updated parameters. Ready? Let's go.
Update the pluginCreateSubmission Plug-In
So far, you've updated the mapping in your Create Schema (API) and Update Schema (API) modules. So, now you'll need to update mapping in your Schema Dashboard module. First, you'll update the pluginCreateSubmission Plug-In component. This change maps the 2 updated fields in the Create Submission modal to your schema module. So, when you enter new information in the fields in Express View, the Plug-In creates a new schema submission.
| 1. | In the Module Builder, hover over the pluginCreateSubmission Plug-In component. |
A 5-button toolbar appears above the component on hover-over.
| 2. | Using the toolbar, click the (Settings) button. |
| 3. | Update the Inputs table as follows: |
|
Property ID |
Mapping |
|---|---|
|
firstName |
data.firstName |
|
phoneNumber |
data.phoneNumber |
| 4. | Click Save. |
Update the pluginUpdateSubmission Plug-In
Next up, you'll update the pluginUpdateSubmission Plug-In component. This change maps the 2 updated fields in the Edit Submission modal to your schema module. So, when you enter new information in the fields in Express View, the Plug-In overwrites the original schema submission.
| 1. | Hover over the pluginUpdateSubmission Plug-In component. |
A 5-button toolbar appears above the component on hover-over.
| 2. | Using the toolbar, click the (Settings) button. |
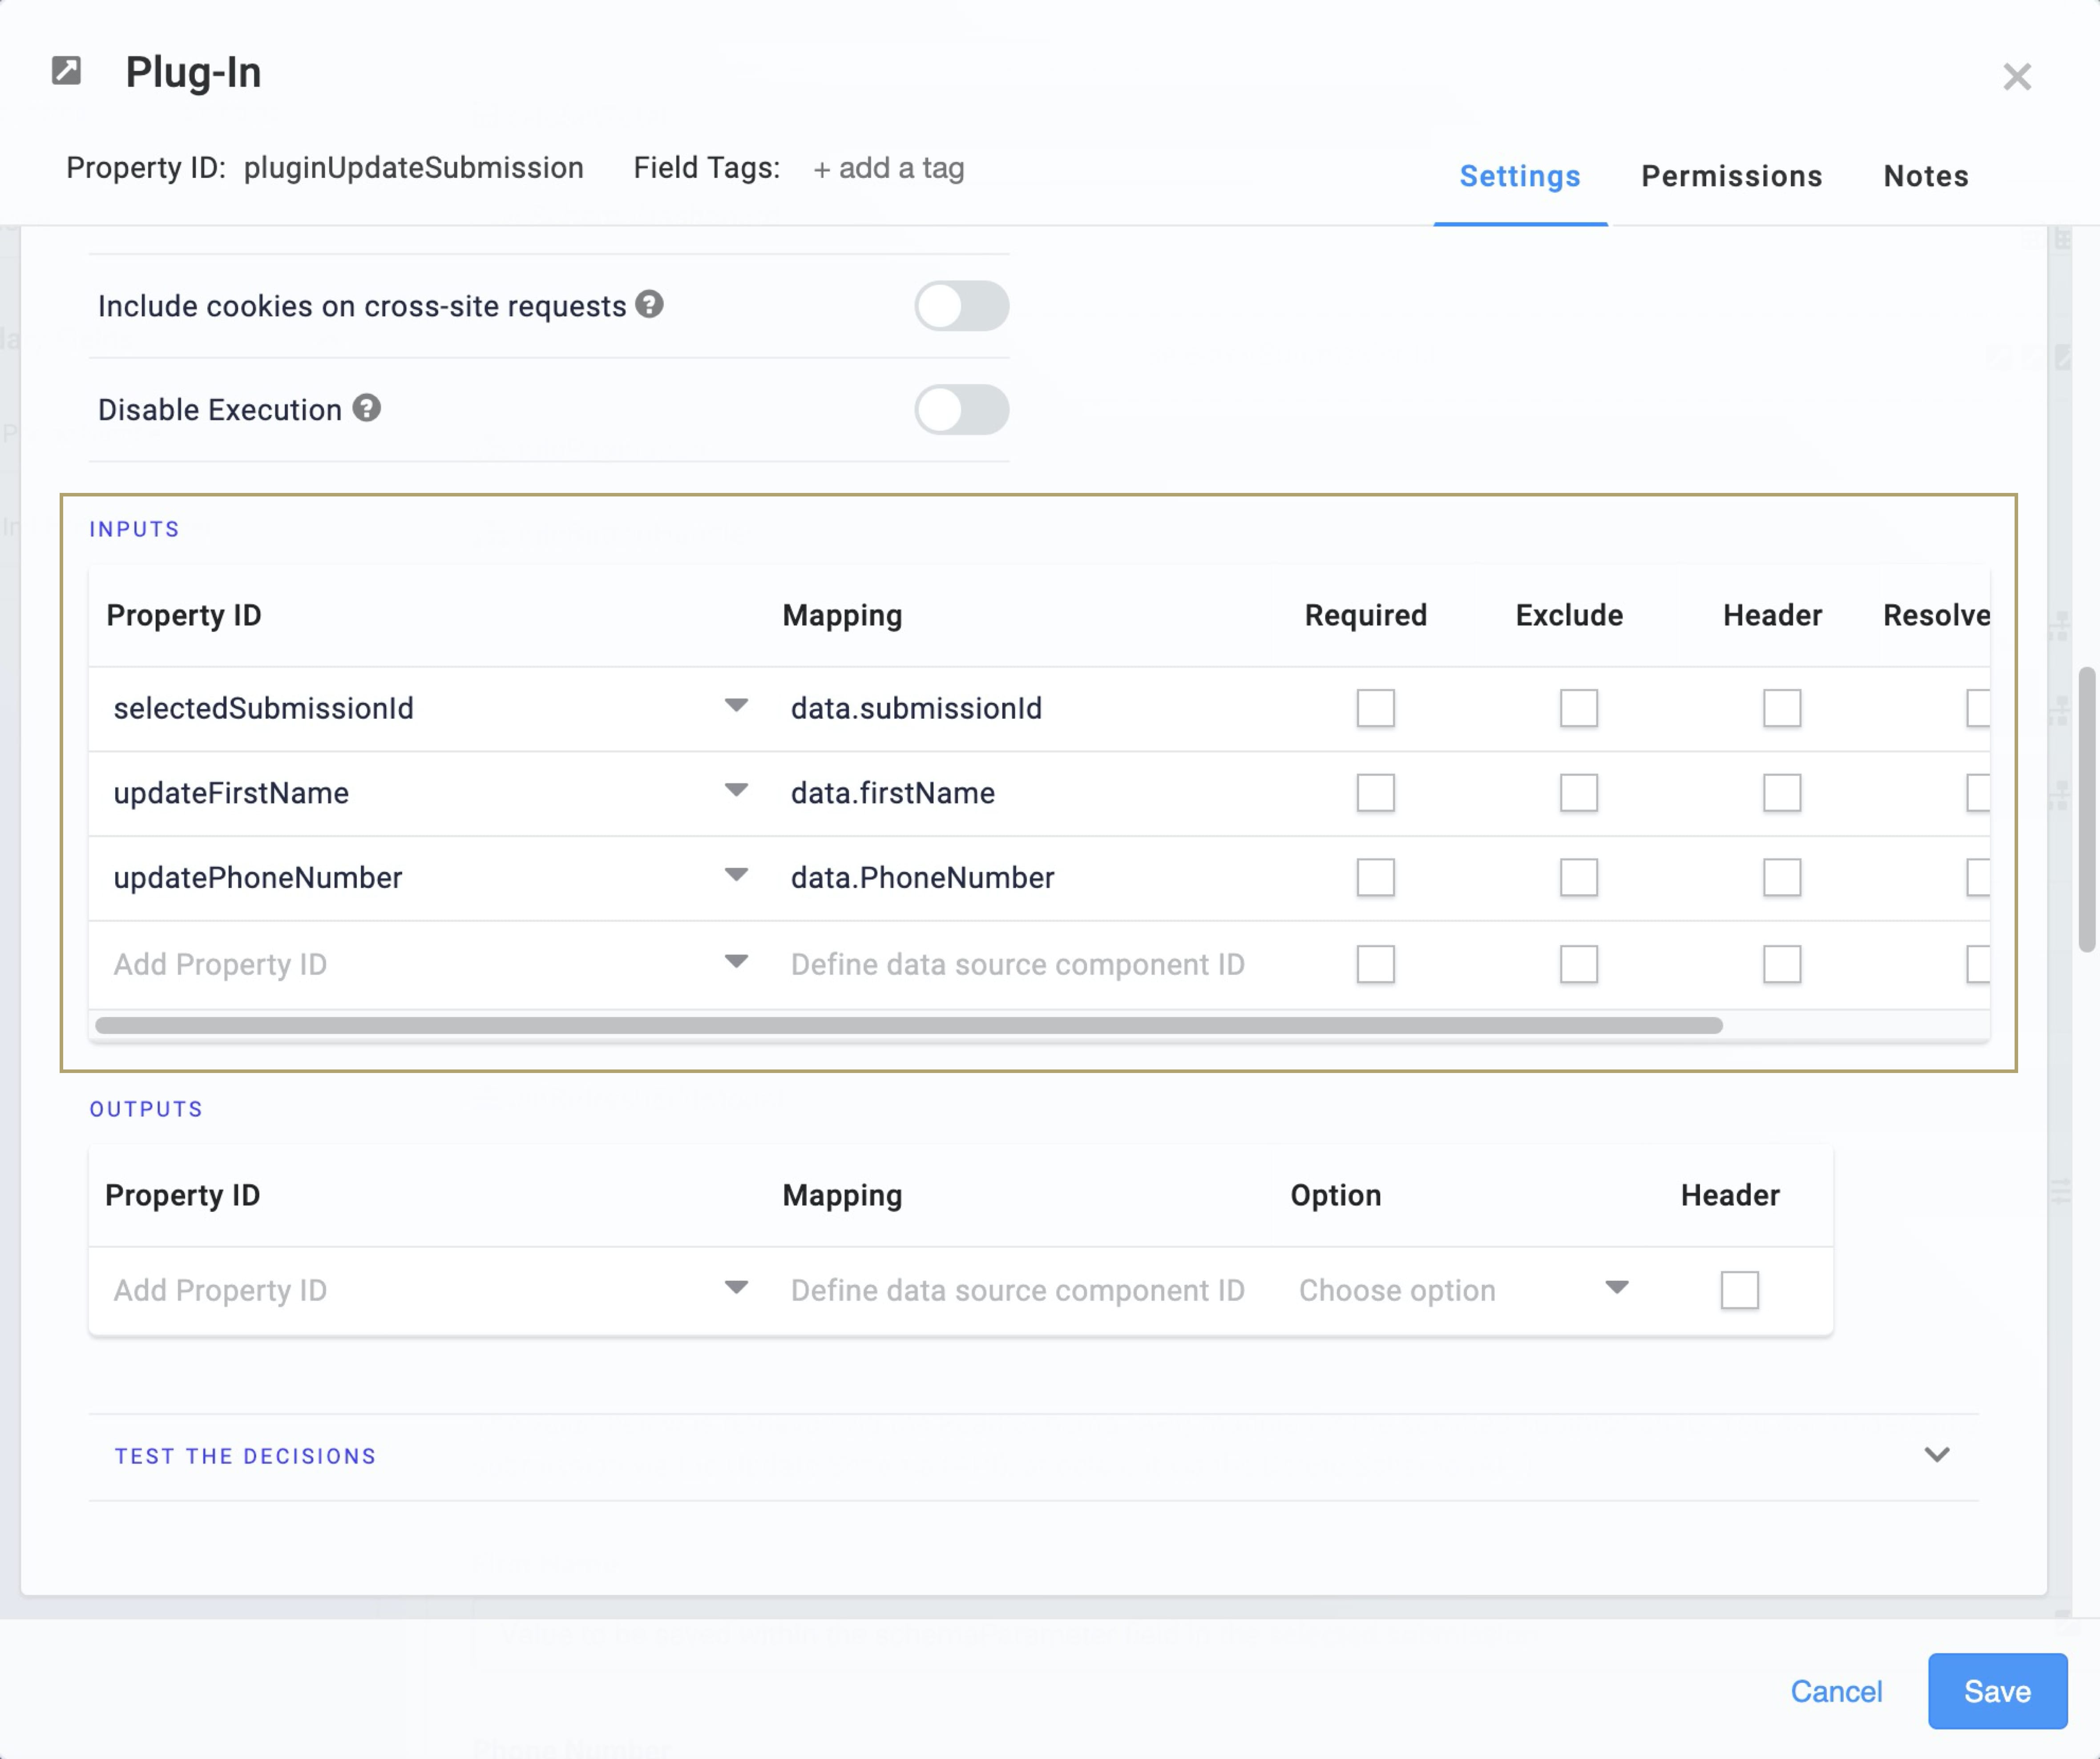
| 3. | Update the Inputs table as follows: |
|
Property ID |
Mapping |
|---|---|
|
selectSubmissionId |
data.submissionId |
|
updateFirstName |
data.firstName |
|
updatePhoneNumber |
data.phoneNumber |
| 4. | Click Save. |
| 5. | Save your module. |
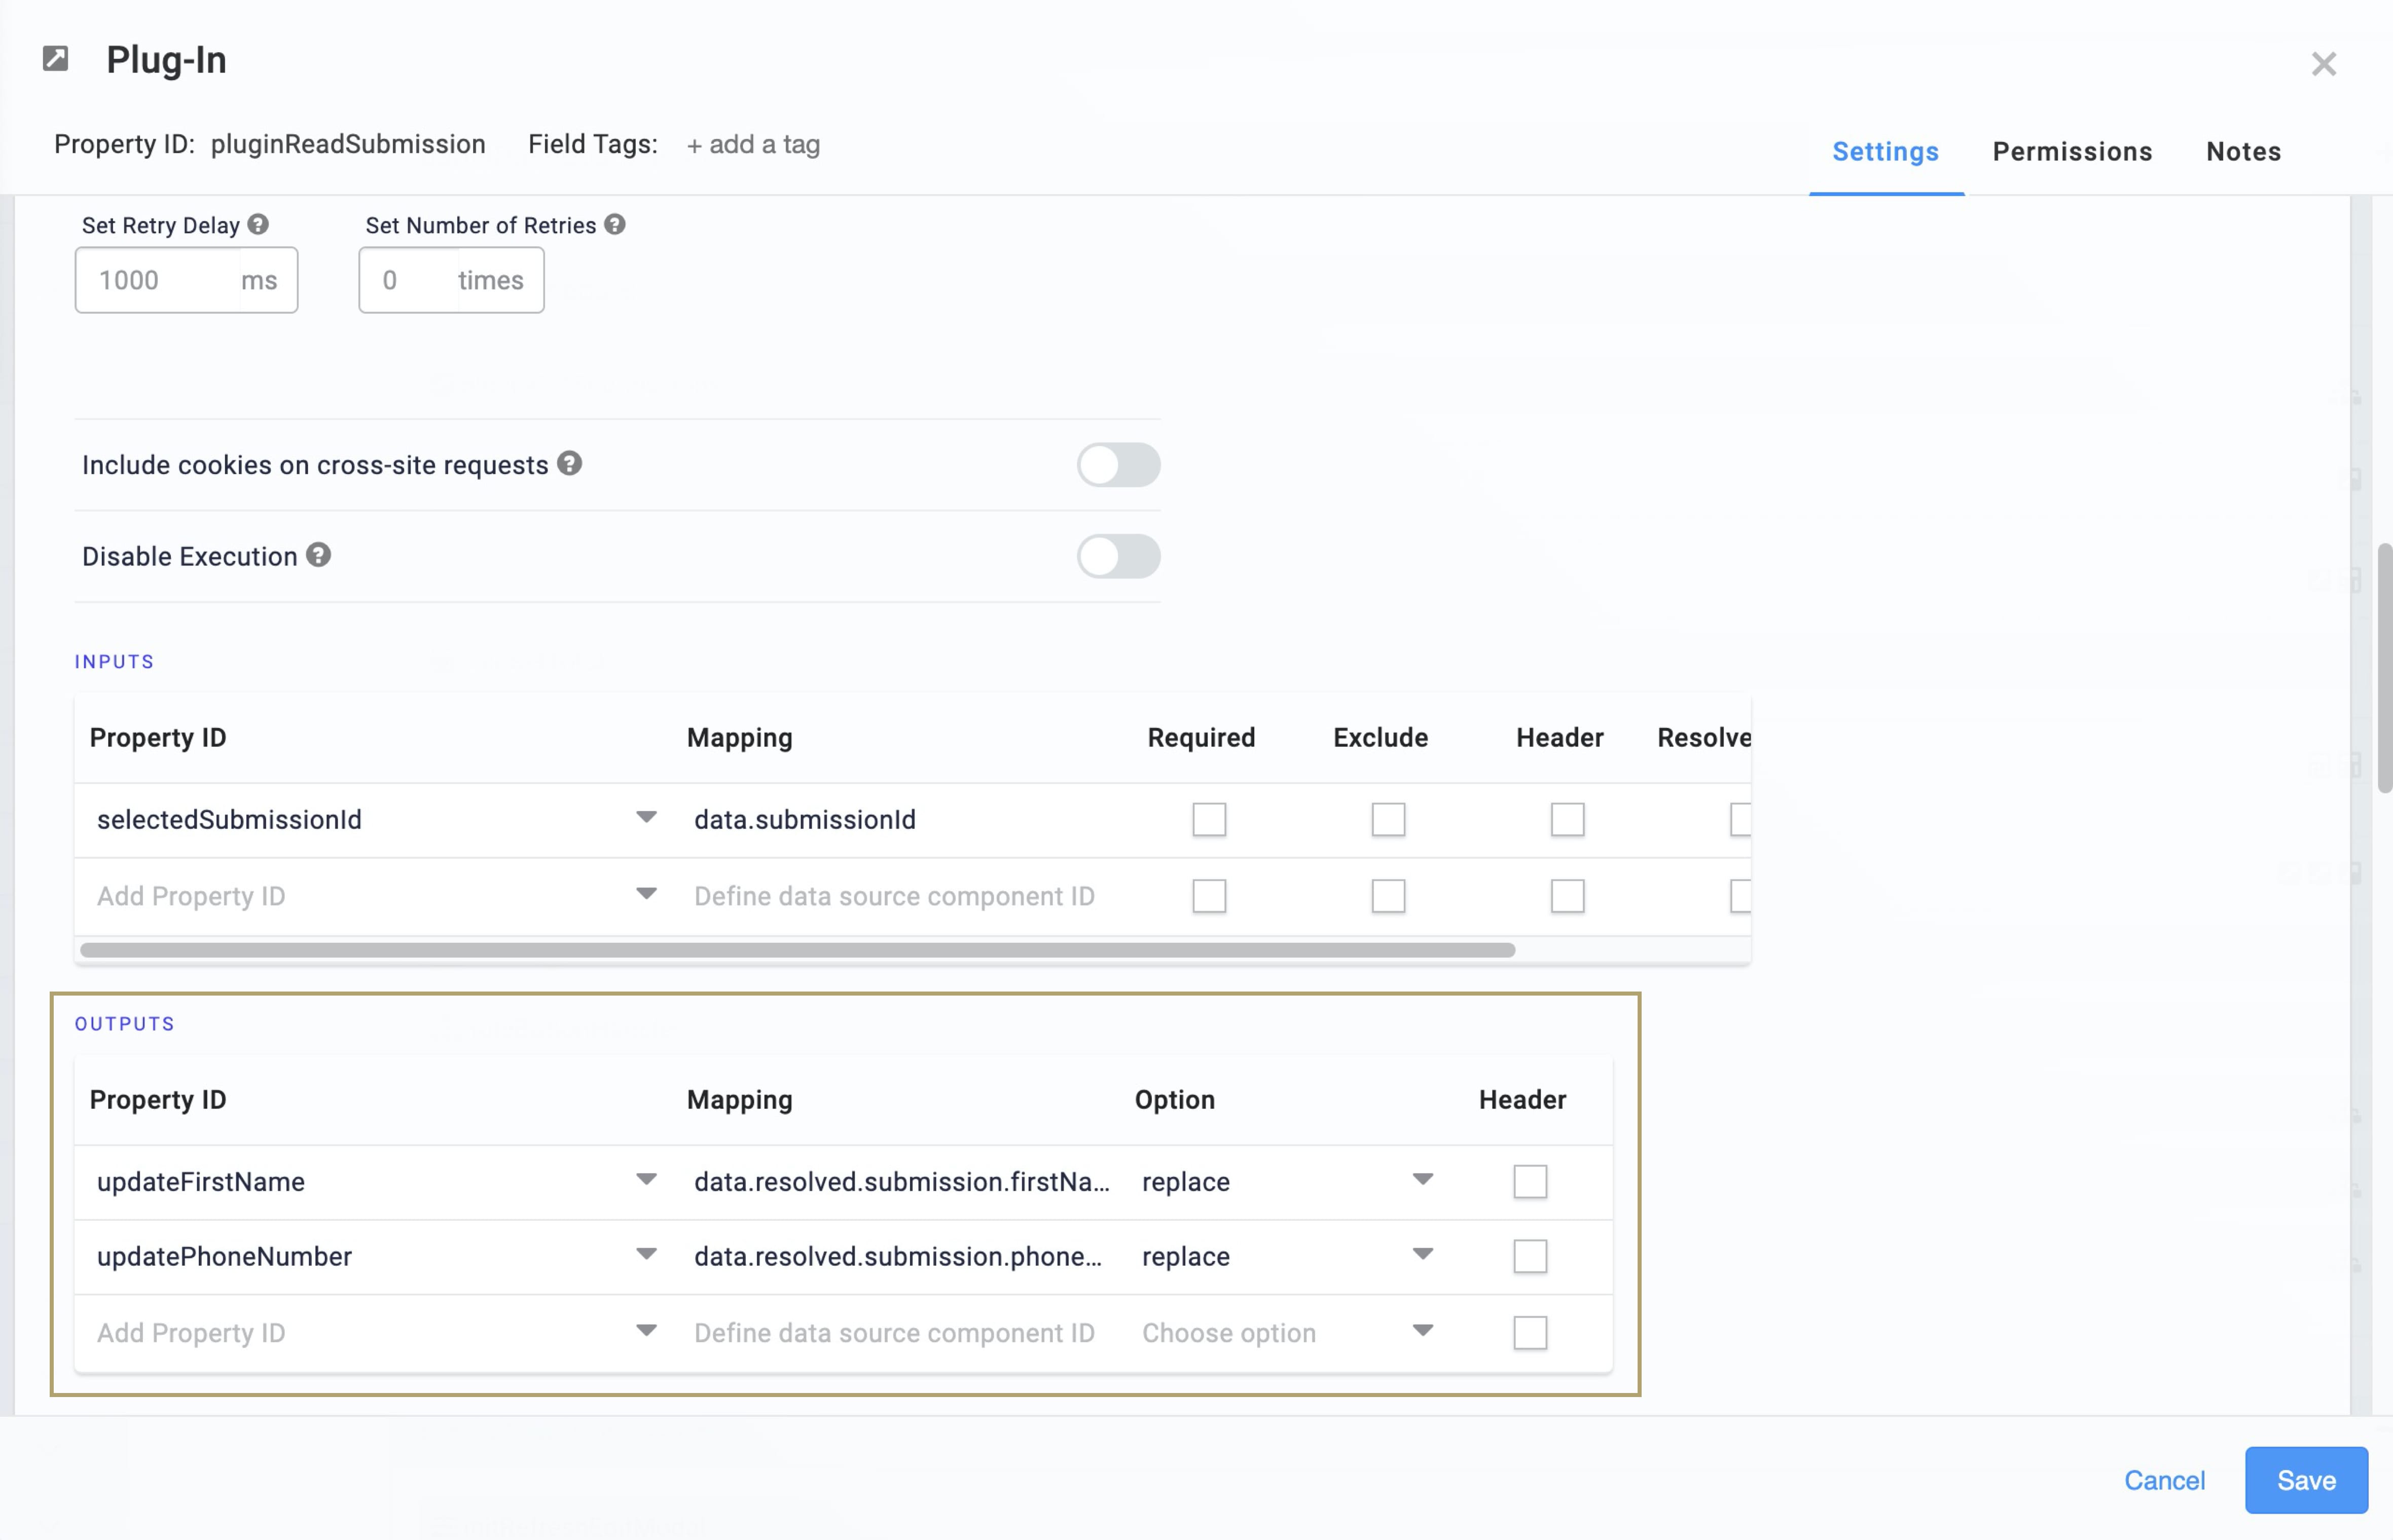
Update the pluginReadSubmission Plug-In
Finally, you'll update the pluginReadSubmission Plug-In. This change ensures that updateFirstName and updatePhoneNumber entries update in the database.
| 1. | Hover over the pluginReadSubmission Plug-In component. |
A 5-button toolbar appears above the component on hover-over.
| 2. | Using the toolbar, click the (Settings) button. |
| 3. | Update the Outputs table as follows: |
|
Property ID |
Mapping |
Option |
|---|---|---|
|
updateFirstName |
data.resolved.submission.firstName |
replace |
|
updatePhoneNumber |
data.resolved.submission.phoneNumber |
replace |
| 4. | Click Save. |
| 5. | Save your module. |
Your application can now support creating and updating schema submissions with your 2 fields. But, what about the dashboard? As of now, it still shows the default display. In the next steps, you'll learn how to adjust your schema dashboard. You'll make it reflect the First Name and Phone Number fields you added.
Changing What Displays on Your Schema Dashboard
On your dashboard, you likely won't display all fields you collected from your end-user. Realistically, you'd likely only display the fields needed to identify each submission. Say you have 6 fields in the Create Schema (API) module. The fields are: First Name, Last Name, Address, Phone Number, Job Title, and Business Address. On your dashboard, you may choose to only show First Name and Phone Number. Maybe you want to collect the other parameters for each client, but not display that information on the dashboard.
Easy. You have 2 components that work together to make this happen. First, the pluginGetSubmissions Plug-In in your List Schema Submissions (API) module must reference the fields you want in your dashboard. You took care of this already when updating the mapping in the List Schema Submissions (API) module. So now, you'll update your View Grid component to only display the 2 fields you want.
Update the View Grid
This update takes place in the Schema Dashboard module.
| 1. | Hover over the vgSchemaDashboard View Grid component. |
A 5-button toolbar appears above the component on hover-over.
| 2. | Using the toolbar, click the (Settings) button. |
| 3. | Update the Display table as follows: |
| ID | Heading | Type |
|---|---|---|
|
id |
ID |
string |
|
firstName |
First Name |
string |
|
phoneNumber |
Phone Number |
number |

You can only display fields that you've specified in the pluginGetSubmissions Plug-In in the List Schema Submissions (API) module.
| 4. | Click Save. |
| 5. | Save your module. |
Now, go ahead and preview your Schema Dashboard module in Express View. Your dashboard should have First Name and Phone Number as headers. Following along from the other configuration steps? Great. You can now click around and use the full capabilities of this CRUD application!
Removing the Application Template
Removing the Template from Your Environment
You might need to clean your environment and remove unused templates. The Unqork Library makes this easy. To uninstall a template from your environment:
| 1. | At the top right of the Unqork Designer Platform, click Library. |
| 2. | Find the template to uninstall. |
| 3. | Click the ellipsis (...) in the template tile header. |
| 4. | Click Uninstall Template. |
| 5. | Click Yes, Uninstall in the confirmation modal. |
You can visit the Marketplace and reinstall the template at any time.
What if you have an existing application built from this template and then uninstall the template from your environment? Your existing application remains unaffected. Also, it no longer has any ties to the template. So, let's say you reinstall a newer version of the template in the future. You can rest assured that the installation doesn't impact your existing application.
Deleting Your Data Model and CRUD Application
If you no longer need the application you created from your template, you can delete it. To delete your application:
| 1. | Navigate to the Apps tab from an open workspace. |
| 2. | Find the application to delete. |
| 3. | Click the ellipsis (...) in the app tile header. |
| 4. | Click Delete. |
| 5. | Retype the provided text. |
| 6. | Click Yes, Delete. |
