Overview
The Set operator lets Creators add new values to a data structure. Examples of how you can use a Set operator include:
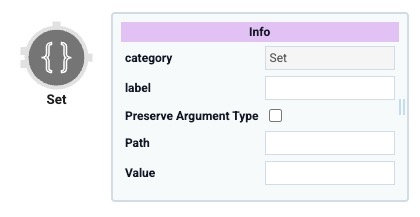
Creating a new key/value pair in an object.
Creating new row(s) in a table.
Adding new key/value pairs in a table row.
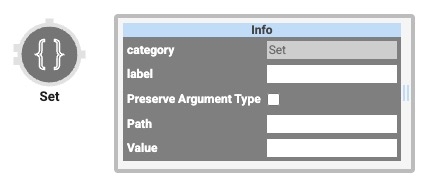
You'll find the Set operator in the Table group to the left of the Data Workflow canvas.
About the Info Window
Learn more about each setting in the Set operator's Info window:
Setting | Description |
|---|---|
Category | Grayed out and non-adjustable setting indicating the operation type. |
Label | Sets the label for your operator, displaying below the operator on your Data Workflow canvas. This field is optional, but set a label if you use more than one of the same operator type. A label helps you identify your operators without opening any Info windows. |
Path | Enter the key of the key/value pair you want to create. If you add this key to a specific position in an existing array, it specifies the path to get that position. Use dot notation. For example, |
Value | Enter the value for the key/value pair you want to create. You can leave the Value setting blank if you connect another data source to the Set operator's lower input port.
|
Input Port Functionality
There are two input ports on the left of the Set operator. Each input port provides a different function:
Upper Input Port
Connect the upper input port to connect to a data source. For example, an Input operator connected to a Data Table component could be the data source. Or, an Input operator could connect to a Create Table operator if you use the Set operator to create rows in a new table.
Lower Input Port
The lower input port connects data to add to your data source. The lower input port is optional as you can define data to add in the Set operator's Info window. However, you can only define simple values to add like a string or a number, in the Info window. To add a more complex data structure, like an array or object, to an existing object, connect the array to the lower input port and the object to the upper input port.
The lower input port can also connect a Create Value operator. Instead of defining the value to add in the Set operator, you'll define the value in the Create Value operator. Enter a value in the Expression/Value field of the Create Value operator. Make sure to use the following formats: =string for strings, and =number for numbers. Then, connect the output port (right) of the Create Value operator to the lower input port (left) of the Set operator.
Configure the Set Operator
In this example, use the Set operator to create a key/value pair in an existing object. First, define an object in the Default Value field of a Hidden component. Then, use a JSON Parse operator in the Data Workflow to turn the JSON into an object data structure.
Configure the Hidden Component
Use a Hidden component to create an object where you'll add a key/value pair.
In the Module Builder, drag and drop a Hidden component onto your canvas.
In the Property ID and Label Text fields, enter
sampleObject.In the Default Value field, enter the following:
{"firstName":"Minna", "lastName":"Amigon", "age":27}.Click Save Component.
Configure the Data Workflow Component
Next, you'll create the Data Workflow which adds a new key/value pair to your object.
Drag and drop a Data Workflow component onto your canvas, placing it below the sampleObject Hidden component.
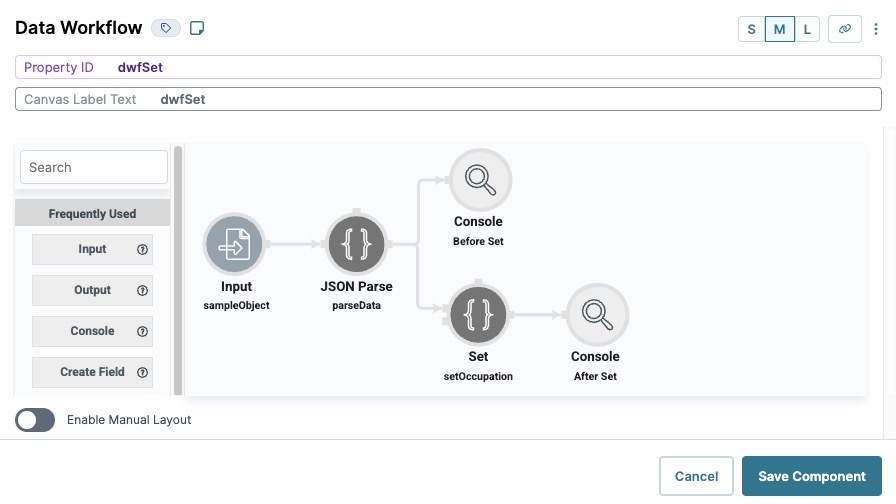
In the Property ID field, enter dwfSet.
In the Canvas Label Text field, enter
dwfSet.
Configure the Input Operator
Drag and drop an Input operator onto your Data Workflow canvas.
Configure the operator's Info window as follows:
Info
Category
Input
Component
sampleObject
Required
Yes
Source
Default
Configure the JSON Parse Operator
The JSON Parse operator lets you create the data structure defined in your Hidden component. It parses the JSON and creates the specified object. You cannot add a key/value pair to the object without the JSON Parse operator because you need an object where you can add a key/value pair.
Drag and drop a JSON Parse operator onto your Data Workflow canvas.
Configure the operator's Info window as follows:
Info
Category
JSON Parse
Label
parseData
Preserve Argument Type
☐ (unchecked)
Connect the output port (right) of the sampleObject Input operator to the input port (left) of the parseData JSON Parse operator.
Configure the First Console Operator
Drag and drop a Console operator onto your Data Workflow canvas.
Configure the operator's Info window as follows:
Info
Category
Console
Label
Before Set
Connect the output port (right) of the parseData JSON Parse operator to the input port (left) of the Console operator.
Configure the Set Operator
Drag and drop a Set operator onto your Data Workflow canvas.
Configure the operator's Info window as follows:
Info
Category
Set
Label
setOccupation
Path
occupation
Value
lawyer
Connect the output port (right) of the parseData JSON Parse operator to the upper input port (left) of the setOccupation Set operator.
Configure the Second Console Operator
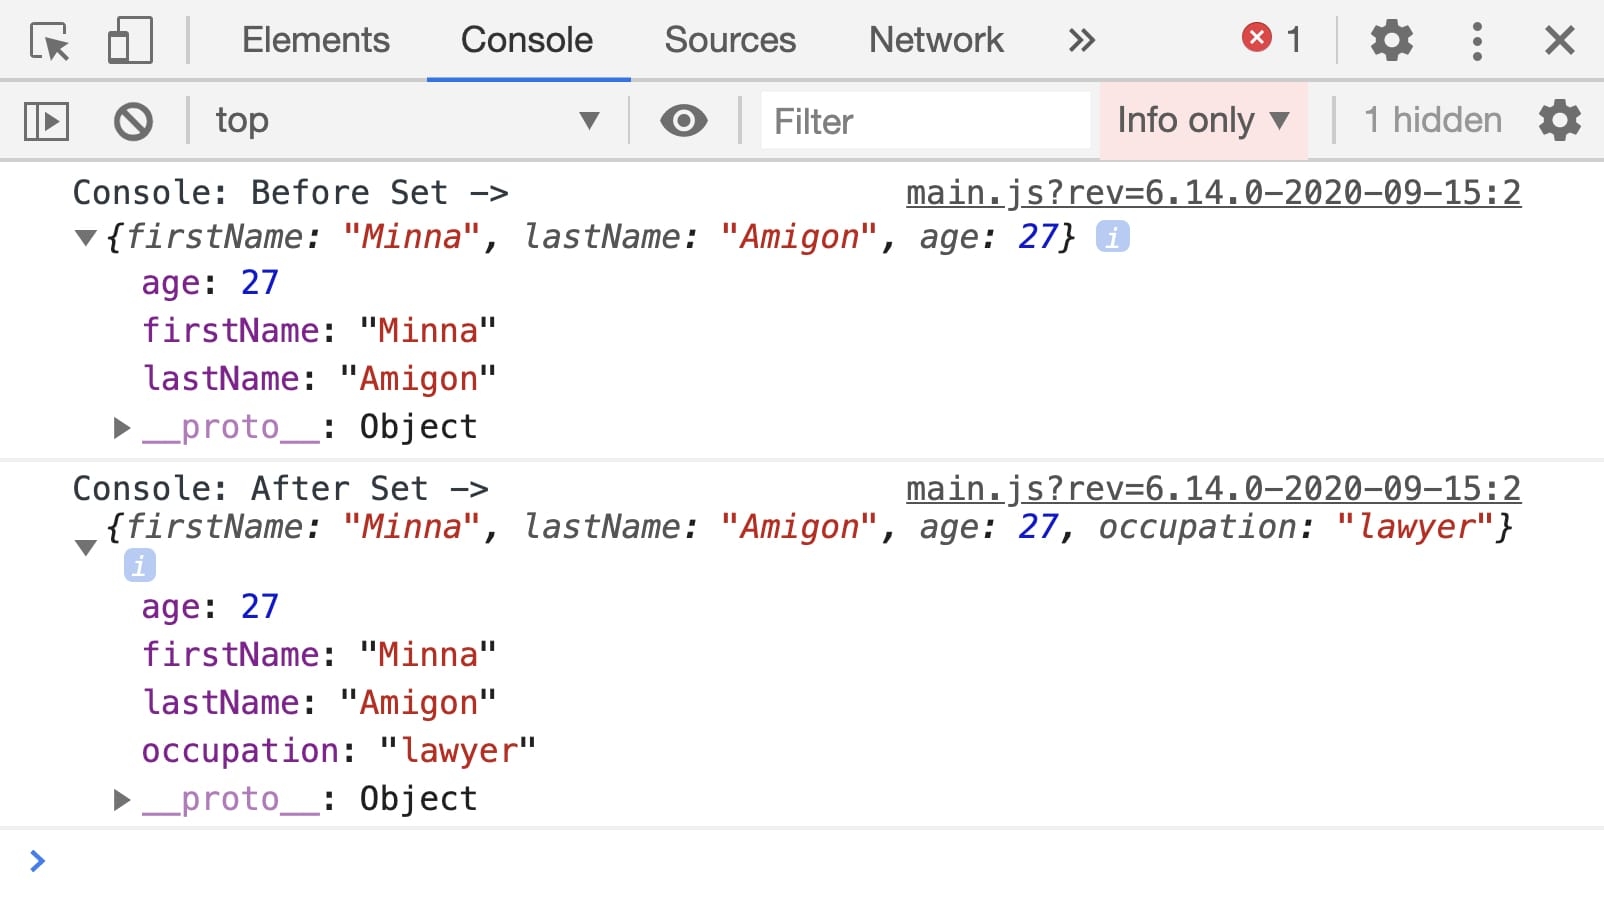
Add a Console operator to view how the Set operator affects the data in the Data Workflow.
Drag and drop a Console operator onto your Data Workflow canvas.
Configure the operator's Info window as follows:
Info
Category
Console
Label
After Set
Connect the output port (right) of the setOccupation Set operator to the input port (left) of the After Set Console operator.
Click Save Component.
Here's how the completed Data Workflow looks:
Configure the Button Component
Finally, create a button to click in Express View that triggers your Data Workflow.
Drag and drop a Button component onto your canvas, placing it below the dwfSet Data Workflow.
In the Property ID field, enter btwRunDWF.
In the Label Text field, enter
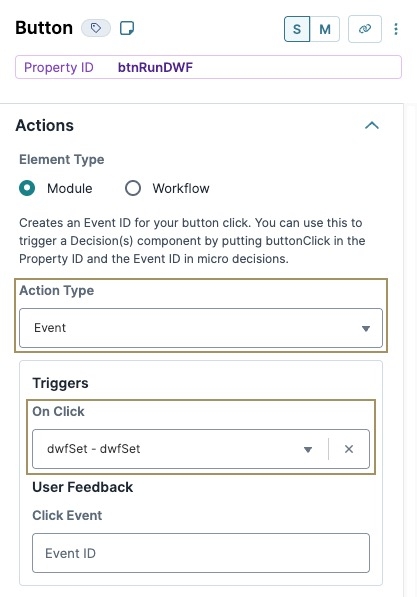
Run DWF Set.Navigate to the Actions settings.
From the Action Type drop-down, select Event.
In the On Click field, enter or select dwfSet.
Click Save Component.
Save your module.
Your completed module looks like the following in the Module Builder:
 Preview your module in Express View. Open the DevTools Console and click Run DWF Set.
Overview
The Set operator lets Creators add new values to a data structure. Examples of how you can use a Set operator include:
Creating a new key/value pair in an object.
Creating new row(s) in a table.
Adding new key/value pairs in a table row.
You'll find the Set operator in the Table group to the left of the Data Workflow canvas.
About the Info Window
Learn more about each setting in the Set operator's Info window:
Setting | Description |
|---|---|
Category | Grayed out and non-adjustable setting indicating the operation type. |
Label | Sets the label for your operator, displaying below the operator on your Data Workflow canvas. This field is optional, but set a label if you use more than one of the same operator type. A label helps you identify your operators without opening any Info windows. |
Path | Enter the key of the key/value pair you want to create. If you add this key to a specific position in an existing array, it specifies the path to get that position. Use dot notation. For example, |
Value | Enter the value for the key/value pair you want to create. You can leave the Value setting blank if you connect another data source to the Set operator's lower input port.
|
Input Port Functionality
There are two input ports on the left of the Set operator. Each input port provides a different function:
Upper Input Port
Connect the upper input port to connect to a data source. For example, an Input operator connected to a Data Table component could be the data source. Or, an Input operator could connect to a Create Table operator if you use the Set operator to create rows in a new table.
Lower Input Port
The lower input port connects data to add to your data source. The lower input port is optional as you can define data to add in the Set operator's Info window. However, you can only define simple values to add like a string or a number, in the Info window. To add a more complex data structure, like an array or object, to an existing object, connect the array to the lower input port and the object to the upper input port.
The lower input port can also connect a Create Value operator. Instead of defining the value to add in the Set operator, you'll define the value in the Create Value operator. Enter a value in the Expression/Value field of the Create Value operator. Make sure to use the following formats: =string for strings, and =number for numbers. Then, connect the output port (right) of the Create Value operator to the lower input port (left) of the Set operator.
Adding and Configuring the Set Operator
In this example, use the Set operator to create a key/value pair in an existing object. First, define an object in the Default Value field of a Hidden component. Then, use a JSON Parse Operator in the Data Workflow to turn the JSON into an object data structure.
Configure the Hidden Component
Use a Hidden component to create an object where you'll add a key/value pair.
In the Module Builder, drag and drop a Hidden component onto your canvas.
In the Property ID and Label Text fields, enter
sampleObject.In the Default Value field, enter the following:
{"firstName":"Minna", "lastName":"Amigon", "age":27}.Click Save.
Configure the Data Workflow Component
Next, you'll create the Data Workflow which adds a new key/value pair to your object.
Drag and drop a Data Workflow component onto your canvas, placing it below the sampleObject Hiddencomponent.
In the Label and Property Name fields, enter
dwfSet.
Configure the Input Operator
Drag and drop an Input operator onto your Data Workflow canvas.
Configure the operator's Info window as follows:
Setting
Value
Category
Input
Component
sampleObject
Required
Yes
Source
Default
Configure the JSON Parse Operator
The JSON Parse operator lets you create the data structure defined in your Hidden component. It parses the JSON and creates the specified object. You cannot add a key/value pair to the object without the JSON Parse operator because you need an object where you can add a key/value pair.
Drag and drop a JSON Parse operator onto your Data Workflow canvas.
Configure the operator's Info window as follows:
Setting
Value
Category
JSON Parse
Label
parseData
Preserve Argument Type
☐ (unchecked)
Connect the output port (right) of the sampleObject Input operator to the input port (left) of the parseData JSON Parse operator.
Configure the First Console Operator
Drag and drop a Console operator onto your Data Workflow canvas.
Configure the operator's Info window as follows:
Setting
Value
Category
Console
Label
Before Set
Connect the output port (right) of the parseData JSON Parse operator to the input port (left) of the Console operator.
Configure the Set Operator
Drag and drop a Set operator onto your Data Workflow canvas.
Configure the operator's Info window as follows:
Setting
Value
Category
Set
Label
Path
occupation
Value
lawyer
Connect the output port (right) of the parseData JSON Parse operator to the upper input port (left) of the setOccupation Set operator.
Configure the Second Console Operator
Add a Console operator to view how the Set operator affects the data in the Data Workflow.
Drag and drop a Console operator onto your Data Workflow canvas.
Configure the operator's Info window as follows:
Setting
Value
Category
Console
Label
After Set
Connect the output port (right) of the setOccupation Set operator to the input port (left) of the After Set Console operator.
Click Save.
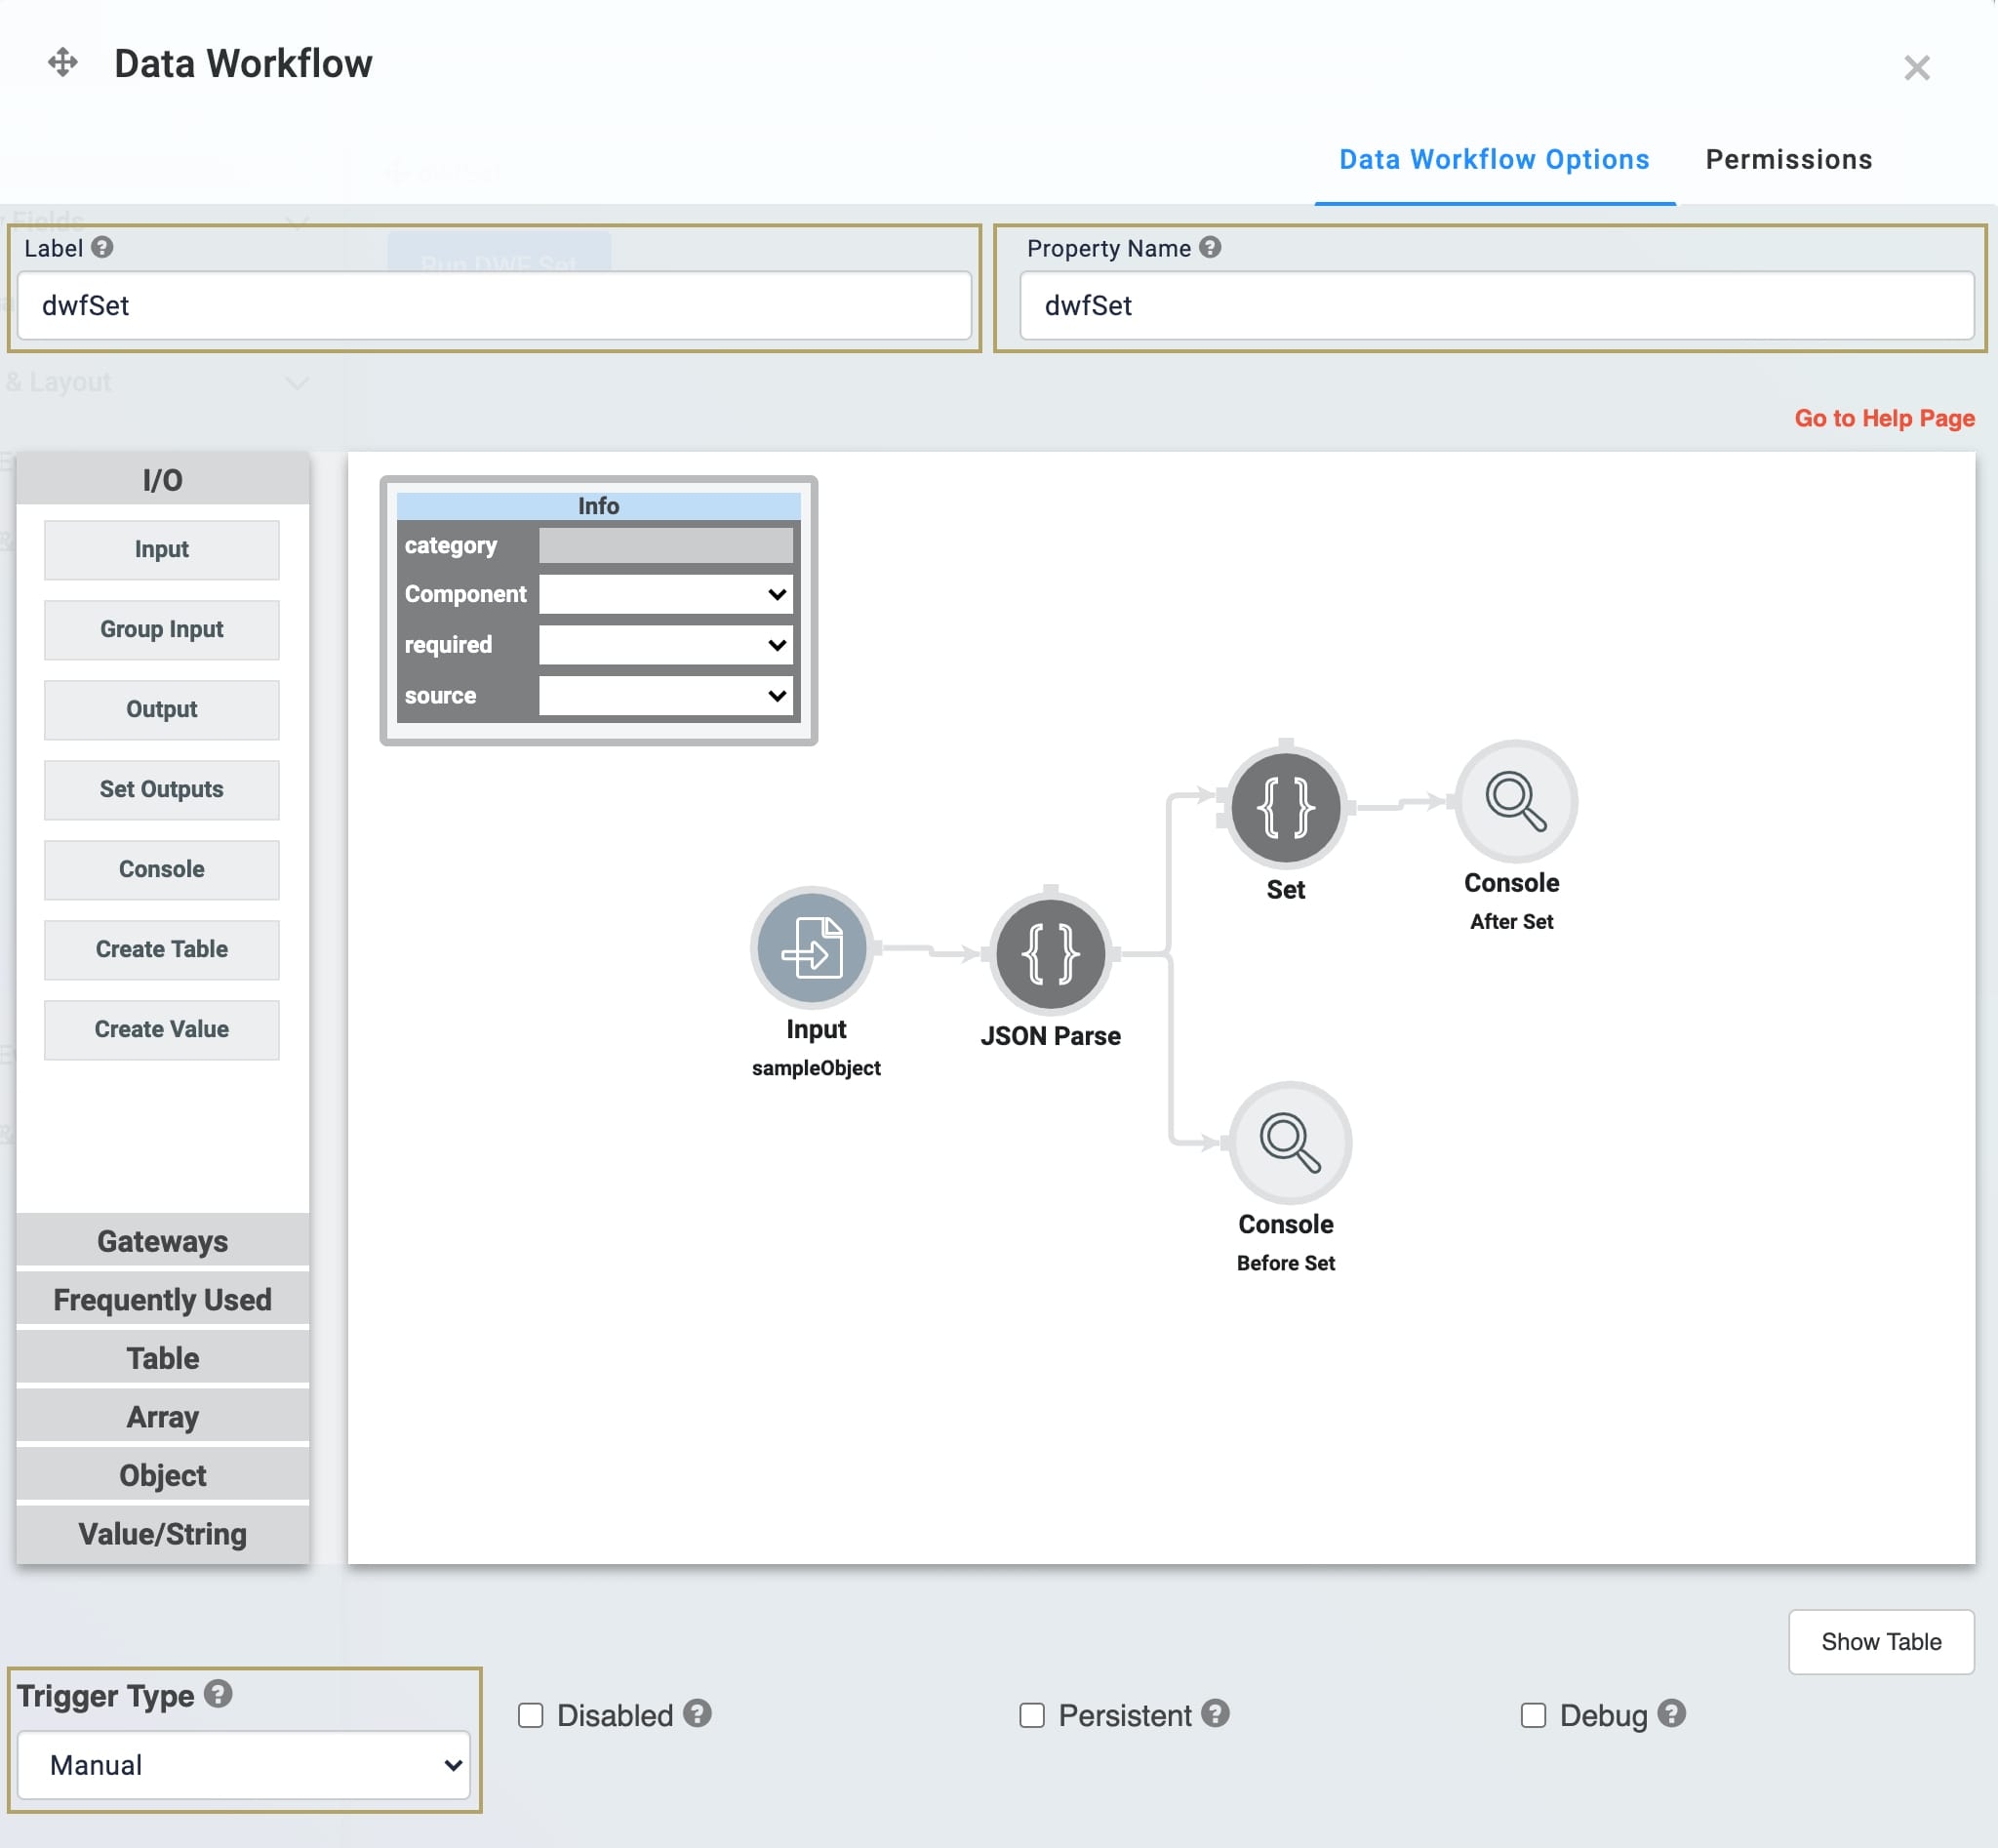
Here's how the completed Data Workflow looks:
Configure the Button Component
Finally, create a button to click in Express View that triggers your Data Workflow.
Drag and drop a Button component onto your canvas, placing it below the dwfSet Data Workflow.
In the Property ID field, enter btwRunDWF.
In the Label Text field, enter
Run DWF Set.From the configuration window, click the Actions button.
Set the Action Type type to Event.
In the On Click field, enter or select
dwfSet.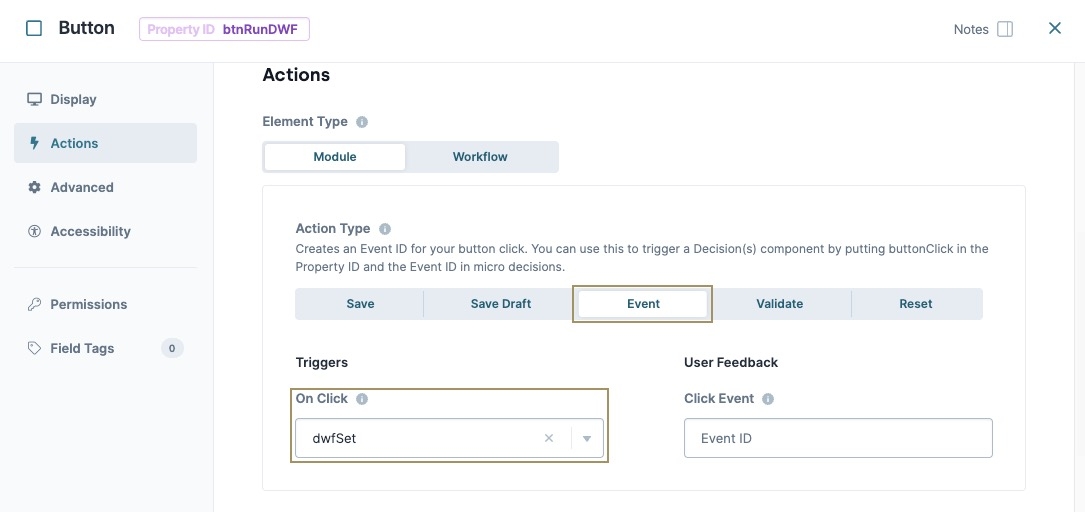
Click Save & Close.
Save your module.
Your completed module looks like the following in the Module Builder:

Preview your module in Express View. Open the DevTools Console and click Run DWF Set.
.jpg)