A few steps are involved when creating connections and recipes and running them:
1.
Create a connection: First, you must connect to your Unqork environment to make API calls using the IntegrationGateway. This process requires an account and authorization credentials for access to the Unqork API.
2.
Create a recipe: Recipes are workflow-like steps that perform actions. Recipes have many advanced features that can handle all application integrations and workflow automation scenarios, including conditional triggers, actions, and so on.
3.
Define an endpoint for a recipe: To make an API call to the Unqork service in your applications, you must establish an endpoint. You'll use this endpoint to make the call in a Plug-In component.
4.
Configure a Plug-In component: Set up a Plug-In component to call your recipe's endpoint and perform the recipe's actions.
The first step when creating your Unqork recipe is generating Unqork Access Credentials using the API Access Management page. Then, you'll use the credentials to set up the Unqork connection in the IntegrationGateway.
You must have an Unqork Administrator account to create access credentials.
Generate Unqork Access Credentials
This example connects the Unqork API to the Integration Administration recipe. To grant the recipe access to the Unqork API for your environment, create a Creator Access Credential in API Access Management. You'll insert these credentials into the recipe in the next section.
1.
At the top right of the Unqork Designer Platform, click Settings ▾.
2.
Select Administration.
3.
Under Integration, click API Access Management.
4.
On the API Access Management page, click + Create New ▾.
Click Connect. The Connection Status changes to Connected.
Your connection is now established and active for use in your recipe. Next, you'll review how to create your recipe.
Create a Recipe
Recipes let you integrate your connections, set up triggers, and determine the actions and events you want to occur. For this how-to guide, you'll configure a recipe to retrieve specified Workspace Application fields from Unqork.
To create a recipe and designate a starting point:
1.
Open the Unqork project.
2.
Click Create ▾.
3.
Select Recipe.
Configure a Starting Point
First, you must configure the starting point, or trigger, for your recipe. With the recipe page now open, configure the following fields:
1.
In the Name field, enter a unique name for the recipe. For example, {{teamName}} - Get Workspace Application.
2.
From the Location* drop-down, specify the project.
3.
From the Pick a starting point* list, select Trigger from an App.
4.
Click Start Building. The recipe page loads.
Configure the Trigger
1.
On the Recipe Canvas, under TRIGGER, click the Select an App and Trigger Event button. A configuration panel displays all your connected apps at the right of the page.
2.
Under Choose an App, in the search field, enter API to filter the list.
3.
Select API Platform by Workato. The TRIGGER step changes to NewAPI requestReal-time.
Configure the First Action
1.
Under ACTIONS, click the (Add Step) button. A list of actions displays.
2.
Click Action in App. The configuration panel displays.
3.
Under Choose an App, search for and select the Unqork Customer API tile. The configuration panel navigates to the Action step.
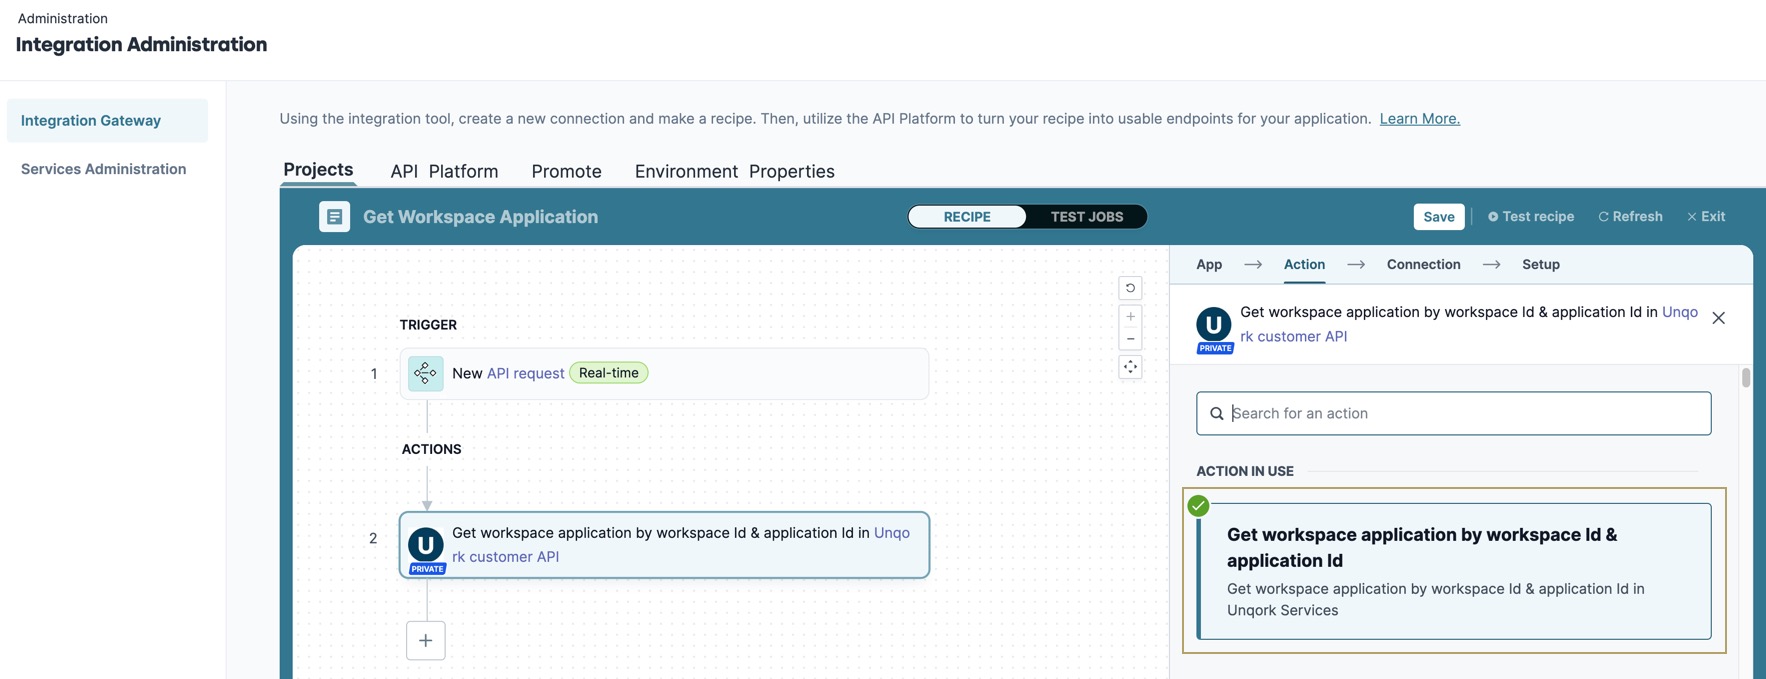
4.
Under Choose an Action, search for and select Get workspace application by workspace Id & application id. The configuration panel navigates to the Connection step.
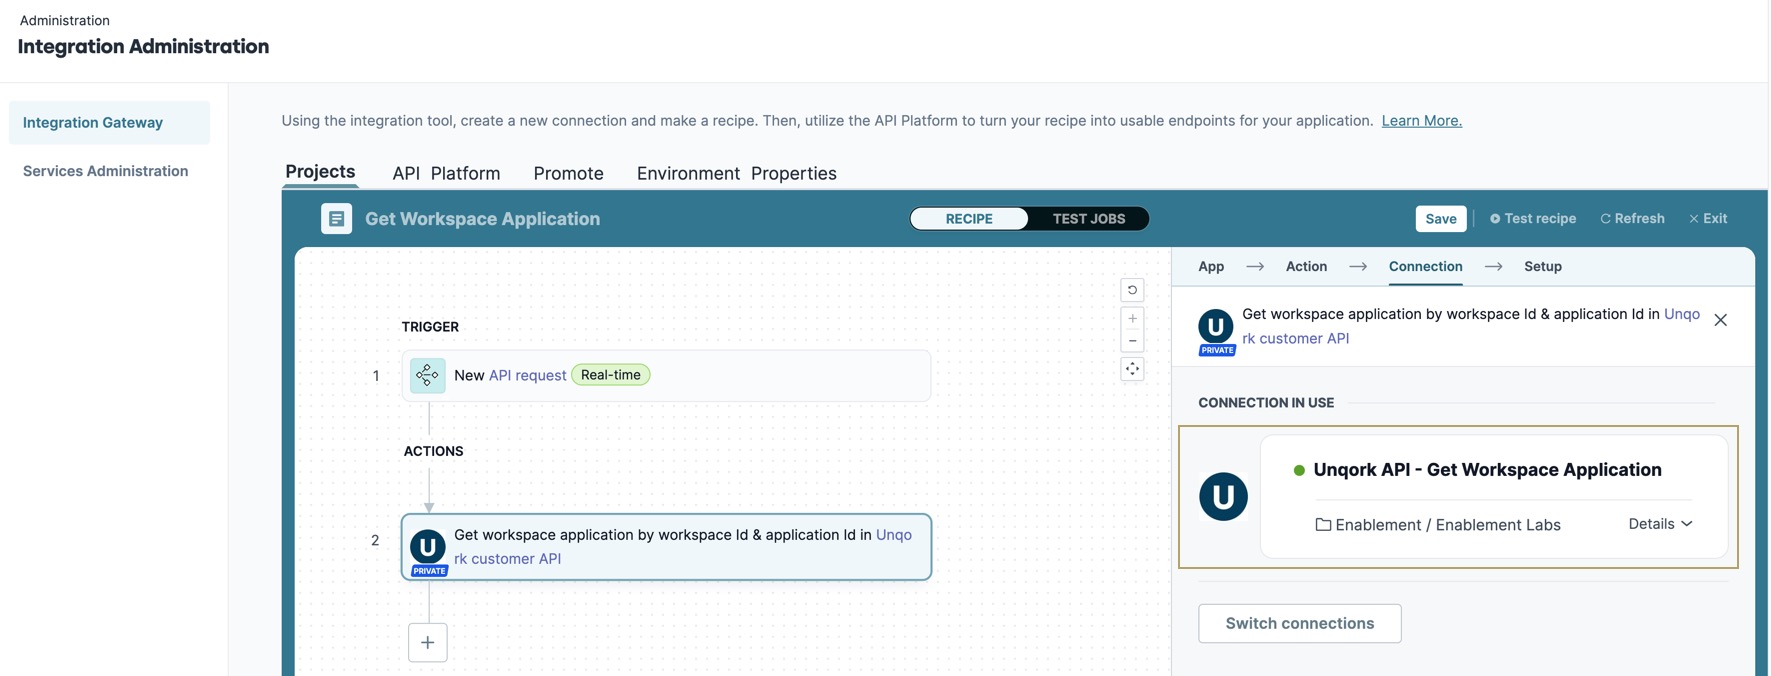
Connect to the Unqork Customer API
Select the connection set up in the Configure Your Unqork Connection section. Doing so adds the Access Credentials to your API Request.
Click Connect. The configuration panel navigates to the Setup step.
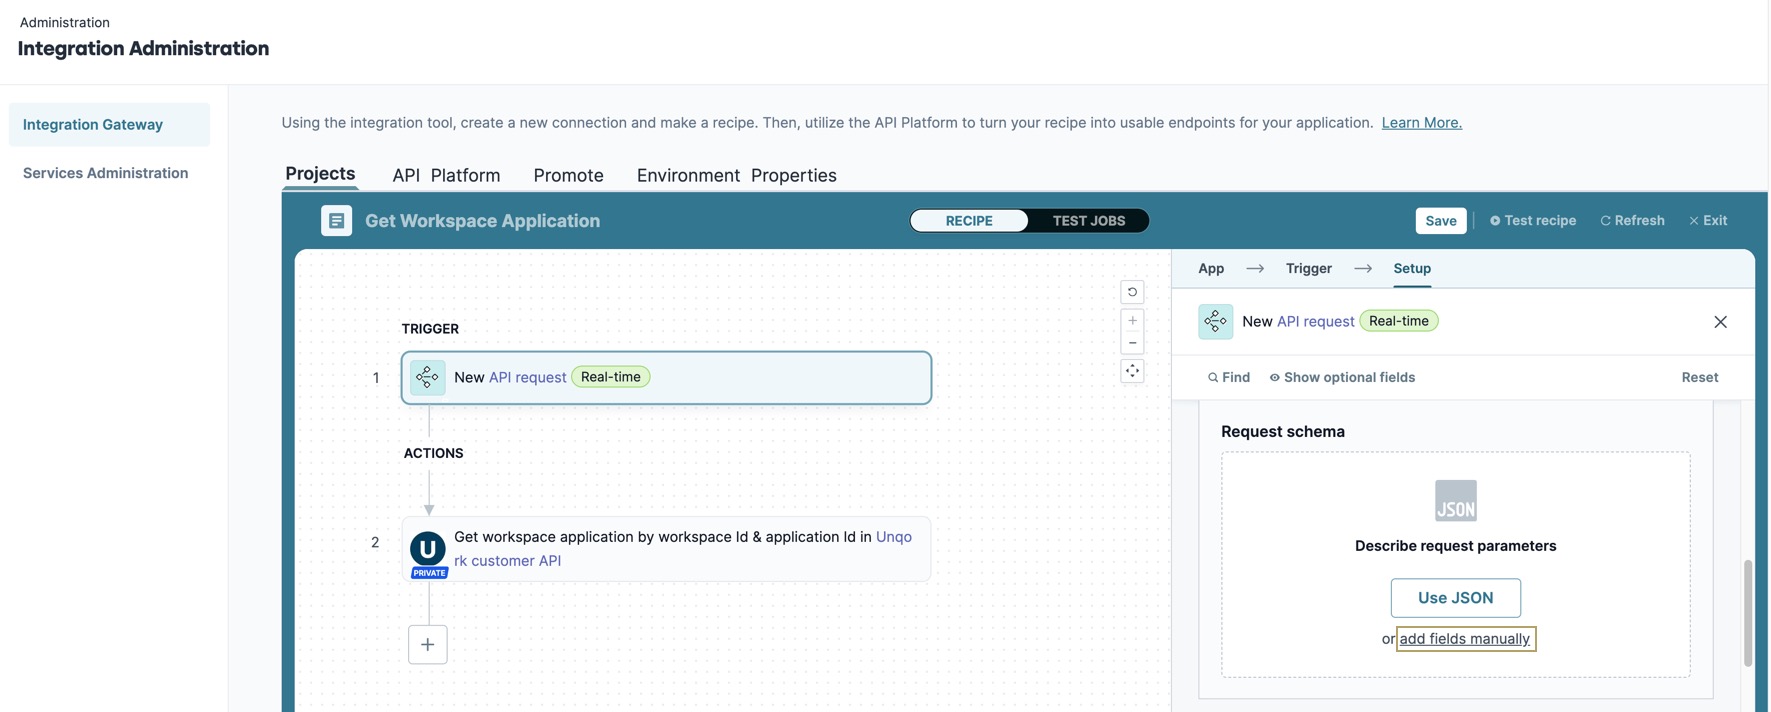
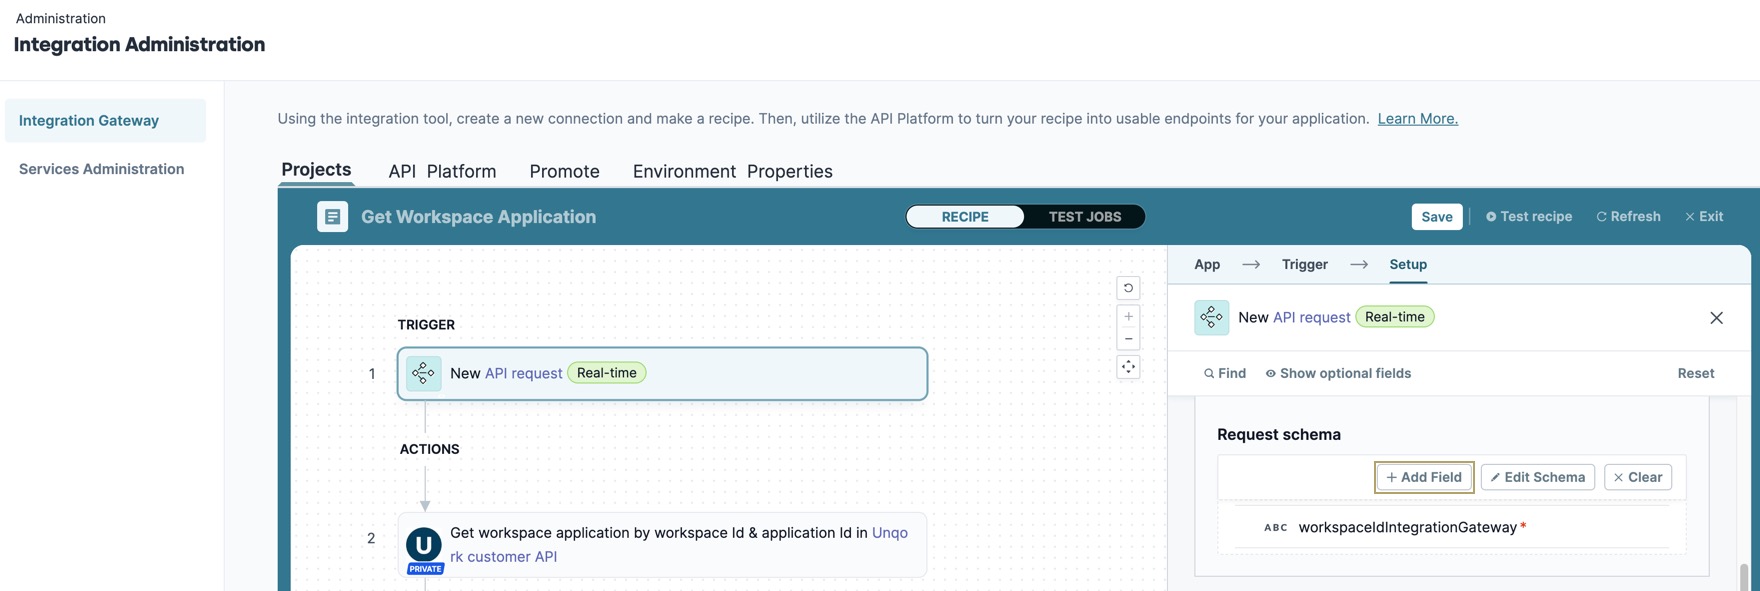
Pass the workspaceId and applicationId fields to the Endpoint
Because you're retrieving a workspace's application using its Workspace ID and Application ID values, you must map them from the TRIGGER step to the ACTIONS'Setup step. Mapping these fields lets you to pass workspace and application ID values to the endpoint from inside a module.
1.
Select the NewAPI requestReal-timeTRIGGER step. The configuration panel displays.
2.
On the Setup pane, navigate to the Request Schema section.
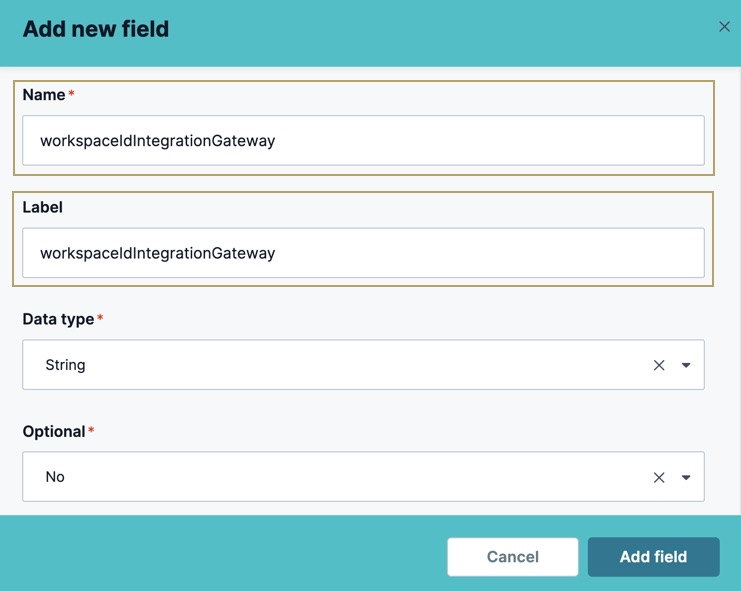
3.
Click Add fields manually. The Add New Field modal displays.
4.
In the Name* and Label* fields, enter workspaceIdIntegrationGateway.
5.
Click Add Field. The field displays under the Request Schema section.
6.
Click +Add Field. The Add New Field modal displays.
7.
In the Name* and Label* fields, enter applicationIdIntegrationGateway.
8.
Click Add Field. The field displays under the Request Schema section.
9.
Select the Get workspace application by Id & application id in Unqork Customer API step and return to the Setup section.
10.
Click the workspaceId* field, the Recipe Data modal expands.
11.
In the Recipe Data modal, navigate to the Request Parameters section.
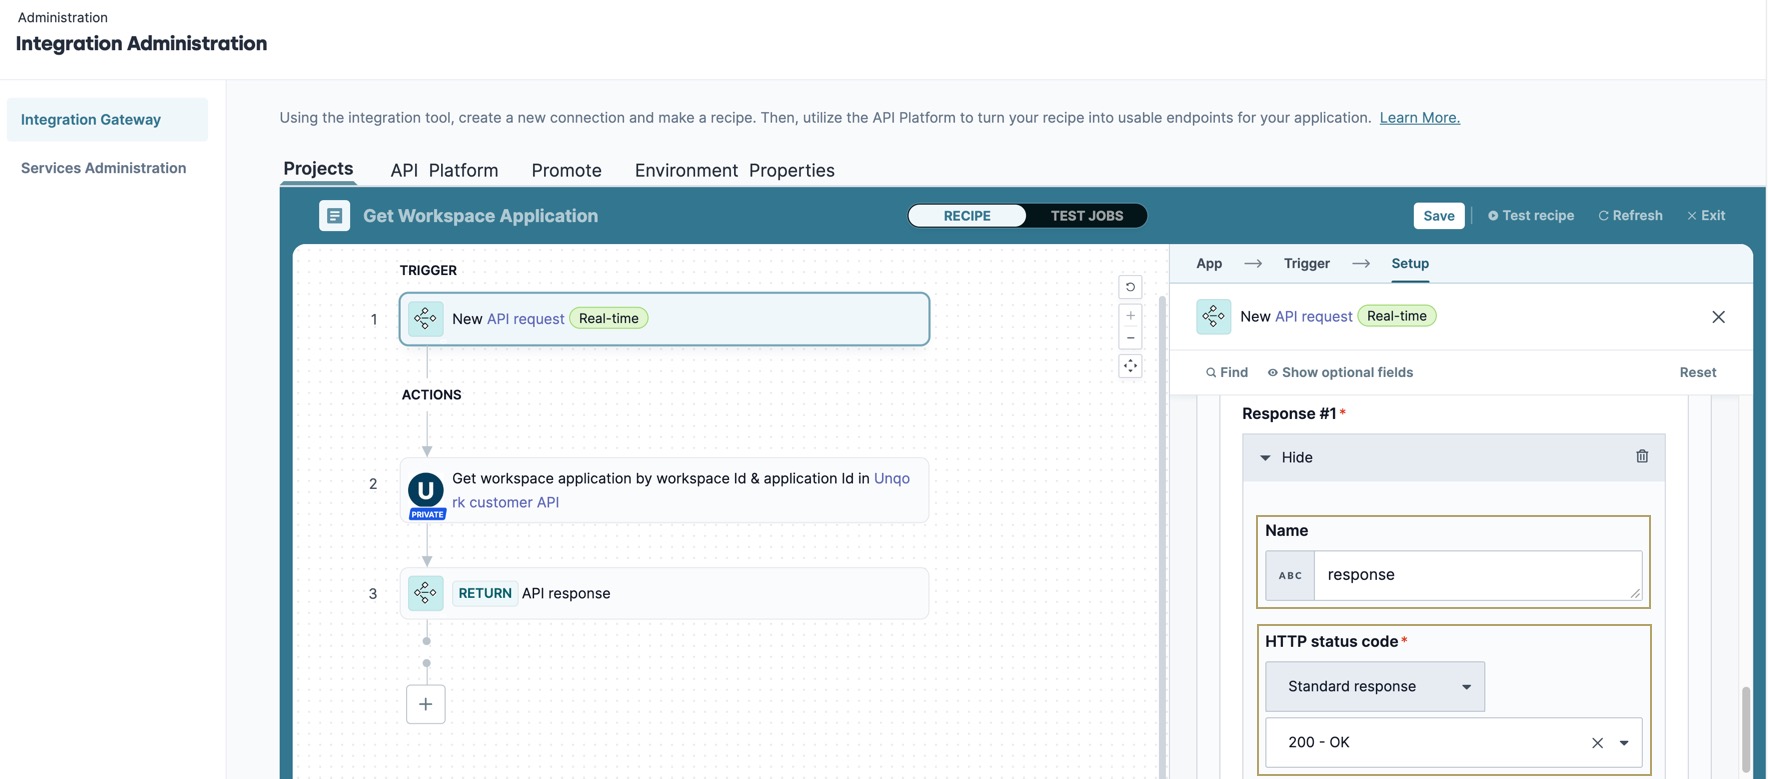
The third step in the recipe locates the response from the API request.
1.
Under ACTIONS, click the (Add Step) button. A list of actions displays.
2.
Click Action in App. The configuration panel displays.
3.
Under Choose an App, search for and select the API Platform by Workato tile. This step changes the action to RETURNAPI Response and the configuration panel navigates to the Setup step.
4.
Return to and select the NewAPI requestReal-timeTRIGGER step.
5.
From the right-menu, scroll to the Responses* section.
6.
Click Add Response.
7.
In Name field of the Response #1 box, enter response.
8.
From the HTTP status code* drop-down, select 200 - OK. Whenever the API successfully returns the response values, this status code displays.
To learn more about response codes, view our HTTP Status Codes article.
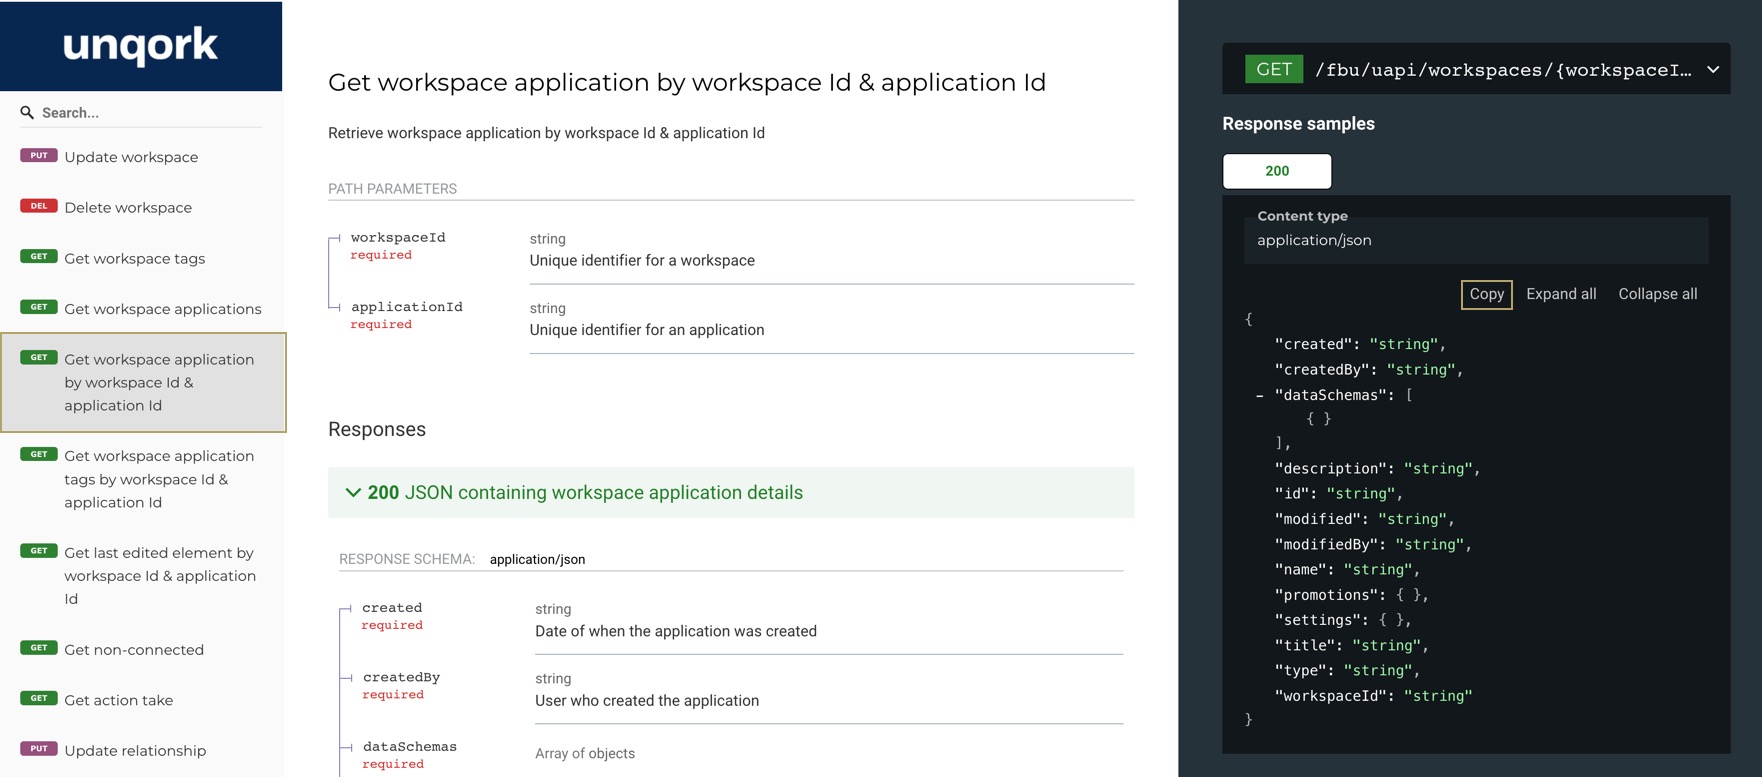
Add the Response Schema
Use the Response schema fields to return specific values from the Get workspace application by workspace Id & application id endpoint. For this example, use Unqork's API documentation to find and copy the JSON definition.
1.
Under Response Schema, select Use JSON. The Generate Schema modal displays.
2.
Open a new browser tab and navigate to your Unqork environment's API documentation. For example, https://training.unqork.io/#/apidocs.
3.
In the Search Bar, search for and select Get workspace application by workspace Id & application id. The page displays the endpoint and response samples.
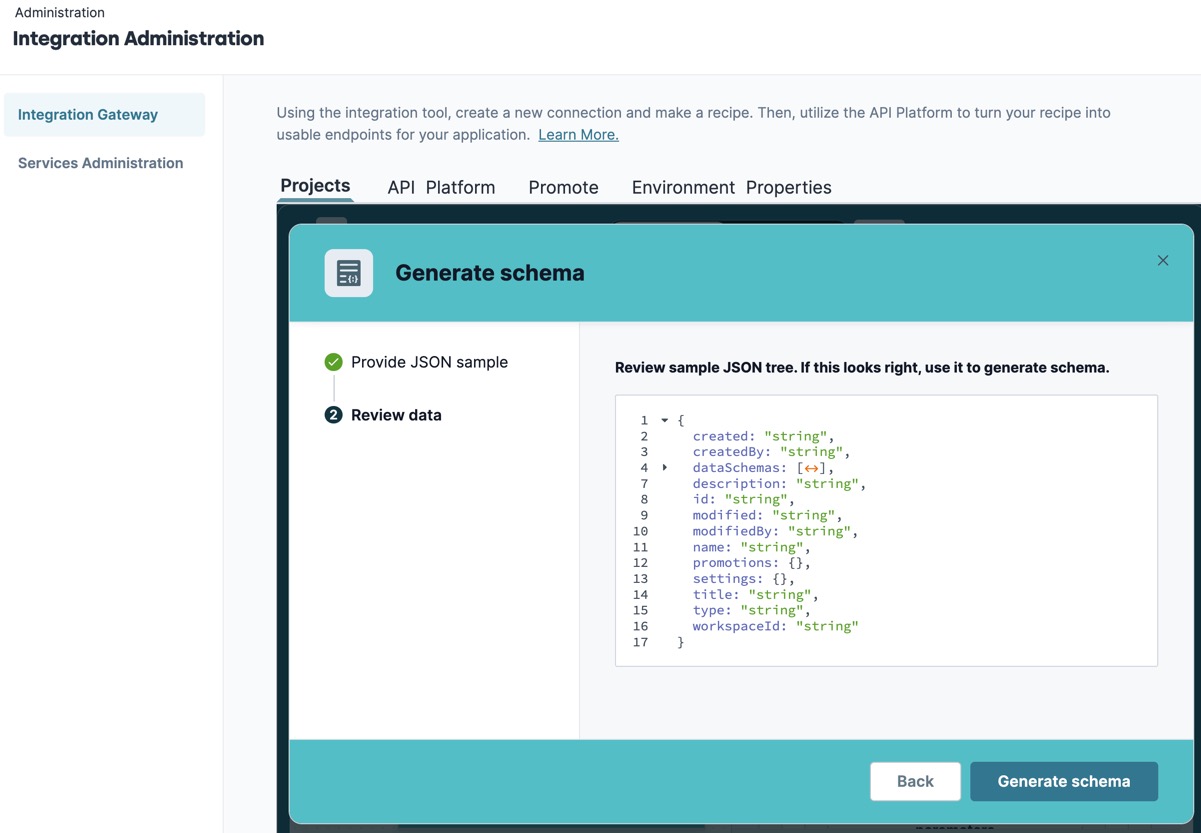
Return to the Generate Schema modal and paste the clipboard data into the JSON Sample code box.
6.
Click Next. The Review Data section displays the JSON definition for review.
7.
Click Generate Schema. The modal closes, and the JSON definition's fields are added to the NewAPI requestReal-timeTRIGGER step's Response Schema box, and to the Recipe Data modal.
Set the Settings and Promotions Fields to Optional
For this example, not all fields from the JSON definition are required. Edit the Response Schema to remove the promotions and settings fields.
1.
Under Responses* in the Response Schema box, navigate to and mouse-over the Promotions* field.
2.
Click the (Edit) button. The Edit Field modal displays.
3.
From the Optional* drop-down, select Yes.
4.
Click Save. The Promotions field no longer displays the *(Required) symbol.
5.
Repeat this process for the Settings* field.
Pass the JSON Fields to the API Response Step
Now that your Recipe has a Response schema, add the response fields to the API Response's Setup step.
1.
Select the RETURNAPI Response step. The configuration menu displays the Setup settings.
2.
From the Response* drop-down, select response. The Response body* box displays below.
3.
Select the Created* field. The Recipe Data modal expands.
The recipe is now running and ready for use in Unqork. The final step in the IntegrationGateway is to create an endpoint for the recipe.
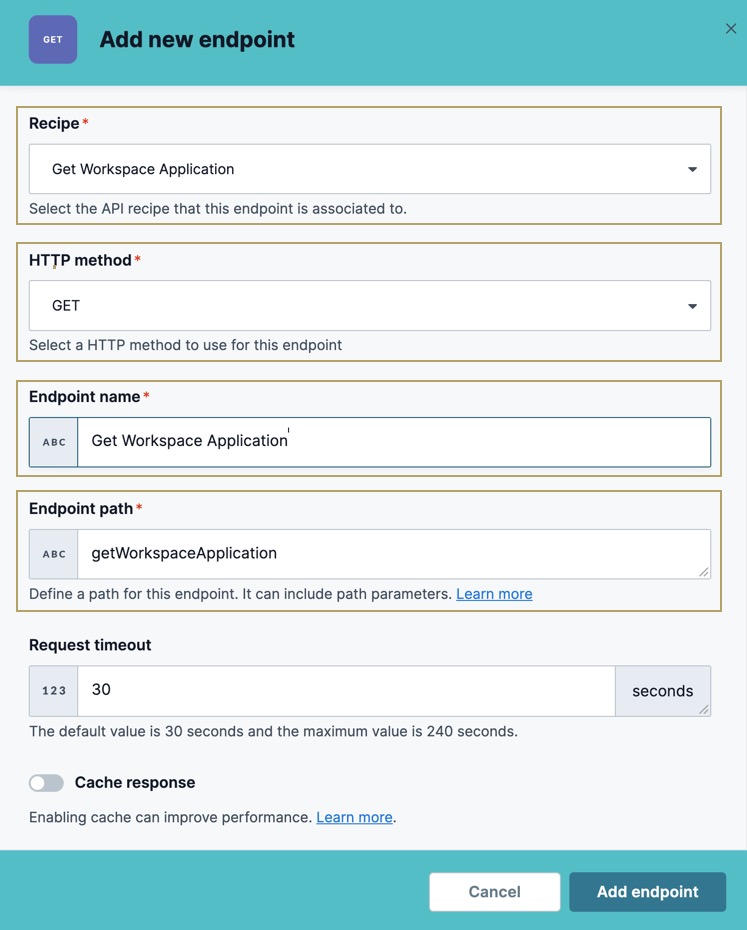
Configure Your Endpoint
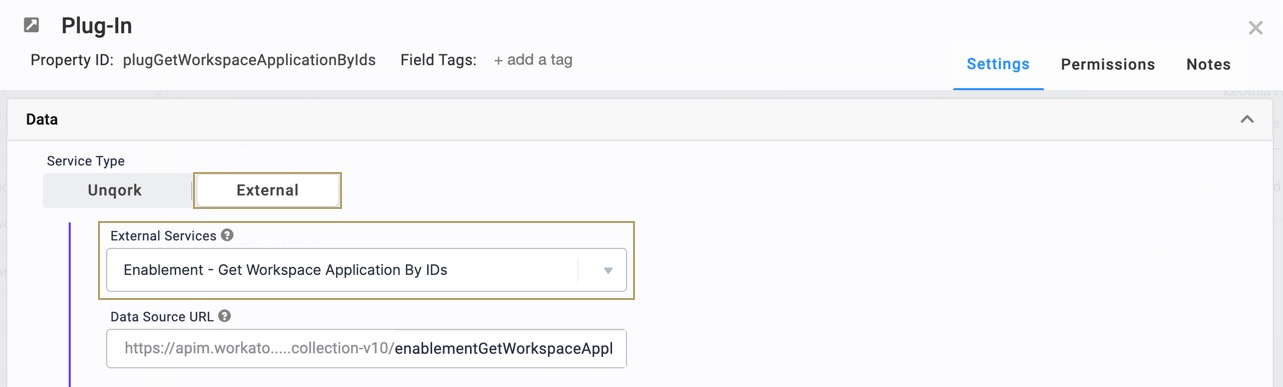
In order to use your recipe in a Plug-In component, you must create an endpoint in the IntegrationGateway. Once created, it displays in the Plug-In component's External Services drop-down.
To configure your endpoint:
1.
At the top left of the Recipe Builder, click the API Platform tab.
2.
From the API Collections panel, select an existing API Recipe collection.
3.
Click + New Endpoint. The Add New Endpoint modal displays.
4.
From the Recipe* drop-down, search for and select your recipe's name.
5.
From the HTTP Method* drop-down, select the method to use for this endpoint. In this case, leave it as the default GET.
6.
In the Endpoint Name* field, enter a unique name for this endpoint. For example, Get Workspace Application. This value displays in the Plug-In component's External Services setting.
7.
In the Endpoint Path* field, enter a unique path for your endpoint. For example, getWorkspaceApplication.
8.
Click Add Endpoint. You return to the API Platform page and the new endpoint tile displays at the top of the page.
9.
On the endpoint tile, click the ··· (options) button.
10.
Select Activate Endpoint. The endpoint's status changes from Never Active to Active.
You endpoint is now active, so you can select it in a Plug-In component.
Configuration
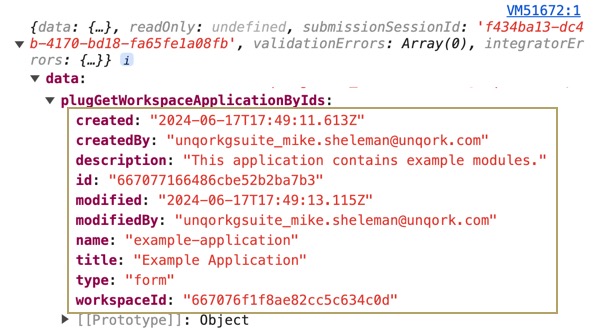
The last step of the process is to configure a module to retrieve Unqork application data using the endpoint. These instructions assume you have a module saved with a title.
Configure the Text Field Components
Configure two Text Field components for entering the Workspace ID and Application IDs. These values input into the Plug-In component.
1.
In the Module Builder, drag and drop two Text Field component onto the canvas.

 Unqork Customer API connection tile.
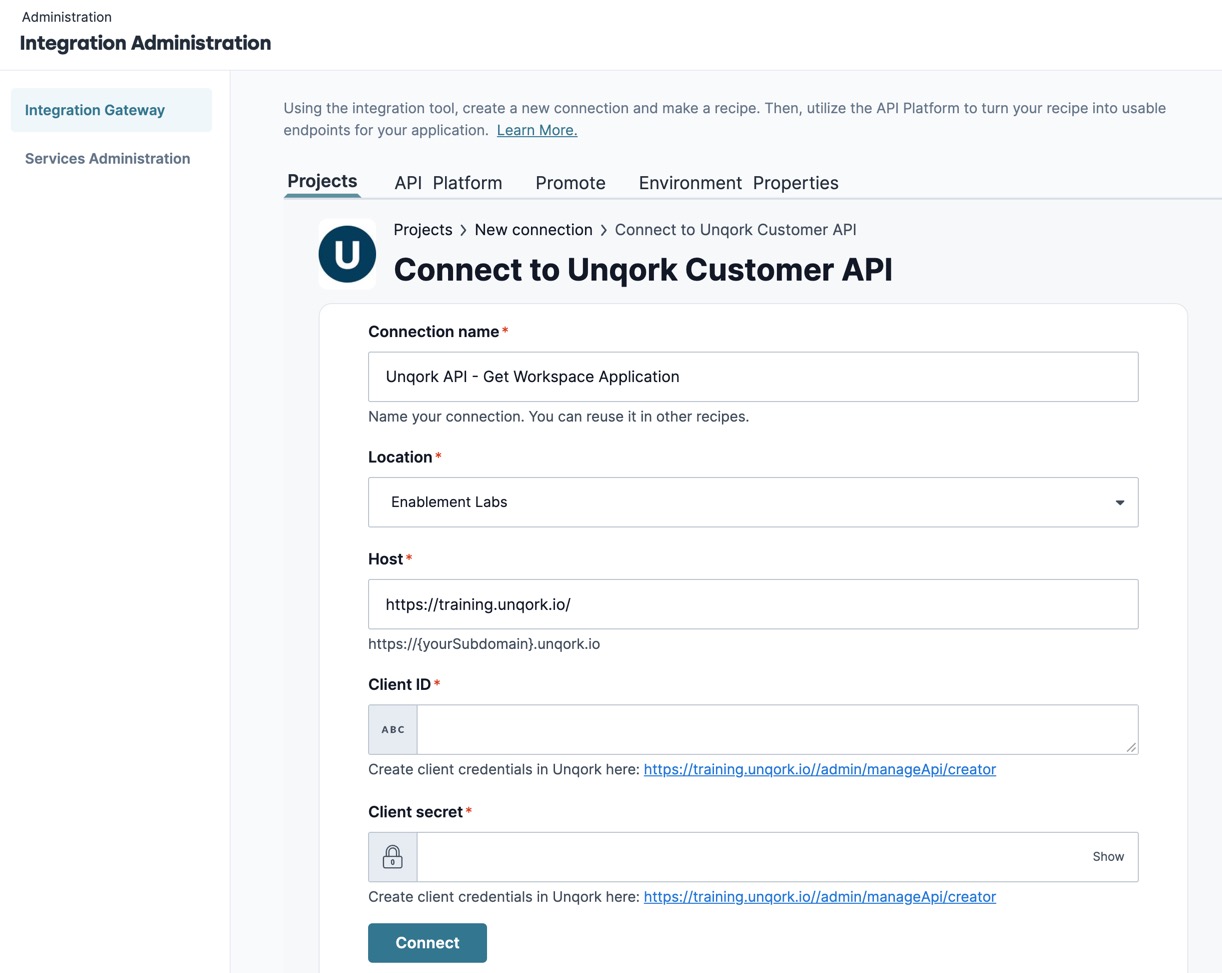
 Connected.
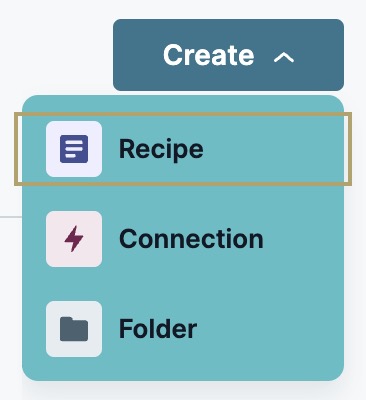
 Recipe.
 Trigger from an App.
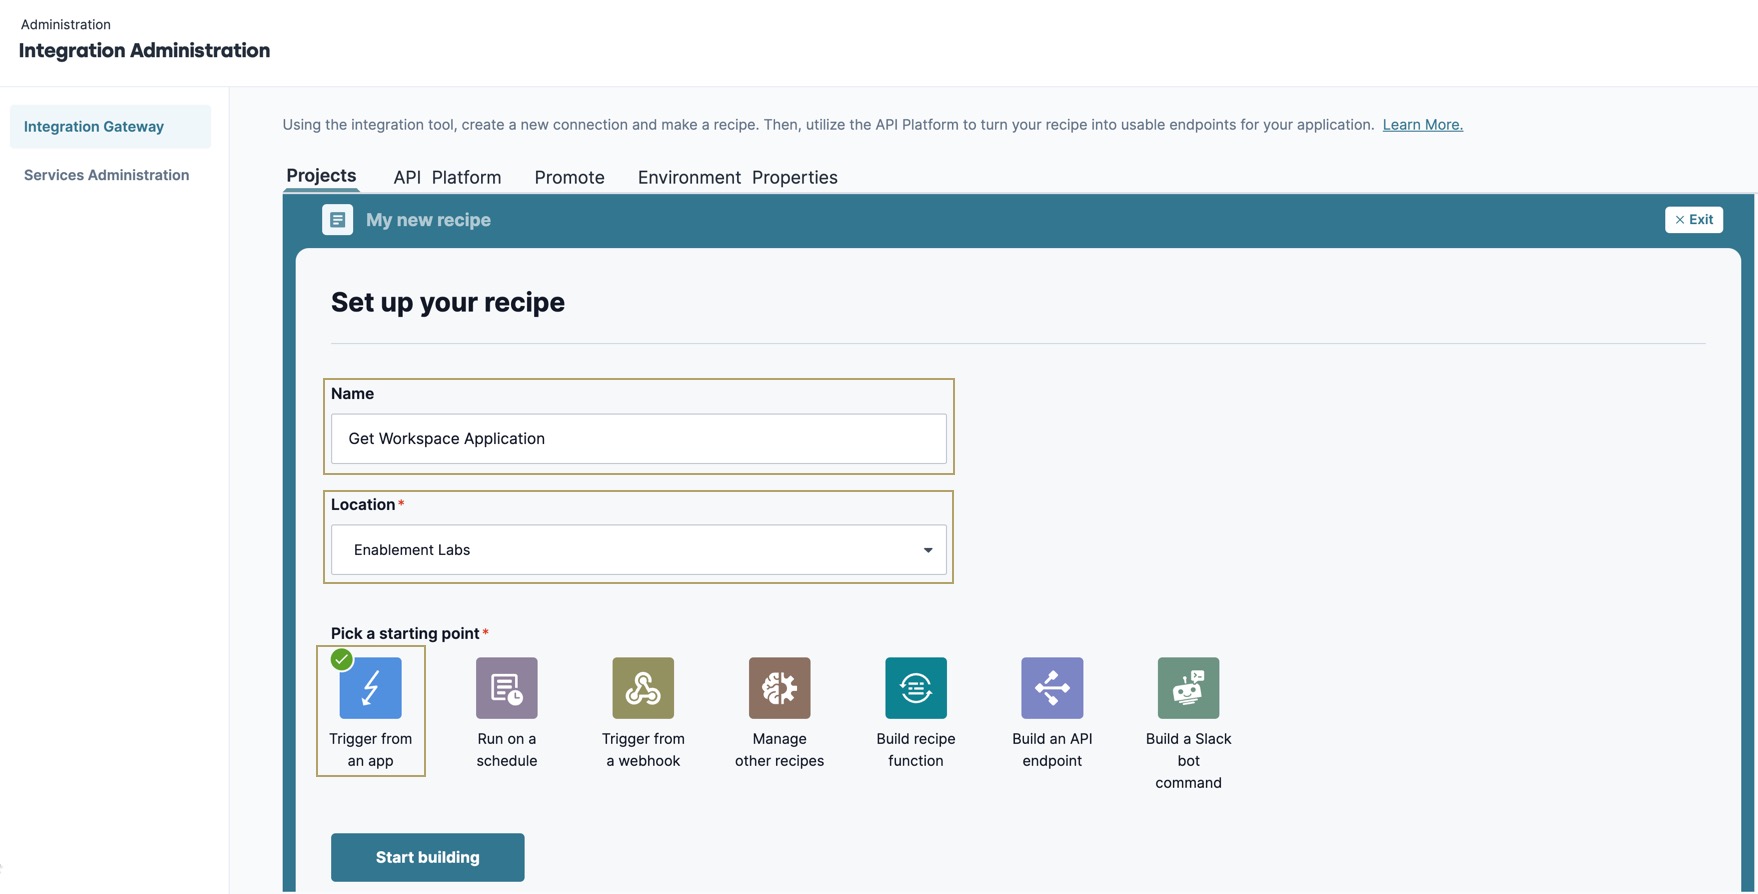
 Select an App and Trigger Event button. A configuration panel displays all your connected apps at the right of the page.
 API Platform by Workato. The TRIGGER step changes to
  Action in App. The configuration panel displays.
 Choose an App, search for and select the