Overview
The Integration Gateway supports variable path parameters for endpoints. Variable path parameters let you insert a dynamic value into an endpoint's pathway. For example, if you create an Unqork Connector that retrieves a module's submission data, you can create an endpoint with a variable parameter that uses the module's ID in the pathway.
Variable path parameters let you create endpoints similar to Unqork's API. For example, the Unqork Get Module Submissions API endpoint looks like the following: https://{host}/api/1.0/modules/{moduleId}/submissions. The {host} and {moduleId} values are variables that you replace to target a specific environment and module.
Create a Variable Endpoint for an Existing Recipe
For this example, you'll create and connect a variable endpoint to an existing recipe. Later, we'll set up a module with a Plug-In component that targets the variable endpoint.
What You Need
1 Module
Creating the Variable Endpoint
First, use the Integration Gateway to create a new endpoint for an existing recipe. These instructions assume you have an existing recipe where you'll create an endpoint.
For this example, we'll use the Integration Gateway recipe set up in the How to: Retrieve a Payload Using an Unqork Connector article.
To create a new variable endpoint:
At the top right of the Unqork Designer Platform, click Settings ▾.
Select Administration.
Under Integration, click API Access Management.
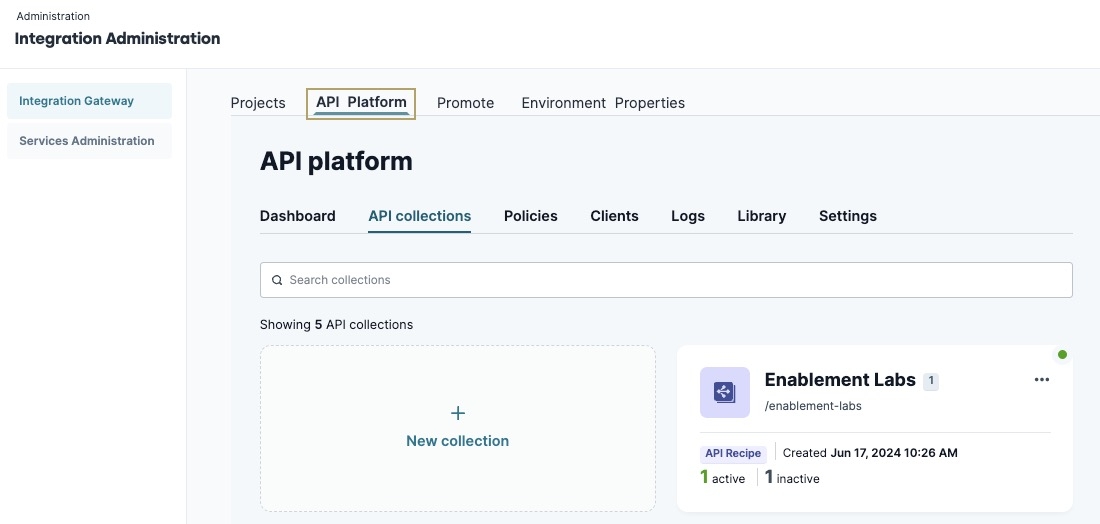
Select the API Platform tab.

Select your API Collection.
Click + New Endpoint.
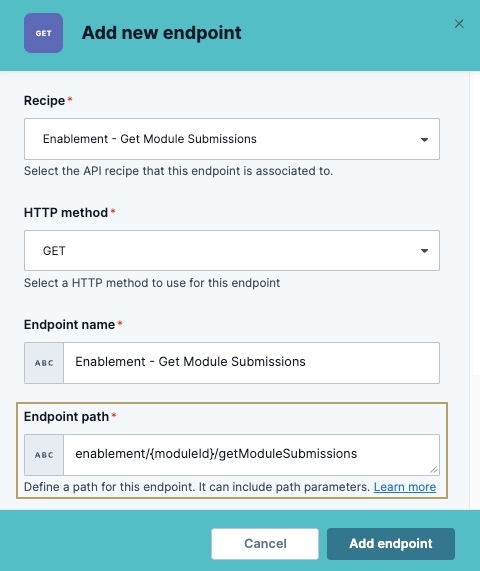
From the Recipe* drop-down, select an existing recipe.
For this example, we'll use the Unqork Get Module Submissions recipe created in the How to: Retrieve a Payload Using an Unqork Connector article.
From the HTTP Method* drop-down, select the request method for the recipe. For the Get Module Submissions endpoint, select GET.
In the Endpoint Name* field, enter a unique name. This value displays in a Plug-In component as an External Service.
Configuring the Variable Endpoint Path
The Endpoint Path field accepts variable parameters. To create a variable parameter, use a single set of curly braces {} to enclose a variable value. For this example, the Unqork Get Module Submissions recipe uses the variable value moduleId to retrieve submissions from the specified module. Adding {moduleId} to the endpoint path displays the recipe's moduleId value when calling the endpoint.
In the Endpoint Path*, enter a value that includes a variable parameter. For example
enablement/{moduleId}/getModuleSubmissions.
Click Add Endpoint.
On the endpoint tile, click the ··· (options) button.
Select Activate Endpoint. The endpoint's status changes from Never Active to Active.
Your variable endpoint is now active for you to select it in a Plug-In component.
Configuration
The last step of the process is to configure a module to retrieve Unqork application data using the variable endpoint. These instructions assume you have a module saved with a title.
For this example, we'll use the Integration Gateway recipe set up in the How to: Retrieve a Payload Using an Unqork Connector article.
Configure the Text Field Component
Configure a Text Field component for entering the module ID. This value inputs into the Plug-In component you'll configure in the next step.
In the Module Builder, drag and drop a Text Field component onto the canvas.
In the Property ID field, enter textModuleId.
In the Canvas Label Text field, enter
Module ID:.Click Save & Close.
Configure the Plug-In Component
Add a Plug-In component to use your new Integration Gateway endpoint and retrieve your workspace application.
Drag and drop a
 Plug-In component onto your canvas, placing it below the textModuleId Text Field component.
In the Property ID and Canvas Label Text fields, enter
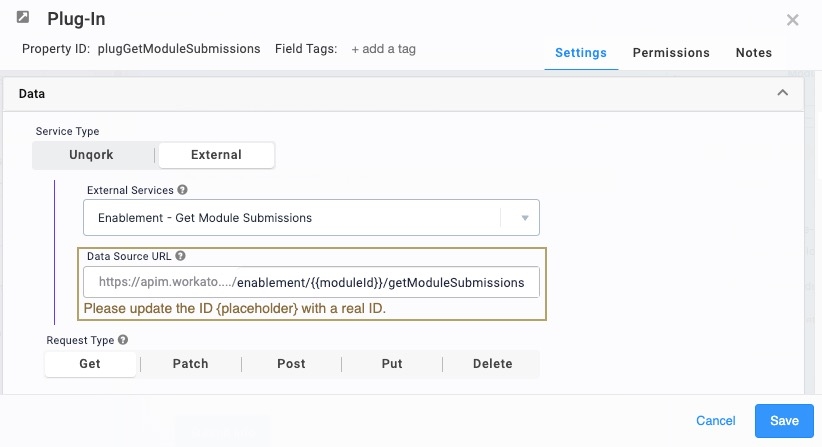
plugGetModuleSubmissions.Set the Service Type to External.
From the External Services drop-down, select the endpoint you created.
In the Data Source URL field, the variable parameter from the Configuring the Variable Endpoint Path section now displays in {{}} (double curly brackets).

In the Data Source URL field, modify the variable value to use the module's textModuleId Text Field component value. For example,
{{moduleId}}becomes{{data.textModuleId}}. Now, when users enter a value in the textModuleId Text Field component field, the Data Source URL updates the value between the brackets.In the INPUTS table, enter the following:
Property ID
Mapping
textModuleId
moduleId
Click Save.
Configure the Button Component
Next, add a Button component to trigger the Plug-In component.
Drag and drop a Button component onto the canvas, placing it below your Plug-In component.
In the Property ID field, enter btnGetModuleSubmissions.
In the Canvas Label Text field, enter
Get Module Submissions.Set the Action Type to Event.
In the Trigger field, enter
plugGetModuleSubmissions.Click Save & Close.
Save your module.
View the API Request Payload in the DevTools Console
Now that you've built your endpoint and created a module that can call it, verify the endpoint works correctly.
Preview your module in Express View.
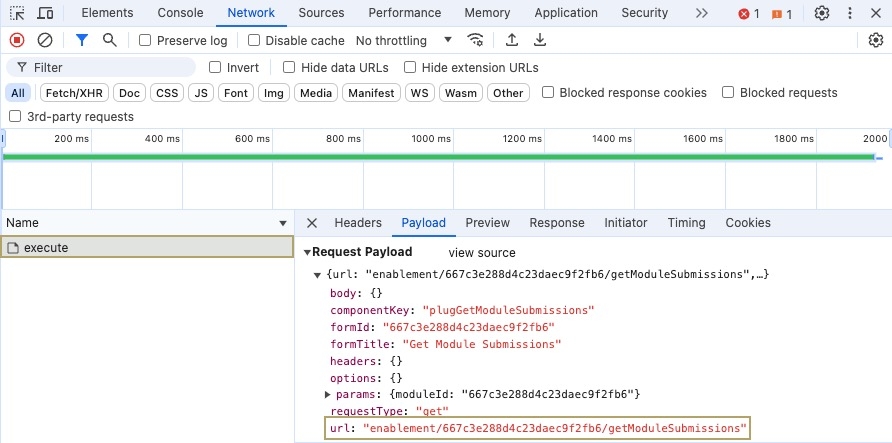
Right-click anywhere in Express View and click Inspect. The DevTools Console displays.
Your browser type and settings might look different than the image and steps displayed below.
From the DevTools Console, select the Network tab.
In the Module ID field, enter a module ID that contains submission data.
Click the Get Module Submissions button. The execute request displays in the Network tab's list.
Select the execute request, then click Payload. The Request Payload data displays.
In the Request Payload, the endpoint URL replaces the Plug-In component {{data.textModuleId}} variable parameter with the value from the textModuleId Text Field component field.

The endpoint URL updates every time you call the endpoint using a different module ID.