Overview
Once you have your JSON Schemas uploaded and binded to a Data Model, you can apply them to a module in the same workspace. After you upload your schemas, the Data Model creates a relationship between your schema and module(s). That way, the schemas map to components you can add to your modules. When a Data Model is applied to a module, you can access, edit, and organize the schema fields on the Module Builder canvas.
To learn more about component mapping, view our JSON Schema Component Mapping article.
Data Models are not supported in workflow-type applications. For example, modules associated with a Data Model cannot be selected from a workflow's Task node.
Binding a Data Model to a Module
Before you can apply a Data Model to a module, you must first create a module-type application.
WORM Storage is not currently supported by the Data Model feature. Module-type applications with WORM Storage enabled might encounter errors.
To bind your Data Model to a module:
In Workspaces view, navigate to and select the Workspace that contains the Data Model you want to apply.
In the
.png) Applications tab of your workspace, select or create the module application where you want to apply your Data Model.
Applications tab of your workspace, select or create the module application where you want to apply your Data Model.In the
.png) Modules tab of your application, select the
Modules tab of your application, select the .png) (ellipsis) icon of the module where you want to apply your Data Model.
(ellipsis) icon of the module where you want to apply your Data Model.Select
.png) Settings.
Settings.From the Data Models drop-down, enter or select the Data Model(s) you want to apply.
You can apply multiple Data Models to a module. Confirm your Data Models do not conflict or have overlapping properties.
Select Save.
Customizing a Module Using Your Data Model
Unqork uses a codeless approach to structuring your Data Models inside any module they're bound to.
To add your schema fields to your module:
In Workspaces view, navigate to and select the Workspace that contains your module application.
In the
.png) Applications tab, select the module application where you want to apply your Data Model.
Applications tab, select the module application where you want to apply your Data Model.In your module application, select the module where you applied your Data Model.
Above the component tray to the left of the Module Builder, select Data. Your Data Models and schema fields display.
Drag and drop your schema fields from the menu onto the canvas.
Save your module.
Modifying Data Model Fields in the Module Builder
When you add a schema to your module, the component mapped to your schema displays on the canvas. You can move or edit the component as long as the settings are available.
To learn more about schema mapping, view our Upload, Modify, and Publish JSON Schemas article.
Open the configuration window for a component mapped to your schema to view the Data Model attributes. Data Model attributes let you view how the Data Model and schemas map to the component. Attributes include the Field Name, Data Model, and Type.
Attribute | Description |
|---|---|
Field Name | The field path of the Data Model. |
Data Model | The name of the attributed Data Model. |
Type | The data type used to map to the component. |
Data Model Validation
Unqork Data Modeling also lets you enforce JSON Schema validation in your Data Models. When an end-user submits a record (or submission) in Express View, the application validates against the JSON Schema and returns an error if the validation fails. You can enforce this validation on individual field entries or modules if a required field is missing.
In this example, the Creator is building an application that itemizes case numbers. To submit the record, the application must include a case ID and name. If the end-user does not enter these values, the following error message displays:
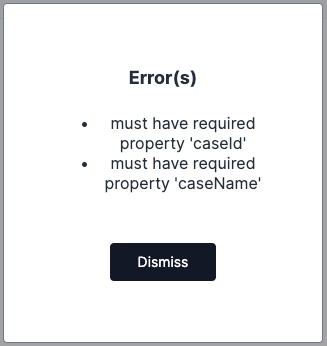
If the Creator does not add these fields to the module for the end-user to submit the record, the error message also displays once the record is submitted.