Workspaces: Global and Advanced Search
Overview
Global Search and Advanced Search let you search for elements at the module, application, workspace, and workspaces levels. Use Global Search if you know the name of a module or application but are unsure of its workspace. Alternatively, Global Search includes a link to the Advanced Search page if you need to narrow down your search. The Advanced Search page lets you narrow your search by using filter and search sorting options.
Global Search
The (Global Search) tool displays in the navigation bar at the top of UDesigner. Searching using the Global Search tool displays results for workspaces, applications, or app elements that contain the search criteria.
To use Global Search in Workspaces:
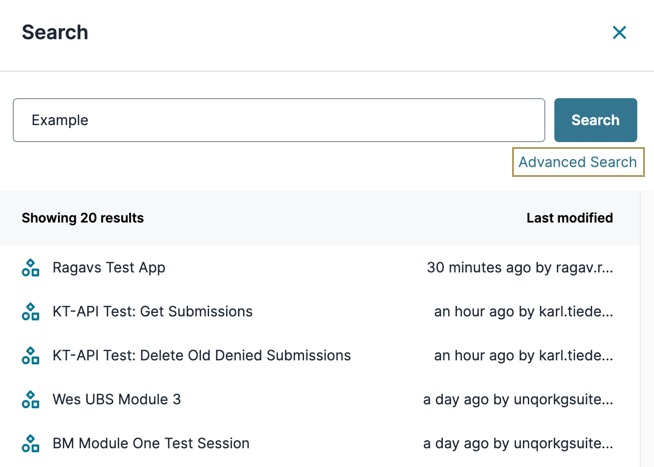
| 1. | Click the (magnifying glass) at the top of the page. The workspace's most recently updated modules display at the top of the modal A modal is a window that appears on top of the content you are currently viewing.. |
| 2. | In the Search Environment field, enter all or part of a workspace, application, or app element name. You can also search for a specific module ID. |
The matching workspaces, applications, and app elements display in a list. As you continue entering characters, the list narrows.
The icons to the left of the results identify the result as a workspace, application, workflow, module, or Data Collection. You can also reference the Last Modified date to help you locate the correct element. By default, search results sort by the most recently updated workspaces, applications, and app elements.
| 3. | Scroll to find the workspace, application, or app element. |
| 4. | Click the line item to open the workspace, application, or app element. |
- Clicking a workspace opens it at the Workspace level.
- Clicking an app opens it at the Application level.
- Clicking an app element opens it in the Module Builder.
Advanced Search
While Global Search provides general search results, Advanced Search lets you use additional filters to narrow the results.
Accessing Advanced Search
To use the Advanced Search:
| 1. | Click the (magnifying glass) at the top of the page. |
| 2. | Click Advanced Search. |
When Advanced Search opens, Unqork retains the search criteria you entered. The matching workspaces, apps, and elements display in a list.
Navigating Advanced Search
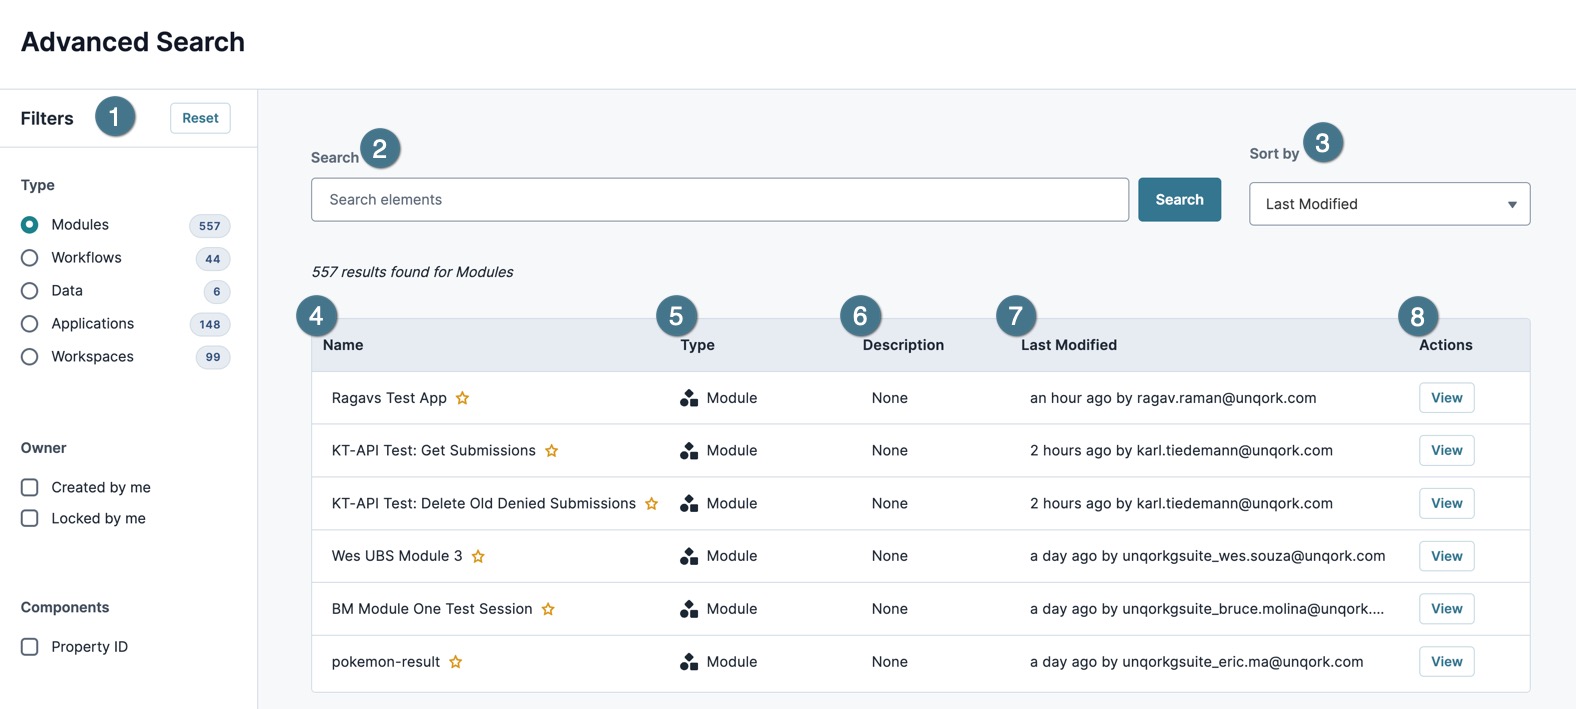
| # | Setting | Description |
|---|---|---|
|
1 |
Filters |
Apply filters to the search to narrow down the results. View the Filters section for more setting descriptions. |
|
2 |
Search |
Enter a value in the field, then click Search. Leave the Search field empty to search for all elements. |
|
3 |
Sort By |
Set the order of the results that display in the Search Grid. The Sort By settings include:
|
|
|
Search Grid |
The search grid contains information related to the Search field's value. |
|
4 |
Name |
The element's name. |
|
5 |
Type |
The type of element. Element types include:
|
|
6 |
Description |
Displays additional information entered in the element's Description field setting. If no description exists, the value displays as None. Data Collections do not have a Description field and display as None. |
|
7 |
Last Modified |
The date, time, and Creator Also known as Unqork Users, or Designer Users; is anyone who is inside the Unqork platform. that last modified the element. |
|
8 |
Actions |
Click View to open the app element in a new browser tab. |
Filters
Use the Filters pane to narrow your search. These filters include:
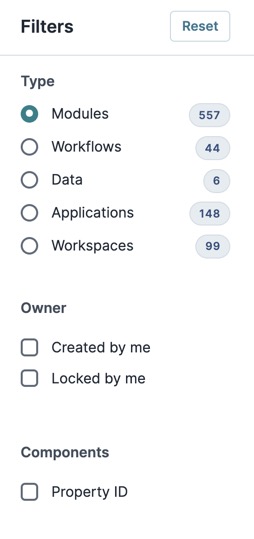
| Filter | Description |
|---|---|
|
Type |
These radio buttons help to narrow your search to specific workspaces or app elements. By default, the Type is set to Modules. |
|
Modules |
Limit the search to modules. |
|
Workflows |
Limits the search to workflows. |
|
Data |
Limits the search to reference data. |
|
Applications |
Limits the search to applications. |
|
Workspaces |
Limits the search to workspaces. |
|
Owner |
View only workspaces or elements you created or locked. By default, no Owner settings are selected. |
|
Created by Me |
Limits the search to workspaces and elements created by you. |
|
Locked by Me |
Limits the search to workspaces and elements locked by you. |
|
Components |
Search for module component elements. By default, no Components settings are selected. |
|
Property ID |
Limits the search to modules that contain the Property ID value. This filter does not display individual components, but the module that contains the component. |

Overview
Global Search and Advanced Search let you search for elements at the module, application, workspace, and workspaces levels. Use Global Search if you know the name of a module or application but are unsure of its workspace. Alternatively, Global Search includes a link to the Advanced Search page if you need to narrow down your search. The Advanced Search page lets you narrow your search by using filter and search sorting options.
To quickly access the Search field, press the forward-slash (/) on your keyboard. This is the Search hotkey. When you press this Search hotkey, the Search field opens in a focused state, ready for text entry. This hotkey only works when navigating Workspaces. It won't work if you enter the hotkey in the Module Builder.
Using Global Search
The Search ( ) feature displays at the top of the page as you navigate Workspaces. You can also access the Search field using the Search hotkey. You can begin a search from any level in Workspaces and the result is the same. The results display workspaces, applications, or app elements contain the search criteria.
To use Global Search in Workspaces:
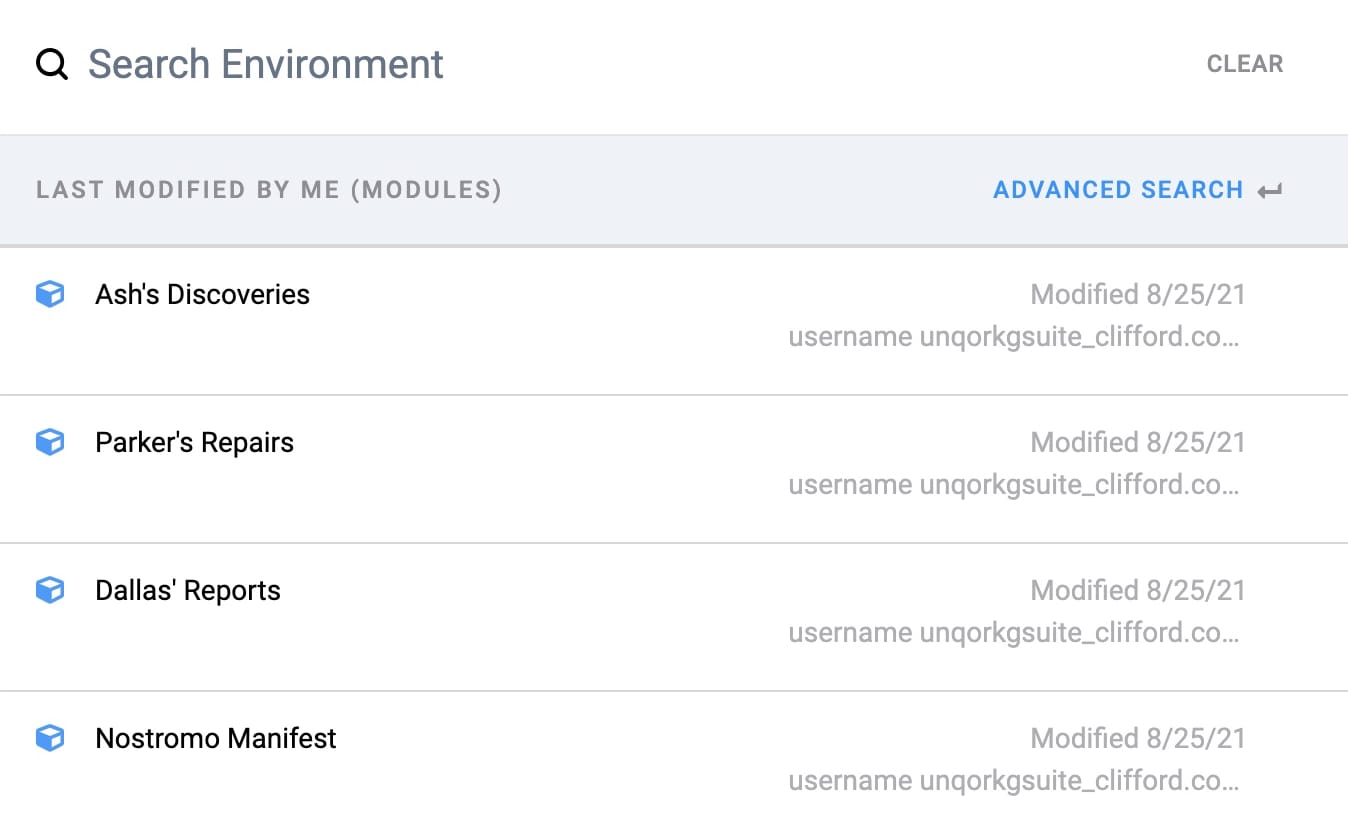
| 1. | Click the magnifying glass () at the top of the page. Or, press forward-slash (/) on your keyboard. Your most recently updated modules display at the top of the modal A modal is a window that appears on top of the content you are currently viewing.. |
| 2. | In the Search Environment field, enter all or part of the workspace, application, or app element name you want to filter by. You can also search for a specific module ID. |
The matching workspaces, applications, and app elements display in a list. As you continue entering characters, the list filters further.
Pressing Enter with the Search field blank returns all workspaces, applications, and app elements. The icons to the left of the results identify the result as a workspace, application, workflow, module, or Data Collection. You can also reference the modified date to help you locate the correct element. By default, search results sort by the most recently updated workspaces, applications, and app elements.
| 3. | Scroll to find the workspace, application, or app element. |
| 4. | Click the line item to open the workspace, application, or app element. |
- Clicking a workspace opens it at the Workspace level.
- Clicking an application opens it at the Application level.
- Clicking an app element opens it in an editing view at the App Element level.
Using Advanced Search
If you're unable to locate a workspace, application, or app element, use the Advanced Search option.
To use the Advanced Search:
| 1. | Click the magnifying glass () at the top right of the page. Or, press forward-slash (/) on your keyboard. |
| 2. | Click Advanced Search at the top of the Search modal A modal is a window that appears on top of the content you are currently viewing.. |
When Advanced Search opens, Unqork retains the search criteria you entered. The matching workspaces, applications, and app elements display in a list.
| 3. | In the Search Environment field, enter all or part of the workspace, application, or app element name you want to filter by. You can also search for a specific module ID. |
| 4. | Click Enter or Return on your keyboard. |
You can also use the page's filters to narrow your search. These filters include the following:
| Filter | Description |
|---|---|
|
Type |
These radio buttons help to narrow your search to specific workspaces or app elements. |
|
Modules |
Select this filter to view only your environment's modules. |
|
Workflows |
Select this filter to view only your environment's workflows. |
|
Data |
Select this filter to view only your environment's reference data. |
|
Applications |
Select this filter to view only your environment's applications. |
|
Workspaces |
Select this filter to view only your environment's workspaces. |
|
Owner |
These checkboxes let you view only workspaces or app elements you created or locked. |
|
Created by Me |
Select this checkbox to view only workspaces and app elements created by you. |
|
Locked by Me |
Select this checkbox to view only workspaces and app elements locked by you. |

Advanced Search Results
After narrowing your search, you can sort the results or perform administrative actions. Use the Sort by drop-down to sort the results by Last Modified, Created Date, or Title. By default, the results sort by Last Modified in ascending order (A-Z). If you select Last Modified again, the results sort in descending order (Z-A).
You can also use the drop-down next to the workspace, application, or app element name to display its breadcrumb. For example, if you open the breadcrumbs for a module, you'll see the application where it exists.
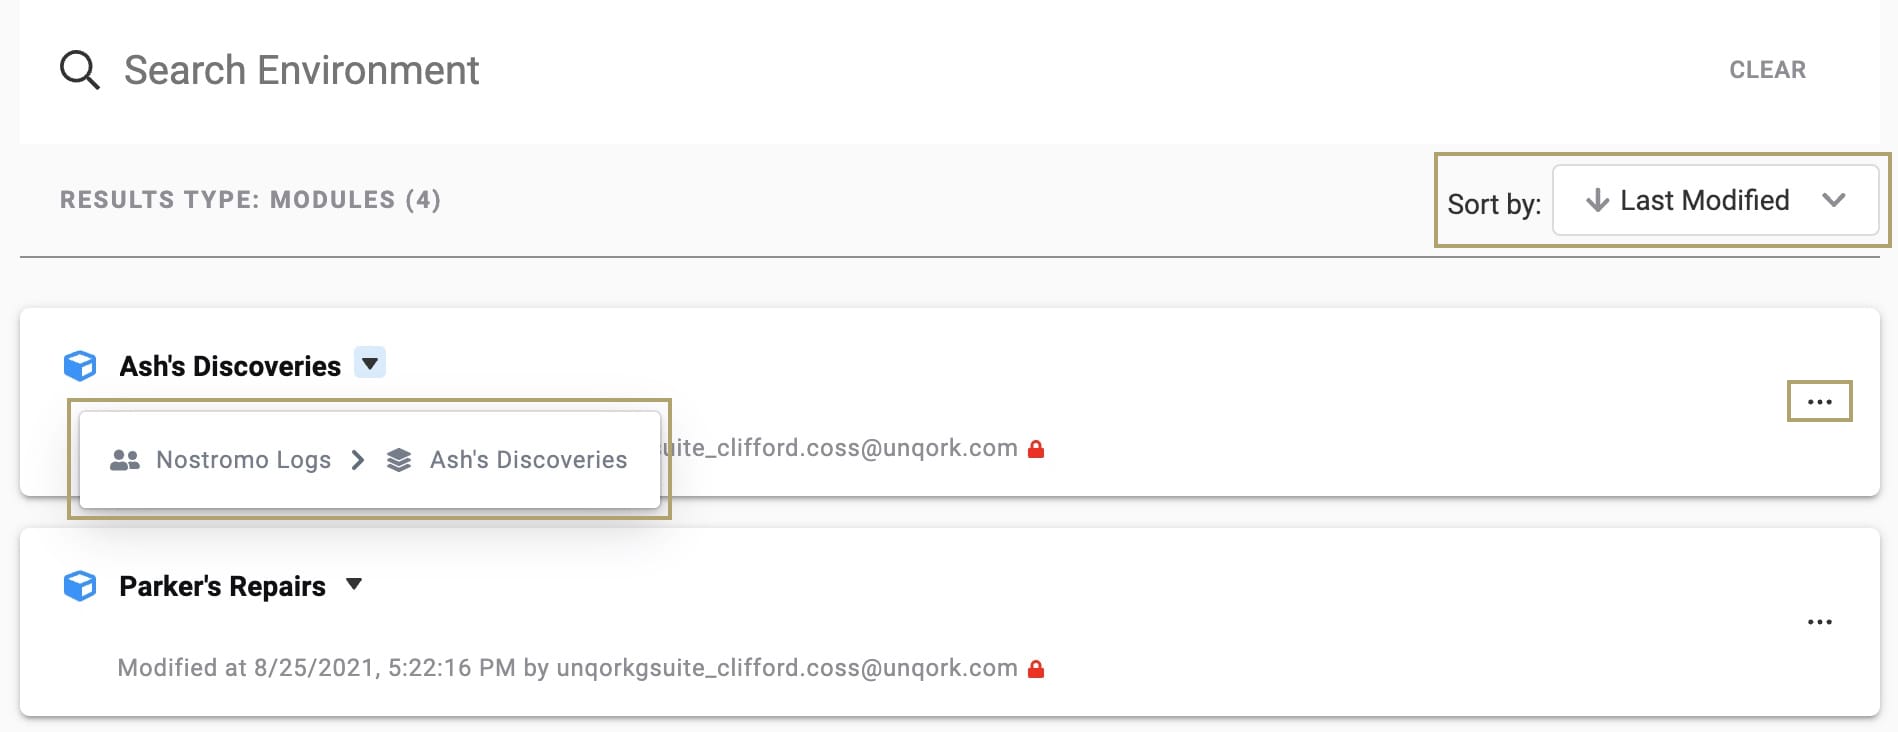
An ··· (ellipsis) button displays to the far right of each tile that lets you perform the following actions:
| Option | Description |
|---|---|
|
Preview |
This option is available for modules, workflows, and applications. It lets you preview the element in Express View Express View is how your end-user views your application. Express View also lets you preview your applications to test your configuration and view the styling. This is also the view your end-users will see when interacting with your application. After configuring a module, click Preview in the Module Builder to interact with the module in Express View.. |
|
Share Settings |
This option is available for modules and Data Collections. Clicking this link opens the Share Settings modal A modal is a window that appears on top of the content you are currently viewing., displaying shared information for this element. Setting Share to the Environment to (ON) shares your module or Data Collection across your environment. The Share Settings modal also shows the usage of a shared element. You'll see Total Workspaces Shared to and Total Apps Connected. |
|
Duplicate |
This option is available for modules and applications. It creates a copy of the module or application. |
|
Move to... |
This option is available for modules, Data Collections, and applications. It moves the module, Data Collection, or application to another environment or workspace. |
|
Delete |
This option is available for modules, Data Collections, applications, and workflows. It deletes the module, Data Collection, application, or workflow. |
|
Settings |
This option is available with applications, workflows, and workspaces. If selected for a workflow, you can change the Workflow Name and Path. If selected for an application, you can change App Info or Data Settings. App Info includes the App Name, Path, and Style. App Info also displays the App Id, App Type, and App Workflow. Data Settings includes toggle fields for Data Versioning and WORM Storage. All are required fields. If selected for a workspace, you can change the Workspace Name. |
| Reload |
This option is available for a Data Collection. You can update the file used to create the Data Collection. This option erases existing data. You can only reload your Data Collection as a CSV file containing information from the previous schema. |
|
Export |
This option is available for a Data Collection. It creates a CSV file of your Data Collection. |
|
Data Model |
This option is available for applications. It generates a link to your application's data model. Data models are visual representations of an application's data. |
|
Promotion |
This option is available for applications. You can promote your application and app elements. First, you'll set a required destination promotion environment. Then, you can view general application information and promotion history. Lastly, you'll select the modules and/or Data Collection you want to promote. |
|
Export CSV |
This option is available for applications. It creates a CSV file that lists component details from your application. |
|
Unshare |
This option is available for shared modules and Data Collections. It lets you unshare and localize your module or Data Collection to a single application. |
Resources
