Overview
In this how-to guide, you'll explore a simple Data Model for a case management application. A fictional company called ACME wants you to use two predefined schemas to create two data models. Creators can then use the data models in a module to capture new applications.
What You’ll Learn
In this article, you’ll learn how to create a set of data models for a case management application using predefined schemas.
What You Need
For this how-to guide, you need the following:
2 JSON Schemas
Import and Bind Schemas to Data Models
Unqork Data Models use a JSON Schema to define the requirements for storing and validating data in applications. For this how-to guide, you’ll download and import two predefined JSON Schemas. Later, you’ll bind the schemas to Unqork Data Models. Then, you can use them in your modules to insert predetermined fields set by the schemas.
Download the Company's Schema Files
The insurance company has created two schemas for you to use when building your Data Model. The application-schema.json schema file contains fields that Creators can use to capture case-specific data. The product-schema.json schema file contains fields used to capture product information, like loan type.
Right-click and save the following files to an accessible location on your computer:
Application-schema.json
{
  "title": "Application",
  "type": "object",
  "properties": {
    "ApplicationId": {
      "type": "string"
    },
    "ApplicationName": {
      "type": "string"
    },
    "InvestorType": {
      "type": "string"
    },
    "AccountType": {
      "type": "string",
      "enum": [
        "Pension",
        "401K",
        "IRA"
      ]
    },
    "Cases": {
      "type": "array",
      "items": {
        "type": "object",
        "properties": {
          "caseId": {
            "type": "string",
            "minLength": 5
          },
          "caseName": {
            "type": "string",
            "maxLength": 10
          },
          "caseStatus": {
            "type": "integer"
          }
        }
      }
    }
  }
}
Product-schema.json
{
  "title": "Product",
  "type": "object",
  "properties": {
    "ProductId": {
      "type": "string"
    },
    "ProductName": {
      "type": "string"
    },
    "ProductType": {
      "type": "string",
      "enum": [
        "Mortgage",
        "Loan",
        "Other"
      ]
    }
  }
}
Import the Schema Files Into Unqork
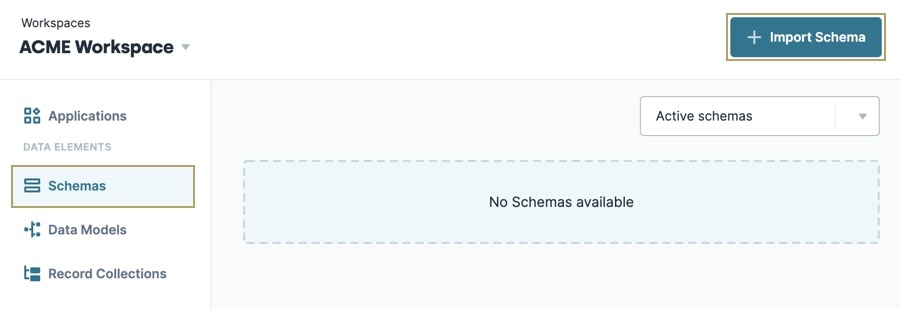
Import the application-schema and product-schema schemas using the Schemas page. After importing the schemas, publish and bind them to Data Models using the Data Models page.
To learn more about using the Schema page, view our Upload, Modify, and Publish JSON Schemas article.
First, import the application-schema.json schema. Then repeat the process for the product-schema.json schema:
In Workspaces view, navigate to and select your Workspace.
To the left of the page, select Schemas.
At the top right, click + Import Schema.

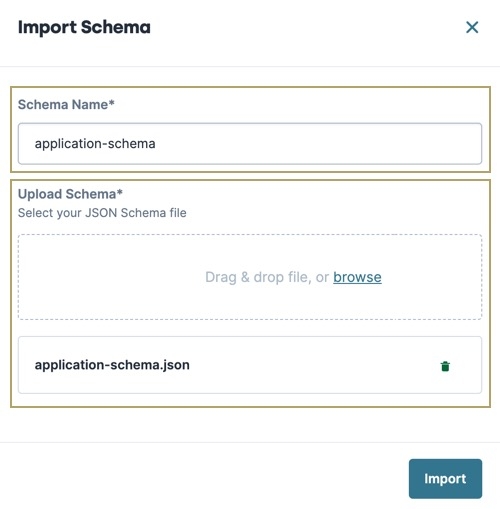
In the Schema Name field, enter
application-schema.Under Upload Schema, drag and drop or browse and select the application-schema.json file from your computer.

Click Import. The application-schema schema displays on the Schemas page.
A warning message displays in the upload modal if the uploaded schema contains invalid JSON.
Repeat this process for the product-schema.json file. In the Schema Name field, enter product-schema.
Publish the Schemas
Each schema begins in a draft state. In this draft state, you can adjust the schema values as needed. When creating your schemas, it's important to verify all aspects of it before publishing. For this example, the schema does not need to be adjusted and is ready to be published.
First, publish the application-schema schema, then repeat the process for the product-schema schema:
From the Schemas page, select application-schema from the schemas list. The Schema Information panel displays.
Click Publish.
After publishing a schema, you cannot edit it. Confirm your schema is ready before publishing.
Click Yes, Publish. The application-schema schema’s state changes from Draft to Published.
Repeat this process for the product-schema schema.
Create the Data Models and Bind the Schemas
Now that you have published two unique schemas, you'll create two Data Models and bind them to the schemas.
First, create and bind the application-model Data Model, then repeat the process for the product-model Data Model:
To the left of your Workspaces view, click Data Models.
At the top right, click + Create Data Model.
In the Data Model Name field, enter
application-model. You’ll reference this name when you assign a Data Model to a module.From the Select Schema drop-down, select application-schema.
Click Create.
Repeat this process for the product-schema schema. In the Data Model Name field, enter
product-model. From the Select Schema drop-down, select product-schema.
You now have two Data Models bound to schemas. To learn how to bind your Data Models to a module, view our How to: Apply Data Models to a Case Management Application article.