About this Configuration Guide
Using this guide, you'll explore how the SendGrid Email with Attachment template works. You'll learn how to install the template to your environment and how to build an application from it. Plus, you'll see how to customize your application to fit your needs.
And here's a high-level overview of the modules:
Title | Element Type | Description |
|---|---|---|
Sendgrid Send Single Email with Attachment API | Module | This API module uses SendGrid to dynamically send an email to your recipients. You can call this API module from many different modules in your application. |
Sendgrid: Send Single Email with Attachment | Module | This front-end module lets you add recipients' email addresses and attachments to your email. The module lets you add CC and BCC recipients as well. When you're ready, click Send Single Email to send the email and its attachment(s) to your recipients. |
SendGrid | Service | This is an external service that lets you integrate with SendGrid. |
All images used in this guide are for illustrative purposes only. Images are subject to change without notice. All images are correct at the time of publication.
Overview
This template integrates with SendGrid so you can send emails to end-users from your application. SendGrid lets you build and track your email solution on a trusted foundation. It also gives you the tools and expertise you need to optimize your inbox delivery rate.
This template is much like SendGrid Single Email Module Integration template. The template is fully customizable. Configure message and subject lines and add as many recipients as you want. You can also add one or more attachments to send to your recipients.
This is a module integration template. So, let's say you build an application from this template. Along with it, you'll see a service (integration) added to your environment in Services Administration. The service has a layout prepped for your SendGrid credentials. You'll learn more about this later in the article.
To learn more about SendGrid, such as how to use SendGrid in test environments and production environments, search SendGrid in our In-Product Help.
Features
With this template, you can:
Add attachments and send emails directly from your application to your end-users.
Use SendGrid's email templates to create beautiful, customized emails.
Requirements
To use this module integration template, you must have an active SendGrid account with API credentials.
Adding the Template
Before you can build an application from this template, you must install the template to your environment. Then, you can visit your Library and build an application from your new template.
Adding the Template to Your Environment
To add the template to your environment:
Click Marketplace at the top right of the Unqork Designer Platform.
You can also access the Marketplace at any time by visiting https://marketplace.unqork.io.
Enter SendGrid Email with Attachment in the Search the Marketplace field.
Click the SendGrid Email with Attachment tile.
Click Install to Environment.
Click Install Template.
If you aren't logged in, you'll see a field for Environment URL and a Login button. Enter your environment's URL where you want to install the template. For example: [environmentname.unqork.io]. Click the Login button. Then, return to step 4 and click Install to Environment again. Follow the remaining steps as listed.
Now, you can use your newly installed template to create an application.
Creating an Application from the Template
After you add the template to your environment from Marketplace, you can use it to create an application. This template creates a module-type application with a SendGrid service.
Click Library at the top right of the Unqork Designer Platform.
Find the SendGrid Email with Attachment template tile.
Click Create App from Template.
Choose the destination workspace from the Workspace drop-down. This is where your application lives once created.
Enter your unique App Name. The App Path auto-fills as you type your App Name.
If you want a different App Path, enter it in the App Path field.
Select a preview style from the Style drop-down. A style specifies your application’s appearance in Express View. If left blank, your application uses your environment's default style.
You'll notice the App Type and App Entrypoint are grayed out. The template automatically takes care of these for you.
Click Create App.
The application opens in the workspace you specified. You'll land on the Modules tab of your application, which lists all modules of this template.
Your new application looks something like this:

When you create an application from the template, your module names automatically include the template ID and a time stamp. This is to prevent any duplicate module paths. You can change module names and module paths at any time. Any service or workflow you create with your template also has a template ID and time stamp.
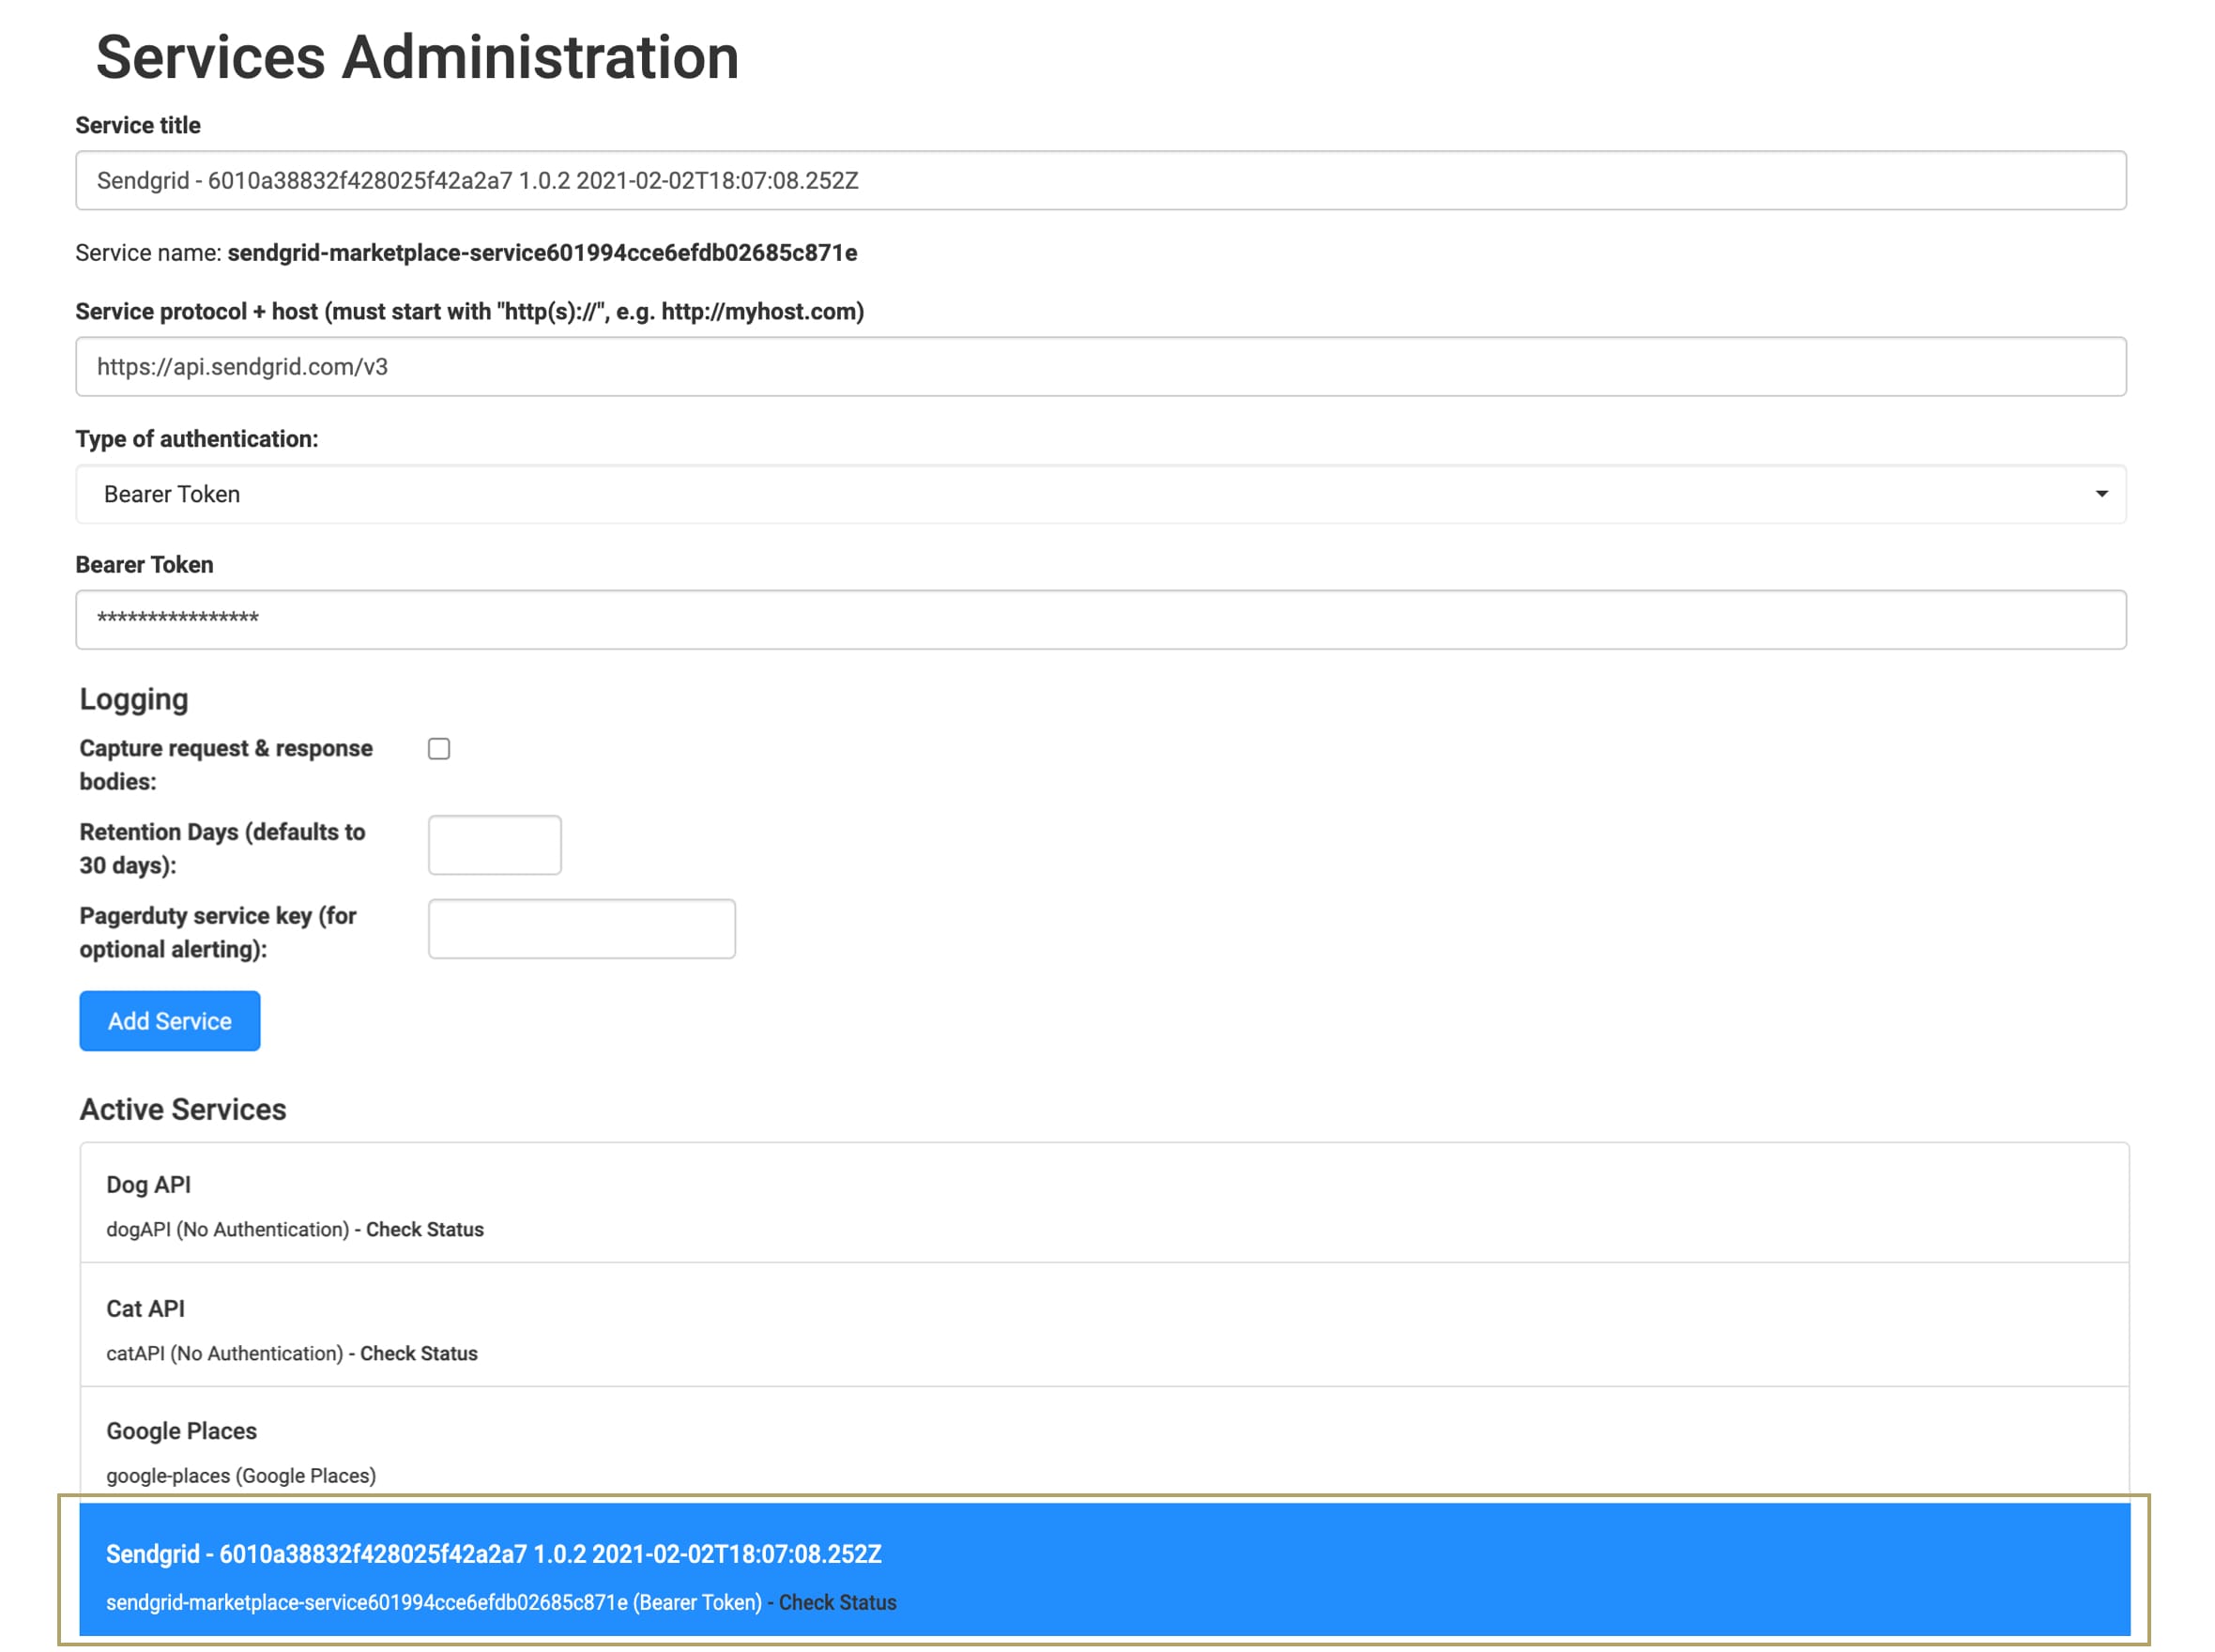
When you create an application from this template, you'll see a new service added to your Services Administration. This service has the correct setup for SendGrid. You'll need to update it with your company's SendGrid account credentials. (You'll get those credentials when you set up your account directly through SendGrid.) You'll learn how to link your environment to SendGrid in the Configuring the Template section.
Here's an example of a SendGrid service in Services Administration:
How the Template Works
This module includes an external service to function correctly. This service is a SendGrid send email API call. You'll set up this service directly through SendGrid. When you create an application from this template, you’ll get:
A new service in Services Administration with the correct setup for SendGrid.
A module-type application with 2 modules.
Let's take a look at how the SendGrid service and modules work.
How the SendGrid Service Works
SendGrid is a service that uses API calls to send customized emails. Based on your needs, you'll use API parameters to determine those customizations. So, if you want to send an email at any point in your application, you'll add a SendGrid API call.
Let's look at some examples of when you might send an email using SendGrid:
Your end-user submits an application and you want to send a confirmation.
Your end-user leaves an application incomplete and you want to send a reminder to finish it.
Your end-user submitted an application and, after some data-processing, you want to send them an update.
You want to send a reminder email on a schedule using a scheduled batch processing job.
First, you'll set up your SendGrid account directly through SendGrid. Then, you'll create an application from the SendGrid Email with Attachment template. The template automatically adds a service to your environment that has the correct protocol and host for SendGrid. This template also specifically lets you send emails with attachments. After basic configuration of the service, your application connects to SendGrid to send dynamic emails.
To learn more about SendGrid, such as how to use SendGrid in test environments and production environments, search SendGrid in our In-Product Help.
How the Sendgrid: Send Single Email with Attachment Module Works
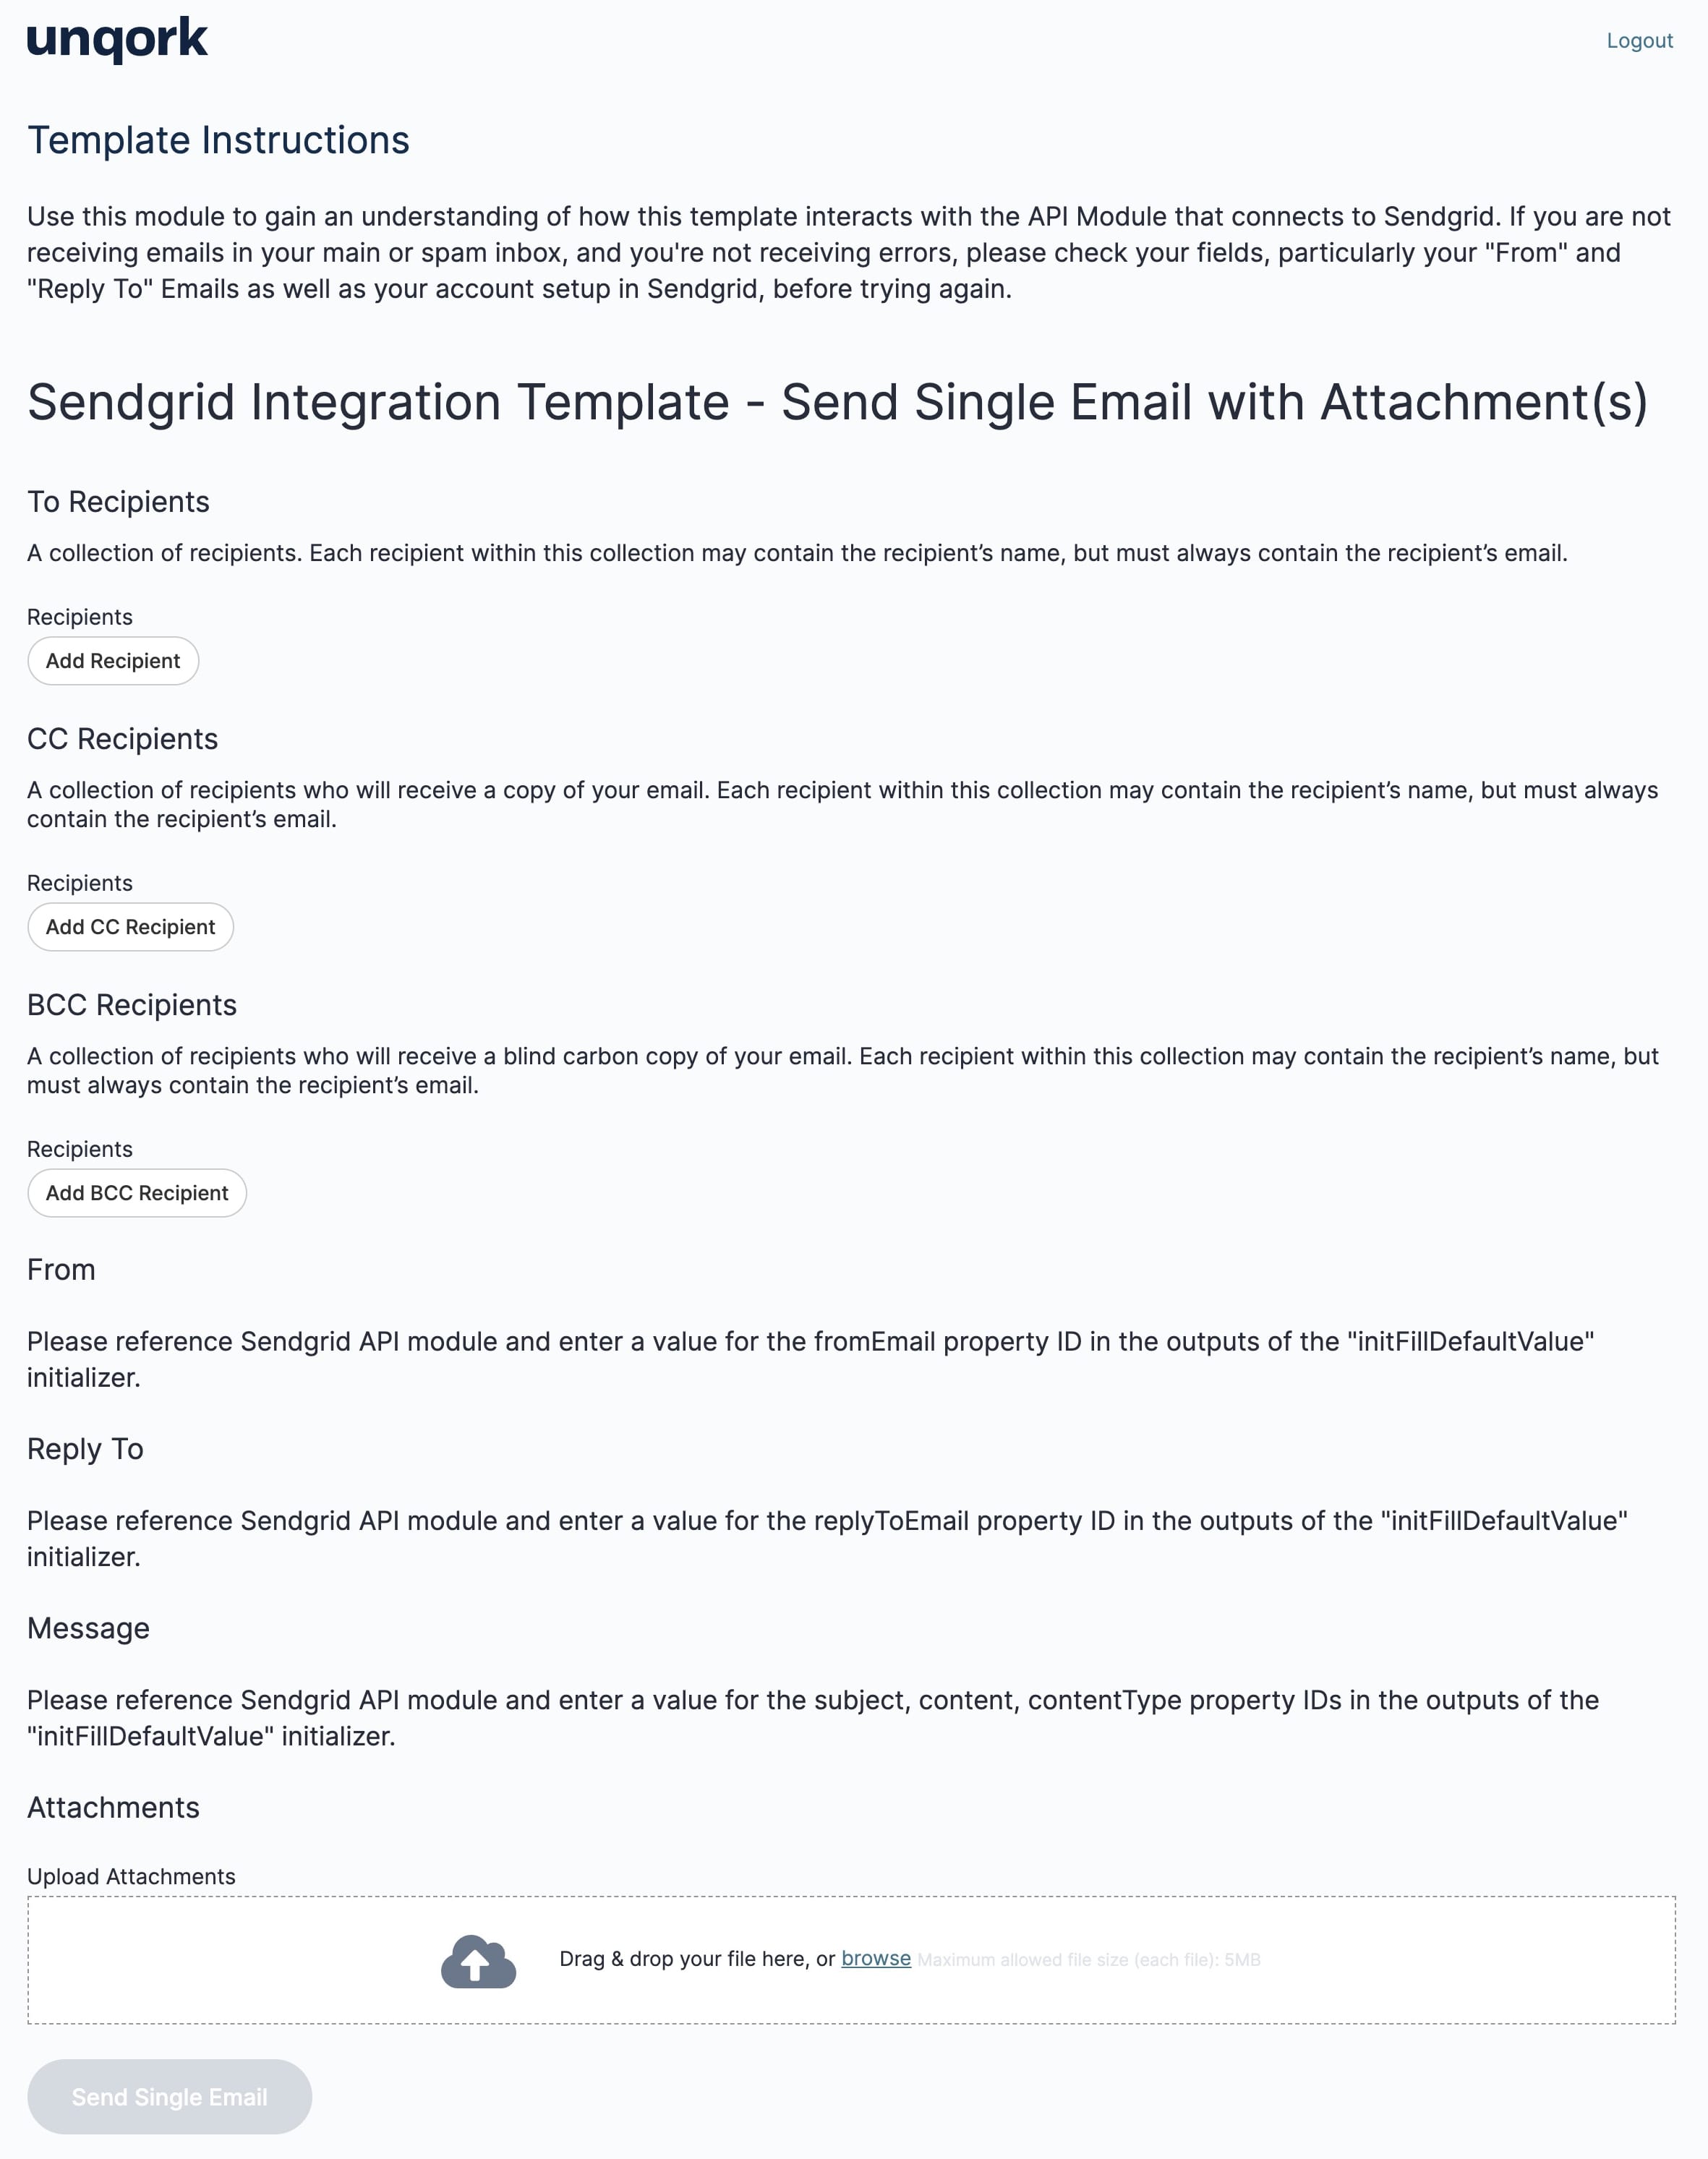
You’ll interact with this front-end module in Express View. But you likely won’t use it in your actual application. So, what’s its purpose? Here are some helpful ways to use this Express View module:
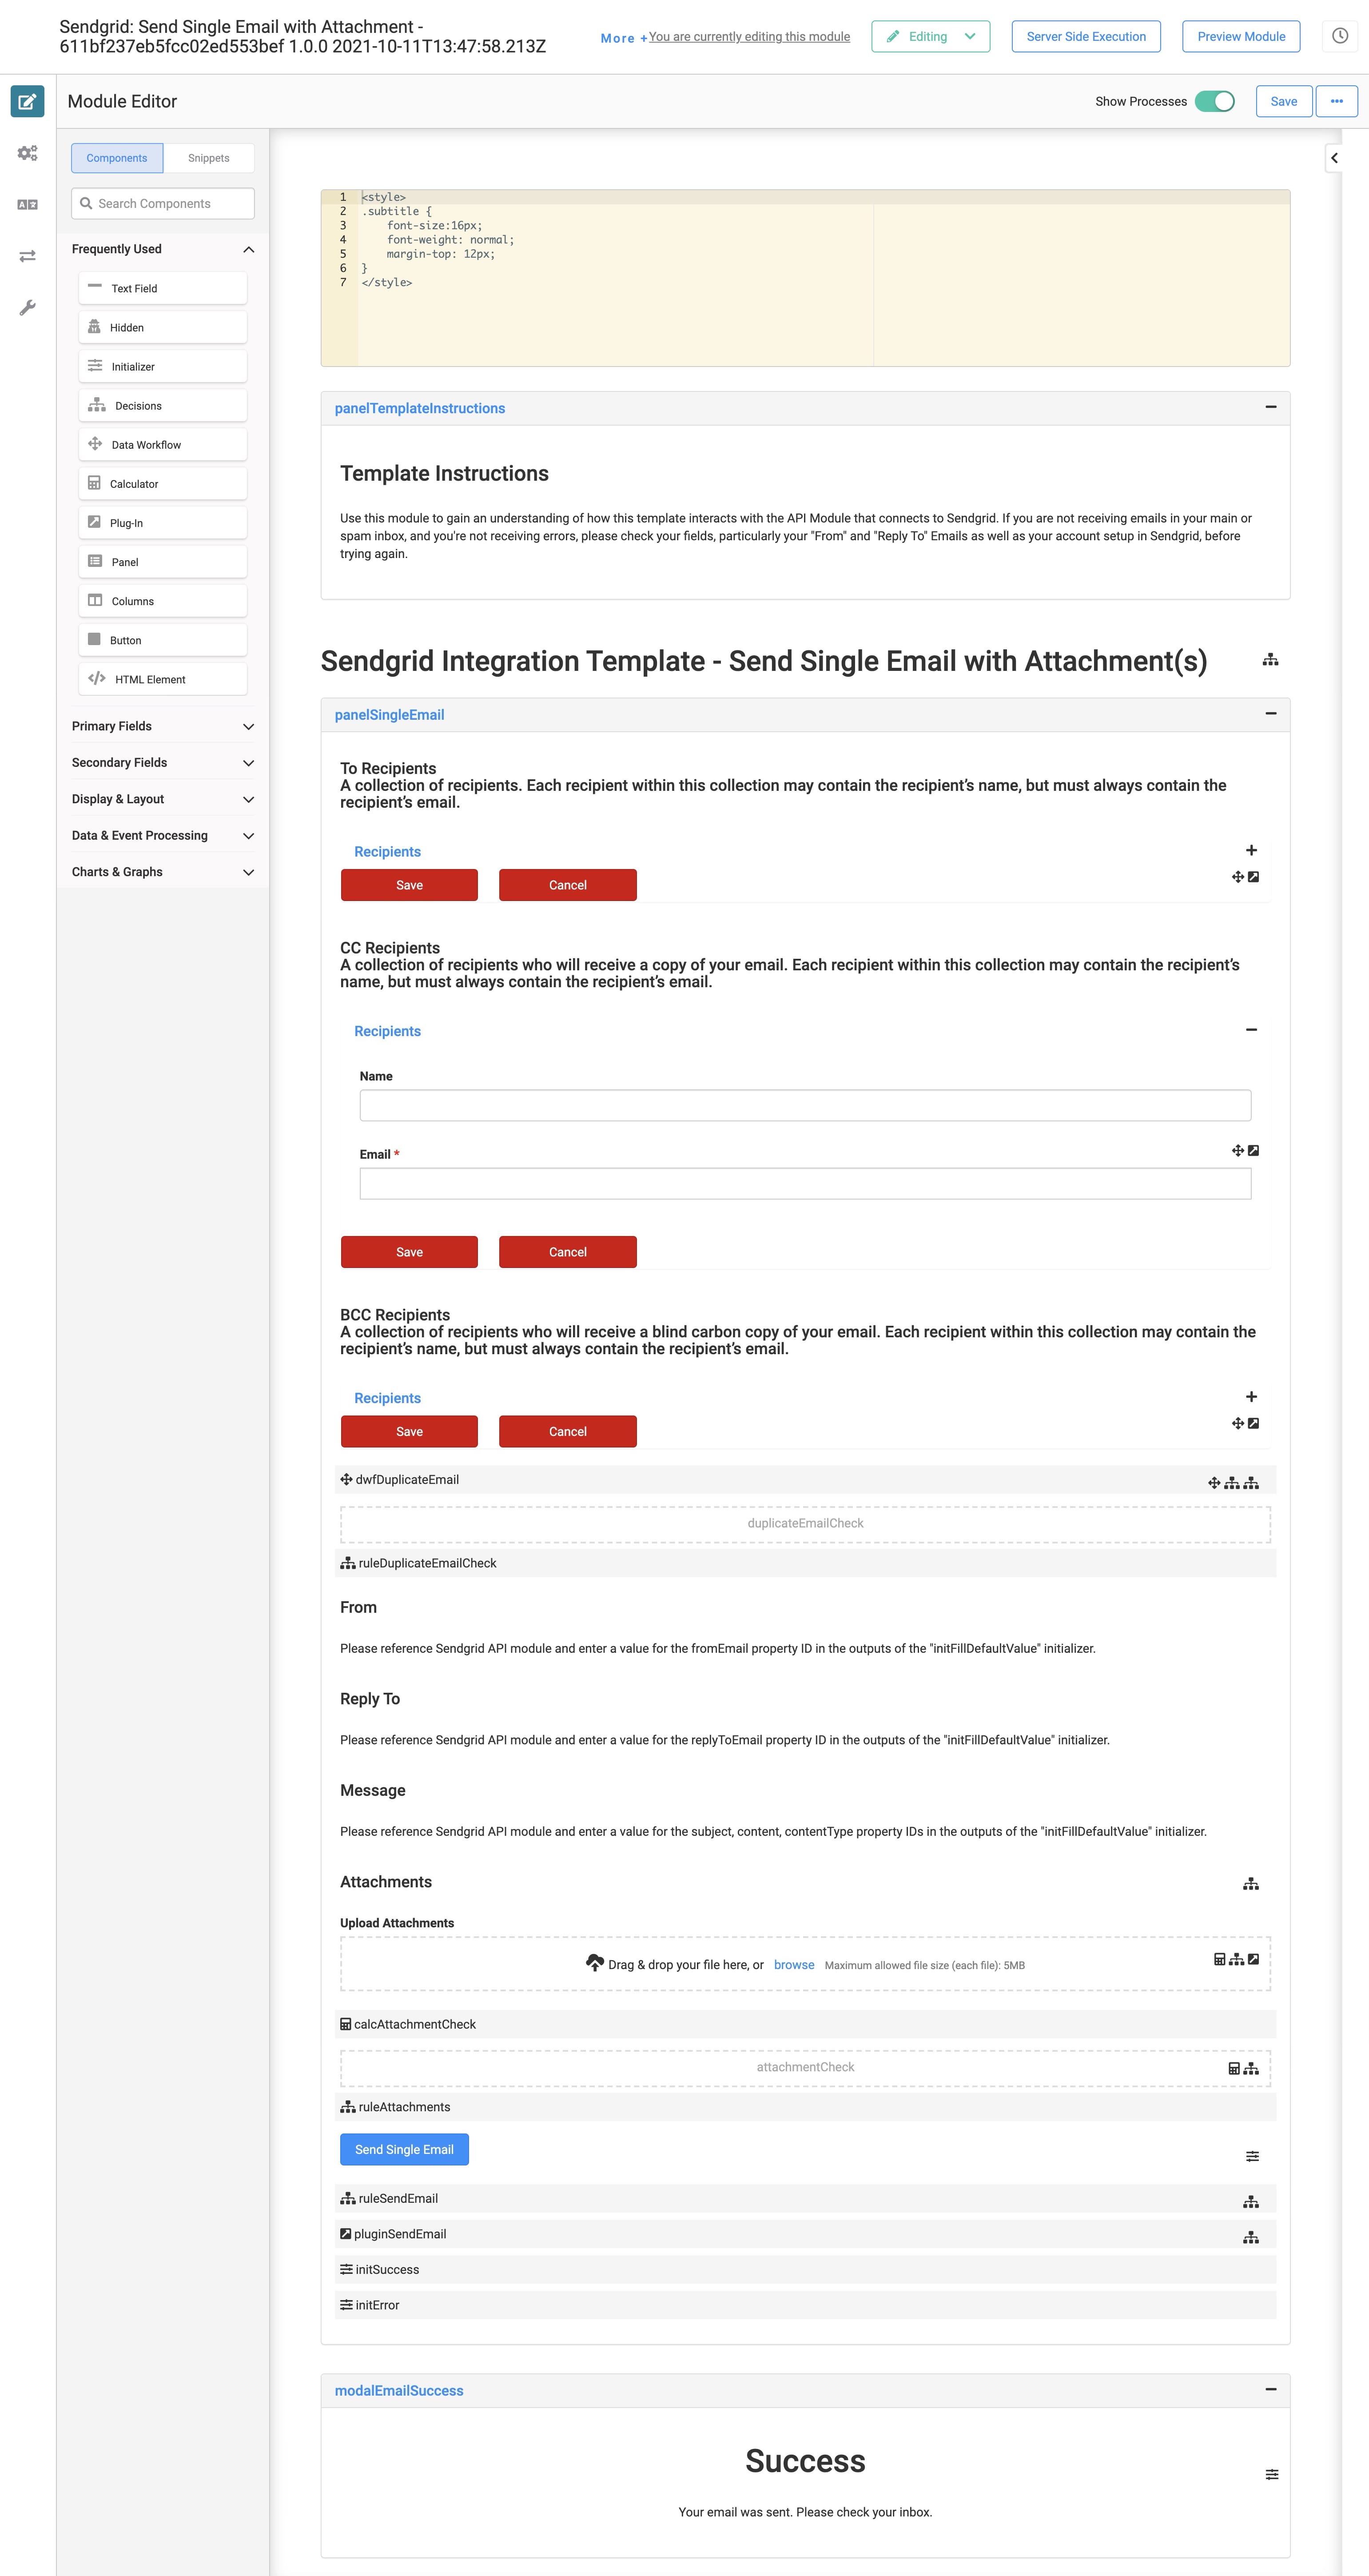
Use it as a frame of reference for how to configure in your own application. For example, use the Property ID and the Plug-In configurations in your own application.
Check to make sure your Bearer Token and emails work how you want them to.
Create a request payload that you can copy when setting up SendGrid emails elsewhere.
The module also comes prebuilt with a couple of validations. One checks to see that there aren't duplicate emails entered. That way, your recipient doesn't receive duplicate emails. The module also checks to make sure that an attachment is successfully uploaded.
These are the acceptable file types you can upload to your SFTP server: .xls, .xlsx, .doc, .docx, .ppt, .pptx, .jpeg, .jpg, .png, .gif, .pdf, .csv, .rtf, .dot, .mp3, .mp4, .zip, .bmp, .msg, .txt.
Here's how the module looks in the Module Builder:
Here's how the module looks in Express View:
How the Sendgrid Send Single Email with Attachment API Module Works
The Sendgrid Send Single Email with Attachment API module is where the connection with SendGrid happens. This module uses SendGrid to dynamically send an email to your recipients. It's already configured to work with all the Property IDs and mapping in the Sendgrid: Send Single Email with Attachment module. The only component you need to customize is the initFillDefaultValue Initializer. You'll use this component to add values to your email's From, Reply To, Subject, and content fields.
Here's how the module looks in the Module Builder:
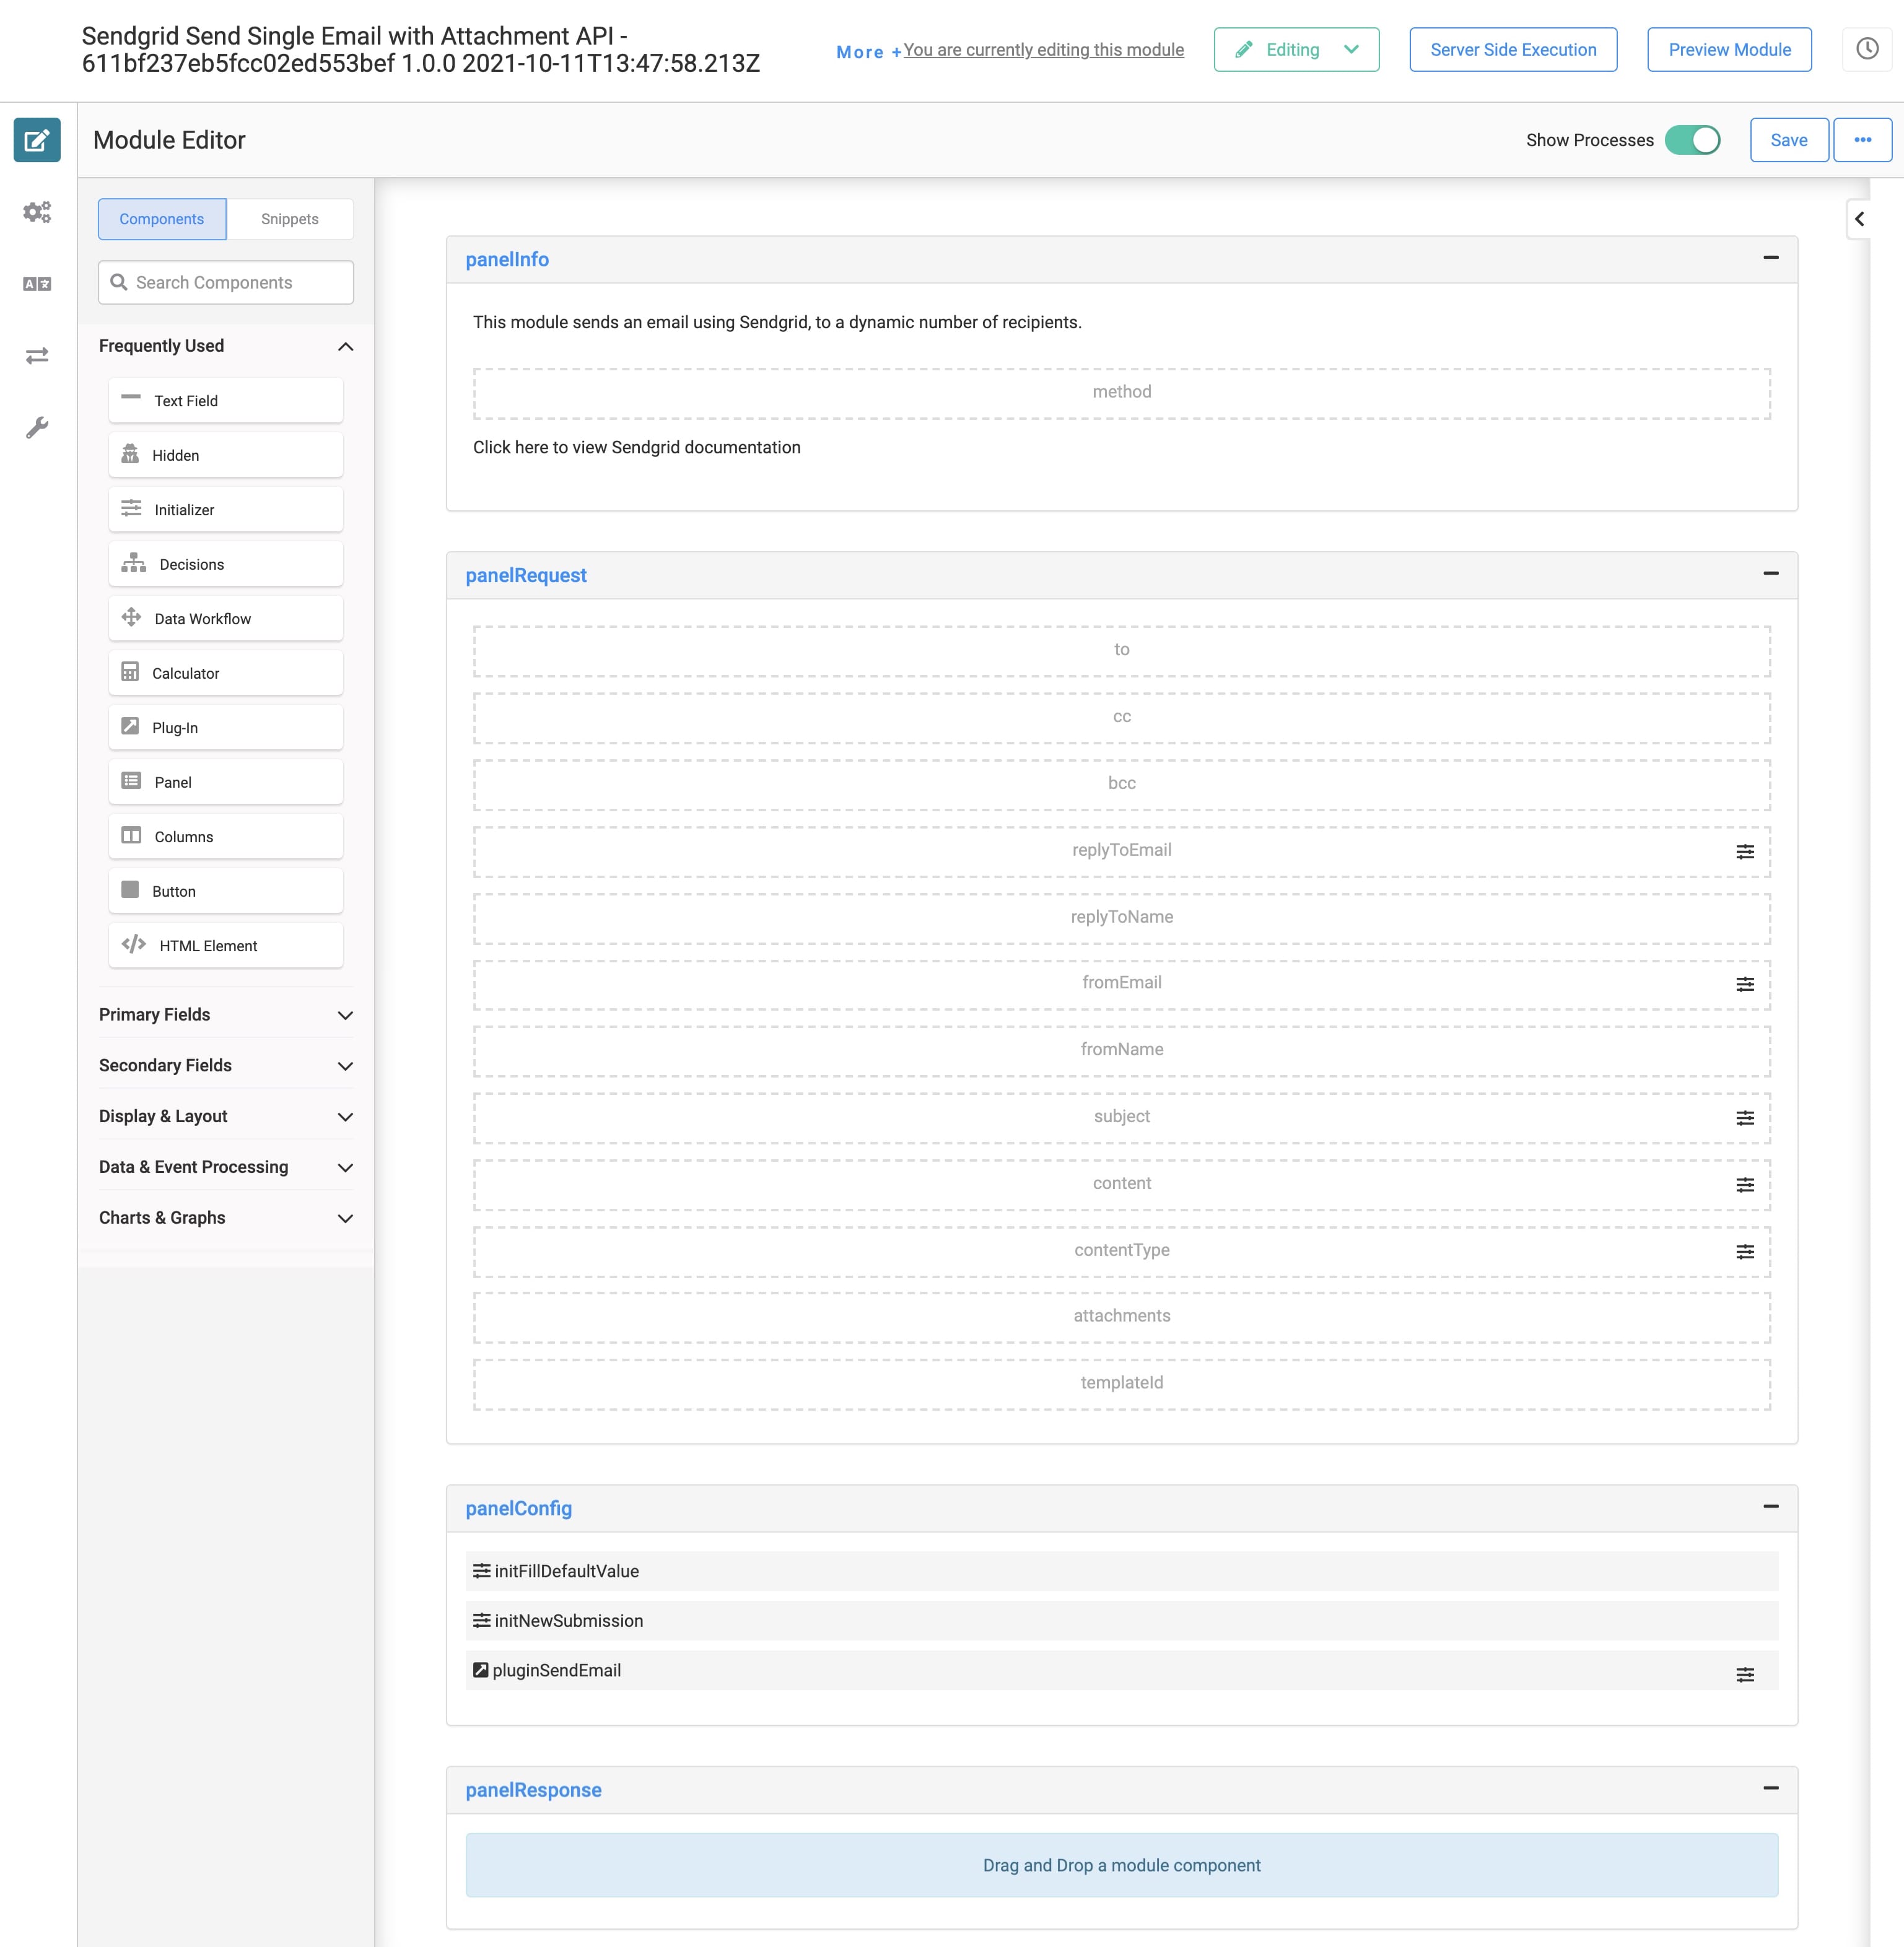
You'll see various Hidden components in this module. We configured the Sendgrid: Send Single Email with Attachment module's Plug-In to map to these Hidden components. That way, this API module communicates with SendGrid to send your email.
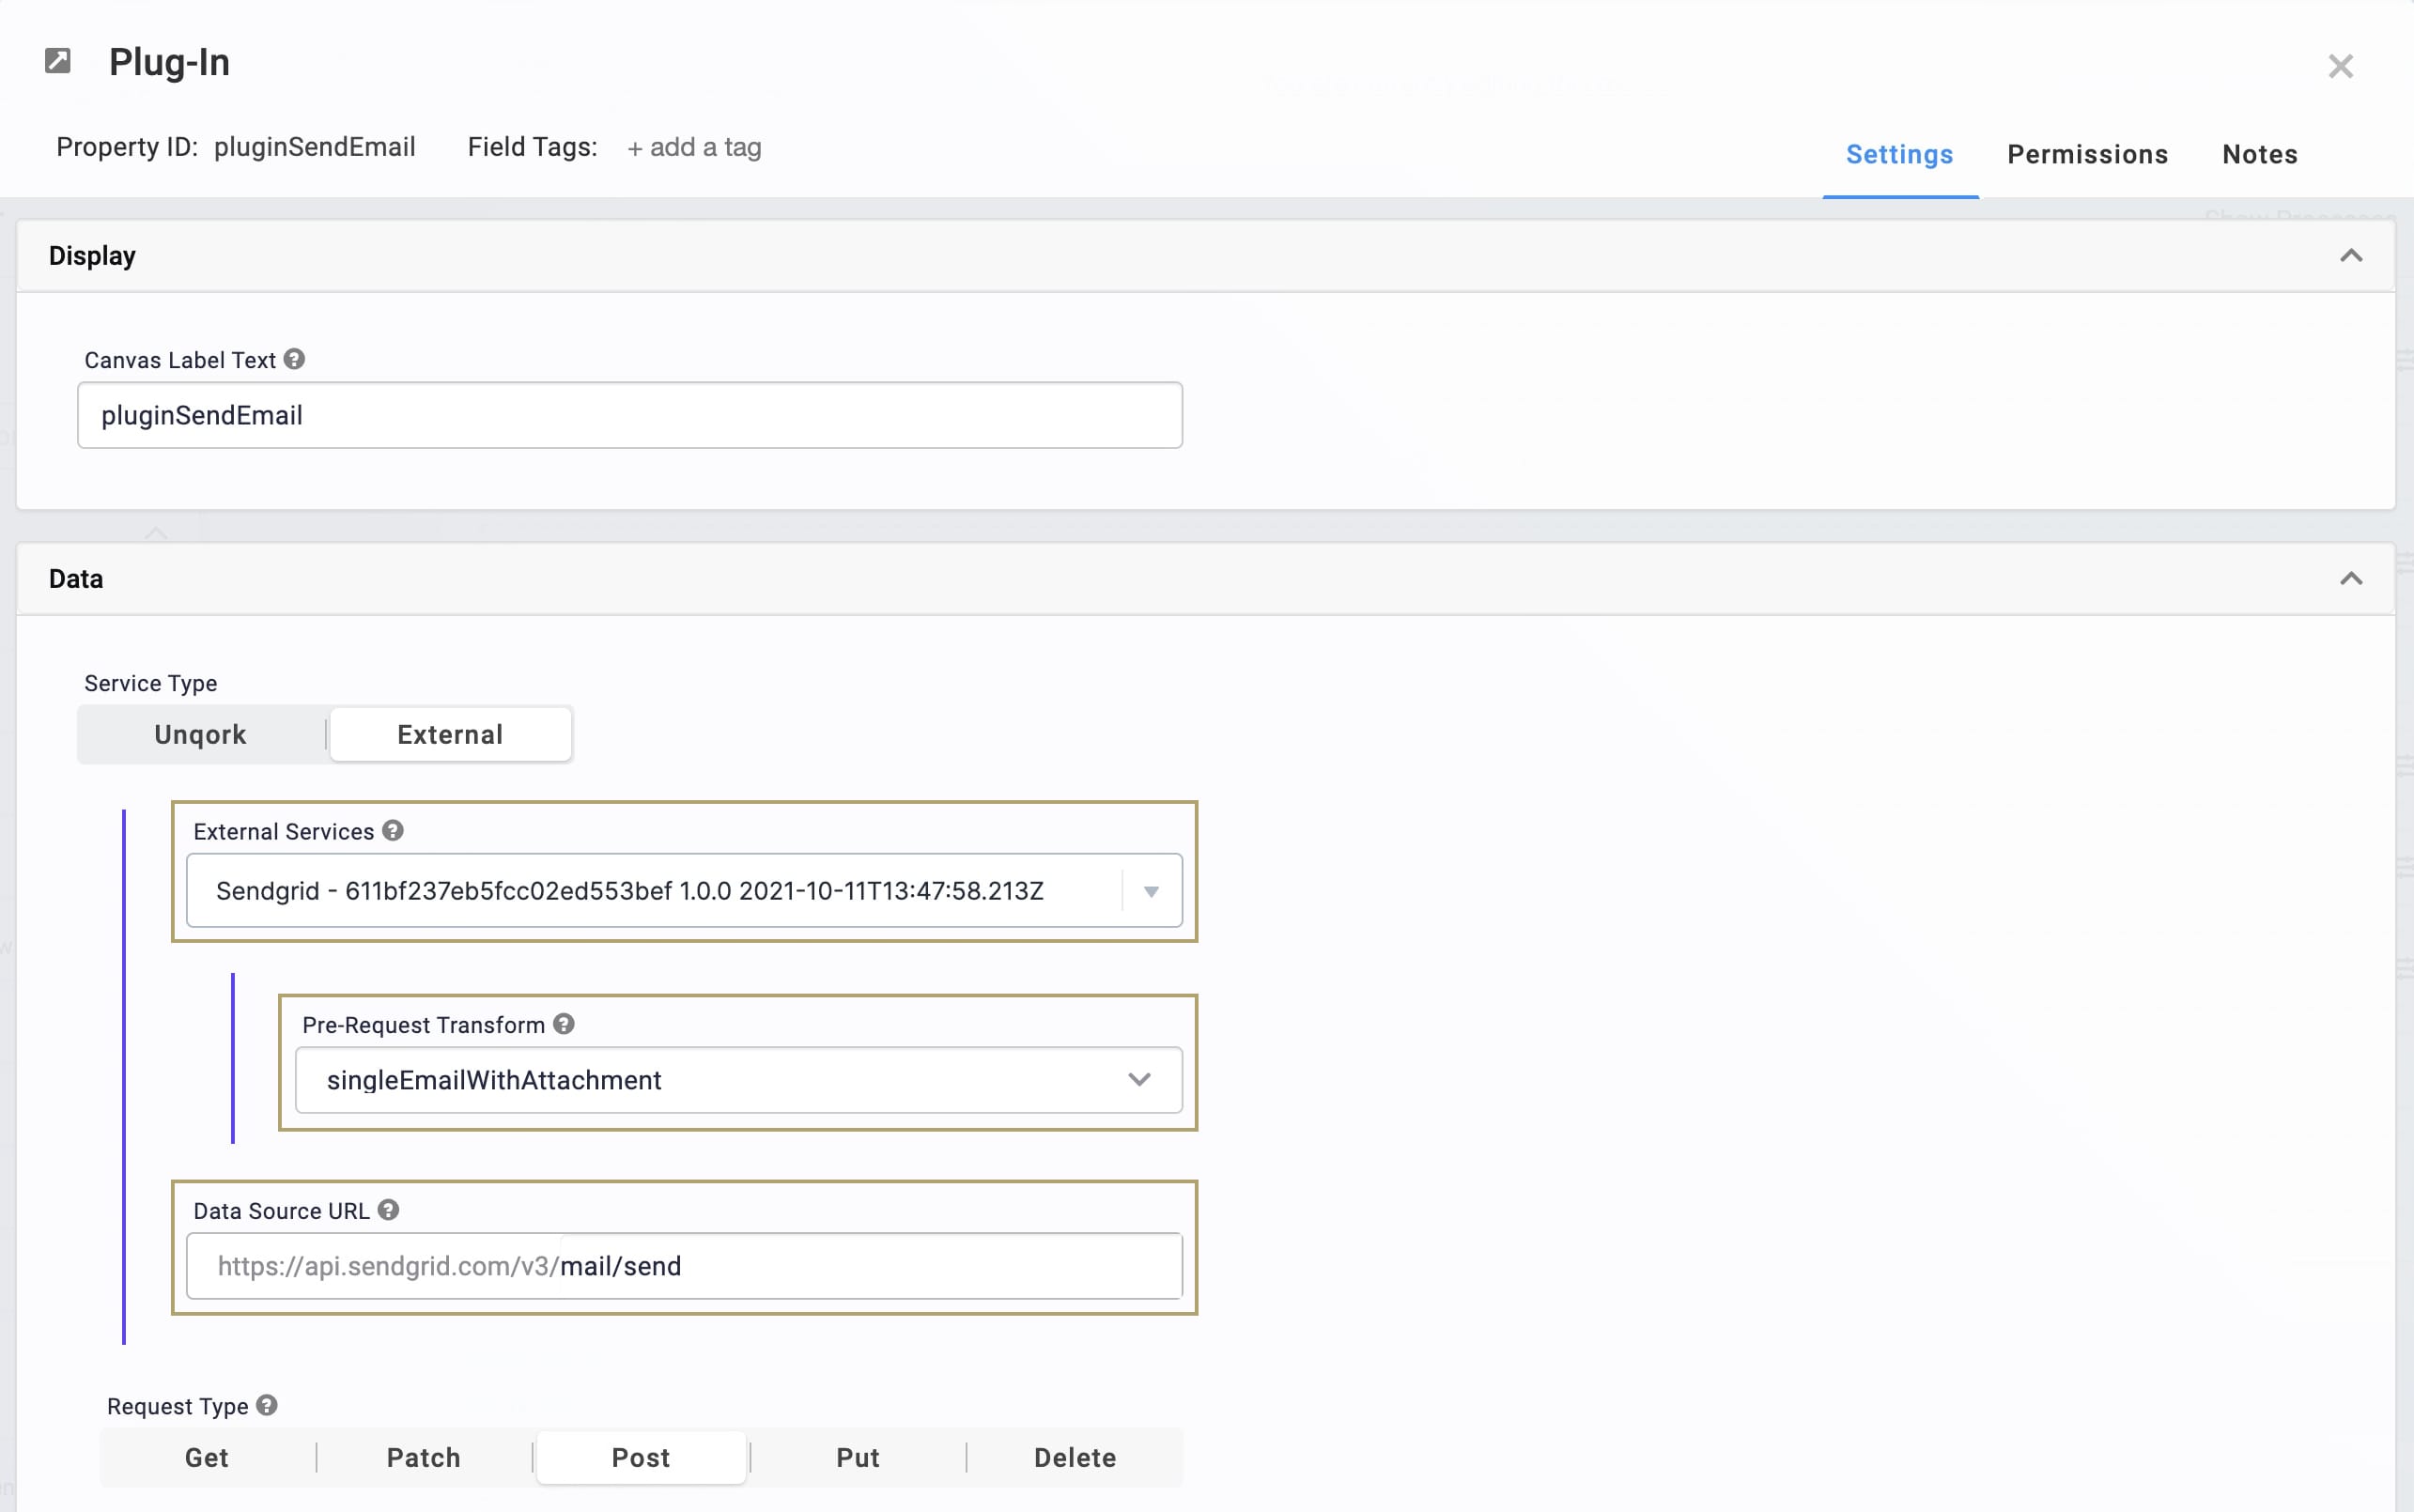
The main driver of this module is the Plug-In component. The Plug-In puts your information through a singleEmail pre-request transform. Then, the transform takes the information and formats it so SendGrid can use it. The Plug-In also connects to the external SendGrid service you set up in Services Administration. It does a simple call to SendGrid using a mail/send endpoint. And just like that, your email sends.
For more information on SendGrid's mail/send endpoint, visit: https://sendgrid.com/docs/api-reference/.
Here's a look at the configuration of the pluginSendEmail Plug-In:
Now, let's talk about how you configure the template to work with SendGrid.
Configuring the Template
Once you create an application from this template, you'll do a bit of configuration to get it working. Before you can successfully use your application, you need to update your SendGrid service under Services Administration. Adding your SendGrid credentials to the service grants your environment permission to use SendGrid's API. From there, the Send Single Email functionality works. So, there's zero configuration needed in your actual modules.
Configuring the SendGrid Service in Services Administration
To configure the SendGrid service, you'll first need a Bearer Token. This is something you set up directly with SendGrid. Then, you'll do a quick update in Services Administration.
Use this site to get an API key through SendGrid: https://sendgrid.com/docs/ui/account-and-settings/api-keys/.
To access Services Administration:
Click the Settings drop-down at the top right of the Unqork Designer Platform.
Click Administration.
Under Integration, select Services Administration.
Next, you'll need to find and update the SendGrid service with your SendGrid Bearer Token:
Scroll to the bottom of your Active Services list.
Click your SendGrid service.
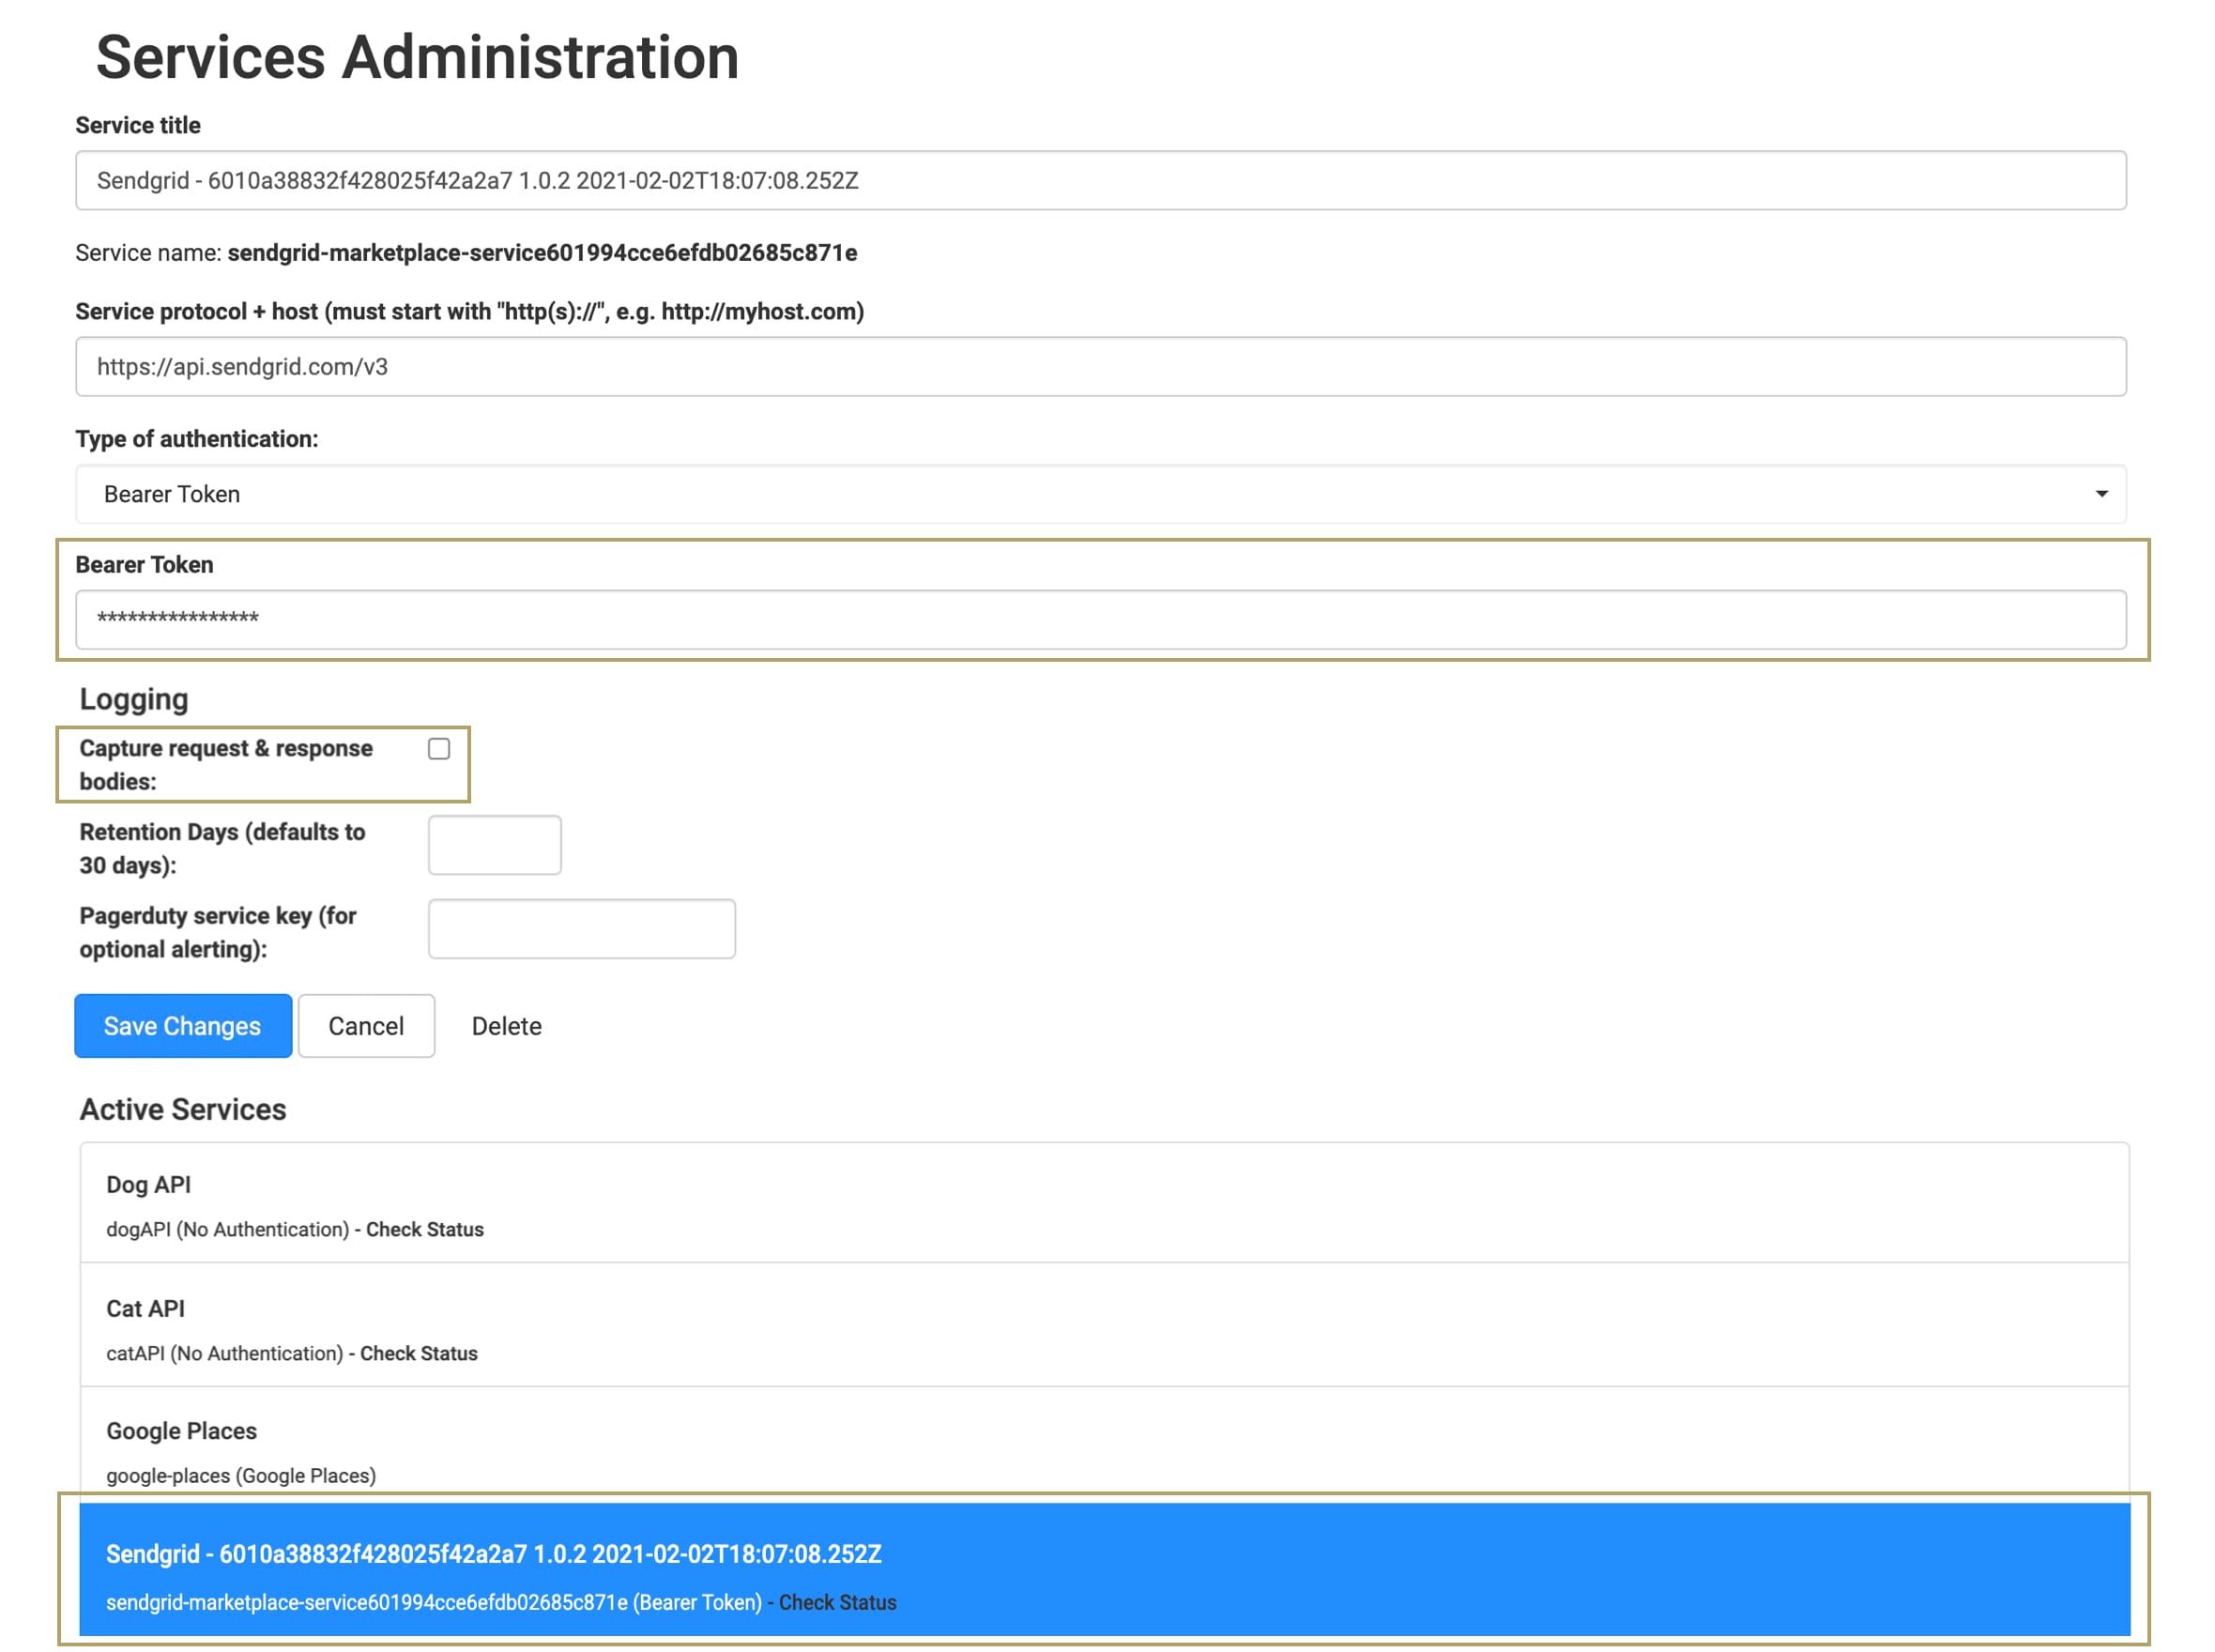
The title is something like this: Sendgrid - 6010a38832f428025f42a2a7 1.0.2 2021-02-21T18:07:08.252Z. What if your environment has more than one SendGrid service? Here's a trick. Look for the service with the same template ID and time stamp as the template's modules.
Scroll to the top of the page.
Enter your Bearer Token in the Bearer Token field.
When you open your SendGrid service for the first time, you'll see that there's already an obfuscated Bearer Token entry. This is a dummy entry, meaning it doesn't map anywhere. Make sure to enter your Bearer Token for this service to work. Note that once you save your Bearer Token to this SendGrid service, it also becomes obfuscated.
Select the Capture request & response bodies checkbox if you want to capture this information.
Enabling this box logs the details (bodies) of the call's request and response. If you have a failed API call, the log's request body and response body give you information on why the call failed. Or, maybe the API request was successful, but the data sent wasn't handled correctly. The request body and response body show you the details of your calls. The service logs save to Unqork's database and you can query the logs at any time.
Click Save Changes.
Customizing the Template
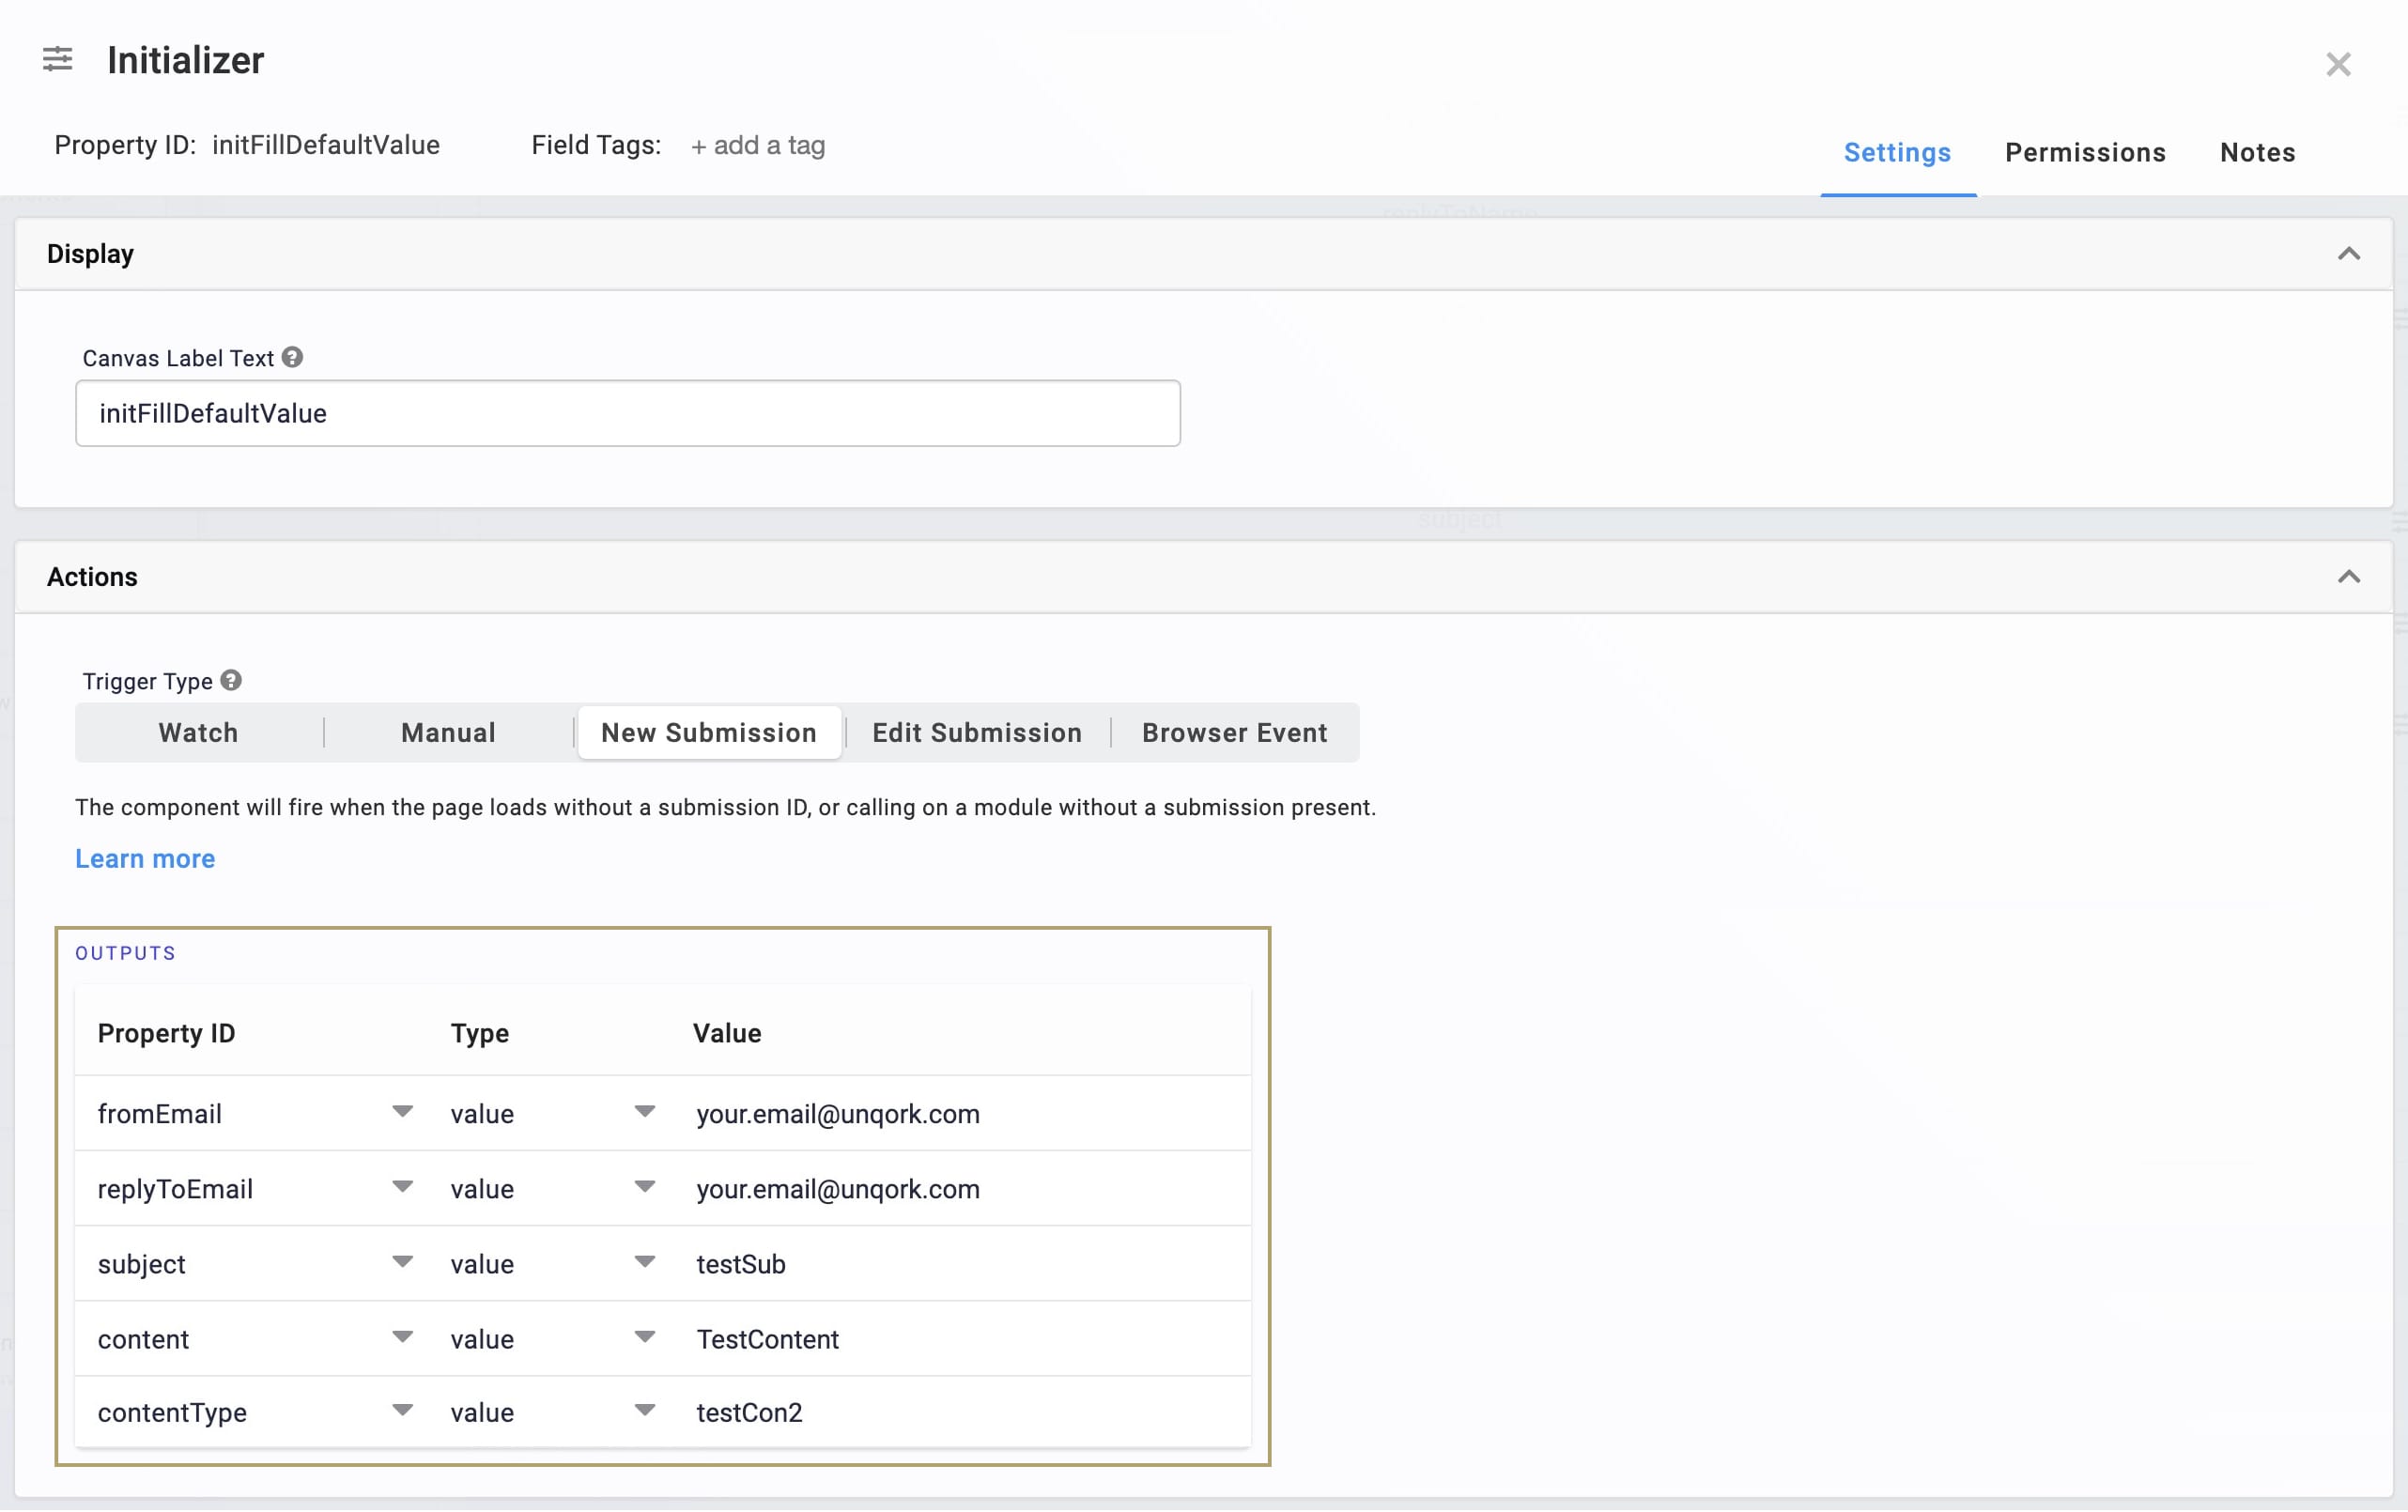
The only customizations you need to make are in the initFillDefaultValue Initializer of the Sendgrid Send Single Email with Attachment API module. The Initializer outputs entered values to their respective Hidden components. Those values then display in their specific fields in the email. You need to set up values for the From, Reply To, Subject, and content fields of the email.
To update these values:
Hover over the initFillDefaultValue Initializer component.
A 5-button toolbar displays above the component on hover-over.
Using the toolbar, click the
.jpg) (Settings) button.
(Settings) button.In the Outputs table, replace the dummy values of the fromEmail, replyToEmail, subject, content, and contentType Property IDs with values of your choosing.
Click Save.
Save your module.
Now, what happens when an email sends to your end-user? This Plug-In passes the SendGrid template ID to the templateId Hidden component in the SendGrid: Send Single Email (API) module. That API module then sends that template ID to SendGrid. The end result is a dynamic email sent to your end-user based on the template ID you chose.
Remember to model your Plug-In after the pluginSendEmail Plug-In in the SendGrid: Send Single Email Template module.
Testing the Module Integration Template
Now it's time to try out the template. Open the Sendgrid: Send Single Email with Attachment module in Express View. Fill out the fields as if you're an end-user. Drag and drop an attachment into the Upload Attachments field. (The maximum allowed attachment size is 5 megabytes.) Then, click Send Single Email at the bottom of the page. Check your inbox to see if the email went through.
SendGrid doesn't let you send to the same email address more than once. So, if you want to test your To, CC, and BCC fields, here's a trick for Google-based emails. Append + and a word to the end of your username before the @. For example, say your email address is youremail@unqork.com. To test the CC field, you can enter youremail+CC@unqork.com. The test the BCC field, you can enter youremail+BCC@unqork.com. This registers as a separate email address for SendGrid, but still sends to your main inbox.
Removing the Module Integration Template
What if you no longer need this template or the application you built from it? There are 2 parts to removing this template. First, you'll uninstall it from your environment. Then you'll delete the application you created from the template. These steps are easy, and you can do them in any order.
Removing the Template from Your Environment
You might need to clean your environment and remove unused templates. The Unqork Library makes this easy. To uninstall a template from your environment:
At the top right of the Unqork Designer Platform, click Library.
Find the template to uninstall.
Click the ellipsis (...) in the template tile header.
Click Uninstall Template.
Click Yes, Uninstall in the confirmation modal.
You can visit the Marketplace and reinstall the template at any time.
What if you have an existing application built from this template and then uninstall the template from your environment? Your existing application remains unaffected. Also, it no longer has any ties to the template. So, let's say you reinstall a newer version of the template in the future. You can rest assured that the installation doesn't impact your existing application.
Deleting Your Sendgrid Attachment Application
If you no longer need the application you created from your template, you can delete it. To delete your application:
Navigate to the Apps tab from an open workspace.
Find the application to delete.
Click the ellipsis (...) in the app tile header.
Click Delete.
Retype the provided text.
Click Yes, Delete.
Removing the SendGrid Service from Your Environment
To remove your SendGrid service from your environment:
Click the Settings drop-down at the top right of the Unqork Designer Platform.
Click Administration.
Under Integration, select Services Administration.
Scroll down and select the SendGrid service you want to delete from the Active Services list.
Click the Delete link. You’ll find this above the Active Services list.
At the Delete message, click OK.
At the Success message, click OK.