Decision Operator
Overview
The Decision operator lets you build simple logic statements that evaluate whether input values meet specific conditions. Based on the result, the operator outputs true or false, letting you control the flow in a Data Workflow.
To configure a Decision operator, use the Info window and define a condition. This condition uses comparison symbols, like <, >, =, >=, or <=, to evaluate incoming data. For example, to check if an end-user's End-users, also known as Express Users, are the individuals accessing an application through Express View. In most cases, end-users are the customers using the product. income is greater than 100,000, your condition might look like the following: A > 100000. Here, A represents the incoming value, and 100000 is the threshold.
For more advanced logic, you can use an OR statement. For example, OR(A="a", A="b", A="c"). This configuration returns true if the input value matches "a", "b", or "c". All other values return false.
The Decision operator evaluates conditions and routes data based on the result. It passes data through one output port at a time. The port that does not receive data displays as _BLOCKED, and any steps connected to that port will not execute.
Using Arguments in Conditions
You can configure a Decision operator to evaluate a condition using an argument from another operator.
For example, you'll:
-
Connect another operator to the argument port (top) of the Decision operator.
-
Enter _arg in the Condition field.
The argument must return a string A string is an object that represents a sequence of characters. Strings typically hold data represented in text form. or Boolean The Boolean data type accepts one of two values: true, or, false. value. Your condition should use a standard comparison format, like <, >, =, >=, or <=. The condition must be either TRUE or FALSE.
You'll find the Decisions operator under the Gateways group to the left of the Data Workflow canvas.
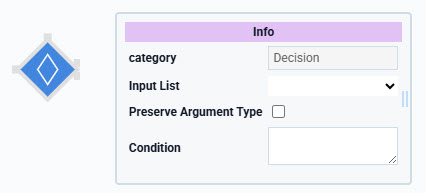
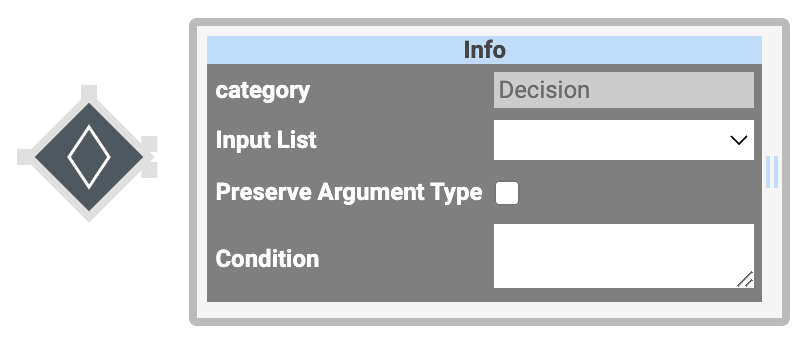
About the Info Window
Learn more about each setting in the Decision operator's Info window:
|
Setting |
Description |
|---|---|
|
Category |
Grayed out and non-adjustable setting indicating the operation type. |
|
Input List |
Select the Property ID for the data you want your Decision operator to process. This selection should match the Property ID you've selected in your Input operator. This field is optional, but making a selection displays a label below your operator. These labels can help to keep your canvas organized. |
|
Preserve Argument Type |
When selected, this setting ensures the argument data type is respected when the operator executes. |
|
Condition |
Here, you'll set the expression the operator runs your data against. You'll use <, >, =, >=, or <= to set your expression. You can also use a combination of these, set inside an OR statement. For example, OR(A="a",A="b",A="c"). To use another operator as an argument, connect the operator to the argument port and enter _arg. |
Adding a Decision Operator
To see how the Decision operator works, you’ll walk through a simple example. In this example, you’ll create a module that collects an end-user’s income. Then, you’ll use a Data Workflow to recommend a financial adviser to the end-user End-users, also known as Express Users, are the individuals accessing an application through Express View. In most cases, end-users are the customers using the product. based on the income entered.
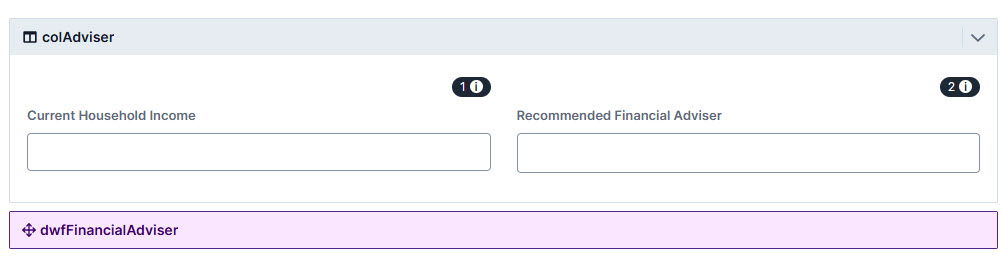
Configure the Columns Component
First configure a Columns component that acts as containers for the components that follow.
| 1. | In the Module Builder, drag and drop a  Columns component onto your canvas. Columns component onto your canvas. |
| 2. | In the Property ID A Property ID is the unique field ID used by Unqork to track and link components in your module. field, enter colAdviser. |
| 3. | Click Save Component |
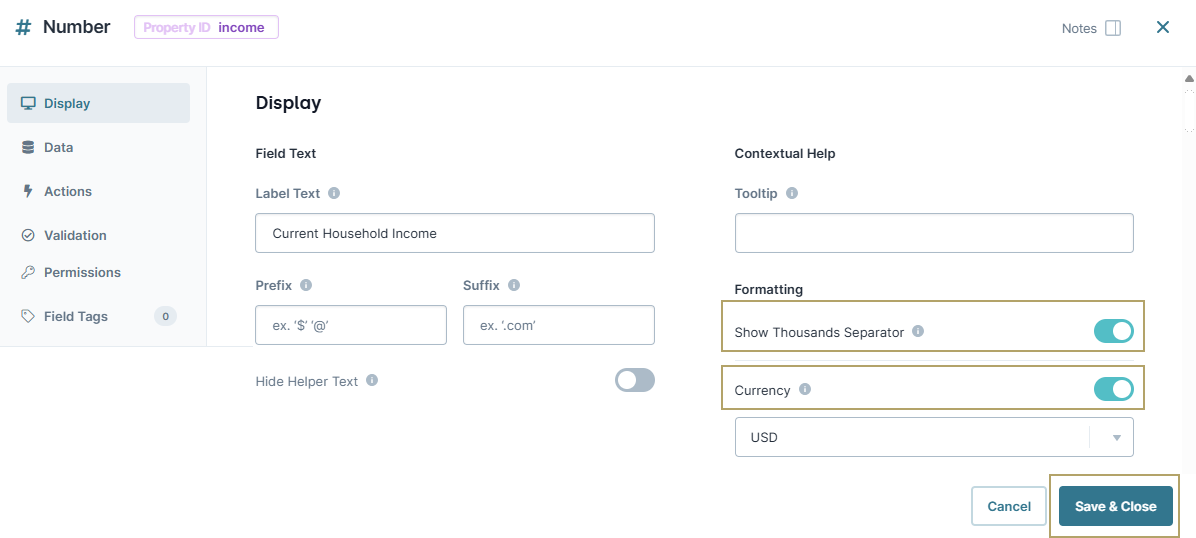
Configure the Number Component
Next, configure a Number component to collect the income of your end-user End-users, also known as Express Users, are the individuals accessing an application through Express View. In most cases, end-users are the customers using the product..
| 1. | Drag and drop a Number component onto your canvas, placing it inside the left column of the colAdviser Columns component. |
| 2. | In the Property ID A Property ID is the unique field ID used by Unqork to track and link components in your module. field, enter income. |
| 3. | In the Label Text Label Text conveys what the input component is and what information it displays. Enter the purpose of the corresponding component or field. field, enter Current Household Income. |
| 4. | Set Show Thousands Separator to (ON). |
| 5. | Set Currency to (ON). |

| 6. | Click Save Component. |
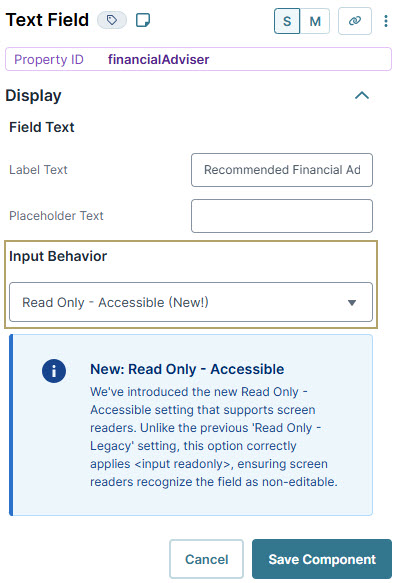
Configure the Text Field Component
Next, add a Text Field component to display the output of your Data Workflow. This field displays the recommended financial adviser to the end-user End-users, also known as Express Users, are the individuals accessing an application through Express View. In most cases, end-users are the customers using the product.. Because the end-user does not need to enter any information to this field, set it to read-only.
| 1. | Drag and drop a Text Field component onto your canvas, placing it inside the right column of the colAdviser Columns component. |
| 2. | In the Property ID A Property ID is the unique field ID used by Unqork to track and link components in your module. field, enter financialAdviser. |
| 3. | In the Label Text Label Text conveys what the input component is and what information it displays. Enter the purpose of the corresponding component or field. field, enter Recommended Financial Adviser. |
| 4. | From the Input Behavior drop-down, select Read Only - Accessible (New). |
| 5. | Click Save Component. |
Configure the Data Workflow Component
Lastly, set up the Data Workflow with an Input operator that brings in your end-user's End-users, also known as Express Users, are the individuals accessing an application through Express View. In most cases, end-users are the customers using the product. income. Then, use a Decision operator to determine which financial adviser to recommend. Add Console operators to help you view how the data passes to each step.
| 1. | Drag and drop a Data Workflow onto your canvas, placing it below your colAdviser Columns component. |
| 3. | From the Trigger Type drop-down, select Watch. |
Configure the Input Operator
| 1. | Drag and drop an Input operator onto your Data Workflow canvas. |
| 2. | Configure the operator's Info window as follows: |
|
Info |
|
|---|---|
|
Category |
Input |
|
Component |
income |
|
Required |
Yes |
|
Source |
Default |
Configure the Decision Operator
| 1. | Drag and drop a Decision operator onto your Data Workflow canvas. |
| 2. | Configure the operator's Info window as follows: |
|
Info |
|
|---|---|
|
Category |
Decision |
|
Input List |
income |
|
Preserve Argument Type |
Unchecked (no) |
|
Condition |
A > 100000 |
| 3. | Connect the output port (right) of the Input operator to the input port (left) of the Decision operator. |
Configure the First Create Value Operator
| 1. | Drag and drop a Create Value operator onto your Data Workflow canvas. |
| 2. | Configure the operator's Info window as follows: |
|
Info |
|
|---|---|
|
Category |
Create Value |
|
Label |
Decision True |
|
Expression/Value |
"Andrea Matthews" |
| 3. | Connect the upper output port (right) of the Decision operator to the argument port (top) of the Create Value operator. |
Configure the First Output Operator
| 1. | Drag and drop an Output operator onto your Data Workflow canvas. |
| 2. | Configure the operator's Info window as follows: |
|
Info |
|
|---|---|
|
Category |
Output |
|
Component |
financialAdviser |
|
Action |
value |
| 3. | Connect the output port (right) of the Create Value operator to the input port (left) of the Outputoperator. |
Configure the First Console Operator
| 1. | Drag and drop a Console operator onto your Data Workflow canvas. |
| 2. | Configure the operator's Info window as follows: |
|
Info |
|
|---|---|
|
Category |
Console |
|
Label |
Console Decision True |
| 3. | Connect the upper output port (right) of the Decision operator to the input port (left) of the Console operator. |
Configure the Second Create Value Operator
| 1. | Drag and drop a second Create Value operator onto your Data Workflow canvas. |
| 2. | Configure the operator's Info window as follows: |
|
Info |
|
|---|---|
|
Category |
Create Value |
|
Label |
Decision False |
|
Expression/Value |
"Rachel Moose" |
| 3. | Connect the lower output port (right) of the Decision operator to the argument port (top) of the Decision False Create Value operator. |
Configure the Second Output Operator
| 1. | Drag and drop a second Output operator onto your Data Workflow canvas. |
| 2. | Configure the operator's Info window as follows: |
|
Info |
|
|---|---|
|
Category |
Output |
|
Component |
financialAdviser |
|
Action |
value |
| 3. | Connect the output port (right) of the Decision False Create Value operator to the input port (left) of the financialAdviser Output operator. |
Configure the Second Console Operator
| 1. | Drag and drop a second Console operator onto your Data Workflow canvas. |
| 2. | Configure the operator's Info window as follows: |
|
Info |
|
|---|---|
|
Category |
Console |
|
Label |
Console Decision False |
| 3. | Connect the lower output port (right) of the Decision operator to the input port (left) of the Console Decision False Console operator. |
| 4. | Click Save Component. |
| 5. | Save your module. |
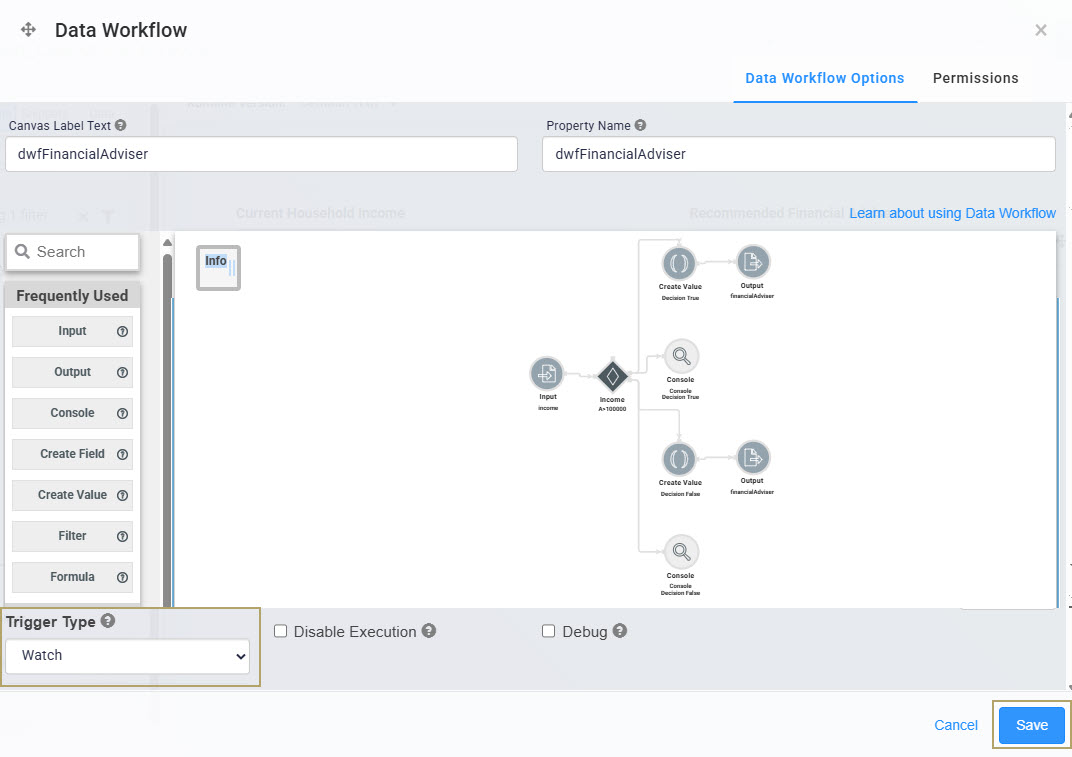
Here's how the completed Data Workflow looks:
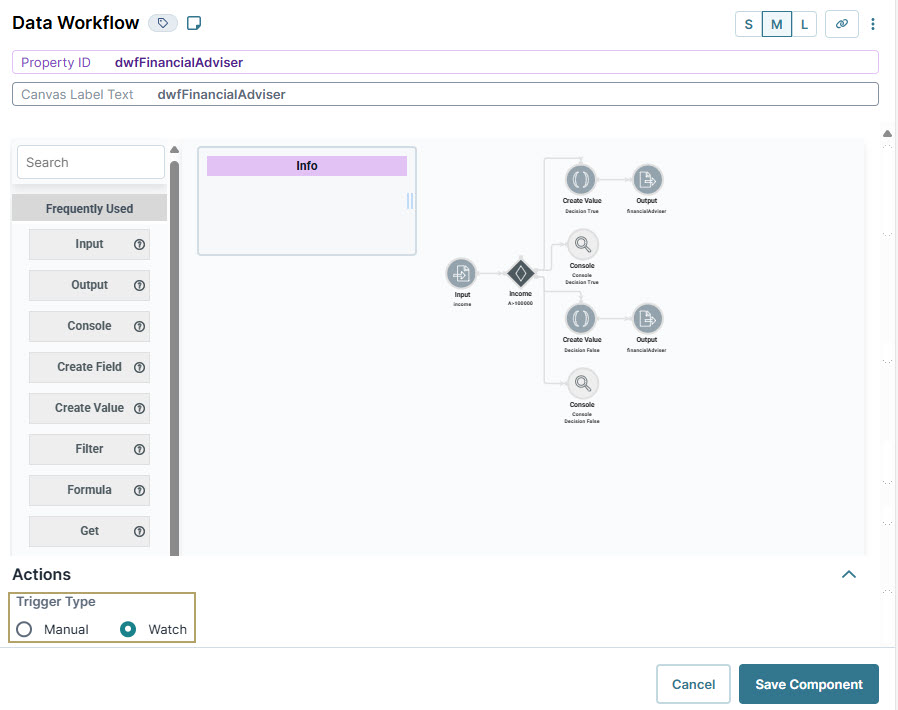
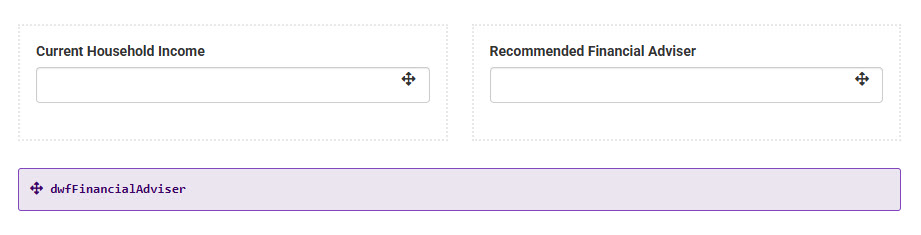
Here's how the completed example looks in the Module Builder:
Preview your module in Express View Express View is how your end-user views your application. Express View also lets you preview your applications to test your configuration and view the styling. This is also the view your end-users will see when interacting with your application. After configuring a module, click Preview in the Module Builder to interact with the module in Express View. and open the DevTools Console The DevTools Console helps you securely store, build, test, and deploy your software..
If you open your browser’s DevTools Console, you’ll see how the logic works. Enter a value in your Current Household Income field and you'll see the Recommended Financial Adviser update in real-time, depending on your entered income.
You'll see one of two scenarios:
-
When the income is less than 100,000, the TRUE condition is _BLOCKED, and the FALSE condition displays the value.
-
When the income is greater than 100,000, the FALSE condition is _BLOCKED, and the TRUE condition displays the value.
Overview
The Decision operator lets you build simple logic statements that evaluate whether input values meet specific conditions. Based on the result, the operator outputs true or false, letting you control the flow in a Data Workflow.
To configure a Decision operator, use the Info window and define a condition. This condition uses comparison symbols, like <, >, =, >=, or <=, to evaluate incoming data. For example, to check if an end-user's End-users, also known as Express Users, are the individuals accessing an application through Express View. In most cases, end-users are the customers using the product. income is greater than 100,000, your condition might look like the following: A > 100000. Here, A represents the incoming value, and 100000 is the threshold.
For more advanced logic, you can use an OR statement. For example, OR(A="a", A="b", A="c"). This configuration returns true if the input value matches "a", "b", or "c". All other values return false.
The Decision operator evaluates conditions and routes data based on the result. It passes data through one output port at a time. The port that does not receive data displays as _BLOCKED, and any steps connected to that port will not execute.
Using Arguments in Conditions
You can configure a Decision operator to evaluate a condition using an argument from another operator.
For example, you'll:
-
Connect another operator to the argument port (top) of the Decision operator.
-
Enter _arg in the Condition field.
The argument must return a string A string is an object that represents a sequence of characters. Strings typically hold data represented in text form. or Boolean The Boolean data type accepts one of two values: true, or, false. value. Your condition should use a standard comparison format, like <, >, =, >=, or <=. The condition must be either TRUE or FALSE.
You'll find the Decisions operator under the Gateways group to the left of the Data Workflow canvas.
About the Info Window
Learn more about each setting in the Decision operator's Info window:
|
Setting |
Description |
|---|---|
|
Category |
Grayed out and non-adjustable setting indicating the operation type. |
|
Input List |
Select the Property ID for the data you want your Decision operator to process. This selection should match the Property ID you've selected in your Input operator. This field is optional, but making a selection displays a label below your operator. These labels can help to keep your canvas organized. |
|
Preserve Argument Type |
When selected, this setting ensures the argument data type is respected when the operator executes. |
|
Condition |
Here, you'll set the expression the operator runs your data against. You'll use <, >, =, >=, or <= to set your expression. You can also use a combination of these, set inside an OR statement. For example, OR(A="a",A="b",A="c"). To use another operator as an argument, connect the operator to the argument port and enter _arg. |
Adding a Decision Operator
To see how the Decision operator works, you’ll walk through a simple example. In this example, you’ll create a module that collects an end-user’s income. Then, you’ll use a Data Workflow to recommend a financial adviser to the end-user End-users, also known as Express Users, are the individuals accessing an application through Express View. In most cases, end-users are the customers using the product. based on the income entered.
Configure the Columns Component
First configure a Columns component that acts as containers for the components that follow.
| 1. | In the Module Builder, drag and drop a Columns component onto your canvas. |
| 2. | In the Property ID field, enter colAdviser. |
| 3. | Click Save & Close. |
Configure the Number Component
Next, configure a Number component to collect the income of your end-user End-users, also known as Express Users, are the individuals accessing an application through Express View. In most cases, end-users are the customers using the product..
| 1. | Drag and drop a Number component onto your canvas, placing it inside the left column of the colAdviser Columns component. |
| 2. | In the Property ID A Property ID is the unique field ID used by Unqork to track and link components in your module. field, enter income. |
| 3. | In the Label Text Label Text conveys what the input component is and what information it displays. Enter the purpose of the corresponding component or field. field, enter Current Household Income. |
| 4. | Set Show Thousands Separator to (ON). |
| 5. | Set Currency to (ON). |
| 6. | Click Save & Close. |
Configure the Text Field Component
Next, add a Text Field component to display the output of your Data Workflow. This field displays the recommended financial adviser to the end-user End-users, also known as Express Users, are the individuals accessing an application through Express View. In most cases, end-users are the customers using the product.. Because the end-user does not need to enter any information to this field, set it to read-only.
| 1. | Drag and drop a Text Field component onto your canvas, placing it inside the right column of the colAdviser Columns component. |
| 2. | In the Property ID A Property ID is the unique field ID used by Unqork to track and link components in your module. field, enter financialAdviser. |
| 3. | In the Label Text Label Text conveys what the input component is and what information it displays. Enter the purpose of the corresponding component or field. field, enter Recommended Financial Adviser. |
| 4. | Set Read Only to (ON). |
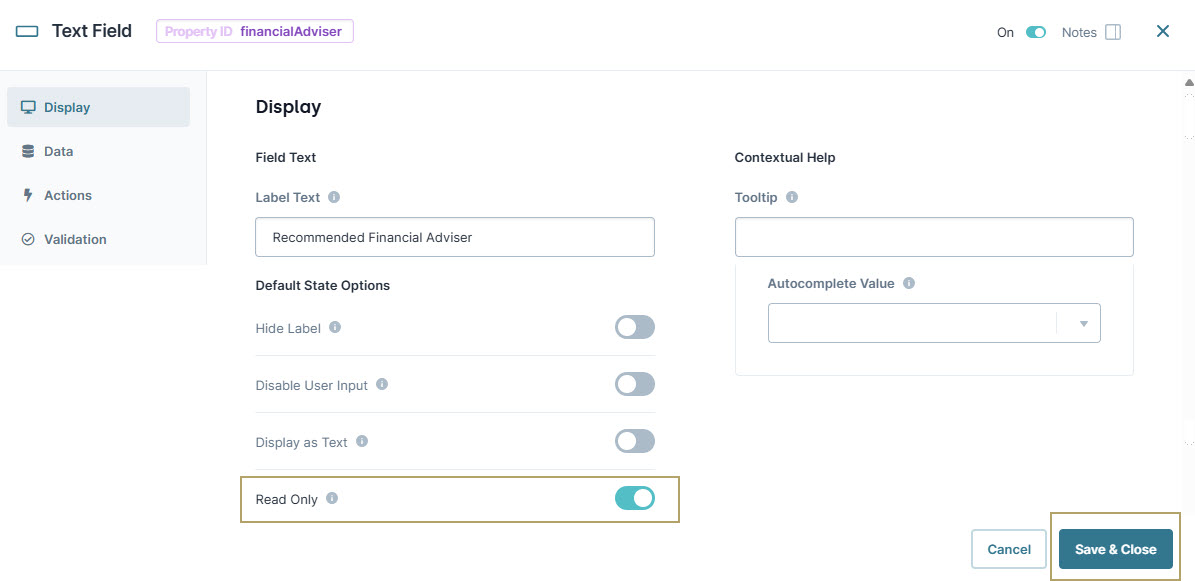
| 5. | Click Save & Close. |
Configure the Data Workflow Component
Lastly, set up the Data Workflow with an Input operator that brings in your end-user's End-users, also known as Express Users, are the individuals accessing an application through Express View. In most cases, end-users are the customers using the product. income. Then, use a Decision operator to determine which financial adviser to recommend. Add Console operators to help you view how the data passes to each step.
| 1. | Drag and drop a Data Workflow onto your canvas, placing it below your colAdviser Columns component. |
| 2. | In the Canvas Label Text and Property Name fields, enter dwfFinancialAdviser. |
| 3. | From the Trigger Type drop-down, select Watch. |
Configure the Input Operator
| 1. | Drag and drop an Input operator onto your Data Workflow canvas. |
| 2. | Configure the operator's Info window as follows: |
|
Setting |
Value |
|---|---|
|
Category |
Input |
|
Component |
income |
|
Required |
Yes |
|
Source |
Default |
Configure the Decision Operator
| 1. | Drag and drop a Decision operator onto your Data Workflow canvas. |
| 2. | Configure the operator's Info window as follows: |
|
Setting |
Value |
|---|---|
|
Category |
Decision |
|
Input List |
income |
|
Preserve Argument Type |
Unchecked (no) |
|
Condition |
A > 100000 |
| 3. | Connect the output port (right) of the Input operator to the input port (left) of the Decision operator. |
Configure the First Create Value Operator
| 1. | Drag and drop a Create Value operator onto your Data Workflow canvas. |
| 2. | Configure the operator's Info window as follows: |
|
Setting |
Value |
|---|---|
|
Category |
Create Value |
|
Label |
Decision True |
|
Expression/Value |
"Andrea Matthews" |
| 3. | Connect the upper output port (right) of the Decision operator to the argument port (top) of the Create Value operator. |
Configure the First Output Operator
| 1. | Drag and drop an Output operator onto your Data Workflow canvas. |
| 2. | Configure the operator's Info window as follows: |
|
Setting |
Value |
|---|---|
|
Category |
Output |
|
Component |
financialAdviser |
|
Action |
value |
| 3. | Connect the output port (right) of the Create Value operator to the input port (left) of the Outputoperator. |
Configure the First Console Operator
| 1. | Drag and drop a Console operator onto your Data Workflow canvas. |
| 2. | Configure the operator's Info window as follows: |
|
Setting |
Value |
|---|---|
|
Category |
Console |
|
Label |
Console Decision True |
| 3. | Connect the upper output port (right) of the Decision operator to the input port (left) of the Console operator. |
Configure the Second Create Value Operator
| 1. | Drag and drop a second Create Value operator onto your Data Workflow canvas. |
| 2. | Configure the operator's Info window as follows: |
|
Setting |
Value |
|---|---|
|
Category |
Create Value |
|
Label |
Decision False |
|
Expression/Value |
"Rachel Moose" |
| 3. | Connect the lower output port (right) of the Decision operator to the argument port (top) of the Decision False Create Value operator. |
Configure the Second Output Operator
| 1. | Drag and drop a second Output operator onto your Data Workflow canvas. |
| 2. | Configure the operator's Info window as follows: |
|
Setting |
Value |
|---|---|
|
Category |
Output |
|
Component |
financialAdviser |
|
Action |
value |
| 3. | Connect the output port (right) of the Decision False Create Value operator to the input port (left) of the financialAdviser Output operator. |
Configure the Second Console Operator
| 1. | Drag and drop a second Console operator onto your Data Workflow canvas. |
| 2. | Configure the operator's Info window as follows: |
|
Setting |
Value |
|---|---|
|
Category |
Console |
|
Label |
Console Decision False |
| 3. | Connect the lower output port (right) of the Decision operator to the input port (left) of the Console Decision False Console operator. |
| 4. | Click Save. |
| 5. | Save your module. |
Here's how the completed Data Workflow looks:
Here's how the completed example looks in the Module Builder:
Preview your module in Express View Express View is how your end-user views your application. Express View also lets you preview your applications to test your configuration and view the styling. This is also the view your end-users will see when interacting with your application. After configuring a module, click Preview in the Module Builder to interact with the module in Express View. and open the DevTools Console The DevTools Console helps you securely store, build, test, and deploy your software..
If you open your browser’s DevTools Console, you’ll see how the logic works. Enter a value in your Current Household Income field and you'll see the Recommended Financial Adviser update in real-time, depending on your entered income.
You'll see one of two scenarios:
-
When the income is less than 100,000, the TRUE condition is _BLOCKED, and the FALSE condition displays the value.
-
When the income is greater than 100,000, the FALSE condition is _BLOCKED, and the TRUE condition displays the value.
Resources
For more information, you can read about the Decision operator in our Documentation Hub.
