Overview
The Gate operator filters your data based on given criteria. If your data does not meet the criteria, the Gate operator blocks it. Blocking the data frees up your application to improve performance elsewhere.
Let's say you build a module that requires an end-user to enter a user name. Suppose you want to transfer an end-user's date of birth from a text field to a data table. Maybe you want to exclude displaying October birth dates. You can use the Gate operator to either block or transfer October birthdates.
Similar Data Workflow Operators
The Gate operator is similar to the Filter and Decision operators. Here are the operators compared:
Gate operator: Returns only the data that meets your Condition's criteria. If the data does not meet your criteria, the Gate operator blocks it.
Filter operator: Separates data that meets your Condition’s criteria from data that does not. Data that meets your criteria passes through one pathway while data that does not meet your criteria passes through another.
Decision operator: Separates data that meets your Condition’s criteria from data that does not. But, the Decision operator differs from the Filter operator because it only returns one output. If the input matches the criteria, it it passes through one pathway. If the input does not match the criteria, it passes through another pathway.
You'll find the Gate operator under the Gateways group to the left of your Data Workflow canvas..
About the Info Window
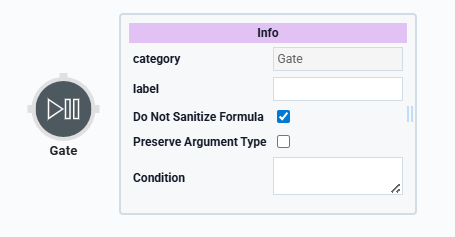
Here's a breakdown of each setting in the operator's Info window:
Setting | Description |
|---|---|
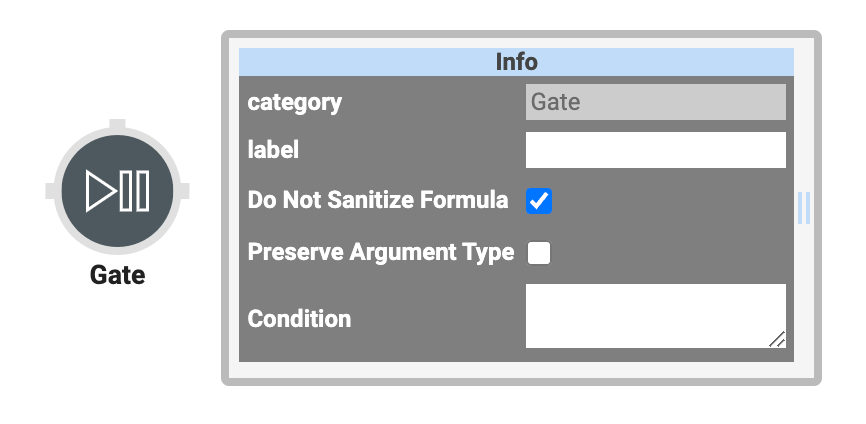
Category | Grayed out and non-adjustable setting indicating the operation type. |
Label | Sets the label for your operator, displaying below the operator on your Data Workflow canvas. This field is optional, but set a label if you use more than one of the same operator type. A label helps you identify your operators without opening any Info windows. |
Do Not Sanitize Formula | When this checkbox is clear, the operator cleans values coming into or defined in the operator. For example, removing special characters. Some of those special characters include Sanitizing improves performance. But, it can also lead to unexpected data behavior. If your Create Field is not behaving as expected, try selecting this box. When selected, the operator uses your values and expressions as-is. This is best when working with complex values or values that should remain unchanged. By default, this setting is selected, which means the operator does not attempt to sanitize. |
Preserve Argument Type | When selected, this setting ensures the argument data type is respected when the operator executes. |
Condition | Defines the condition of the Gate operator based on the argument ( When the condition is true, the Gate operator passes the input value to the output. When the condition is false, the Gate operator blocks the input value. When the Gate operator blocks a value, the Data Workflow stops. |
Adding a Gate Operator
You'll configure a module that transfers a username from one Text Field component to another. The Gate operator lets end-users decide if they want their username transferred or not. If the end-user selects chooses not to transfer the username, the transfer is blocked.
These instructions assume you have a new module open, saved, and with a title.
Configure the Text Field Components
First, add two Text Field components to your module. The first component collects a username from the end-user. The second displays the username if they choose to confirm it.
In the Module Builder, drag and drop two Text Field components onto your canvas.
In the Property ID and Label Text fields, enter the following:
Property ID
Label Text
gateInput
Please enter your username.
gateOutput
Is this the username you'd like to use?
Click Save Component for each component after you add it.
Configure the Radio Buttons Components
Next, add a Radio Buttons component so your end-user can select whether they want to confirm their username.
Drag and drop a Radio Buttons component onto your canvas, placing it between the gateInput and gateOutput Text Field components.
In the Property ID field, enter gateArg.
In the Label Text field, enter
Confirm your username submission?.Set Horizontal Layout to
 (ON).
(ON).In the Label and Value fields, enter the following:
Label
Value
1
Yes
Yes
2
No
No
.png)
Click Save Component.
Configure the Data Workflow Component
Now, add the Data Workflow component to retrieve the data from your gateInput Text Field component and pass it through a Gate operator. Then, the results are passed and displayed in the gateOutput Text Field component.
Drag and drop a Data Workflow component onto your canvas, placing it between the gateArg Radio Buttons and gateOutput Text Field components.
In the Property ID field, enter dwfGate.
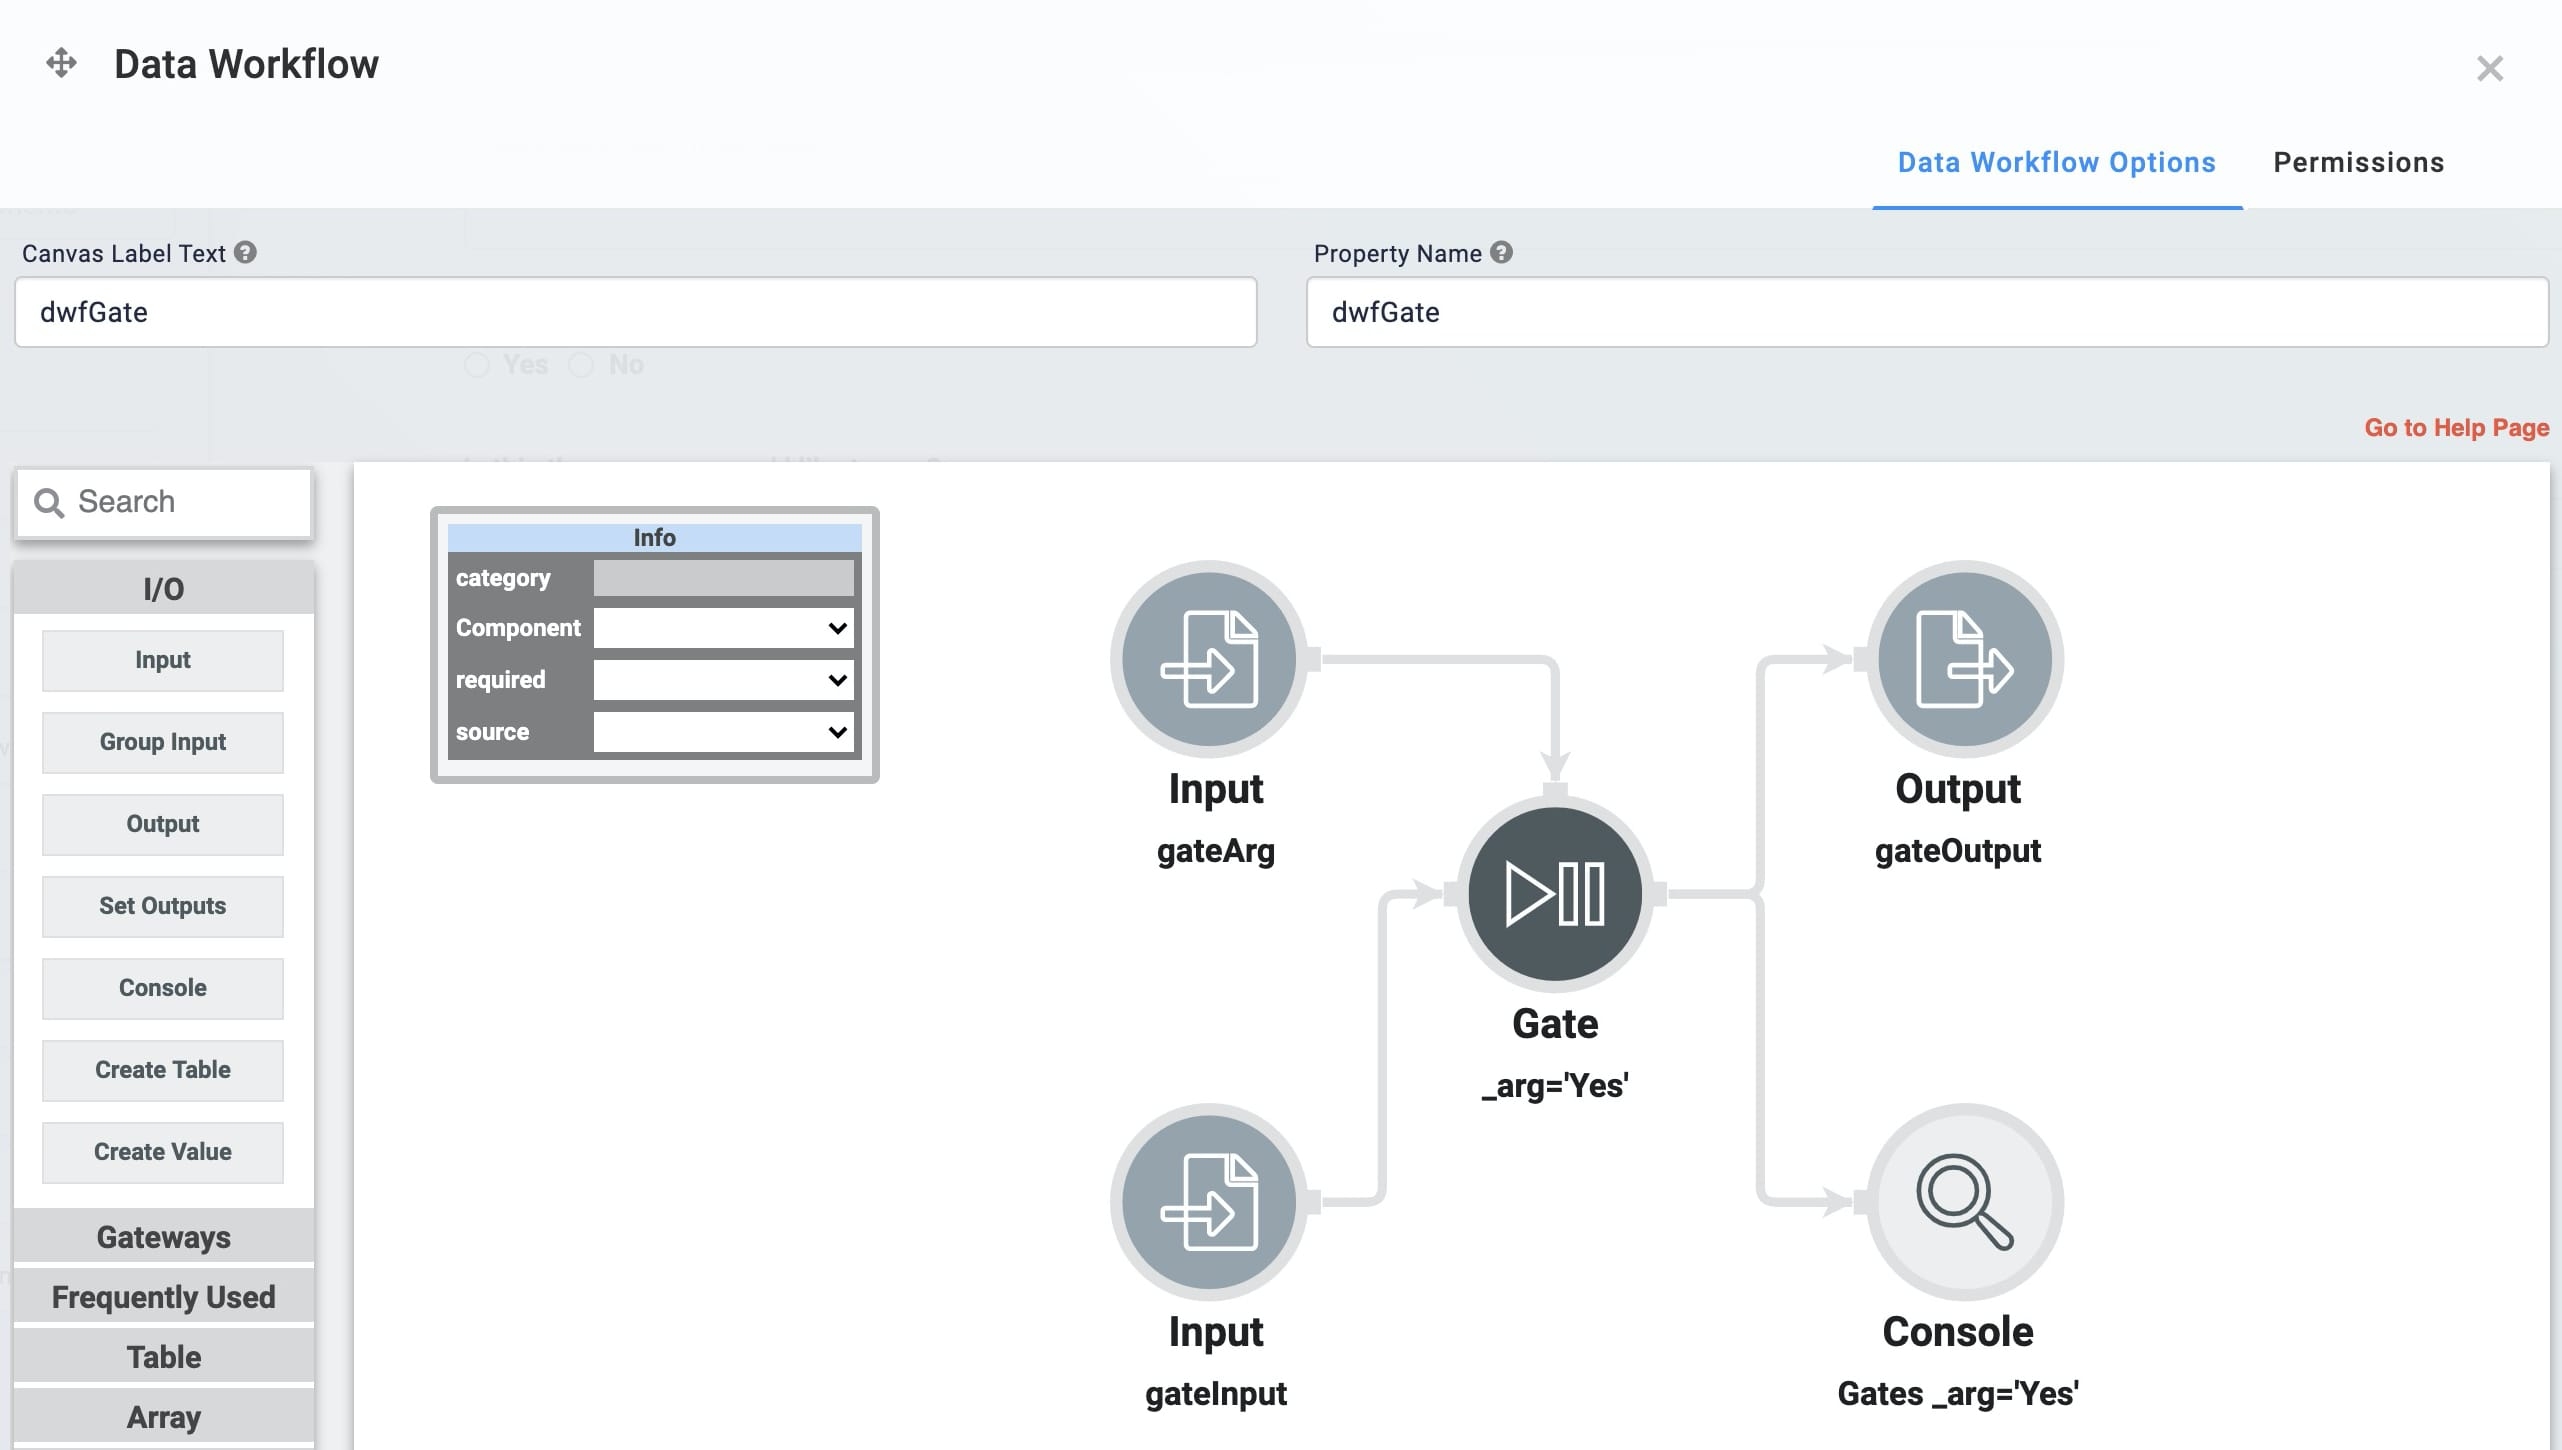
In the Canvas Label Text, enter
dwfGate.
Configure the First Input Operator
Drag and drop an Input operator onto your Data Workflow canvas.
Configure the operator's Info window as follows:
Info
Category
Input
Component
gateArg
Required
Yes
Source
Default
Configure the Second Input Operator
Drag and drop an Input operator onto your Data Workflow canvas.
Configure the operator's Info window as follows:
Info
Category
Input
Component
gateInput
Required
Yes
Source
Default
Configure the Gate Operator
Drag and drop a Gate operator onto your Data Workflow canvas.
Configure the operator's Info window as follows:
Info
Category
Gate
Label
_arg ='Yes'
Do Not Sanitize Formula
(checked)
Preserve Argument Type
☐ (unchecked)
Condition
_arg ='Yes'
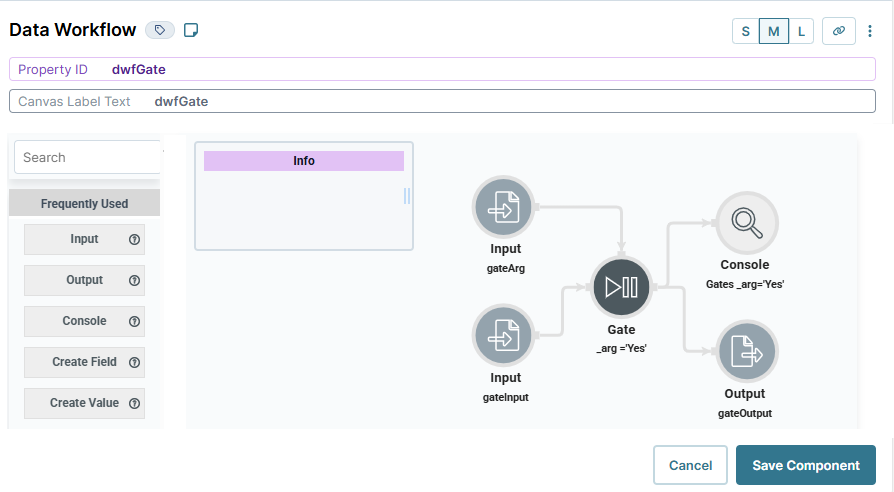
You'll connect the output port (right) of the gateArg Input operator to the argument port (top) of the Gate operator. The connection passes the Radio Buttons component criteria to the Gate operator. The Gate operator blocks the 'No' criteria from the gateArg Input operator.
Connect the output port (right) of the gateInput Input operator to the input port (left) of the _arg ='Yes' Gate operator.
Connect the output port (right) of the gateArg Input operator to the argument port (top) of the _arg ='Yes' Gate operator.
Configure the Console Operator
Drag and drop a Console operator onto your Data Workflow canvas.
Configure the operator's Info window as follows:
Info
Category
Console
Label
Gates _arg='Yes'
Connect the output port (right) of the _arg ='Yes' Gate operator to the input port (left) of the Gates _arg='Yes' Console operator.
Configure the Output Operator
Drag and drop an Output operator onto your Data Workflow canvas.
Configure the operator's Info window as follows:
Info
Category
Output
Component
gateOutput
Action
value
Connect the output port (right) of the _arg ='Yes' Gate operator to the input port (left) of the gateOutput Output operator.
Click Save Component.
Save your module
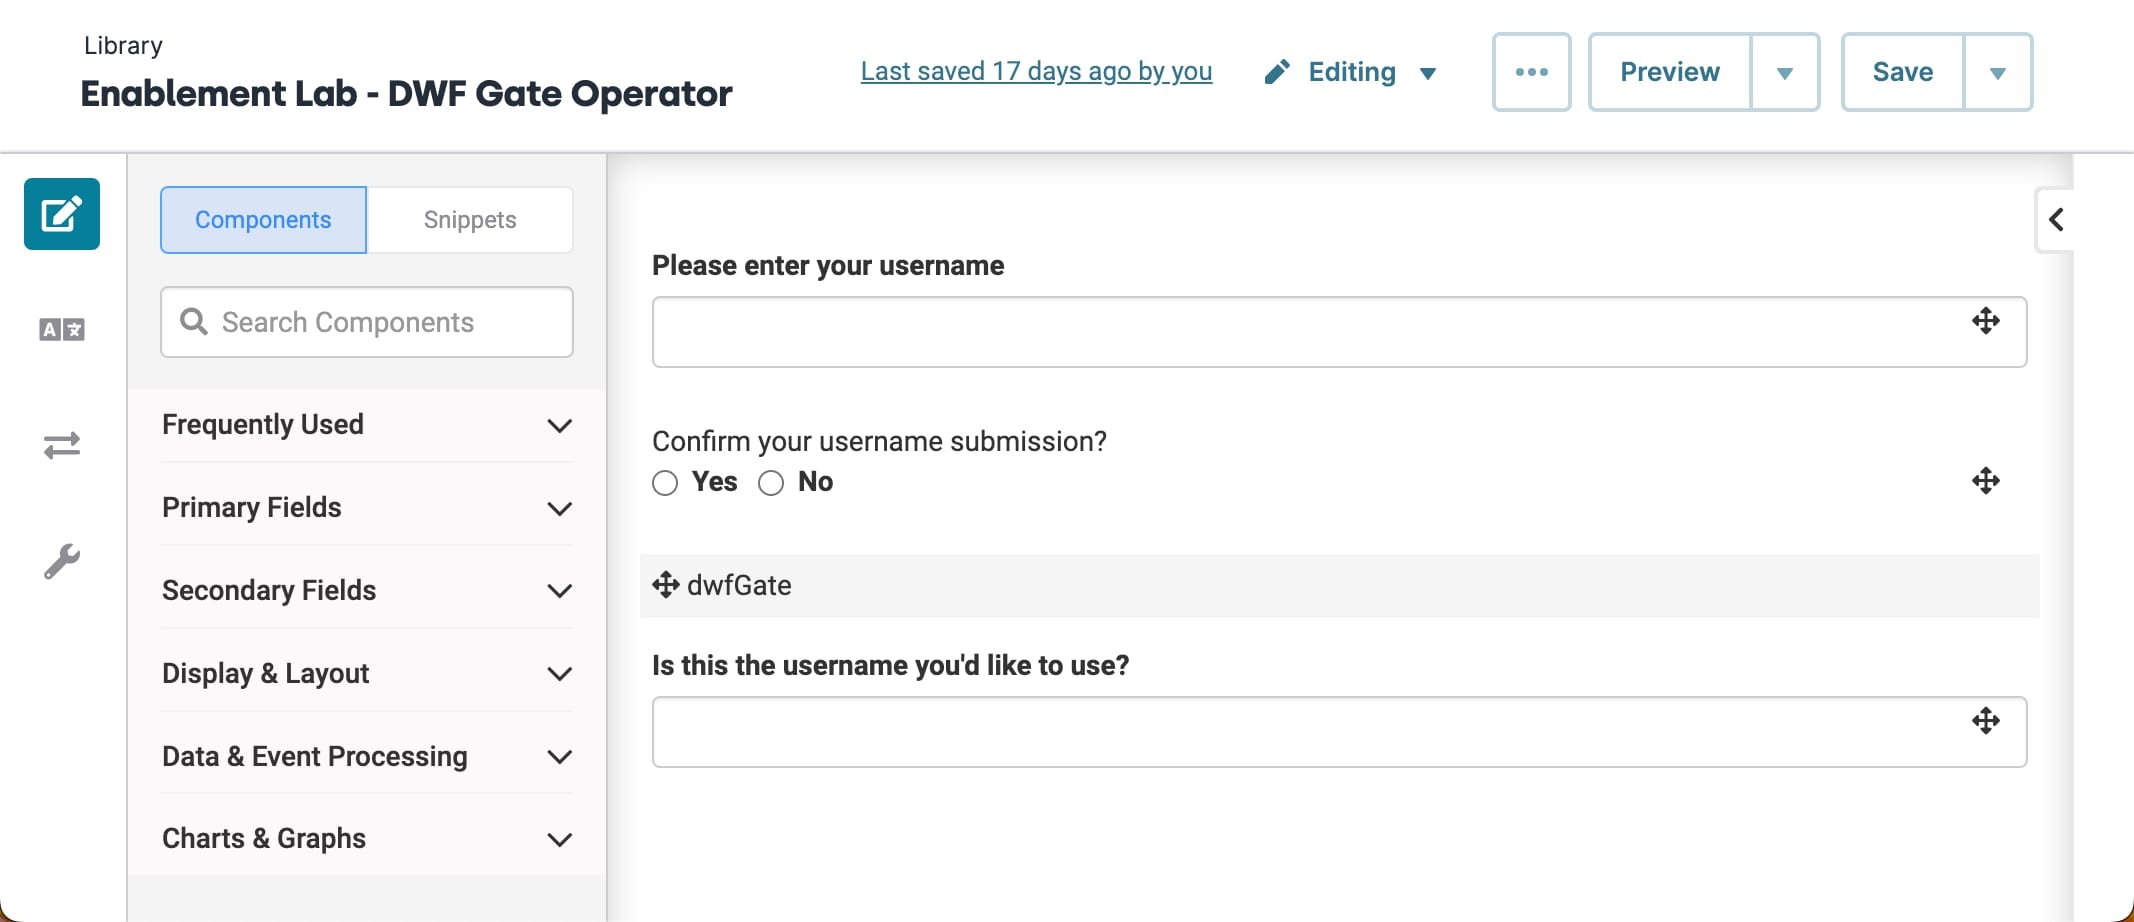
Here's how a completed example looks in the Module Builder:
 Preview the module in Express View and open the DevTools Console. Enter
 sample_User in the first field and select Yes. When you click Yes, sample_User displays in the second field.
Overview
The Gate operator filters your data based on given criteria. If your data does not meet the criteria, the Gate operator blocks it. Blocking the data frees up your application to improve performance elsewhere.
Let's say you build a module that requires an end-user to enter a user name. Suppose you want to transfer an end-user's date of birth from a text field to a data table. Maybe you want to exclude displaying October birth dates. You can use the Gate operator to either block or transfer October birthdates.
Similar Data Workflow Operators
The Gate operator is similar to the Filter and Decision operators. Here are the operators compared:
Gate operator: Returns only the data that meets your Condition's criteria. If the data does not meet your criteria, the Gate operator blocks it.
Filter operator: Separates data that meets your Condition’s criteria from data that does not. Data that meets your criteria passes through one pathway while data that does not meet your criteria passes through another.
Decision operator: Separates data that meets your Condition’s criteria from data that does not. But, the Decision operator differs from the Filter operator because it only returns one output. If the input matches the criteria, it it passes through one pathway. If the input does not match the criteria, it passes through another pathway.
You'll find the Gate operator under the Gateways group to the left of your Data Workflow canvas..
About the Info Window
Here's a breakdown of each setting in the Info window:
Setting | Description |
|---|---|
Category | Grayed out and non-adjustable setting indicating the operation type. |
Label | Sets the label for your operator, displaying below the operator on your Data Workflow canvas. This field is optional, but set a label if you use more than one of the same operator type. A label helps you identify your operators without opening any Info windows. |
Do Not Sanitize Formula | When this checkbox is clear, the operator cleans values coming into or defined in the operator. For example, removing special characters. Some of those special characters include Sanitizing improves performance. But, it can also lead to unexpected data behavior. If your Create Field is not behaving as expected, try selecting this box. When selected, the operator uses your values and expressions as-is. This is best when working with complex values or values that should remain unchanged. By default, this setting is selected, which means the operator does not attempt to sanitize. |
Preserve Argument Type | When selected, this setting ensures the argument data type is respected when the operator executes. |
Condition | Defines the condition of the Gate operator based on the argument ( When the condition is true, the Gate operator passes the input value to the output. When the condition is false, the Gate operator blocks the input value. When the Gate operator blocks a value, the Data Workflow stops. |
Adding a Gate Operator
You'll configure a module that transfers a username from one Text Field component to another. The Gate operator lets end-users decide if they want their username transferred or not. If the end-user selects chooses not to transfer the username, the transfer is blocked.
These instructions assume you have a new module open, saved, and with a title.
Configure the Text Field Components
First, add two Text Field components to your module. The first component collects a username from the end-user. The second displays the username if they choose to confirm it.
In the Module Builder, drag and drop two Text Field components onto your canvas.
Enter the following Property ID and Label Text:
Property ID
Label Text
gateInput
Please enter your username.
gateOutput
Is this the username you'd like to use?
Click Save & Close
Configure the Radio Buttons Component
Next, add a Radio Buttons component so your end-user can select whether they want to confirm their username.
Drag and drop a Radio Buttons component onto your canvas, placing it between the gateInput and gateOutput Text Field components.
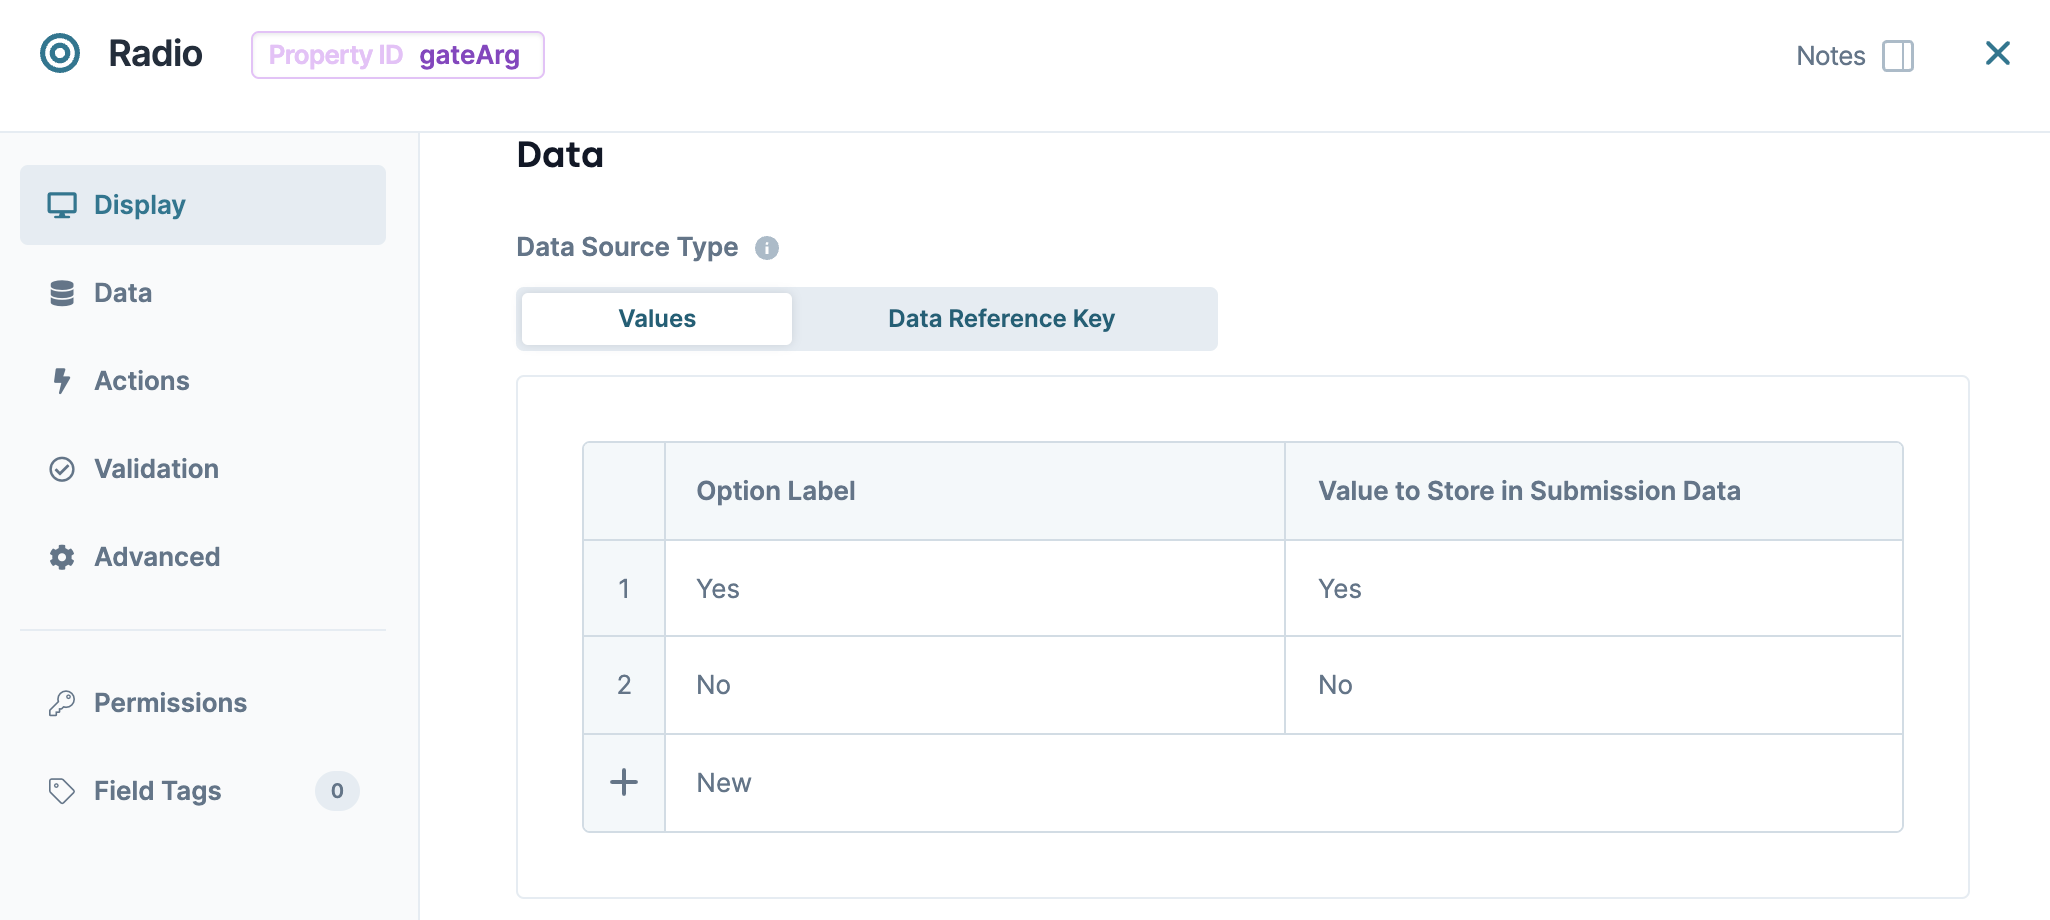
In the Property ID field, enter gateArg.
In the Label Text field, enter
Confirm your username submission?.Set Horizontal Layout to
 (ON).
(ON).In the Option Label and Value to Store in Submission Data fields, enter the following:
Option Label
Value to Store in Submission Data
1
Yes
Yes
2
No
No
Click Save & Close.
Configure the Data Workflow Component
Now, add the Data Workflow component to retrieve the data from your gateInput Text Field component and pass it through a Gate operator. Then, the results are passed and displayed in the gateOutput Text Field component.
Drag and drop a Data Workflow component onto your canvas, placing it between the gateArg Radio Buttons and gateOutput Text Field components.
In the Canvas Label Text and Property Name fields, enter
dwfGate.
Configure the First Input Operator
Drag and drop an Input operator onto your Data Workflow canvas.
Configure the operator's Info window as follows:
Setting
Value
Category
Input
Component
gateArg
Required
Yes
Source
Default
Configure the Second Input Operator
Drag and drop an Input operator onto your Data Workflow canvas.
Configure the operator's Info window as follows:
Setting
Value
Category
Input
Component
gateInput
Required
Yes
Source
Default
Configure the Gate Operator
Drag and drop a Gate operator onto your Data Workflow canvas.
Configure the operator's Info window as follows:
Setting
Value
Category
Gate
Label
_arg ='Yes'
Do Not Sanitize Formula
.png) (checked)
(checked)Preserve Argument Type
☐ (unchecked)
Condition
_arg ='Yes'
You'll connect the output port (right) of the gateArg Input operator to the argument port (top) of the Gate operator. The connection passes the Radio Buttons component criteria to the Gate operator. The Gate operator blocks the 'No' criteria from the gateArg Input operator.
Connect the output port (right) of the gateInput Input operator to the input port (left) of the _arg ='Yes'Gate operator.
Connect the output port (right) of the gateArg Input operator to the argument port (top) of the _arg ='Yes'Gate operator.
Configure the Console Operator
Drag and drop a Console operator onto your Data Workflow canvas.
Configure the operator's Info window as follows:
Setting
Value
Category
Console
Label
Gates _arg='Yes'
Connect the output port (right) of the _arg ='Yes'Gate operator to the input port (left) of the Gates _arg='Yes'Console operator.
Configure the Output Operator
Drag and drop an Output operator onto your Data Workflow canvas.
Configure the Output operator's Info window as follows:
Setting
Value
Category
Output
Component
gateOutput
Action
value
Connect the output port (right) of the _arg ='Yes'Gate operator to the input port (left) of the gateOutputOutput operator.
Click Save.
Save your module.
Here's how a completed example looks in the Module Builder:
Preview the module in Express View and open the DevTools Console. Enter sample_User in the first field and select Yes. When you click Yes, sample_User displays in the second field.
Resources
What's the difference between the Gate, Decision, and Branch Split/Merge operators?
Modify the Gate operator in the Data Workflow's configuration window.

