Branch Merge Operator

Overview

The Branch Merge operator merges the 2 pathways created by the Branch Split operator. The Branch Split operator has 2 different outputs. The Condition found in your operator Info window decides the output your data will take. If your data matches your Condition, the operator returns True. From there, your data follows one of the possible paths. If your input doesn't match, the operator returns False, choosing the second path. Once the operator chooses a path, it blocks the other.

The Branch Merge operator merges one of the 2 paths from the Branch Split operator into a single output. The Branch Merge only accepts the non-blocked path as its input. If the Branch Merge receives non-blocked values in both inputs, it'll use data from the top input. The operator blocks all other data.

You'll notice that the Branch Merge operator includes an argument port (top). While this is not currently used, it's being reserved for future development.

You’ll find the Branch Merge operator under the Gateways group at the left of the Data Workflow canvas.

Similar Data Workflow Operators

The Branch Merge operator is similar to the Input Switch and Append operators. Here are the operators compared: 

  • Branch Merge operator: Pairs with the Branch Split operator. The Branch Merge receives 2 pathways as inputs into a single output. It uses the input pathway determined by the Branch Split's Condition.
  • Input Switch operator: Lets you alternate between 2 inputs. The Input Switch uses a condition to determine which set of input data to use. If the input returns True, the Input Switch receives the top input. If the input returns False, it receives the bottom input.
  • Append operator: Brings values from 2 different fields or data sets together. For example, if you had 8 in one field and 9 in another, the Append operator would output a value of 89.

What You'll Learn

In this article, you'll learn:

About the Info Window

Here's what the Branch Merge operator looks like, along with its Info window:

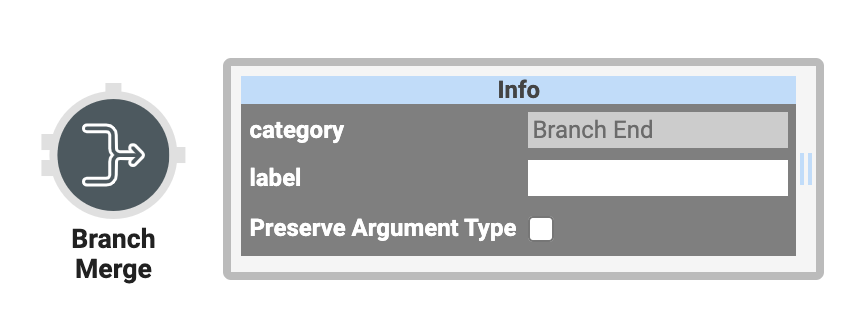
And here's a breakdown of each setting in the Info window:

Setting

Description

Category

Grayed out and non-adjustable setting indicating the operation type.

Label

Sets the label for your operator. The label you enter here shows beneath your operator on your Data Workflow canvas.

This field is optional, but set a label if you use more than one of the same operator type. A label helps you identify your operators without opening any Info windows.

Adding a Branch Merge Operator

To show you how the Branch Split operator works, you'll set up an application that adds a column to a data table. Let's say you have a data table of company users. You want the end-user to determine whether they are U.S. residents. You want the data table to show their residency information based on what the end-user decides. You'll use the Branch Split and Merge operators to add a column that tells where the users live.

NOTE  As a reminder, you'll use the Branch Split and Branch Merge operators together. While they can be used individually, we've designed them to split single inputs and merge to a single output.

Here's how the completed use case will look in the Module Builder:

Here's how the completed use case will look in Express View, including a peek at the DevTools Console:

What You'll Need

To set up this use case, you'll need:

  • 1 Data Table component

  • 3 Data Workflow components

  • 3 Hidden components

  • 2 Content components

  • 1 Radio Buttons component

To set up your first Data Workflow, you'll need:

  • 1 Input operator

  • 1 HTML Table operator

  • 1 Output operator

To set up your second Data Workflow, you'll need:

  • 2 Input operators

  • 1 Branch Split operator

  • 2 Create Field operators

  • 2 Console operators

  • 1 Branch Merge operator

  • 1 Output operator

To set up your third Data Workflow, you'll need:

  • 1 Input operator

  • 1 HTML Table operator

  • 1 Output operator

NOTE  These instructions assume you have a new module open, saved, and with a title.

Configuration

Configure the Data Table Component

First, you'll set up a Data Table to hold the data you'll use for the rest of the module.

1. In the Module Builder, drag and drop a Data Table component onto your canvas.
2. Enter dtDataExample in the Label and Property Name fields.
3. In the data table, enter the following:
user age company

Rachel

30

Ralph Lauren

Joey

31

DOUL

Ross

31

NYU

Chandler

31

Data Inc

Pheobe

31

Massages

Monica

30

Javu

4. Click Save.

Configure the First Hidden Component

You'll need a place to store your data once it's passed through your first Data Workflow. You'll use a Hidden component for that.

1. Drag and drop a Hidden component onto your canvas under your Data Table.
2. Enter showInputTable in the Label and Property Name fields.
3. Click Save.

Configure the First Data Workflow Component

Next, you’ll add a Data Workflow. This component creates an HTML version of your Data Table. In it’s current form, your table isn’t visible to the end-user. You’ll use a Content component later to convert it to HTML and display it to your end-user.

1. Drag and drop a Data Workflow component onto your canvas under your Hidden component.
2. Enter dwfShowInputTable in the Canvas Label Text and Property Name fields.
3. Set Watch as the Trigger Type.

Configure the Input Operator

1. Drag and drop an Input operator onto your Data Workflow canvas.
2. Configure the Input operator's Info window as follows:

Setting

Value

Category

Input

Component

dtDataExample

Required

Yes

Source

Default

Configure the HTML Table Operator

1. Drag and drop an HTML Table operator onto your Data Workflow canvas.
2. Configure the HTML Table operator's Info window as follows:

Setting

Value

Category

HTML Table

Label

HTML Convert

Striped

No

Bordered

Yes

Hover

No

Condensed

No

Custom Class


3. Connect the output port (right) of the Input operator to the input port (left) of the HTML Table operator.

Configure the Output Operator

1. Drag and drop an Output operator onto your Data Workflow canvas.
2. Configure the Output operator's Info window as follows:

Setting

Value

Category

Output

Component

showInputTable

Action

value

3. Connect the output port (right) of the HTML Table operator to the input port (left) of the Output operator.
4. Save the Data Workflow.

Configure the First Content Component

You'll use a Content component to display your HTML data table to the end-user.

1. Drag and drop a Content component onto your canvas below the showInputTable Hidden component.
2. Enter contentInputTable in the Property ID and Canvas Label Text fields.
3. Click Save.
4. Enter the following in the Content component field:
Copy
The Input data is the following: <br>
<span ng-bind-html="data.showInputTable | safehtml"></span>
<br>
<br>

5. Click Save.

Configure the Radio Buttons Component

Next, you'll add a Radio Buttons component. The end-user will use these buttons to select which data column they want to add to the output table.

1. Drag and drop the Radio Buttons component onto your canvas under your Data Table component.
2. Enter usResident in the Property ID field.
3. Enter Please choose whether these users are residents of the U.S. in the Label Text field.
4. Set your Option Label and Value to Store in Submission Data as shown below:

Option Label

Value to Store in Submission Data

Yes

yes

No

no

5. Click Save.

Configure the Second Hidden Component

1. Drag and drop a Hidden component onto your canvas.
2. Enter brOutputData in the Canvas Label Text and Property ID fields.
3. Click Save.

Configure the Second Data Workflow

Next, you'll add your second Data Workflow component. This component runs your data through your Branch Split and Branch Merge operators.

1. Drag and drop a Data Workflow component onto your canvas under your Radio Buttons component.
2. Enter dwfBranchSplitAndMerge in the Canvas Label Text and Property Name fields.
3. Set Watch as the Trigger Type.

Configure the First Input Operator

1. Drag and drop an Input operator onto your Data Workflow canvas.
2. Configure the Input operator's Info window as follows:

Setting

Value

Category

Input

Component

usResident

Required

Yes

Source

Default

Configure the Second Input Operator

1. Drag and drop an Input operator onto your Data Workflow canvas.
2. Configure the Input operator's Info window as follows:

Setting

Value

Category

Input

Component

dtDataExample

Required

Yes

Source

Default

Configure the Branch Split Operator

1. Drag and drop a Branch Split operator onto your Data Workflow canvas.
2. Configure the Branch Split operator's Info window as follows:

Setting

Value

Category

Branch Split

Label

_arg = resident of the U.S. yes

Do Not Sanitize Formula

Checked (yes)

Condition

_arg='yes'

NOTE  You'll connect the usResident Input operator's output to the argument (top) port of the Branch Split operator. The connection passes the end-user's Radio Button selection as an argument. Adding the 'yes' Condition diverts to the top node if the argument is True. If the argument is False it'll divert to the bottom node.

3. Connect the output port (right) of the usResident Input operator to the argument port (top) of the Branch Split operator.
4. Connect the output port (right) of the dtDataExample Input operator to the input port (left) of the Branch Split operator.

Configure the First Create Field Operator

To add a column to your data table, you'll add a Create Field operator. This new column labels your data entries as non-U.S. residents.

1. Drag and drop a Create Field operator onto your Data Workflow canvas.
2. Configure the Create Field operator's Info window as follows:

Setting

Value

Category

Formula

Label

U.S. Resident

Do Not Sanitize Formula

Checked (yes)

Field 1

US Resident="no"

Field 2


Field 3


Field 4


Field 5


Configure the Second Create Field Operator

You'll add another Create Field operator for U.S. residents. This added column will label your sample data entries as U.S. residents.

1. Drag and drop a Create Field operator onto your Data Workflow canvas.
2. Configure the Create Field operator's Info window as follows:

Setting

Value

Category

Formula

Label

country

Do Not Sanitize Formula

Checked (yes)

Field 1

country="US"

Field 2


Field 3


Field 4


Field 5


Configure the First Console Operator

You'll add a Console operator next. Use the Console to show your Data Workflow's progress after your data passes through the country Create Field operator. You can see the progress in the DevTools Console.

1. Drag and drop a Console operator onto your Data Workflow canvas.
2. Configure the Console operator's Info window as follows:

Setting

Value

Category

Console

Label

Create Field Yes

3. Connect the output port (right) of the country Create Field operator to the input port (left) of the Console operator.

Configure the Second Console Operator

Then you'll add another Console operator. You'll use this Console to show the progress of the U.S. Resident Create Field operator.

1. Drag and drop a Console operator onto your Data Workflow canvas.
2. Configure the Console operator's Info window as follows:

Setting

Value

Category

Console

Label

Create Field No

3. Connect the output port (right) of the US Resident Create Field operator to the input port (left) of the Console operator.

Configure the Branch Merge Operator

Next, you'll add a Branch Merge operator. You'll use this to tie each Branch Split operator path to a single output. Remember, your Branch Merge operator is tied to your Branch Split operator. If your Branch Split operator returns True and takes this path, it blocks the other.

1. Drag and drop a Branch Merge operator onto your Data Workflow canvas.
2. Configure the Branch Merge operator's Info window as follows:

Setting

Value

Category

Branch End

Label

Merge Paths

3. Connect the output port (right) of the country Create Field operator to the input port (left) of the Branch Merge operator.
4. Connect the output port (right) of the US Resident Create Field operator to the input port (left) of the Branch Merge operator.

Configure the Output Operator

1. Drag and drop an Output operator onto your Data Workflow canvas.
2. Configure the Output operator's Info window as follows:

Setting

Value

Category

Output

Component

brOutputData

Action

value

Configure the Third Hidden Component

You'll need a place to store the output of your third Data Workflow. You'll use another Hidden component for this.

1. Drag and drop a Hidden component onto your canvas.
2. Enter brOutputDataShow in the Label and Property Name fields.
3. Click Save.

Configure the Third Data Workflow Component

Next, you'll add your third Data Workflow component. You'll use this to take the data output from the dwfBranchSplitAndMerge Data Workflow. Then, the Data Workflow will create an HTML version of your new Data Table.

1. Drag and drop a Data Workflow component onto your canvas under your Hidden component.
2. Enter dwfShowOutputTable in the Canvas Label Text and Property Name fields.
3. Set Watch as the Trigger Type.

Configure the Input Operator

1. Drag and drop an Input operator onto your Data Workflow canvas.
2. Configure the Input operator's Info window as follows:

Setting

Value

Category

Input

Component

brOutputData

Required

Yes

Source

Default

Configure the HTML Table Operator

1. Drag and drop an HTML Table operator onto your Data Workflow canvas.
2. Configure the HTML Table operator's Info window as follows:

Setting

Value

Category

HTML Table

Label

HTML Convert

Striped


Bordered


Hover


Condensed


Custom Class


3. Connect the output port (right) of the Input operator to the input port (left) of the HTML Table operator.

Configure the Output Operator

1. Drag and drop an Output operator onto your Data Workflow canvas.
2. Configure the Output operator's Info window as follows:

Setting

Value

Category

Output

Component

brOutputDataShow

Action

value

3. Connect the output port (right) of the HTML Table operator to the input port (left) of the Output operator.
4. Save the Data Workflow.

Configure the Second Content Component

Now, you'll add another Content component. Like the first Data Workflow, your data table is in HTML form and invisible to the end-user. You'll use a Content component to make the second data table visible.

1. Drag and drop a Content component onto your canvas below the brOutputDataShow Hidden component.
2. Enter contentOutputTable in the Property ID and Label Text fields.
3. Click Save.
4. Enter the following in the Content component field:
Copy
The output table is the following: <br>
<span ng-bind-html="data.brOutputDataShow | safehtml"></span>
<br>
<br>
<br>
<br>
<br>
<br>

5. Click Save.
6. Save your module.

Nice work! Let's take a look at your completed module in action. First, preview the module in Express View and open the DevTools Console. Click Yes and you'll see a new version of your table appear, this one with an extra country column.

This column labels the users as U.S. residents. If you open the Create Field Yes array in the Console, you'll see each value represented in the second table.

If you click No, you'll see a different column appear in the table below. This time, it'll add a column that labels the users as non-U.S. residents. If you're viewing the DevTools Console, you'll see the data pass down the Create Field No Console path.

Changing a Branch Split Operator's Settings

You can revisit and make changes to this operator.

1. Click the Data Workflow component.

A 5-button toolbar displays above the component on hover-over.

2. Click the (Settings) button to open the Data Workflow canvas.
3. Click the operator to open its Info Window.
4. Make changes to the operator's settings as needed.
5. Click Save.
6. Save your module.

Copying a Branch Split Operator

You can make a copy of your operator using familiar keyboard settings. You can copy and paste an exact copy of your operator, matching all settings.

1. Hover over the Data Workflow component.

A 5-button toolbar displays above the component on hover-over.

2. Click the (Settings) button to open the Data Workflow canvas.
3. Click the operator you want to duplicate.
4. On your keyboard, press Command + C (Mac OS) or Ctrl + C (Windows/Linux) to copy the operator.

TIP  You can copy more than one operator at a time. Hold Command or Ctrl on your keyboard and click all the operators you want to copy. Follow the rest of the steps as usual.

5. On your keyboard, press Command + V (Mac OS) or Ctrl + V (Windows/Linux) to paste the copied operator(s) to the Data Workflow canvas.
6. Click Save.
7. Save your module.

TIP  Did you know you can copy an operator and paste it into a different Data Workflow? You'll use the same steps outlined above.

Removing a Branch Split Operator

Lastly, you can delete this operator from your Data Workflow canvas. You can also use these same steps to delete a connection between two operators.

1. Hover over the Data Workflow component.

A 5-button toolbar displays above the component on hover-over.

2. Click the (Settings) button to open the Data Workflow canvas.
3. Click the operator you want to delete.
4. On your keyboard, press Delete.

NOTE  Once you delete this operator, make sure to connect your remaining operators. If your Data Workflow path doesn't end with an Output or Console operator, your Data Workflow won't work. So, once you delete an operator, make sure to update any remaining paths to end at an Output or Console operator.

5. Click Save.
6. Save your module.

Lab

You can view this complete use case here: https://training.unqork.io/#/form/604bd29c75657f0373bb3a25/edit.