Create Value Operator
Overview
The Create Value operator generates a new data value in a Data Workflow component in the form of the following data types:
Most often, you'll use this operator in tandem with a logic component. For example, to create a value of GO to trigger a Plug-In or Calculator component.
The Create Value operator serves as the start of your Data Workflow and does not have an input port. It also includes an argument for determining the value it creates. Connect another operator to the Create Value operator's argument port. Then, in the Expression/Value field, use the _arg value to reference that value.
You can find the Create Value operator under the I/O group to the left of your Data Workflow canvas.
About the Info Window
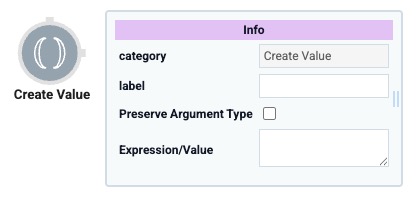
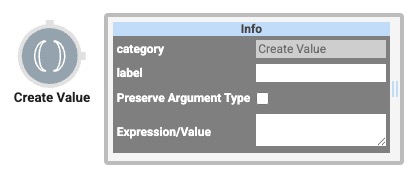
Learn more about each setting in the Create Value operator's Info window:
|
Setting |
Description |
|---|---|
|
Category |
Grayed out and non-adjustable setting indicating the operation type. |
|
Label |
Sets the label for your operator, displaying below the operator on your Data Workflow canvas. This field is optional, but set a label if you use more than one of the same operator type. A label helps you identify your operators without opening any Info windows. |
|
Preserve Argument Type |
When selected, this setting ensures the argument data type is respected when the operator executes. |
|
Expression/Value |
Sets the value to create and pass to another operator. You can create a number The Number data type accepts integer or floating point values. The number data type does not use quotes around numerical values., string A string is an object that represents a sequence of characters. Strings typically hold data represented in text form., or Boolean The Boolean data type accepts one of two values: true, or, false. value. To create a number, enter the number here. To create a string, enter the string here, surrounded by single quotes. To create a Boolean, enter either TRUE or FALSE. |
Adding a Create Value Operator
To demonstrate a Create Value operator, configure a Data Workflow to create a value of 2 and send it to a Hidden component.
These instructions assume that you have a new module open, saved, and with a title.
Configure the Hidden Component
Before you can add your Data Workflow, you'll configure a Hidden component to store its output.
| 1. | In the Module Builder, drag and drop a Hidden component onto your canvas. |
| 3. | Click Save Component. |
Configure the Data Workflow Component
Configure a Data Workflow component to create and send a numerical value to the Hidden component.
| 1. | Drag and drop a Data Workflow component onto your canvas, placing above the valueOutput Hidden component. |
| 2. | In the Property ID A Property ID is the unique field ID used by Unqork to track and link components in your module. field, enter dwfCreateValue. |
Configure the Create Value Operator
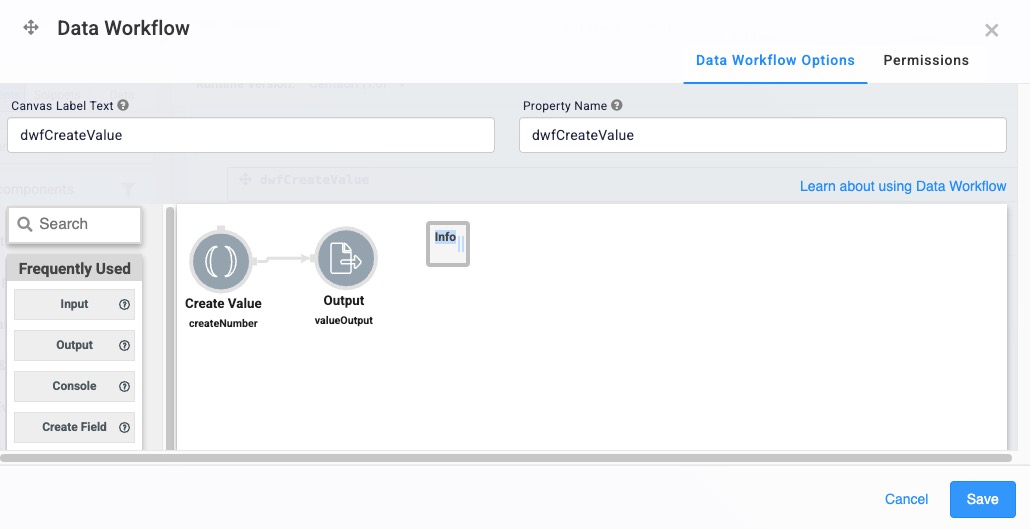
Configure a Create Value operator to create a value of 2.
| 1. | Drag and drop a Create Value operator onto your Data Workflow canvas. |
| 2. | Configure the operator's Info window as follows: |
| Info | |
|---|---|
|
Category |
Create Value |
|
Label |
createNumber |
|
Preserve Argument Type |
☐ (unchecked) |
|
Expression/Value |
2 |
Configure the Output Operator
Configure an Output operator to send the new value to the Hidden component.
| 1. | Drag and drop an Output operator onto your Data Workflow canvas. |
| 2. | Configure the operator's Info window as follows: |
| Info | |
|---|---|
|
Category |
Output |
|
Component |
valueOutput |
|
Action |
Value |
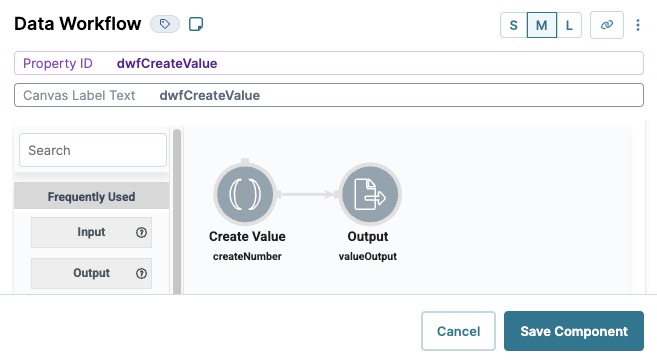
| 3. | Connect the output port (right) of the Create Value operator to the input port (left) of the Output operator. |
| 4. | Click Save Component. |
Here's how the completed Data Workflow looks:
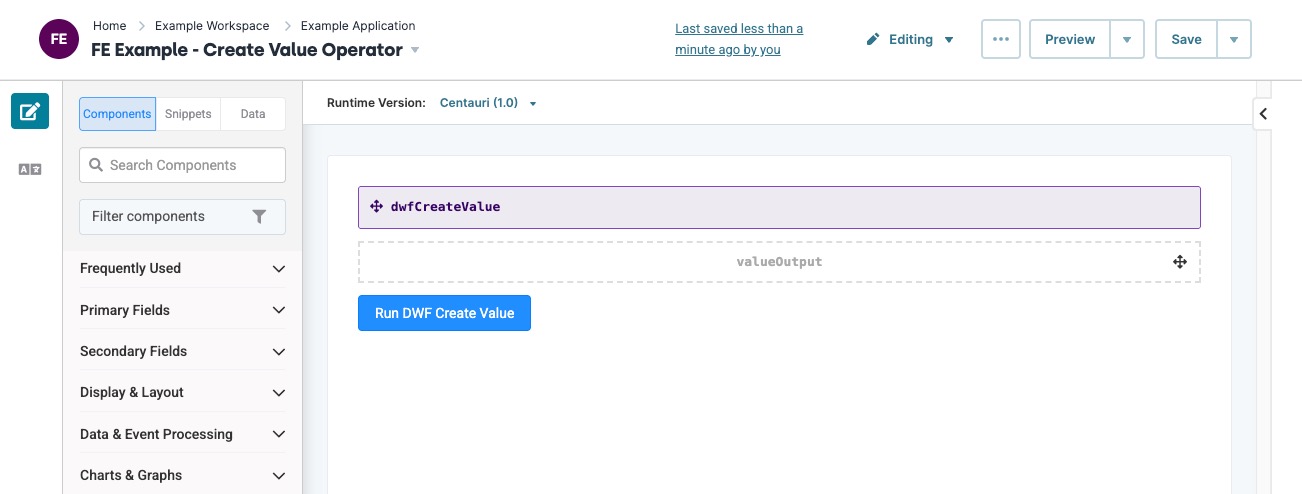
Configure the Button Component
Lastly, configure a Button component to trigger the Data Workflow.
| 1. | Drag and drop a |
| 2. | In the Property ID A Property ID is the unique field ID used by Unqork to track and link components in your module. field, enter btnTrigger. |
| 3. | In the Label Text Label Text conveys what the input component is and what information it displays. Enter the purpose of the corresponding component or field. field, enter Run DWF Create Value. |
| 4. | Set the Action Type to Event. |
| 5. | In the On Click field, enter or select dwfCreateValue. |
| 6. | Click Save Component. |
| 7. | Save your module. |
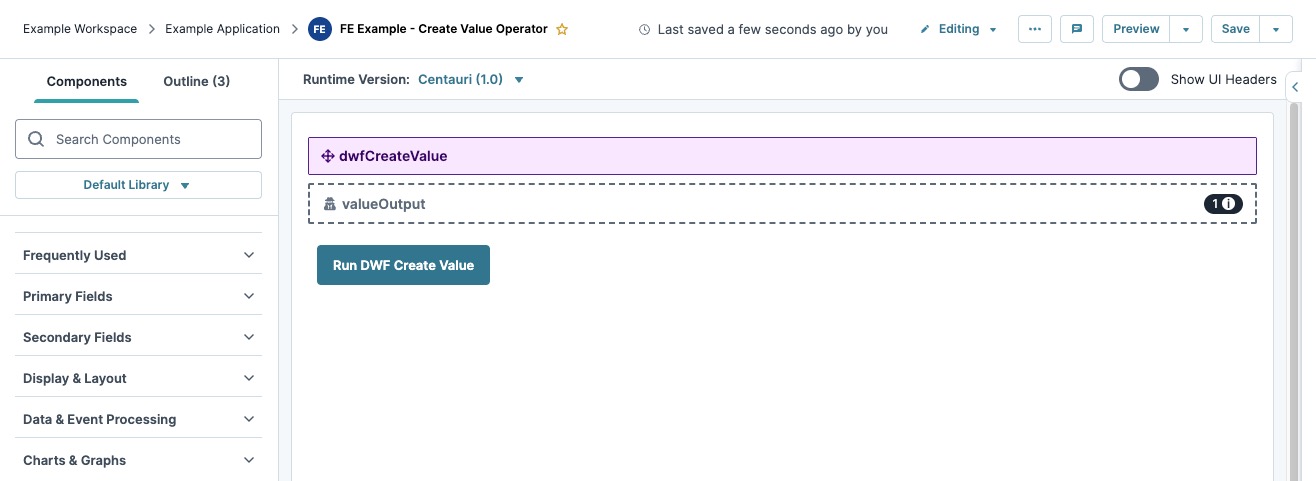
Here's how the completed use case looks in the Module Builder:
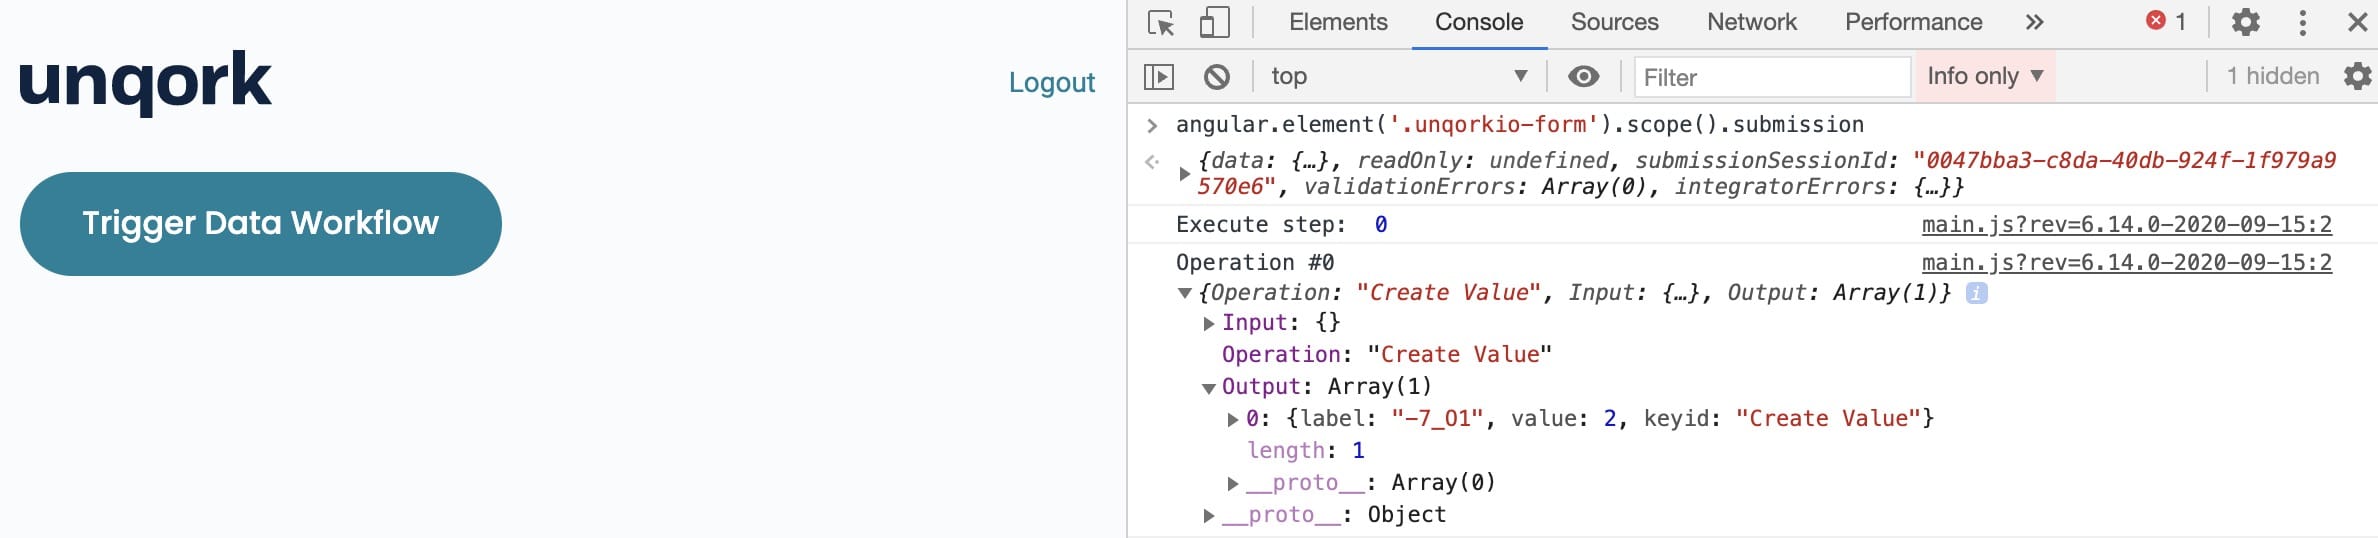
Preview your module in Express View Express View is how your end-user views your application. Express View also lets you preview your applications to test your configuration and view the styling. This is also the view your end-users will see when interacting with your application. After configuring a module, click Preview in the Module Builder to interact with the module in Express View. and click Trigger Data Workflow. Then, open the DevTools Console The DevTools Console helps you securely store, build, test, and deploy your software. and run the Angular command The Angular command, or data command, is a tool that displays submission data in a browser's developer console. In Express View, enter the following command in the devtool console: angular.element('.unqorkio-form').scope().submission. You'll see the valueOutput Hidden populates with a value of 2.
Overview
The Create Value operator generates a new data value in a Data Workflow component in the form of the following data types:
Most often, you'll use this operator in tandem with a logic component. For example, to create a value of GO to trigger a Plug-In or Calculator component.
The Create Value operator serves as the start of your Data Workflow and does not have an input port. It also includes an argument for determining the value it creates. Connect another operator to the Create Value operator's argument port. Then, in the Expression/Value field, use the _arg value to reference that value.
You can find the Create Value operator under the I/O group to the left of your Data Workflow canvas.
About the Info Window
Learn more about each setting in the Create Value operator's Info window:
|
Setting |
Description |
|---|---|
|
Category |
Grayed out and non-adjustable setting indicating the operation type. |
|
Label |
Sets the label for your operator, displaying below the operator on your Data Workflow canvas. This field is optional, but set a label if you use more than one of the same operator type. A label helps you identify your operators without opening any Info windows. |
|
Preserve Argument Type |
When selected, this setting ensures the argument data type is respected when the operator executes. |
|
Expression/Value |
Sets the value to create and pass to another operator. You can create a number The Number data type accepts integer or floating point values. The number data type does not use quotes around numerical values., a string A string is an object that represents a sequence of characters. Strings typically hold data represented in text form., or a Boolean The Boolean data type accepts one of two values: true, or, false. value. To create a number, enter the number here. To create a string, enter the string here, surrounded by single quotes. To create a Boolean, enter either TRUE or FALSE. |
Adding a Create Value Operator
To demonstrate a Create Value operator, configure a Data Workflow to create a value of 2 and send it to a Hidden component.
These instructions assume that you have a new module open, saved, and with a title.
Configure the Hidden Component
Before you can add your Data Workflow, you'll configure a Hidden component to store its output.
| 1. | Drag and drop a Hidden component onto your canvas. |
| 3. | Click Save & Close. |
Configure the Data Workflow Component
Configure a Data Workflow component to create and send a numerical value to the Hidden component.
| 1. | Drag and drop a Data Workflow component onto your canvas, placing above the valueOutput Hidden component. |
Configure the Create Value Operator
Configure a Create Value operator to create a value of 2.
| 1. | Drag and drop a Create Value operator onto your Data Workflow canvas. |
| 2. | Configure the operator's Info window as follows: |
| Setting | Value |
|---|---|
|
Category |
Create Value |
|
Label |
createNumber |
|
Preserve Argument Type |
☐ (unchecked) |
|
Expression/Value |
2 |
Configure the Output Operator
Configure an Output operator to send the new value to the Hidden component.
| 1. | Drag and drop an Output operator onto your Data Workflow canvas. |
| 2. | Configure the operator's Info window as follows: |
| Setting | Value |
|---|---|
|
Category |
Output |
|
Component |
valueOutput |
|
Action |
Value |
| 3. | Connect the output port (right) of the Create Value operator to the input port (left) of the Output operator. |
| 4. | Click Save. |
Here's how the completed Data Workflow looks:
Configure the Button Component
Lastly, configure a Button component to trigger the Data Workflow.
| 1. | Drag and drop a |
| 2. | In the Property ID A Property ID is the unique field ID used by Unqork to track and link components in your module. field, enter btnTrigger. |
| 3. | In the Label Text Label Text conveys what the input component is and what information it displays. Enter the purpose of the corresponding component or field. field, enter Run DWF Create Value. |
| 4. | Set the Action Type to Event. |
| 5. | In the On Click field, enter or select dwfCreateValue. |
| 6. | Click Save & Close. |
| 7. | Save your module. |
Here's how the completed use case looks in the Module Builder:
Preview your module in Express View Express View is how your end-user views your application. Express View also lets you preview your applications to test your configuration and view the styling. This is also the view your end-users will see when interacting with your application. After configuring a module, click Preview in the Module Builder to interact with the module in Express View. and click Trigger Data Workflow. Then, open the DevTools Console The DevTools Console helps you securely store, build, test, and deploy your software. and run the Angular command The Angular command, or data command, is a tool that displays submission data in a browser's developer console. In Express View, enter the following command in the devtool console: angular.element('.unqorkio-form').scope().submission. You'll see the valueOutput Hidden populates with a value of 2.
