Introduction to the Query Builder
This feature is currently in production early-access. Functionality is subject to change as this feature is prepared for general access.
Overview
The Query Builder tool enables Creators Also known as Unqork Users, or Designer Users; is anyone who is inside the Unqork platform. and administrators to target specific data captured by their applications. The Query Builder is similar to a SQL SQL (Structured Query Language) is language used in programming and designed for managing data contained in a relational database system. builder tool in that you create a logic statement to retrieve specific information from a database. The information can then be retrieved into a module using a Plug-In component.
Query Builder is optimized for accessing data stored against Data Model schemas, reducing the need to build complex data workflows for targeting and retrieving data.
Benefits of the Query Builder Tool
Retrieving data from an unstructured or large database can be a slow and inefficient process. In Unqork, utilizing Data Models and the Query Builder tool lets you retrieve and analyze data using SQL-like queries A query lets you retrieve, access, manipulate, and delete data in a database.. With the Query Builder, you build queries using logical and comparison operators on data fields. Then, you can reference these queries in a Plug-In component to retrieve data to display in a Table or Grid component.
Benefits include the following:
-
A simple-to-use interface for building and refining queries.
-
Quickly build queries using logical and comparison operators to retrieve specific data without the need for complex data workflows.
-
Optimize data retrieval time by targeting only the data you need.
-
Easily refer to prebuilt queries using the Plug-In component in a module.
To learn more about the Query Builder, click each of the tabs below:
Navigating the Query Builder Tool
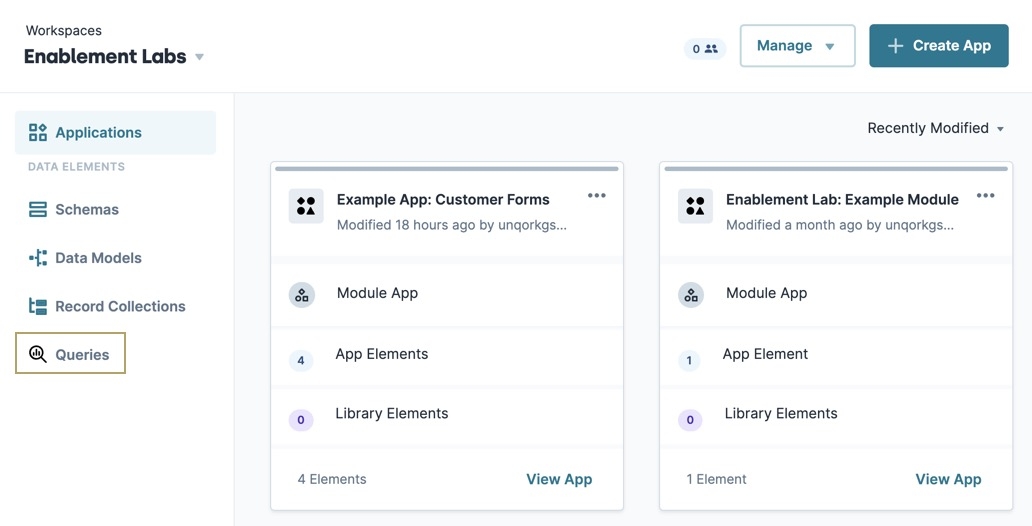
The Query Builder tool is located at the Workspace level of your environment, under Data Elements to the left of the Workspaces page.
The Query Builder tool requires Designer Administrator access to use.
Accessing the Query Builder Tool
To access the Query Builder from the homepage:
| 1. | Navigate to and select a Workspace. |
| 2. | From the left-side menu, under Data Elements, select Queries. |
Navigating the Queries Page
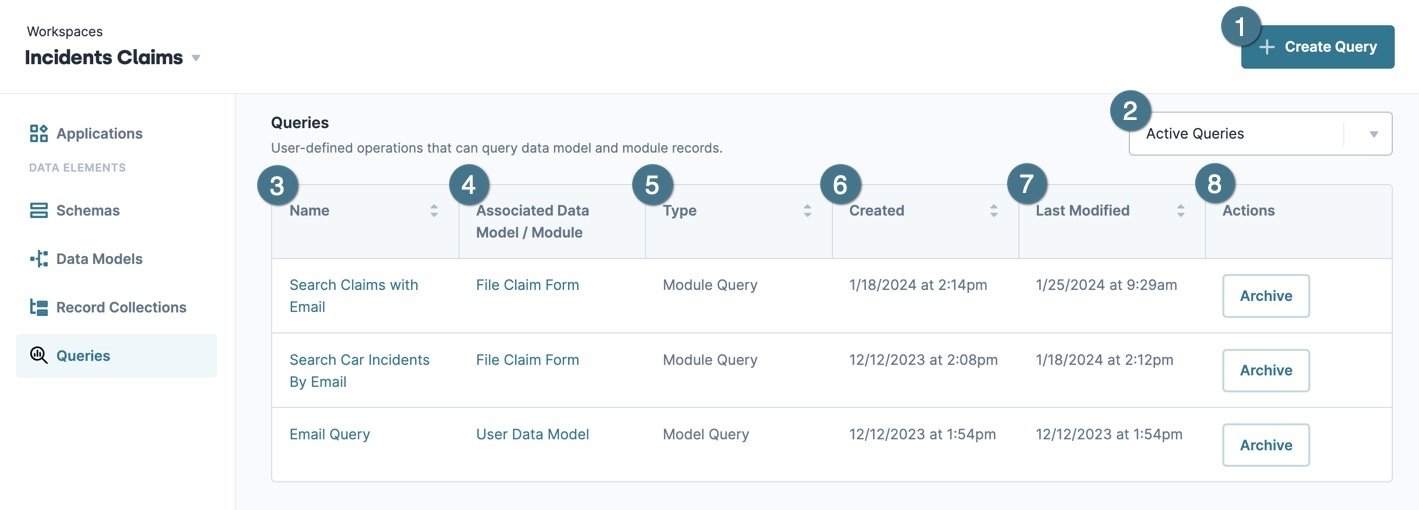
The Queries page displays a list of all active and archived queries in the workspace. From this page, you can create a new query and review, modify, or delete an existing one.
|
Setting |
Description |
|
|---|---|---|
|
1 |
+ Create Query |
Click to open the Create New Query page. |
|
|
Queries |
Displays a list of queries that exist in the workspace. |
|
2 |
Active Queries |
Sorts between active queries and archived queries.
|
|
3 |
Name |
The name of the query. Click to view the query's logic page. |
|
4 |
Associated Data Model / Module |
The associated Data Model or module the query is using. Click to open the Data Model or module on a new page. |
|
5 |
Type |
Displays if the query is targeting submission data Also known as Record Data. Submission data consists of information saved by Unqork components. View submission data by using the angular command, or in Record Collections. from a module or Data Model. |
|
6 |
Created |
The date and time when the query was created. This value is permanent and cannot be changed. |
|
7 |
Last Modified |
The date and time the query was last edited. This value changes whenever a query's logic is modified. |
|
8 |
Actions |
Click Archive to display a confirmation modal A modal is a window that appears on top of the content you are currently viewing.. Click Yes, Archive to move the query to the Archived Queries list. Archived queries can be modified, but cannot be used in a Plug-In component. To restore an archived query, set Active Queries to Archived Queries, then click Restore in the row of the query you want to restore. |
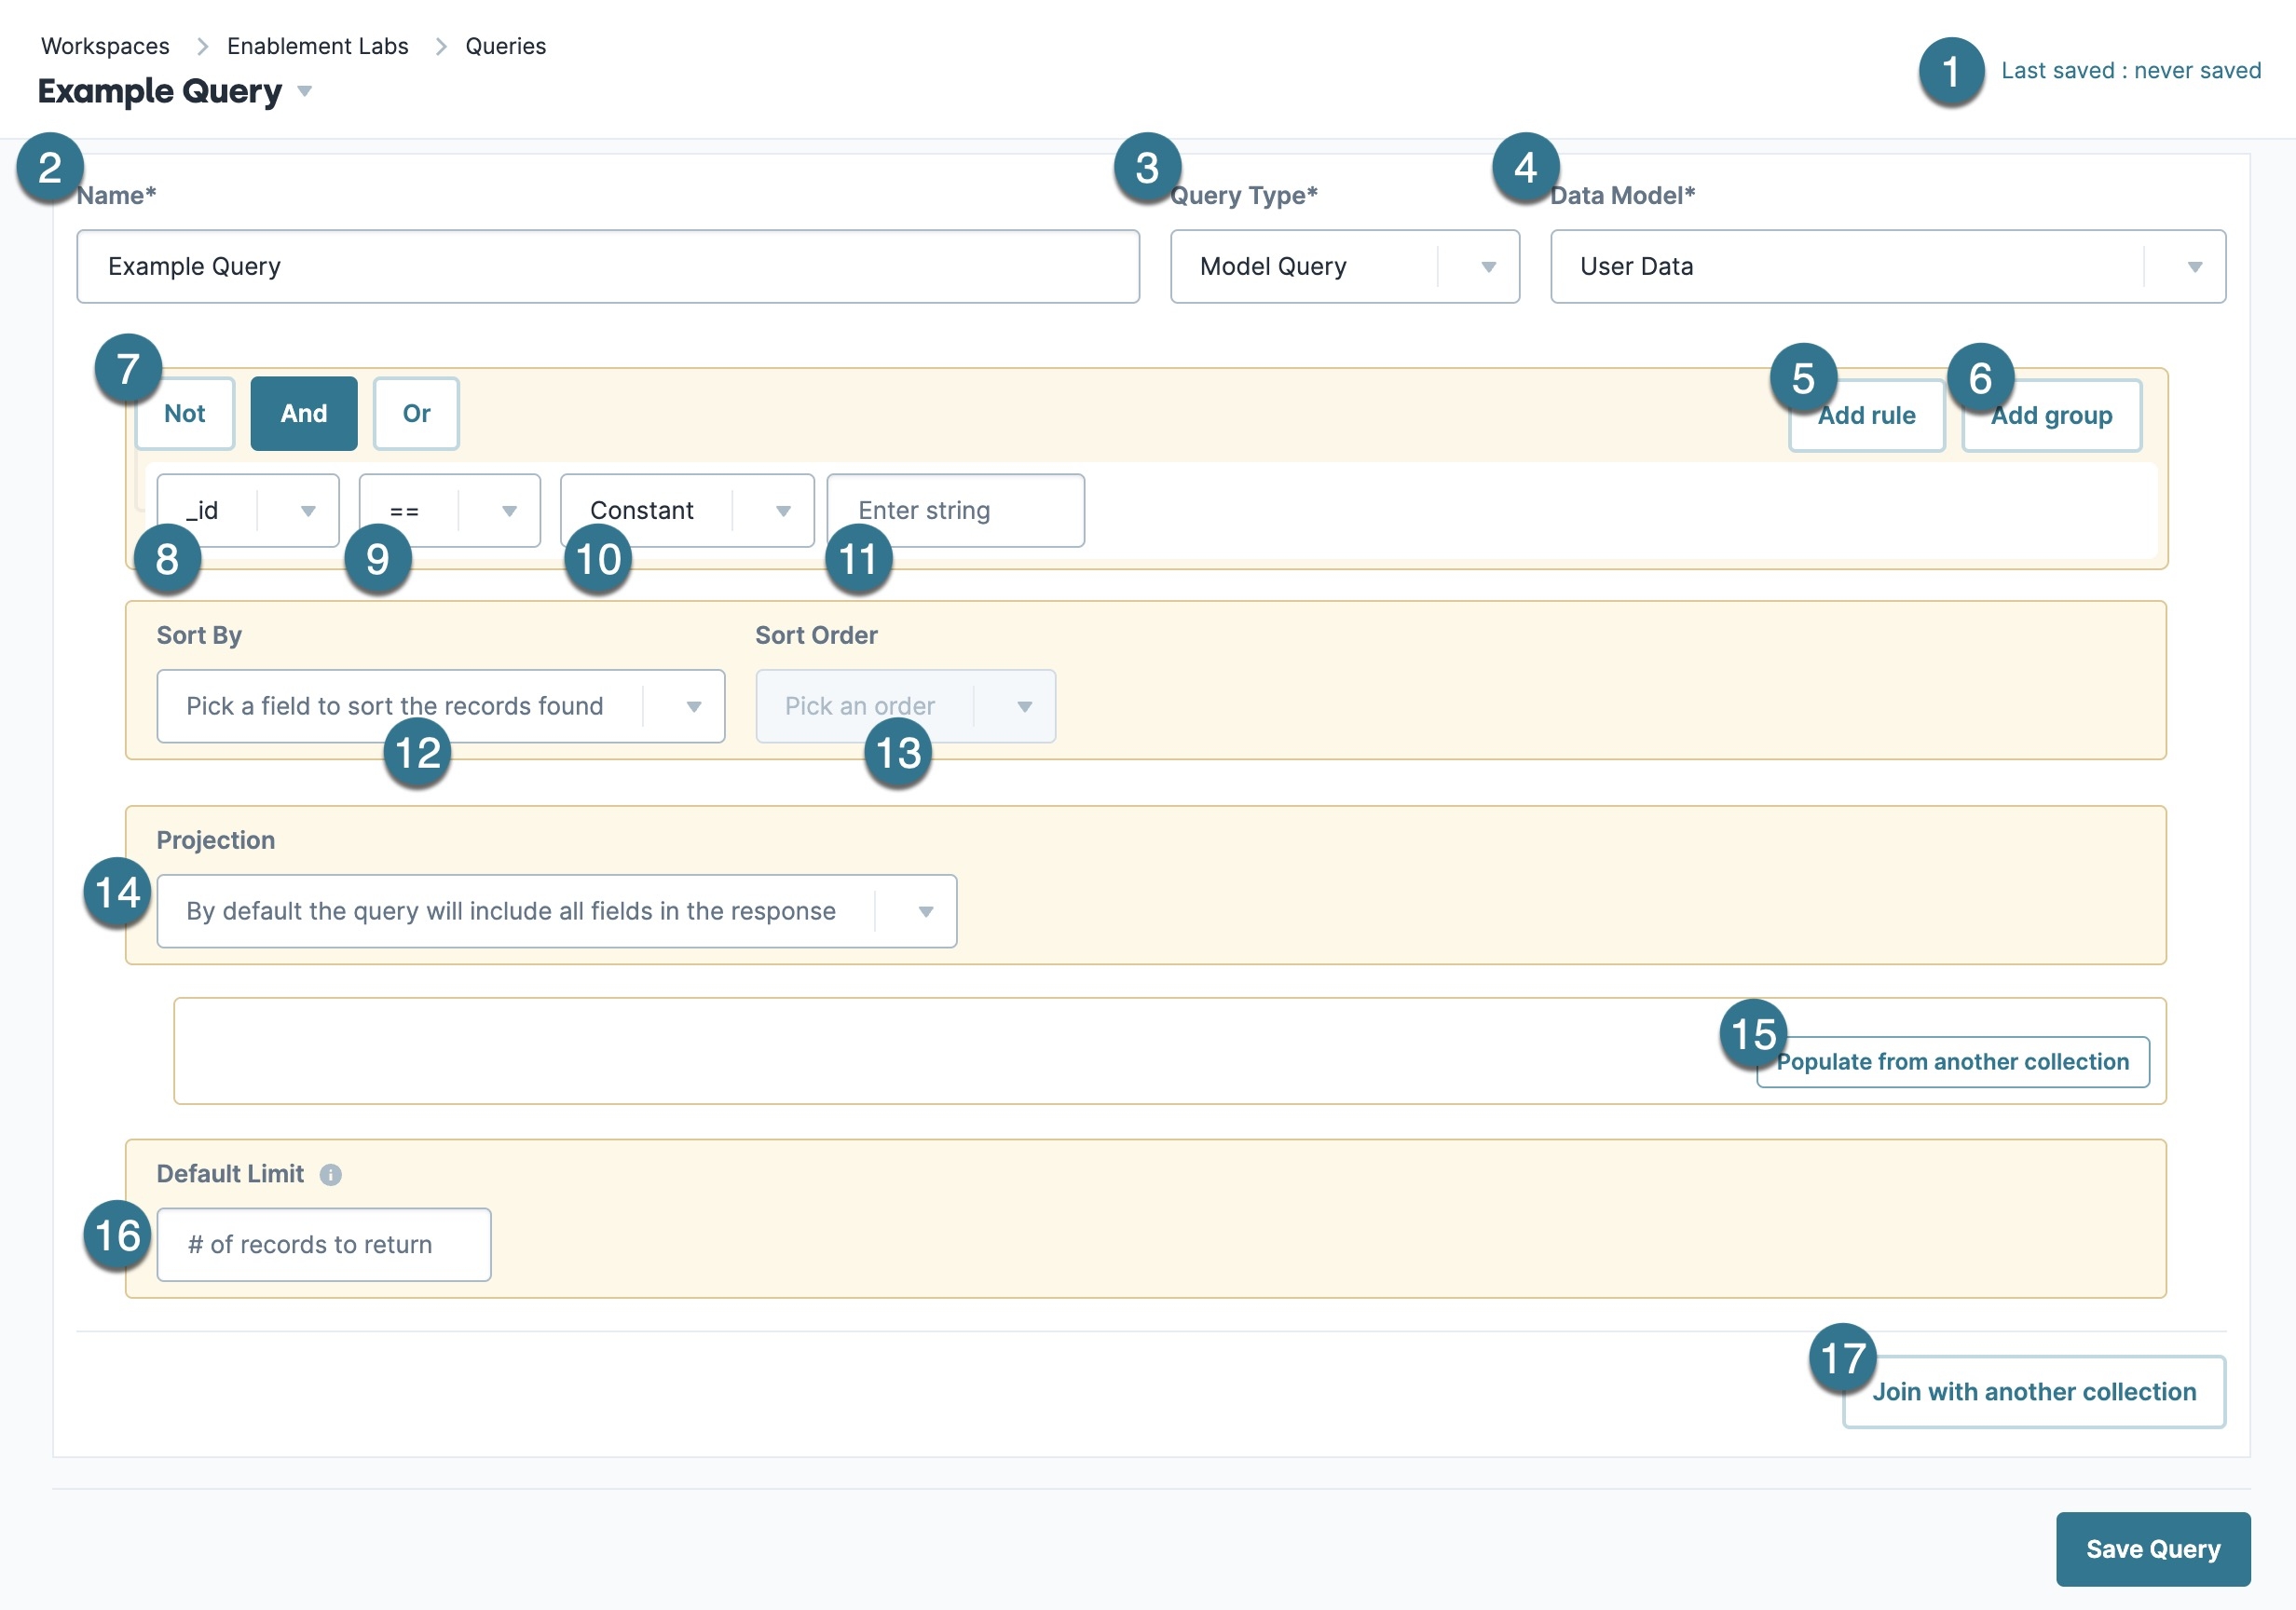
Navigating the Create New Query Page
|
Setting |
Description |
|
|---|---|---|
|
1 |
Last saved |
Displays the date and time the query was saved. If it is a new query, then it displays never saved. |
|
2 |
Name* |
Enter a name for the query. *This field is required to create a query. |
|
3 |
Query Type* |
Choose to query a Data Model or Submission Data. *This field is required to create a query. |
|
4 |
Data Model / Module* |
The associated Data Model or module the query is using. Click to open the Data Model or module on a new page. *You must select a Data Model or module to create a query. |
|
5 |
Add Rule |
Creates a rule object inside the group object. The rule applies when querying the Data Model or module. Rules contain query parameters and logical operators that filter the Data Model or module's records. |
|
6 |
Add Group |
Creates a group object inside of the original group. Each group can apply a different set of logical operators and contain rules. Groups can also contain another group. |
|
7 |
Logical Operators |
Logical operators are used to combine or manipulate the group conditions in a query. The Query Builder supports the following logical operators: Not: Used to give the opposite result. For example, returning results for all clients that do NOT live in Canada. And: Filters results on more than one condition. For example, returning results for all country names AND customer names that begin with the letter S. Or: Filters results on one or more condition. For example, returning results for all clients from Canada OR Mexico. |
|
8 |
Field |
Searches against record or data fields. Data Model data fields are defined in the model's schema. Submission Query data fields are defined in the module's submission data. The Query Builder tool's Submission Query fields are determined using the last 1,000 submissions. Modifying field IDs in a module might result in an older ID becoming unavailable in the Query Builder tool. Queries can also search against record details, like the record ID, creation date, and so on. Submission Query record details include:
Model Query record details include:
|
|
9 |
Comparison operators test the field against the constant string or variable name. Available comparison operators include:
|
|
|
10 |
Constant or Variable |
Choose if the field is a constant or a variable. Constants are predefined values and variables are passed into the query from the Plug-In component's API APIs (application programming interfaces) are a set of protocols and definitions developers use to build and integrate application software. APIs act as the connective tissue between products and services. call. |
|
11 |
Constant String or Variable Name |
The value of the constant or variable to filter by. |
|
12 |
Sort By |
When the query executes, choose what field the returned data sorts by. |
|
13 |
Sort Order |
When the query executes, choose the sorting order of the returned data. |
|
14 |
Projection |
Choose which fields to include in the response. By default, this setting includes all fields in the response. |
|
15 |
Populate From Another Collection |
Select an additional Data Model's data to include in the query. Only Data Model collections are supported at this time. |
|
16 |
Default Limit |
Specify how many records are retrieved per query. The default maximum amount of records retrieved at a time is 50. |
|
17 |
Join With Another Collection |
Include two or more data sets based on a related field. |
Create and Use a Query
This example assumes you have a Data Model and some submission records to query against. For this example, the Data Model contains the fields firstName and lastName. Let's create a simple Data Model query that targets the lastName field. Then, use a Plug-In component to execute the query and display it in a ViewGrid component.
What You Need
To configure a query, you need the following:
- 1 Workspace with Administrator access
- 1 Data Model
- 1 Module
Creating a Query
To learn more about using Schemas and Data Models, view our Introduction to Data Modeling article.
To create a query targeting a field called lastName:
| 1. | Navigate to the Workspace page of an application that has your Data Model and records data. |
Creator Administrator access is required to access the Data Model and Query Builder pages.
| 2. | Select Queries to the left of the page. |
| 3. | Click + Create Query. |
| 4. | In the Name* field, enter Last Name Query. |
| 5. | From the Query Type* drop-down, select Model Query. The Data Model* drop-down displays. |
| 6. | From the Data Model* drop-down, select the Data Model that contains the field you want to target. |
| 7. | Click Add Rule. The Not, And, Or, and Select Field options display. |
| 8. | From the Select Field drop-down, select the lastName field. |
The lastName field is specific to this example, but you can choose any field that is available in the Data Model.
| 9. | From the == (Comparison Operators) drop-down, choose operators to test the field against. |
| 10. | Change the Constant drop-down to Variable. |
| 11. | In the Variable Name field, enter lastName. |
| 12. | Click Save Query. The query Id field displays next to the query Name* field. You'll use the Id to execute the query in a Plug-In component. |
Improperly configured queries produce Status Code 500 - Server Error Response in the Express View Express View is how your end-user views your application. Express View also lets you preview your applications to test your configuration and view the styling. This is also the view your end-users will see when interacting with your application. After configuring a module, click Preview in the Module Builder to interact with the module in Express View.DevTools Console The DevTools Console helps you securely store, build, test, and deploy your software..
Create a Last Name Search Dashboard
Build a dashboard to search for last names using the query you built in the Creating a Query steps. To build a dashboard, create a module in the same workspace as the query.
What You Need
To configure this module, you need:
Configure the Text Field Component
This Text Field component lets end-users End-users, also known as Express Users, are the individuals accessing an application through Express View. In most cases, end-users are the customers using the product. enter last names to filter by.
| 1. | In the Module Builder, drag and drop a Text Field component onto the canvas. |
| 2. | In the Property ID A Property ID is the unique field ID used by Unqork to track and link components in your module. field, enter searchLastName. |
| 3. | In the Label Text Label Text conveys what the input component is and what information it displays. Enter the purpose of the corresponding component or field. field, enter Enter a Last Name. |
| 4. | Click Save Component. |
Configure the Button Component
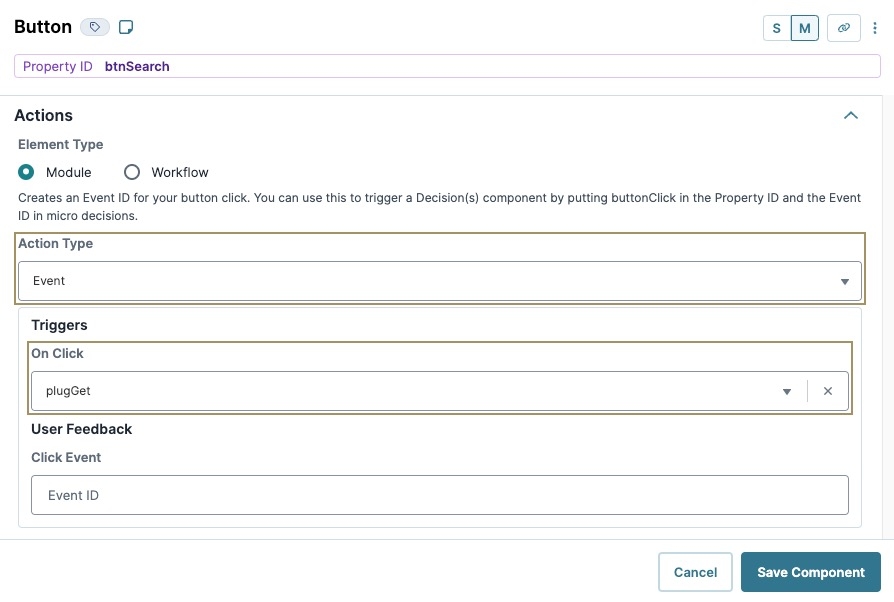
The Button component triggers the Plug-In component to use the query with the searchLastName Text Field component's value as its input.
| 1. | Drag and drop a |
| 2. | In the Property ID A Property ID is the unique field ID used by Unqork to track and link components in your module. field, enter btnSearch. |
| 3. | In the Label Text Label Text conveys what the input component is and what information it displays. Enter the purpose of the corresponding component or field. field, enter Search. |
| 4. | Navigate to the Actions settings. |
| 5. | Set the Action Type to Event. |
| 6. | In the On Click field, enter plugGet. You'll build the plugGet Plug-In component in the next step. |
| 7. | Click Save Component. |
Configure the Plug-In Component
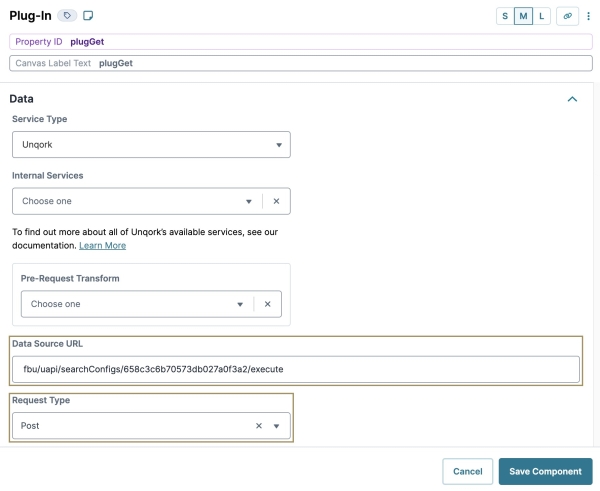
This Plug-In component targets the searchConfigs endpoint using a Post Request Type. You'll refer to the Query ID created during the Creating a Query steps.
| 1. | Drag and drop a Plug-In component onto your canvas, placing it below the btnSearch |
| 2. | In the Property ID A Property ID is the unique field ID used by Unqork to track and link components in your module. field, enter plugGet. |
| 4. | In the Data Source URL field, enter fbu/uapi/searchConfigs/queryId/execute, where queryId is the value displayed on the query's parameters page. |
| 5. | Set the Request Type to Post. |
| 6. | In the Inputs table, enter the following: |
|
Property ID |
Mapping |
|
|---|---|---|
|
1 |
searchLastName |
lastName |
| 7. | Navigate to the Actions settings. |
| 8. | In the Post Trigger field, enter dwfSet. You'll build the dwfSet Data Workflow component next. |
| 9. | Click Save Component. |
Configure the Data Workflow Component
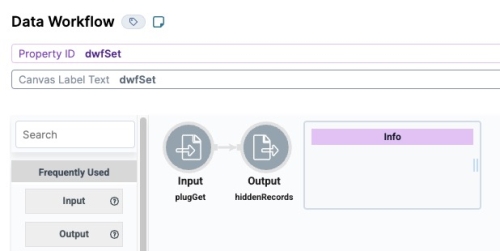
The Data Workflow component retrieves the data from the plugGet Plug-In component and sends it to a Hidden component so the ViewGrid component can reference it.
| 1. | Drag and drop a Data Workflow onto the canvas, placing it below the plugGet Plug-In component. |
| 2. | In the Property ID A Property ID is the unique field ID used by Unqork to track and link components in your module. field, enter dwfSet. |
| 3. | In the Label Text Label Text conveys what the input component is and what information it displays. Enter the purpose of the corresponding component or field. field, enter dwfSet. |
Configure the Input Operator
The Input operator brings the data from the plugGet Plug-In component into the Data Workflow component.
| 1. | Drag and drop an Input operator onto your Data Workflow canvas. |
| 2. | Configure the Input operator's Info window as follows: |
| Info | |
|---|---|
|
category |
Input |
|
Component |
plugGet |
|
required |
Yes |
|
source |
Default |
Configure the Output Operator
The Output operator sends the data to the hiddenRecords Hidden component to store it.
| 1. | Drag and drop an Output operator onto your Data Workflow canvas. |
| 2. | Configure the Output operator's Info window as follows: |
| Info | |
|---|---|
|
category |
Output |
|
Component |
hiddenRecords |
|
action |
value |
| 3. | Connect the output port (right) of the plugGetInput operator to the input port (left) of the hiddenRecords Output operator. |
| 4. | Click Save Component. |
Your completed Data Workflow looks like the following:
Configure the Hidden Component
The Hidden component stores the data retrieved from the Data Workflow component. The ViewGrid component uses the Hidden component to reference the query data.
| 1. | Drag and drop a Hidden component onto the canvas, placing it below the dwfSet Data Workflow component. |
| 2. | In the Property ID A Property ID is the unique field ID used by Unqork to track and link components in your module. field, enter hiddenRecords. |
| 3. | In the Label Text Label Text conveys what the input component is and what information it displays. Enter the purpose of the corresponding component or field. field, enter hiddenRecords. |
| 4. | Click Save Component. |
Configure the ViewGrid Component
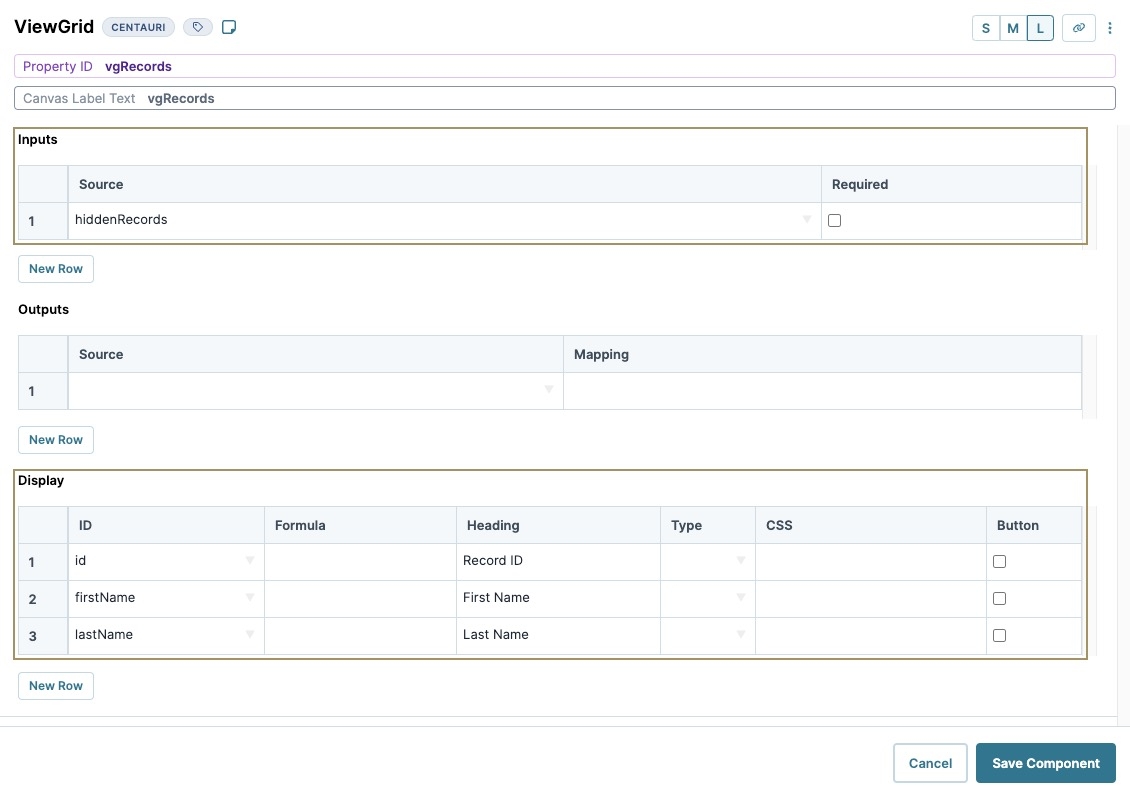
The ViewGrid component displays the data stored in the recordsHidden component.
| 1. | Drag and drop a  ViewGrid component onto the canvas, placing it below the hiddenRecords Hidden component. ViewGrid component onto the canvas, placing it below the hiddenRecords Hidden component. |
| 2. | In the Property ID A Property ID is the unique field ID used by Unqork to track and link components in your module. field, enter vgRecords. |
| 3. | In the Canvas Label Text Label Text conveys what the input component is and what information it displays. Enter the purpose of the corresponding component or field. field, enter vgRecords. |
| 4. | In the Inputs table, enter the following: |
|
id |
required |
|
|---|---|---|
|
1 |
hiddenRecords |
☐ (unchecked) |
| 5. | In the Display table, enter the following: |
|
id |
formula |
heading |
|
|---|---|---|---|
|
1 |
id |
|
Record ID |
|
2 |
firstName |
|
First Name |
|
3 |
lastName |
|
Last Name |
| 6. | Navigate to the Actions settings. |
| 7. | In the Action field, enter null. |
| 8. | Click Save Component. |
| 9. | Save your module |
Preview your module in Express View Express View is how your end-user views your application. Express View also lets you preview your applications to test your configuration and view the styling. This is also the view your end-users will see when interacting with your application. After configuring a module, click Preview in the Module Builder to interact with the module in Express View.. You'll see the following functionality:
Best Practices
-
Query Builder is most effective when querying Data Models with large sets of data.
Resources

