VCS: Branch Details View
Early Access VCS Articles
|
Overview
In Unqork's VCS Unqork Version Control, also known as source control, is a system used to track and manage changes to modules and applications. (version control system), the Branch Details view displays all information related to a branch A branch is a copy of modules in an Unqork application that helps Creators work in parallel. Branching an application can seperate in-progress changes from release-ready modules. of an application In Unqork an application is a program used to perform specific tasks. An application can be one of two types: workflow or module.. From this view, Creators Also known as Unqork Users, or Designer Users; is anyone who is inside the Unqork platform. assigned to roles in a branch can access the Module Builder for branched modules, create Pull Requests, see a history of changes, and review all participants in the branch.
To learn how to create a branch in a VCS-controlled application, view our VCS: Create a Branch article.
The Branch Details view is divided into four parts:
-
Modules: Displays a list of modules branched from the Main Branch The Main Branch (or Main Modules) consists of a core set of modules for an application. The Main Branch's modules can only be modified by creating a seperate branch.. Creators with the Contributor The VCS (version control system) Contributor role has permissions to edit modules in a branch. Set contributors during the VCS Create a Branch process. or Owner The VCS (version control system) Owner role is the user who creates a new branch. The VCS owner decides what parts of an application are to be modified in a branch, and assigns roles to users for the branch. roles can edit modules from this page.
-
Pull Request: If a Pull Request A Pull Request, also known as a Merge Request, is a VCS event that indicates the contributor is ready for their branch changes to be reviewed by an Approver, then merged into the main branch. is active, this page displays the modules submitted for review, any activity in the request, and Commit History. Creators with the Approver The VCS (version control system) Approver role is the user who reviews and approves branch changes submitted in a Pull Request. The VCS Approver verifies all changes are compatible with the Main Branch. role can approve or reject changes submitted in a Pull Request.
-
Branch Activity: Tracks major changes to the branch, including creation, branch setting changes, pull requests, comments, and more.
-
Participants: Lists Creators and their roles in the branch.
The Branch Details view also provides role-specific access to the following features:
-
Edit Branch: Owners can adjust the details and what modules are being changed in the branch.
-
Comment Panel: Participants can read or add comments on the branch, Pull Requests, individual modules, or components.
-
Preview Branch: Participants can preview branch changes and see how the changes interact with main modules not included in the branch.
-
Create Pull Request: Owners and Contributors can submit the branch for review in a Pull Request.
What You'll Learn
After completing this article, you’ll know how to access and navigate the Branch Details view.
Accessing the Branch Details View
Access the Branch Details view from the application tile or the Version Control Dashboard. To access an application's branch, Creators must be assigned to the application's workspace and assigned a branch role.
To learn about enabling VCS for an application, see our How To: Enable Application Version Control article.
To access Branch Details view for a VCS-enabled application:
| 1. | From the Workspaces view, select a workspace tile. |
| 2. | Locate a VCS-enabled application. VCS apps display the VCS icon in the tile's header. |
| 3. | Click the application tile's name, or click View App in VCS. |
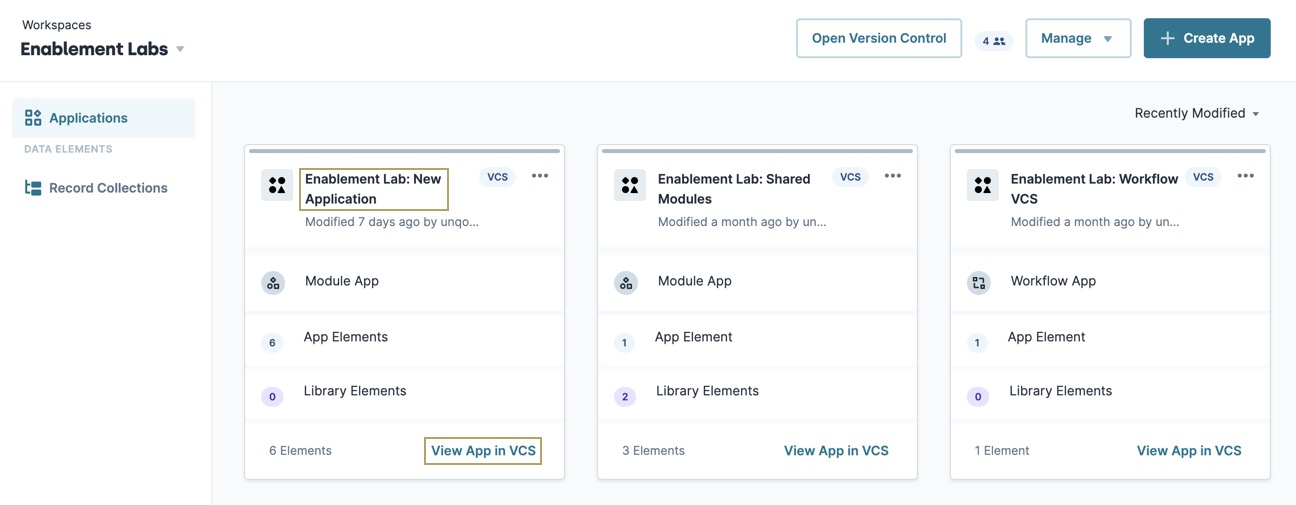
(click image to enlarge)
| 4. | If required, enter your UDLC credentials to log into the VCS tool. The App Details' Branches page displays. |
| 5. | From the Branches list, click the name of a branch. The Branch Details Modules page displays. |
Creators must be assigned a role in a branch to see it in the Branches list. The branch Owner can add Creators to roles in a branch by editing the branch settings.
To access App Details View using the Version Control Dashboard:
| 1. | From the Workspaces view, select a workspace tile. |
| 2. | Click Open Version Control. |
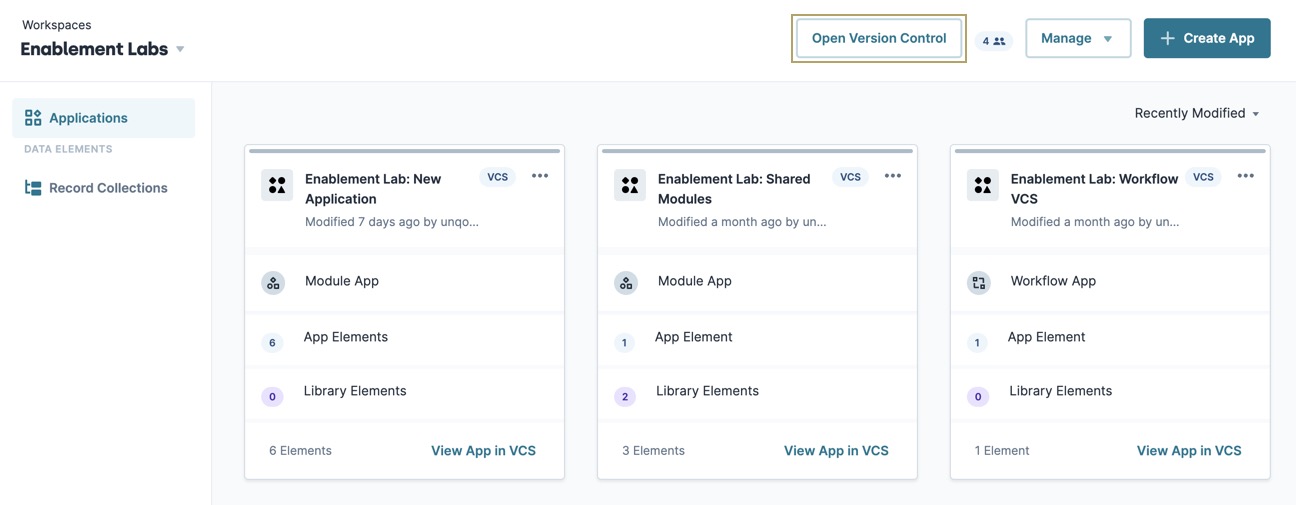
(click image to enlarge)
| 3. | If required, enter your UDLC credentials to log into the VCS tool. |
| 4. | From the Version Control Dashboard, search for or select your application's name from the list. The App Details' Branches page displays. |
Branch Details Header
The Branch Details header provides a high-level view of the branch's current state. As the branch moves through each state, the buttons change to match the current event. Branch states include Work in Progress, Pending Review, and Approved.
Work In Progress Header
The WORK IN PROGRESS header is the starting state for a branch. In this state, Owners can use the settings button to modify the branch details, Contributors or Owners can create a Pull Request, and everyone can preview the current branch changes. The Work in Progress header changes to the Pending Review header after submitting a Create Pull Request.

| Settings | Descriptions |
|---|---|
|
(Comments) |
Opens the Comments panel for the Branch. |
|
... (Settings) |
Opens the settings drop-down. Options include:
|
|
Preview Branch |
Opens the Preview Branch modal. From this modal, you can search and filter for a specific module to act as the Entrypoint for the preview. |
|
+Create Pull Request |
Opens the Create Pull Request page. This button does not display for users with Reviewer The VCS (version control system) Reviewer role is a user assigned to a branch for viewing changes made by Owners or Contributors. The VCS Reviewer role is passive and cannot modify the branch. or Approver The VCS (version control system) Approver role is the user who reviews and approves branch changes submitted in a Pull Request. The VCS Approver verifies all changes are compatible with the Main Branch. permissions. |
Pending Review Header
The PENDING REVIEW header, also known as the Pull Request header, displays when changes in the branch have been submitted for review to the Approver The VCS (version control system) Approver role is the user who reviews and approves branch changes submitted in a Pull Request. The VCS Approver verifies all changes are compatible with the Main Branch.. At this stage, the Approver approves or rejects changes made to modules in the branch. Then, they can approve or reject the branch changes using the Approve/Reject Pull Request button. The Pending Review header changes to the Approved header after an Approver accepts all changes in a Pull Request.
| Settings | Descriptions |
|---|---|
|
|
Opens the Comments panel for the Branch. |
|
Preview Branch |
Opens the Preview Branch modal. From this modal, you can search and filter for a specific module to act as the Entrypoint for the preview. |
|
Approve Pull Request... |
This button changes depending on the current status of the Pull Request. Only users with the Approver role can see this button. The state of this button changes depending on the Pull Request.
|
Approved Header
The APPROVED header, or Merge header, displays after an Approver reviews and approves all branch changes submitted in a Pull Request. While in the Approved stage, branches cannot be edited, and the settings cannot be changed. Clicking the Merge button sends branch changes to the Main Branch. Branch modules will replace their main module counterparts and close the branch.

| Settings | Descriptions |
|---|---|
|
(Comments) |
Opens the Comments panel for the branch. |
|
Preview Branch |
Opens the Preview Branch modal. From this modal, you can search and filter for a specific module to act as the Entrypoint for the preview. |
|
Merge... |
Opens the Merge modal and displays an optional comment field. Click the Merge button to submit all branch changes to the Main Branch. Only users with the Owner role have access to the merge button. |
Modules Page
The Modules page displays all modules added to the branch. The module list also includes new or restored modules and modules marked for deletion. From this page, Owners and Contributors can search for modules from the list, preview them, or access the Module Builder and Comment panel. Additionally, Owners can elect to modify the branch or create a Pull Request.
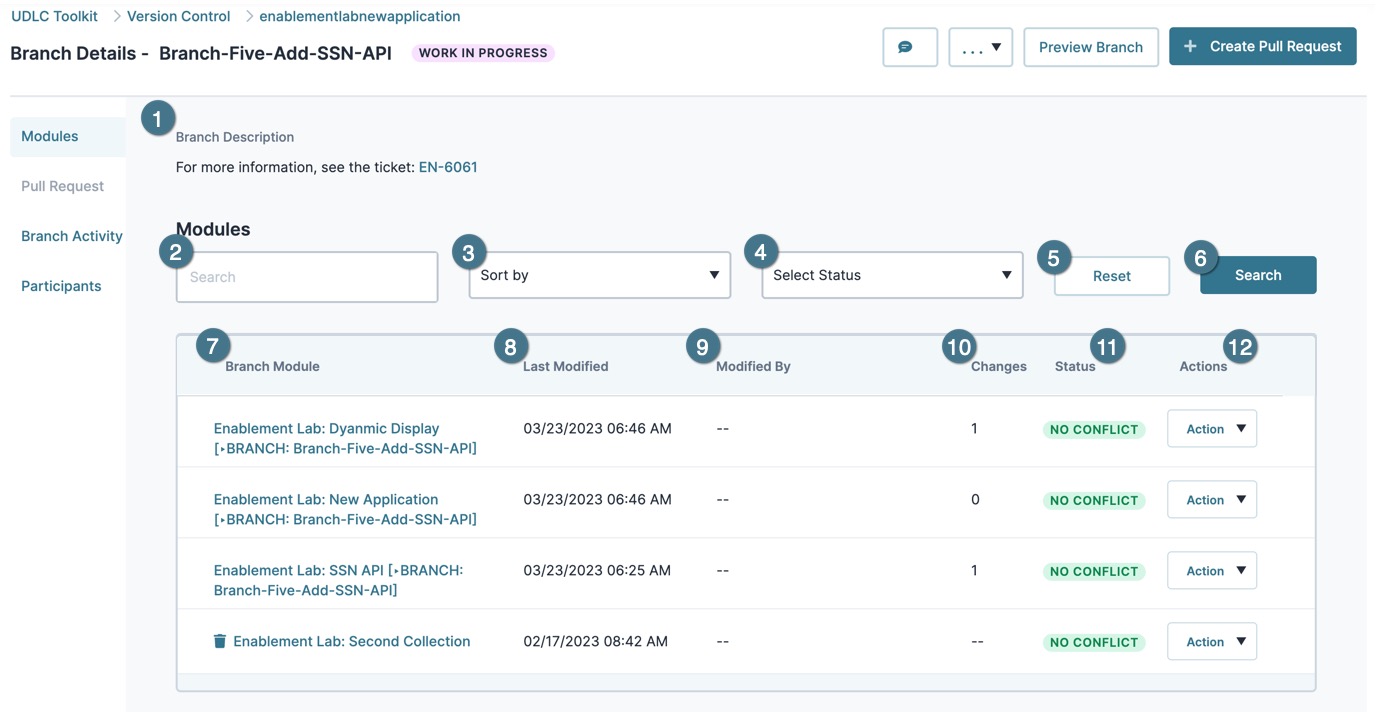
(click image to expand)
| Setting | Description | |
|---|---|---|
|
1 |
Branch Description |
The description of the branch. Inserting URLs converts them to hyperlinks when saved. JIRA URLs become hyperlinks and use the ticket value as the name. For example: https://{{yourCompany}}.atlassian.net/browse/EN-6061 becomes EN-6061. |
|
2 |
Search |
Enter all or part of a module's name to search for it. By default, the Search field is empty. |
|
3 |
Sort By |
Select the method to sort modules by when clicking the Search button. Sort options include:
By default, the Sort By drop-down is set to the Sort By option. |
|
4 |
Select Status |
Select the module status type to filter by when clicking the Search button. Options include:
By default, the Select Status drop-down is set to the Select Status option. |
|
5 |
Reset |
Resets the Search, Last Modified, and Select Status fields to their default settings. |
|
6 |
Search |
Click to search for a module using the values in the Search, Last Modified, and Select Status fields. |
|
|
Branch Modules List |
This list displays all modules added or marked during the Create Branch process. |
|
7 |
BranchModule |
Displays the name of the module. The branch name is included in brackets. And, if applicable, the |
|
8 |
Last Modified |
The date and time when the module was last edited. By default, the module's Last Merged Date displays. |
|
9 |
Modified By |
Displays the last Owner or Contributor to edit the module. |
|
10 |
Changes |
Displays the sum of modifications to a branch module. Modules created in the branch start with a value of 1. The Changes value increases when:
Reverting a change reduces the Changes count. For example, adding a new component increases the Changes value by 1. Removing the new component in the same branch decreases the value by 1.
|
|
11 |
Status |
Displays the conflict status between the branch module and its main module. Module status changes if the branched module does not match the most recent merge of the main module. |
|
12 |
Actions |
The Action button contains context-sensitive options depending on the module's state. These option include:
|
|
13 |
|
The |
Pull Request Page
The Pull Request page becomes available after creating a Pull Request for the branch. When creating a Pull Request, the Owner or Contributors submit their branched module changes for review. The Approver uses the Pull Request page to review, approve, or reject changes. If all changes are approved, the Pull Request can be approved for a merge into the Main Module Branch.
If the Approver completes their review and a change is rejected, the Approver must reject the Pull Request.
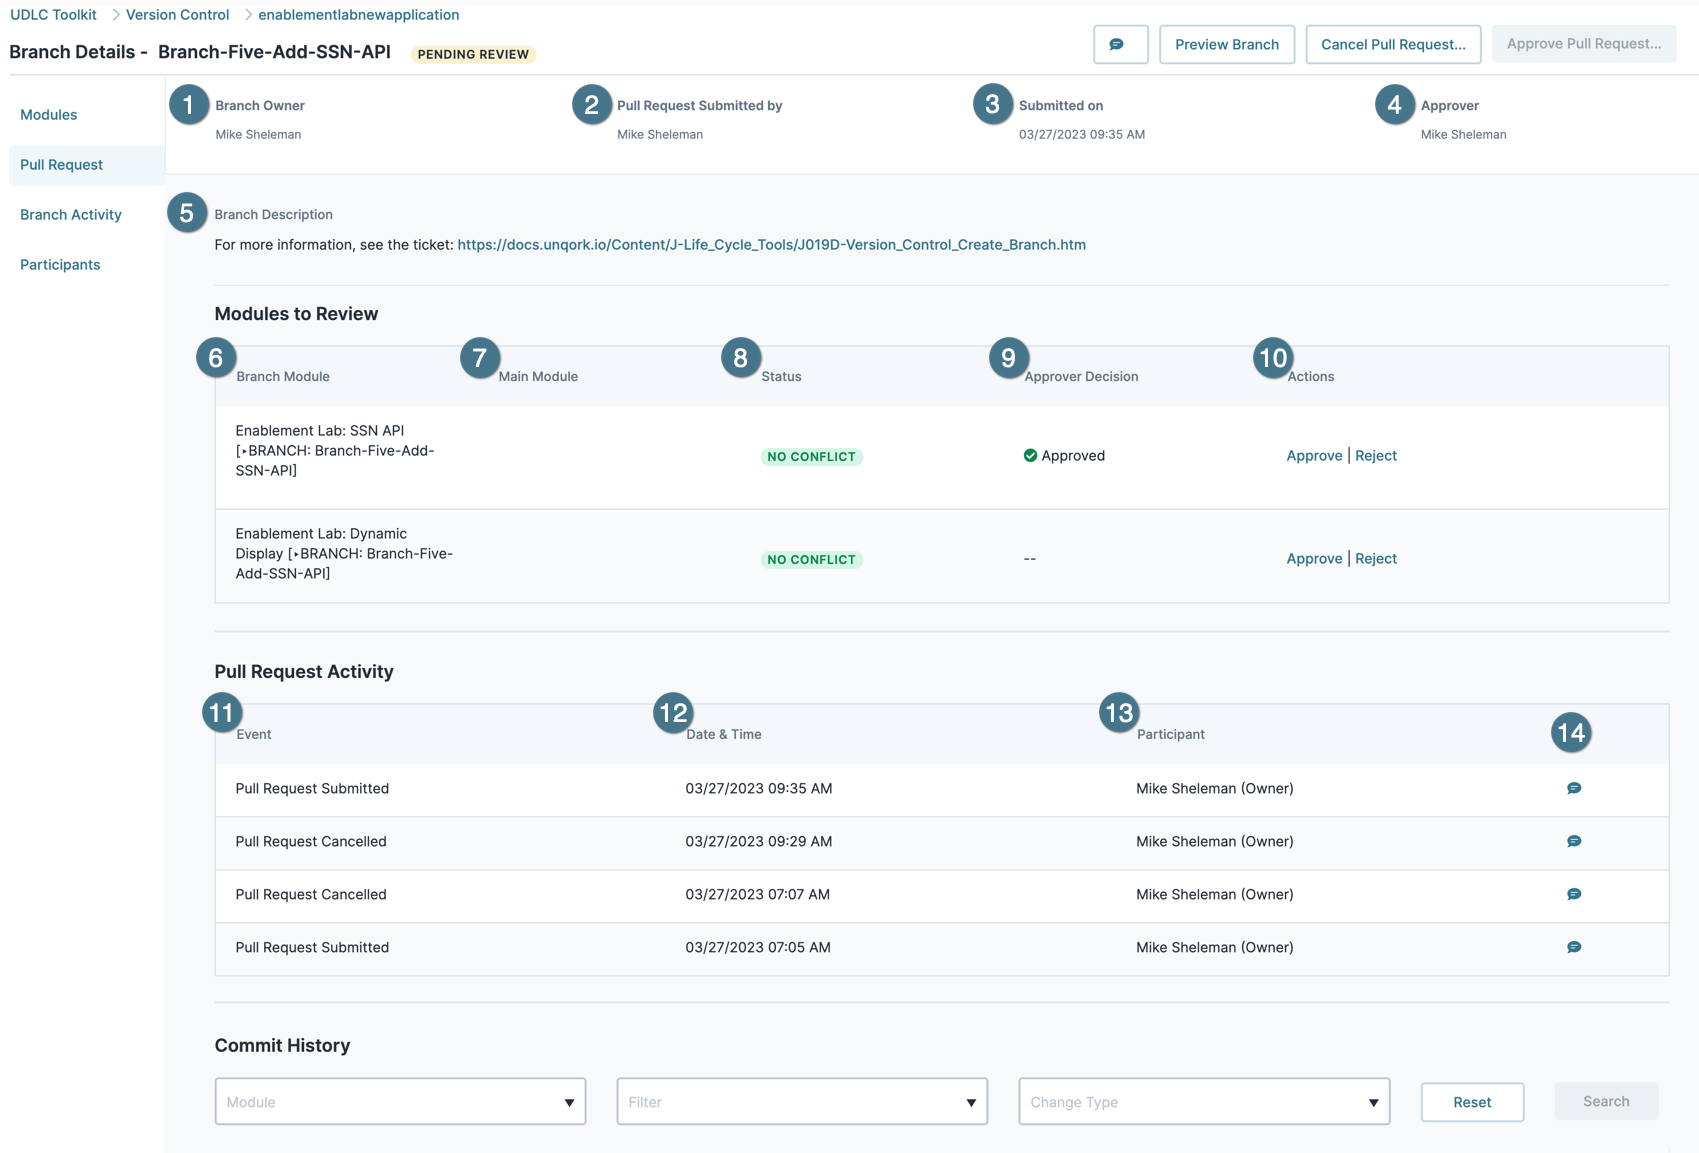
(click image to expand)
The Branch Details Pull Request page includes the following settings and fields:
| Setting | Description | |
|---|---|---|
|
1 |
Branch Owner |
The name of the user who owns the branch. |
|
2 |
Pull Request Submitted By |
The name of the Owner or Contributor that submitted the Pull Request. |
|
3 |
Submitted On |
The date and time the Pull Request was created. |
|
4 |
Approver |
The name of the user assigned to the Approver role. The Approver reviews modules in the Pull Request and approves or rejects them. |
|
5 |
Branch Description |
The description of the branch entered on the Create a Branch page. |
|
|
Modules to Review List |
Contains modules submitted for review in the Pull Request. All modules in this list must be approved or rejected before approving the Pull Request. |
|
6 |
Branch Module |
Displays the module and branch name in brackets. |
|
7 |
Main Module |
Displays the name of the main module that the branch module was created from. |
|
8 |
Status |
Displays the conflict status between the branch module and its main module. Module status changes if the branched module does not match the most recent merge of the main module. |
|
9 |
Approver Decision |
The Approver's decision to include or reject the Module in the merge. |
|
10 |
Actions |
Displays options for the Approver to review, approve, or reject the branch module in the Pull Request. Options include:
|
|
|
Pull Request Activity List |
Displays the branch's Pull Request events in a list categorized by the Date & Time category. |
|
11 |
Event |
The type of Pull Request event. Events include submissions, cancellations, and rejections. |
|
12 |
Date & Time |
The local date and time of the Pull Request event. |
|
13 |
Participant |
The user that submitted the pull request and their role (Owner or Contributor) in the branch. |
|
14 |
|
Opens the comment panel and displays the comment submitted with the event. |
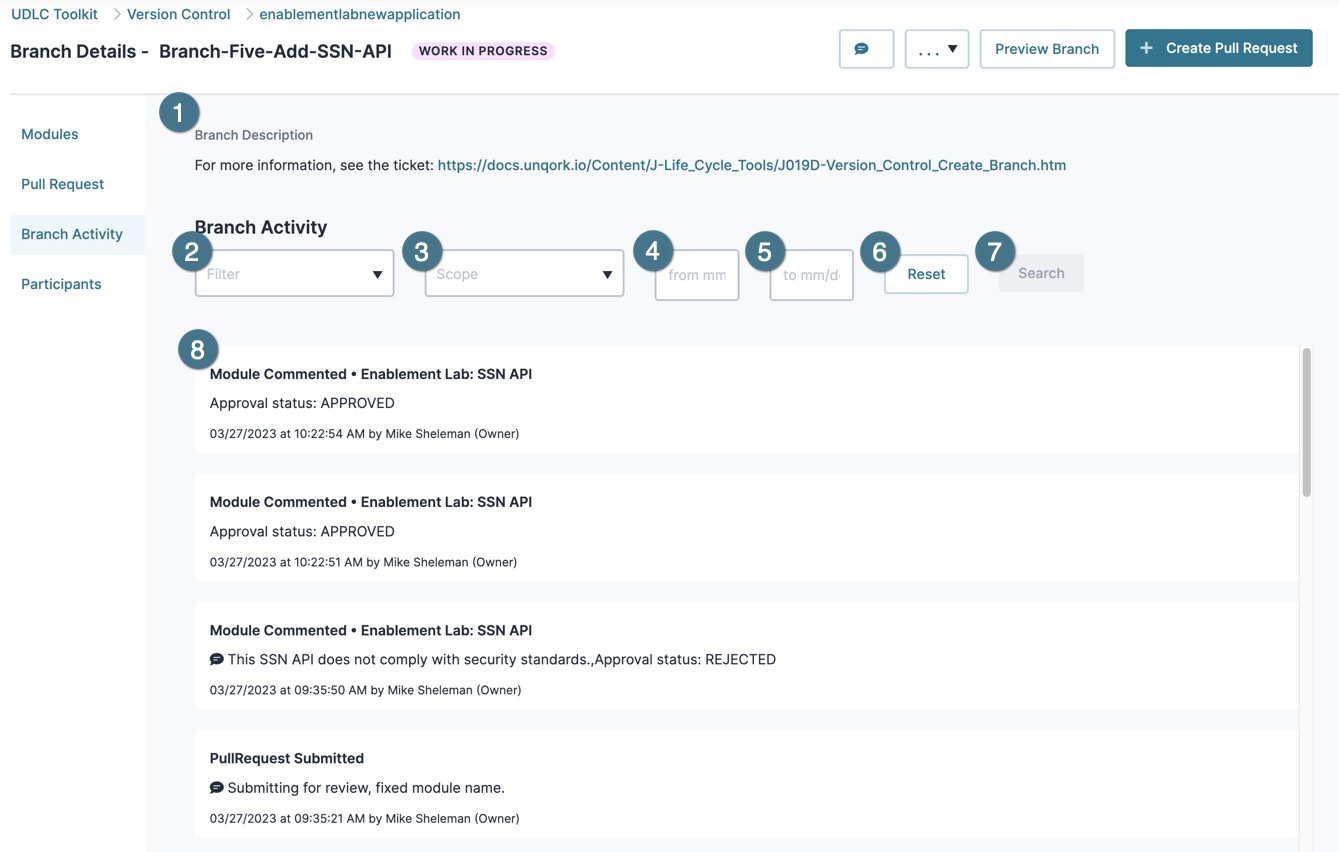
Branch Activity Page
The Branch Activity page provides a running log of changes occurring in the branch. Changes include branch creation and modifications, conflict resolutions, Pull Request submissions, and so on.
(click image to expand)
| Setting | Description | |
|---|---|---|
|
1 |
Branch Description |
The description of the branch. Inserting URLs converts them to hyperlinks when saved. JIRA URLs become hyperlinks and use the ticket value as the name. For example: https://{{yourCompany}}.atlassian.net/browse/EN-6061 becomes EN-6061. |
|
|
Branch Activity |
The Branch Activity list displays modifications to the branch, Pull Requests, and comments. |
|
2 |
Filter |
Select the activity type to filter by when clicking the Search button. Options include:
By default, the Filter drop-down is empty. |
|
3 |
Scope |
Select the method to filter the scope by when clicking the Search button. Filter options include:
By default, the Scope drop-down is empty. |
|
4 |
from mm/dd/yyy (From Date) |
Enter the start date you want to filter the Branch Activity list by. The From Date field accepts the mm/dd/yyyy date format. By default, the From Date field is empty. |
|
5 |
to mm/dd/yyyy (To Date) |
Enter the end date you want to filter the Branch Activity list by. The To Date field accepts the mm/dd/yyyy date format. By default, the To Date field is empty. |
|
6 |
Reset |
Resets the Search, Last Modified, and Select Status fields to their default settings. |
|
7 |
Search |
Click to search for a module using the values in the Search, Last Modified, and Select Status fields. |
|
8 |
Branch Activity Card |
Each card provides a title and description of the branch activity event. Events that include comments display the |
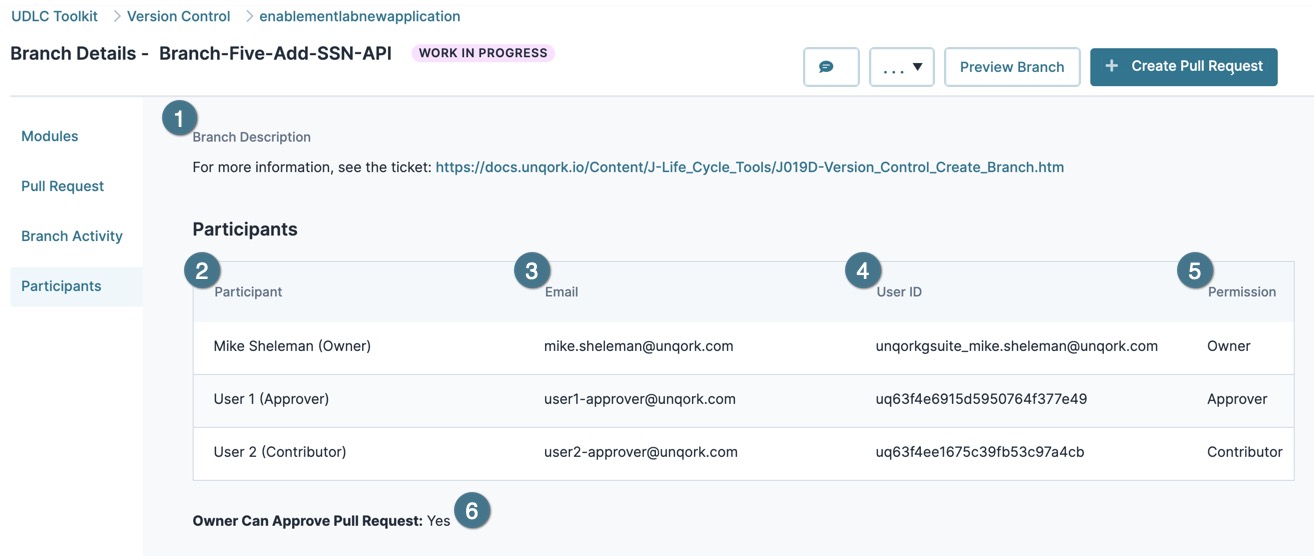
Participants Page
The Participants page lists all users that have been assigned to the branch. This page also includes the branch description and Owners that can approve a Pull Request.
(click image to expand)
| Setting | Description | |
|---|---|---|
|
1 |
Branch Description |
The description of the branch. Inserting URLs converts them to hyperlinks when saved. JIRA URLs become hyperlinks and use the ticket value as the name. For example: https://{{yourCompany}}.atlassian.net/browse/EN-6061 becomes EN-6061. |
|
|
Participants |
The participants list displays all users added to the branch. Participants are Creator-users defined on the Creator (User) Administration page. |
|
2 |
Participant |
The Creator-user's name and role in the branch. |
|
3 |
|
The participant's Creator-User email. |
|
4 |
User ID |
The Creator-user's ID. |
|
5 |
Permission |
The role permission assigned to the participant. |
|
6 |
Owner Can Approve Pull Request |
Displays if the Owner can approve Pull Requests. |
Best Practices
-
In a Pull Request, only include modules with changes. Merging a branch module without changes creates a new version of the main module despite no changes.
Resources
