VCS How To: Create a Module in a New Branch
Early Access VCS Articles
|
Overview
To create a new module in Unqork's VCS (version control system) Unqork Version Control, also known as source control, is a system used to track and manage changes to modules and applications., you must first create it in a new branch A branch is a copy of modules in an Unqork application that helps Creators work in parallel. Branching an application can seperate in-progress changes from release-ready modules. using the Create a Branch page. Creating modules in a new branch lets Contributors The VCS (version control system) Contributor role has permissions to edit modules in a branch. Set contributors during the VCS Create a Branch process. modify the module's contents before submitting a Pull Request A Pull Request, also known as a Merge Request, is a VCS event that indicates the contributor is ready for their branch changes to be reviewed by an Approver, then merged into the main branch. and merging it in the main module The Main Branch (or Main Modules) consists of a core set of modules for an application. The Main Branch's modules can only be modified by creating a seperate branch..
What You'll Learn
After completing this article, you'll understand how to use the VCS Create Module modal A modal is a window that appears on top of the content you are currently viewing.. You'll also create a new module in a new VCS branch.
About the VCS Create Module Modal
When creating modules in a VCS-controlled application, use the Create New Module modal A modal is a window that appears on top of the content you are currently viewing. to enter the name, path, and tags for a new module.
To access the Create New Module modal, click the + Create New Module button.
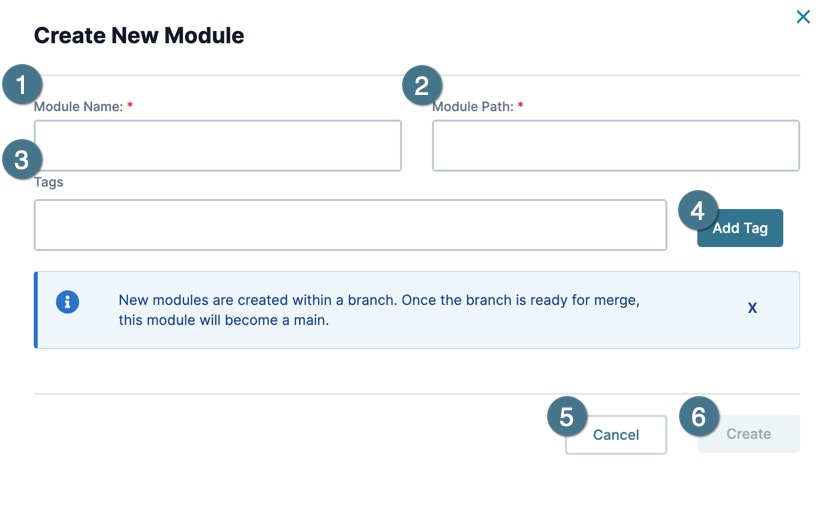
The Create New Module modal contains the following:
| Setting | Description | |
|---|---|---|
|
1 |
Module Name* |
Enter a name for the new module. The module name must be unique to the environment. The Module Path value is created from the module's name. *This field is required. |
|
2 |
Module Path* |
Enter a unique path value for the new module. The path value does not accept special characters. Entering a space replaces it with a hyphen. Path values can be different than module names. *This field is required. |
|
3 |
Tags |
Add tags to a module for easier tracking, or to indicate what the module does. An example tag would be: api. |
|
4 |
Add Tag |
Click to add the value entered in the Tags field. |
|
5 |
Cancel |
Cancels the Create New Module process and closes the modal. |
|
6 |
Create |
Adds the new module to the Modules to Create in Branch list. |
Creating a Module in a New Branch
In a VCS-controlled application, new modules are created during the Create Branch process. After creating a branch, new modules become available to edit by the Owner The VCS (version control system) Owner role is the user who creates a new branch. The VCS owner decides what parts of an application are to be modified in a branch, and assigns roles to users for the branch. and Contributors The VCS (version control system) Contributor role has permissions to edit modules in a branch. Set contributors during the VCS Create a Branch process. until it is ready to be submitted to the Main Branch in a Pull Request. After review, approval, and merge, the new module becomes a main module.
This example assumes you have access to a VCS-controlled application.
To learn how to enable VCS, view our How to: Enable VCS (Version Control System) article.
From the Workspaces page:
| 1. | Find and open a workspace that contains a VCS-enabled application. |
| 2. | Click the application's View App in VCS button. The UDLC Login page displays. |
| 3. | Enter your credentials and click Login. The View App Details' Branches page displays. |
| 4. | Click + Create Branch. The Create Branch page displays. |
| 5. | In the Branch Name* field, enter a name for the branch. |
| 6. | Under Modules, click + Create New Module. The Create New Module modal displays. |
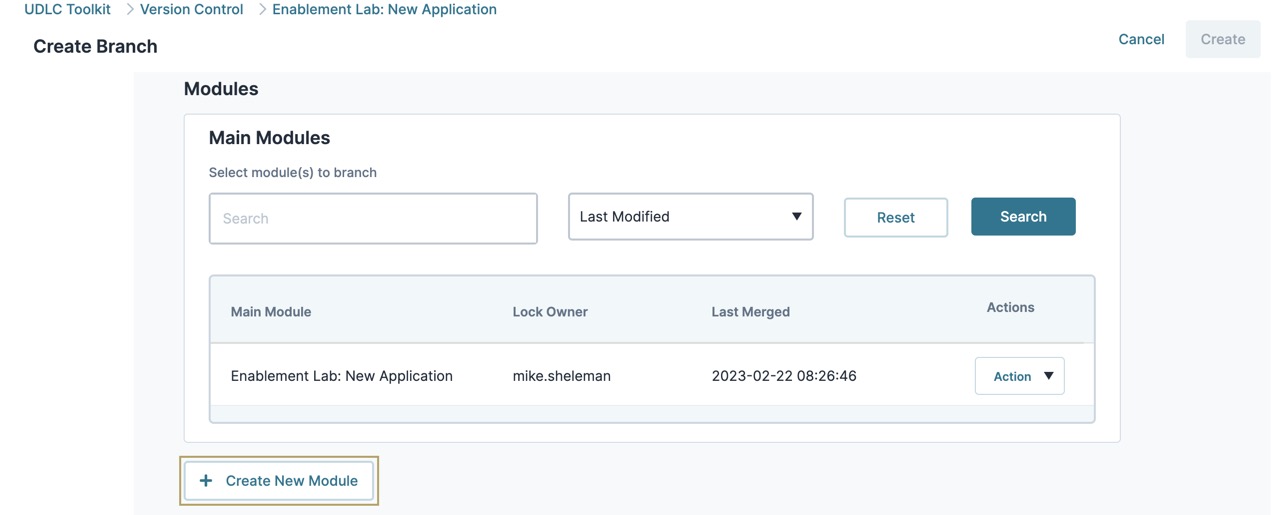
(click image to expand)
| 7. | In the Module Name* field, enter a name for the module. The Module Path* field populates based on the module name. |
| 8. | Click Create. A confirmation modal displays. |
| 9. | Click OK. The new module is added to the Modulees to Create in Branch list. |
| 10. | Under Participants, click Show Advanced Settings. |
| 11. | Set Owner Can Approve Pull Requests to  (Checked). (Checked). |
This setting allows the Owner The VCS (version control system) Owner role is the user who creates a new branch. The VCS owner decides what parts of an application are to be modified in a branch, and assigns roles to users for the branch. to review and approve the branch's Pull Request. Outside of testing, the use of this setting should be determined by your organization.
| 12. | In the Please Document Reason field, enter |
| 13. | Click Create. A modal displays informing you the branch has been successfully created. |
| 14. | Click OK. The Branch Details page displays. |
