Version Control Dashboard
Early Access VCS Articles
|
Pardon our dust! The Version Control Dashboard article's layout, design, and language are currently undergoing changes. Use caution when referring to steps and processes contained in this page.
Overview
The Version Control Dashboard is an Unqork Development Life Cycle (UDLC) tool that provides a high-level view of VCS Unqork Version Control, also known as source control, is a system used to track and manage changes to modules and applications.-controlled (Version Control System) applications In Unqork an application is a program used to perform specific tasks. An application can be one of two types: workflow or module. in an environment. On this page, a list displays which applications have VCS enabled, how many branches A branch is a copy of modules in an Unqork application that helps Creators work in parallel. Branching an application can seperate in-progress changes from release-ready modules. for each application have been created, the last time a branch was modified, and provides access to the App Details page for VCS-enabled applications.
To learn more about Unqork's VCS tool, view our Introduction to the Version Control System<-(![]() LINK OUT) article.
LINK OUT) article.
The Version Control Dashboard also contains search and filter bars for categorizing the applications list by application/workspace name, modification date, and if VCS is enabled for the application.
What You'll Learn
After completing this article, you’ll know how to access and navigate the Version Control Dashboard.
Accessing the Version Control Dashboard
The Version Control Dashboard requires access to the UDLC Toolkit and is available in every workspace.
To learn how to enable VCS for an application, view our How To: Enable Application Version Control article.
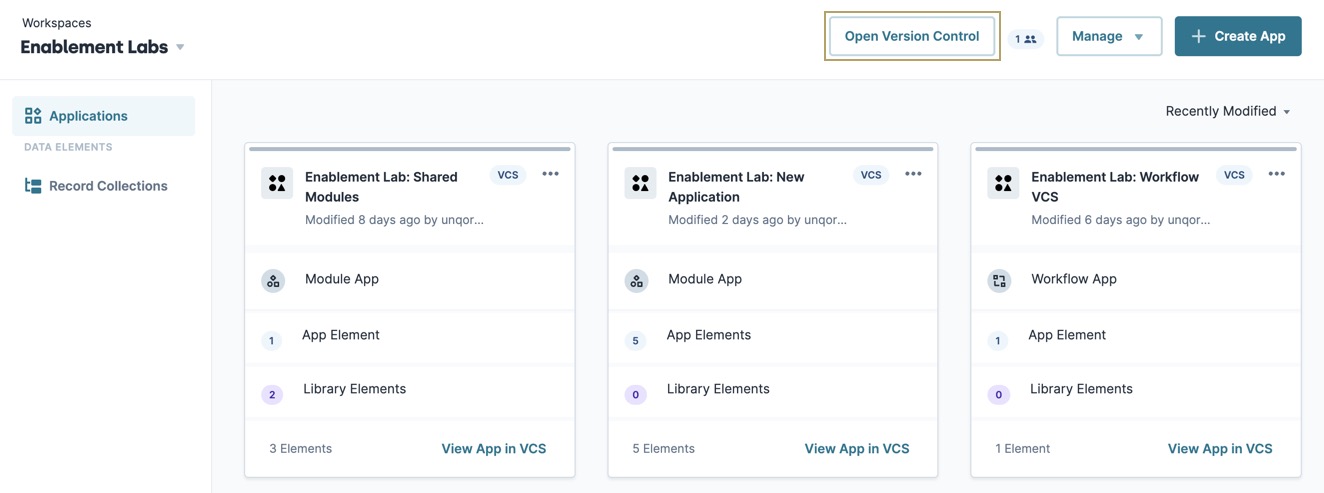
To access the Version Control Dashboard from Workspaces view:
| 1. | From the Workspaces view, select a workspace tile. |
| 2. | Click Open Version Control. |
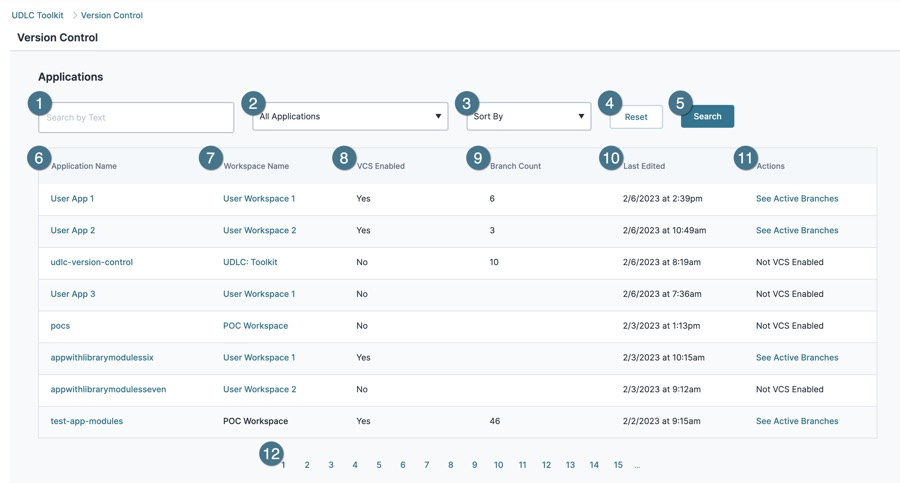
Navigating the Version Control Dashboard
| Setting | Description | |
|---|---|---|
| 1 |
Search By Text |
Search for an application or workspace by entering part or all of its name. |
| 2 |
All Applications (VCS Control Filter) |
Filter applications by VCS Control. Coincides with the VCS Enabled column. Filter options include:
|
|
3 |
Sort By |
Sorts the application list based on the setting selected. Sort options include:
|
|
4 |
Reset |
Resets the search bar. Clears the Search By Text field, sets VCS Control Filter to All Applications, returns the Sort By drop-down to Sort By, and refreshes the Application List using the default search settings. |
|
5 |
Search |
Searches the workspace using the current search bar settings. |
|
6 |
Application Name |
The name of the application. Clicking on the application name navigates to one of two places:
|
|
7 |
Workspace Name |
The name of the workspace. Click the workspace name to open the workspace on a new page. |
|
8 |
VCS Enabled |
Indicates if the application uses VCS. |
|
9 |
Branch Count |
The total number of branches created for the application. Includes all branch status types. |
|
10 |
Last Edited |
Displays the date and time of the branch that was most recently modified. |
|
11 |
Actions |
Click to display actions for the application, including:
|
| 12 |
Paginated List |
Each page in the list contains eight applications. Click a page number to navigate to that section of the list. For environments with more than 15 pages, click the ... (ellipsis) to load the next set of pages. |
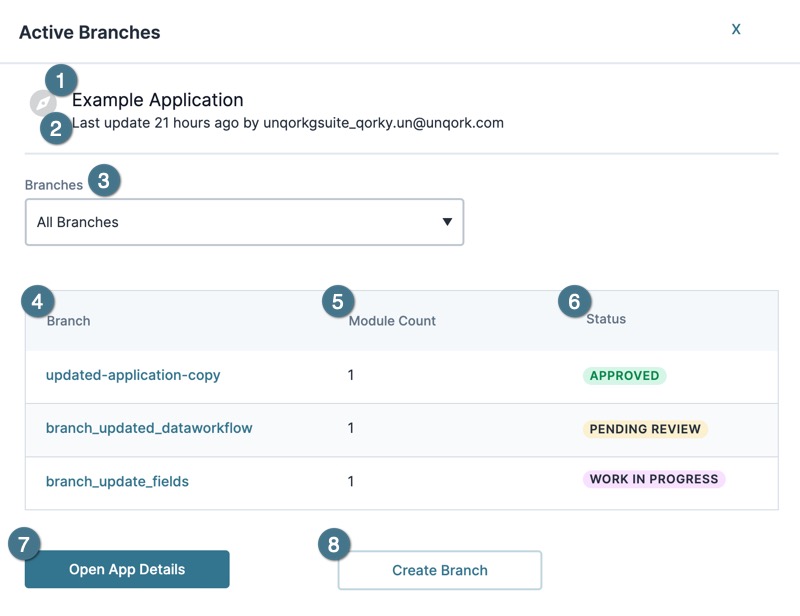
Active Branches Panel
From the Version Control Dashboard, click See Active Branches to open the Active Branches panel. The Active Branches panel displays application branches that are APPROVED, WORK IN PROGRESS, or PENDING REVIEW.
For more details on managing branches, read our Branch Details article.
| Setting | Description | |
|---|---|---|
| 1 | Application Name |
The name of the application, as seen in Workspaces. |
| 2 |
Last Edited |
Displays the date and time of the most recently modified branch and the user that modified it. |
|
3 |
My Branches (Branch Owner Filter) |
Filter application branches by the branch owner. Branch filters include:
|
|
4 |
Branch |
Displays the name of the active branch set during the Create Branch process. |
|
5 |
Module Count |
The total number of modules in the branch. |
|
6 |
Status |
The current branch status. Active branch statuses include:
|
|
7 |
Open App Details |
Opens the App Details View page. |
|
8 |
Create Branch |
Opens the Create Branch page. |
