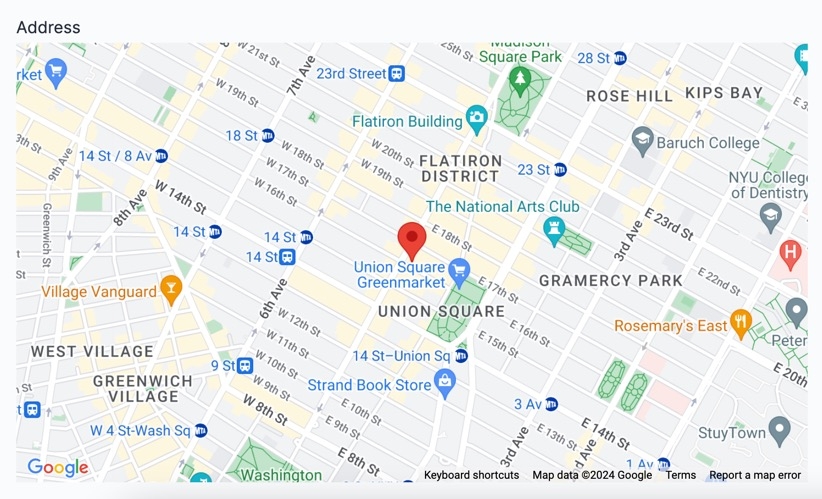
The Map V2 component is a Charts & Graphs component for displaying a visual map in Express View. Creators can use a Data Reference Key containing an address string to move the map view to the address location and pin it. You can also enable other map features, like Satellite View and Street View.
A Google Map API key is required when using this component. Visit the Google Maps Platform website to obtain a key: https://developers.google.com/maps/documentation/javascript/get-api-key.
The Map V2 component uses a Google Maps API key to access Google's Maps JavaScript API and Geocoding APIs. Each API serves a different function:
Maps JavaScript API: Displays a map that includes imagery and local data from the same source as Google Maps.
To learn more about the Maps Javascript API, visit the Google APIs Marketplace: https://console.cloud.google.com/marketplace/product/google/maps-backend.googleapis.com.
Geocoding API: Converts an address to a geographic coordinate. The Maps V2 component uses this API when referencing the address in the Data Reference Key field.
To learn more about the Geocoding API, visit the Google APIs Marketplace: https://console.cloud.google.com/marketplace/product/google/geocoding-backend.googleapis.com.
You'll find the Map V2 component in the Charts & Graphs group to the left of the Module Builder.
About the Configuration Window
To learn more about general component settings, view our General Component Settings article.
Display Settings
Field Text
Setting | Description |
|---|---|
Label Text | Label Text conveys what the input component is and what information it displays. Enter the purpose of the corresponding component or field. User-friendly labels make your module more accessible. Keep labels short and descriptive (a word or two) using title case. For longer entries, use sentence case. |
Default State Options
Setting | Description |
|---|---|
Hide Field | Displays or hides the component from view. Setting Hide Field to By default, Hide Field is set to Reveal a hidden component by using a logic component's Outputs table with the Type set to visible. |
Formatting
Setting | Description |
|---|---|
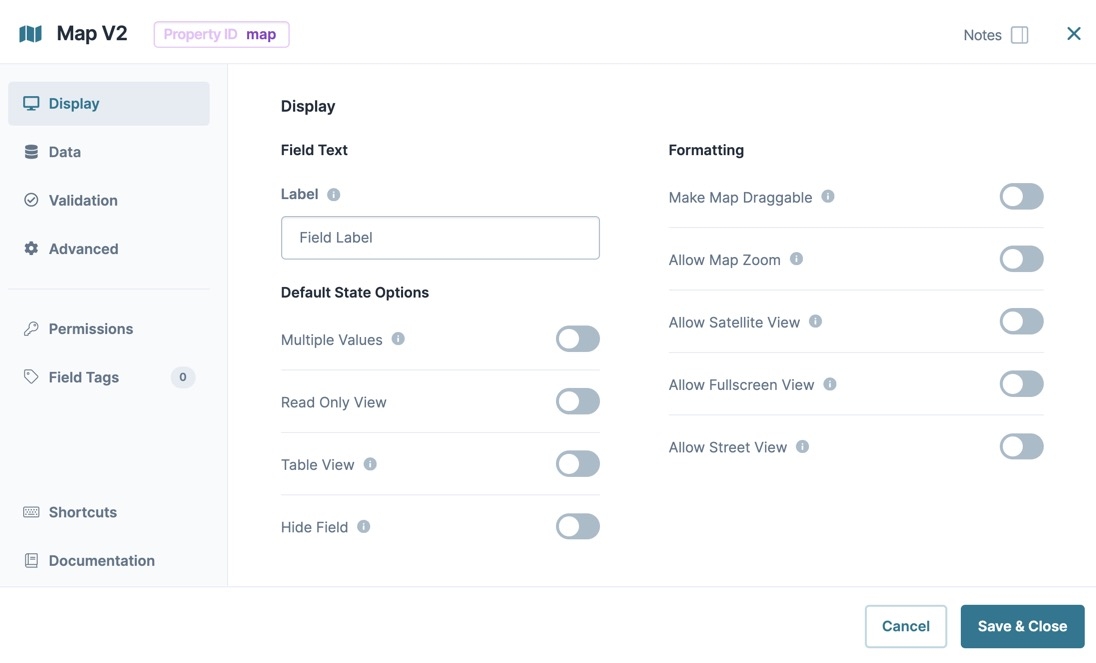
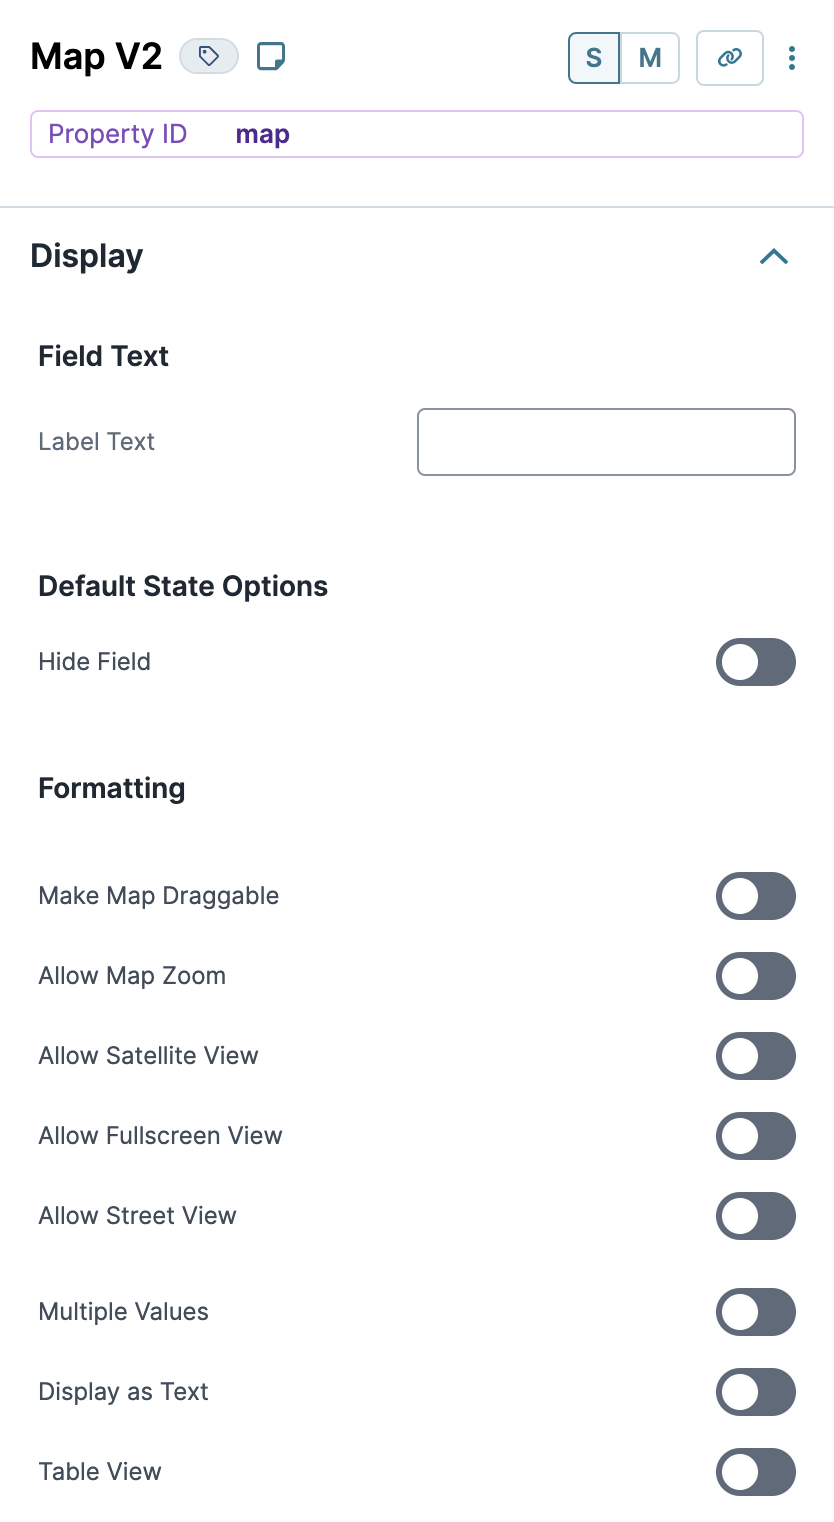
Make Map Draggable | Set to |
Allow Map Zoom | Set to |
Allow Satellite View | Set to |
Allow Fullscreen View | Set to |
Allow Street View | Set to
|
Multiple Values | Enter a formatted address string for the map to begin on. |
Display as Text | Prevents end-users from entering data and replaces the field with the component’s data value. If no value is provided, the component displays None. |
Table View | Displays the value in the table view of the submission data. |
Data Settings
Data Storage
Setting | Description |
|---|---|
Store in Database | The Store Data in Database setting affects how data persists through your application. When set to
Set the toggle to
|
Data Source
Setting | Description |
|---|---|
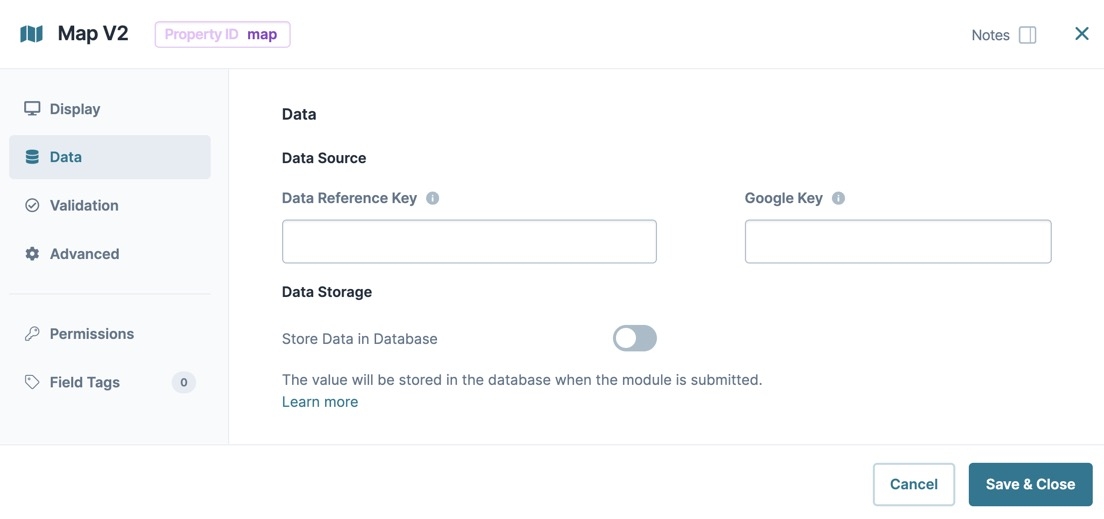
Data Reference Key | Enter the Property ID of the component that contains either a formatted address string or a single value. For example,
|
Google Key | Enter an API key to access Google's Maps API. *This field is required to use the Map V2 component. Acquire an API key here: https://developers.google.com/maps/documentation/javascript/get-api-key.
|
Validation Settings
User Input
Setting | Description |
|---|---|
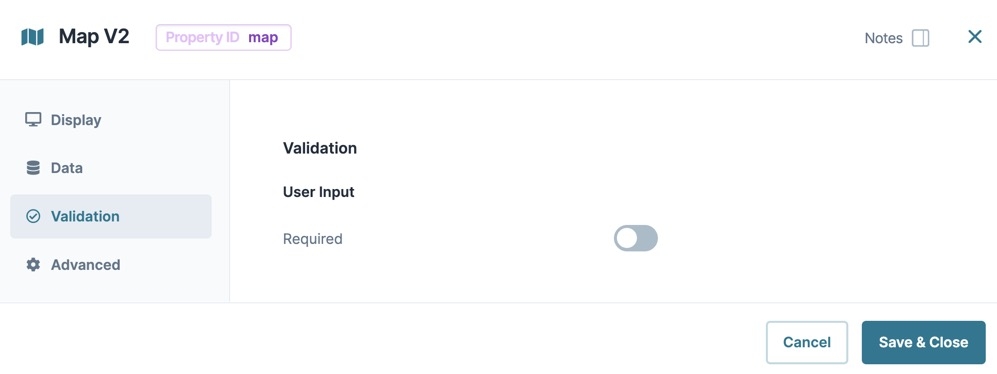
Required | Set to |
Advanced Settings
Set Execution
Setting | Description |
|---|---|
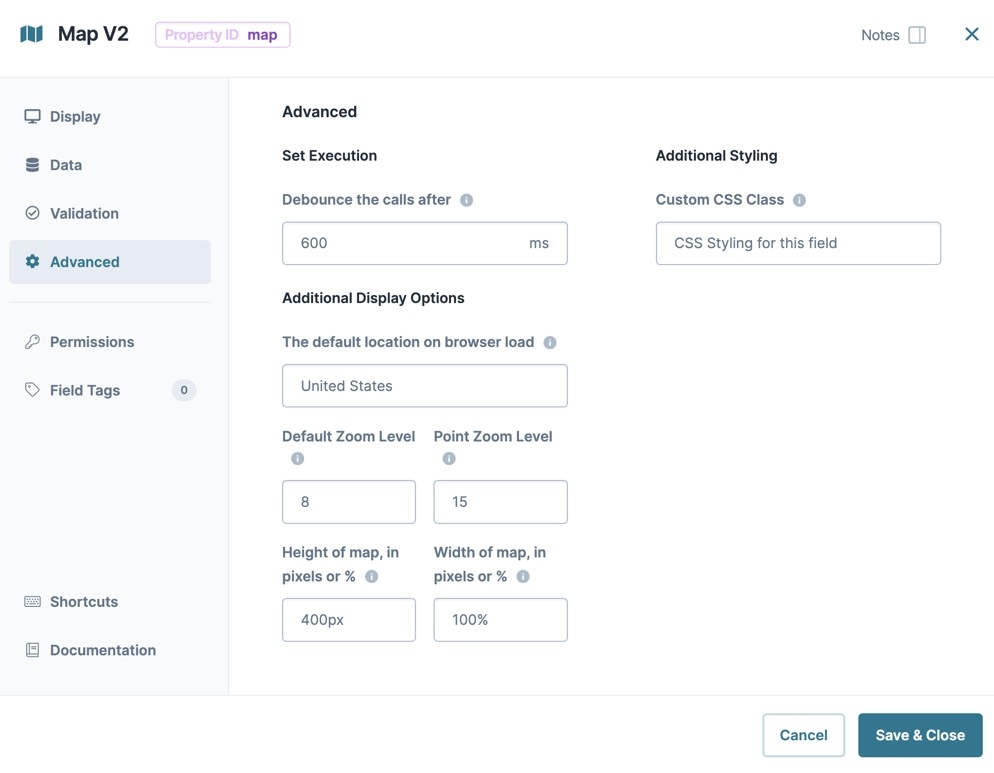
Debounce the Calls After | The number of milliseconds that pass before this component calls the Google Maps API using the Data Reference Key value. If your Data Reference Key dynamically updates, increase the value to reduce the call frequency to the Google Maps API. The default value is |
Additional Display Options
Setting | Description |
|---|---|
The Default Location on Browser Load | Enter a formatted address string for the map to begin on. |
Default Zoom Level | The map's zoom level is based on the location set in The Default Location on Browser Load field. Set a value between The default value is |
Point Zoom Level | The level of zoom after setting a value between The default for this setting is |
Height of Map | Set the height of the map viewport in pixels (px). The default value is
|
Width of Map | Set the width of the map viewport in pixels (px) or percentage (%). The default value is |
Additional Styling
Setting | Description |
|---|---|
Custom CSS Class | Enter a Custom CSS Class to apply to your component. Custom CSS lets you maintain a consistent look and feel when the field or element is part of a template or multiple modules. Updated CSS styling applies to all components that reference this custom class name. |
Adding a Map V2 Component
For this example, create a module that lets end-users search for map locations by entering an address into an Address Search component. You need a Google Map API key to configure this module. Visit the Google Maps Platform website to obtain a key: https://developers.google.com/maps/documentation/javascript/get-api-key.
Configure the Address Search Component
First, add an Address Search component, so end-users can enter an address that stores in the Map V2 component.
In the Module Builder, drag and drop an Address Search component onto the canvas.
In the Property ID field, enter
address.In the Label Text field, enter
Address Search.Under Formatting, set Show Street, Show City, Show State, and Show Country to
 (ON).
(ON).Navigate to the Data settings.
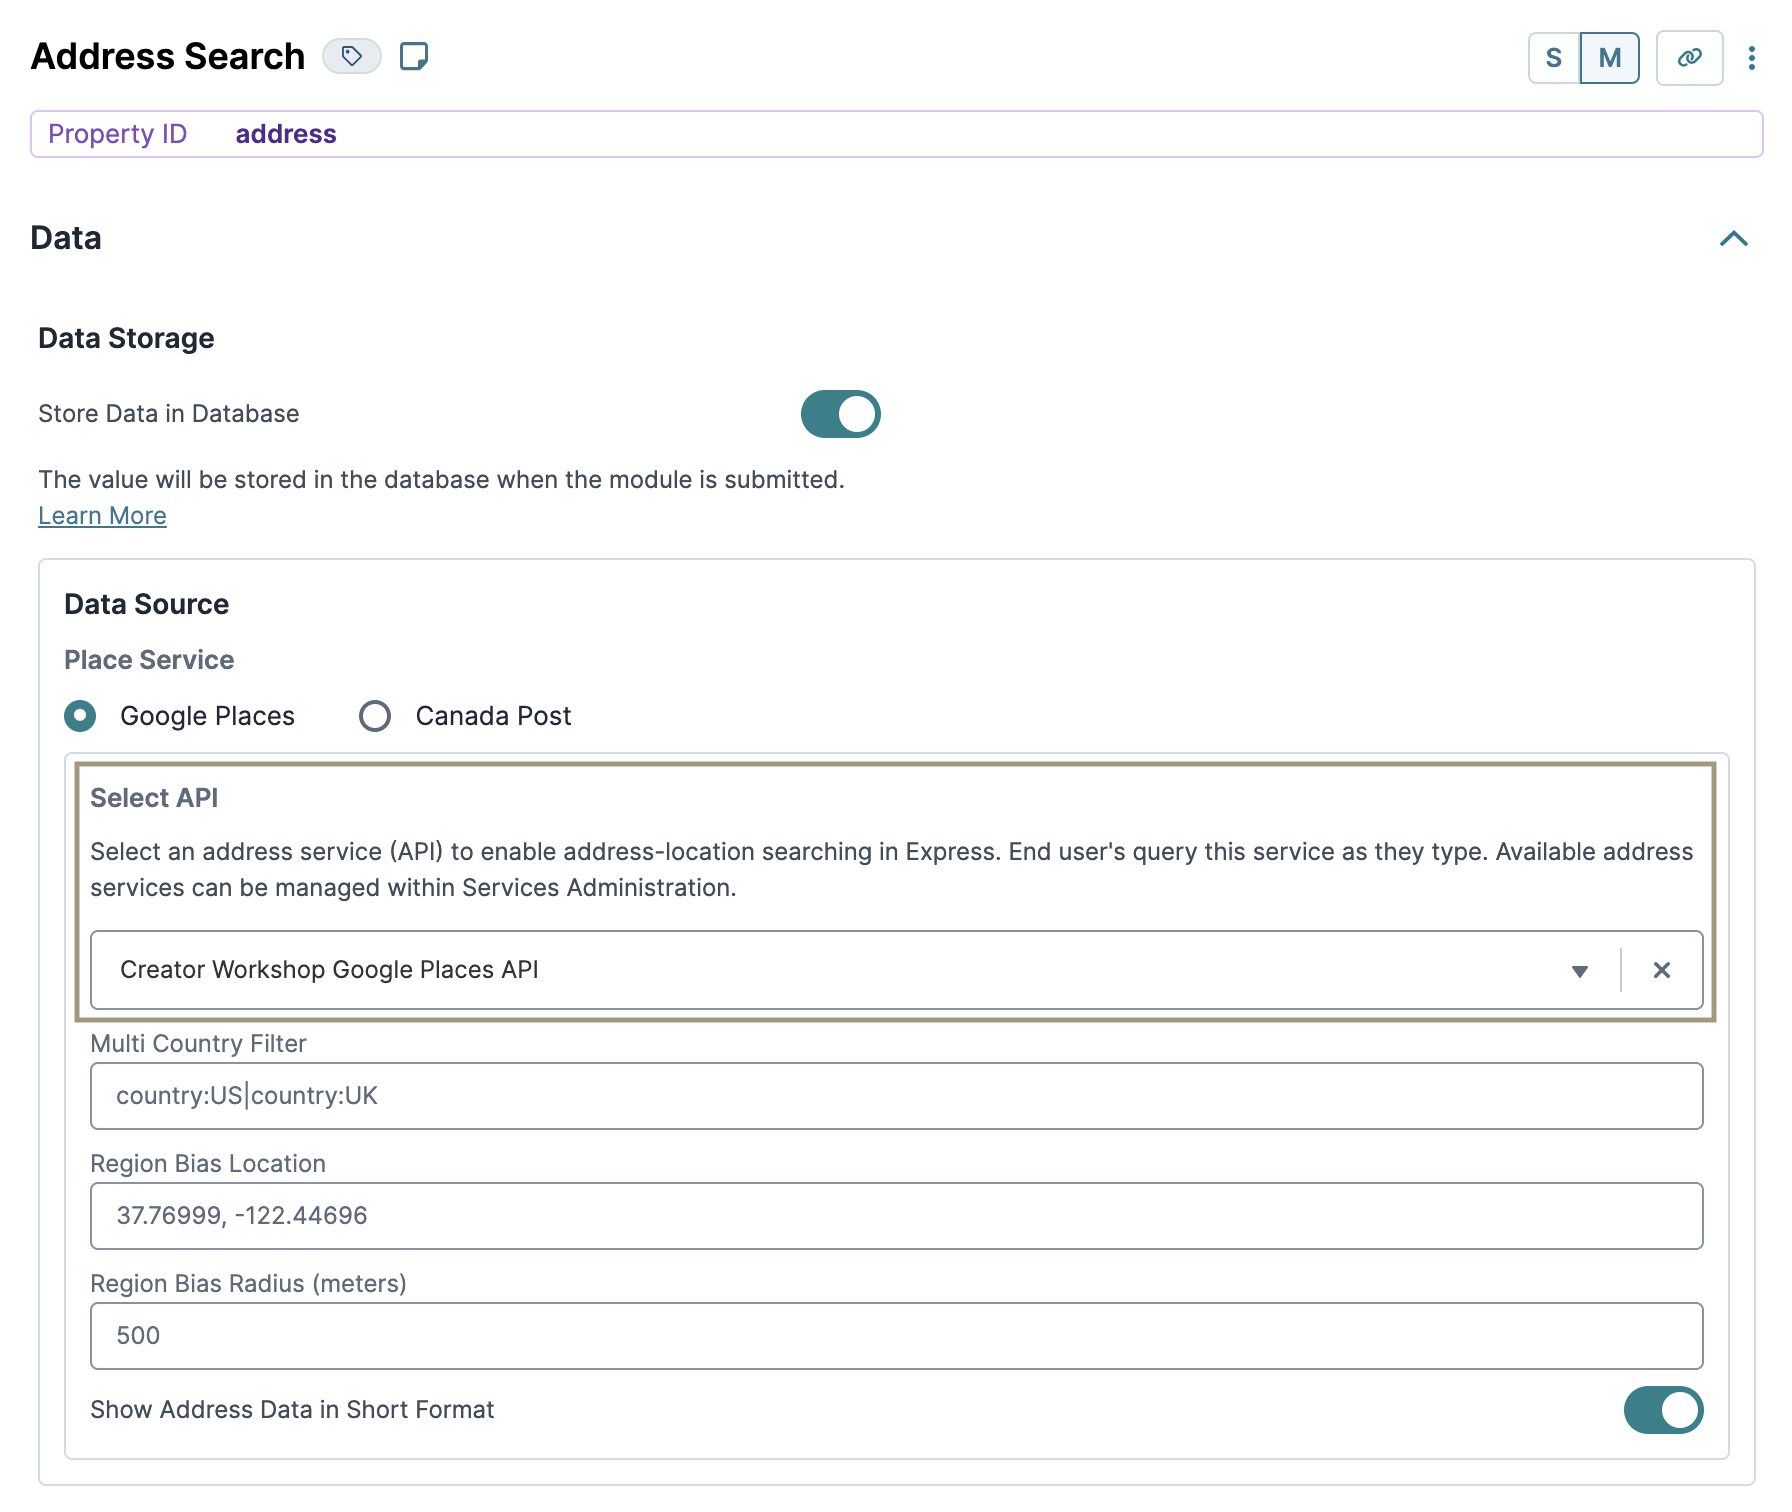
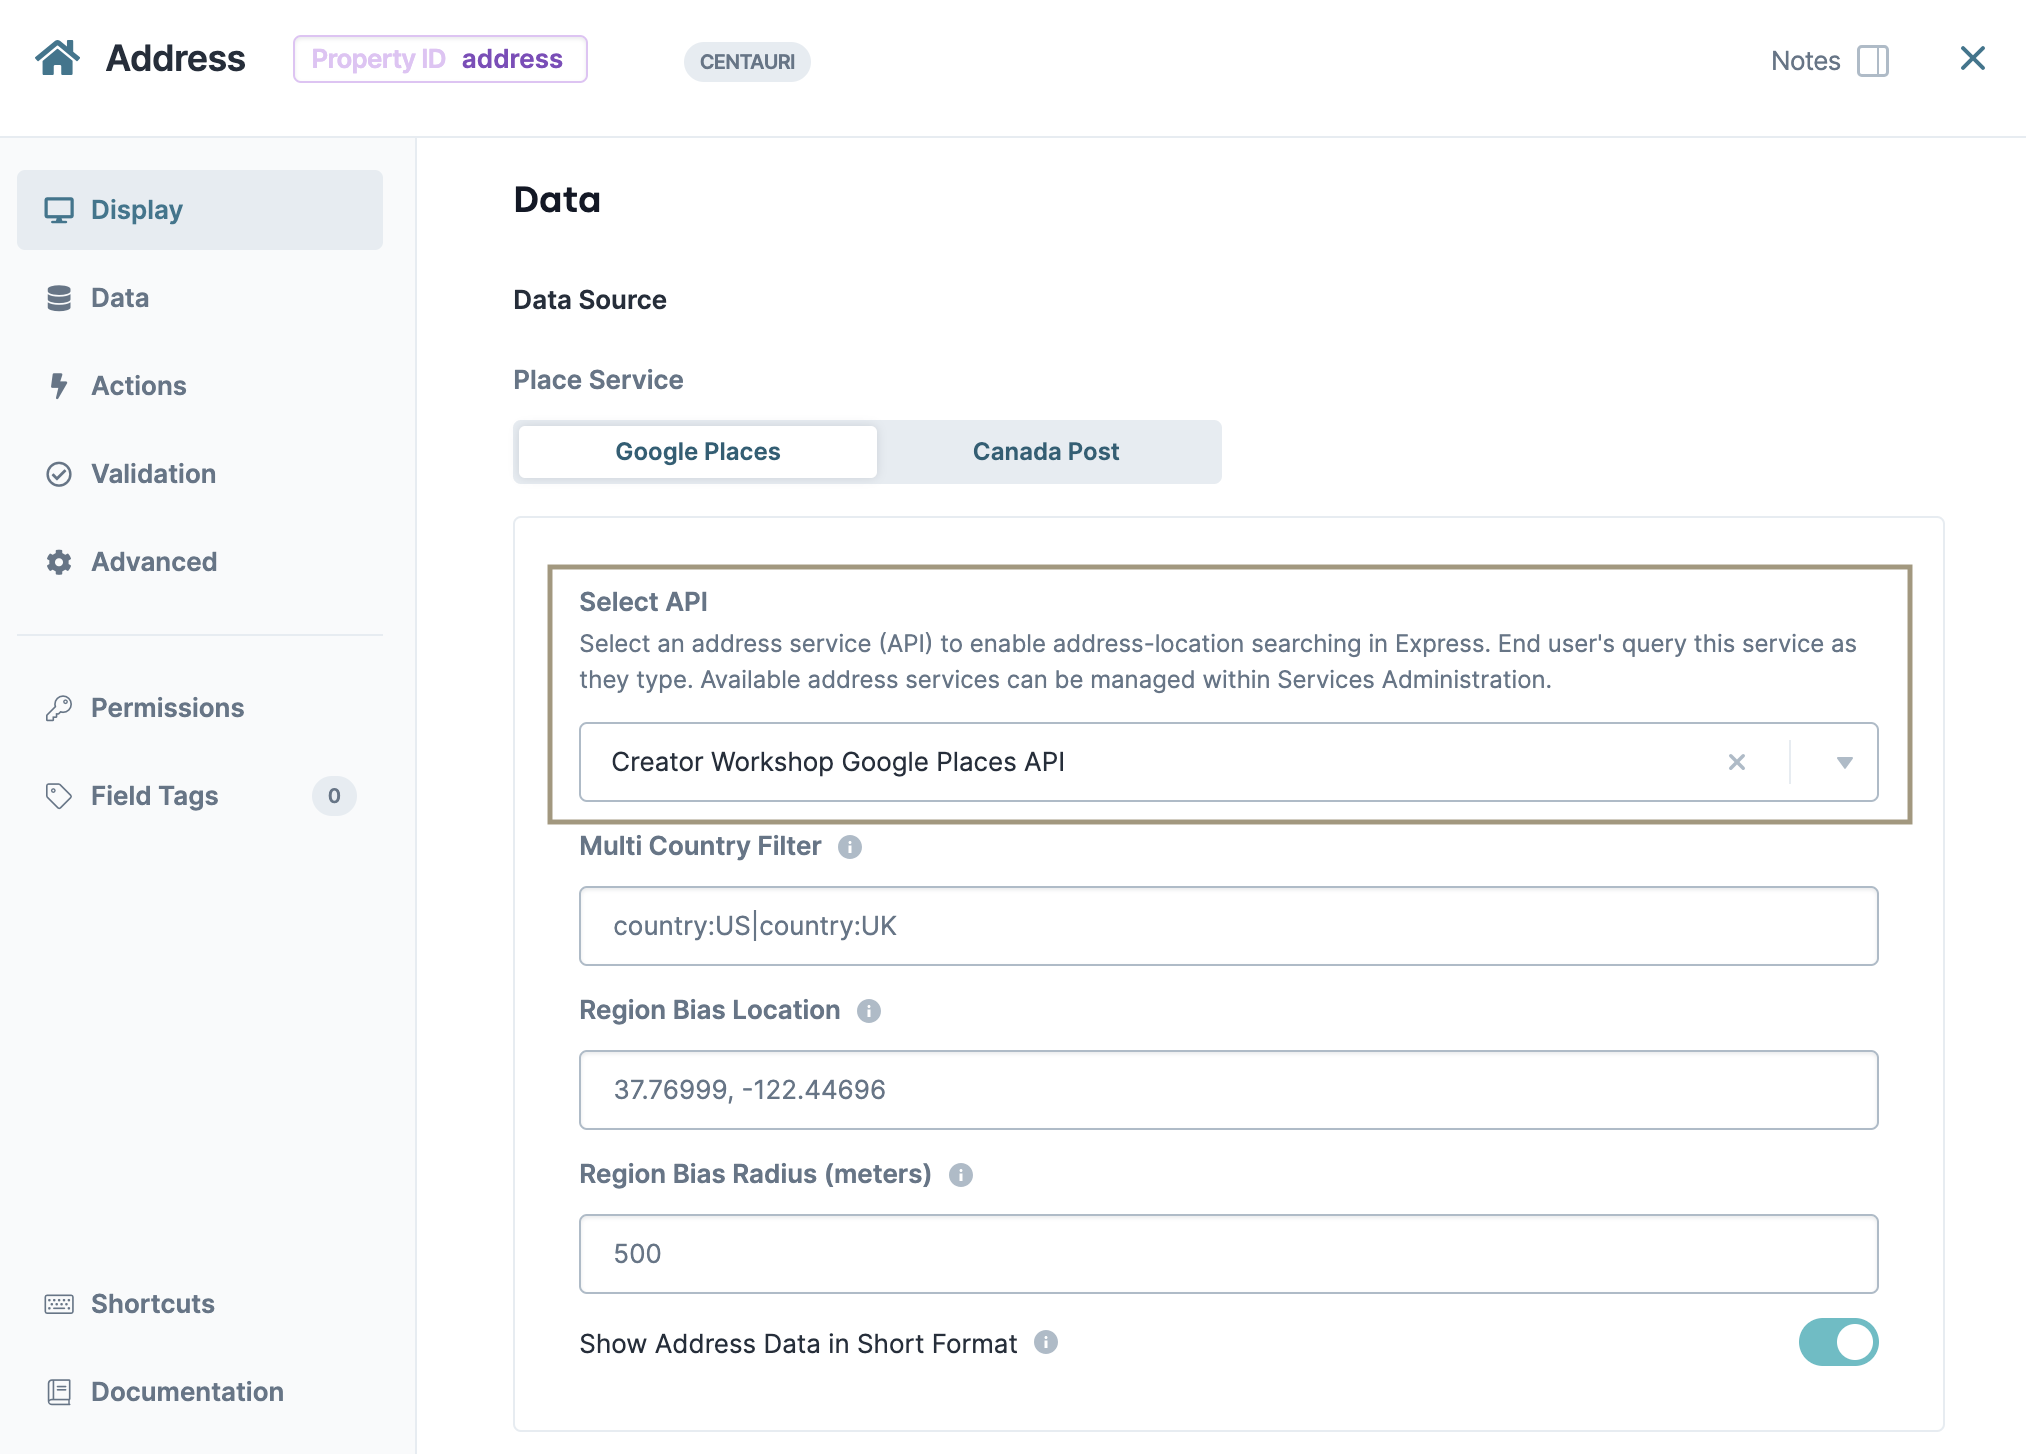
From the Select API drop-down, select an available Google Places API. If you are in the Unqork Training environment, select Creator Workshop Google Places API.
To learn more about Address Search APIs, view our Enabling Address Search Using Address Services article.
Navigate to the Actions settings.
In the Trigger field, enter
dwfFormatAddress.Click Save Component.
Configure the Data Workflow Component
The Data Workflow component retrieves the formatted address from the Address Search component. Then, it sends it to a Hidden component, so the Map V2 component can reference it.
Drag and drop a Data Workflow component onto the canvas, placing it below the
addressAddress Search component.In the Property ID field, enter
dwfFormatAddress.In the Label Text field, enter
dwfFormatAddress.
Configure the Input Operator
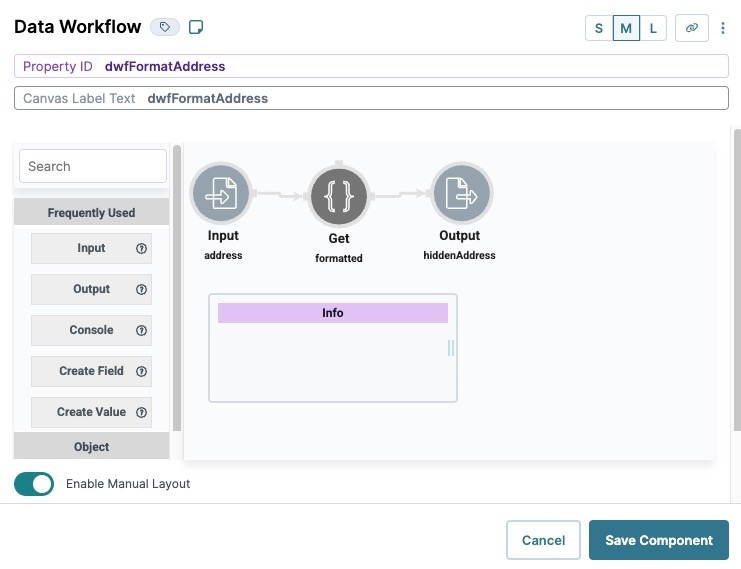
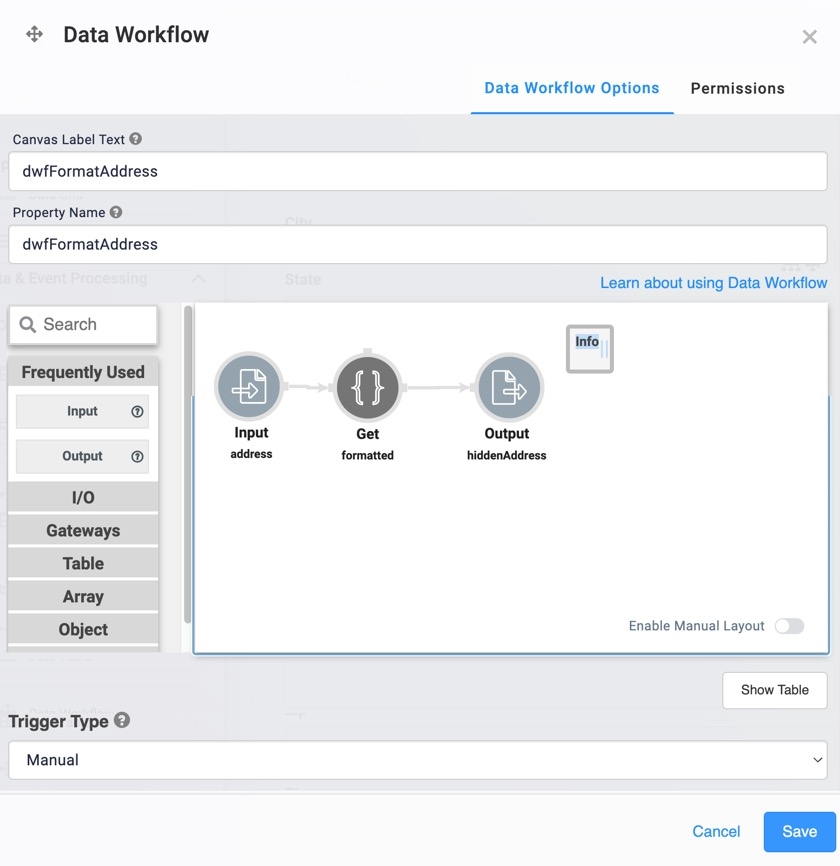
The Input operator brings the data from the address Address Search component into the Data Workflow.
Drag and drop an Input operator onto your Data Workflow canvas.
Configure the operator's Info window as follows:
Info
Category
Input
Component
address
required
Yes
source
Default
Configure the Get Operator
The Get operator selects the formatted key from the address Address Search component. The formatted key is an address in a string format.
Drag and drop a Get operator onto your Data Workflow canvas.
Configure the operator's Info window as follows:
Info
Category
Get
Label
formatted
Preserve Argument Type
☐ (unchecked)
Path
formatted
Connect the output port (right) of the
addressInput operator to the input port (left) of theformattedGet operator.
Configure the Output Operator
The Output operator sends the data to the hiddenAddress Hidden component to store it.
Drag and drop an Output operator onto your Data Workflow canvas.
Configure the operator's Info window as follows:
Info
Category
Output
Component
hiddenAddress
action
value
Connect the output port (right) of the
formattedGet operator to the input port (left) of thehiddenAddressOutput operator.Click Save Component.
Your completed Data Workflow looks like the following:
Configure the Hidden Component
The Hidden component stores the formatted address retrieved from the Data Workflow component. The Map V2 component uses the Hidden component as its Data Reference Key for placing a pin on the map view.
Drag and drop a Hidden component onto the canvas, placing it below the
dwfFormatAddressData Workflow component.In the Property ID field, enter
hiddenAddress.In the Label Text field, enter
hiddenAddress.Navigate to the Data settings.
Set Store Data in Database to
 (ON).
(ON).Click Save Component.
Configure the Map V2 Component
Lastly, configure a Map V2 component for end-users to visualize the address they searched.
Drag and drop a Map V2 component onto the canvas, placing it below the
hiddenAddressHidden component.In the Property ID field, enter
mapAddress.In the Label field, enter
Address.In the Data Reference Key field, enter
hiddenAddress.In the Google Key field, enter your Google Maps API key. You can obtain one here: https://developers.google.com/maps/documentation/javascript/get-api-key.
Click Save Component.
Save your module.
Preview your module in Express View. You'll see the following functionality:
The Map V2 component is a Charts & Graphs component for displaying a visual map in Express View. Creators can use a Data Reference Key containing an address string to move the map view to the address location and pin it. You can also enable other map features, like Satellite View and Street View.
A Google Map API key is required when using this component. Visit the Google Maps Platform website to obtain a key: https://developers.google.com/maps/documentation/javascript/get-api-key.
The Map V2 component uses a Google Maps API key to access Google's Maps JavaScript API and Geocoding APIs. Each API serves a different function:
Maps JavaScript API: Displays a map that includes imagery and local data from the same source as Google Maps.
To learn more about the Maps Javascript API, visit the Google APIs Marketplace: https://console.cloud.google.com/marketplace/product/google/maps-backend.googleapis.com.
Geocoding API: Converts an address to a geographic coordinate. The Maps V2 component uses this API when referring to the address in the Data Reference Key field.
To learn more about the Geocoding API, visit the Google APIs Marketplace: https://console.cloud.google.com/marketplace/product/google/geocoding-backend.googleapis.com.
You'll find the Map V2 component in the Charts & Graphs group to the left of the Module Builder.
About the Configuration Window
To learn more about general component settings, view our General Component Settings article.
Display Panel
Field Text
Setting | Description |
|---|---|
Label | Label Text conveys what the input component is and what information it displays. Enter the purpose of the corresponding component or field. User-friendly labels make your module more accessible. Keep labels short and descriptive (a word or two) using title case. For longer entries, use sentence case. |
Formatting
Setting | Description |
|---|---|
Make Map Draggable | Set to |
Allow Map Zoom | Set to |
Allow Satellite View | Set to |
Allow Fullscreen View | Set to |
Allow Street View | Set to
|
Default State Options
Setting | Description |
|---|---|
Multiple Values | Enter a formatted address string for the map to start on. |
Read-Only View | Prevents the map from accepting a Data Reference Key, and prevents end-users from adjusting the map view. Checking this setting disables the following settings:
|
Table View | Displays the value in the table view of the submission data. |
Hide Field | Displays or hides the component from view. Setting Hide Field to By default, Hide Field is set to Reveal a hidden component using the OUTPUTS table in a logic component with the Type set to visible. |
Data Panel
Data Source
Setting | Description |
|---|---|
Data Reference Key | Enter the Property ID of the component that contains either a formatted address string or a single value. For example,
|
Google Key | Enter an API key to access Google's Maps API. *This field is required to use the Map V2 component. Acquire an API key here: https://developers.google.com/maps/documentation/javascript/get-api-key.
|
Data Storage
Setting | Description |
|---|---|
Store in Database | The Store Data in Database setting affects how data persists through your application. When set to
Set the toggle to
|
Validation Panel
User Input
Setting | Description |
|---|---|
Required | This setting is currently in development. |
Advanced Panel
Set Execution
Setting | Description |
|---|---|
Debounce the Calls After | The number of milliseconds that pass before this component calls the Google Maps API using the Data Reference Key value. If your Data Reference Key dynamically updates, increase the value to reduce the call frequency to the Google Maps API. The default value is 600 ms. |
Additional Styling
Setting | Description |
|---|---|
Custom CSS Class | Enter a Custom CSS Class to apply to your component. Custom CSS lets you maintain a consistent look and feel when the field or element is part of a template or multiple modules. Updated CSS styling applies to all components that reference this custom class name. |
Additional Display Options
Setting | Description |
|---|---|
The Default Location on Browser Load | Enter a formatted address string for the map to begin on. |
Default Zoom Level | The map's zoom level is based on the location set in The Default Location on Browser Load field. Set a value between The default value is |
Point Zoom Level | The level of zoom after setting a value between The default for this setting is |
Height of Ma | Set the height of the map viewport in pixels (px). The default value is
|
Width of Map | Set the width of the map viewport in pixels (px) or percentage (%). The default value is |
Adding a Map V2 Component
For this example, create a module that lets end-users search for map locations by entering an address into an Address Search component. You need a Google Map API key to configure this module. Visit the Google Maps Platform website to obtain a key: https://developers.google.com/maps/documentation/javascript/get-api-key.
Configure the Address Search Component
First, configure an Address Search component so end-users can enter an address that stores in the Map V2 component.
In the Module Builder, drag and drop an Address Search component onto the canvas.
In the Property ID field, enter
address.In the Label Text field, enter
Address Search.Under Address Display Options, set the Show Street, Show City, Show State, and Show Country toggles to
 (ON).
(ON).To the left of the component's configuration window, select Data.
From the Select API drop-down, select an available Google Places API. If you are in the Unqork Training environment, select Creator Workshop Google Places API.
To learn more about Address Search APIs, view our Enabling Address Search Using Address Services article.
Navigate to the Actions settings.
In the Trigger field, enter
dwfFormatAddress.Click Save & Close.
Configure the Data Workflow Component
The Data Workflow component retrieves the formatted address from the Address Search component. Then, it sends it to a Hidden component, so the Map V2 component can reference it.
Drag and drop a Data Workflow onto the canvas, placing it below the
addressAddress Search component.In the Property ID field, enter
dwfFormatAddress.In the Label Text field, enter
dwfFormatAddress.From the Trigger Type drop-down, select Watch.
Configure the Input Operator
The Input operator brings the data from the address Address Search component into the Data Workflow.
Drag and drop an Input operator onto your Data Workflow canvas.
Configure the operator's Info window as follows:
Setting
Value
Component
address
Required
Yes
Source
Default
Configure the Get Operator
The Get operator selects the formatted key from the address Address Search component. The formatted key is an address in a string format.
Drag and drop a Get operator onto your Data Workflow canvas.
Configure the operator's Info window as follows:
Setting
Value
Label
formatted
Preserve Argument Type
☐ (unchecked)
Path
formatted
Connect the output port (right) of the Input operator to the input port (left) of the Get operator.
Configure the Output Operator
The Output operator sends the data to the hiddenAddress Hidden component to store it.
Drag and drop an Output operator onto your Data Workflow canvas.
Configure the operator's Info window as follows:
Setting
Value
Component
hiddenAddress
action
value
Connect the output port (right) of the Get operator to the input port (left) of the Output operator.
Click Save.
Your completed Data Workflow looks like the following:
Configure the Hidden Component
The Hidden component stores the formatted address retrieved from the Data Workflow component. The Map V2 component uses the Hidden component as its Data Reference Key for placing a pin on the map view.
Drag and drop a Hidden component onto the canvas, placing it below the dwfFormatAddress Data Workflow component.
In the Property ID and Label Text fields, enter
hiddenAddress.Click Save & Close.
Configure the Map V2 Component
Lastly, configure a Map V2 component for end-users to visualize the address they searched. You'll configure the component to be hidden, using the Decisions component from earlier to make it visible when an end-user enters an address.
Drag and drop a Map V2 component onto the canvas, placing it below the
hiddenAddressHidden component.In the Property ID field, enter
mapAddress.In the Label field, enter
Address.In the Data Reference Key field, enter
hiddenAddress.In the Google Key field, enter your Google Maps API key. You can acquire one here: https://developers.google.com/maps/documentation/javascript/get-api-key.
Click Save & Close.
Save your module.
Preview your module in Express View. You'll see the following functionality:
Structure of a Map V2 Component's Data
When using a Data Reference Key, the Map V2 component stores the address string in a key and the coordinates in an array. From the previous example, you'll see the following in Express View and in the DevTools Console:
Here's how a Map V2 component looks in the component configuration view:
Here's how the same Map V2 component looks in the DevTools Console:
.png)
.jpg)
.jpg)
.jpg)
