The Date Input component lets your end-user enter or select a date from a specific date range. By default, all Date Input entries store using the YYYY-MM-DD format and include a timestamp of midnight (00:00) in Coordinated Universal Time. This ensures all date-related data stores in a consistent and standardized way.
Here are some examples of when you would use a Date Input component:
Collecting date of birth.
Setting a minimum age for an application.
Noting a date of service or period of employment.
Recording the date of signing.
Setting an effective date (from/to), first date, or last date.
About the Configuration Window
To learn more about general component settings and those that display when a component is associated with Data Models, view our General Component Settings article.
Display Settings
Field Text
Setting | Description |
|---|---|
Label Text | Label Text conveys what the input component is and what information it displays. Enter the purpose of the corresponding component or field. User-friendly labels make your module more accessible. Keep labels short and descriptive (a word or two) using title case. For longer entries, use sentence case. |
Placeholder Text | A short prompt telling end-users the expected value of an input field. For example, |
Contextual Help
Setting | Description |
|---|---|
Tooltip | A short hint that displays when an end-user positions their cursor over the |
Default State Options
Setting | Description |
|---|---|
Hide Label | Setting Hide Label to By default, this setting is set to |
Hide Field | Displays or hides the component from view. Setting Hide Field to By default, Hide Field is set to |
Formatting
Setting | Description |
|---|---|
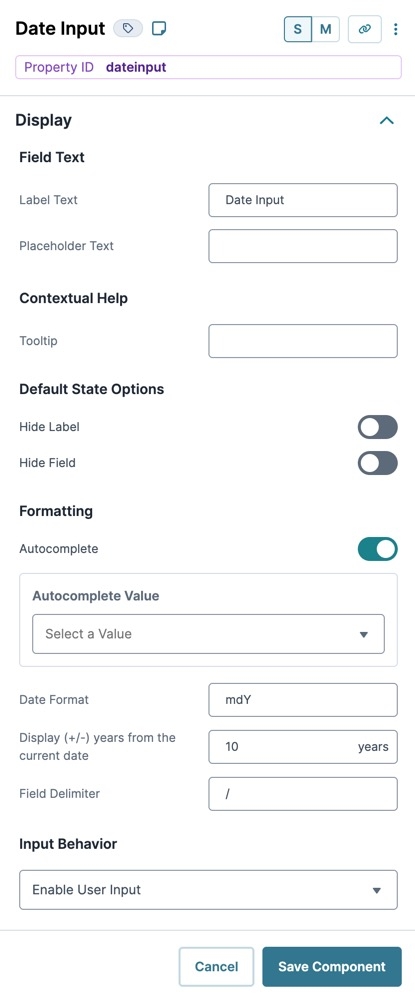
Autocomplete | Autocomplete detects end-user data saved in a browser and uses it to fill relevant fields. For example, in Express View, if there is a field labeled First Name, and an end-user clicks into the field, the end-user's browser autofill function suggests first names saved to the browser. By default, Autocomplete is set to |
Autocomplete Value | When Autocomplete is set to
|
Date Format | Use this setting to change the format of the Placeholder Text or any dates selected in Calendar View. Possible values are
|
Display (+/-) Years from the Current Date | Sets the maximum number of years available in the date picker calendar. |
Field Delimiter | Delimiters show the breaks between the month, day, and year in a date. Common delimiters include a period ( |
Input Behavior
Setting | Description |
|---|---|
Input Behavior | Controls how end-users interact with the component. Choose from the following options:
|
Data Settings
Data Storage
Setting | Description |
|---|---|
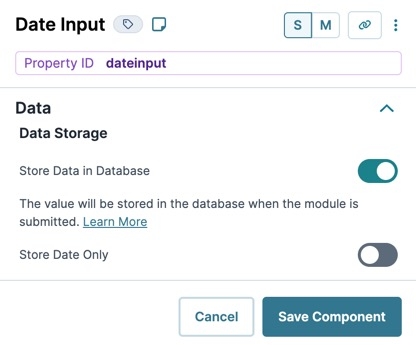
Store Data in Database | The Store Data in Database setting affects how data persists through your application. When set to
Set the toggle to
|
Store Date Only | Unqork stores all dates in ISO8601 format with or without the timestamp based on the Store Date Only setting. That way, dates are always passed as either When set to By default, Store Date Only is set to |
Actions Settings
Triggers
Setting | Description |
|---|---|
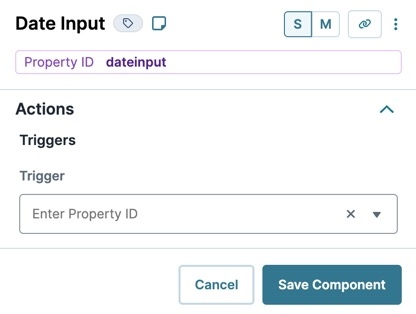
Trigger | To set up a trigger, enter the Property ID of your chosen logic component into this field. When the end-user performs an action on the current component, the triggered component fires. |
Validation Settings
Valid Date
Setting | Description |
|---|---|
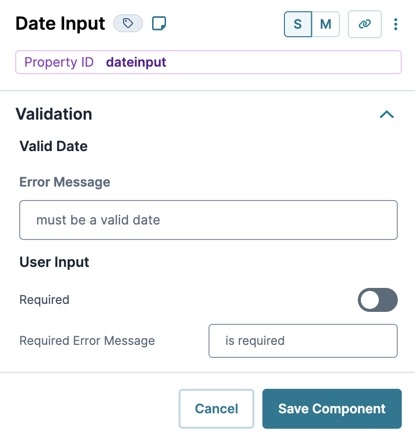
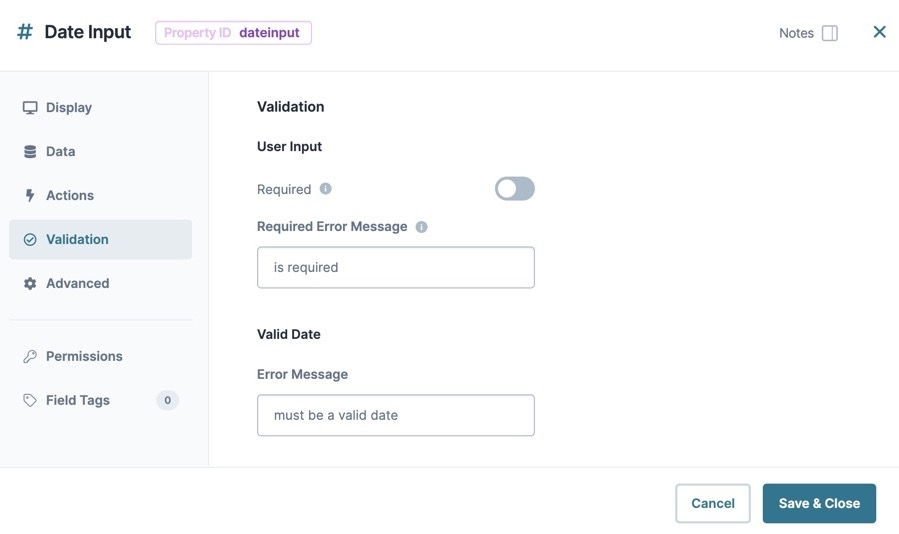
Error Message | Displays as a custom error message when the end-user enters an invalid date. |
User Input
Setting | Description |
|---|---|
Required | When set to By default, Required is set to |
Required Error Message | A custom error message that displays below a required field. The error message displays when the end-user tries to save or submit the module without completing the required field. |
Advanced Settings
Additional Validation Options
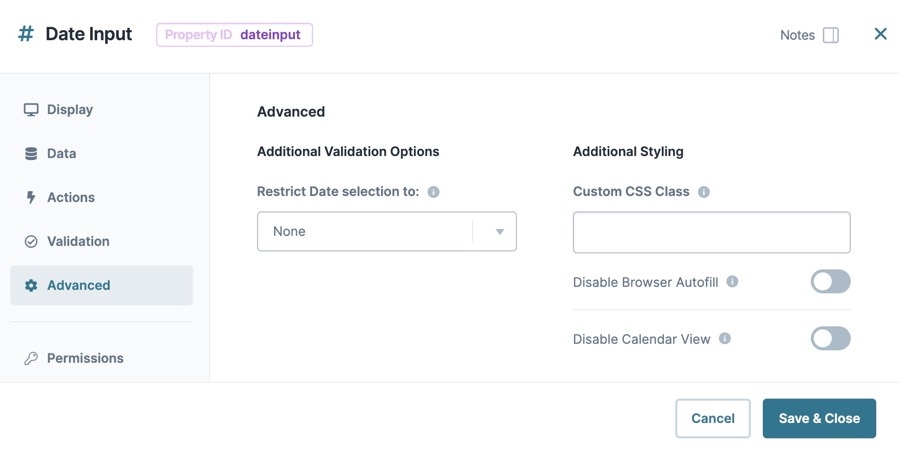
Restrict Date Selection To
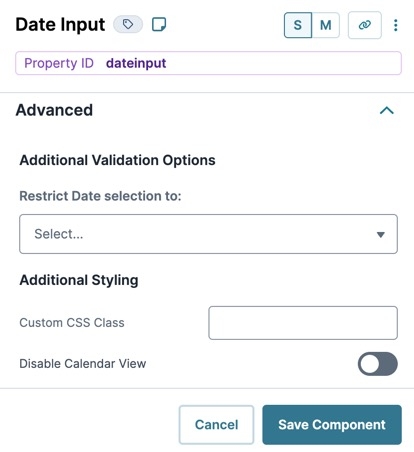
The Restrict Date Selection To setting lets you set date restrictions to prevent end-users from choosing invalid values. For example, use the Restrict Date Selection To setting to require a minimum age for end-users, or to schedule for dates only in the future.
None
No validation restrictions apply, and end-users can select or enter any date into the Date Input component.
Future Only
Specify a date range where end-users only select dates that exist on or after the current date.
Setting | Description |
|---|---|
Minimum Date Error Message | Displays as a custom error message when the end-user enters a date that exists after the current date. |
Choose Date | All future dates of the current date are accepted. To choose a date in the future and to accept all dates after it, use the After a Date setting. |
Past Only
Specify a date range where end-users only select dates that exist on or before the current date.
Setting | Description |
|---|---|
Maximum Date Error Message | Displays as a custom error message when the end-user enters a date that exists before the current date. |
Choose Date | All past dates of the current date are accepted. To choose a date in the past and to accept all dates that come before it, use the Before a Date setting. |
Before a Date
Specify a date range where end-users can only select dates that exist before the chosen date specified in the Choose Date field.
Setting | Description |
|---|---|
Minimum Date Error Message | Displays as a custom error message when the end-user enters a date that exists after the Choose Date value. |
Choose Date | Enter or select a date the Date Input component validates against. If an end-user enters a date that exists after the Choose Date value, the Minimum Date Error Message value displays. End-users using Calendar View cannot select dates that exist after the Choose Date value. |
After a Date
Specify a date range where end-users can only select dates that exist after the chosen date specified in the Choose Date field. End-Users can also select dates in the future.
Setting | Description |
|---|---|
Maximum Date Error Message | Displays as a custom error message when the end-user enters a date that exists before the Choose Date value. |
Choose Date | Enter or select a date the Date Input component validates against. If an end-user enters a date that exists before the Choose Date value, the Minimum Date Error Message value displays. End-users using Calendar View cannot select dates that exist before the Choose Date value. |
Between Dates
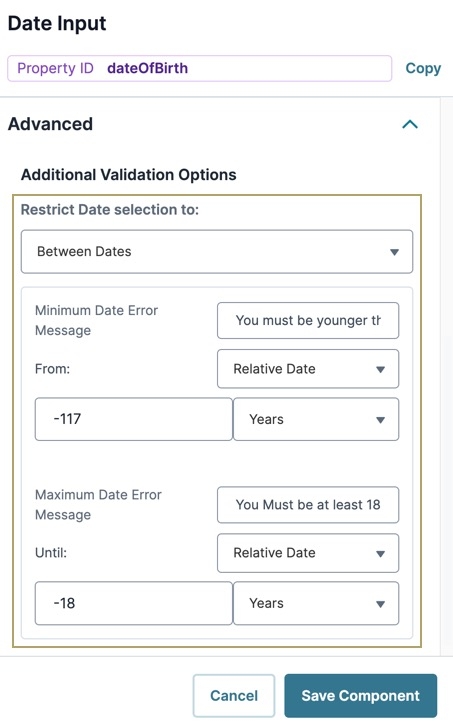
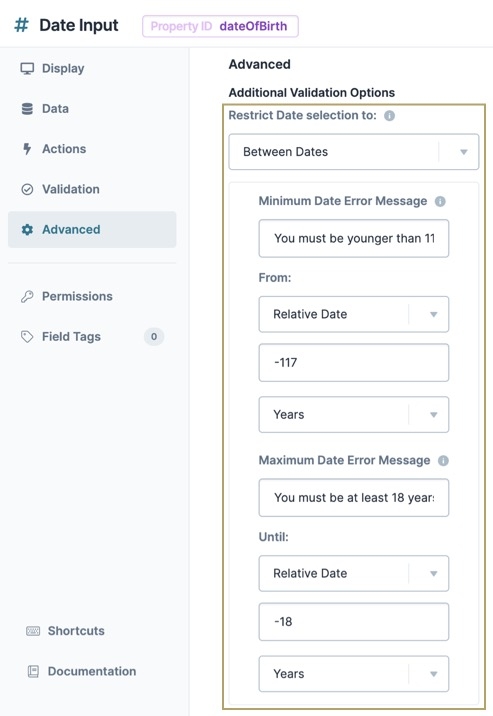
The Between Dates setting offers the greatest flexibility for dictating which dates an end-user can choose.
Setting | Description |
|---|---|
Minimum Date Error Message | Displays as a custom error message when the end-user enters an invalid date. |
From | Specifies the from date. Use the drop-down menu to apply more restrictions to the beginning of your date range:
|
Maximum Date Error Message | Displays as a custom error message when the end-user enters an invalid date. |
Until | This field displays on selection of the Between Dates setting. Use the drop-down menu to apply more restrictions to the beginning of your date range:
|
Additional Styling
Setting | Description |
|---|---|
Custom CSS Class | Enter a Custom CSS Class to apply to your component. Custom CSS lets you maintain a consistent look and feel when the field or element is part of a template or multiple modules. Updated CSS styling applies to all components that reference this custom class name. |
Disable Browser Autofill | Setting the toggle to
By default, the Disable Browser Autofill toggle is set to |
Disable Calendar View |
|
Adding a Date Input Component
Set up a Date Input component that collects date of birth information. Use Validation settings to require the end-user to be older than 18 years of age, but younger than 117 years.
These instructions assume that you have an open module saved with a title.
Configure the Date Input Component
In the Module Builder, drag and drop a
.png) Date Input component onto your canvas.
Date Input component onto your canvas.In the Property ID field, enter dateOfBirth.
In the Label Text field, enter
Date of Birth.Navigate to the component's Data settings.
Under Data Storage, set Store Date Only to
 (ON).
(ON).Navigate to the component's Validation settings.
Under User Input, set Required to
 (ON).
(ON).Navigate to the component's Advanced settings.
In the Restrict Date selection to drop-down, select Between Dates.
In the Minimum Date Error Message field, enter
You must be younger than 117 years of age to apply..In the From drop-down, select Relative Date. The relative date field and Days/Months/Years drop-down display.
In the Relative Date field, enter
-117.From the Days/Months/Years drop-down, select Years.
In the Maxmimum Date Error Message field, enter
You Must be at least 18 years of age to apply..In the Relative Date field, enter
-18.From the Days/Months/Years drop-down, select Years.
Under Additional Styling, set Disable Calendar View to
 (ON).
(ON).Click Save Component.
Save your module.
Once implemented, your Date Input component looks like the following in Express View:
Structure of a Date Input Component's Data
The data structure of a Date Input is a key/value pair. The key is the Property ID name of the component, and the value is stored as a string. By default, the value includes the date and timestamp. To remove the timestamp from the stored value, set the Store Date Only setting to ![]() (ON).
(ON).
The Date Input component lets your end-user enter or select a date from a specific date range. By default, all Date Input entries store using the YYYY-MM-DD format and include a timestamp of midnight (00:00) in Coordinated Universal Time. This ensures all date-related data stores in a consistent and standardized way.
Here are some examples of when you would use a Date Input component:
Collecting date of birth.
Setting a minimum age for an application.
Noting date of service or period of employment.
Recording date of signing.
Setting an effective date (from/to), first date, or last date.
About the Configuration Window
To learn more about general component settings and those that display when a component is associated with Data Models, view our General Component Settings article.
Display Panel
Field Text
Setting | Description |
|---|---|
Label Text | Label Text conveys what the input component is and what information it displays. Enter the purpose of the corresponding component or field. User-friendly labels make your module more accessible. Keep labels short and descriptive (a word or two) using title case. For longer entries, use sentence case. |
Placeholder Text | A short prompt telling end-users the expected value of an input field. For example, |
Default State Options
Setting | Description |
|---|---|
Hide Label | Setting Hide Label to By default, this setting is set to |
Read Only View | When set to By default, the Read Only View toggle is set to |
Disable User Input | When set to By default, Disable User Input is set to |
Hide Field | Displays or hides the component from view. Setting Hide Field to By default, Hide Field is set to |
Contextual Help
Setting | Description |
|---|---|
Tooltip | A short hint that displays when an end-user positions their cursor over the |
Formatting
Setting | Description |
|---|---|
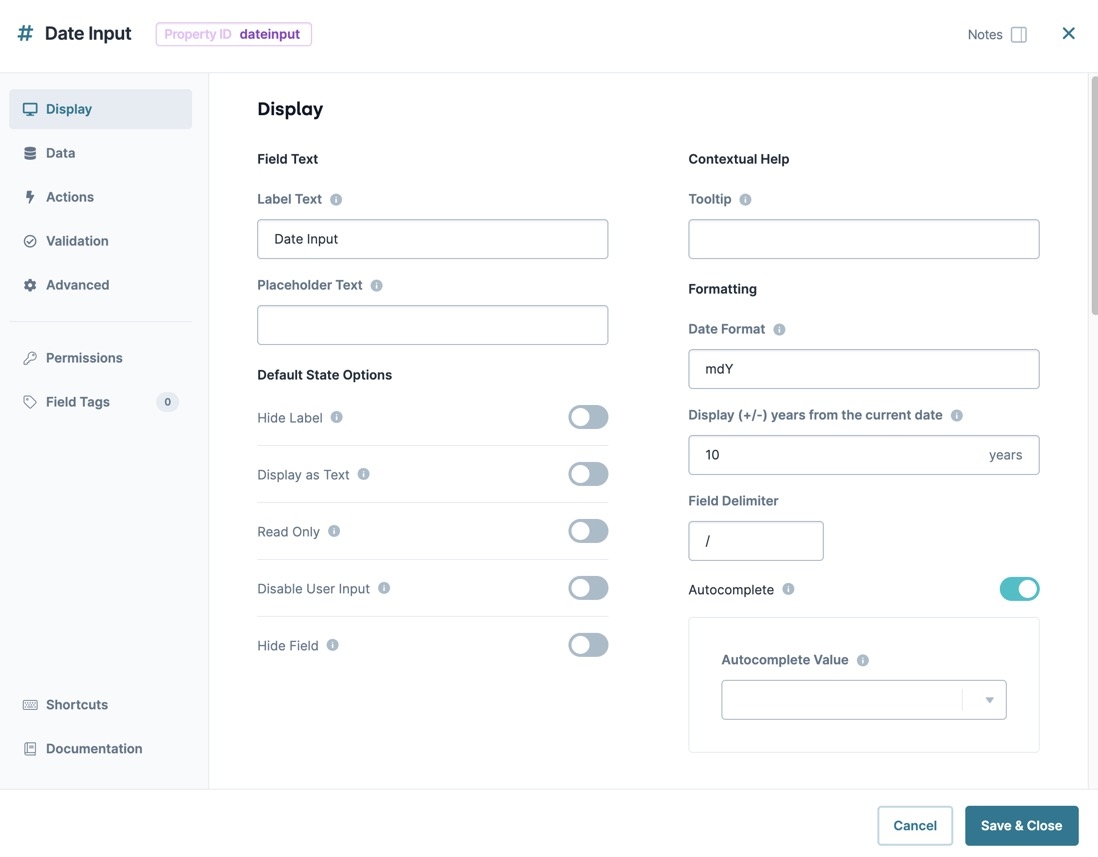
Date Format | Use this setting to change the format of the Placeholder Text or any dates selected in Calendar View. Possible values are
|
Display (+/-) Years from the Current Date | Sets the maximum number of years available in the date picker calendar. |
Field Delimiter | Delimiters show the breaks between the month, day, and year in a date. Common delimiters include a period ( |
Autocomplete
Setting | Description |
|---|---|
Autocomplete | Autocomplete detects end-user data saved in a browser and uses it to fill relevant fields. For example, in Express View, if there is a field labeled First Name, and an end-user clicks into the field, the end-user's browser autofill function suggests first names saved to the browser. By default, Autocomplete is set to |
Autocomplete Value | When Autocomplete is set to
|
Data Panel
Data Storage
Setting | Description |
|---|---|
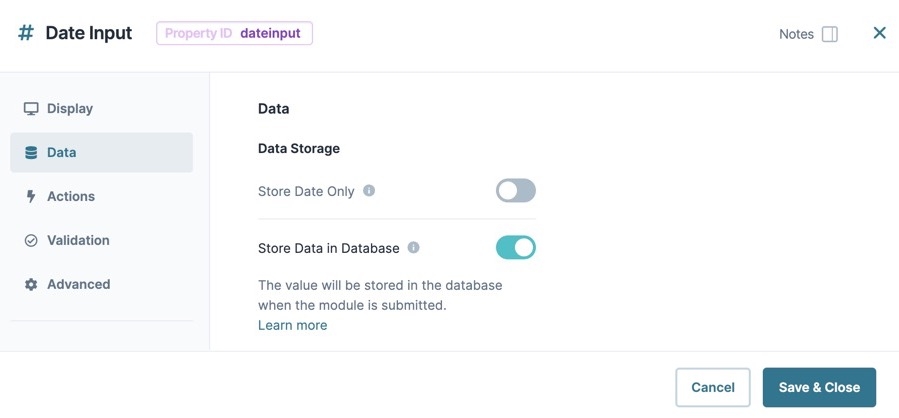
Store Date Only | Unqork stores all dates in ISO8601 format with or without the timestamp based on the Store Date Only setting. That way, dates are always passed as either When set to By default, Store Date Only is set to |
Store Data in Database | The Store Data in Database setting affects how data persists through your application. When set to
Set the toggle to
|
Actions Panel
Triggers
Setting | Description |
|---|---|
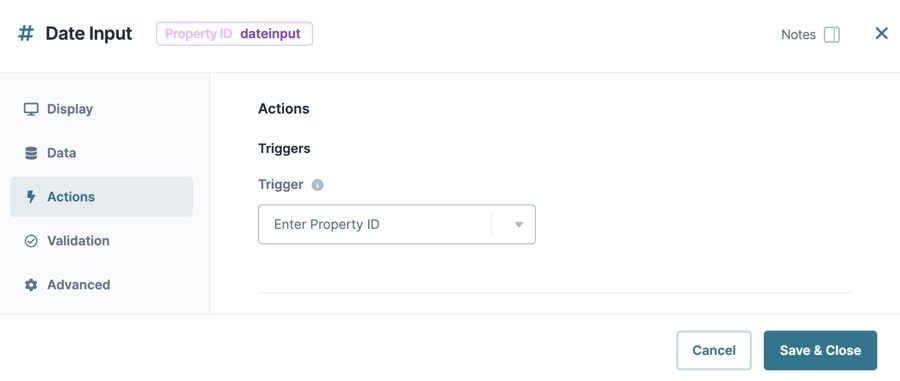
Trigger | To set up a trigger, enter the Property ID of your chosen logic component into this field. When the end-user performs an action on the current component, the triggered component fires. |
Validation Panel
User Input
Setting | Description |
|---|---|
Required | When set to By default, Required is set to |
Required Error Message | A custom error message that displays below a required field. The error message displays when the end-user tries to save or submit the module without completing the required field. |
Valid Date
Setting | Description |
|---|---|
Error Message | Displays as a custom error message when the end-user enters an invalid date. |
Advanced Panel
Additional Validation Options
Restrict Date Selection To
The Restrict Date Selection To setting lets you set date restrictions to prevent end-users from choosing invalid values. For example, use the Restrict Date Selection To setting to require a minimum age for end-users, or to schedule for dates only in the future.
None
No validation restrictions apply, and end-users can select or enter any date into the Date Input component.
Future Only
Specify a date range where end-users only select dates that exist on or after the current date.
Setting | Description |
|---|---|
Minimum Date Error Message | Displays as a custom error message when the end-user enters a date that exists after the current date. |
Choose Date | All future dates of the current date are accepted. To choose a date in the future and to accept all dates after it, use the After a Date setting. |
Past Only
Specify a date range where end-users only select dates that exist on or before the current date.
Setting | Description |
|---|---|
Maximum Date Error Message | Displays as a custom error message when the end-user enters a date that exists before the current date. |
Choose Date | All past dates of the current date are accepted. To choose a date in the past and to accept all dates that come before it, use the Before a Date setting. |
Before a Date
Specify a date range where end-users can only select dates that exist before the chosen date specified in the Choose Date field.
Setting | Description |
|---|---|
Minimum Date Error Message | Displays as a custom error message when the end-user enters a date that exists after the Choose Date value. |
Choose Date | Enter or select a date the Date Input component validates against. If an end-user enters a date that exists after the Choose Date value, the Minimum Date Error Message value displays. End-users using Calendar View cannot select dates that exist after the Choose Date value. |
After a Date
Specify a date range where end-users can only select dates that exist after the chosen date specified in the Choose Date field. End-Users can also select dates in the future.
Setting | Description |
|---|---|
Maximum Date Error Message | Displays as a custom error message when the end-user enters a date that exists before the Choose Date value. |
Choose Date | Enter or select a date the Date Input component validates against. If an end-user enters a date that exists before the Choose Date value, the Minimum Date Error Message value displays. End-users using Calendar View cannot select dates that exist before the Choose Date value. |
Between Dates
The Between Dates setting offers the greatest flexibility for dictating which dates an end-user can choose.
Setting | Description |
|---|---|
Minimum Date Error Message | Displays as a custom error message when the end-user enters an invalid date. |
From | Specifies the from date. Use the drop-down menu to apply more restrictions to the beginning of your date range:
|
Maximum Date Error Message | Displays as a custom error message when the end-user enters an invalid date. |
Until | This field displays on selection of the Between Dates setting. Use the drop-down menu to apply more restrictions to the beginning of your date range:
|
Additional Styling
Setting | Description |
|---|---|
Custom CSS Class | Enter a Custom CSS Class to apply to your component. Custom CSS lets you maintain a consistent look and feel when the field or element is part of a template or multiple modules. Updated CSS styling applies to all components that reference this custom class name. |
Disable Browser Autofill | Setting the toggle to
By default, the Disable Browser Autofill toggle is set to |
Disable Calendar View | Set to By default, Disable Calendar View is set to |
Adding a Date Input Component
Set up a Date Input component that collects date of birth information. Use Validation settings to require the end-user to be older than 18 years of age, but younger than 117 years.
These instructions assume that you have an open module saved with a title.
Configure the Date Input Component
In the Module Builder, drag and drop a
.png) Date Input component onto your canvas.
Date Input component onto your canvas.In the Property ID field, enter dateOfBirth.
In the Label Text field, enter Date of Birth.
Click
.png) Data.
Data.Under Data Storage, set Store Date Only to
 (ON).
(ON).Click
.png) Advanced.
Advanced.In the Restrict Date selection to drop-down, select Between Dates.
In the Minimum Date Error Message field, enter
You must be younger than 117 years of age to apply.In the From drop-down, select Relative Date. The relative date field and Days/Months/Years drop-down display.
In the Relative Date field, enter -117.
From the Days/Months/Years drop-down, select Years.
In the Maxmimum Date Error Message field, enter You Must be at least 18 years of age to apply.
In the Relative Date field, enter -18.
From the Days/Months/Years drop-down, select Years.
Under Additional Styling, set Disable Calendar View to
 (ON).
(ON).Click Save & Close.
Save your module.
Once implemented, your Date Input component looks like the following in Express View:
Structure of a Date Input Component's Data
The data structure of a Date Input is a key/value pair. The key is the Property ID name of the component, and the value is stored as a string. By default, the value includes the date and timestamp. To remove the timestamp from the stored value, set the Store Date Only setting to ![]() (ON).
(ON).
.jpg) (Tooltip) icon. Tooltips can display across more than one line.
(Tooltip) icon. Tooltips can display across more than one line.