Overview
Sometimes, you might need to change your data objects to camelCase. This is especially helpful when building your applications since Unqork uses camelCase for object and Property ID naming. To do that, use the _.invert and _.camelCase Lodash functions.
To read more about the
_.invertand_.camelCaseparameters, you can visit: https://lodash.com/docs/4.17.15.
How This Example Works
To turn your data into camelCase, you must first retrieve a data set with object keys that do not use camelCase. In this example, you'll retrieve your data from a transform. Once you have the data in your module, your Data Workflow swaps the information in your object's key and value pairs. Then, your Data Workflow turns your inverted object values into camelCase. The last step inverts the key/value pairs again to their original order.
Here are the basic steps for this example:
Set up and execute the transform's input data.
Invert input data keys into object values.
Convert inverted values into camelCase.
Revert inverted values into object keys.
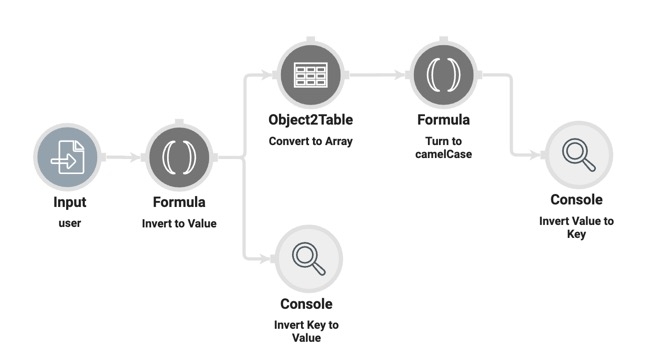
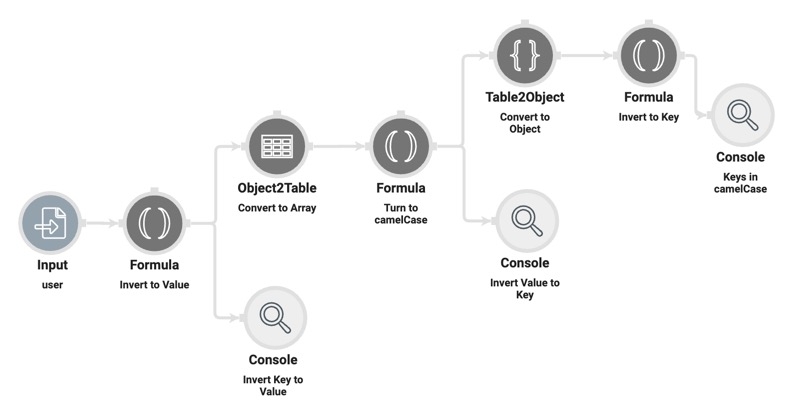
Here's how the completed configuration looks in the Module Builder:
Setting Up Your Input Data
Creating Your Input Data
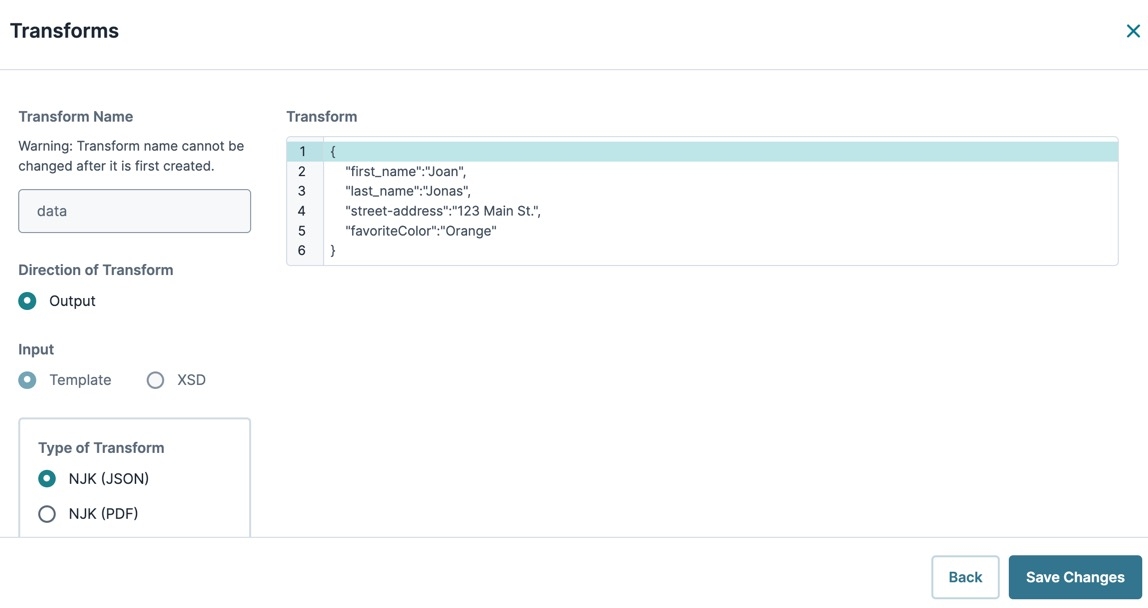
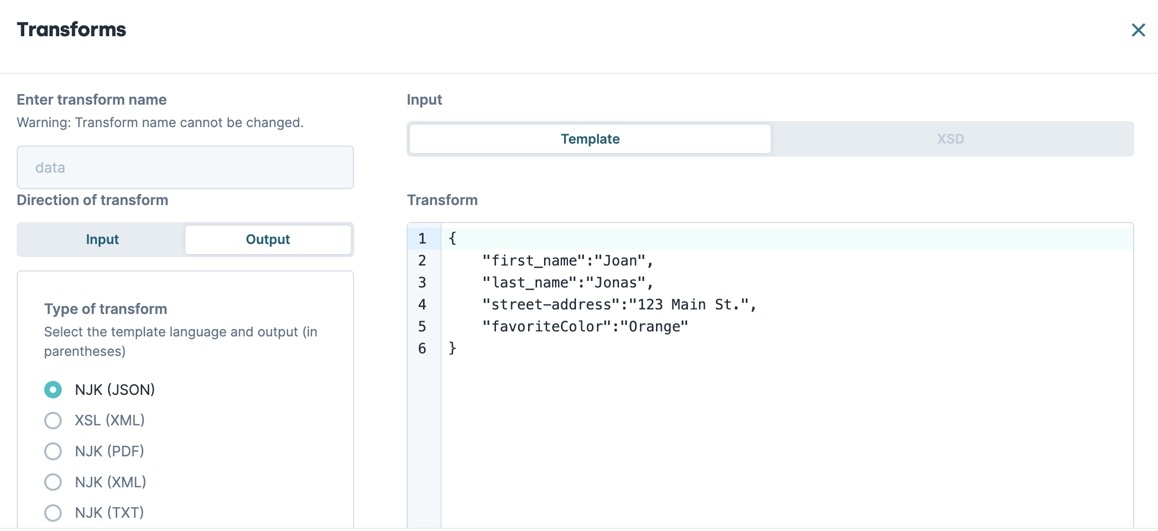
Before you can convert data into camelCase, you need a data set to make your alterations. In this example, you'll set up a transform and call the transform data into your module. Open Transforms page from the Module Builder and create a new transform called data. Then, set the Direction of Transform to Output and the Type of Transform to Output NJK(JSON). In the Transform body, enter the following:
{
    "first_name":"Joan",
    "last_name":"Jonas",
    "street-address":"123 Main St.",
    "favoriteColor":"Orange"
}
Here's how the transform looks on the Transforms page:
Calling the Data in Your Module
Now that your transform is ready, you can call it in your module using a Plug-In component. Before you configure your Plug-In, add a Hidden component to store your transform data, naiming it user. Then, add the  Plug-In component and name it plugGetData.
In your Plug-In component's Inputs table, enter the following:
Property ID | Mapping |
|---|---|
'Enter Your Module ID' | moduleId |
'Enter Your Transform Name' | transformName |
'Enter the Field to Transform' | data |
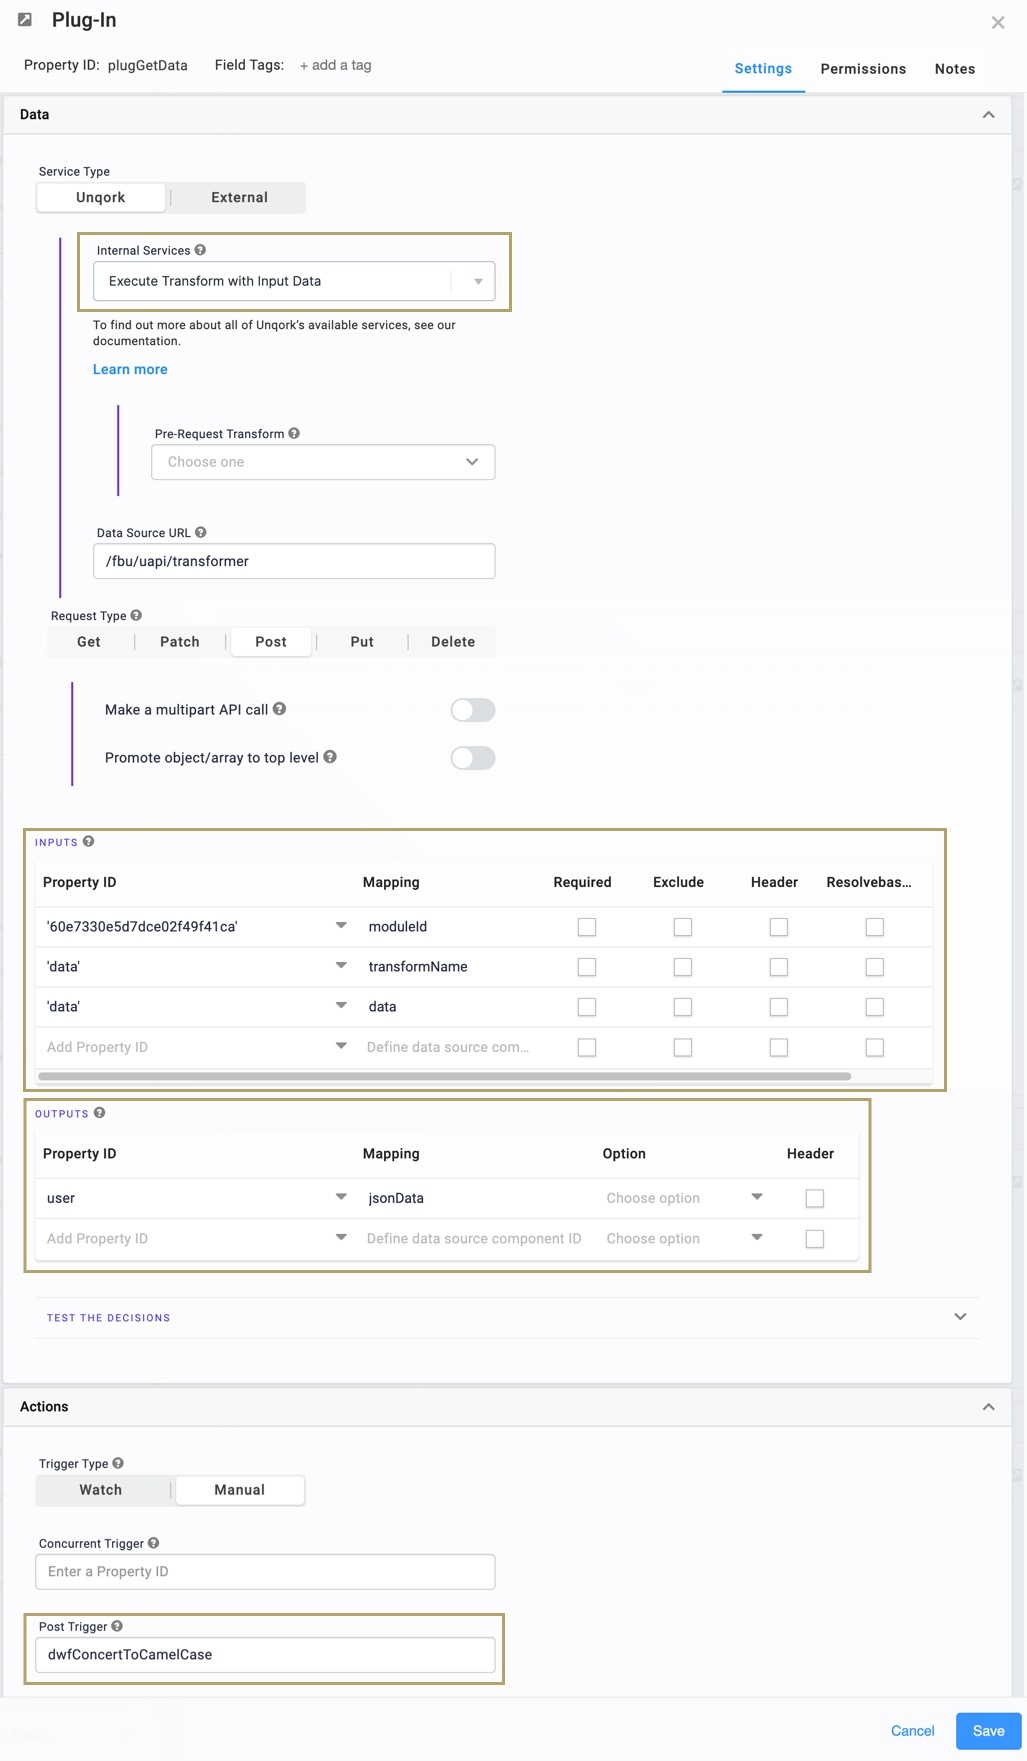
Next, you'll add the user Hidden component as the output for your  Plug-In component. Because you used a NJK(JSON) transform, your output Mapping is
 jsonData. Your transform exists in the same module where you call it, so you'll use the Internal ServiceService Type and set it to Execute Transform with Input Data.
Here's how the plugGetData Plug-In component's configuration looks:
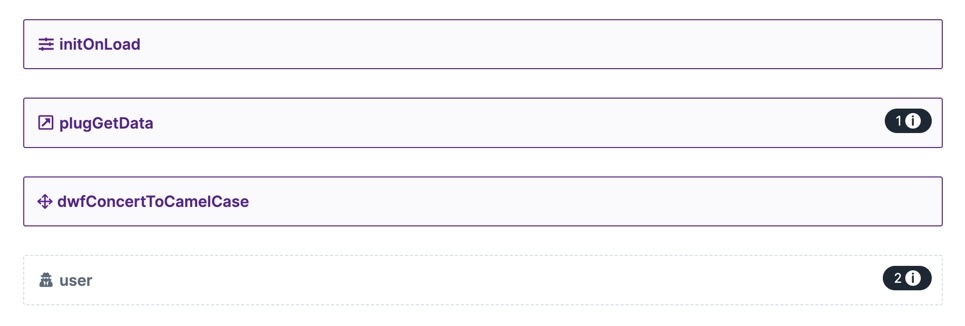
And here's how the components look in the Module Builder:
Initiating Your Data Transformation
Now you can retrieve your data using an Initializer component. Name your Initializer component initOnLoad and set the Trigger Type to New Submission. In the Outputs table, enter your plugGetData Plug-In component to trigger it.
Here's how the components look in your Module Builder:
Inverting Your Data Object Keys
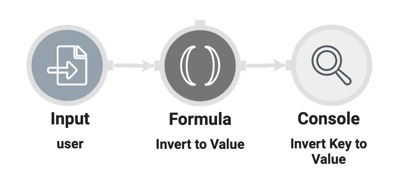
With the input data in your module, you'll convert the placement of your key/value pairs. To do that, add a Data Workflow component and name it dwfConvertToCamelCase. Your Data Workflow begins with an Input operator that retrieves your user Hidden component's transform data. Then, add a Formula operator with the _.invert Lodash function. This function converts the key/value data in the object's key/value pair. To track the results of this inversion using the DevTools Console, you'll connect a Console operator.
Before viewing the Console output in the DevTools Console, your dwfConvertToCamelCase Data Workflow component needs a trigger. In your plugGetData  Plug-In component's Post-Trigger field, enter your Data Workflow's Property Name.
Here's how the Info windows look for your operators:
Input operator:
Setting
Value
Category
Input
Component
user
Required
Yes
Source
Default
Formula operator:
Setting
Value
Category
Formula Value
Label
Invert Value
Formula/Expression
value=LODASH("invert",A)
Console operator:
Setting
Value
Category
Console
Label
Invert Key to Value
Here's how the operators look on your Data Workflow canvas:
Here's a peek at the key/value pairs in the DevTools Console:
Turning Your Inverted Data Into camelCase
Because you only want to apply the camelCase function to your value, you must separate the key/value pair. To do that, add an Object2Table operator to separate your objects into an indexed array. Then, you can apply another Formula operator and use the _.camelCase function on your object value. To track the results of this function, you'll connect another Console operator.
Here's how the Info windows look for your operators:
Object2Table operator:
Setting
Value
Category
Object2Table
Label
Convert to Array
Key Column Name
key
Value Column Name
value
Formula operator:
Setting
Value
Category
Formula Value
Label
Turn to camelCase
Formula/Expression
value=LODASH("camelCase",value)
Console operator:
Setting
Value
Category
Console
Label
Value to camelCase
Here's how the operators look on your Data Workflow canvas:
And here's a peek at your indexed array using camelCase in the DevTools Console:
Inverting Your Data Object Values
Now that your object values are in camelCase, you must return them to their original form. To begin, you'll use a Table2Object operator to return your indexed array to an object. Next, you'll add another Formula operator with the _.invert function to convert your object value back into an object key.
Here's how the Info windows look for your operators:
Table2Object operator:
Setting
Value
Category
Input
Label
Convert to Object
Key Column Name
key
Value Column Name
value
Formula operator:
Setting
Value
Category
ormula Value
Label
Invert to Key
Formula/Expression
key=LODASH("invert",A)
Console operator:
Setting
Value
Category
Console
Label
Keys in camelCase
And here's how the operators look on your Data Workflow canvas:
Here's a peek at your object keys using camelCase in the DevTools Console:
Overview
Sometimes, you might need to change your data objects to camelCase. To do that, you can use the _.invert and _.camelCase Lodash functions. This is especially helpful when building your applications since Unqork uses camelCase for object and Property ID naming.
To read more about the _.invert and _.camelCase parameters, you can visit: https://lodash.com/docs/4.17.15.
How This Use Case Works
To turn your data into camelCase, you must first retrieve a data set. In this use case, you retrieve your data from a transform. The object keys of your data don't use camelCase. So, once you have your data in your module, your Data Workflow swaps the information in your object's key and value pairs. Then, your Data Workflow turns your inverted object values into camelCase. The last step inverts the key/value pairs again to their original order.
Here are the basic steps for how this use case works:
Setup and execute transform input data.
Invert input data keys into object values.
Turn inverted values into camelCase.
Revert inverted values into object keys.
Here's how the completed module looks in the Module Builder:
Setting Up Your Input Data
Creating Your Input Data
Before you can turn data into camelCase, you need a data set to make your alterations. For this use case, you'll set up a transform and call your transform data into your module. So, you'll open your Transforms tab on your Module Builder and add a new transform. Then, name your transform data and set the Direction of transform to Output and the Type of transform to Output NJK(JSON). In the Transform body, enter the following:
{
    "first_name":"Joan",
    "last_name":"Jonas",
    "street-address":"123 Main St.",
    "favoriteColor":"Orange"
}
Here's how the data transform looks in the Transforms tab:
Calling Your Data Into Your Module
Now that your transform is ready, you can call it into your module using a Plug-In component. But, before you configure your Plug-In, add a Hidden component to store your transform data and name it user. Then, add the  Plug-In component and name it plugGetData.
For your Plug-In's Inputs table, enter the following:
Property ID | Mapping |
|---|---|
'Your Module ID' | moduleId |
'Your Transform Name Here' | transformName |
'The Field to Transform' | data |
Next, you'll enter the user Hidden component for your output for your  Plug-In. Since you used a NJK(JSON) transform, your output Mapping is jsonData. Your transform exists on the same module as where you call it from, so you'll use the Internal ServiceService Type and set it to
 Execute Transform with Input Data.
Here's how this plugGetData Plug-In configuration looks:
And here's how these components look in your Module Builder:
Initiating Your Data Transformation
By now, your data is ready for retrieval, which you can do by adding an Initializer component. Name your Initializer component initOnLoad and, in the Trigger Type field, select New Submission. In the Outputs table, enter your plugGetData  Plug-In to trigger it.
Here's how these components look in your Module Builder:
Inverting Your Data Object Keys
With your input data in your module, your first step is to swap the placement of your key/value pairs. To do that, add a Data Workflow component and name it dwfConvertToCamelCase. Your Data Workflow starts with an Input operator that retrieves your user Hidden component's transform data. Then, add a Formula operator, which uses the _.invert Lodash function. This function swaps the key and value data in an object's key/value pair. To track the results of this inversion in the DevTools Console, you'll connect a Console operator.
Before viewing the Console output in the DevTools Console, your dwfConvertToCamelCase Data Workflow component also needs a trigger. In your plugGetData Plug-In component's Post-Trigger field, enter your Data Workflow's Property Name.
Here's how the Info windows for those operators look:
Input operator:
Setting
Value
Category
Input
Component
user
Required
Yes
Source
Default
Formula operator:
Setting
Value
Category
Formula Value
Label
Invert Value
Formula/Expression
value=LODASH("invert",A)
Console operator:
Setting
Value
Category
Console
Label
Invert Key to Value
And here's how they look on your Data Workflow canvas:
And here's a peek at your key/value pairs in the DevTools Console:
Turning Your Inverted Data Into camelCase
Because you only want to apply your camelCase function to your value, you must first split them up. To do that, add an Object2Table operator which splits your objects into an indexed array. From here, you can apply another Formula operator to use the _.camelCase function on your object value. To track the results of this function, you'll connect another Console operator.
Here's how the Info windows for those operators look:
Object2Table operator:
Setting
Value
Category
Object2Table
Label
Convert to Array
Key Column Name
key
Value Column Name
value
Formula operator:
Setting
Value
Category
Formula Value
Label
Turn to camelCase
Formula/Expression
value=LODASH("camelCase",value)
Console operator:
Setting
Value
Category
Console
Label
Value to camelCase
Here's how they look on your Data Workflow canvas:
And here's a peek at your indexed array using camelCase in the DevTools Console:
Inverting Your Data Object Values
Now that your object values are in camelCase, you must return them to their original position. To start, you'll use a Table2Object operator to return your indexed array to an object. Next, add another Formula operator to do another _.invert function to swap your object value back into an object key.
Here's how the Info windows for those operators look:
Table2Object operator:
Setting
Value
Category
Input
Label
Convert to Object
Key Column Name
key
Value Column Name
value
Formula operator:
Setting
Value
Category
Formula Value
Label
Invert to Key
Formula/Expression
key=LODASH("invert",A)
Console operator:
Setting
Value
Category
Console
Label
Keys in camelCase
And here's how they look on your Data Workflow canvas:
And here's a peek at your object keys using camelCase in the DevTools Console:
