Learn how to use the REGEXMATCH formula in a Data Workflow component to validate an email address value being submitted by an end-user. You’ll also configure logic that disables a submission button by default, then enables it once the end-user enters a valid email format.
Discover more about regex in our Using Regex in Unqork article.
Configure the End-User Components
For this example, configure an Email component where users enter their email address. Then, configure a Button component to submit the data. Later, you’ll configure a Data Workflow component to enable or disable the submission button based on the validity of the email.
Configure the Email Component
First, configure an Email component to accept an email.
In the Module Builder, drag and drop an Email component onto your canvas.
In the Property ID field, enter
email.In the Label Text field, enter
Email.Click Save Component.
Configure the Button Component
Configure a Button component to be initially disabled. Later, we’ll use a Data Workflow to enable the button if a valid email address is entered in the Email component.
Drag and drop a Button component onto your canvas, placing it below the Email component.
In the Property ID field, enter
btnSubmitEmail.In the Label Text field, enter
Submit Email.Set Disable User Input to
 (ON). This ensures that the end-user cannot select the button before entering an email address.
Set Restrict to Single Click to
 (ON). This prevents users from accidentally submitting their data multiple times.
Click Save Component.
While you can use the Regular Expression Pattern settings in the Email component to validate entries, these settings only notify the end-user if their email is invalid. It does not control the status of the button. To control the visibility of the button, use the Data Workflow to control the Regex.
Configure the Data Workflow Component
Add and configure a Data Workflow component to use a REGEXMATCH function to verify the address entered in the email Email component field. Use a Branch Split operator to enable or disable the btnSubmitEmail Button component depending on the Boolean value returned by the REGEXMATCH function.
Drag and drop a Data Workflow component onto your canvas, placing it above the Button component.
In the Property ID and Canvas Label Text fields, enter
dwfCheckEmail.Navigate to the Actions settings.
Set the Trigger Type as Watch.
Configure the Input Operator
To begin the Data Workflow, use an Input operator to bring in data from your Email component.
Drag and drop an Input operator onto your Data Workflow canvas.
Configure the operator's Info window as follows:
Setting
Value
Category
Input
Component
email
Required
Yes
Source
Default
Configure the Formula Operator
Add a Formula operator with the following expression: =REGEXMATCH(A1, "^[a-zA-Z0-9._%+-]+@[a-zA-Z0-9.-]+\.[a-zA-Z]{2,}$"). You get this expression by using the REGEXMATCH syntax of REGEXMATCH(stringToCheck,regularExpression). But your formula replaces the stringToCheck syntax with A. Doing so retrieves data from the operator's input port. Then, replaces regularExpression with the email validation Regex.
Your organization’s standards might require a different Regex for validation.
Drag and drop a Formula operator onto your Data Workflow canvas.
Configure the operator's Info window as follows:
Setting
Value
Category
Formula Value
Label
REGEXMATCH
Preserve Argument Type
.png) (unchecked)
(unchecked)Formula/Expression
=REGEXMATCH(A1, "^[a-zA-Z0-9._%+-]+@[a-zA-Z0-9.-]+\.[a-zA-Z]{2,}$")
Connect the output port (right) of the Input operator to the input port (left) of the Formula operator.
Configure the Branch Split Operator
Next, use a Branch Split operator to create two paths. If the Formula operator determines the email is valid, the Branch Split operator sends a No value. If the email is invalid, the operator sends a Yes value. Later, you’ll use these values to enable or disable the submission button.
Drag and drop a Branch Split operator onto your Data Workflow canvas.
Configure the operator's Info window as follows:
Setting
Value
Category
Branch Start
Label
Yes or No Split
Do Not Sanitize Formula
.png) (checked)
(checked)Preserve Argument Type
.png) (unchecked)
(unchecked)Condition
A
Connect the output port (right) of the
REGEXMATCHFormula Value operator to the input port (left) of theYes or No SplitBranch Split operator.
Configure the First Create Value Operator
Each branch from the Branch Split operator leads to a Create Value operator depending on the REGEXMATCH response. The created value controls the submission button’s Enable or Disable state.
Drag and drop a Create Value operator onto your Data Workflow canvas.
Configure the operator's Info window as follows:
Setting
Value
Category
Create Value
Label
Yes Value (Disable)
Preserve Argument Type
.png) (unchecked)
(unchecked)Expression/Value
='yes'
Connect the top output port (upper-right) of the
Yes or No SplitBranch Split operator to the argument port (top) of theYes ValueCreate Value operator.
Configure the Second Create Value Operator
Drag and drop a Create Value operator onto your Data Workflow canvas.
Configure the operator's Info window as follows:
Setting
Value
Category
Create Value
Label
No Value (Enable)
Preserve Argument Type
.png) (unchecked)
(unchecked)Expression/Value
='no'
Connect the bottom output port (lower-right) of the
Yes or No SplitBranch Split operator to the argument port (top) of theNo ValueCreate Value operator.
Configure the Branch Merge Operator
While the data travels through separate logic pathways based on validation results, both paths must converge to update the same target component. Add a Branch Merge operator to unify these pathways, then connect it to an Output operator linked to your Button component. The Output operator dynamically toggles the button's state based on the incoming value. If the operator receives a value of Yes (invalid email), the button is disabled. If it receives a value of No (valid email), the button is enabled.
Drag and drop a Branch Merge operator onto your Data Workflow canvas.
Configure the operator's Info window as follows:
Setting | Value |
|---|---|
Category | Branch End |
Label | Yes or No Merge |
Connect the output port (right) of the
Yes ValueCreate Value operator to the top input port (upper left) of theYes or No MergeBranch Merge operator.Connect the output port (right) of the
No ValueCreate Value operator to the bottom input port (lower left) of theYes or No MergeBranch Merge operator.
Configure the Output Operator
Drag and drop an Output operator onto your Data Workflow canvas.
Configure the operator's Info window as follows:
Setting
Value
Category
Output
Component
btnSubmitEmail
Action
Disabled
Connect the output port (right) of the
Yes or No MergeBranch Merge operator to the input port (left) of thebtnSubmitEmailOutput operator.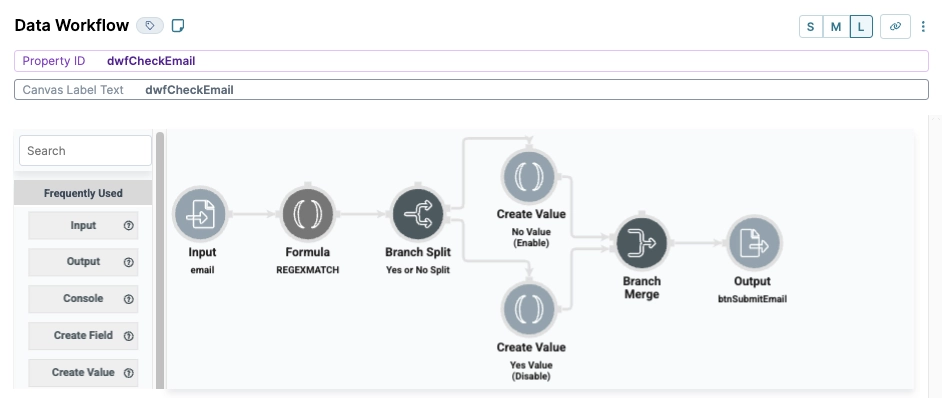
Click Save Component.
Your completed module looks like the following:
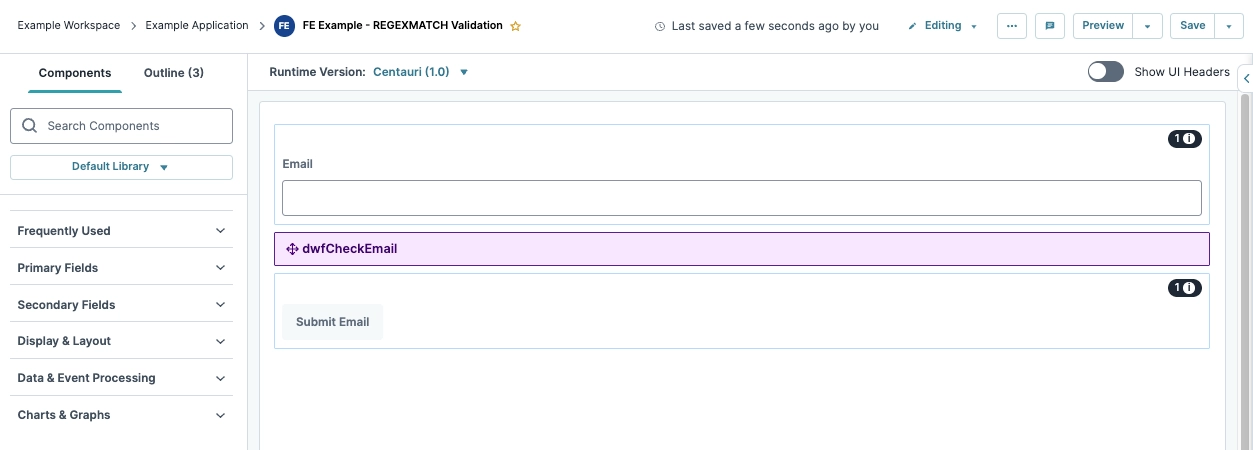
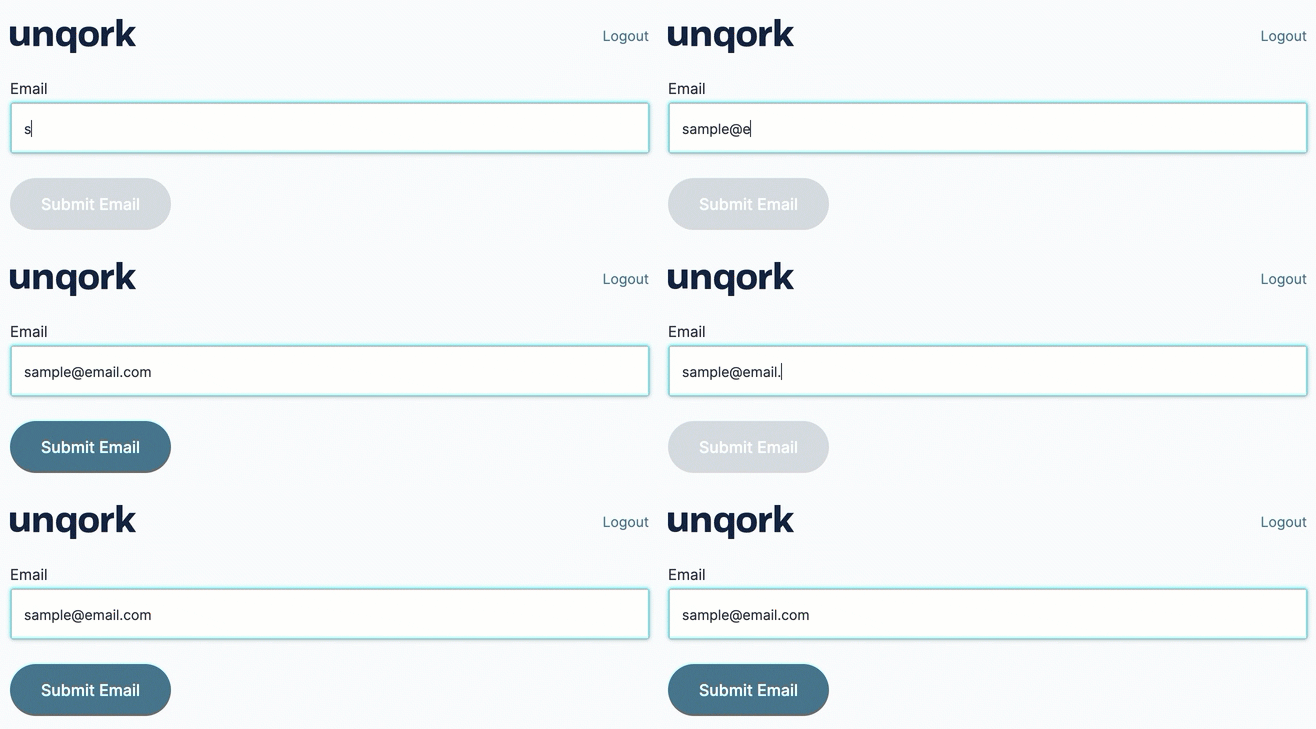
Preview your module in Express View and enter an email in the Email field. The Submit Email button remains disabled until a valid email is entered.
Configure the End-User Components
For this example, configure an Email component where users enter their email address. Then, configure a Button component to submit the data. Later, you’ll configure a Data Workflow component to enable or disable the submission button based on the validity of the email.
Configure the Email Component
First, configure an Email component to accept an email.
In the Module Builder, drag and drop an Email component onto your canvas.
In the Property ID field, enter
email.In the Label Text field, enter
Email.Click Save.
Configure the Button Component
Configure a Button component to be initially disabled. Later, we’ll use a Data Workflow to enable the button if a valid email address is entered in the Email component.
Drag and drop a Button component onto your canvas, placing it below the Email component.
In the Property ID field, enter
btnSubmitEmail.In the Label Text field, enter
Submit Email.Set Disable User Input to
 (ON). This ensures that the end-user cannot select the button before entering an email address.
Set Restrict to Single Click to
 (ON). This prevents users from accidentally submitting their data multiple times.
Click Save & Close.
While you can use the Regular Expression Pattern settings in the Email component to validate entries, these settings only notify the end-user if their email is invalid. It does not control the status of the button. To control the visibility of the button, use the Data Workflow to control the Regex.
Configure the Data Workflow Component
Add and configure a Data Workflow component to use a REGEXMATCH function to verify the address entered in the email Email component field. Use a Branch Split operator to enable or disable the btnSubmitEmail Button component depending on the Boolean value returned by the REGEXMATCH function.
Drag and drop a Data Workflow component onto your canvas, placing it above the Button component.
In the Property ID and Canvas Label Text fields, enter
dwfCheckEmail.These are example Property ID and Label Texts. In your use case, enter unique values for these fields.
Navigate to the Actions settings.
Set the Trigger Type to Watch.
Configure the Input Operator
To begin the Data Workflow, use an Input operator to bring in data from your Email component.
Drag and drop an Input operator onto your Data Workflow canvas.
Configure the operator's Info window as follows:
Setting
Value
Category
Input
Component
email
Required
Yes
Source
Default
Configure the Formula Operator
Add a Formula operator with the following expression: =REGEXMATCH(A1, "^[a-zA-Z0-9._%+-]+@[a-zA-Z0-9.-]+\.[a-zA-Z]{2,}$"). You get this expression by using the REGEXMATCH syntax of REGEXMATCH(stringToCheck,regularExpression). But your formula replaces the stringToCheck syntax with A. Doing so retrieves data from the operator's input port. Then, replaces regularExpression with the email validation Regex.
Your organization’s standards might require a different regex for validation.
Drag and drop a Formula operator onto your Data Workflow canvas.
Configure the operator's Info window as follows:
Setting
Value
Category
Formula Value
Label
REGEXMATCH
Preserve Argument Type
.png) (unchecked)
(unchecked)Formula/Expression
=REGEXMATCH(A1, "^[a-zA-Z0-9._%+-]+@[a-zA-Z0-9.-]+\.[a-zA-Z]{2,}$")
Connect the output port (right) of the Input operator to the input port (left) of the Formula operator.
Configure the Branch Split Operator
Next, use a Branch Split operator to create two paths. If the Formula operator determines the email is valid, the Branch Split operator sends a No value. If the email is invalid, the operator sends a Yes value. Later, you’ll use these values to enable or disable the submission button.
Drag and drop a Branch Split operator onto your Data Workflow canvas.
Configure the operator's Info window as follows:
Setting
Value
Category
Branch Start
Label
Yes or No Split
Do Not Sanitize Formula
.png) (checked)
(checked)Preserve Argument Type
.png) (unchecked)
(unchecked)Condition
A
Connect the output port (right) of the
REGEXMATCHFormula Value operator to the input port (left) of theYes or No SplitBranch Split operator.
Configure the First Create Value Operator
Each branch from the Branch Split operator leads to a Create Value operator depending on the REGEXMATCH response. The created value controls the submission button’s Enable or Disable state.
Drag and drop a Create Value operator onto your Data Workflow canvas.
Configure the operator's Info window as follows:
Setting
Value
Category
Create Value
Label
Yes Value (Disable)
Preserve Argument Type
.png) (unchecked)
(unchecked)Expression/Value
='yes'
Connect the top output port (upper-right) of the
Yes or No SplitBranch Split operator to the argument port (top) of theYes ValueCreate Value operator.
Configure the Second Create Value Operator
Drag and drop a Create Value operator onto your Data Workflow canvas.
Configure the operator's Info window as follows:
Setting
Value
Category
Create Value
Label
No Value (Enable)
Preserve Argument Type
.png) (unchecked)
(unchecked)Expression/Value
='no'
Connect the bottom output port (lower-right) of the
Yes or No SplitBranch Split operator to the argument port (top) of theNo ValueCreate Value operator.
Configure the Branch Merge Operator
While the data travels through separate logic pathways based on validation results, both paths must converge to update the same target component. Add a Branch Merge operator to unify these pathways, then connect it to an Output operator linked to your Button component. The Output operator dynamically toggles the button's state based on the incoming value. If the operator receives a value of Yes (invalid email), the button is disabled. If it receives a value of No (valid email), the button is enabled.
Drag and drop a Branch Merge operator onto your Data Workflow canvas.
Configure the operator's Info window as follows:
Setting | Value |
|---|---|
Category | Branch End |
Label | Yes or No Merge |
Connect the output port (right) of the
Yes ValueCreate Value operator to the top input port (upper left) of theYes or No MergeBranch Merge operator.Connect the output port (right) of the
No ValueCreate Value operator to the bottom input port (lower left) of theYes or No MergeBranch Merge operator.
Configure the Output Operator
Drag and drop an Output operator onto your Data Workflow canvas.
Configure the operator's Info window as follows:
Setting
Value
Category
Output
Component
btnSubmitEmail
Action
Disabled
Connect the output port (right) of the
Yes or No MergeBranch Merge operator to the input port (left) of thebtnSubmitEmailOutput operator.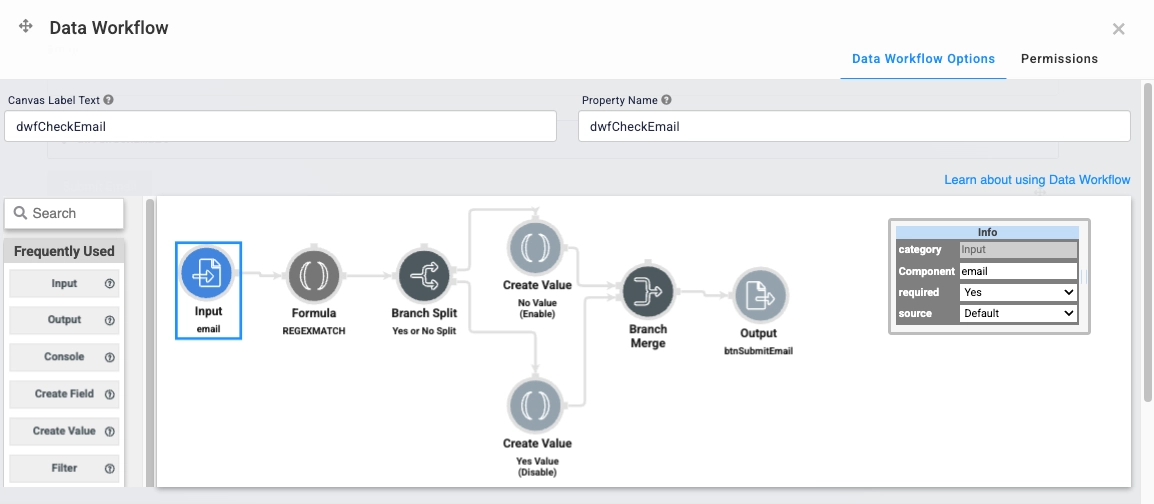
Click Save.
Your completed module looks like the following:
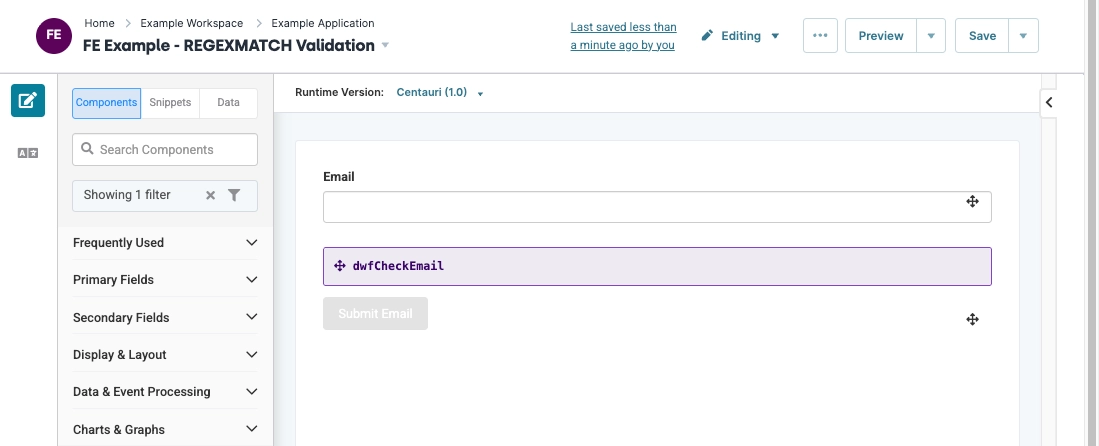
Preview your module in Express View and enter an email in the Email field. The Submit Email button remains disabled until a valid email is entered.
