Overview
When using Unqork, you might want to create or change the values of an object. To do that, use the _.create and _.set Lodash functions.
To read more about the parameters of the
_.createand_.setLodash functions, visit: https://lodash.com/docs/4.17.15.
How This Example Works
In this example, you'll use the _.create and _.set Lodash functions to create and alter your object path and value. First, you'll create an object using the _.create function. Next, you'll use end-user input to alter the key/value pair of your object using the _.set function to set the path, or key, and value of your created object. Then, your module outputs the new key/value pair to the end-user.
Here are the basic steps for this example:
Your Calculator component creates a new object.
The end-user enters their key and value to hardcode into the object.
The object's key/value pair is hardcoded with the end-user's input.
The new object values display to the end-user.
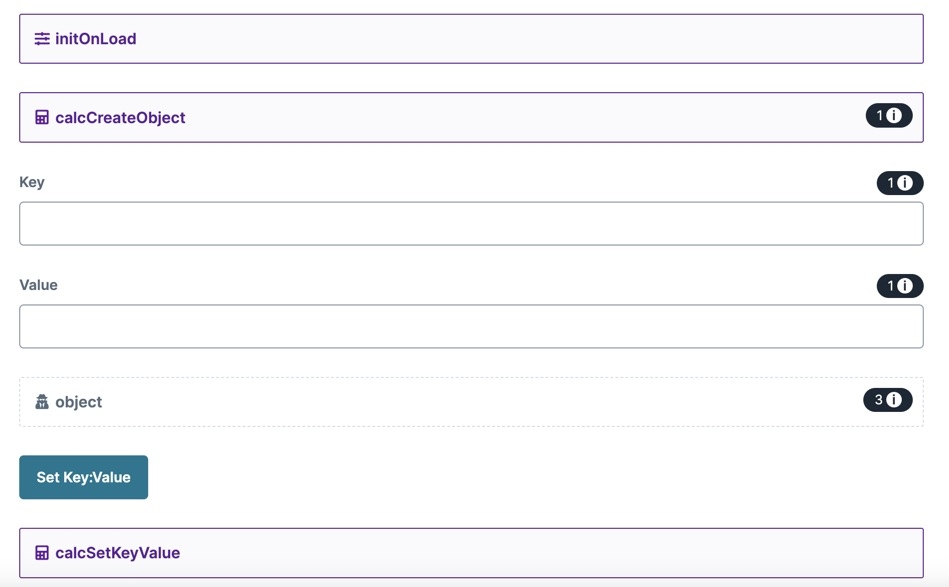
Here's how the comnfiguration looks in the Module Builder:
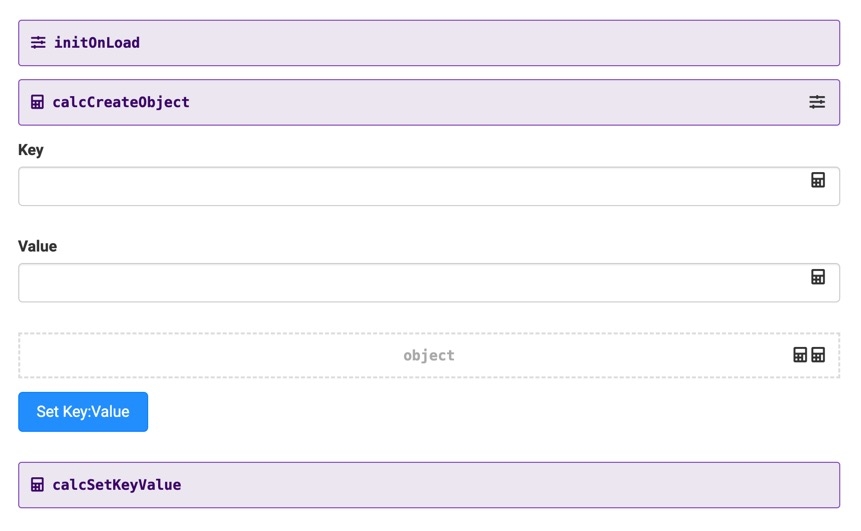
Here’s how the configuration looks in Express View:
Creating Objects Using Lodash
The first step is to create an object using the _.create function. In this example, you'll create your object by hardcoding a value from a Hidden component. Start by adding a Hidden component to your module and name it object. Then, add an Initializer and .png) Calculator component, naming your
Calculator component, naming your .png) Calculator as calcCreateObject. The Initializer component triggers the calcCreateObject
Calculator as calcCreateObject. The Initializer component triggers the calcCreateObject .png) Calculator component, which hardcodes an object value to your company Hidden component. In the
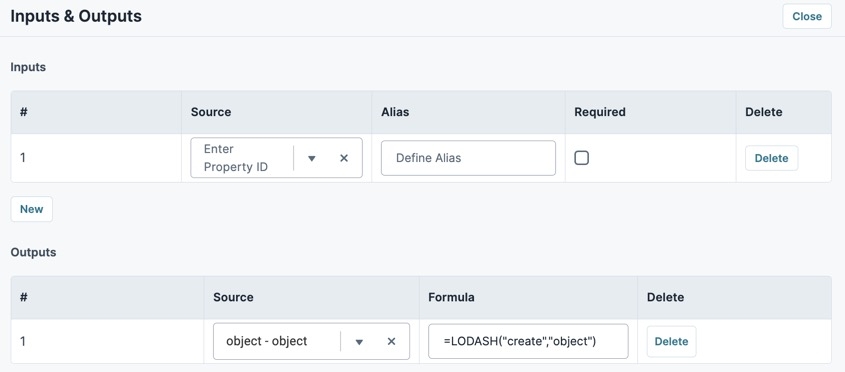
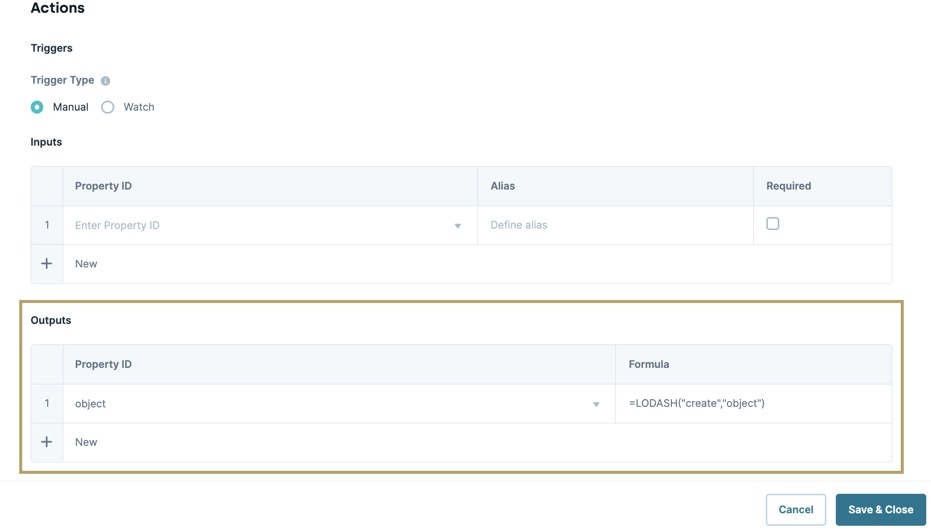
Calculator component, which hardcodes an object value to your company Hidden component. In the .png) Calculator component's Outputs table, you'll enter the Property ID of the Hidden component. Then, you'll enter the _.create function using the following Unqork syntax:
Calculator component's Outputs table, you'll enter the Property ID of the Hidden component. Then, you'll enter the _.create function using the following Unqork syntax: =LODASH("create","object").
Here's how your calcCreateObject .png) Calculator component's Inputs and Outputs configuration looks:
Calculator component's Inputs and Outputs configuration looks:
Here's how these three components look in the Module Builder:
Assigning Value Paths Using Lodash
Now that you have your object value hardcoded in a Hidden component, alter its key/value pair. As mentioned, you'll use the _.set Lodash function and end-user input to complete this task.
For end-user input, use two Text Field components to collect the key and value. Then, add another .png) Calculator component called calcSetKeyValue to input your object and Text Field components.
Calculator component called calcSetKeyValue to input your object and Text Field components.
In the calcSetKeyValue .png) Calculator component's Outputs table, enter
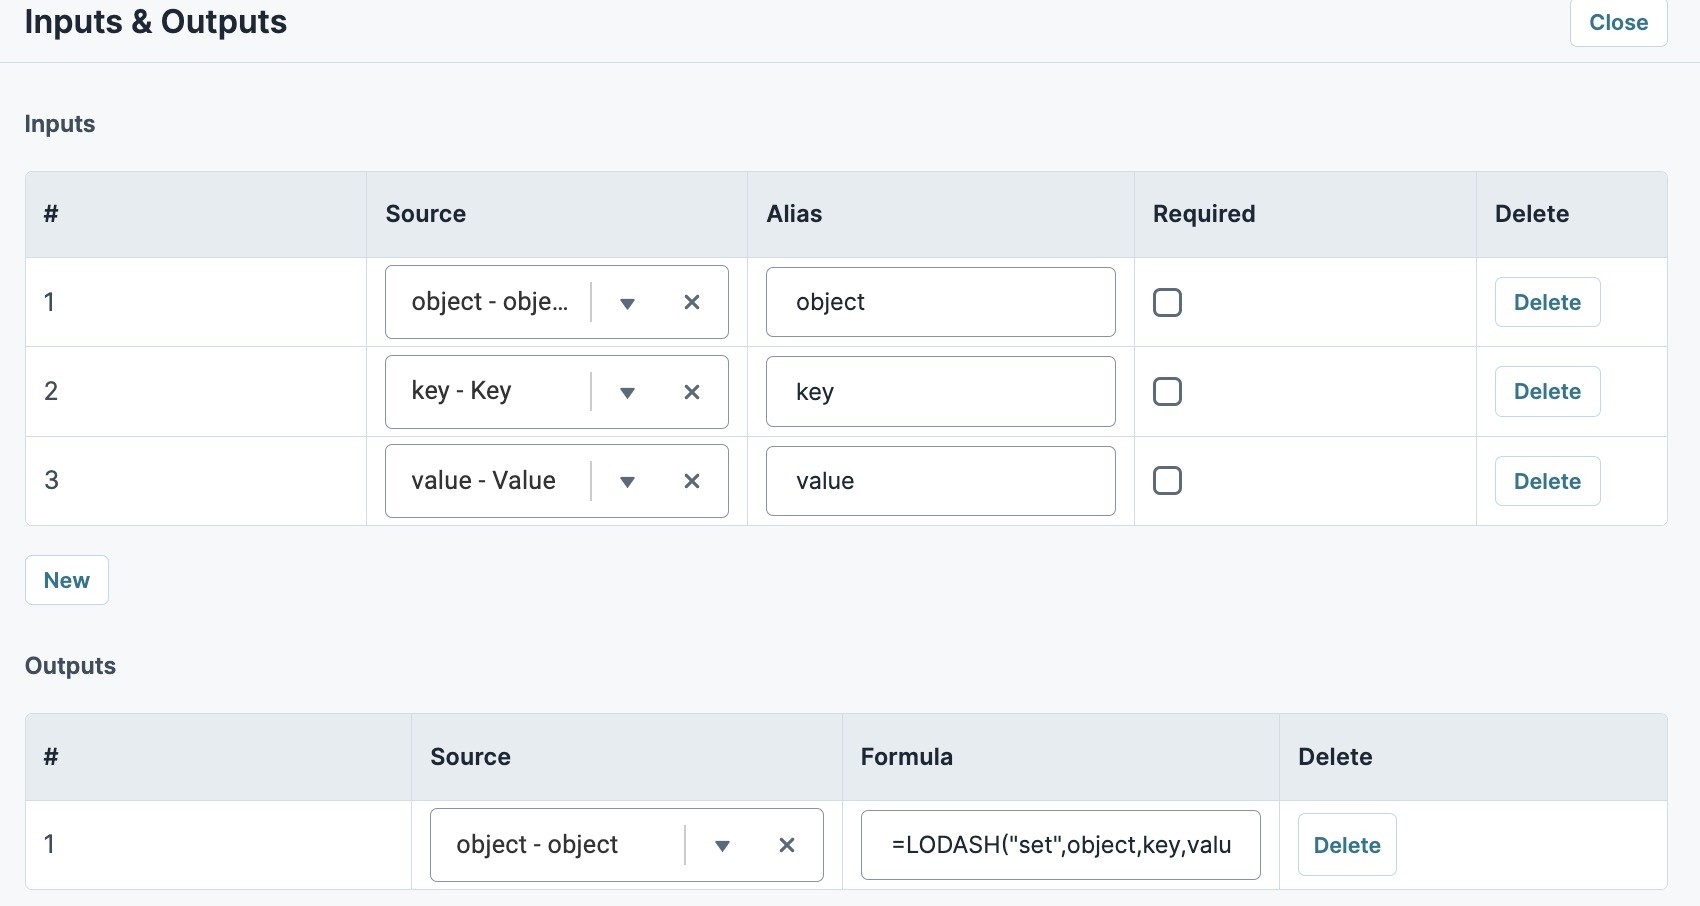
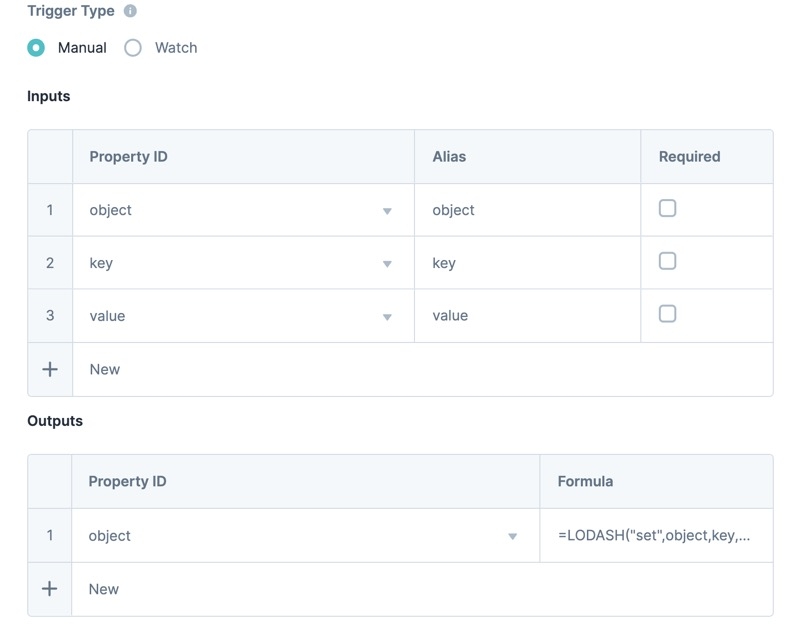
Calculator component's Outputs table, enter object for the Property ID. In the Formula field, you'll enter =LODASH("set",company,key,value). Because the _.set Lodash function takes the object, path, and value parameters, you'll use the Hidden component for your object parameter and your end-user's key and value.
Here's how your calcSetKeyValue .png) Calculator component's Inputs and Outputs configuration looks:
Calculator component's Inputs and Outputs configuration looks:
Displaying Value Paths Using Lodash
Configure a ![]() Button component to trigger your calcSetKeyValue
Button component to trigger your calcSetKeyValue .png) Calculator component and view the object value in the DevTools Console.
Calculator component and view the object value in the DevTools Console.
Preview your module in Express View and open the DevTools Console. Enter a key and value to set your object, and click the button to initiate the change.
Overview
When using Unqork, you might want to create or change the values of an object. To do that, you can use the _.create and _.set Lodash functions.
To read more about the parameters of the
_.createand_.setLodash functions, visit: https://lodash.com/docs/4.17.15.
How This Use Case Works
For this use case, you'll use the _.create and _.set Lodash functions to create and alter your object path and value. First, you create an object using the _.create function. Next, you'll use end-user input to alter the key/value of your object. To do that, you'll use the _.set function to set the path, or key, and value of your created object. Then, your module outputs the new key/value for the end-user to see.
Here are the basic steps for how this use case works:
Your Calculator component creates a new object.
The end-user enters their key and value to hard code onto the object.
Your object's key/value gets hardcoded with the end-user's input.
The new object values display to the end-user.
Here's how the module looks in the Module Builder:
Here’s how the use case looks in Express View:
Creating an Object with Lodash
The first step is to create an object using the _.create function. In this example, you'll create your object by hardcoding a value from a Hidden component. Start by adding a Hidden component to your module and name it object. Then, add an Initializer and .png) Calculator component, and name your
Calculator component, and name your .png) Calculator calcCreateObject. The Initializer component triggers the calcCreateObject
Calculator calcCreateObject. The Initializer component triggers the calcCreateObject .png) Calculator component, which hardcodes an object value to your company Hidden component. In the
Calculator component, which hardcodes an object value to your company Hidden component. In the .png) Calculator component's Outputs table, you'll enter the Property ID of the Hidden component. Then, you'll enter the _.create function using the following Unqork syntax:
Calculator component's Outputs table, you'll enter the Property ID of the Hidden component. Then, you'll enter the _.create function using the following Unqork syntax: =LODASH("create","object").
Here's how your calcCreateObject .png) Calculator looks:
Calculator looks:
And, here's how these three components look in your module:
Assigning Value Paths with Lodash
Now that you have your object value hardcoded in a Hidden component, alter its key/value pair. As mentioned, you'll use the _.set Lodash function and end-user input to complete this task.
For end-user input, use two Text Field components to collect the key and value. Then, you'll add another .png) Calculator component called calcSetKeyValue to input your object and your Text Field components.
Calculator component called calcSetKeyValue to input your object and your Text Field components.
In the calcSetKeyValue .png) Calculator component's Outputs table, enter
Calculator component's Outputs table, enter object for the Property ID. In the Formula field, you'll enter =LODASH("set",company,key,value). Because the _.set Lodash function takes the object, path, and value parameters, you'll use your Hidden component for your object parameter and your end-user's key and value.
Here's how your calcSetKeyValue .png) Calculator looks:
Calculator looks:
Displaying Value Paths with Lodash
Configure a ![]() Button component to trigger your calcSetKeyValue
Button component to trigger your calcSetKeyValue .png) Calculator component and view the object value in the DevTools Console.
Calculator component and view the object value in the DevTools Console.
Preview your module in Express View and open the DevTools Console. Enter a key and value to set your object, and click the button to initiate the change.
Now that you know how to use Lodash functions in your formulas, let’s look at how you can use RegEx in your configuration.
