Step 7: Configuring Valid and Invalid Email Workflow Paths
Estimated Reading Time: 11 minutes
Introduction
In the previous use case article, you copied and pasted a module to validate employee email addresses. This Employee Validation module contains logic components that check the end-user End-users, also known as Express Users, are the individuals accessing an application through Express View. In most cases, end-users are the customers using the product.'s email address for the @unqork.com company domain. In this article, you'll revisit the copy/pasted module and review the configuration of the Initializer, Decisions, and Hidden components to explore how the validation works.
Once your workflow validates the end-user End-users, also known as Express Users, are the individuals accessing an application through Express View. In most cases, end-users are the customers using the product.'s email address, the copy/pasted module's Hidden component contains the valid or invalid response. You can then use an Exclusive Gateway Workflow node to divert your workflow path to different processes based on the valid or invalid response. That means you can stop invalid email address domains from proceeding in your application while allowing valid email address domains to continue the process.
You can preview an example of this completed use case step here: https://training.unqork.io/#/workflow/64653519811f0f6e5b3c24ec/edit.
Learning Objectives
In this use case article, you'll learn how the Initializer, Decisions, and Hidden components validate email addresses for a company domain. You'll learn how to use the Exclusive Gateway node to direct the end-user End-users, also known as Express Users, are the individuals accessing an application through Express View. In most cases, end-users are the customers using the product.'s application path based on their validation response. You'll also learn how to send automated messages from your workflow using Message node.
What You Need
To complete this step of your application, you need
-
1 Exclusive Gateway node.
-
1 Task node.
-
1 Message node.
-
2 End nodes.
Open Your Workflow Application
Start by opening the workflow-type application you previously created in the Workflow Builder.
| 1. | Open your Workspace. You can find your Workspace by selecting  (Search magnifying glass) and entering Creator Workshop Workspace [your name]. (Search magnifying glass) and entering Creator Workshop Workspace [your name]. |
| 2. | In your Workspace, select View App on your application tile. Your application title will be [initials] + “Creator Workshop App” + [date you created the application]. |
| 3. | From the menu to the left of the Application page, select  Workflows. Workflows. |
| 4. | Click on your Creator Workshop App workflow tile. |
Email Validation Module Configuration
Once your application is open, navigate to the Email Validation module to review the logic component configuration.
To open your Email Validation module from the Workflow Builder:
| 1. | Select the Email Validation |
| 2. | Click |
| 3. | Select  Open to open the Email Validation module in the Module Builder. Open to open the Email Validation module in the Module Builder. |
Here's what the Email Validation module looks like in the Module Builder:

Initializer Component Configuration
For an Automated task, there must exist a way to tell the configuration to begin. Because the Email Validation ![]() Task node is in the Automated swimlane, it's an automated task that requires a trigger to run. In the Email Validation module, the initRuleEmailValidation
Task node is in the Automated swimlane, it's an automated task that requires a trigger to run. In the Email Validation module, the initRuleEmailValidation  Initializer component functions as this start trigger. The Initializer’s Trigger Type determines when the component will run.
Below are the available Trigger Types for an Initializer component:
| Trigger Type | Description |
|---|---|
|
Manual |
The component fires when triggered by another component (for example, a Button or Plug-In component). |
|
Watch |
The component fires when there's any action taken on the input component(s) listed in the Inputs table. Actions include entering a new value or editing or overwriting a saved value. If multiple inputs exist, use the Required setting to specify what inputs must be present before firing. |
| New Submission |
The component fires when the page or called module loads without an existing submission ID. Dashboards and remote execute modules are great uses for this trigger. |
| Edit Submission |
The component fires when the page loads with a submission ID. |
| Browser Event |
The component fires when the end-user End-users, also known as Express Users, are the individuals accessing an application through Express View. In most cases, end-users are the customers using the product. closes or refreshes their page. When this happens, the end-user End-users, also known as Express Users, are the individuals accessing an application through Express View. In most cases, end-users are the customers using the product. sees a pop-up. Try to keep your operations simple. Long API APIs (application programming interfaces) are a set of protocols and definitions developers use to build and integrate application software. APIs act as the connective tissue between products and services. (application programming interface) calls, for example, might not complete before the page closes. |
When you build applications in a workflow, all modules load and work on an existing submission ID after the first ![]() Task node. Because your Employee Travel Request workflow application loads with a submission ID, the initRuleEmailValidation Initializer uses the Edit Submission Trigger Type.
Task node. Because your Employee Travel Request workflow application loads with a submission ID, the initRuleEmailValidation Initializer uses the Edit Submission Trigger Type.
The Initializer's Outputs Enter outputs components and actions you want the component to perform. table tells the Initializer what to trigger once it fires. In this module, the initRuleEmailValidation Initializer triggers the ruleEmailValidation ![]() Decisions component. So, the Property ID A Property ID is the unique field ID used by Unqork to track and link components in your module. column of the Outputs table is set to ruleEmailValidation with the Type set to trigger and the value to GO.
Decisions component. So, the Property ID A Property ID is the unique field ID used by Unqork to track and link components in your module. column of the Outputs table is set to ruleEmailValidation with the Type set to trigger and the value to GO.

Decisions Component Configuration
The next component in your Email Validation module is the ruleEmailValidation ![]() Decisions component. This component is what validates the end-user End-users, also known as Express Users, are the individuals accessing an application through Express View. In most cases, end-users are the customers using the product.'s employee email address to confirm it matches the @unqork.com domain.
Decisions component. This component is what validates the end-user End-users, also known as Express Users, are the individuals accessing an application through Express View. In most cases, end-users are the customers using the product.'s employee email address to confirm it matches the @unqork.com domain.
As you just read, the initRuleEmailValidation Initializer triggers this Decisions component. Because another component triggers the ruleEmailValidation ![]() Decisions component, the Trigger Type is set to
Decisions component, the Trigger Type is set to ![]() Manual.
Manual.
The Inputs table is how your Decisions component references the input. The Decisions component validates the employee's email address, so the Property ID column of the Inputs table is that of the employeeEmail  Email component. The Type is set to contains because the Decisions component checks if the employeeEmail value contains the @unqork.com domain.

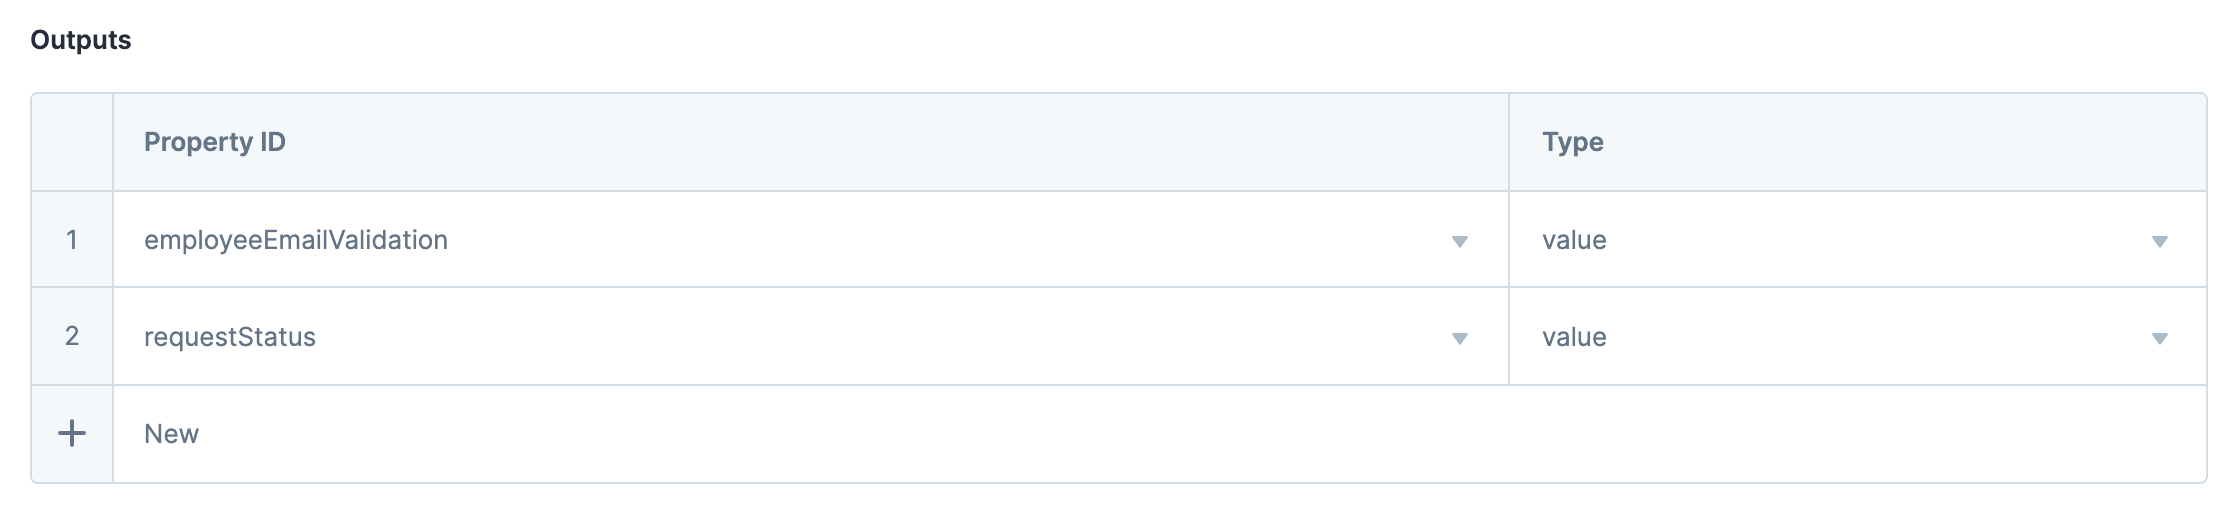
The Decisions component's Outputs Enter outputs components and actions you want the component to perform. table has two outputs: employeeEmailValidation and requestStatus. The employeeEmailValidation output is to the Hidden component in the Email Validation module. Later in your use case configuration, you'll create a component that will use the requestStatus Property ID A Property ID is the unique field ID used by Unqork to track and link components in your module.. In the Outputs table, Property IDs both have the Type set to value. This means both properties have an output value based on the Decisions component's Micro Decisions table.
The Micro Decisions table is the validation configuration of the Decisions component's logic. Here, the Input and Output values are decided, and the action taken depends on whether the validation fails or succeeds.
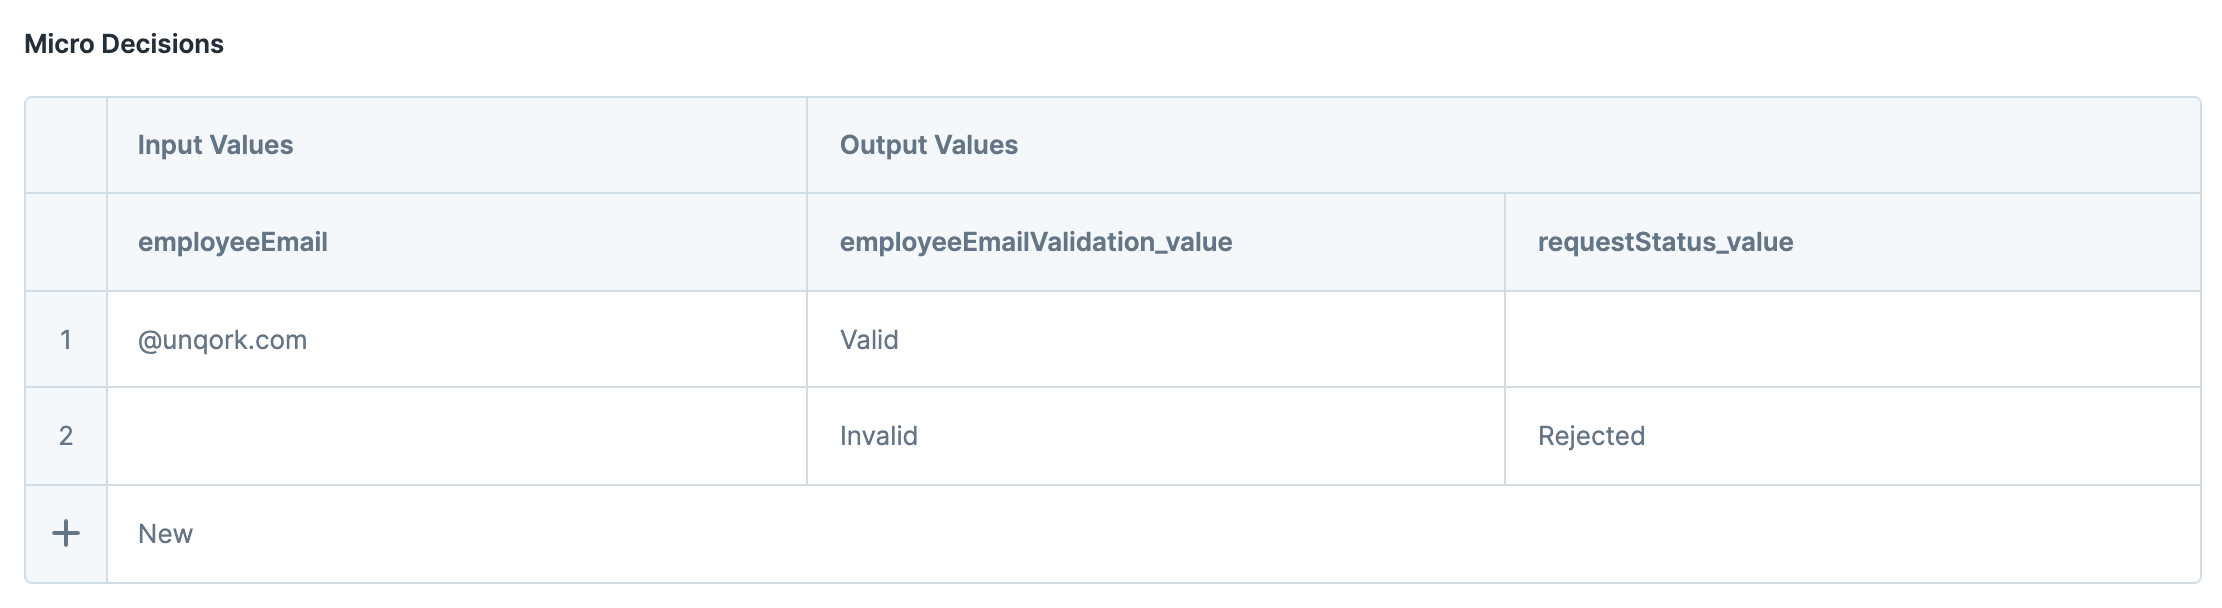
For example, if you open the ruleEmailValidation ![]() Decisions component's Micro Decisions table, you can see the Input Values, Output Values, and action columns.
Decisions component's Micro Decisions table, you can see the Input Values, Output Values, and action columns.
Looking at the first row, if the employeeEmail Email component contains the Input Value of @unqork.com, then the employeeEmailValidation ![]() Hidden component is set to Valid, and the requestStatus_value action is unchanged. In the second row, you can see that if employeeEmail doesn't contain @unqork.com, then employeeEmailValidation is set to Invalid. For Invalid output values, requestStatus_value is set to Rejected.
Hidden component is set to Valid, and the requestStatus_value action is unchanged. In the second row, you can see that if employeeEmail doesn't contain @unqork.com, then employeeEmailValidation is set to Invalid. For Invalid output values, requestStatus_value is set to Rejected.
Like other logic components, the Decisions component contains a Unit Testing tool for testing configuration. Here, you can test different inputs and see how the output functions. You can try this yourself by selecting Create Test. In the Value column, enter an email address that doesn't match the company @unqork.com domain. Below, you can see an example of an @gmail.com domain value. When you click Run Test, the Output table shows that employeeEmailValidation is Invalid and that requestStatus is Rejected. These results from the Unit Test show that the validation works as expected.

You can also test a valid response in the same way. In the Value column, enter an email address that matches the company @unqork.com. If the employeeEmailValidation returns a Valid response in the Output table, your Decisions component is ready to go.

Hidden Component Configuration
The last component in the Email Validation module is the employeeEmailValidation ![]() Hidden component. This component holds the output value (Valid or Invalid) from the ruleEmailValidation
Hidden component. This component holds the output value (Valid or Invalid) from the ruleEmailValidation ![]() Decisions component. You'll reference this Hidden component in your workflow to determine which pathway the end-user End-users, also known as Express Users, are the individuals accessing an application through Express View. In most cases, end-users are the customers using the product. takes in your application.
Decisions component. You'll reference this Hidden component in your workflow to determine which pathway the end-user End-users, also known as Express Users, are the individuals accessing an application through Express View. In most cases, end-users are the customers using the product. takes in your application.
Exclusive Gateway Node Configuration
Once the end-user End-users, also known as Express Users, are the individuals accessing an application through Express View. In most cases, end-users are the customers using the product.'s email address domain is validated, the next step is to direct the workflow path based on their validation response. For this use case, you'll direct the end-user End-users, also known as Express Users, are the individuals accessing an application through Express View. In most cases, end-users are the customers using the product. to one path if their email address is Valid or another if their email address is Invalid.
To split your workflow path into two different paths based on the validation response, you'll use the Exclusive Gateway node.
| 1. | Open your Creator Workshop App workflow application. |
| 2. | Drag and drop an |
| 3. | Select the |
| 4. | Click  Edit to open the Edit Exclusive Gateway menu. Edit to open the Edit Exclusive Gateway menu. |
| 5. | In the Label field, enter Email Validation Gateway. |
| 6. | Disconnect the Email Validation  Delete . Delete . |
| 7. | Connect the output port (right) of the Email Validation |
| 8. | Save... your workflow. |
| 9. | In the Save to Version History window, select Save. |
Configure the Valid Workflow Path
Valid Email Configuration
If the end-user End-users, also known as Express Users, are the individuals accessing an application through Express View. In most cases, end-users are the customers using the product.'s validation returns Valid, your application will divert them to another module. This module will eventually display additional information about their travel request. For this use case, you only need to create the Task node and module.
| 1. | Open your Creator Workshop App workflow. |
| 2. | Drag and drop a |
| 3. | Select the |
| 4. | Click Edit to open the Edit User Task menu. |
| 5. | In the Label field, enter Employee Travel Information. |
| 6. | Under Module, select Create New Module. The Module Title, Module Path, and Module Type populate with default values. |
| 7. | Click Create. |
| 8. | In the Next Button Label field, enter Submit Travel Request. |
| 9. | Select the |
| 10. | Click Edit to open the Edit End Event menu. |
| 11. | In the Label field, enter Employee Submitted. |
| 12. | Connect the output port (right) of the Email Validation Gateway |
| 13. | Connect the output port (right) of the Employee Travel Information |
Valid Email Path Configuration
For the workflow pathway to work, you must configure the Email Validation Gateway ![]() Exclusive Gateway node's path to the Employee Travel Information
Exclusive Gateway node's path to the Employee Travel Information![]() Task node.
Task node.
To edit the path:
| 1. | Select the Email Validation Gateway |
| 2. | Select the |
| 3. | Click Edit to open the Edit Exclusive Gateway menu. |
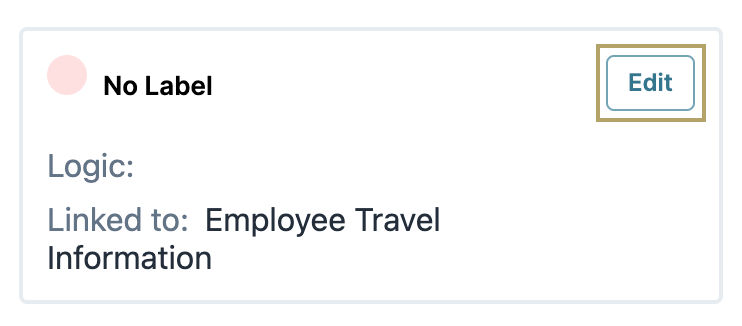
| 4. | In the Output Links section, you can see the No Label link between the Email Validation Gateway |
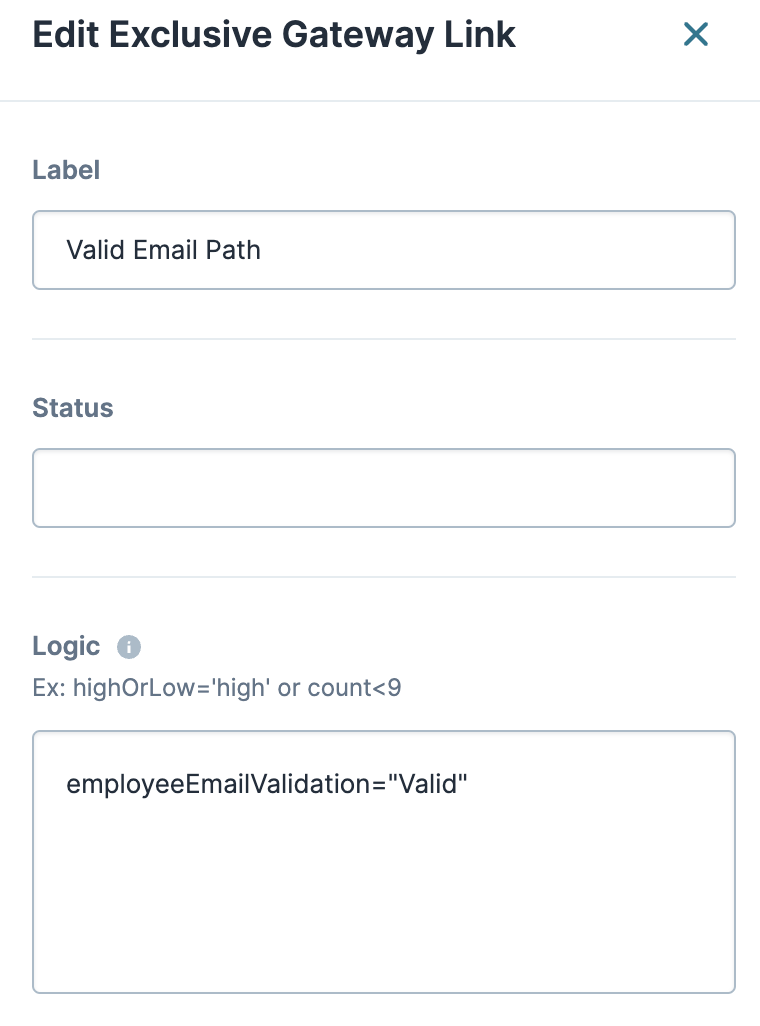
| 5. | In the No Label link, select Edit to open the Edit Exclusive Gateway Link menu. |
| 6. | In the Label field, enter Valid Email Path. |
| 7. | In the Logic field, enter employeeEmailValidation="Valid". This syntax tells the Email Validation Gateway |
| 8. | Save... your workflow. |
| 9. | In the Save to Version History window, select Save. |
Configure the Invalid Workflow Path
Invalid Email Configuration
Next, let's configure another pathway if the validation response is Invalid. This path uses an Message node to email employees, notifying them that their email address domain is invalid. Once the email is sent, the workflow path ends.
| 1. | Open your Creator Workshop App workflow. |
| 2. | Drag and drop a |
| 3. | Click Edit to open the Edit Signal Event menu. |
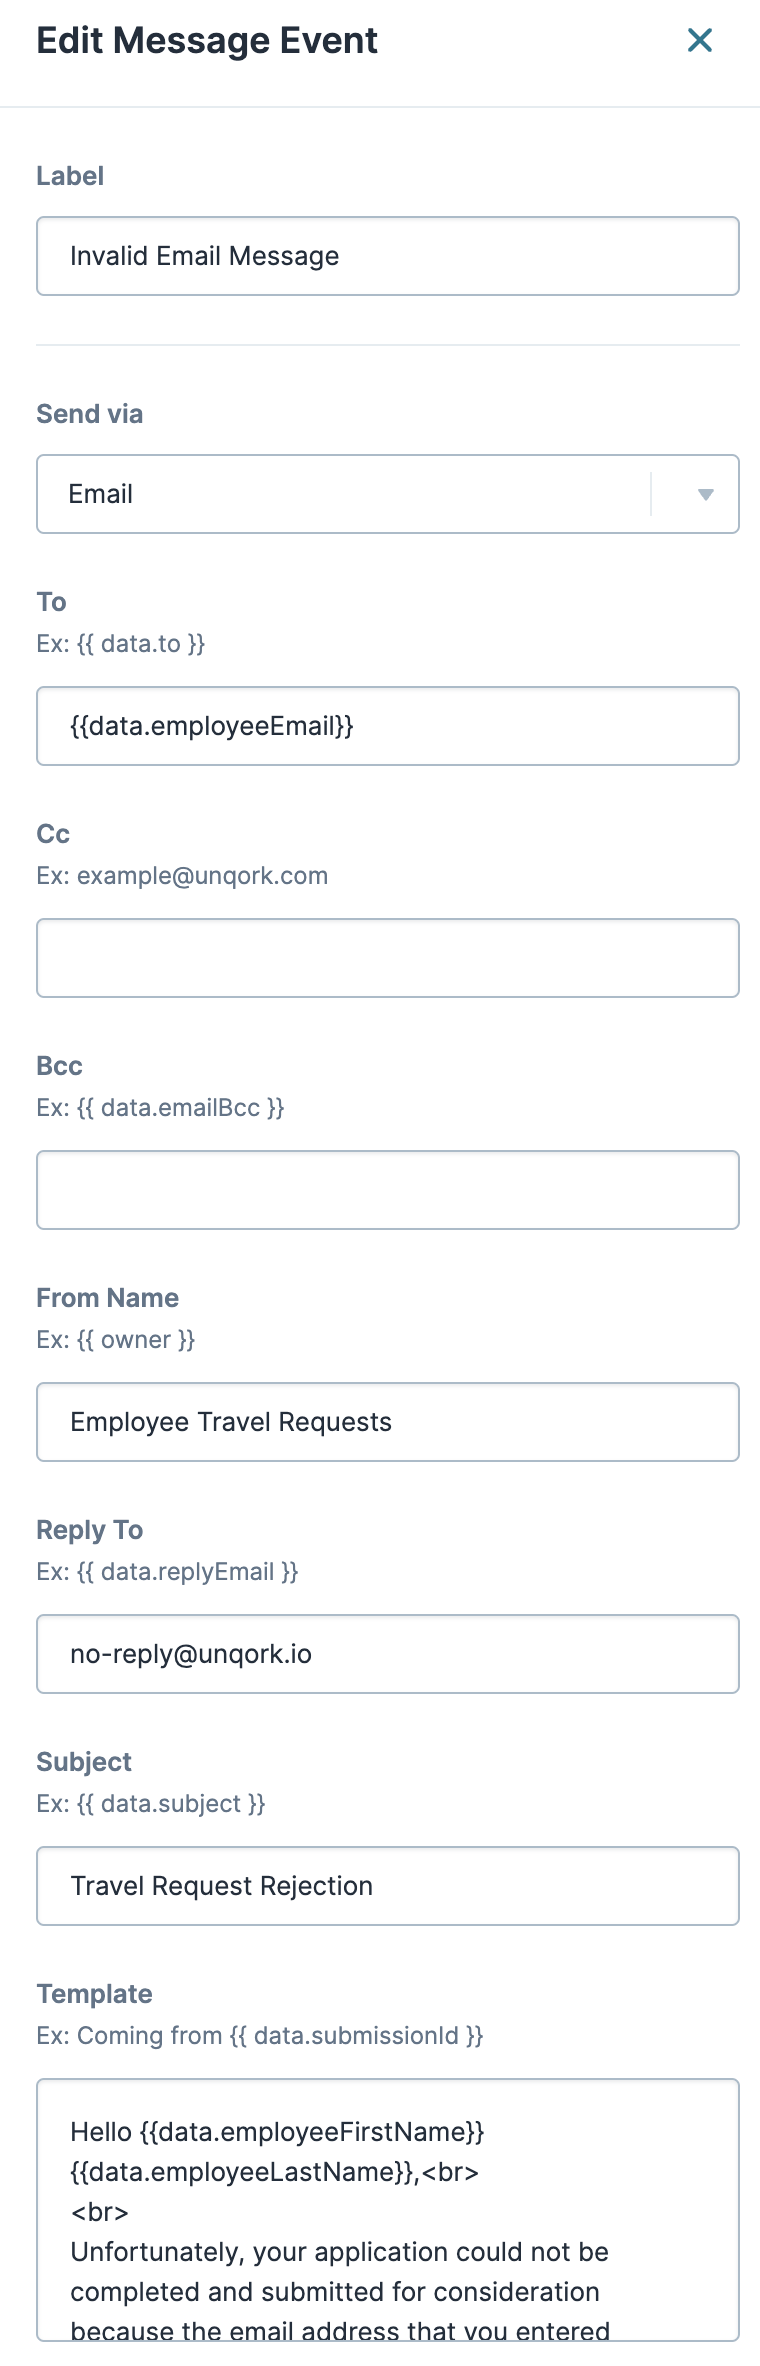
| 4. | In the following fields, enter or select these values: |
|
Field |
Value |
|---|---|
|
Label |
Invalid Email Address |
|
Send via |
|
|
To |
{{data.employeeEmail}} |
|
From Name |
Employee Travel Requests |
|
Reply To |
no-reply@unqork.io |
|
Subject |
Travel Request Rejection |
|
Template |
Hello {{data.employeeFirstName}} {{data.employeeLastName}},<br> <br> Unfortunately, your application could not be completed and submitted for consideration because the email address that you entered ({{data.employeeEmail}}) did not match our expected email domain restriction.<br> <br> We encourage you to apply again in the future but cannot accept your application at this time.<br> <br> Signed,<br> <br> The Employee Travel Processing Team |
This tells the Message node to pull the end-user End-users, also known as Express Users, are the individuals accessing an application through Express View. In most cases, end-users are the customers using the product.'s information from the Employee Travel Information module and populate the email correspondence.
NOTE Anything in the email template inside {{}} (double curly braces) is dynamically populated by the data the end-user End-users, also known as Express Users, are the individuals accessing an application through Express View. In most cases, end-users are the customers using the product. entered in a previous workflow screen. Enter data.properyID in the {{}} to reference a specific component.
| 5. | Drag and drop an |
| 6. | Select the |
| 7. | Click Edit to open the Edit End Event menu. |
| 8. | In the Label field, enter Invalid Email Path End. |
| 9. | Connect the output port (right) of the Email Validation Gateway |
| 10. | Connect the output port (right) of the Invalid Email Address |
Invalid Email Path Configuration
As you did with the Valid path, the Invalid path must also be configured to divert the end-users End-users, also known as Express Users, are the individuals accessing an application through Express View. In most cases, end-users are the customers using the product. who didn't submit an email address with the @unqork.com domain.
To edit the path:
| 1. | Select the Email Validation Gateway |
| 2. | Click Edit to open the Edit Exclusive Gateway menu. |
| 3. | In the Output Links section, you can see the No Label link between the Email Validation Gateway |
| 4. | In the No Label link, select Edit to open the Edit Exclusive Gateway Link menu. |
| 5. | In the Label field, enter Invalid Email Path. |
| 6. | In the Logic field, enter employeeEmailValidation="Invalid". |
| 7. | Save... your workflow. |
| 8. | In the Save to Version History window, select Save. |
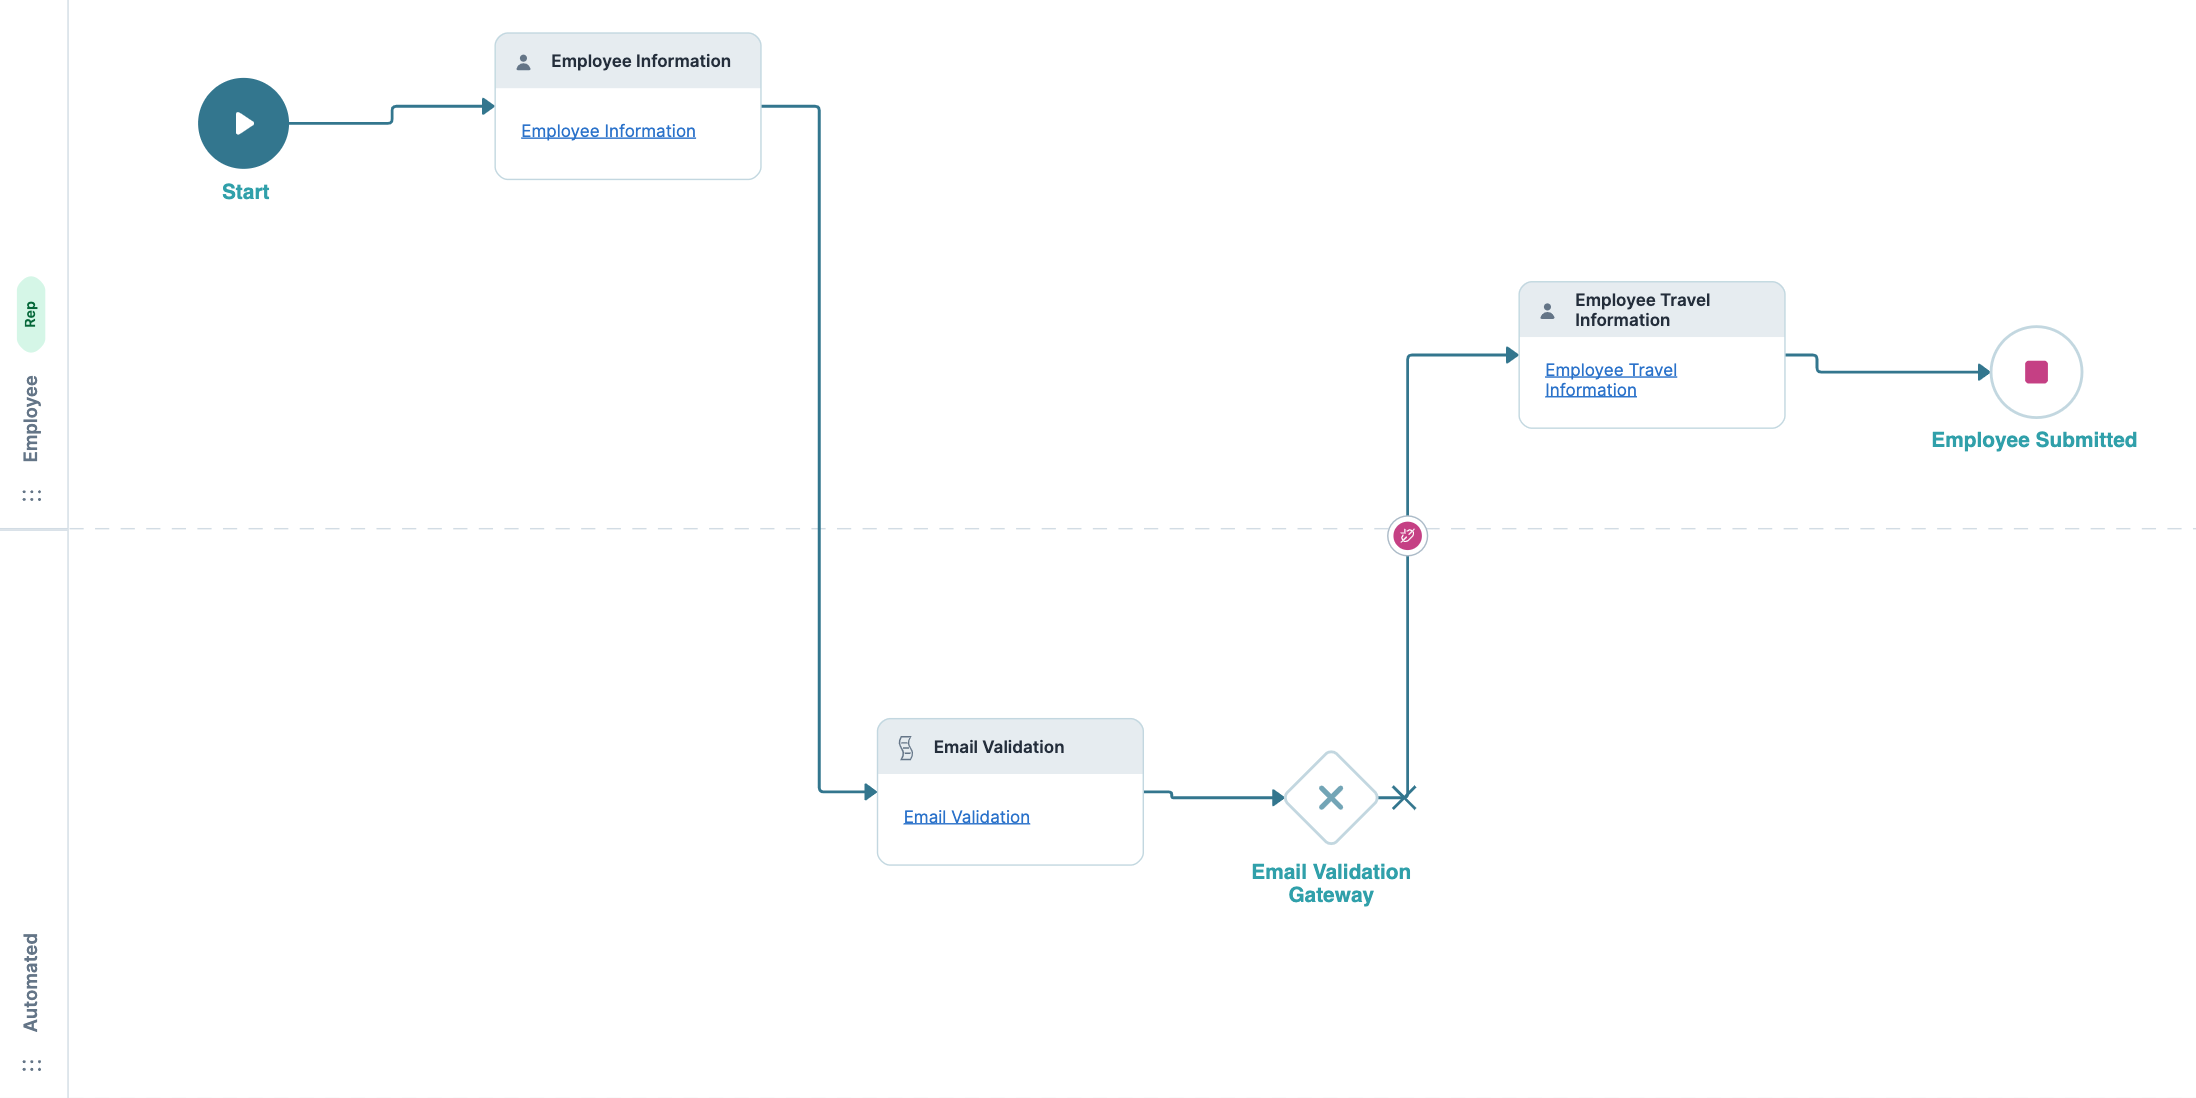
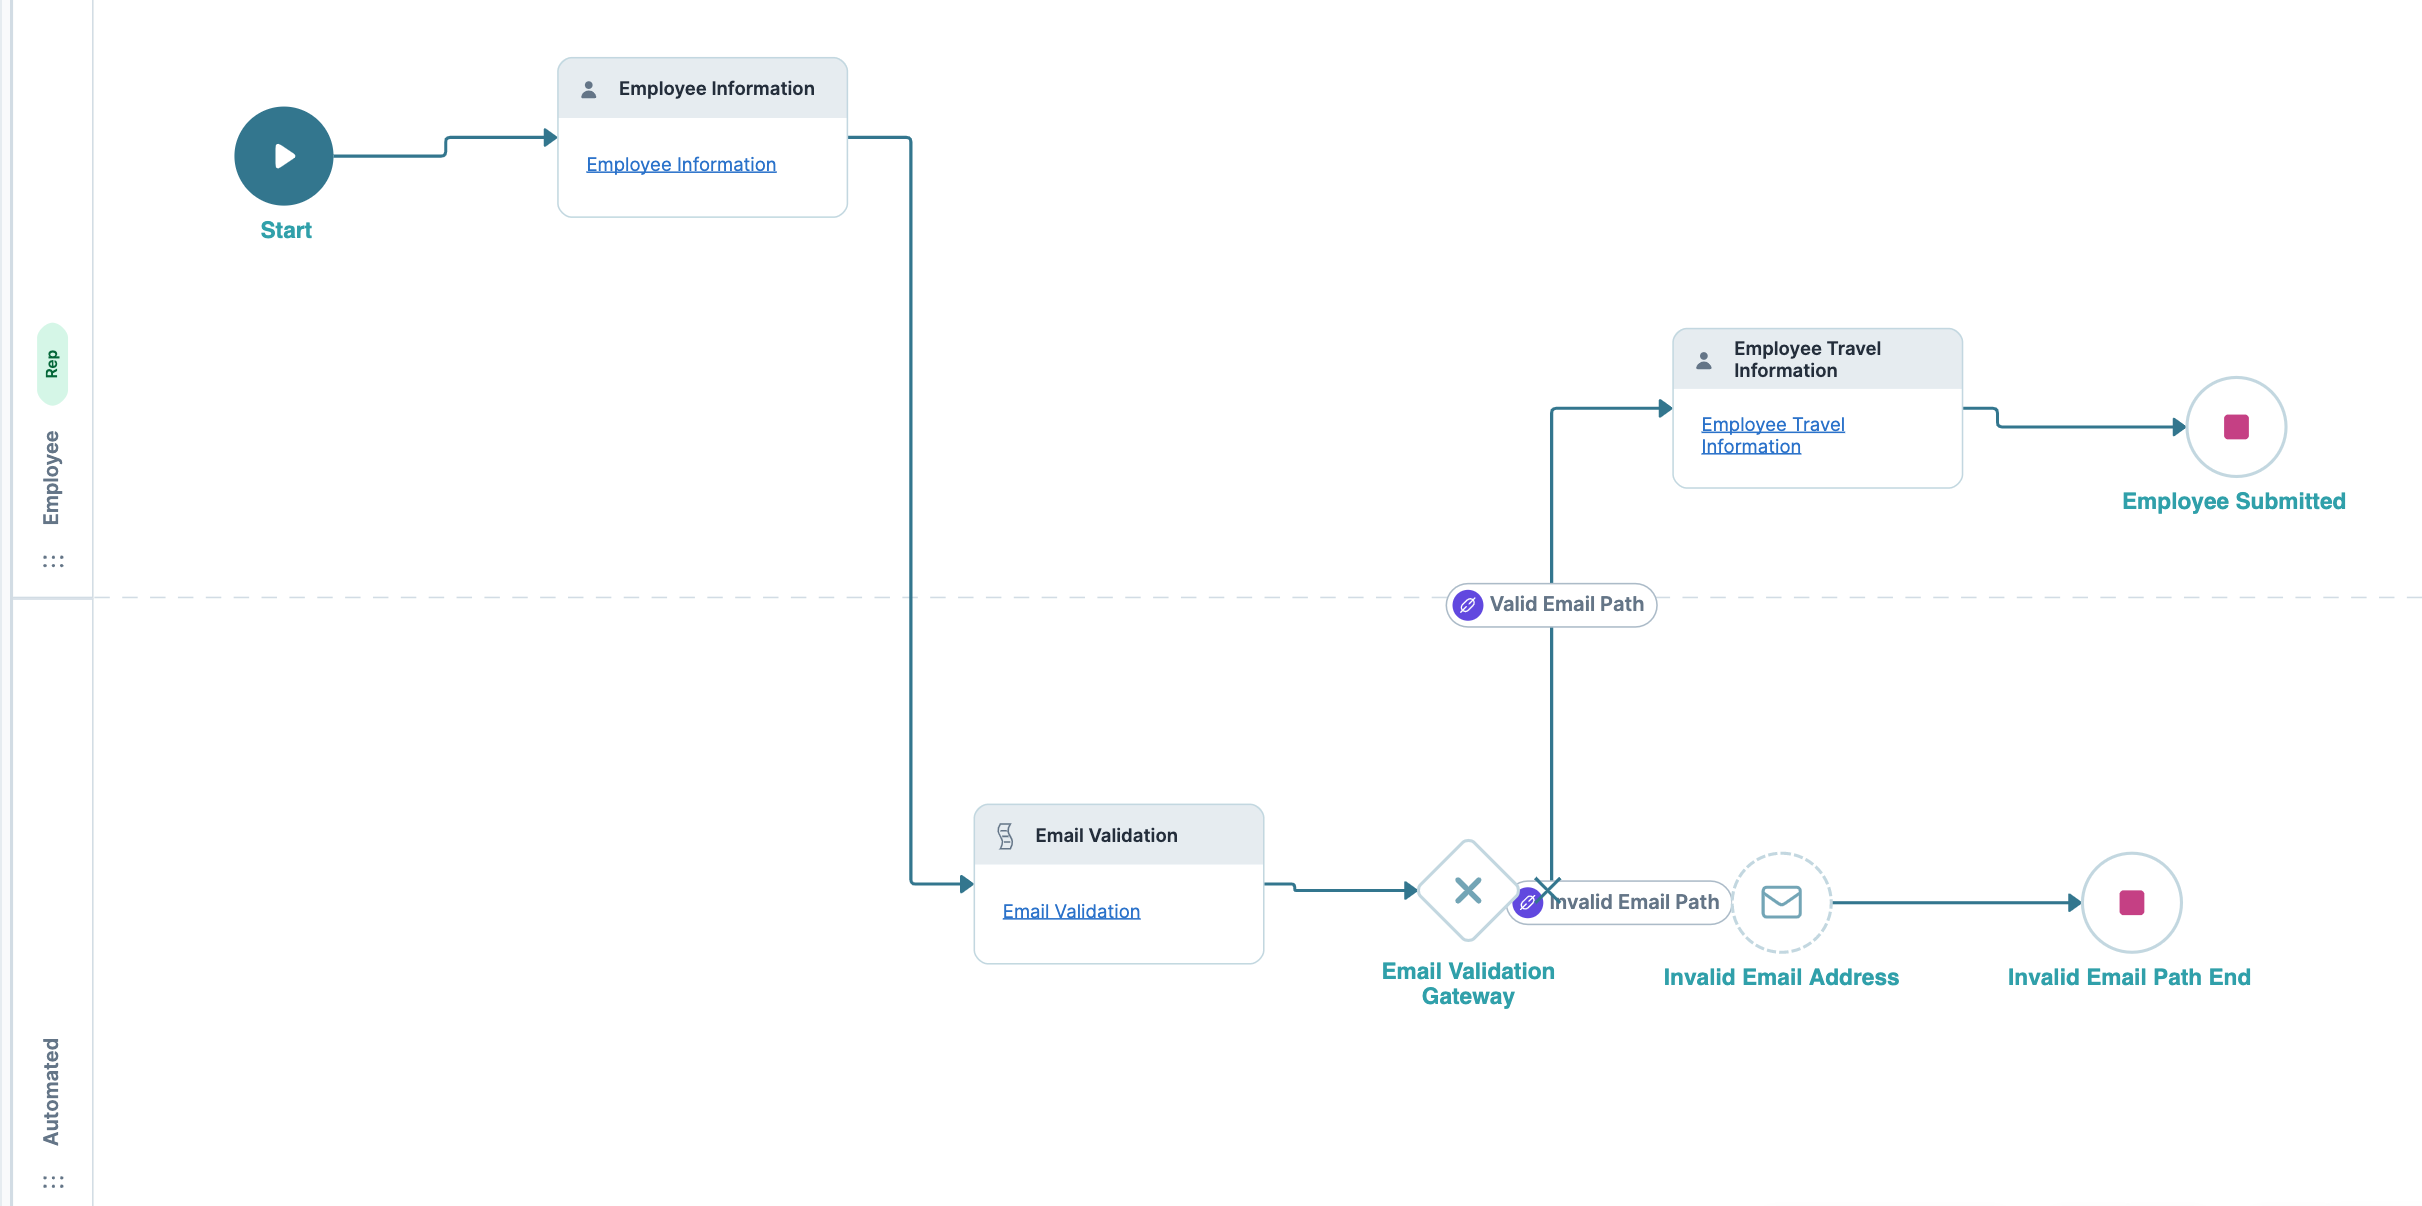
Here's what your workflow looks like once complete:
View and Test the Workflow-Type Application in Express View
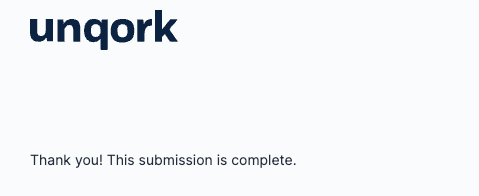
Now that you've completed this workflow use case, view and test it in Express View Express View is how your end-user views you application. Express View also lets you preview your applications to test your configuration and view the styling. This is also the view your end-users will see when interacting with your application. After configuring a module, click Preview in the Module Builder to interact with the module in Express View.. To do that, open your workflow and click the Preview button on the top of the Workflow Builder. Once there, go through the steps using a valid email address. If you don't have a working @unqork.com domain email address, enter a fake one (test@unqork.com) just to test your configuration. Since the Employee Travel Information module isn't configured yet, this will result in a loading or blank screen. After testing the valid response, Preview your workflow again and enter an invalid email address you can access. This way you can test your Invalid Email Address ![]() Message node's configuration. Since the workflow ends after taking the invalid workflow path, you'll see the default workflow end screen thanking you for your submission.
Message node's configuration. Since the workflow ends after taking the invalid workflow path, you'll see the default workflow end screen thanking you for your submission.
Ask yourself the following questions to determine whether or not your application is working as intended:
-
Does entering a valid email address take you to a loading or blank screen? If not, review the Configure the Valid Workflow Path and Exclusive Gateway Node Configuration sections. Return to your Creator Workshop workflow and ensure your Exclusive Gateway and valid path are configured correctly. Remember, you'll build the Employee Travel Information module in the next use case article. For now, the module is incomplete and will appear as a blank or loading screen.
-
Does entering an invalid email address take you to the default workflow end screen? If not, review the Configure the Invalid Workflow Path section. Return to your Creator Workshop workflow and ensure your Exclusive Gateway and invalid path are configured correctly.
-
Do I receive an email from the Invalid Email Address
 Message node after entering an invalid email address I can access? If not, review the Invalid Email Configuration section. Return to your Creator Workshop workflow and ensure your Message node and invalid path are configured correctly.
TIP Having trouble with your configuration? Visit our Troubleshooting the Creator Workshop Configuration article to help identify and resolve any errors on your application.
Recap
In this use case article, you reviewed the Email Validation module you added to your workflow in the previous (Step 6) use case article. You learned how the Initializer component can trigger other logic components. You learned how the Decisions component can intake an email address and validate that email address to a specific value. In this example, that value was the @unqork.com domain. You also learned how the Hidden component can store a value in a module, which can later be referenced in your workflow by other components or workflow nodes.
In your workflow, you added the Exclusive Gateway node to divert your workflow path to different processes. You then configured the path for Valid employee email addresses to continue the workflow with the Employee Travel Information ![]() Task node. For Invalid email addresses, you added a Message node to email the end-user, informing them that their request is denied.
Task node. For Invalid email addresses, you added a Message node to email the end-user, informing them that their request is denied.
In the next use case article, you'll complete the Building Your First App learning module by configuring the Employee Travel Information module. In this module, you'll build a screen where the employee can review their travel request and make calculations about the estimated price.
Continue Your Learning
In the next article, you'll begin Step 8 of the Building Your First App learning module. In the first article of Step 8, you'll learn about snippets and how to add them to the Module Builder.
