How to: Remote Execute a Dashboard
Overview
The Plug-In component is how you connect your module to the outside world. The component uses internal and external APIs (application programming interfaces) to pass data to/from a specified source. But, since you're transferring data outside of your module, you must be as secure as possible.
To keep your module secure, remote execute all API calls. Remote execute, or server-side execution, is when a module executes its Plug-In call outside of the browser. The API call happens behind the scenes on the server.
What You'll Learn
In this how-to guide, you'll learn how to configure a remote execute for a simple dashboard. A simple dashboard collects submission data from one module for display in another module. To make it remotely executed, you'll create a server-side module to process the submission data. To do this, you need 3 modules:
| # | Module Title | Description |
|---|---|---|
|
1 |
SimpleModule for Remote Execute |
A simple module where your end-user fills out their personal information. This is the source module for your dashboard. Refer to this as Module 1. |
|
2 |
Remote Execution |
Shows the back-end functions, including the module ID used by the remote execute. This module gets submissions to display in your dashboard. Refer to this as Module 2. |
|
3 |
Simple Dashboard with Remote Execute |
The dashboard module, where you display submission information from Module 1. Refer to this as Module 3. |
Simple Module for Remote Execute (Module 1)
Begin by creating the Simple Module for Remote Execute module. In this module, you'll set up fields to record the end-user's personal information.
For this module, you need:
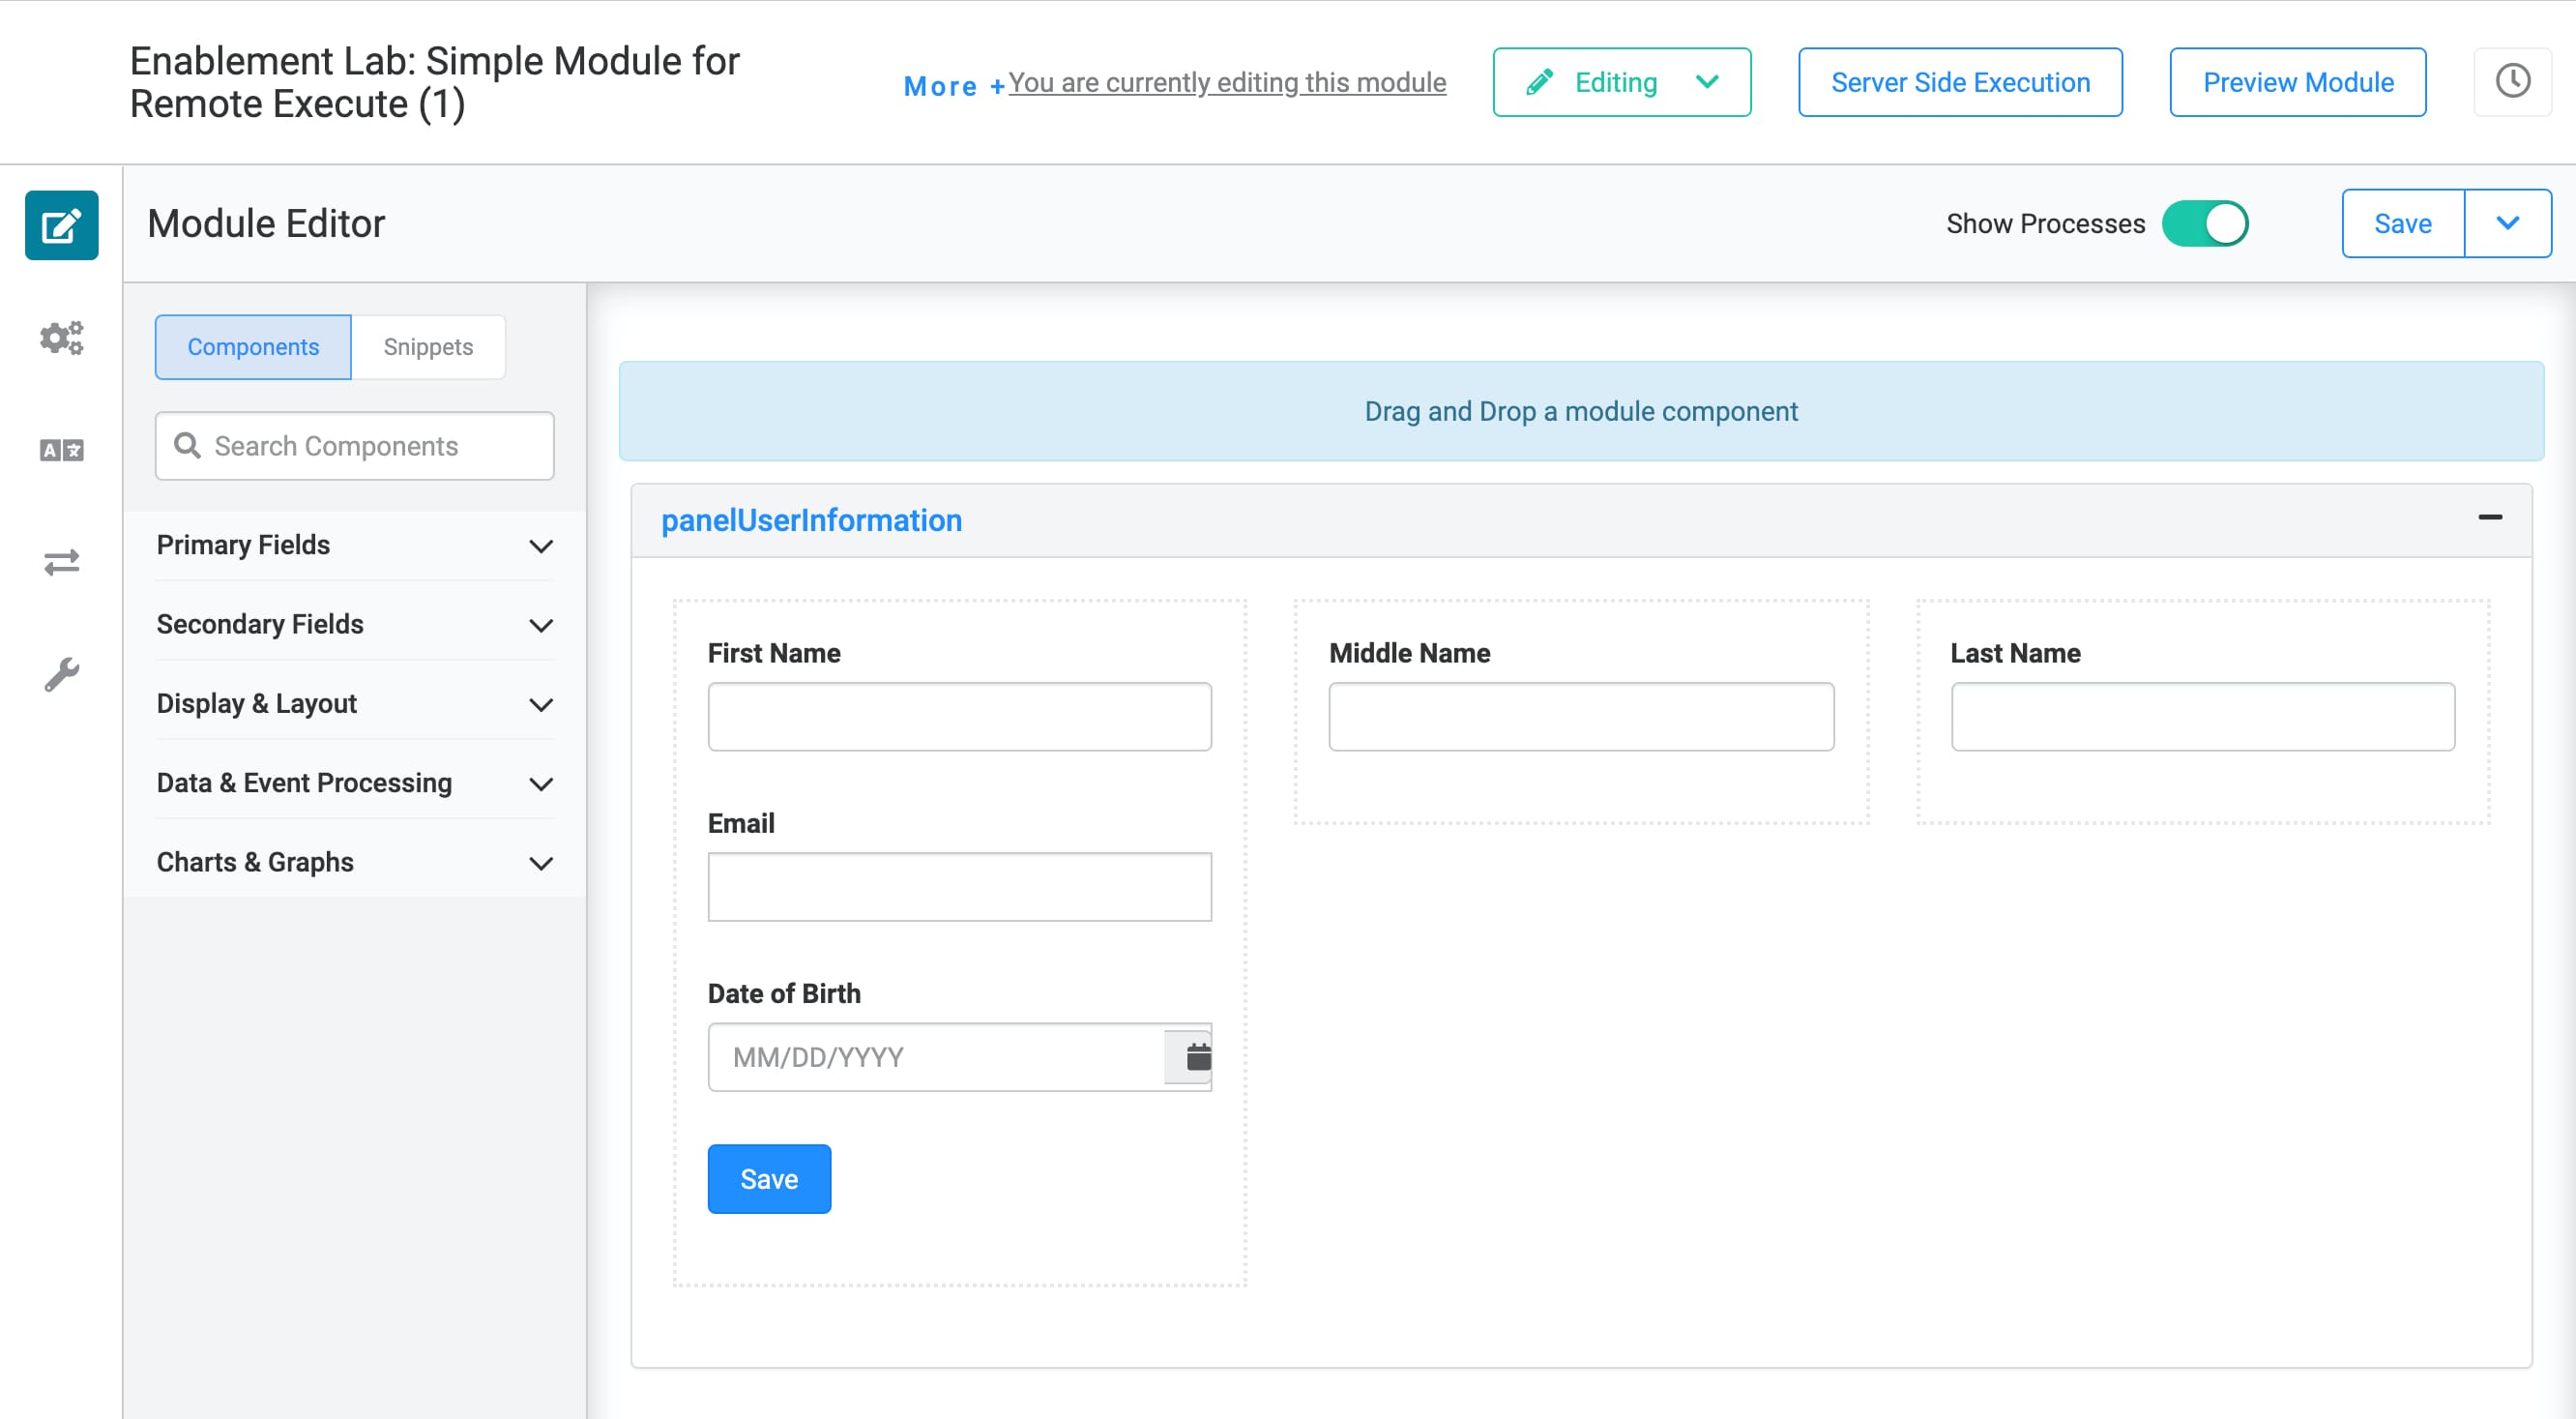
- 3 Text Field components
- 1 Email component
- 1 Date Input component
- 1 Button component
Here's how the completed module looks in the Module Builder. Notice how the optional Panel and Columns components deliver improved organization:
Configure the Text Field Components
| 1. | In the Module Builder, drag and drop 3 Text Field components. |
| 2. | In the Property ID and Label Text fields, enter the following: |
|
Property ID |
Label Text |
|---|---|
|
firstName |
First Name |
|
middleName |
Middle Name |
|
lastName |
Last Name |
| 3. | Save each component as you add it. |
Configure the Email Component
| 1. | Drag and drop an Email component. Place your Email component below your Text Field components. |
| 2. | In the Property ID field, enter emailAddress. |
| 3. | In the Label Text field, enter Email. |
| 4. | Click Save. |
Configure the Date Input Component
| 1. | Drag and drop a Date Input component. Place your Date Input component below your Email component. |
| 2. | In the Property ID field, enter dateOfBirth. |
| 3. | In the Label Text field, enter Date of Birth. |
| 4. | In the Display (+/-) Years From the Current Date field, enter 125. |
| 5. | From the Restrict To drop-down, select Past. |
| 6. | Click Save. |
Configure the Button Component
| 1. | Drag and drop a Button component onto your canvas. Place it below your Date Input component. |
| 2. | In the Property ID field, enter btnSave. |
| 3. | In the Label Text field, enter Save. |
| 4. | In the Success Message field, enter Saved!. |
| 5. | Click Save. |
| 6. | Save your module. |
Remote Execution (Module 2)
Next, create the Remote Execution module (Module 2). This is the module that contains the Plug-In logic. Think about this module as a middleman or a gatekeeper. This module exists server-side, inaccessible to users outside the Module Builder. When you preview this module, you'll see a blank screen. You can only see module details in the DevTools Console.
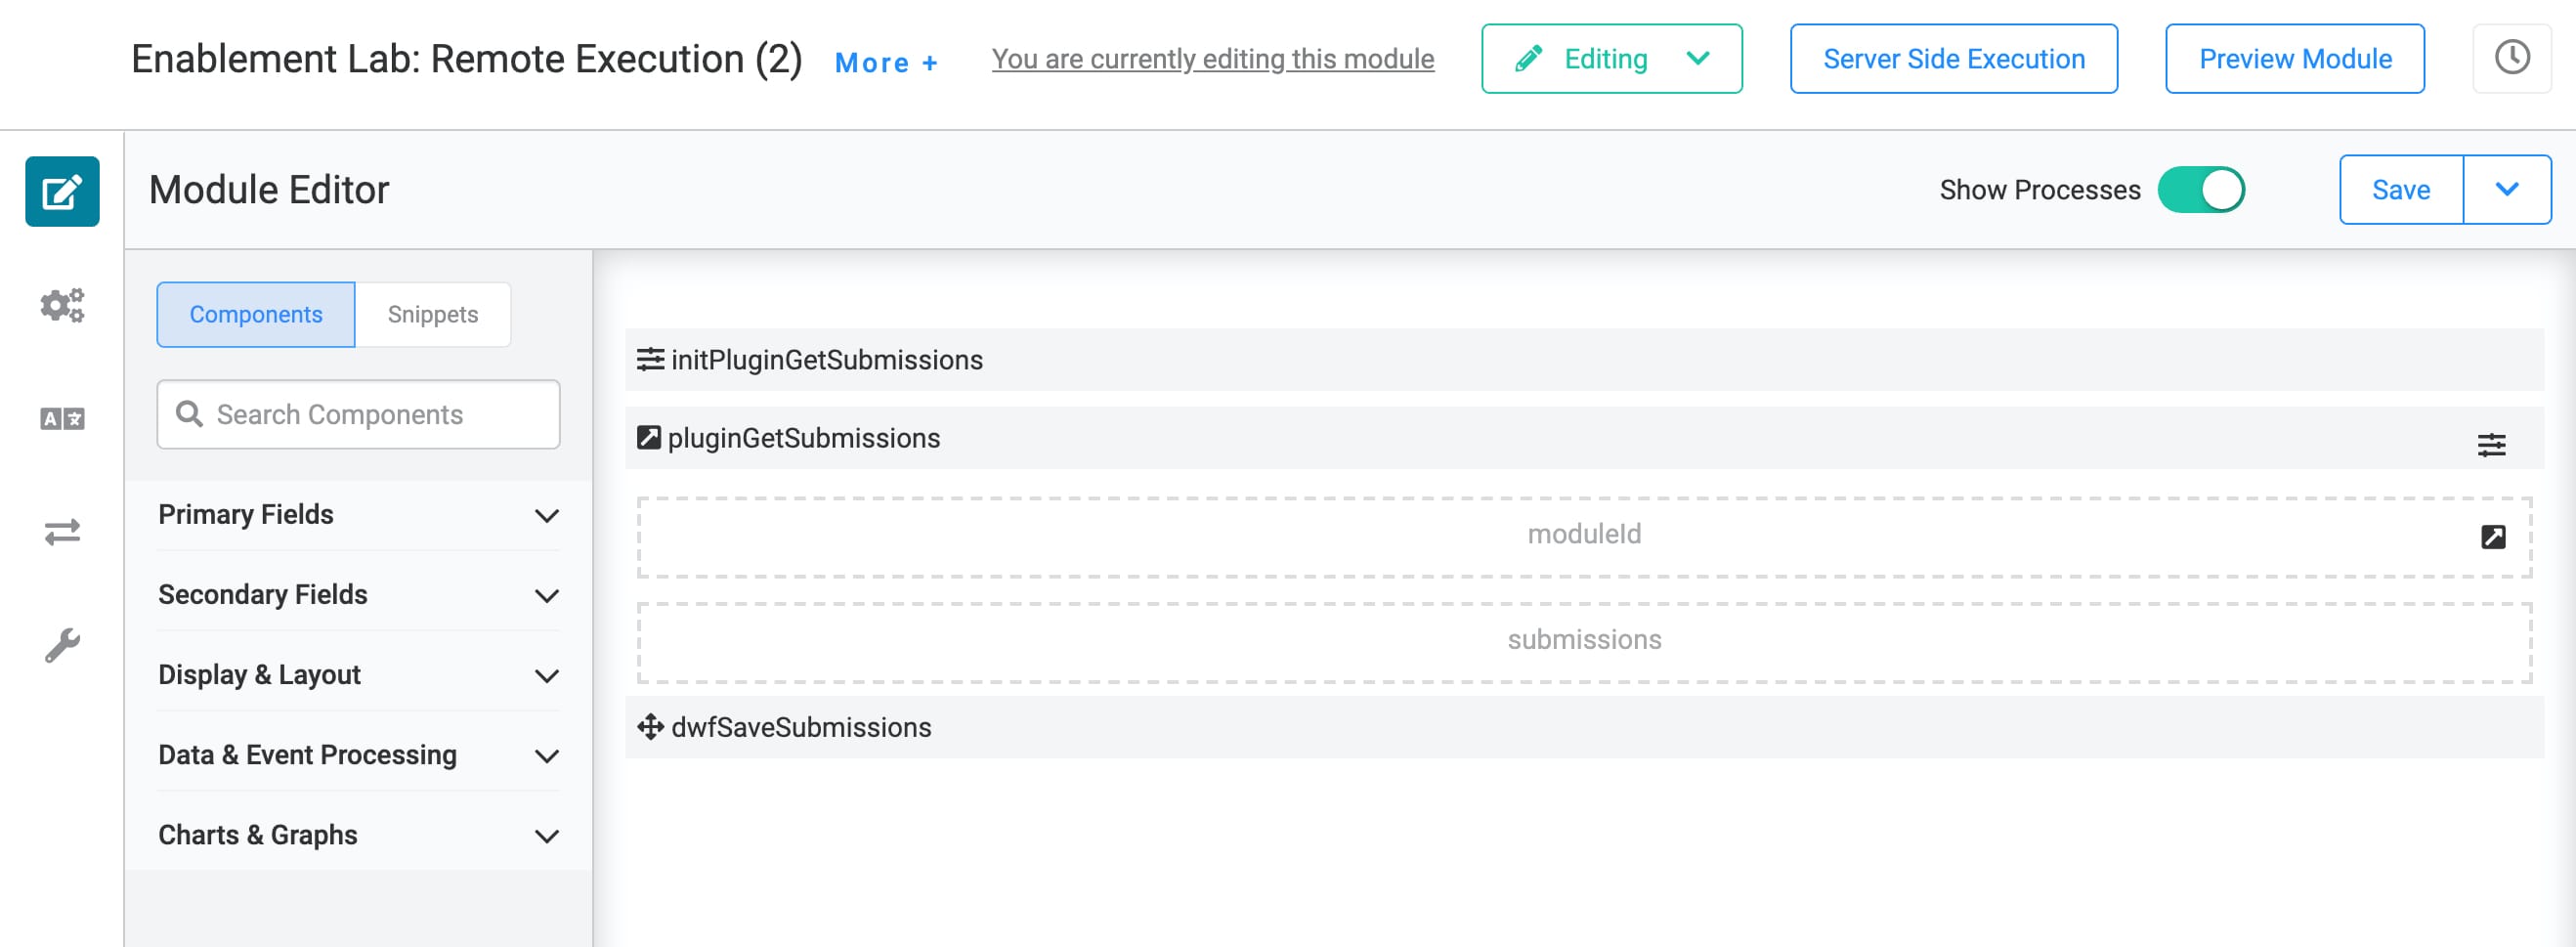
For this module, you need:
- 1 Initializer component
- 1 Plug-In component
- 2 Hidden components
- 1 Data Workflow component
To set up your Data Workflow, you need:
-
1 Input operator
-
1 Output operator
Here's how the completed module looks in the Module Builder:
Turning on Server-Side Execute
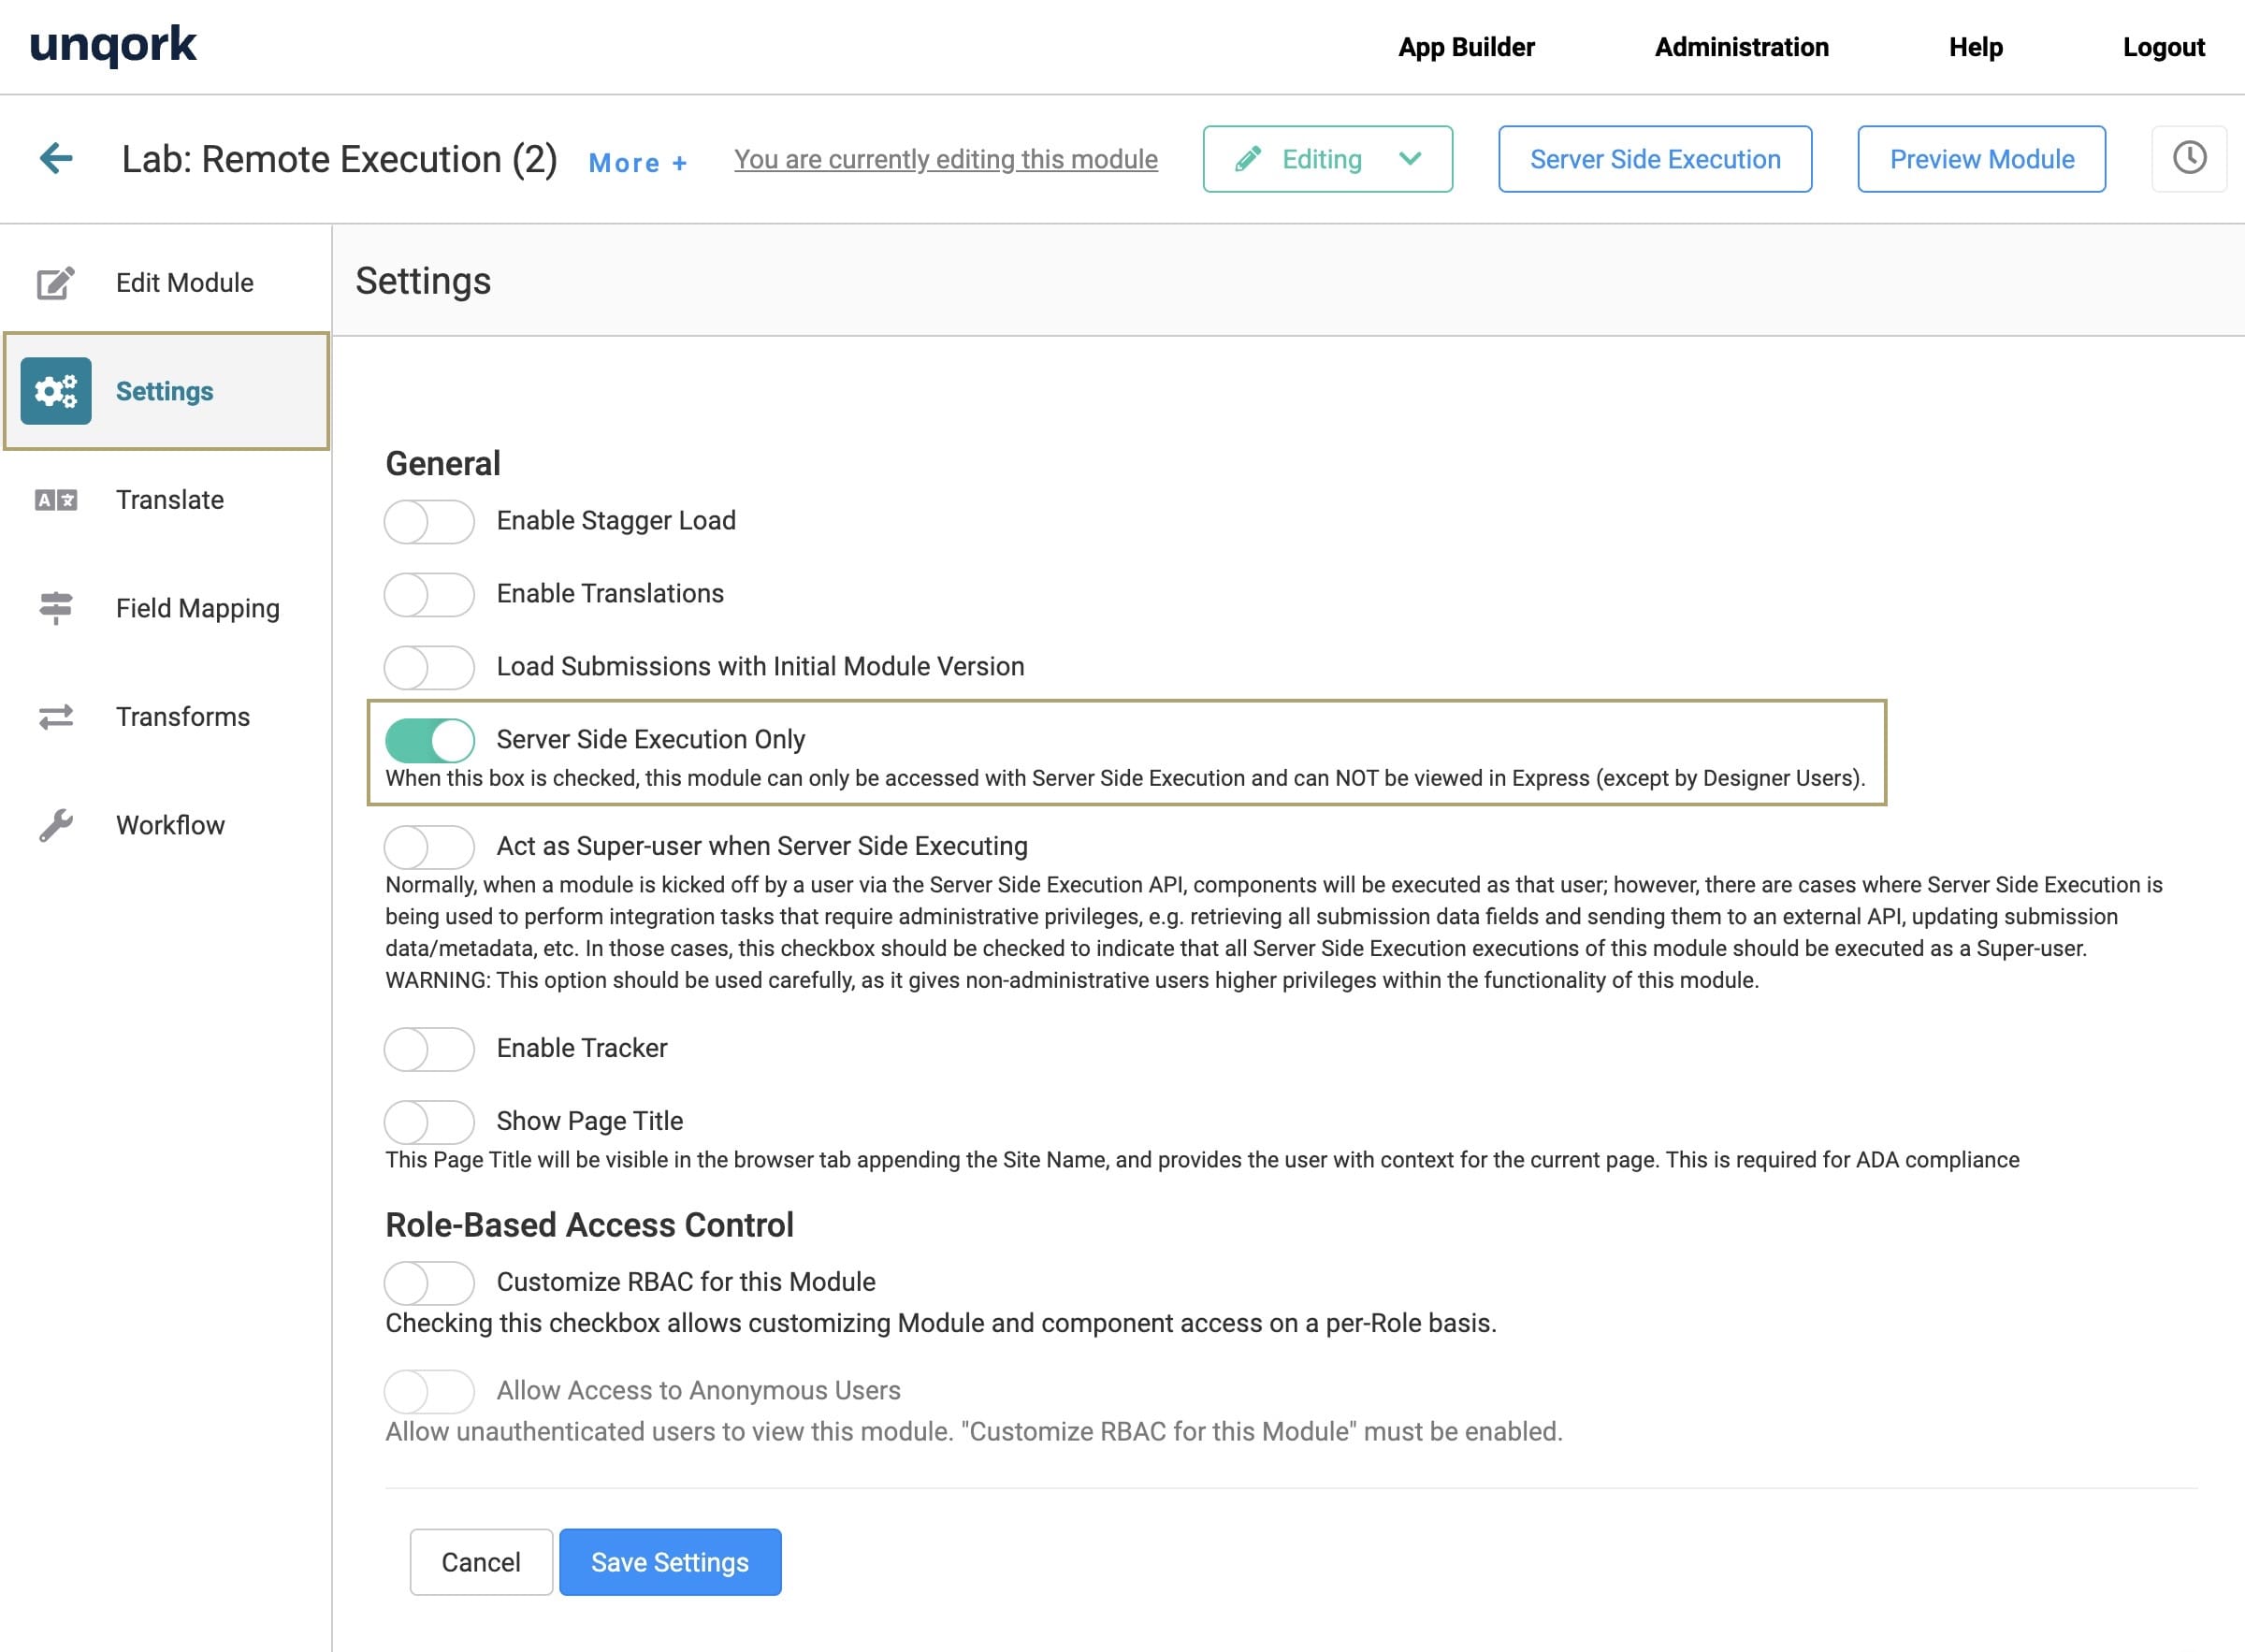
Before adding components to your Module 3, you'll adjust the module settings. By setting your module to server-side execute, your module becomes inaccessible to anyone without Module Builder access.
The Server Side Execution Only toggle enables HTTP status code outputs in API modules. To learn more about HTTP Output, visit our HTTP Status Codes article.
| 1. | On the left side of the Module Builder, click the Settings button. |
| 2. | Set the Server Side Execution Only toggle to ON. |
| 3. | Click Save Settings. |
Configure the Initializer Component
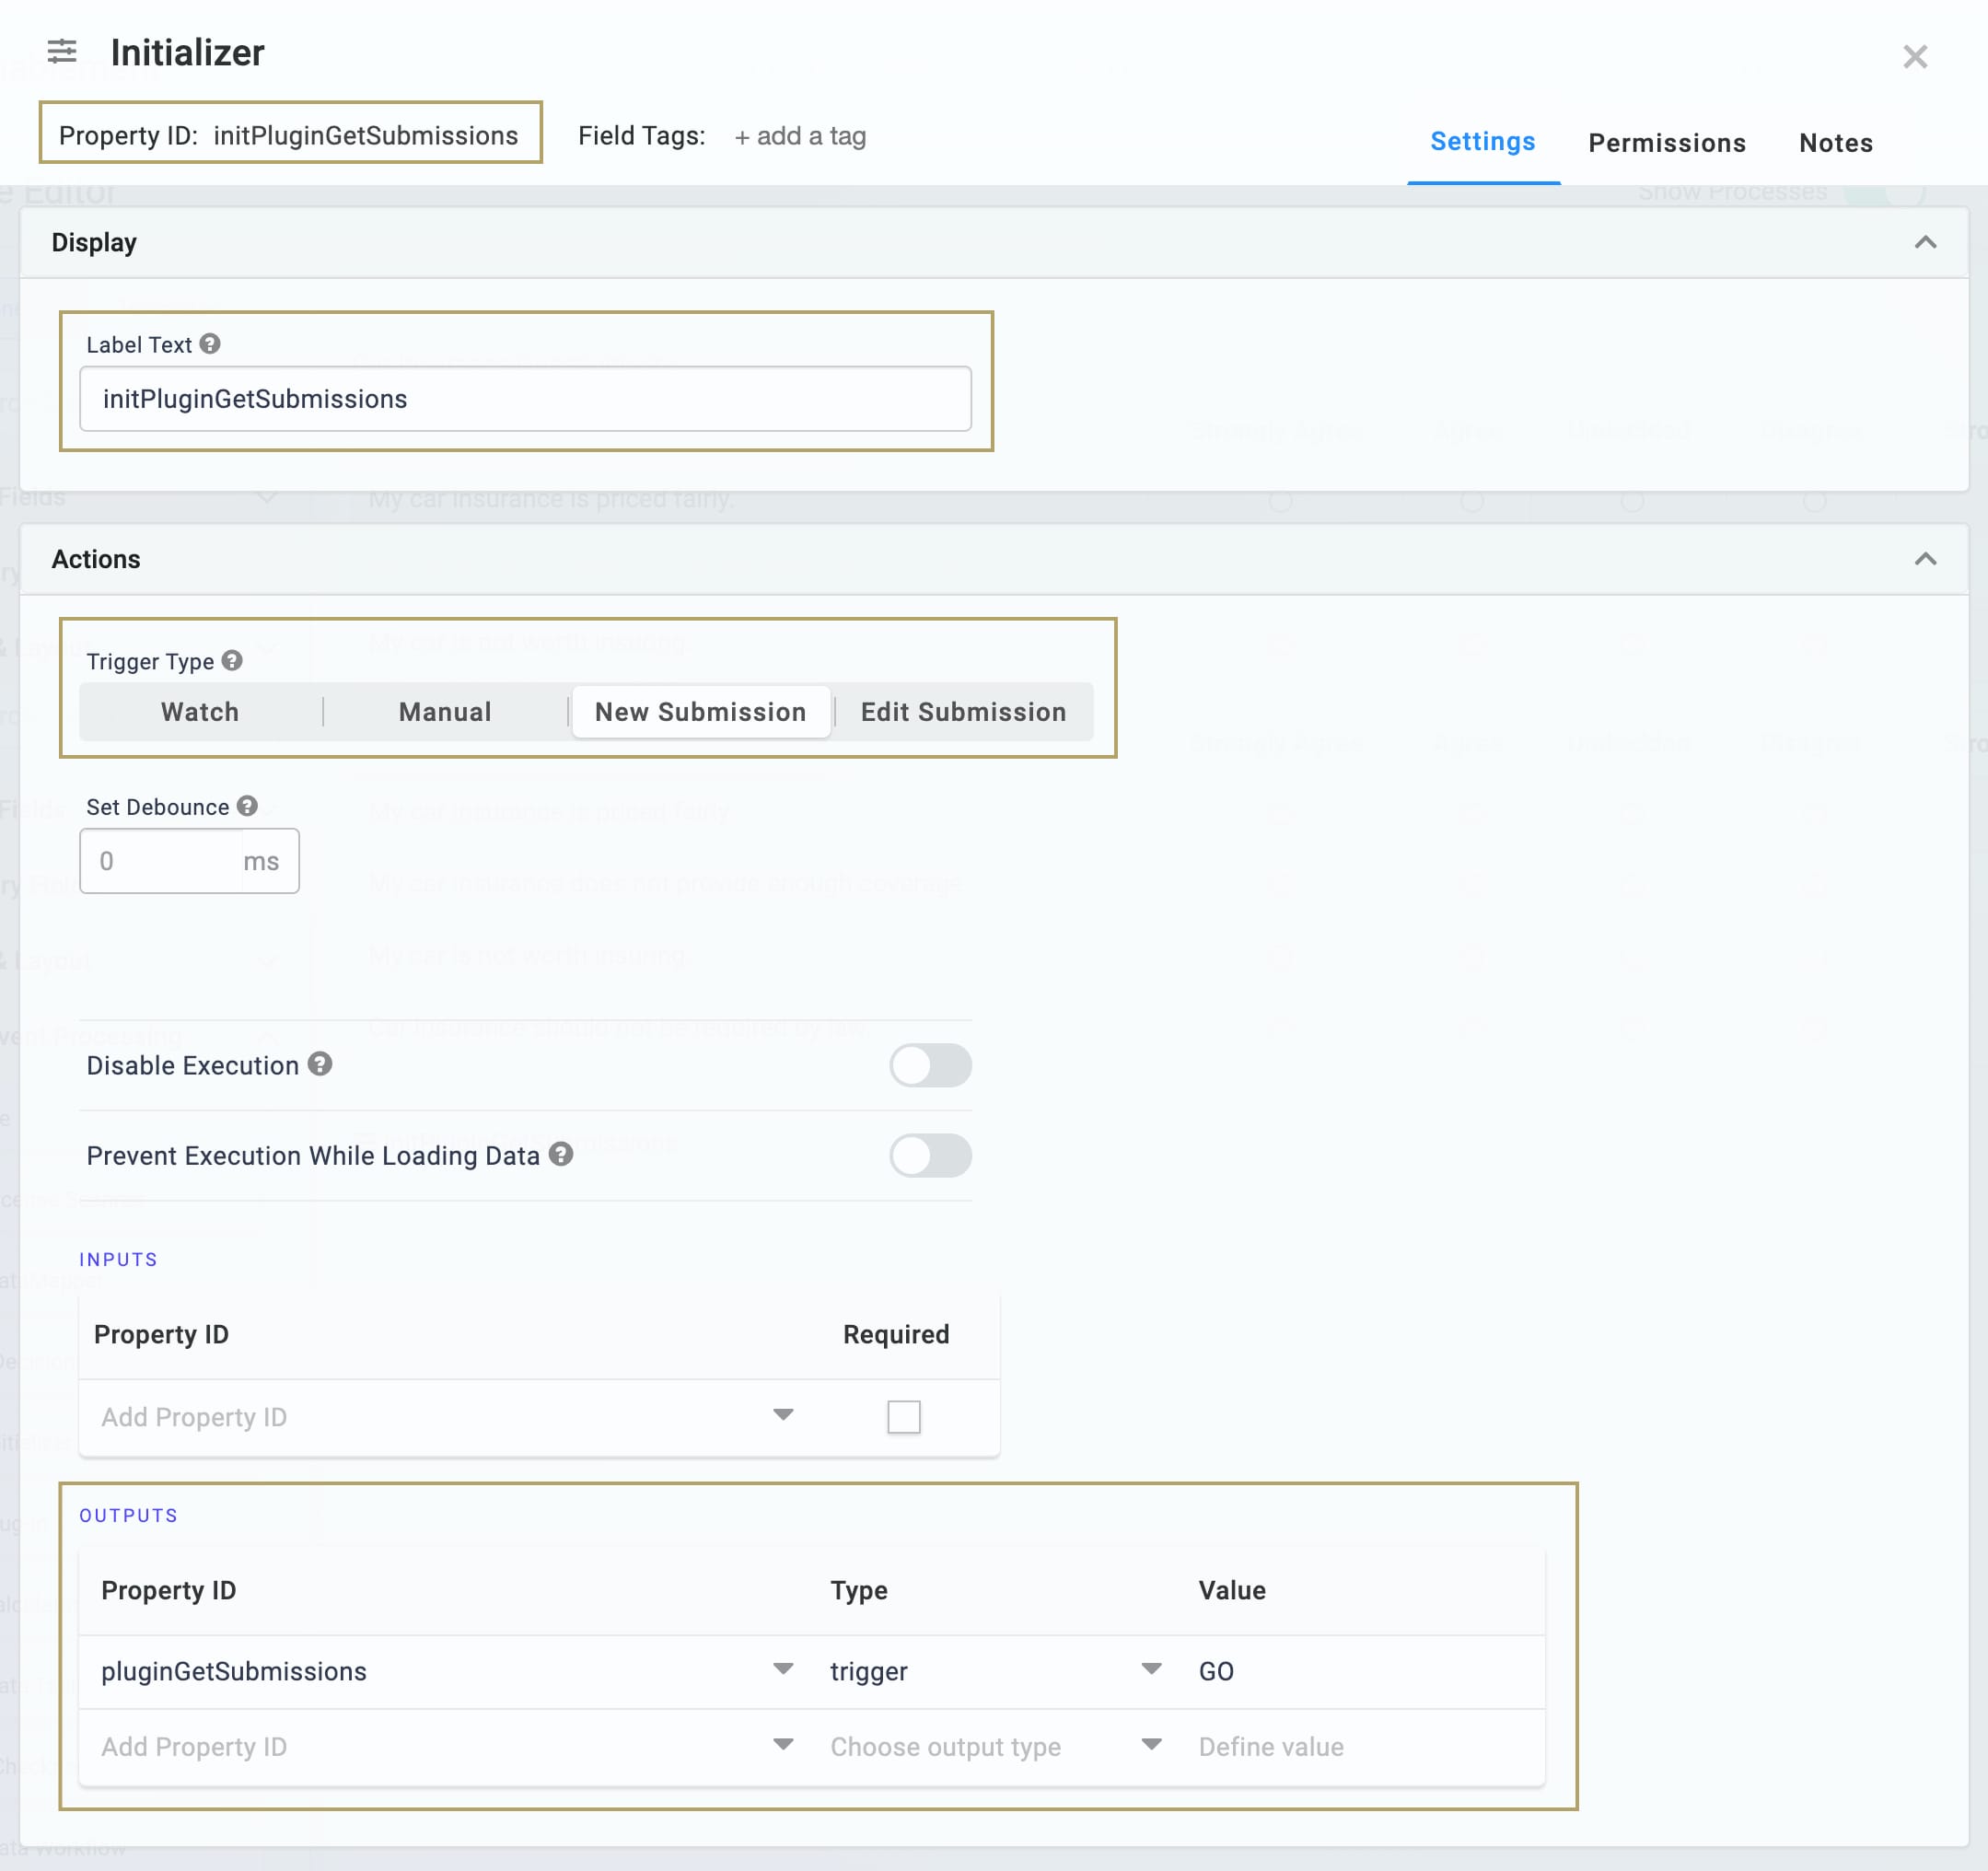
Next, return to the Module Builder and add an Initializer component. The Initializer component is what triggers the Plug-In component. Set the Trigger Type to New Submission so that the Initializer fires on page-load.
| 1. | Drag and drop an Initializer component. |
| 2. | In the Property ID and Label Text fields, enter initPluginGetSubmissions. |
| 3. | Under Trigger Type, select New Submission. |
| 4. | In the Outputs table, enter the following: |
|
Property ID |
Type | Value |
|---|---|---|
|
pluginGetSubmissions |
trigger |
GO |
| 5. | Click Save. |
Configure the First Hidden Component
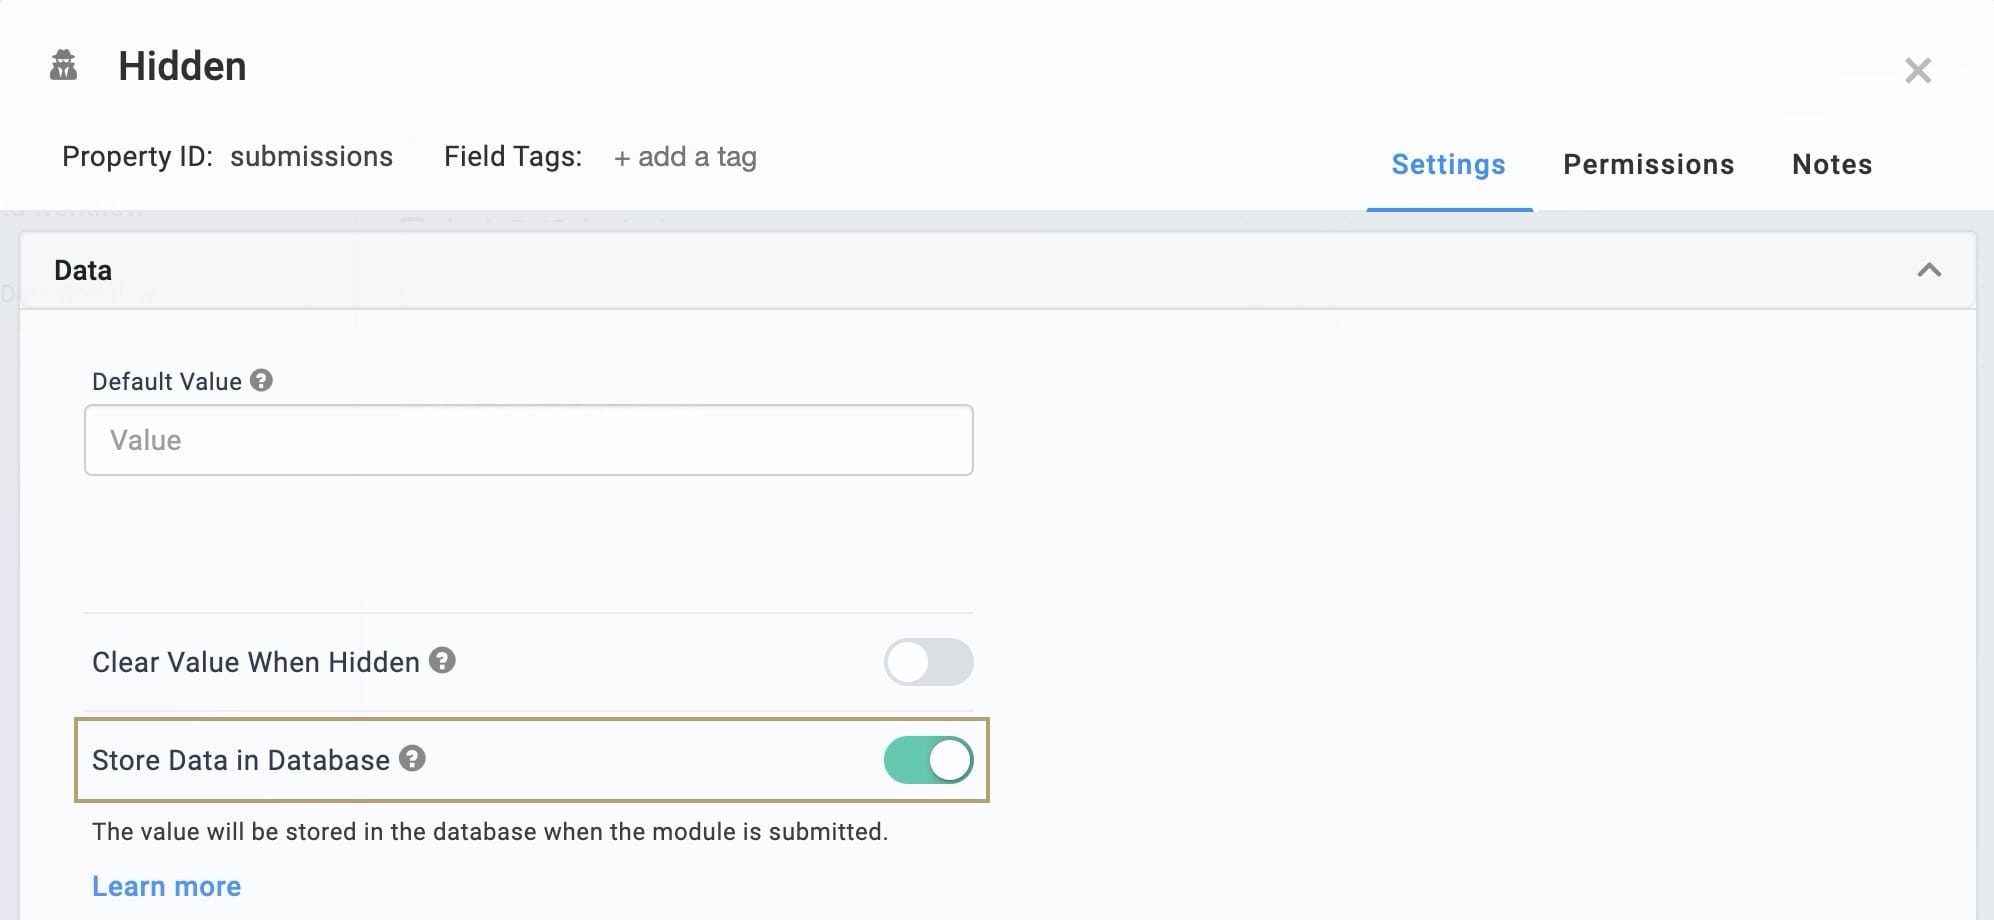
You'll use 2 Hidden components in this module. Your first Hidden component, moduleId, houses the module ID of the Simple Module for Remote Execute (Module 1). For security purposes, you don't want this module ID stored in the database. So, keep the Store Data in Database toggle set to OFF.
| 1. | Drag and drop a Hidden component. Place your Hidden component below your Initializer. |
| 2. | In the Property ID and Label Text fields, enter moduleId. |
| 3. | In the Default Value field, enter 5f8d9eb9f1a98d024e984c75. |
This is the module ID of our Simple Module for Remote Execute (Module 1). It's drawn from the source module's hyperlink as follows: https://training.unqork.io/#/form/5f8d9eb9f1a98d024e984c75/edit. If you created your own Module 1, be sure to enter that module's unique module ID.

| 4. | Click Save. |
Configure the Second Hidden Component
Now, configure the second Hidden component. This Hidden component stores the submission data retrieved by the pluginGetSubmissions Plug-In.
| 1. | Drag and drop a Hidden component. Place this Hidden component below the first. |
| 2. | In the Property ID and Label Text fields, enter submissions. |
| 3. | Set the Store Data in Database toggle to ON. This allows the submission data to be brought into the dashboard. |
| 4. | Click Save. |
Configure the Plug-In Component
Next, add a Plug-In component. The Plug-In's job is to retrieve the submission data from your Module 1 and then trigger your Data Workflow.
| 1. | Drag and drop a Plug-In component. Place your Plug-In component below your Initializer. |
| 2. | In the Property ID and Label Text fields, enter pluginGetSubmissions. |
| 3. | From the Internal Services drop-down, select List Submissions for Dashboard. The Request Type and Data Source URL prepopulate. |
| 4. | In the Inputs table, enter the following: |
|
Property ID |
Mapping |
|---|---|
|
moduleId |
moduleId |
|
'firstName,lastName,emailAddress' |
fields |
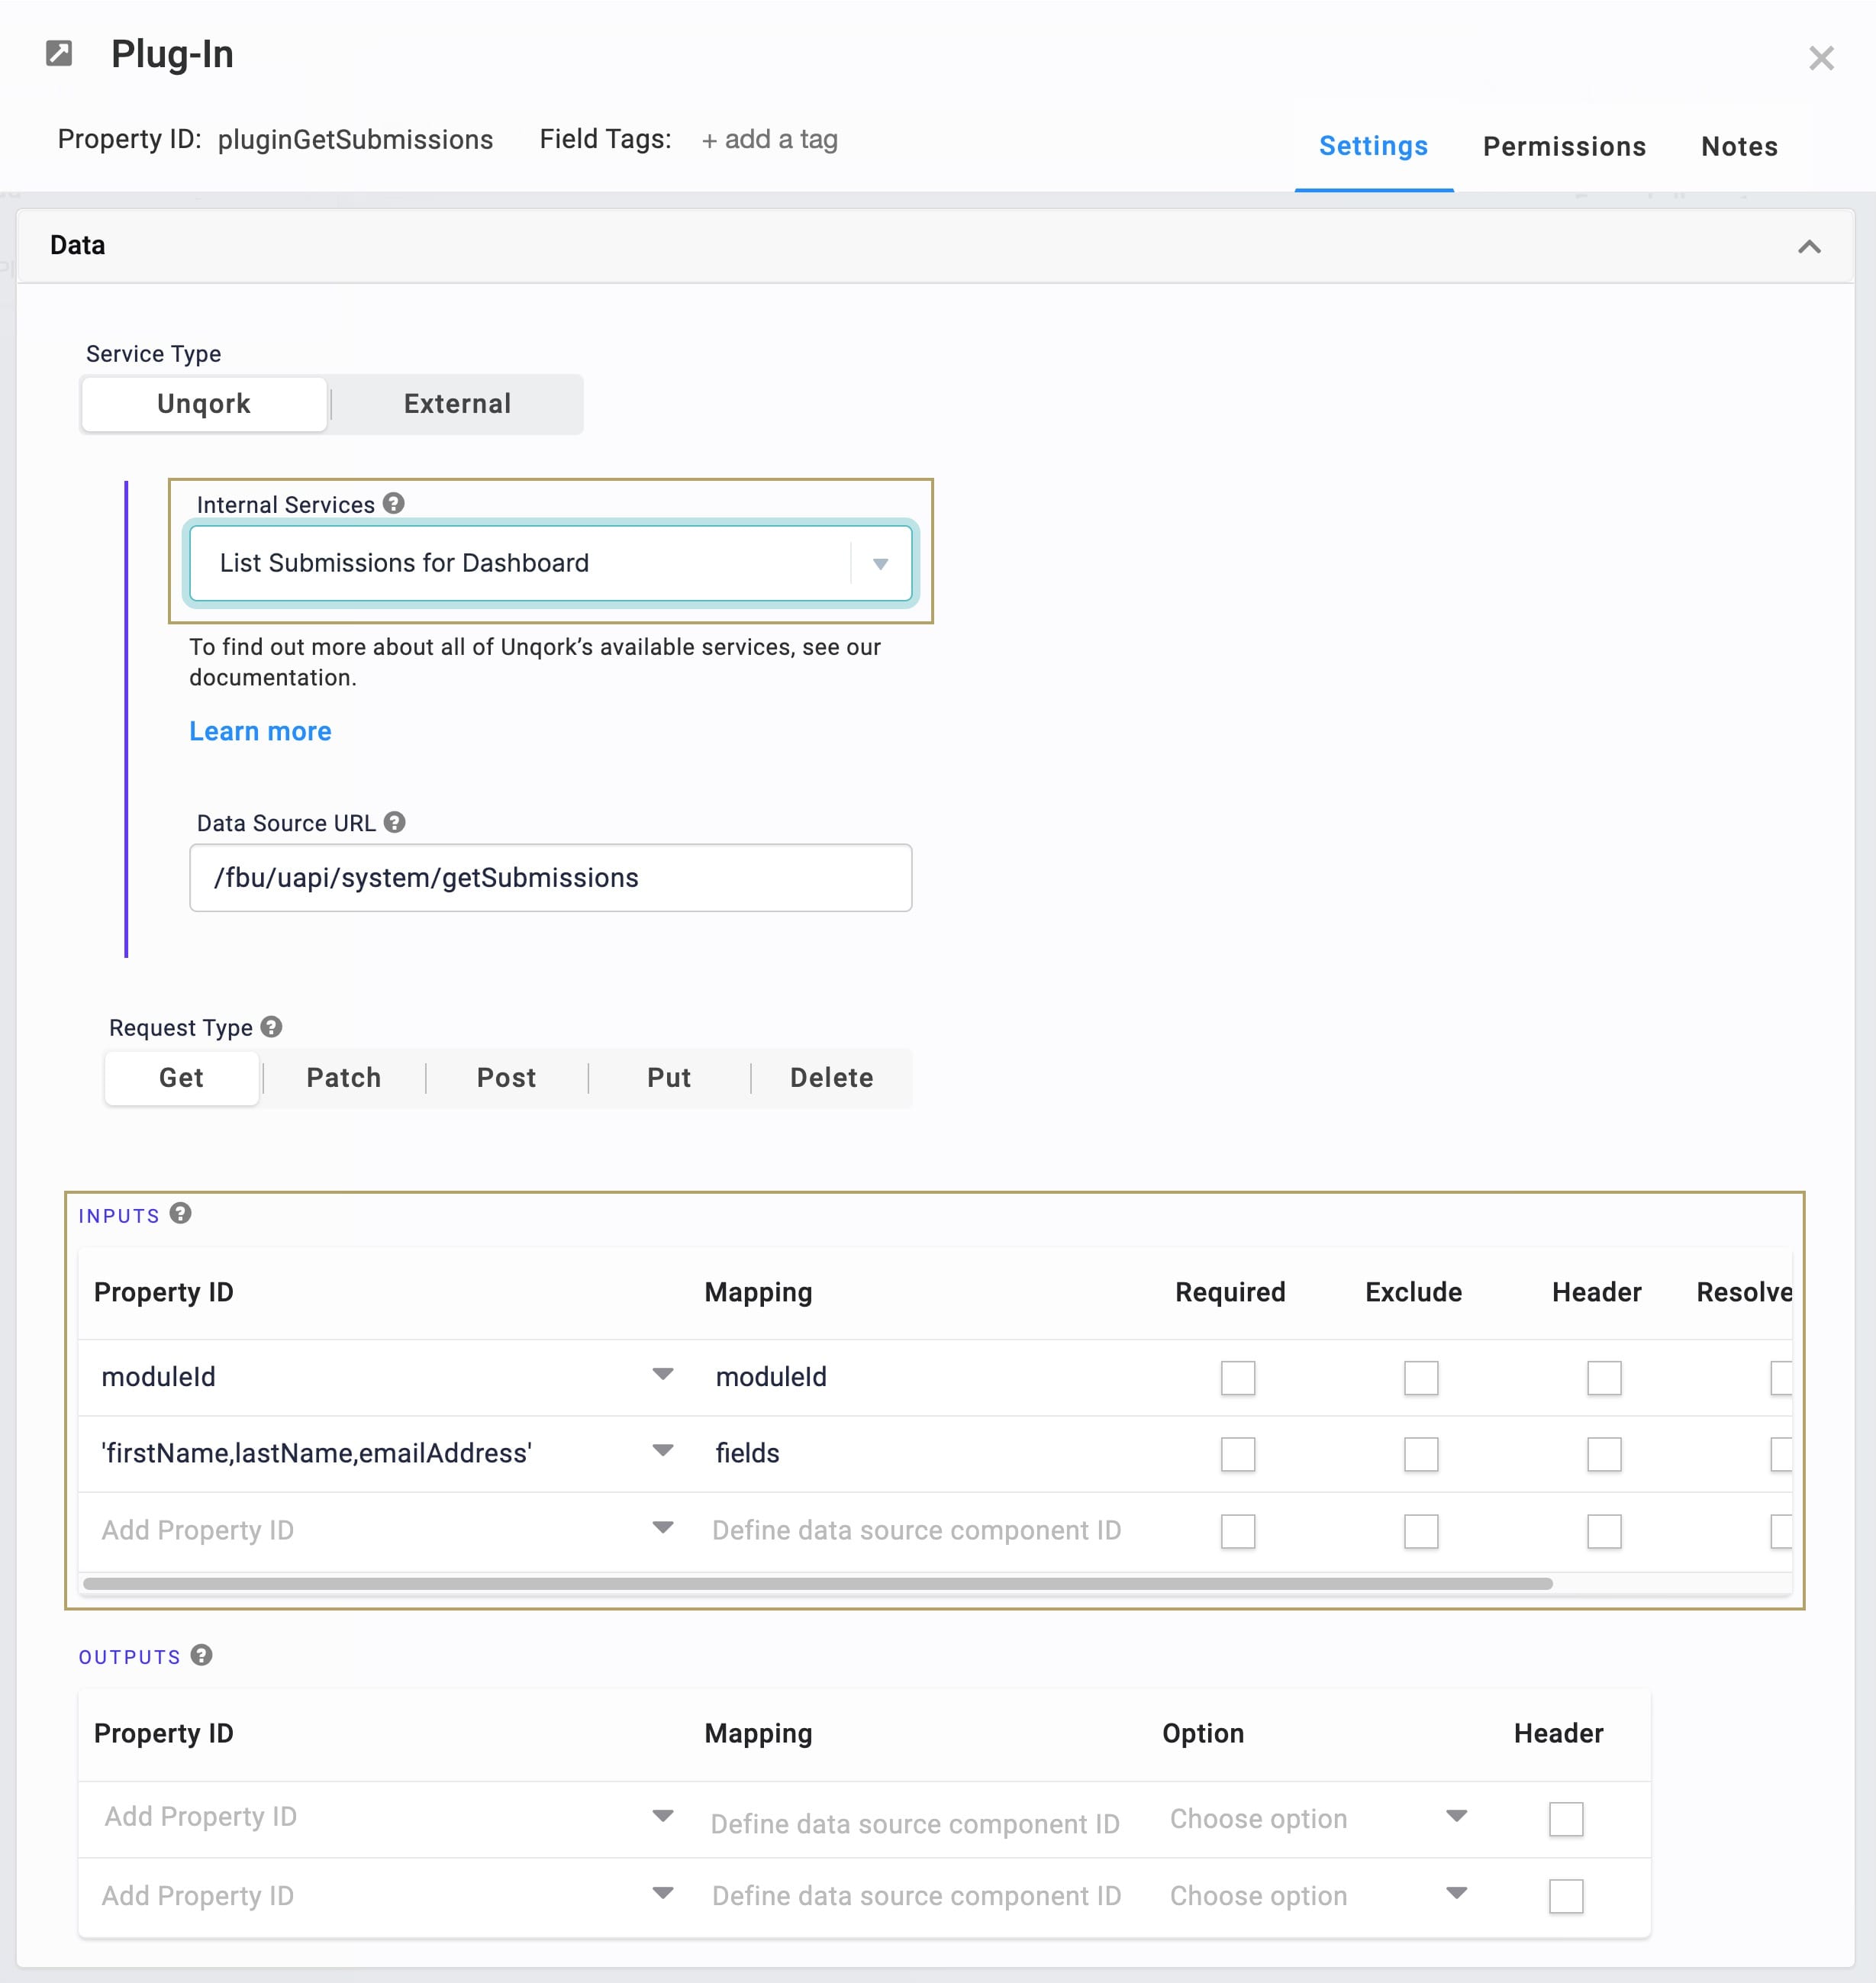
| 5. | In the Post Trigger field, enter dwfSaveSubmissions. The Post Trigger action triggers the Data Workflow, which then outputs the submission data into your module. |
| 6. | Click Save. |
Configure the Data Workflow Component
Lastly, for this module, configure a Data Workflow component. This component pulls the submission data out of the Plug-In, pushing it to the submissions Hidden component. A simple Input to Output Data Workflow performs this.
| 1. | Drag and drop a Data Workflow component. Place your Data Workflow below your Hidden components. |
| 2. | In the Property ID and Label Text fields, enter dwfSaveSubmissions. |
Configure the Input Operator
| 1. | On your Data Workflow canvas, drag and drop an Input operator. |
| 2. | Configure the Input operator's Info window as follows: |
|
Setting |
Value |
|---|---|
|
Category |
Input |
|
Component |
pluginGetSubmissions |
|
Required |
Yes |
|
Source |
Default |
Configure the Output Operator
| 1. | On your Data Workflow canvas, drag and drop an Output operator. |
| 2. | Configure the Output operator's Info window as follows: |
|
Setting |
Value |
|---|---|
|
Category |
Output |
|
Component |
submissions |
|
Action |
value |
| 3. | Connect the output port (right) of the Input operator to the input port (left) of the Output operator. |
| 4. | Click Save. |
| 5. | Save your module. |
Simple Dashboard with Remote Execute (Module 3)
Now, configure your third and final module: the Simple Dashboard with Remote Execute. Module 3 calls on the Remote Execution module (Module 2). The Plug-In in this module retrieves the submission data to display in a simple dashboard.
For this module, you need:
- 1 Initializer component
- 1 Plug-In component
- 1 Hidden component
- 1 ViewGrid component
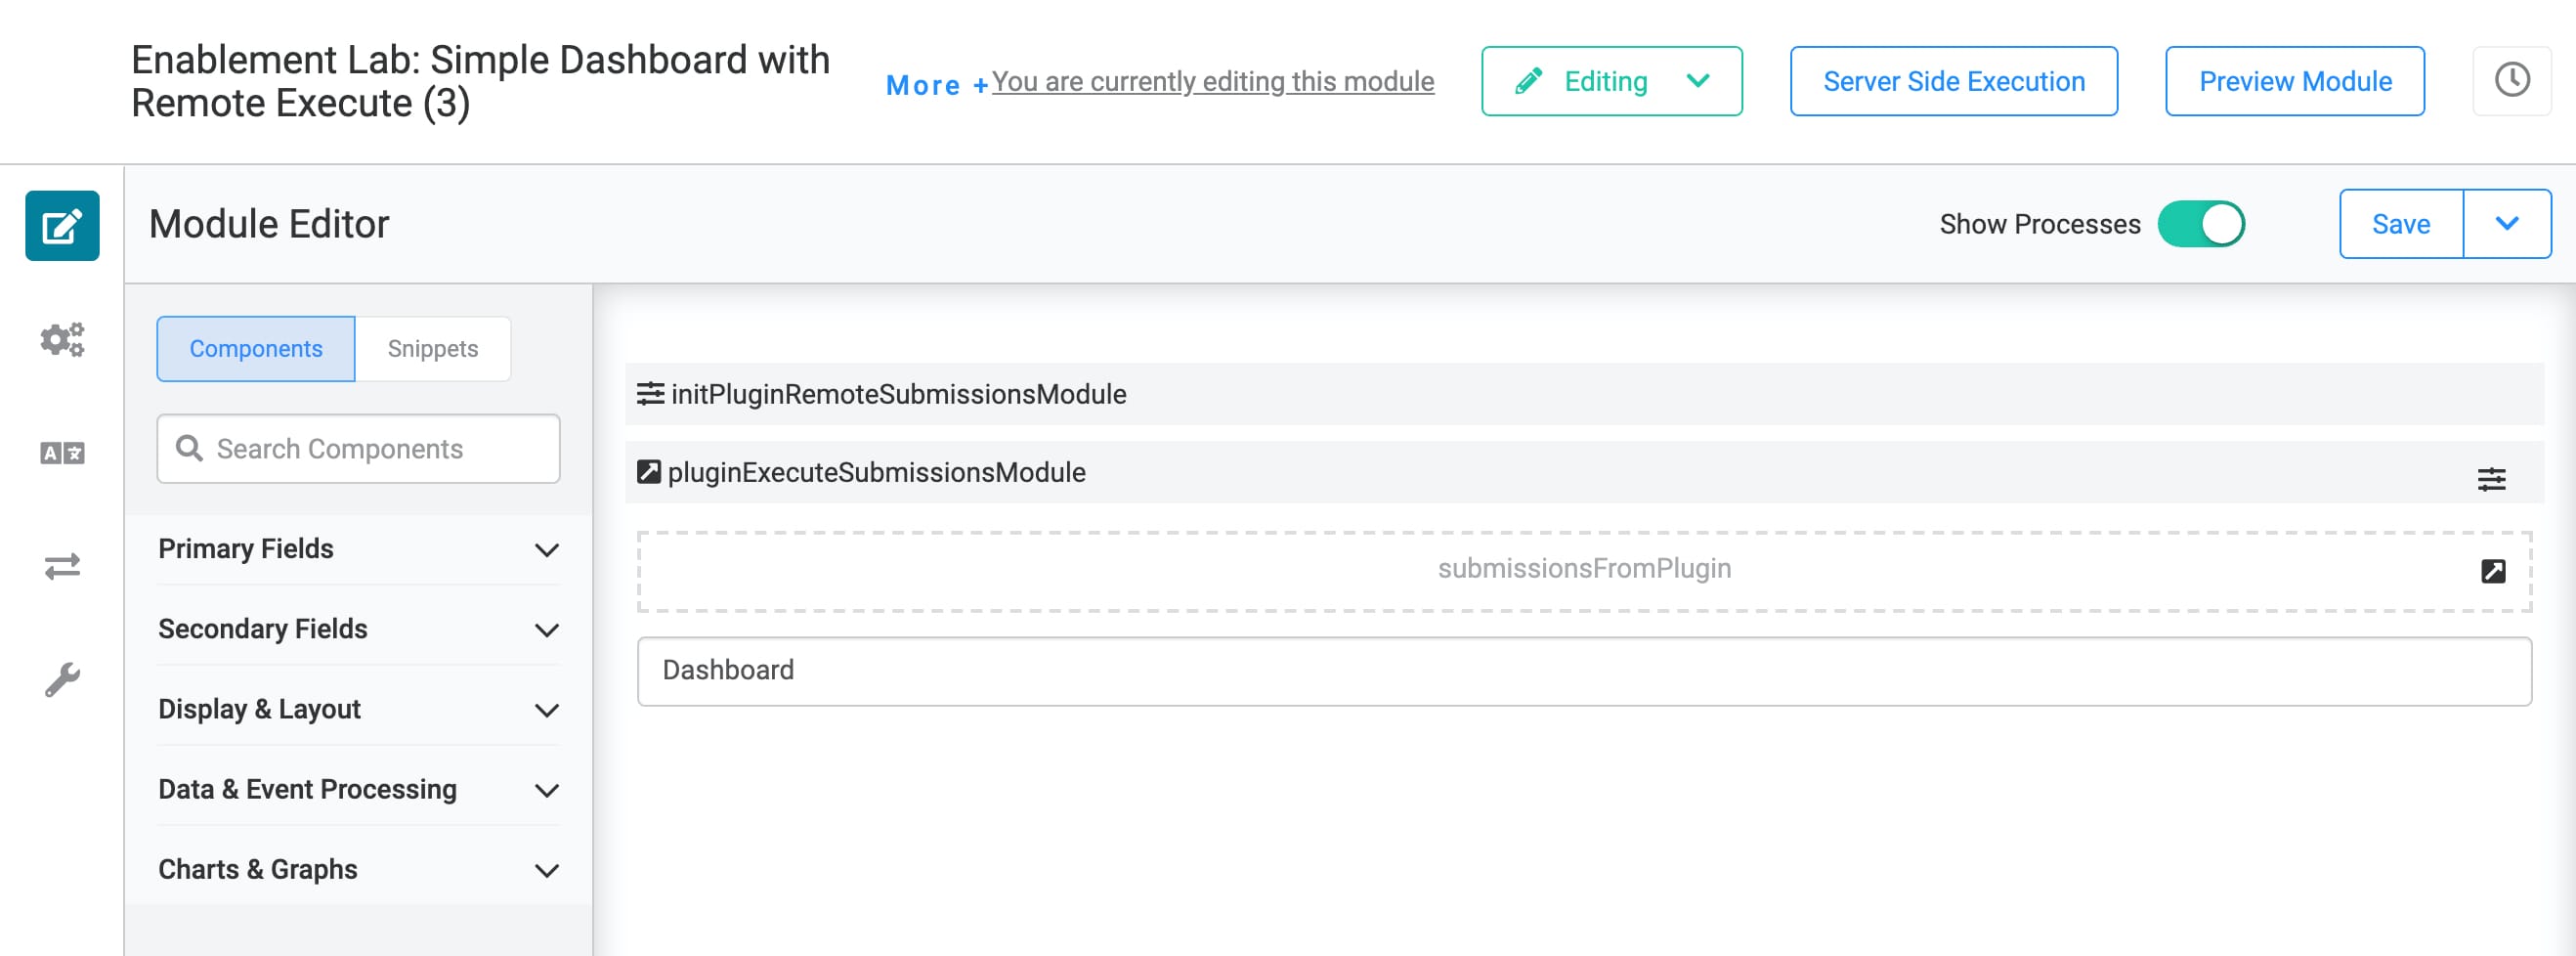
Here's how the completed module looks in the Module Builder:
Configure the Initializer Component
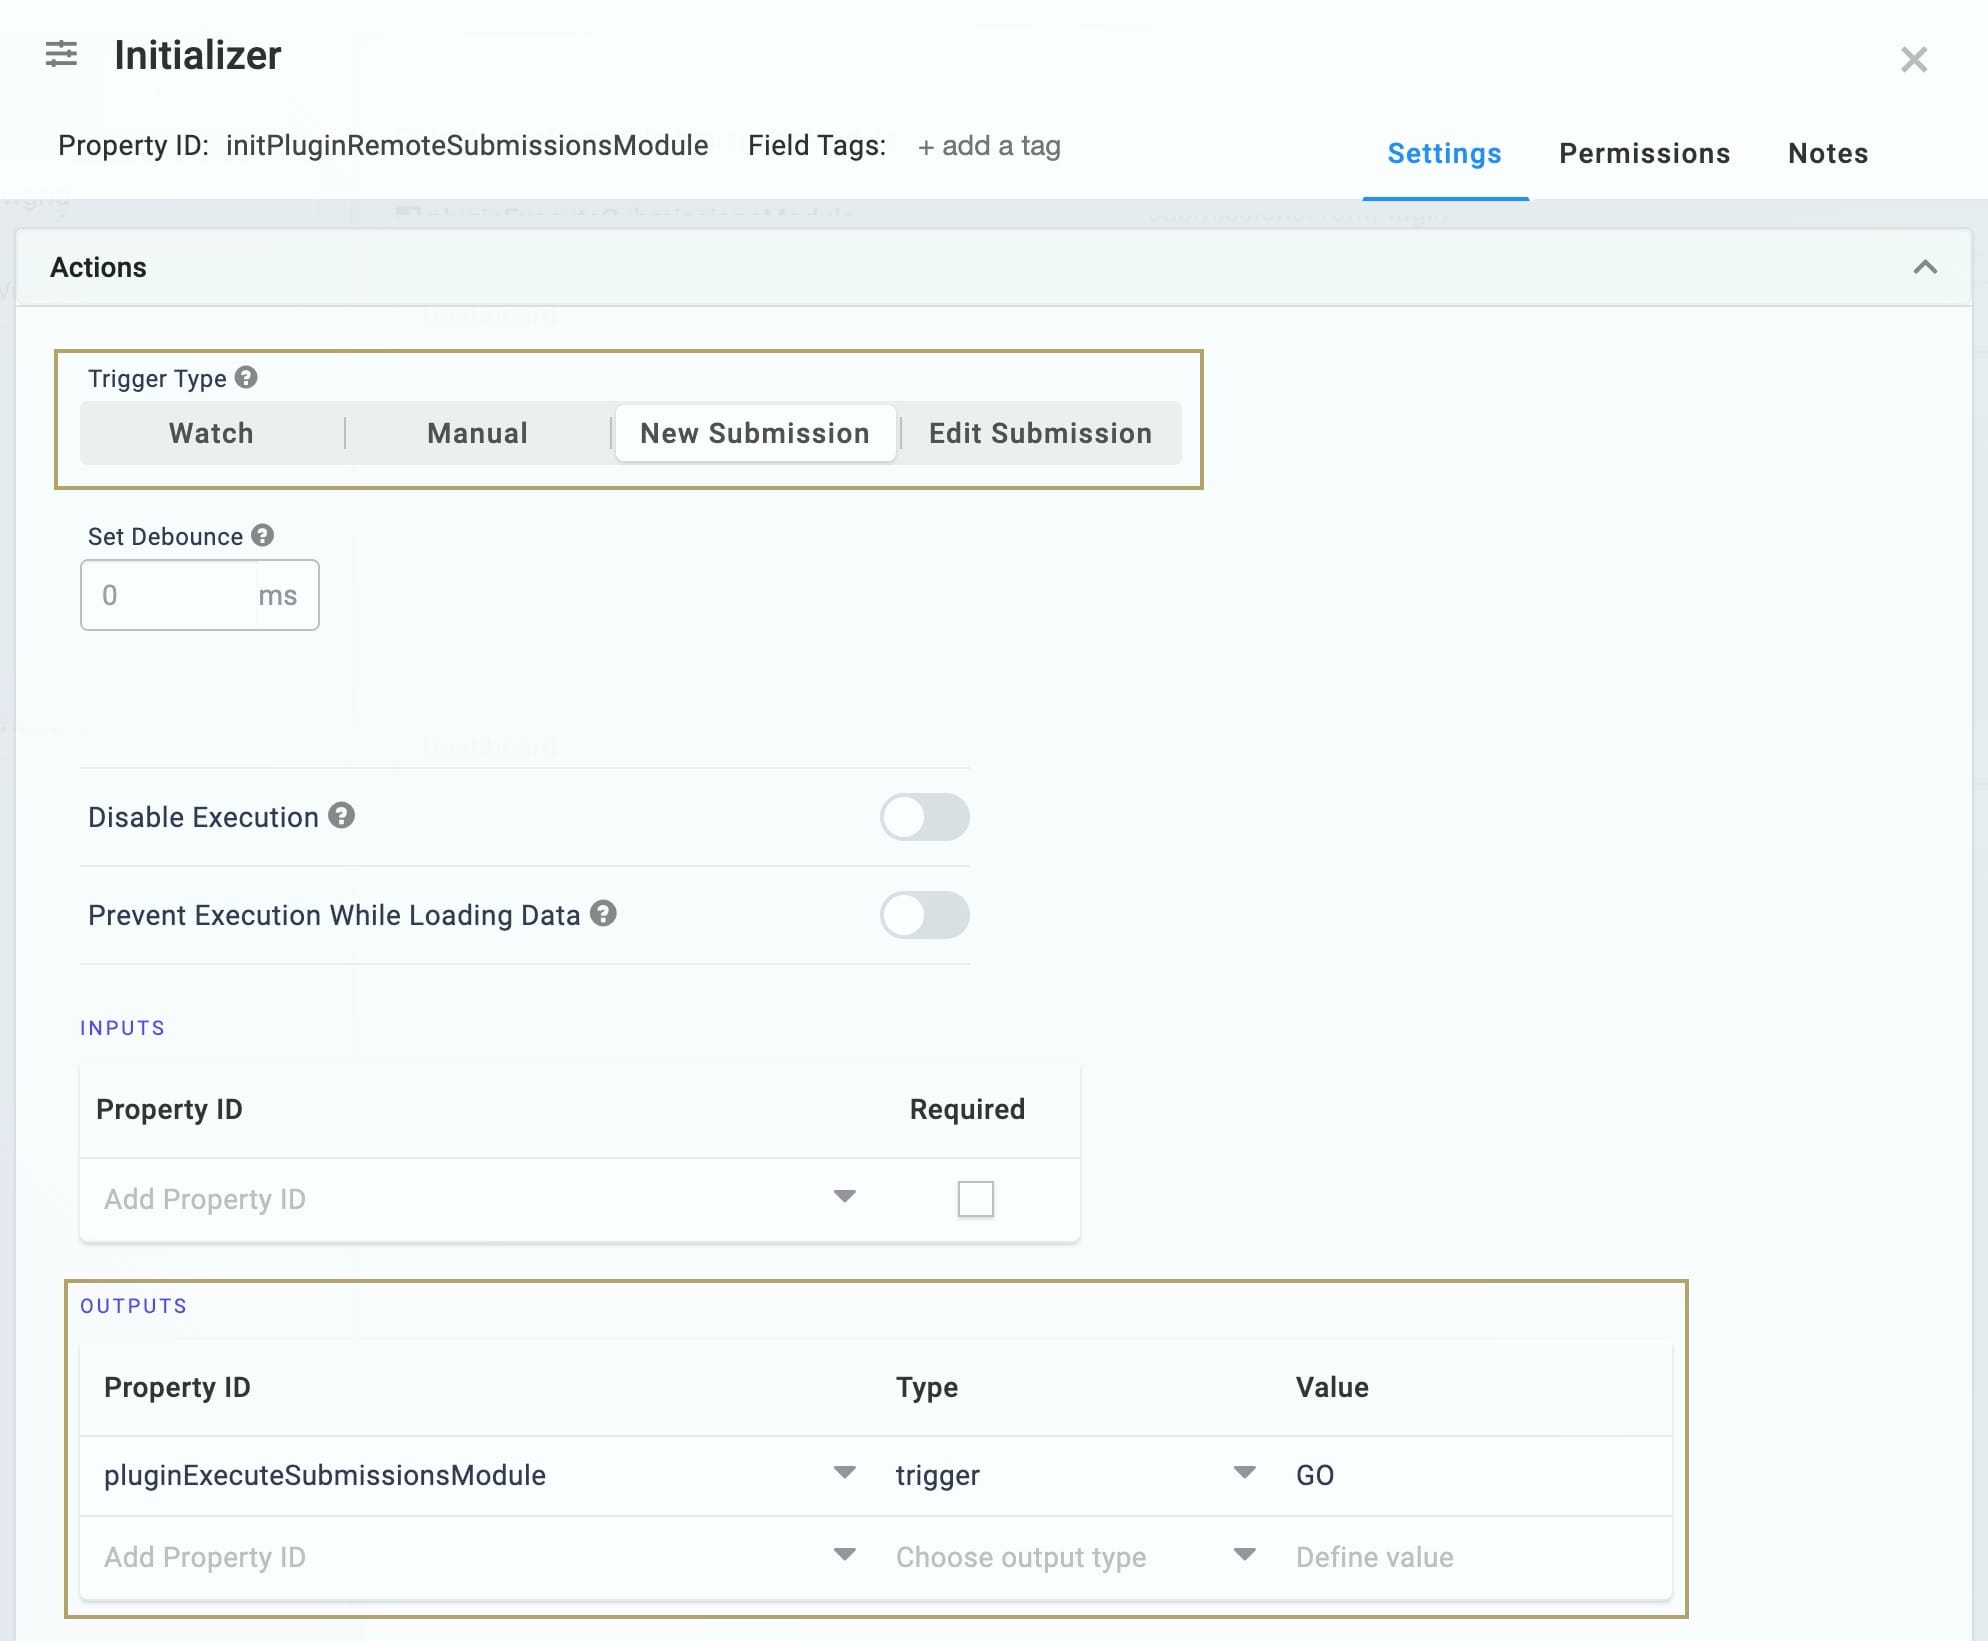
Like in the last module, the Initializer component triggers the Plug-In component on page-load.
| 1. | Drag and drop an Initializer component. |
| 2. | In the Property ID and Label Text fields, enter initPluginRemoteSubmissionsModule. |
| 3. | Under Trigger Type, select New Submission. |
| 4. | In the Outputs table, enter the following: |
|
Property ID |
Type | Value |
|---|---|---|
|
pluginExecuteSubmissions Module |
trigger |
GO |
| 5. | Click Save. |
Configure the Plug-In Component
Next, add a Plug-In component. This Plug-In component pulls the submission data stored in the submissions Hidden component in your Remote Execution module (Module 2). Then, stores that submission data in a Hidden component you'll create in this module (Module 3).
| 1. | Drag and drop a Plug-In component. Place your Plug-In below your Initializer. |
| 2. | In the Property ID and Label Text fields, enter pluginExecuteSubmissionsModule. |
| 3. | From the Internal Services drop-down, select Execute Module. The Data Source URL and Request Type prepopulate. |
| 4. | In the Data Source URL, replace {moduleID} with the module ID from your Remote Execution module (Module 2). In this example, the module's module ID is 5f8d9fec19c4e6024ed45c48. |
| 5. | In the Outputs table, enter the following: |
|
Property ID |
Mapping |
|---|---|
|
submissionsFromPlugin |
data.resolved.submissions |
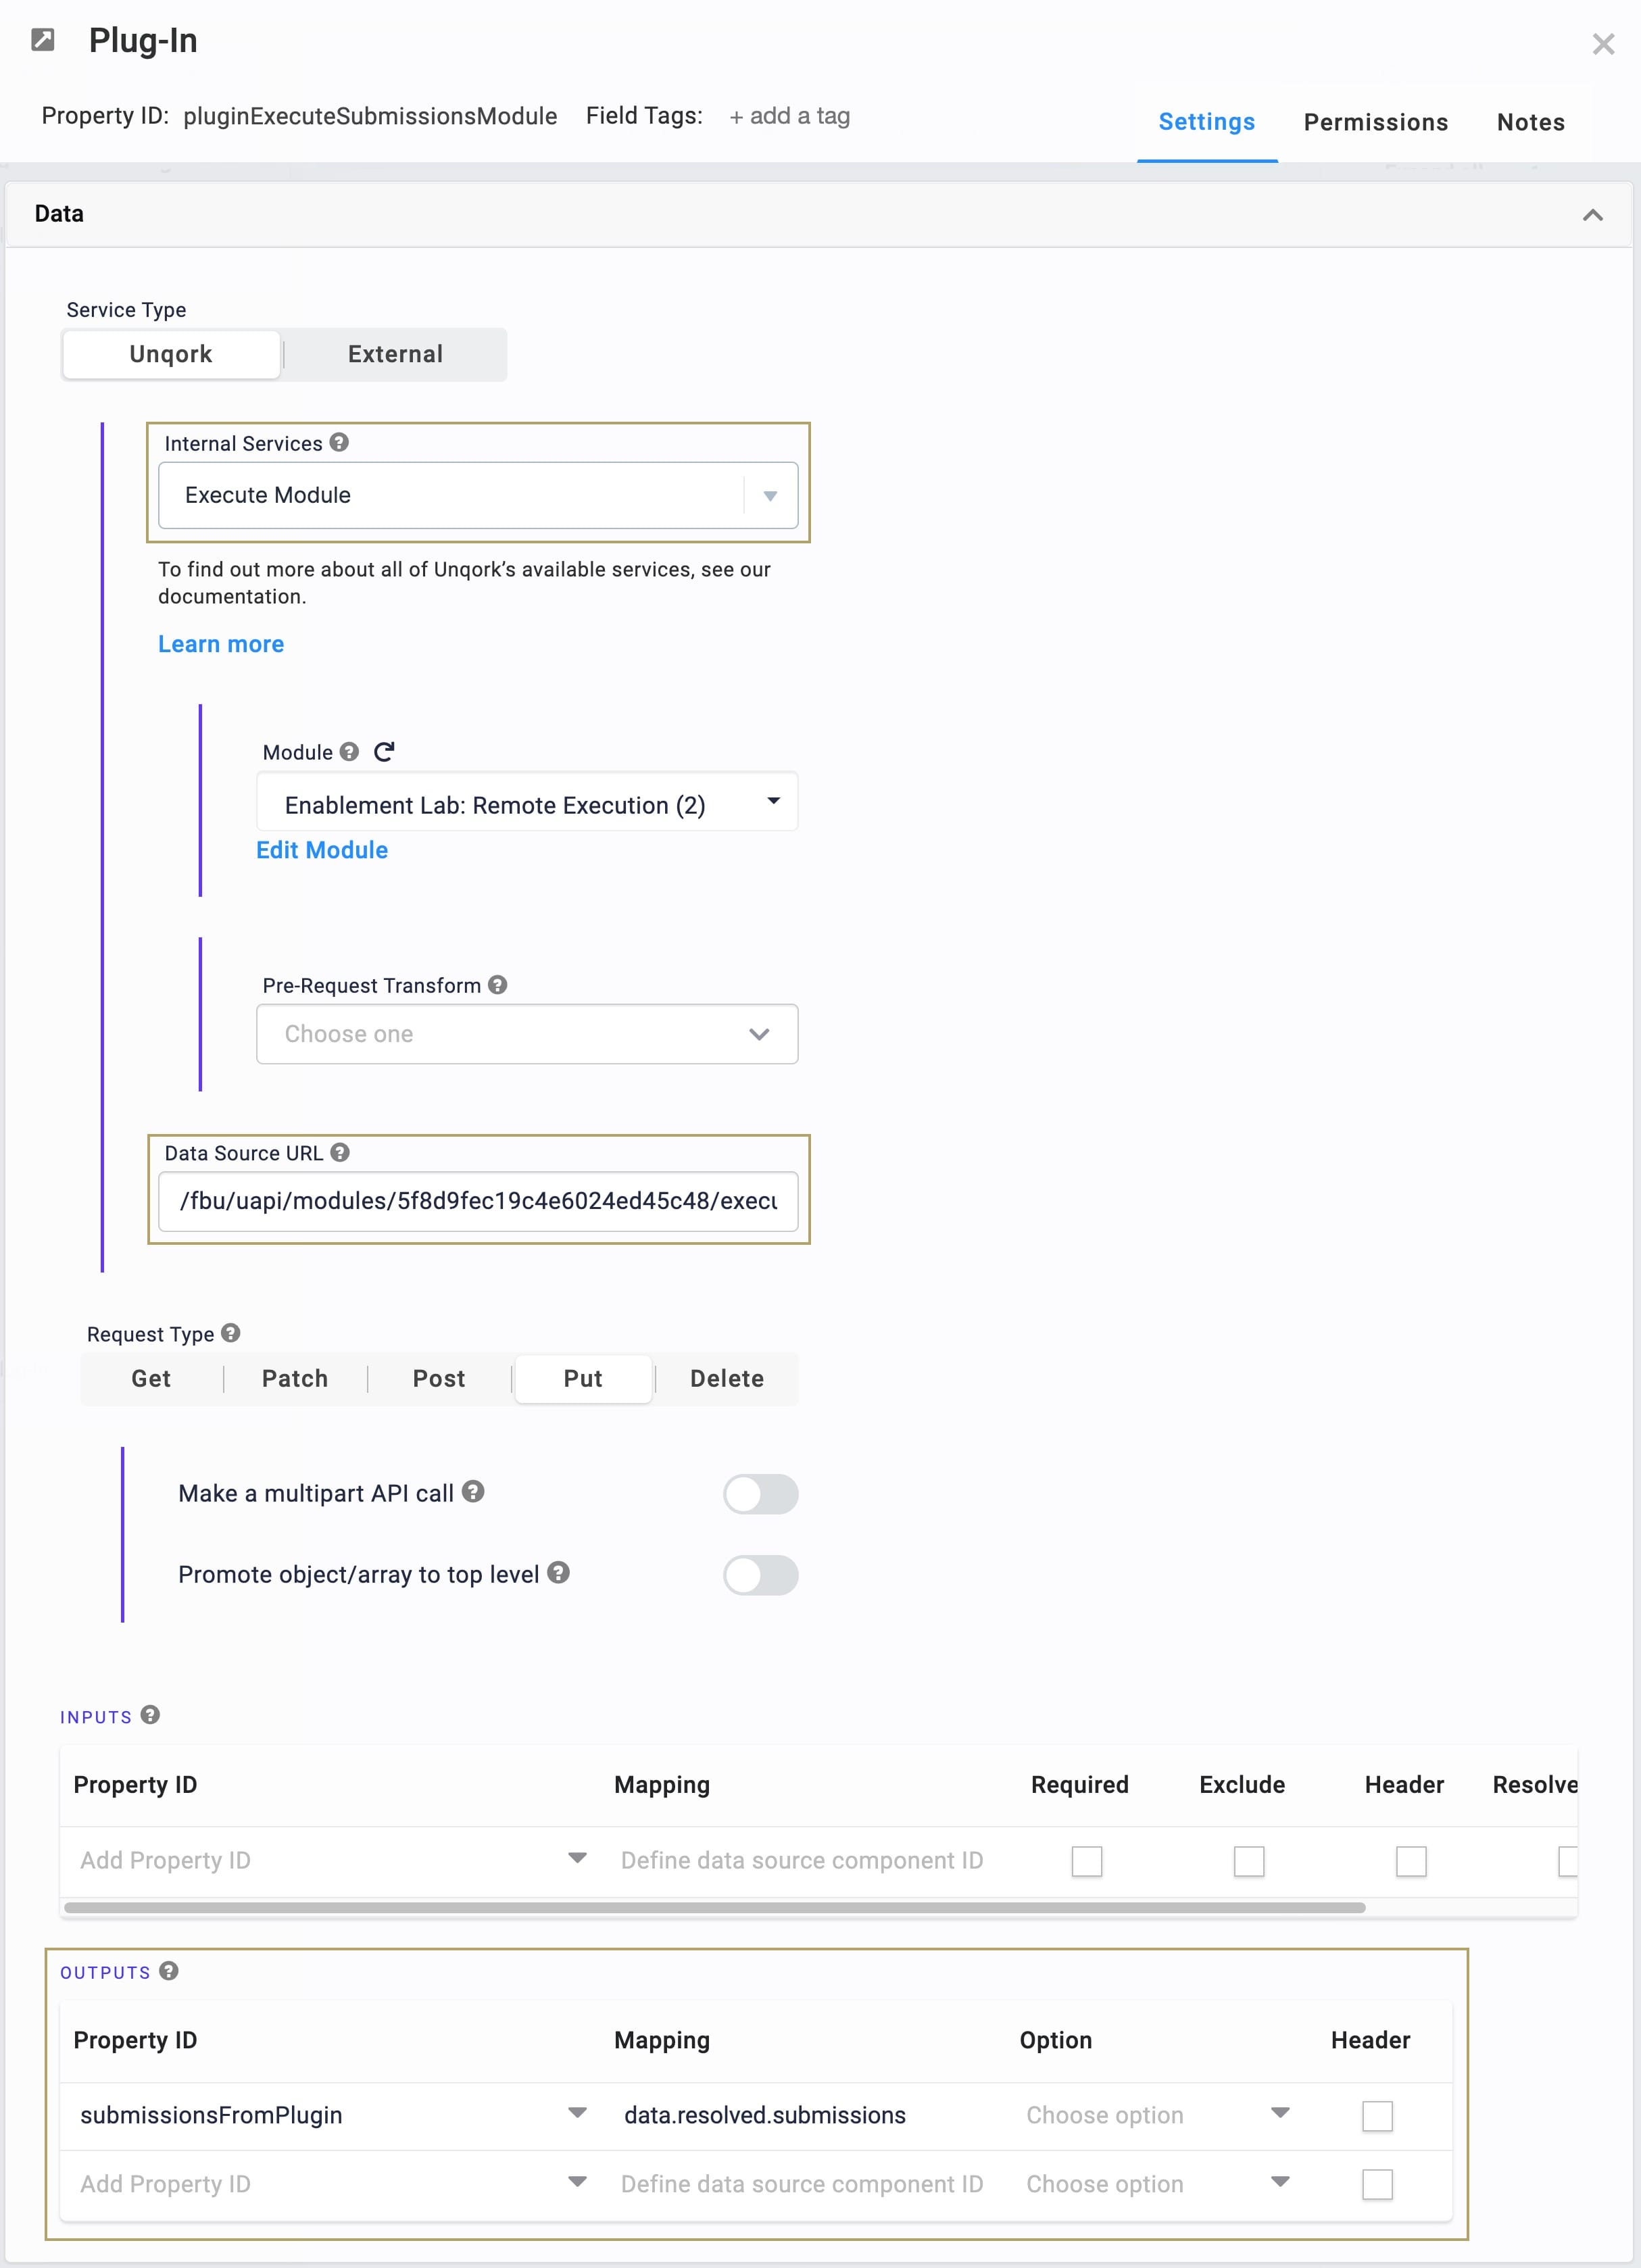
The Property ID here references a Hidden component you'll set up in the next step. The Hidden component stores the submission data Module 2. The Mapping column tells the system to get the submission data from the submissions Hidden component in Module 2.
| 6. | Click Save. |
Configure the Hidden Component
Now, add a Hidden component. This Hidden component stores the submissions from your Remote Execution module (Module 2).
| 1. | Drag and drop a Hidden component. Place your Hidden component below your Plug-In. |
| 2. | In the Property ID and Label Text fields, enter submissionsFromPlugin. |
| 3. | Click Save. |
Configure the ViewGrid Component
Lastly, bring in a ViewGrid component to display your dashboard.
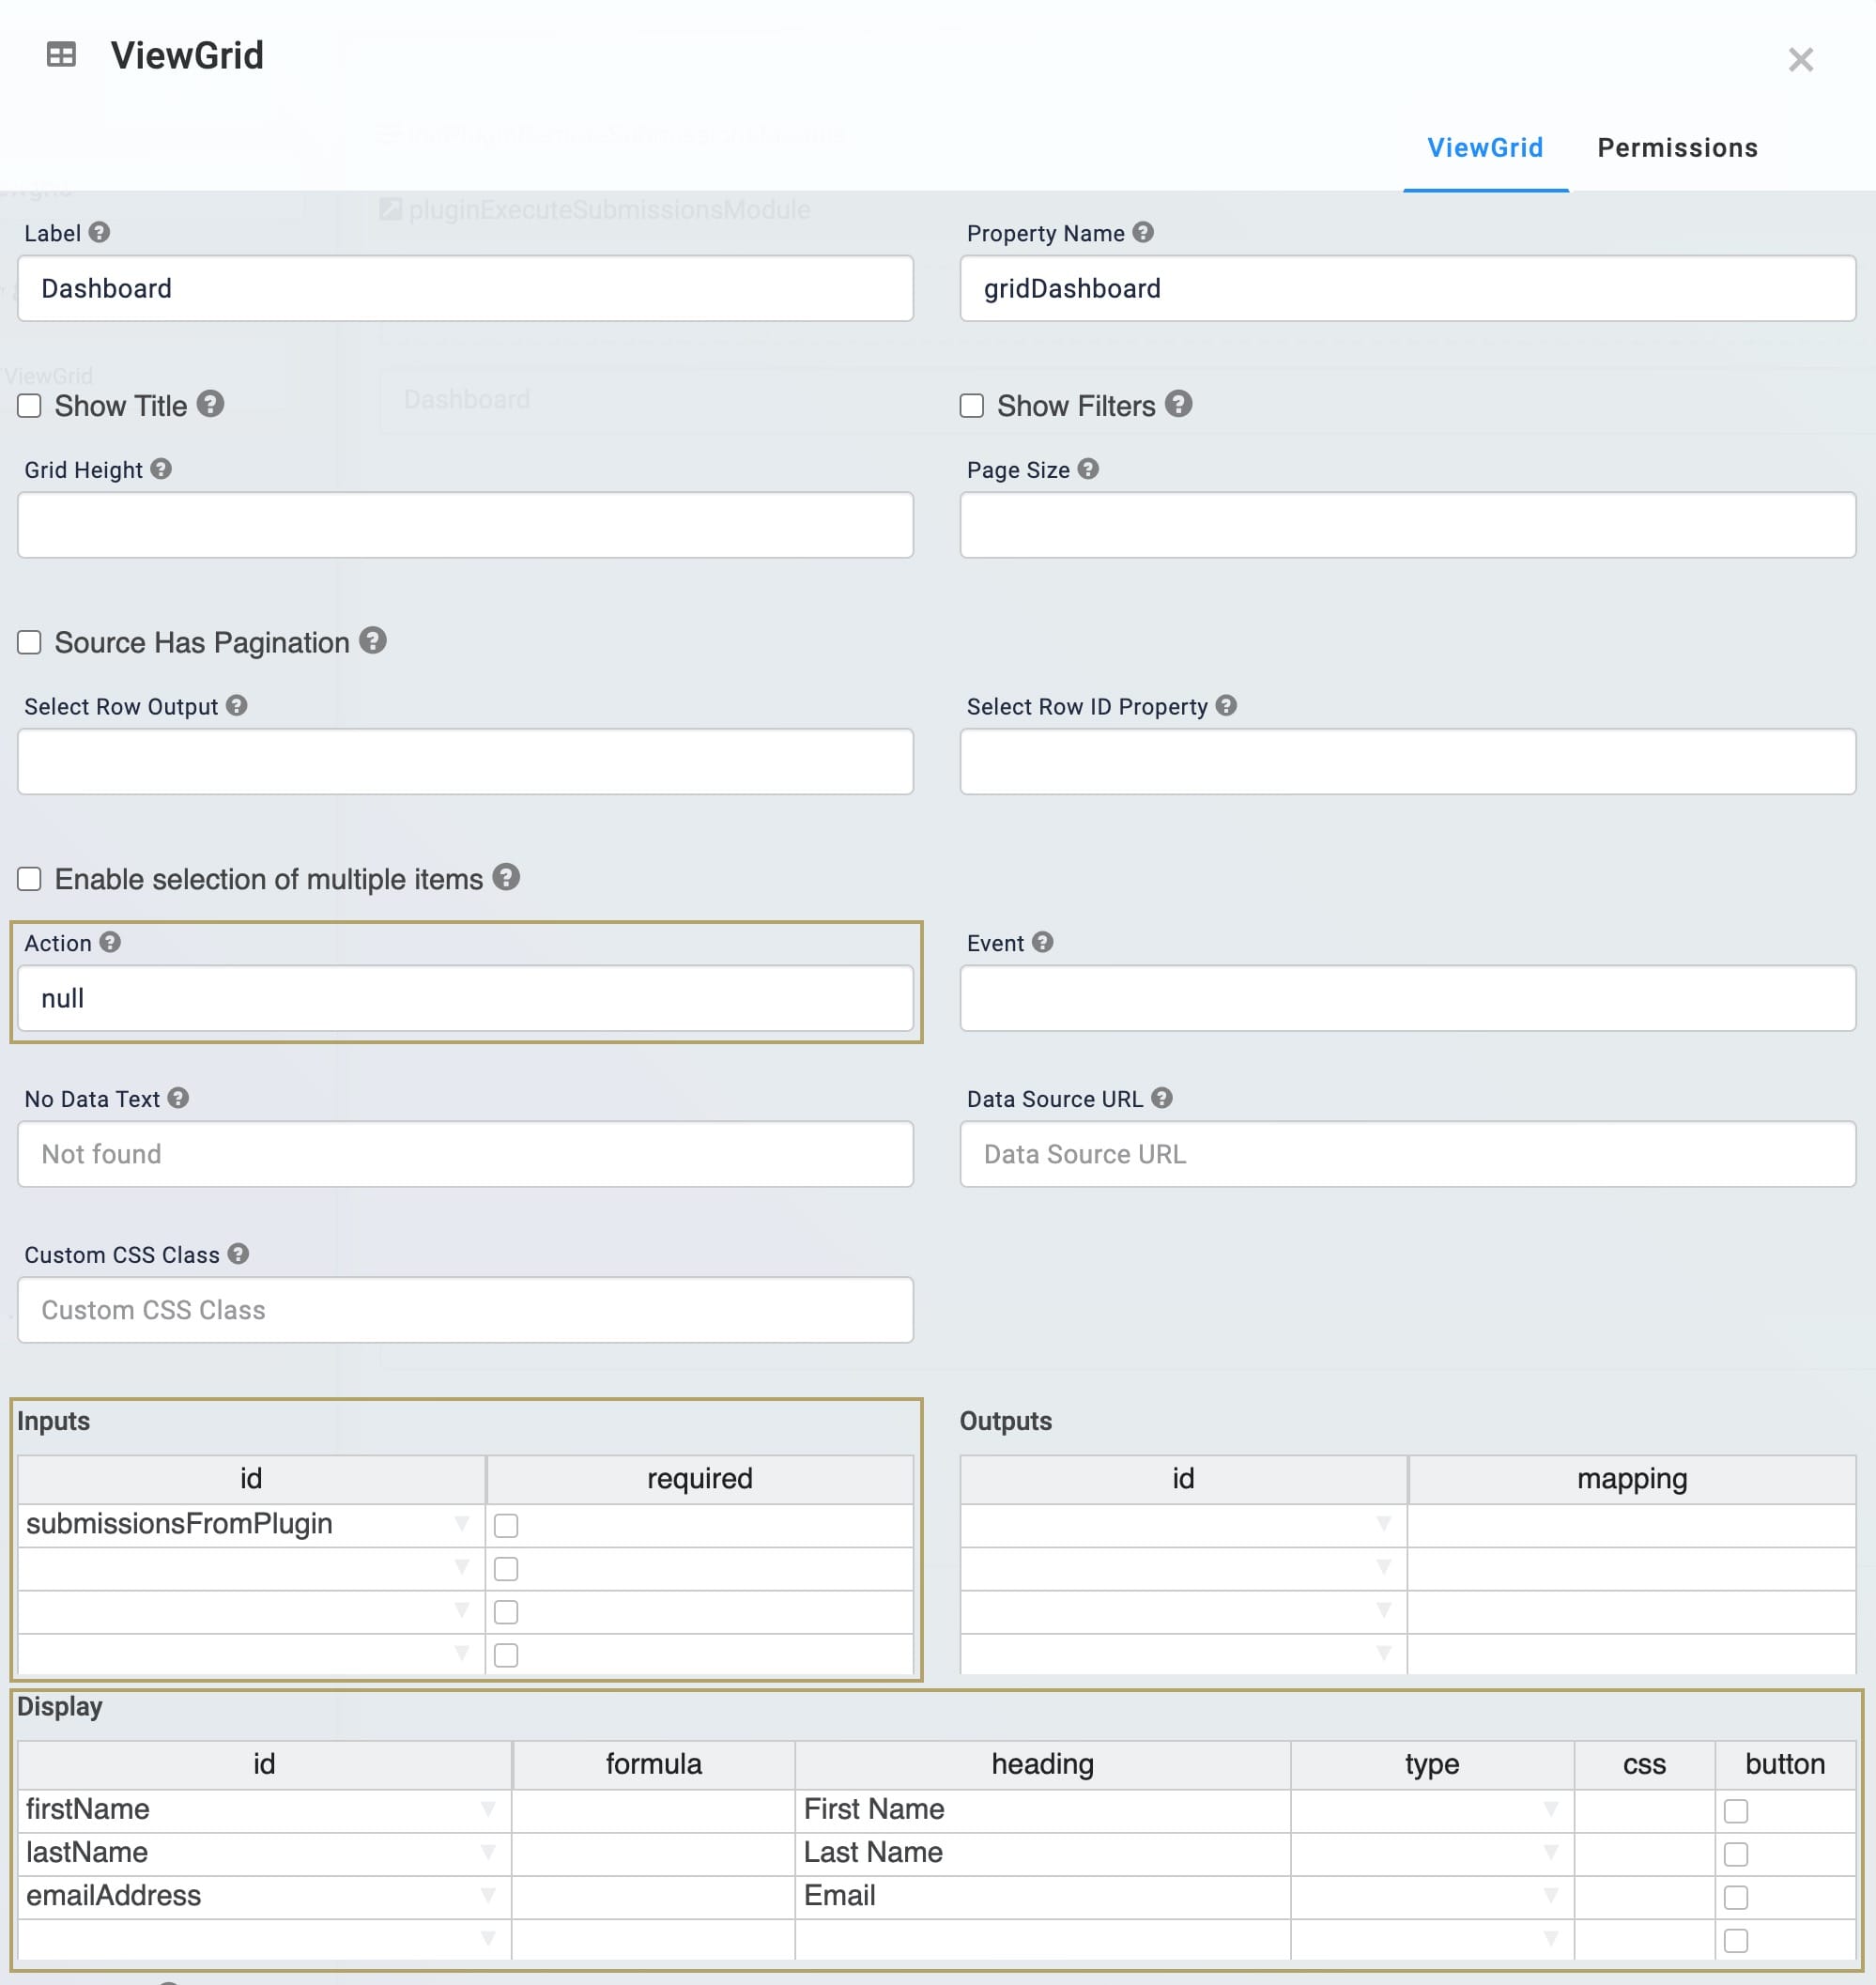
| 1. | Drag and drop a ViewGrid component onto the canvas. Place your ViewGrid below your Hidden component. |
| 2. | In the Property Name field, enter gridDashboard. |
| 3. | In the Label field, enter Dashboard. |
| 4. | In the Action field, enter null. This removes the default Submit button from your dashboard. |
| 5. | In the Inputs table's ID column, enter submissionsFromPlugin. |
| 6. | In the Display table, enter the following: |
|
ID |
Formula |
Heading |
|---|---|---|
|
firstName |
|
First Name |
|
lastName |
|
Last Name |
|
emailAddress |
|
|
| 7. | Click Save. |
| 8. | Save your module. |
Resources

