In this how-to guide, you'll learn how to build a remote execute dashboard with a Delete button. Deleting submissions is possible thanks to the Deletes Multiple Module Submissions internal service. It's a best practice to remote execute any API calls in front-end modules. So, you’ll use a server-side module to handle the retrieval of submissions from the dashboard, and another server-side module to delete submissions from the dashboard.
In this guide, you’ll create four modules:
# | Module Title | Description |
|---|---|---|
1 | Simple Module for Remote Execute | A simple module where the end-user enters their personal information. This module acts as the source module for the dashboard. We'll refer to this module as Module 1. |
2 | Remote Execution | Controls the back-end functions, including the module ID used by the remote execute. This module retrieves submissions to display in your dashboard. We'll refer to this module as Module 2. |
3 | Simple Dashboard With Remote Execute | The dashboard module, where you'll display submission information from Module 1. We'll refer to this module as Module 3. |
4 | Remote Execution for Deleting Submissions | This module handles deleting submissions after the end-user clicks the dashboard's Delete button. We'll refer to this module as Module 4. |
Select the tab that corresponds to your Unqork Designer experience:
Module 1 Configuration: Simple Module for Remote Execute
Let's begin by creating the Simple Module for Remote Execute module. In this module, you'll set up fields to record the end-user's personal information.
Configure the Text Field Components
In the Module Builder, drag and drop three Text Field components onto the canvas.
In the Property ID and Label Text fields, enter the following for each component:
#
Property ID
Label Text
1
firstName
First Name
2
middleName
Middle Name
3
lastName
Last Name
Click Save Component for each component after adding it.
Configure the Email Component
Drag and drop an Email component onto the canvas, placing it below the Text Field components.
In the Property ID and Label Text, enter
emailAddress.Click Save Component.
Configure the Date Input Component
Drag and drop a Date Input component onto the canvas, placing it below the Email component.
In the Property ID field, enter
dateOfBirth.In the Label Text field, enter
Date of Birth.Under the Formatting section, in the Display (+/-) years from the current date field, enter
125.Navigate to the component’s Advanced settings.
From the Restrict Date selection to: drop-down, select Past Only.
Click Save Component.
Configure the Button Component
Drag and drop a Button component onto the canvas, placing it below the Date Input component.
In the Property ID field, enter
btnSave.In the Label Text field, enter
Save.In the Success Message field, enter
Saved!.Click Save Component.
Save your module.
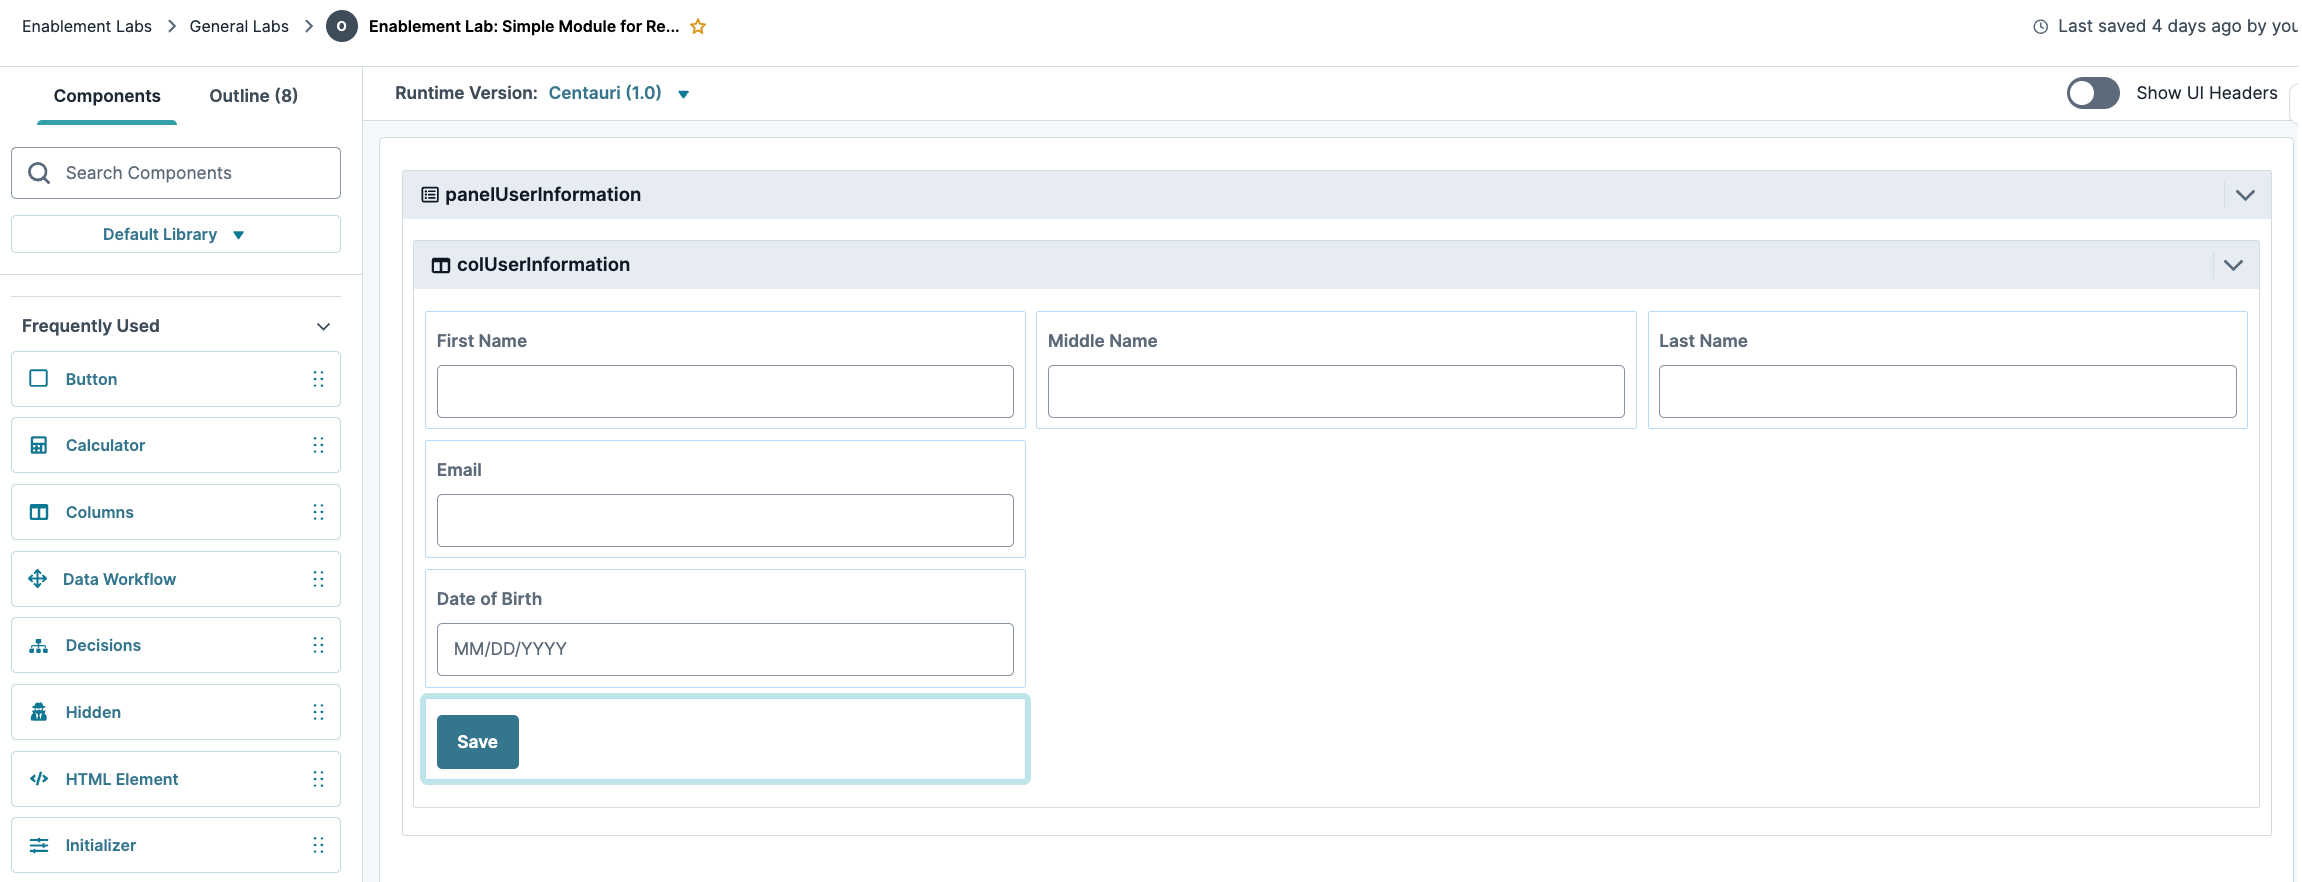
Here's how the completed module looks in the Module Builder:
Module 2 Configuration: Remote Execute Module
Next, you'll create the Remote Execution module (Module 2). This module contains the Plug-In component logic and exists on the server side. Meaning, it’s inaccessible to end-users. When you preview this module, you’ll see a blank screen. Module details are only accessible in the DevTools Console.
Before adding components to Module 2, you'll adjust the module settings. By setting the module to server-side execute, the module becomes inaccessible to anyone without Module Builder access.
At the top right of the Module Builder, click the
 (ellipsis) button.
Select Module Settings.
To the left of the modal, select Module Settings.
Set Server-Side Execution Only to
.png) (ON).
(ON).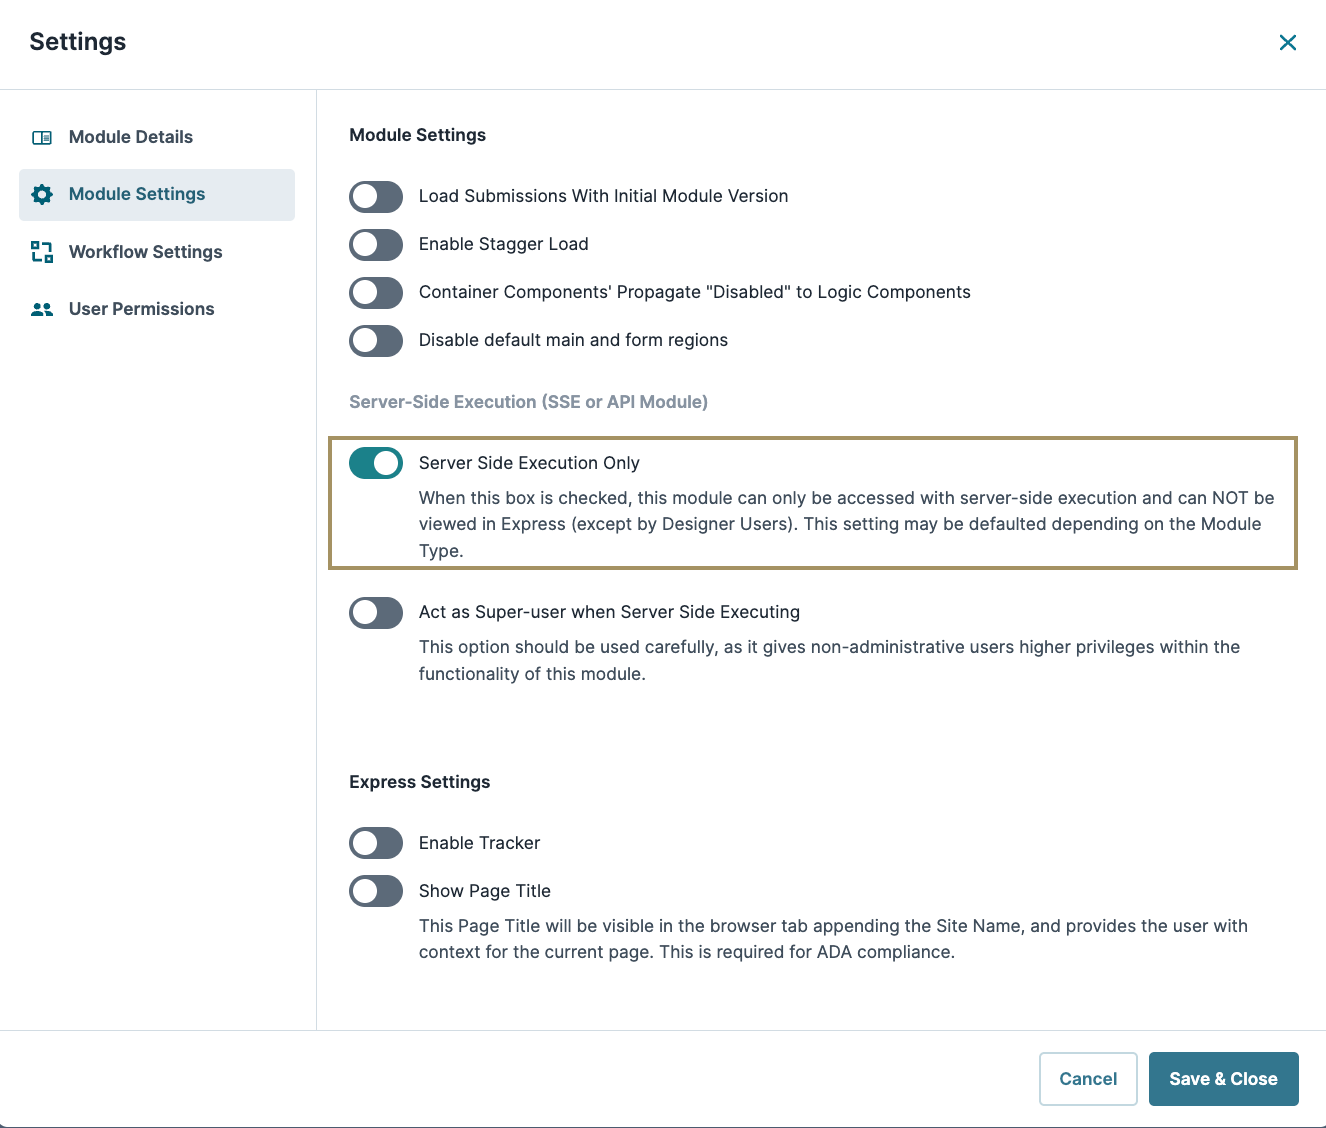
Click Save & Close.
Configure the Initializer Component
In the Module Builder, drag and drop an Initializer component onto the canvas.
In the Property ID and Canvas Label Text fields, enter
initPluginGetSubmissions.From the Trigger Type drop-down, select New Submission.
In the Outputs table, enter the following:
#
Property ID
Type
Value
1
pluginGetSubmissions
trigger
GO
Click Save Component.
Configure the First Hidden Component
You'll use two Hidden components in this configuration. The first Hidden component stores the module ID of the Simple Module for Remote Execute (Module 1). For security purposes, you do not want this module ID stored in the database. So, we'll keep the Store Data in Database setting disabled.
Drag and drop a Hidden component onto the canvas, placing it below the Initializer component.
In the Property ID and Label Text fields, enter
moduleId.In the Default Value field, copy and paste the module Id of Module 1.
In this example, the module ID of Simple Module for Remote Execute (Module 1) is 5f8d9eb9f1a98d024e984c75. If you created your own Module 1, enter that module's module ID.
Click Save Component.
Configure the Second Hidden Component
This Hidden component stores the submission data retrieved by the pluginGetSubmissions Plug-In component.
Drag and drop the second Hidden component onto the canvas, placing it below the first Hidden component.
In the Property ID and Label Text fields, enter
submissions.Set Store Data in Database to
.png) (ON). Doing so allows the submission data to be brought into the dashboard.
(ON). Doing so allows the submission data to be brought into the dashboard.Click Save Component.
Configure the Plug-In Component
The Plug-In component retrieves the submission data from the source module.
Drag and drop a Plug-In component onto the canvas, placing it below the Initializer component.
In the Property ID and Canvas Label Text fields, enter
pluginGetSubmissions.In the Inputs table, enter the following:
Property ID
Mapping
1
moduleId
moduleId
2
'firstName,lastName,emailAddress'
fields
The first row defines which module you’ll retrieve the submissions from. The second row defines which fields you'll send to the dashboard. Here, its references to
firstName,lastName, andemailAddress. The values entered in the Mapping column (moduleIdandfields) are native to Unqork.From the Internal Services drop-down, select List Submissions for Dashboard. The Request Type and Data Source URL populate automatically.
Click Save Component.
Configure the Data Workflow Component
This Data Workflow component retrieves the submission data from the Plug-In component and sends it to the submissions Hidden component.
Drag and drop a Data Workflow component onto the canvas, placing it below the Hidden components.
In the Property ID and Canvas Label Text fields, enter
dwfSaveSubmissions.
Configure the Input Operator
Drag and drop an Input operator onto the Data Workflow canvas.
Configure the operator's Info window as follows:
Setting
Value
Category
Input
Component
pluginGetSubmissions
Required
Yes
Source
Default
Configure the Output Operator
Drag and drop an Output operator onto the Data Workflow canvas.
Configure the operator's Info window as follows:
Setting
Value
Category
Output
Component
submissions
Action
value
Connect the output port (right) of the Input operator to the input port (left) of the Output operator.
Click Save Component.
Save the module.
Here's how the completed module looks in the Module Builder:
Module 3 Configuration: Remote Execute Module
The Simple Dashboard With Remote Execute module (Module 3) calls on the Remote Execution module (Module 2). The Plug-In component in this module retrieves the submission data to display in a simple dashboard.
Configure the Initializer Component
Like the last module, the Initializer component triggers the Plug-In component on page-load.
In the Module Builder, drag and drop an Initializer component onto the canvas.
In the Property ID and Canvas Label Text fields, enter
initPluginRemoteSubmissionsModule.From the Trigger Type drop-down, select New Submission.
In the Outputs table, enter the following:
Property ID
Type
Value
pluginExecuteSubmissionsModule
trigger
GO
Click Save Component.
Configure the Plug-In Component
Next, let's add a Plug-In component to retrieve the submission data in the submissions Hidden component of the Remote Execution module (Module 2). Then, you’ll store the submission data in a new Hidden component you'll create in this module.
Drag and drop a Plug-In component onto the canvas, placing it below the Initializer component.
In the Property ID and Canvas Label Text fields, enter
pluginExecuteSubmissionsModule.In the Outputs table, enter the following:
#
Property ID
Mapping
1
submissionsFromPlugin
data.resolved.submissions
The Property ID references a Hidden component you'll set up in the next step. The Mapping column tells the system to retrieve the submission data from the
submissionsHidden component in Module 2.From the Internal Services drop-down, select Execute Module. The Request Type and Data Source URL populate automatically.
In the Data Source URL, replace {moduleID} with the module ID from the Remote Execution module (Module 2).
In this example, the module ID of the Remote Execution module (Module 2) is 5f8d9fec19c4e6024ed45c48.
Click Save Component.
Configure the Hidden Component
Now, let's add a Hidden component that stores the submissions from the Remote Execution module (Module 2).
Drag and drop a Hidden component onto the canvas, placing it below the Plug-In component.
In the Property ID and Label Text fields, enter
submissionsFromPlugin.Click Save Component.
Configure the ViewGrid Component
Now, let's add a Hidden component that stores the submissions from the Remote Execution module (Module 2).
Drag and drop a ViewGrid component onto the canvas, placing it below the Hidden component.
In the Property ID field, enter
gridDashboard.In the Canvas Label Text field, enter
Dashboard.In the Inputs table, enter
submissionsFromPlugin.In the Display table, enter the following:
#
ID
Formula
Heading
1
firstName
First Name
2
lastName
Last Name
3
emailAddress
Email
In the Action field, enter
null.Doing so removes the default Submit button from the dashboard.
Click Save Component.
Save module.
Module 3 Configuration: Simple Dashboard With Remote Execute
Let’s stay in your Module 3 and add the Delete button and supporting components. After creating Module 4, we’ll revisit Module 3 one more time.
Update the ViewGrid Component
Hover over the
gridDashboardViewGrid component and click the (Settings) button from the toolbar to open the Configuration window.In the Outputs table, enter the following:
#
ID
Mapping
1
exportId
_id
Set up the Outputs table to export submission IDs. When you click a row’s Delete button, that row’s submission ID is exported to a Hidden component. Doing so allows the Delete Multiple Module Submissions API call to identify which submission to remove. For now, use a placeholder Property ID in the Outputs table. In the next step, you’ll configure the Hidden component that stores the submission ID.
In the Display table, add the following information to a new row:
#
ID
Heading
Button
1
Delete
Delete
.png) (checked)
(checked)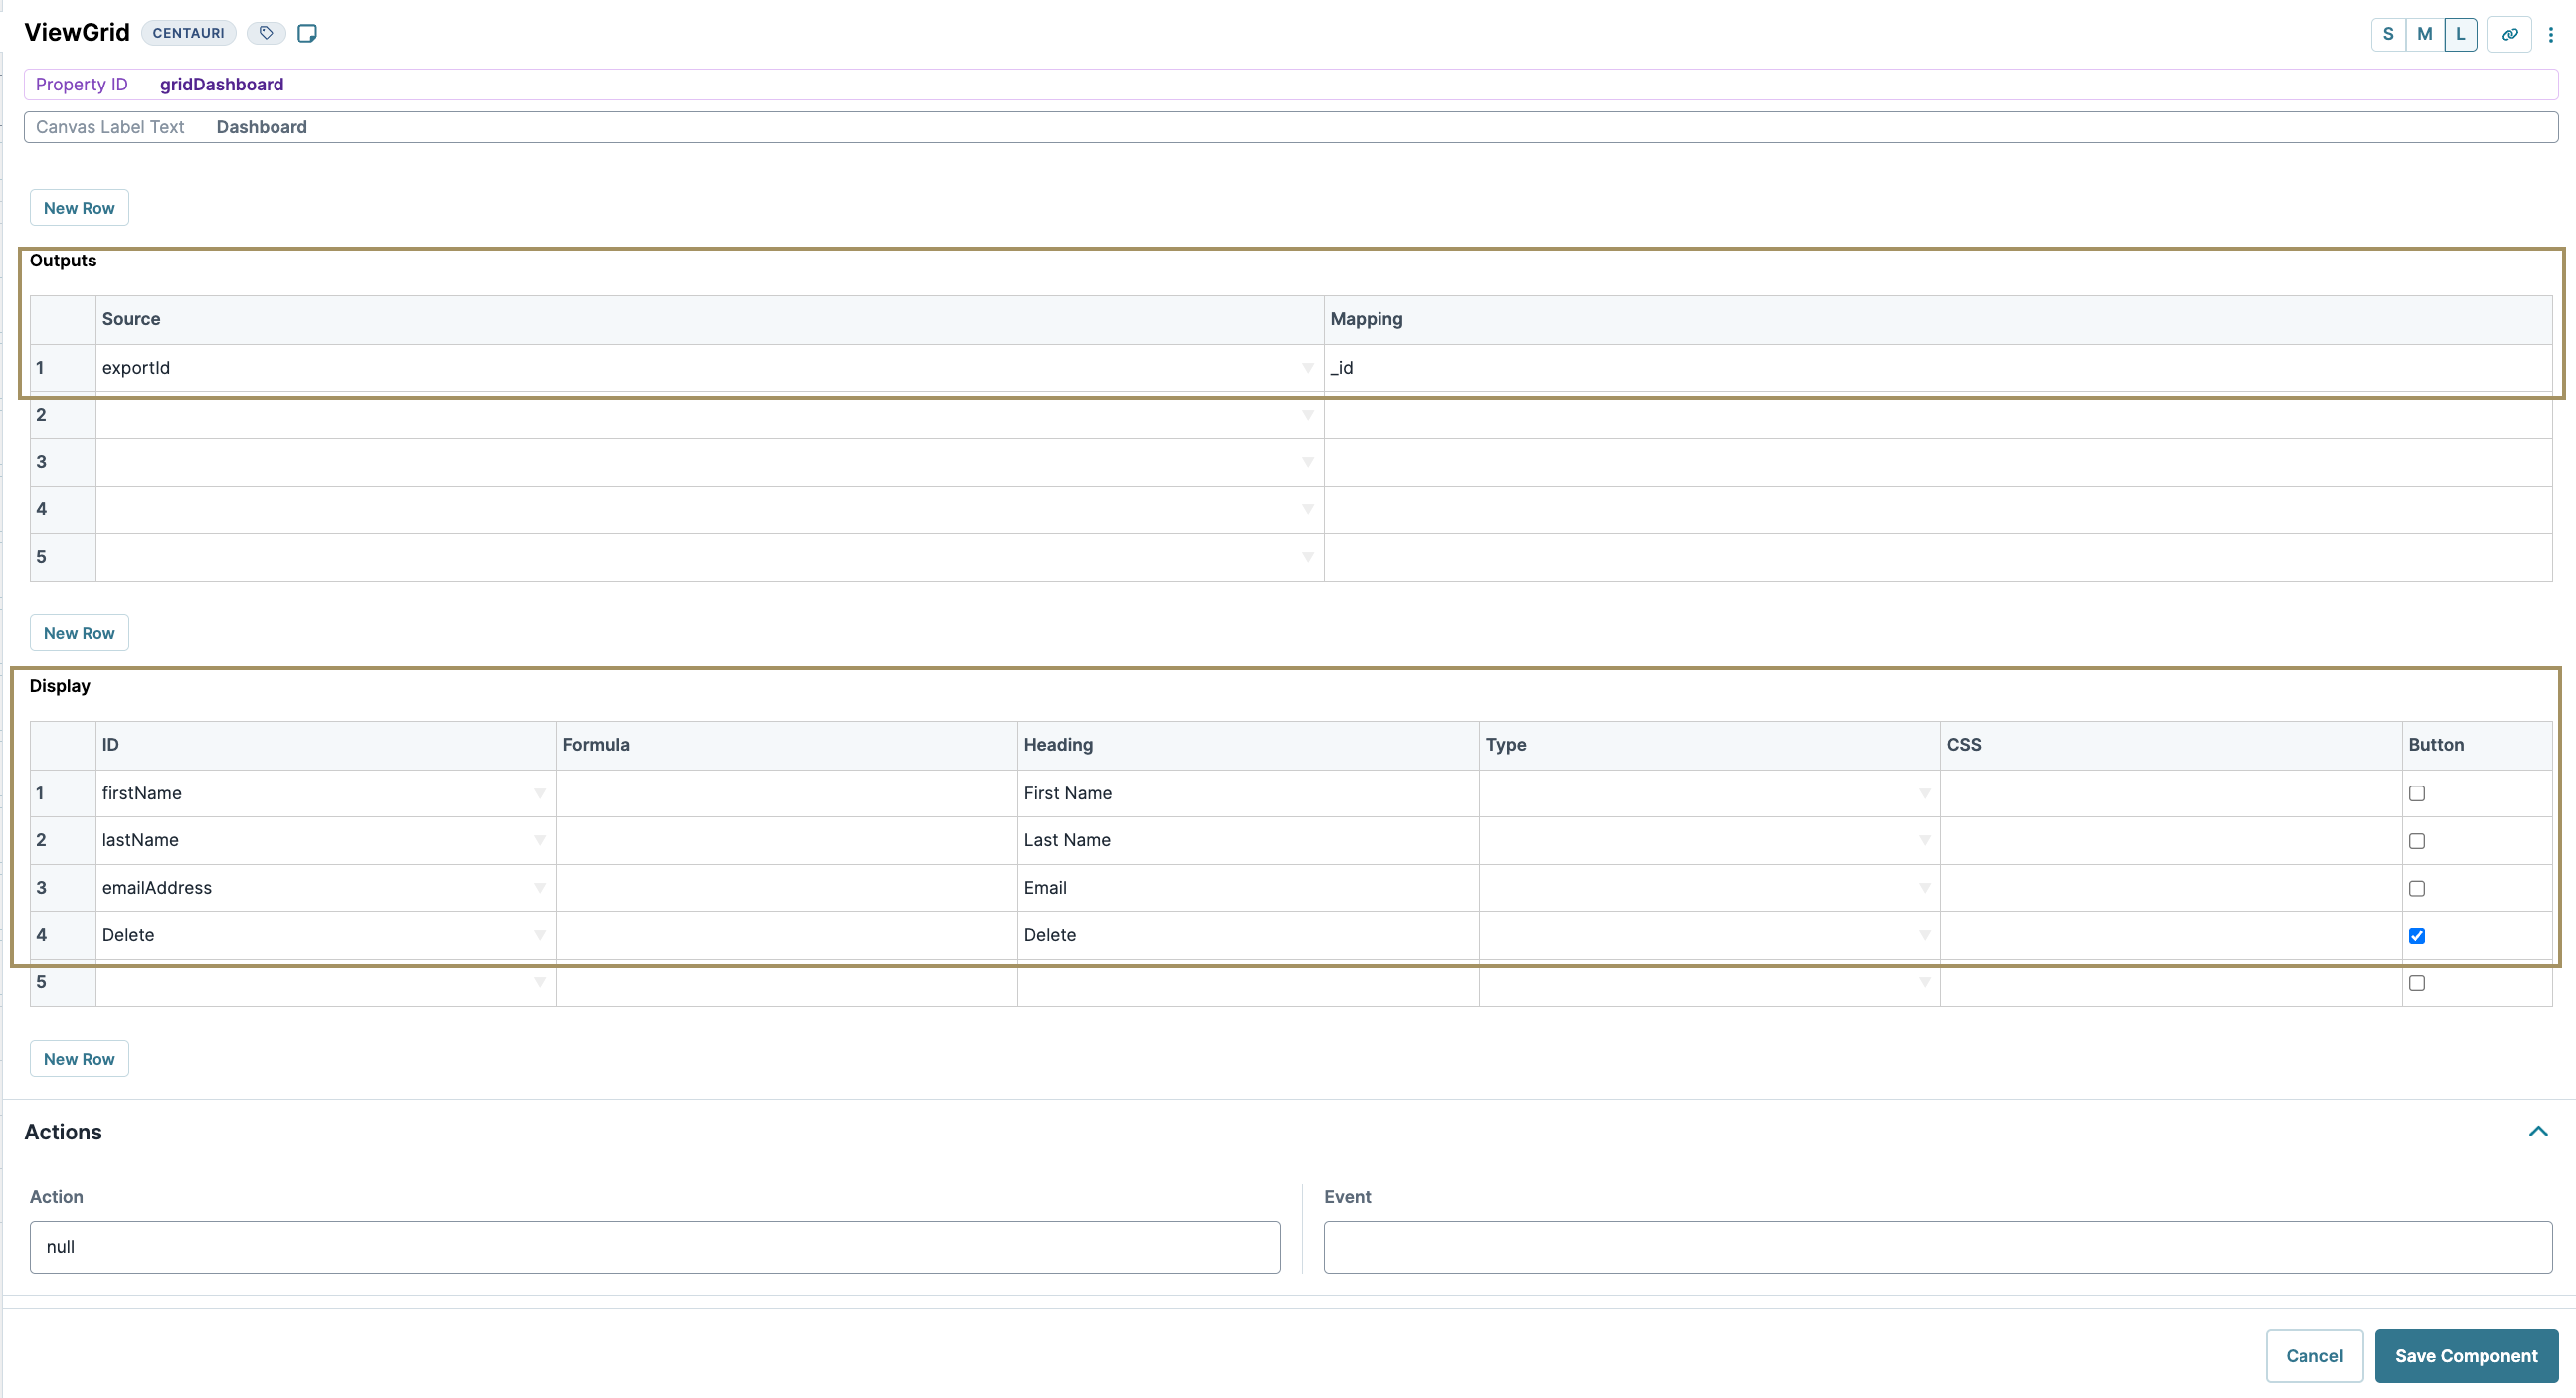
Click Save Component.
Configure the Hidden Component
Next, you'll create a Hidden component to store the submission ID exported by the ViewGrid component. Remember to use the same placeholder Property ID you used in the ViewGrid component's Outputs table.
Drag and drop a Hidden component onto the canvas, placing it below the
DashboardViewGrid component.In the Property ID and Label Text fields, enter
exportId.Click Save Component.
Configure the Decisions Component
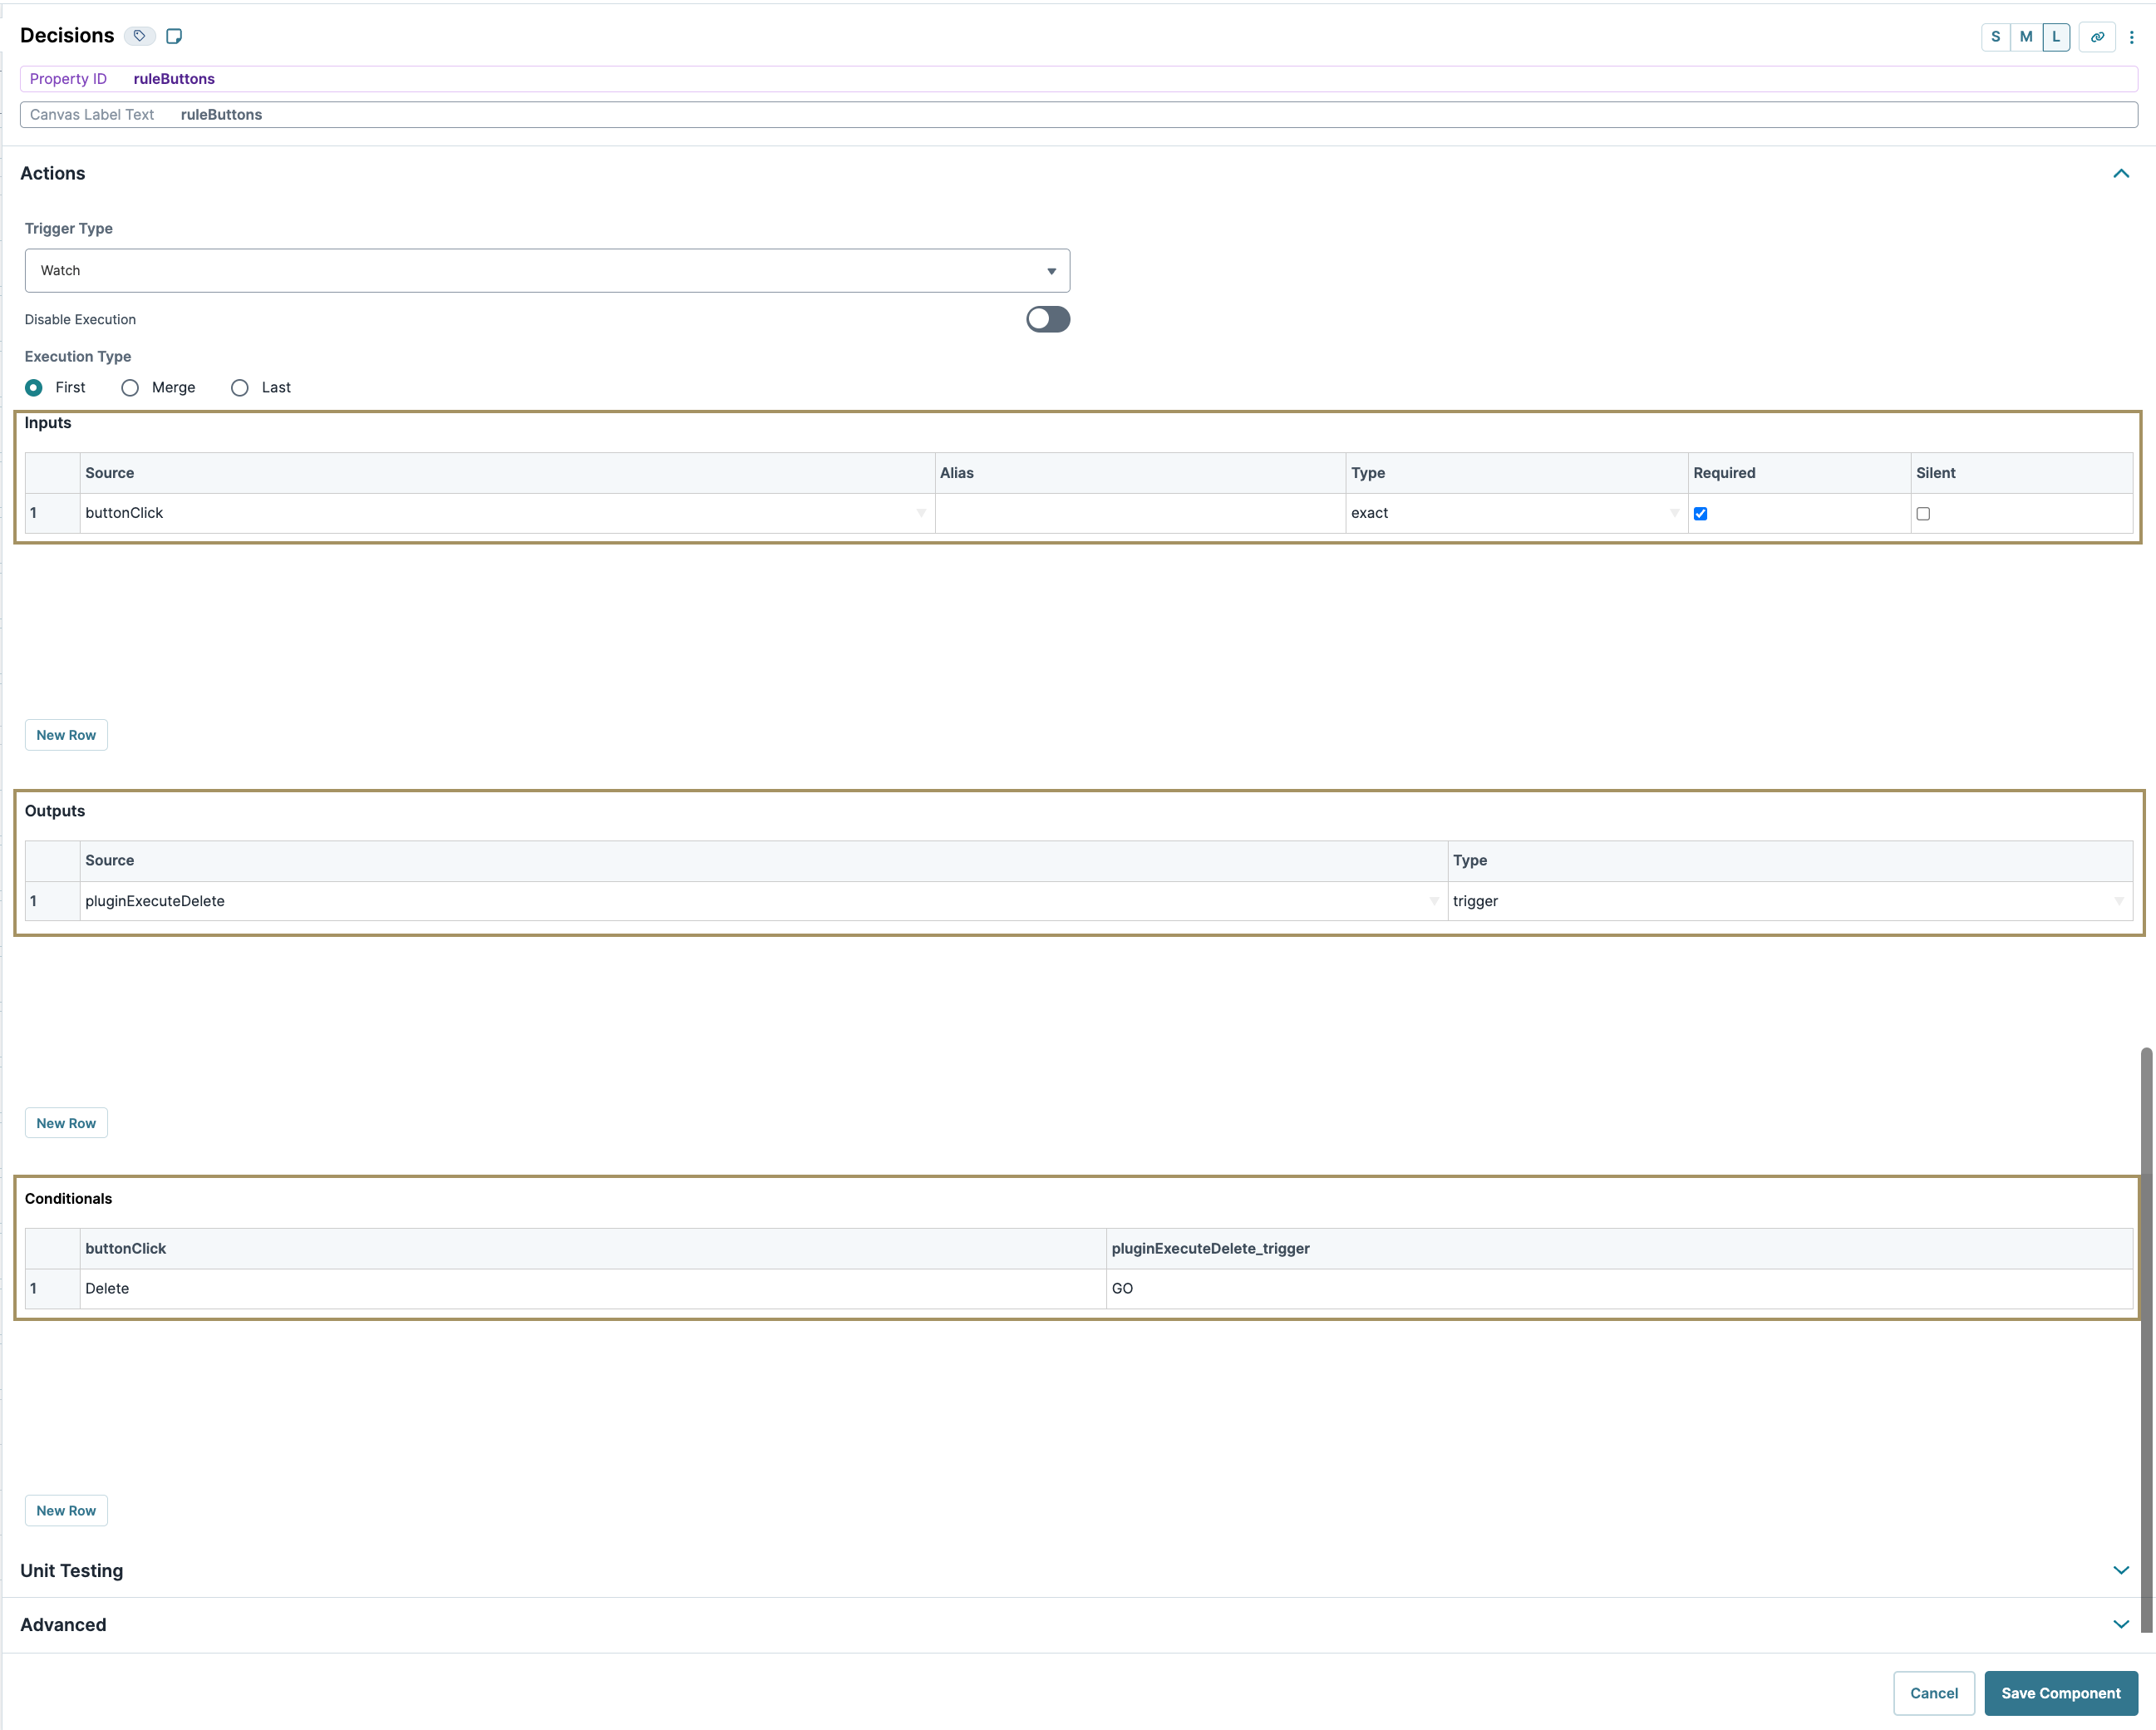
Next, let's set up the Decisions component to create an action when your end-user clicks the Delete button. On button-click, the Decisions component triggers the Plug-In component you'll set up next. That Plug-In component triggers the remote execute of Module 4.
Drag and drop a Decisions component onto the canvas, placing it below the
exportIdHidden component.In the Property ID and Canvas Label Text fields, enter
ruleButtons.In the Inputs table, enter the following:
#
Property ID
Type
Required
1
buttonClick
exact
Yes (checked)
In the Outputs table, enter the following:
#
Property ID
Type
1
pluginExecuteDelete
trigger
In the Conditionals table, enter the following:
#
buttonClick
pluginExecuteDelete_trigger
1
Delete
GO
Click Save Component.
Configure the Plug-In Component
This Plug-In component executes the Remote Execution for Deleting Submissions module (Module 4). You'll need to revisit this Plug-In component later to finalize the connection.
Drag and drop a Plug-In component onto the canvas, placing it below the Decisions component.
In the Property ID and Canvas Label Text fields, enter
pluginExecuteDelete.From the Internal Services drop-down, select Execute Module.
In the Inputs table, enter the following:
#
Property ID
Mapping
Required
1
exportId
data.ids
Yes (checked)
In the Post Trigger field, enter
pluginExecuteSubmissionsModule.This configuration ensures the dashboard refreshes after deleting a submission.
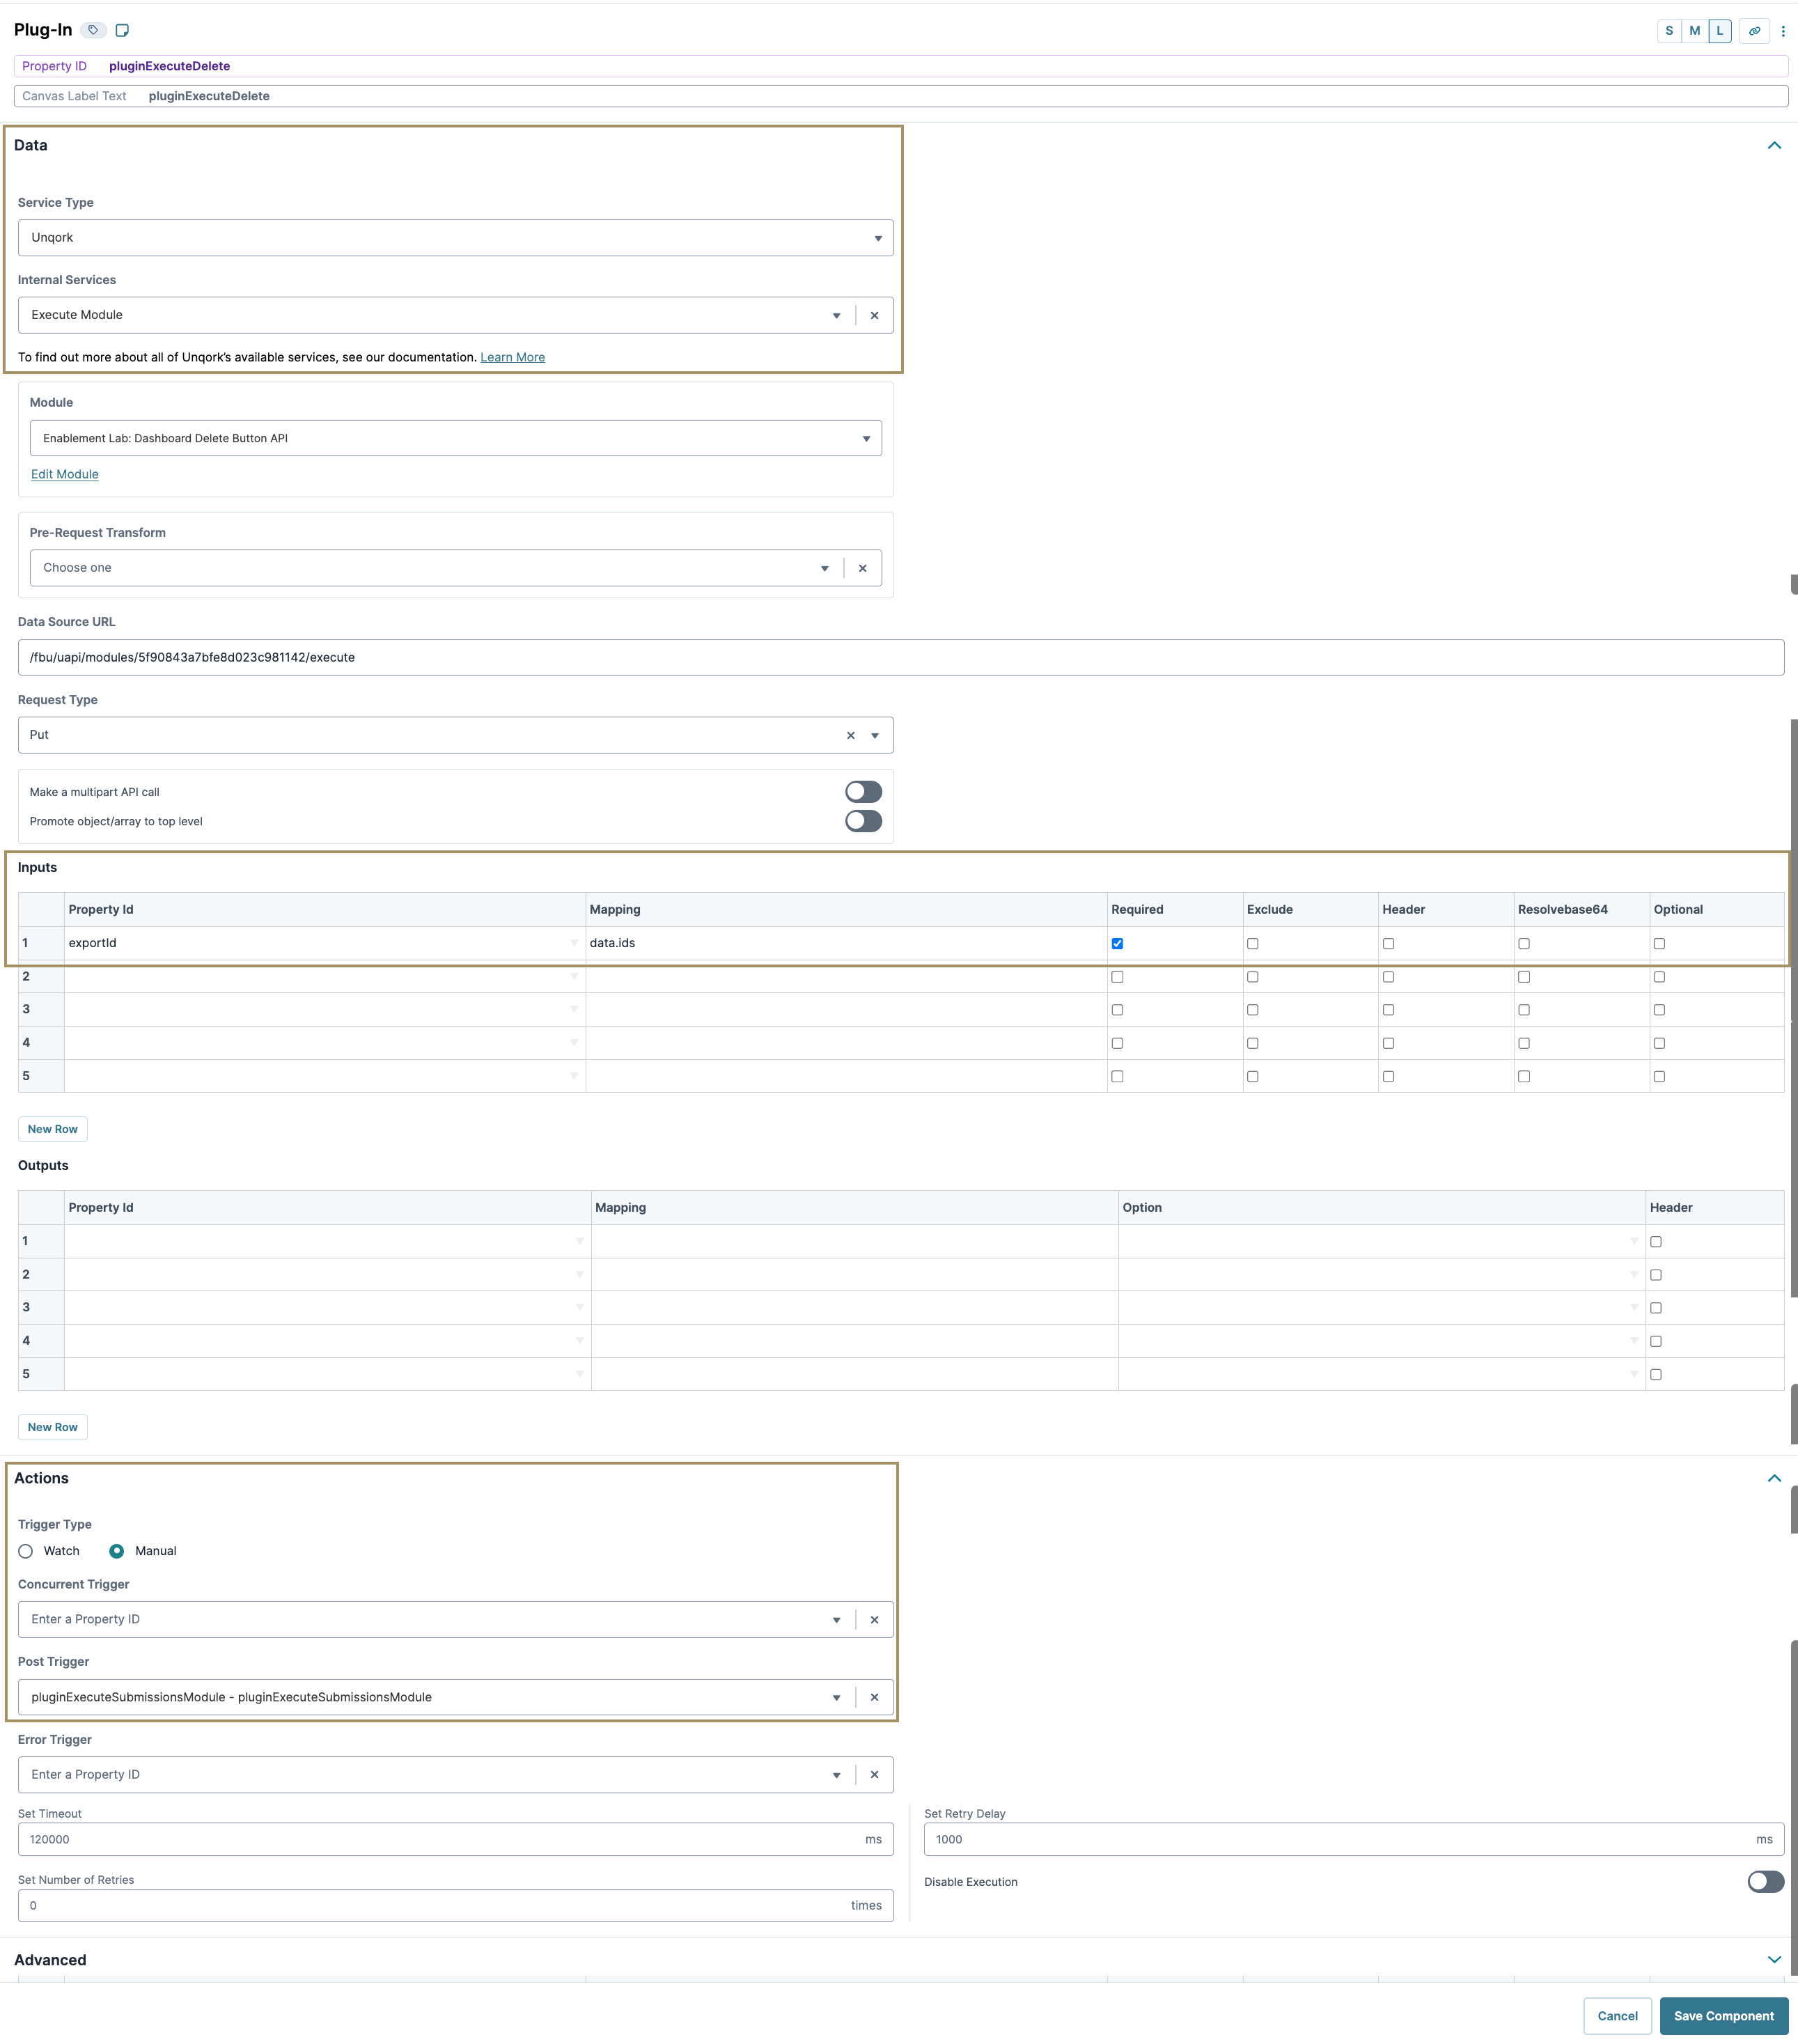
Click Save Component.
Save module.
Here's how the updated module looks in the Module Builder:

Module 4 Configuration: Remote Execution for Deleting Submissions
This module handles deleting submissions from Module 1. Clicking the dashboard's Delete button, the pluginExecuteDelete Plug-In component in Module 3 calls on Module 4. This action causes the Initializer component to fire, which triggers the Plug-In component of Module 4 to run the Deletes Multiple Module Submissions API call.
Configure the API Module
Module 4 must be configured as an Unqork API module to ensure it executes on the server side. To begin, navigate to the Application page where your other modules are configured.
At the top right of the Application page, click + Create New.
Select Module.
In the Module Name field, enter a name for your Module 4 module.
From the Module Type drop-down, select API.
Click Create.
Enabling Server-Side Execution Only
Before adding components to Module 4, you'll adjust the module settings. By setting the module to server-side execute, the module becomes inaccessible to anyone without Module Builder access.
At the top right of the Module Builder, click the
 (ellipsis) button.
 Select Module Settings.
To the left of the modal, click Module Settings.
Set Server-Side Execution Only to
.png) (ON).
(ON).
Click Save.
Update the panelInfo Panel Component
Let's return to the Module Builder and begin configuring your Module 4. Next, let's make some updates to the components in the panelInfo Panel component. This information states the purpose of this remote execute module.
Update the HTML Element Component
Hover over the
descriptionHTML Element component to open the configuration settings drawer.In the Content field, replace the default text with the following:
This module is to host the Deletes Multiple Module Submissions call that is used to delete module submissions on the dashboard..Click Save Component.
Update the Hidden Component
Hover over the
methodHidden component to open the configuration settings drawer.In the Default Value field, replace the default value with
DELETE.Click Save Component.
Update the panelRequest Panel Component
Next, let's set up the panelRequest Panel component. Components in this Panel component are part of the API request and store the values the Plug-In component uses when running the Delete Multiple Module Submissions API call.
Update the requestParameter Hidden Component
Hover over the
requestParameterHidden component to open the configuration settings drawer.In the Property ID and Label Text fields, replace the default value with
ids.
Update the panelConfig Panel Component
Now, let's update the panelConfig Panel component by adding an Initializer and a Plug-In component.
Configure the Initializer component
Let's set up an Initializer component to trigger the pluginDeleteSubmissions Plug-In component you’ll set up later.
Drag and drop an Initializer component onto the canvas, placing it inside the
panelConfigPanel component.In the Property ID and Canvas Label Text fields, enter
initExecuteDeleteSubmissions.From the Trigger Type drop-down, select New Submission.
The New Submission Trigger Type runs the Initializer component whenever the
pluginExecuteDeletePlug-In component in your Module 3 calls Module 4.In the Outputs table, enter the following:
Property ID
Type
Value
pluginDeleteSubmissions
trigger
GO
Click Save Component.
Configure the Plug-In component
The last step in configuring this module is setting up the Plug-In component that deletes submissions from Module 1. So, you'll need Module 1’s module ID to complete the configuration.
Drag and drop a Plug-In component onto the canvas, placing it inside the
panelConfigPanel component.In the Property ID and Canvas Label Text fields, enter
pluginDeleteSubmissions.From the Internal Services drop-down, select Deletes Multiple Module Submissions.
In the Data Source URL field, replace {moduleId} with the module ID of Module 1.
You can retrieve the module ID from Module 1 from the source module's URL as follows: https://training.unqork.io/#/form/5f8d9eb9f1a98d024e984c75/edit. If you have created your own Module 1, enter your module's unique module ID instead.
In the Inputs table, enter the following:
Property ID
Mapping
Required
ids
ids
.png) (checked)
(checked)Click Save Component.
Save module.
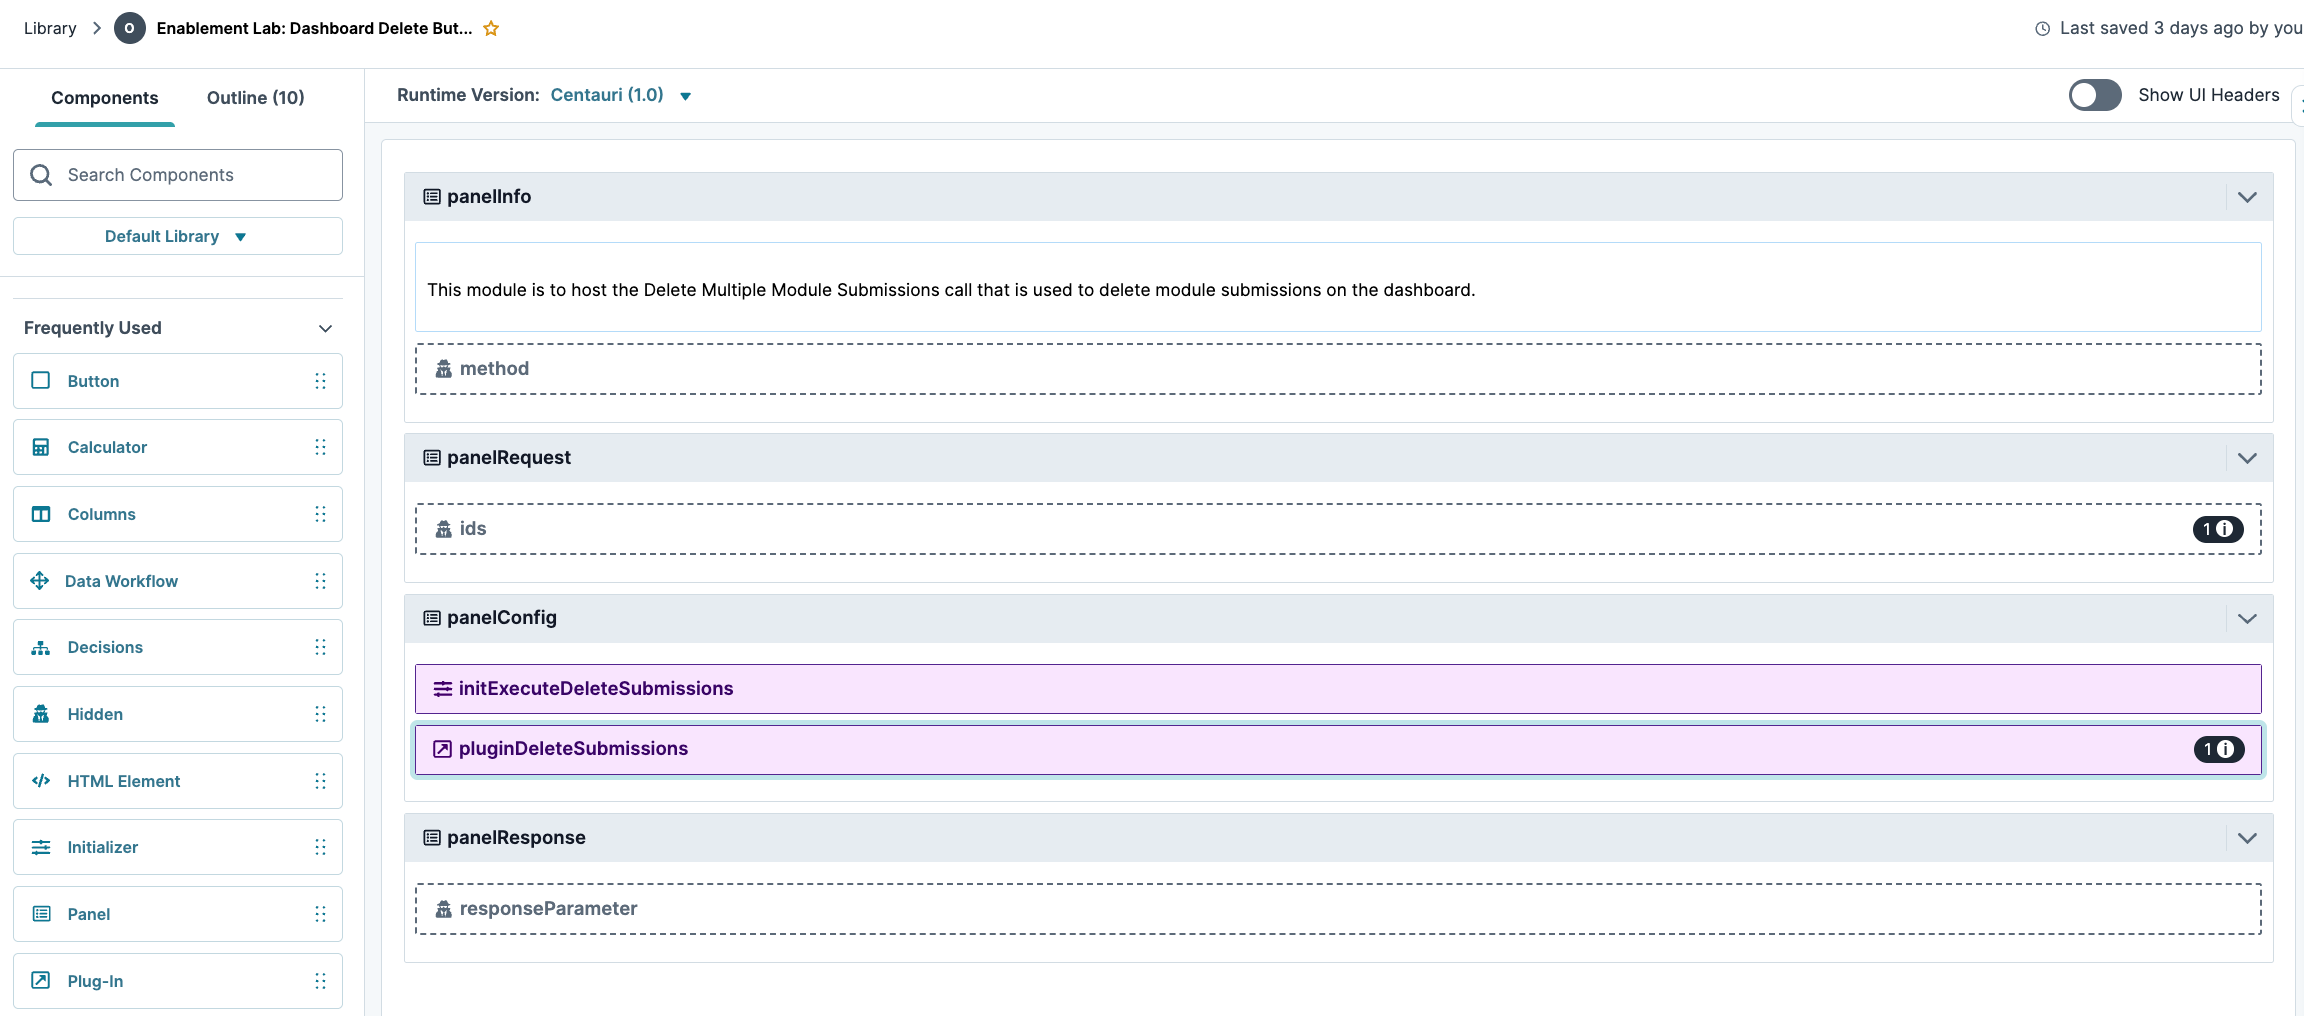
Here's how the completed module looks in the Module Builder:
Update Module 3: Simple Dashboard with Remote Execute
The last step of the configuration ensures the dashboard's Delete button removes a submission. You'll enter the module ID of Module 4 in the pluginExecuteDelete Plug-In component to achieve this action. So, return to Module 4 and copy the module ID.
Update the Plug-In component
Hover over the
pluginExecuteDeletePlug-In component to open the configuration settings drawer.In the Data Source URL field, replace {moduleId} with
5f90843a7bfe8d023c981142.You can retrieve the module ID from Module 4 from the source module's URL as follows: https://training.unqork.io/#/form/5f90843a7bfe8d023c981142/edit . If you created your own Module 4, enter your module's unique module ID instead.
Click Save Component.
Save module.
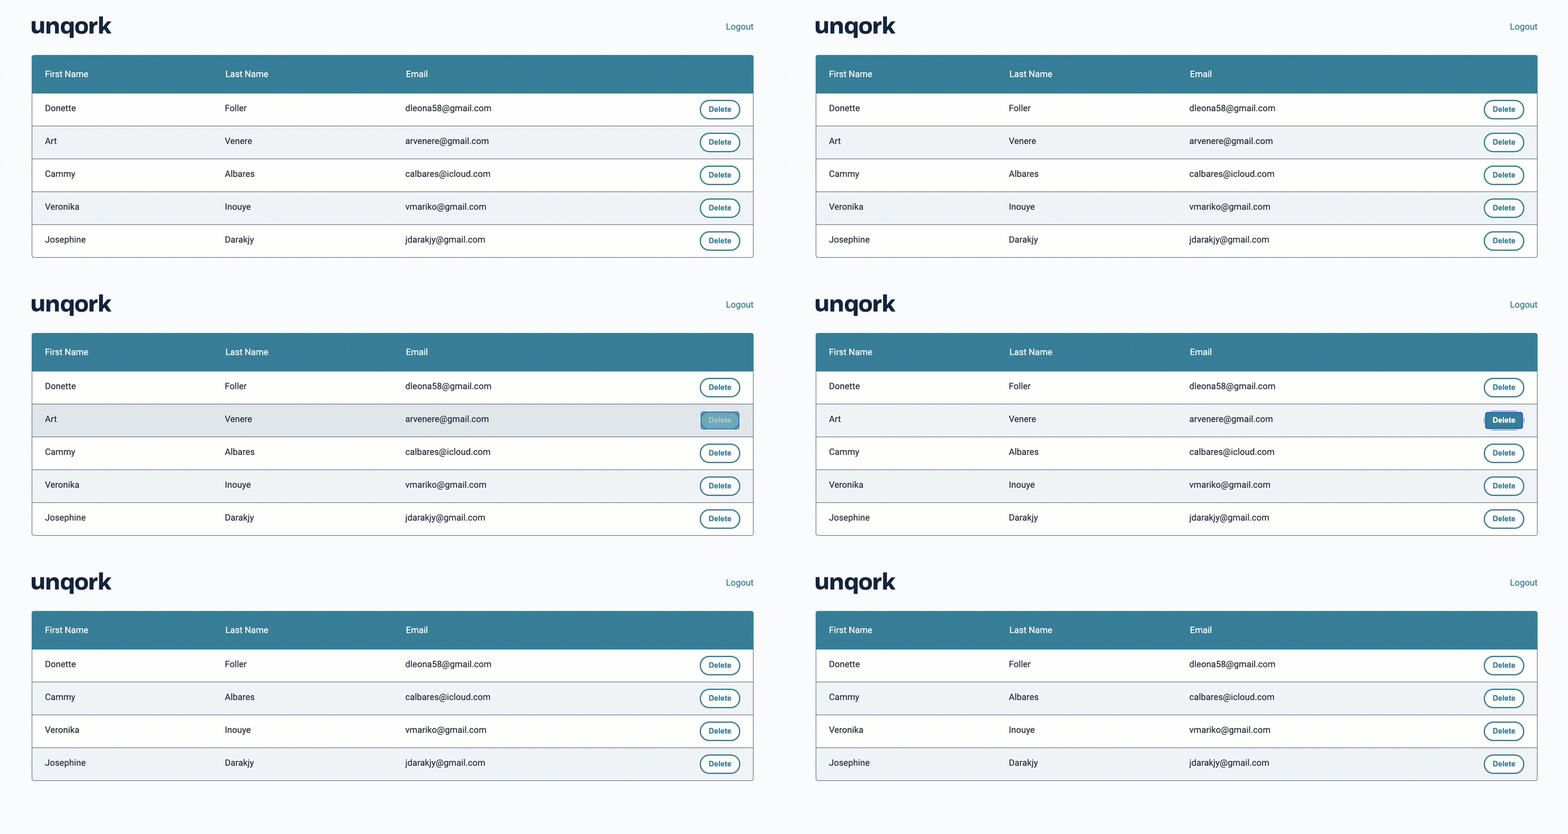
Here’s how the complete dashboard works in Express View:
Module 1 Configuration: Simple Module for Remote Execute
Let's begin by creating the Simple Module for Remote Execute module. In this module, you'll set up fields to record the end-user's personal information.
Configure the Text Field Components
In the Module Builder, drag and drop three Text Field components onto the canvas.
In the Property ID and Label Text fields, enter the following for each component:
#
Property ID
Label Text
1
firstName
First Name
2
middleName
Middle Name
3
lastName
Last Name
Click Save & Close for each component after adding it.
Configure the Email Component
Drag and drop an Email component onto the canvas, placing it below the Text Field components.
In the Property ID and Label Text, enter
emailAddress.Click Save & Close.
Configure the Date Input Component
Drag and drop a Date Input component onto the canvas, placing it below the Email component.
In the Property ID field, enter
dateOfBirth.In the Label Text field, enter
Date of Birth.Under the Formatting section, in the Display (+/-) years from the current date field, enter
125.Navigate to the component’s Advanced settings.
From the Restrict Date selection to: drop-down, select Past Only.
Click Save & Close.
Configure the Button Component
Drag and drop a Button component onto the canvas, placing it below the Date Input component.
In the Property ID field, enter
btnSave.In the Label Text field, enter
Save.In the Success Message field, enter
Saved!.Click Save & Close.
Save your module.
Here's how the completed module looks in the Module Builder:

Module 2 Configuration: Remote Execute Module
Next, you'll create the Remote Execution module (Module 2). This module contains the Plug-In component logic and exists on the server side. Meaning, it’s inaccessible to end-users. When you preview this module, you’ll see a blank screen. Module details are only accessible in the DevTools Console.
Before adding components to Module 2, you'll adjust the module settings. By setting the module to server-side execute, the module becomes inaccessible to anyone without Module Builder access.
At the top right of the Module Builder, click the
 (ellipsis) button.
Select Module Settings.
To the left of the modal, select Module Settings.
Set Server-Side Execution Only to
.png) (ON).
(ON).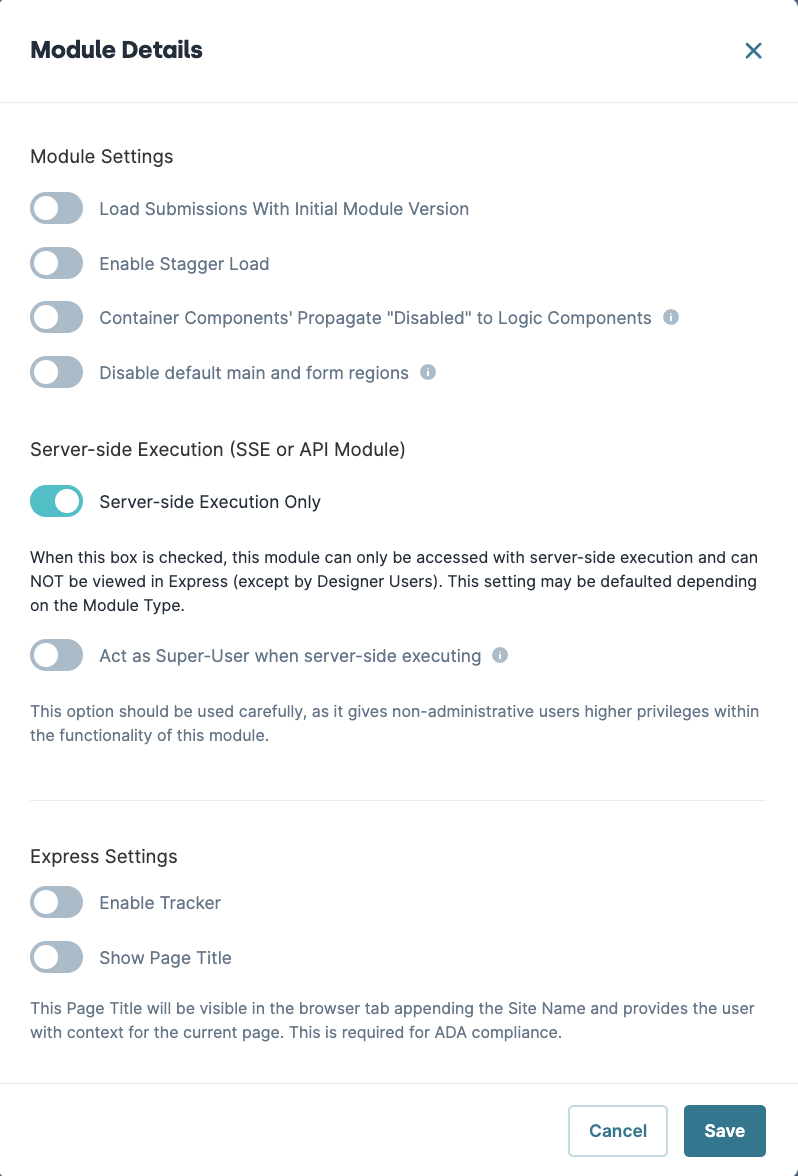
Click Save.
Configure the Initializer Component
In the Module Builder, drag and drop an Initializer component onto the canvas.
In the Property ID and Canvas Label Text fields, enter
initPluginGetSubmissions.From the Trigger Type drop-down, select New Submission.
In the Outputs table, enter the following:
Property ID
Type
Value
pluginGetSubmissions
trigger
GO
Click Save & Close.
Configure the First Hidden Component
You'll use two Hidden components in this configuration. The first Hidden component stores the module ID of the Simple Module for Remote Execute (Module 1). For security purposes, you do not want this module ID stored in the database. So, we'll keep the Store Data in Database setting disabled.
Drag and drop a Hidden component onto the canvas, placing it below the Initializer component.
In the Property ID and Canvas Label Text fields, enter
moduleId.In the Default Value field, copy and paste the module Id of Module 1.
In this example, the module ID of Simple Module for Remote Execute (Module 1) is 5f8d9eb9f1a98d024e984c75. If you created your own Module 1, enter that module's module ID.
Click Save & Close.
Configure the Second Hidden Component
This Hidden component stores the submission data retrieved by the pluginGetSubmissions Plug-In component.
Drag and drop the second Hidden component onto the canvas, placing it below the first Hidden component.
In the Property ID and Canvas Label Text fields, enter
submissions.Set Store Data in Database to
.png) (ON). Doing so allows the submission data to be brought into the dashboard.
(ON). Doing so allows the submission data to be brought into the dashboard.Click Save & Close.
Configure the Plug-In Component
The Plug-In component retrieves the submission data from the source module.
Drag and drop a Plug-In component onto the canvas, placing it below the Initializer component.
In the Property ID and Canvas Label Text fields, enter
pluginGetSubmissions.In the Inputs table, enter the following:
Property ID
Mapping
moduleId
moduleId
'firstName,lastName,emailAddress'
fields
The first row defines which module you’ll retrieve the submissions from. The second row defines which fields you'll send to the dashboard. Here, its references to
firstName,lastName, andemailAddress. The values entered in the Mapping column (moduleIdandfields) are native to Unqork.From the Internal Services drop-down, select List Submissions for Dashboard. The Request Type and Data Source URL are then prepopulated.
Click Save.
Configure the Data Workflow Component
This Data Workflow component retrieves the submission data from the Plug-In component and sends it to the submissions Hidden component.
Drag and drop a Data Workflow component onto the canvas, placing it below your Hidden components.
In the Canvas Label Text and Property Name fields, enter
dwfSaveSubmissions.
Configure the Input Operator
Drag and drop an Input operator onto the Data Workflow canvas.
Configure the operator's Info window as follows:
Setting
Value
Category
Input
Component
pluginGetSubmissions
Required
Yes
Source
Default
Configure the Output Operator
Drag and drop an Output operator onto the Data Workflow canvas.
Configure the operator's Info window as follows:
Setting
Value
Category
Output
Component
submissions
Action
value
Connect the output port (right) of the Input operator to the input port (left) of the Output operator.
Click Save.
Save the module.
Here's how the completed module looks in the Module Builder:
Module 3 Configuration: Remote Execute Module
The Simple Dashboard With Remote Execute module (Module 3) calls on the Remote Execution module (Module 2). The Plug-In component in this module retrieves the submission data to display in a simple dashboard.
Configure the Initializer Component
Like the last module, the Initializer component triggers the Plug-In component on page-load.
In the Module Builder, drag and drop an Initializer component onto the canvas.
In the Property ID and Canvas Label Text fields, enter
initPluginRemoteSubmissionsModule.From the Trigger Type drop-down, select New Submission.
In the Outputs table, enter the following:
Property ID
Type
Value
pluginExecuteSubmissionsModule
trigger
GO
Click Save & Close.
Configure the Plug-In Component
Next, let's add a Plug-In component to retrieve the submission data in the submissions Hidden component of the Remote Execution module (Module 2). Then, you’ll store the submission data in a new Hidden component you'll create in this module.
Drag and drop a Plug-In component onto the canvas, placing it below the Initializer component.
In the Property ID and Canvas Label Text field, enter
pluginExecuteSubmissionsModule.In the Outputs table, enter the following:
Property ID
Mapping
submissionsFromPlugin
data.resolved.submissions
The Property ID references a Hidden component you'll set up in the next step. The Mapping column tells the system to retrieve the submission data from the
submissionsHidden component in Module 2.From the Internal Services drop-down, select Execute Module. The Request Type and Data Source URL are then pre-populated.
In the Data Source URL, replace {moduleID} with the module ID from the Remote Execution module (Module 2).
In this example, the module ID of the Remote Execution module (Module 2) is 5f8d9fec19c4e6024ed45c48.
Click Save.
Configure the Hidden Component
Now, let's add a Hidden component that stores the submissions from the Remote Execution module (Module 2).
Drag and drop a Hidden component onto the canvas, placing it below the Plug-In component.
In the Property ID and Canvas Label Text fields, enter
submissionsFromPlugin.Click Save & Close.
Configure the ViewGrid Component
Now, let's add a Hidden component that stores the submissions from the Remote Execution module (Module 2).
Drag and drop a ViewGrid component onto the canvas, placing it below the Hidden component.
In the Label field, enter
Dashboard.In the Property Name field, enter
gridDashboard.In the Action field, enter
null.Doing so removes the default Submit button from the dashboard.
In the Inputs table, enter
submissionsFromPlugin.In the Display table, enter the following:
ID
Formula
Heading
firstName
First Name
lastName
Last Name
emailAddress
Email
Click Save.
Save module.
Module 3: Simple Dashboard with Remote Execute
Let’s stay in your Module 3 and add the Delete button and supporting components. After creating Module 4, we’ll revisit Module 3 one more time.
Update the ViewGrid Component
Hover over the
gridDashboardViewGrid component to open the configuration settings.In the Outputs table, enter the following:
ID
Mapping
exportId
_id
Set up the Outputs table to export submission IDs. When you click a row’s Delete button, that row’s submission ID is exported to a Hidden component. Doing so allows the Delete Multiple Module Submissions API call to identify which submission to remove. For now, use a placeholder Property ID in the Outputs table. In the next step, you’ll configure the Hidden component that stores the submission ID.
In the Display table, add the following row:
ID
Heading
Button
Delete
Delete
.png) (checked)
(checked)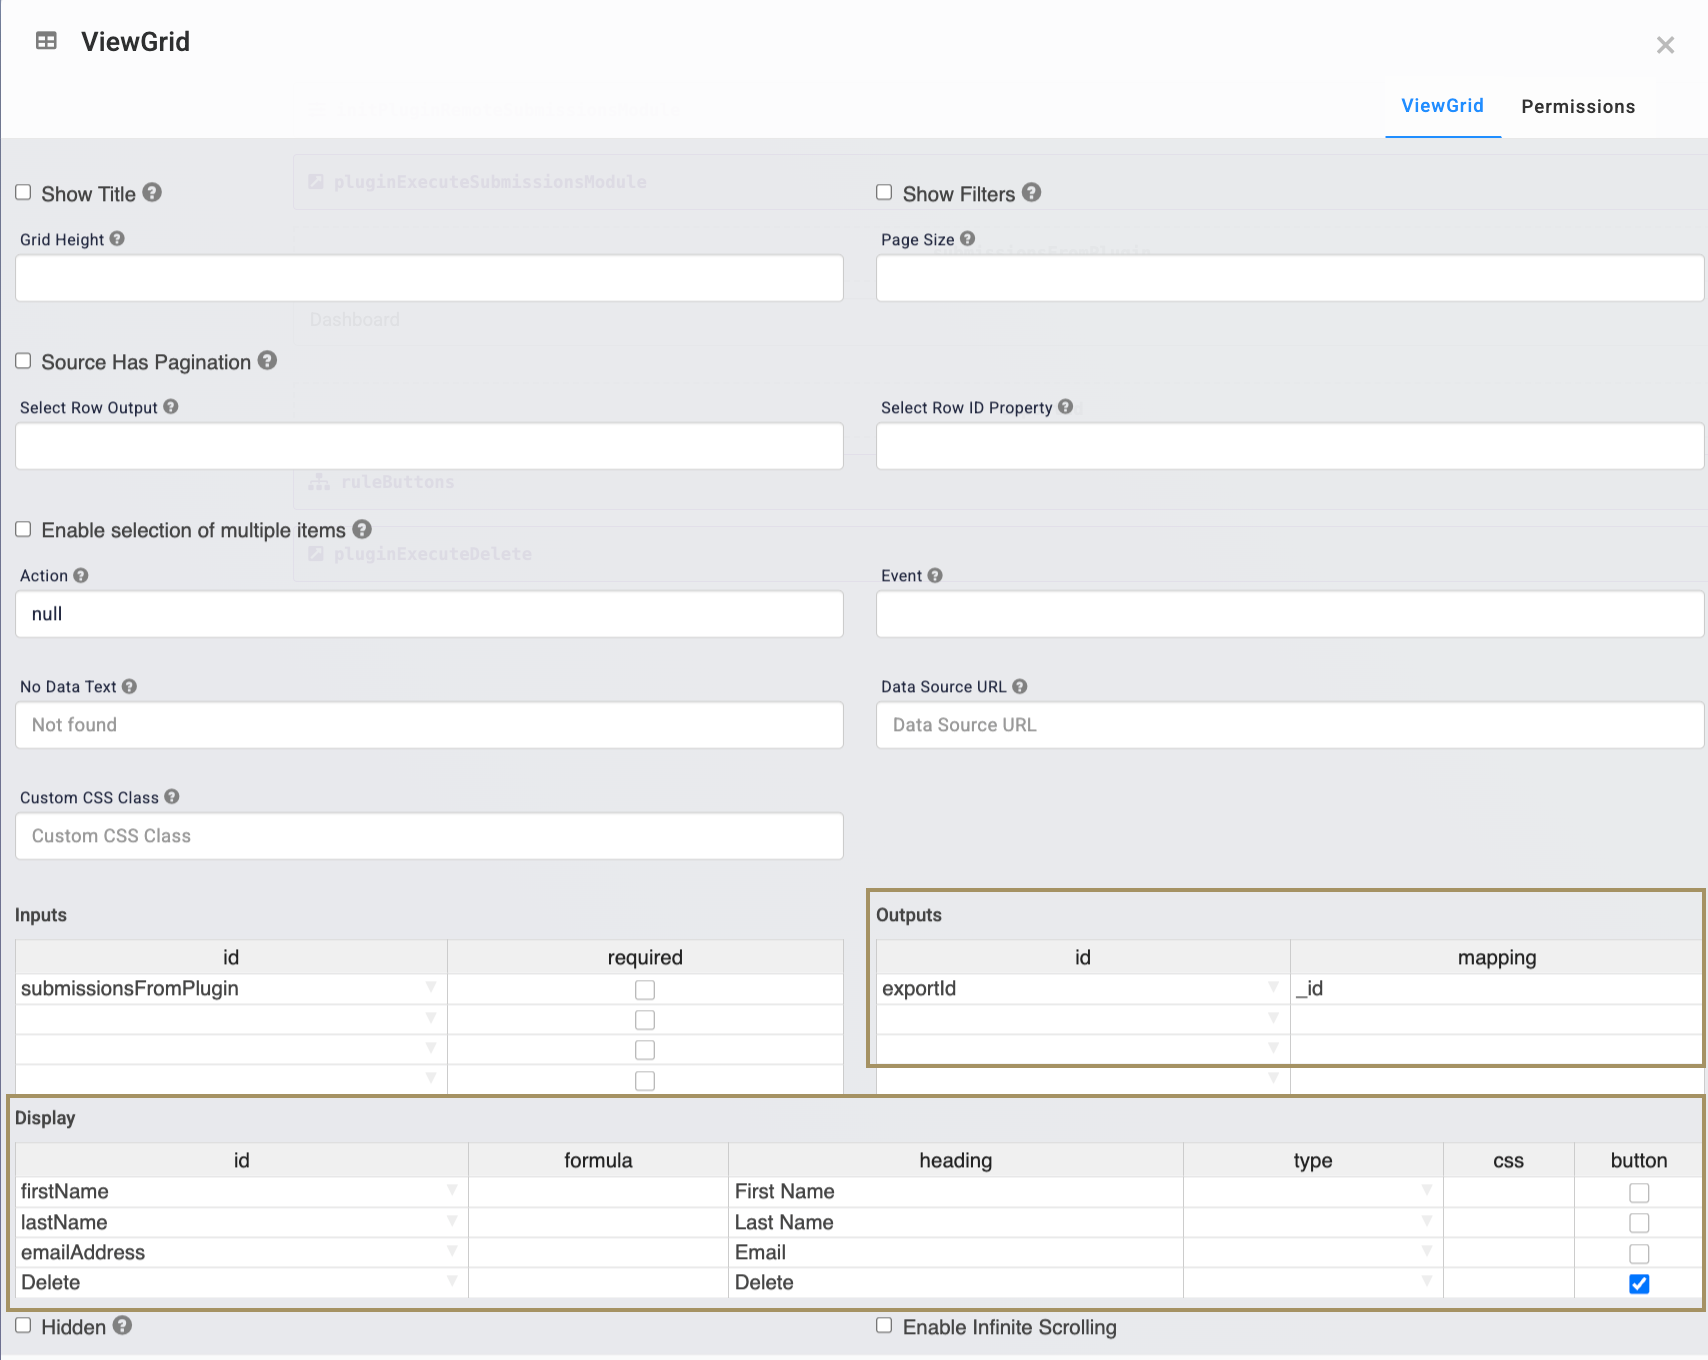
Click Save.
Configure the Hidden Component
Next, you'll create a Hidden component to store the submission ID exported by the ViewGrid component. Remember to use the same placeholder Property ID you used in the ViewGrid component's Outputs table.
Drag and drop a Hidden component onto the canvas, placing it below the
DashboardViewGrid component.In the Property ID and Canvas Label Text fields, enter
exportId.Click Save & Close.
Configure the Decisions Component
Next, let's set up the Decisions component to create an action when your end-user clicks the Delete button. On button-click, the Decisions component triggers the Plug-In component you'll set up next. That Plug-In component triggers the remote execute of Module 4.
Drag and drop a Decisions component onto the canvas, placing it below the
exportIdHidden component.In the Property ID and Canvas Label Text fields, enter
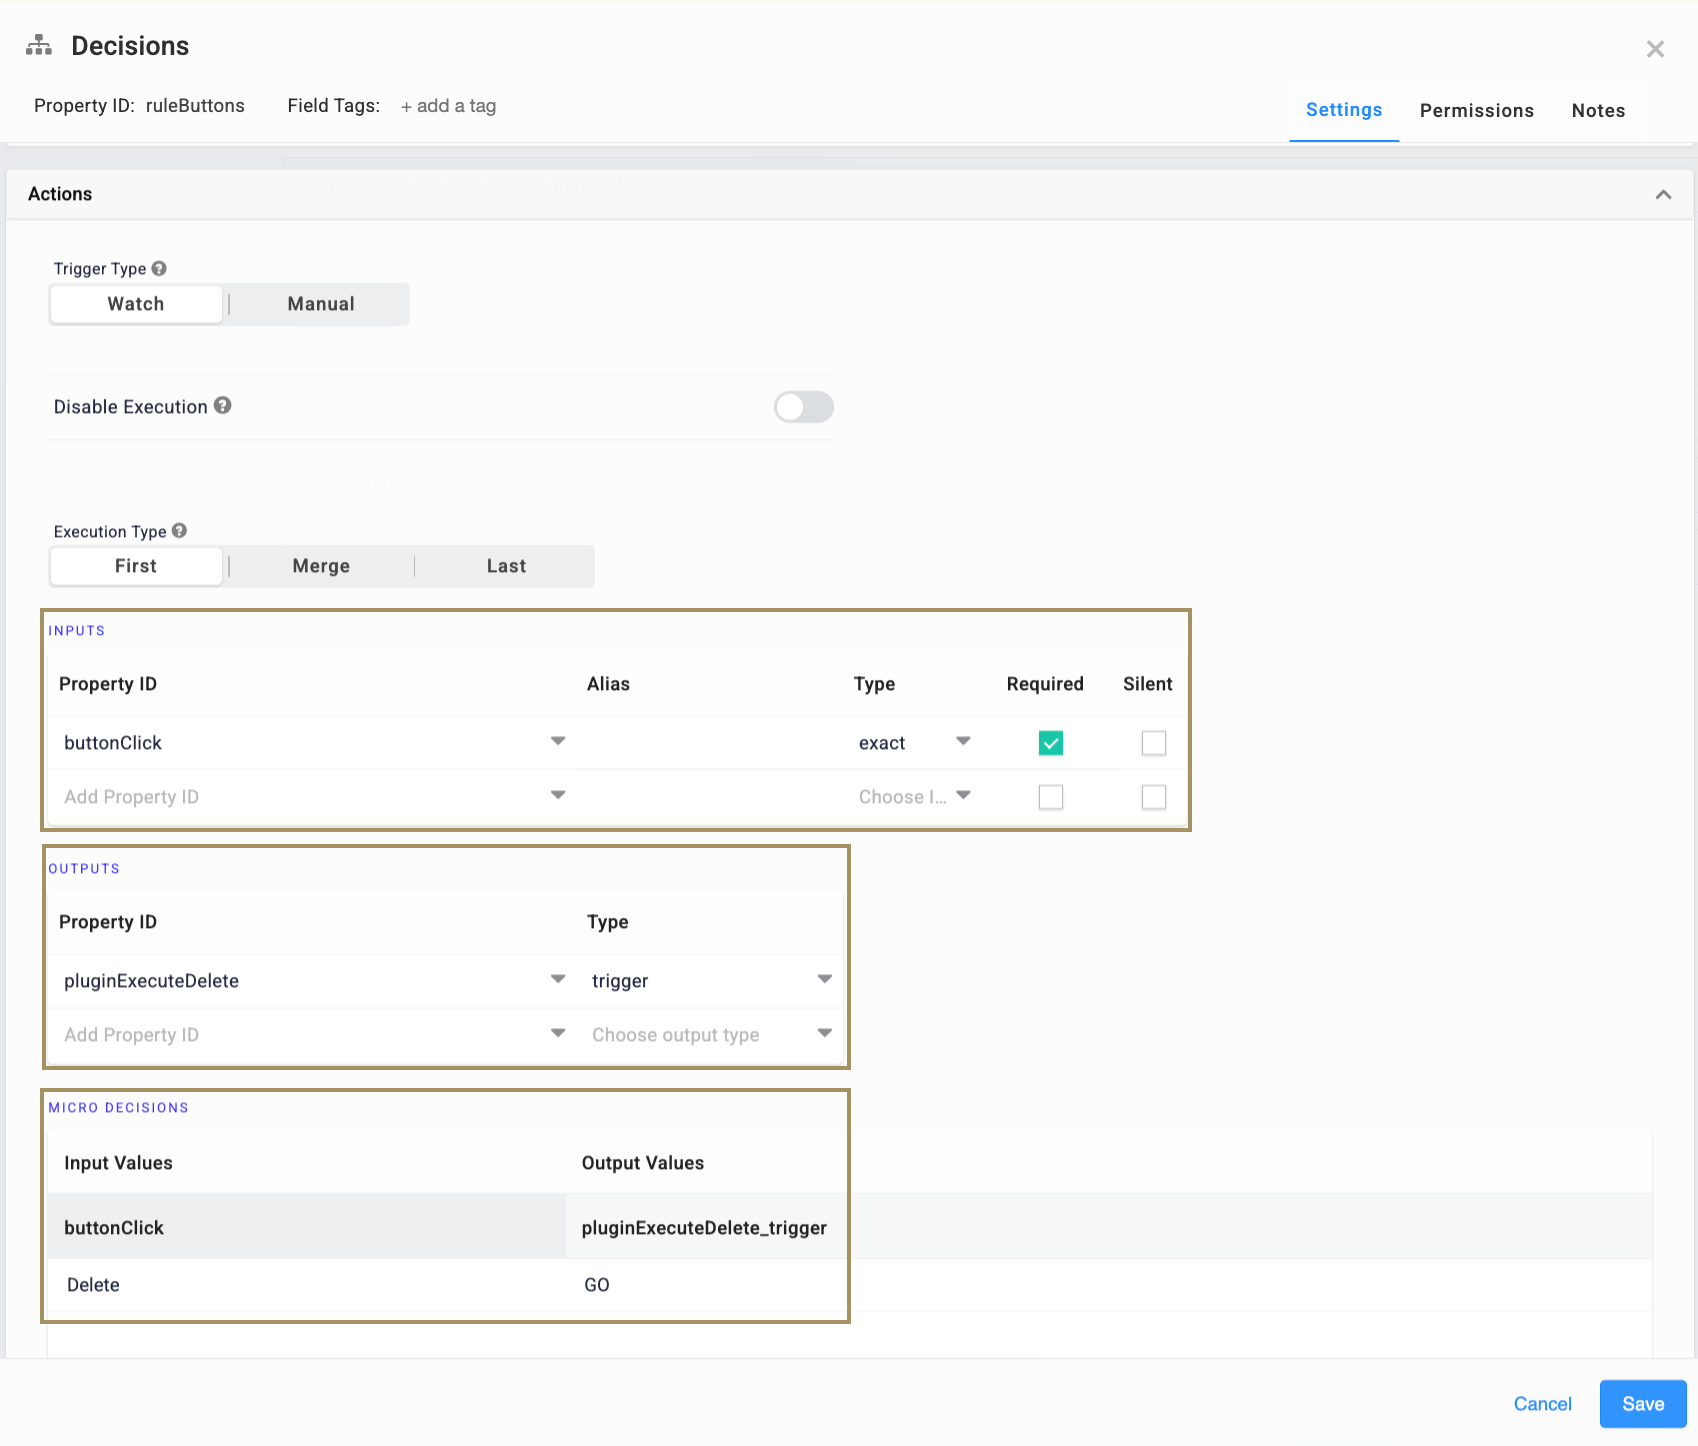
ruleButtons.In the Inputs table, enter the following:
Property ID
Type
Required
buttonClick
exact
.png) (checked)
(checked)In the Outputs table, enter the following:
Property ID
Type
pluginExecuteDelete
trigger
In the Micro Decisions table, enter the following:
buttonClick
pluginExecuteDelete_trigger
Delete
GO
Click Save.
Configure the Plug-In Component
This Plug-In component executes the Remote Execution for Deleting Submissions module (Module 4). You'll need to revisit this Plug-In component later to finalize the connection.
Drag and drop a Plug-In component onto the canvas, placing it below the Decisions component.
In the Property ID and Canvas Label Text fields, enter
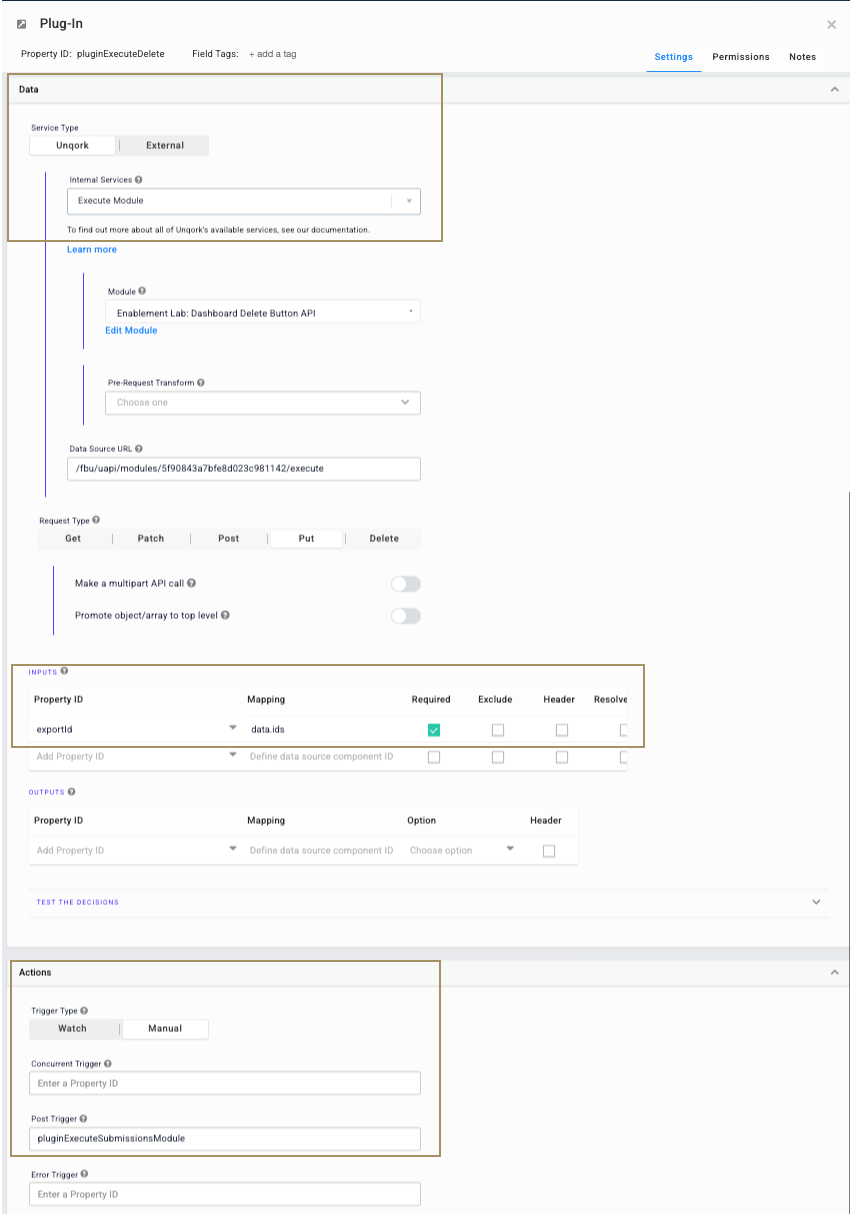
pluginExecuteDelete.From the Internal Services drop-down, select Execute Module.
In the Inputs table, enter the following:
Property ID
Mapping
Required
exportId
data.ids
.png) (checked)
(checked)In the Post Trigger field, enter
pluginExecuteSubmissionsModule.Doing ensures the dashboard refreshes after deleting a submission.
Click Save.
Save module.
Here's how the updated module looks in the Module Builder:

Module 4 Configuration: Remote Execution for Deleting Submissions
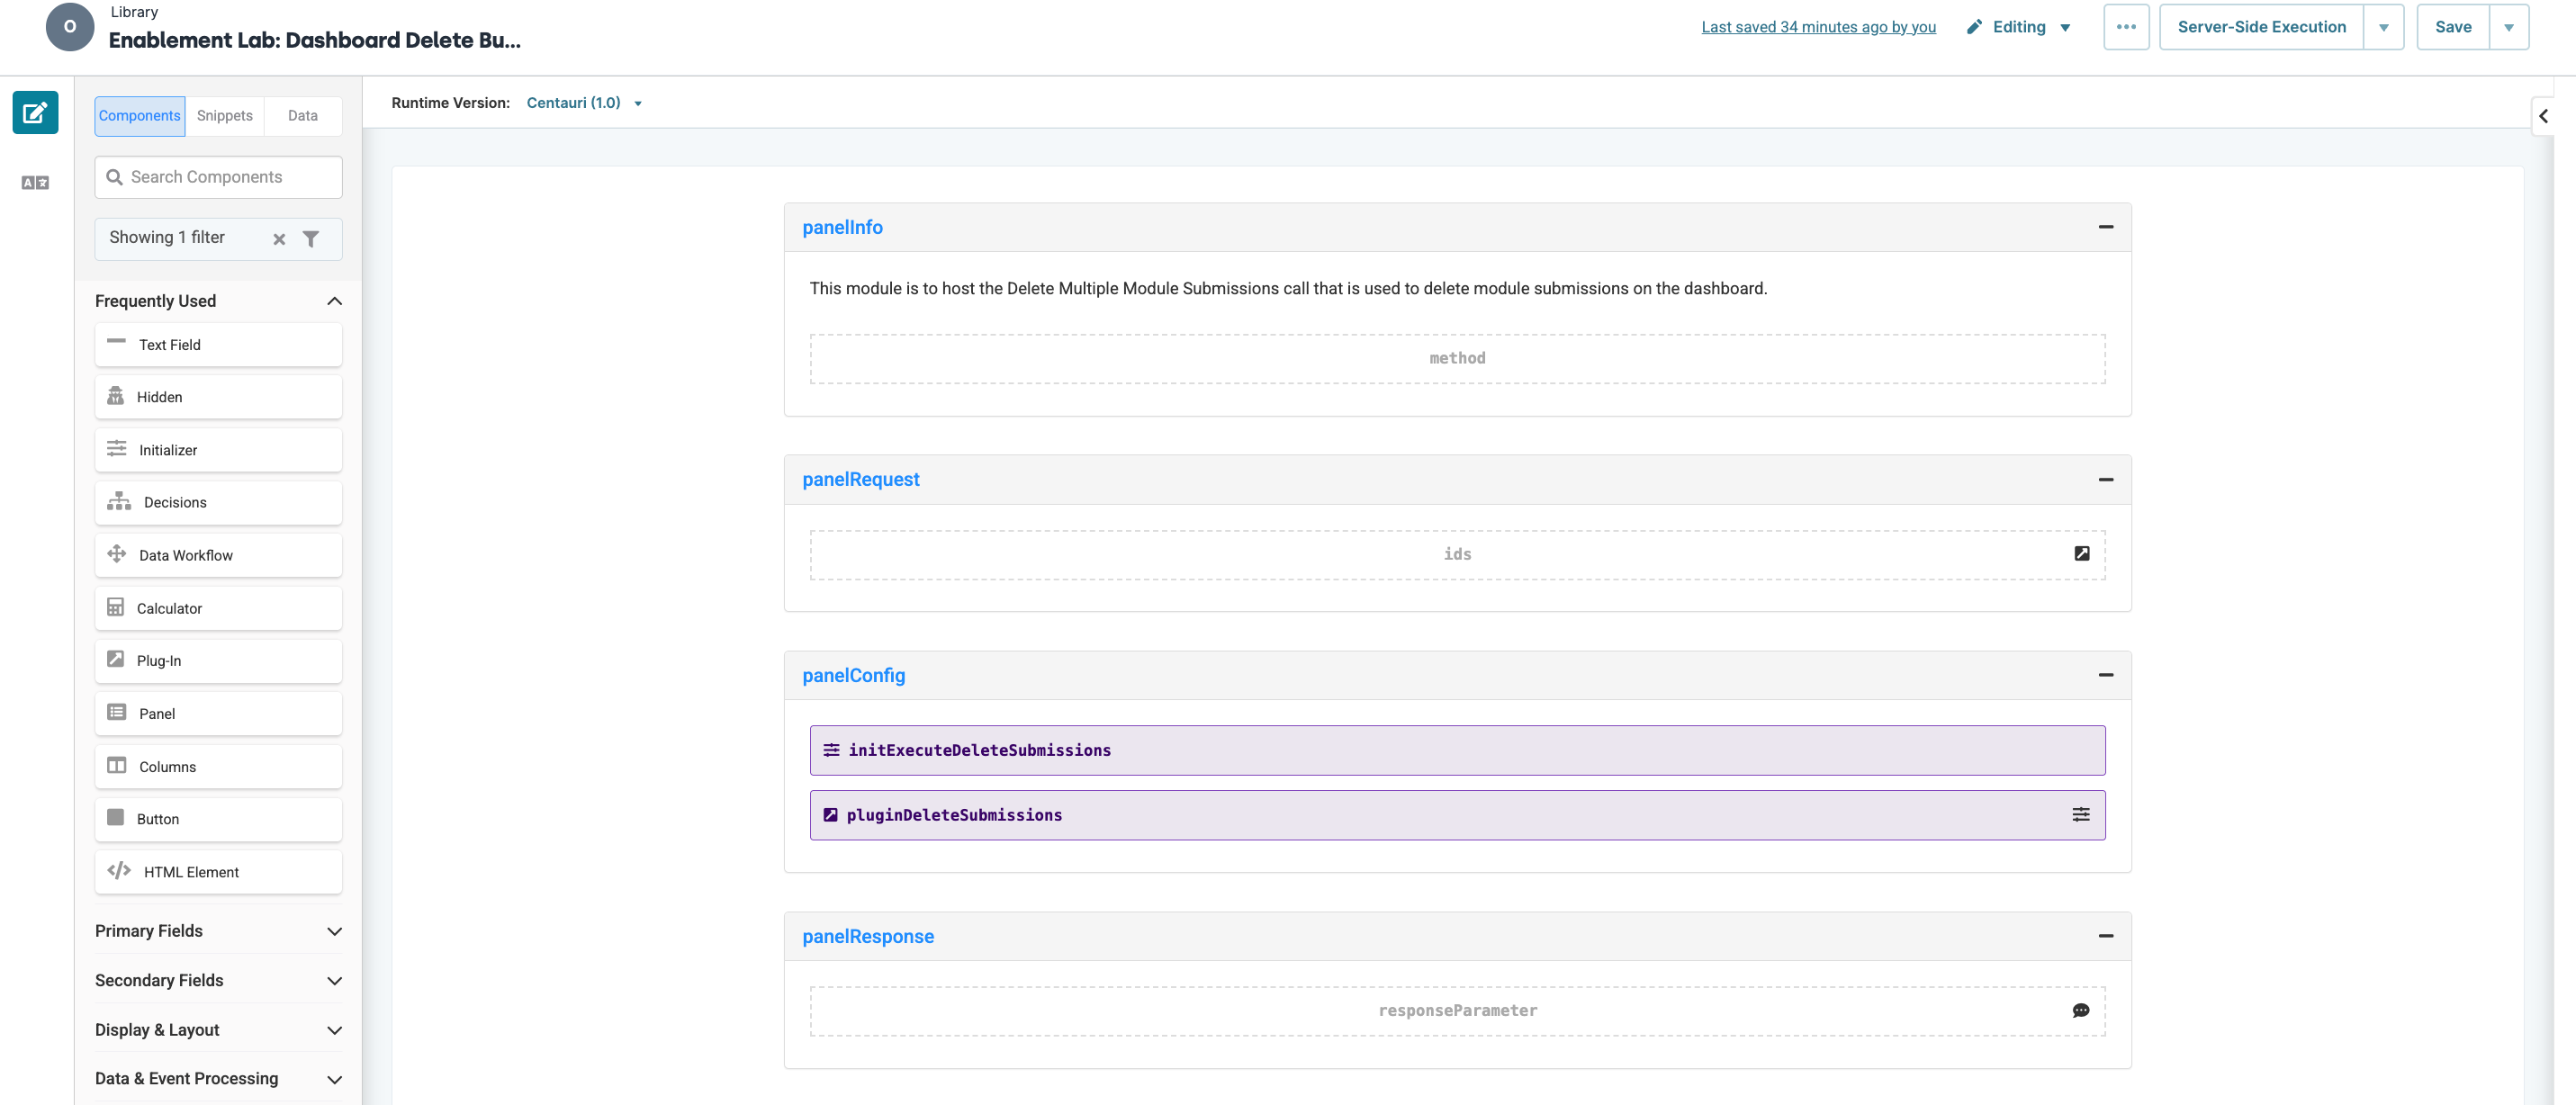
This module handles deleting submissions from Module 1. Clicking the dashboard's Delete button, the pluginExecuteDelete Plug-In component in Module 3 calls on Module 4. This action causes the Initializer component to fire, which triggers the Plug-In component of Module 4 to run the Deletes Multiple Module Submissions API call.
Configure the API Module
Module 4 must be configured as an Unqork API module to ensure it executes on the server side. To begin, navigate to the Application page where your other modules are configured.
At the top right of the Application page, click + Create New.
Select Module.
In the Module Name field, enter a name for your Module 4 module.
From the Module Type drop-down, select API.
Click Create.
Enabling Server-Side Execution Only
Before adding components to Module 4, you'll adjust the module settings. By setting the module to server-side execute, the module becomes inaccessible to anyone without Module Builder access.
At the top right of the Module Builder, click the
 (ellipsis) button.
 Select Module Settings.
To the left of the modal, click Module Settings.
Set Server-Side Execution Only to
.png) (ON).
(ON).
Click Save.
Update the panelInfo Panel Component
Let's return to the Module Builder and begin configuring your Module 4. Next, let's make some updates to the components in the panelInfo Panel component. This information states the purpose of this remote execute module.
Update the HTML Element Component
Hover over the
descriptionHTML Element component to open the configuration setting.In the Content field, replace the default text with the following:
This module is to host the Deletes Multiple Module Submissions call that is used to delete module submissions on the dashboard.Click Save & Close.
Update the Hidden Component
Hover over the
methodHidden component to open the configuration settings.In the Default Value field, replace the default value with
DELETE.Click Save & Close.
Update the panelRequest Panel Component
Next, let's set up the panelRequest Panel component. Components in this Panel component are part of the API request and store the values the Plug-In component uses when running the Delete Multiple Module Submissions API call.
Update the requestParameter Hidden Component
Hover over the
requestParameterHidden component to open the configuration settings drawer.In the Property ID and Canvas Label Text fields, replace the default value with
ids.
Update the panelConfig Panel Component
Now, let's update the panelConfig Panel by adding an Initializer and a Plug-In component.
Configure the Initializer component
Let's set up an Initializer component to trigger the pluginDeleteSubmissions Plug-In component you’ll set up later.
Drag and drop an Initializer component onto the canvas, placing it inside the
panelConfigPanel component.In the Property ID and Canvas Label Text fields, enter i
nitExecuteDeleteSubmissions.From the Trigger Type drop-down, select New Submission.
The New Submission Trigger Type runs the Initializer component whenever the
pluginExecuteDeletePlug-In component in your Module 3 calls Module 4.In the Outputs table, enter the following:
Property ID
Type
Value
pluginDeleteSubmissions
trigger
GO
Click Save & Close.
Configure the Plug-In component
The last step in configuring this module is setting up the Plug-In component that deletes submissions from Module 1. So, you'll need Module 1’s module ID to complete the configuration.
Drag and drop a Plug-In component onto the canvas, placing it inside the
panelConfigPanel component.In the Property ID and Canvas Label Text fields, enter
pluginDeleteSubmissions.From the Internal Services drop-down, select Deletes Multiple Module Submissions.
In the Data Source URL field, replace {moduleId} with the module ID of Module 1.
You can retrieve the module ID from Module 1 from the source module's URL as follows: https://training.unqork.io/#/form/5f8d9eb9f1a98d024e984c75/edit. If you have created your own Module 1, enter your module's unique module ID instead.
In the Inputs table, enter the following:
Property ID
Mapping
Required
ids
ids
Yes (checked)
Click Save.
Save module.
Here's how the completed module looks in the Module Builder:
Update Module 3: Simple Dashboard with Remote Execute
The last step of the configuration ensures the dashboard's Delete button removes a submission. You'll enter the module ID of Module 4 in the pluginExecuteDelete Plug-In component to achieve this action. So, return to Module 4 and copy the module ID.
Update the Plug-In component
Hover over the
pluginExecuteDeletePlug-In component to open the configuration settings drawer.In the Data Source URL field, replace {moduleId} with
5f90843a7bfe8d023c981142.You can retrieve the module ID from Module 4 from the source module's URL as follows: https://training.unqork.io/#/form/5f90843a7bfe8d023c981142/edit . If you created your own Module 4, enter your module's unique module ID instead.
Click Save.
Save module.
Here’s how the complete dashboard works in Express View:
