Overview
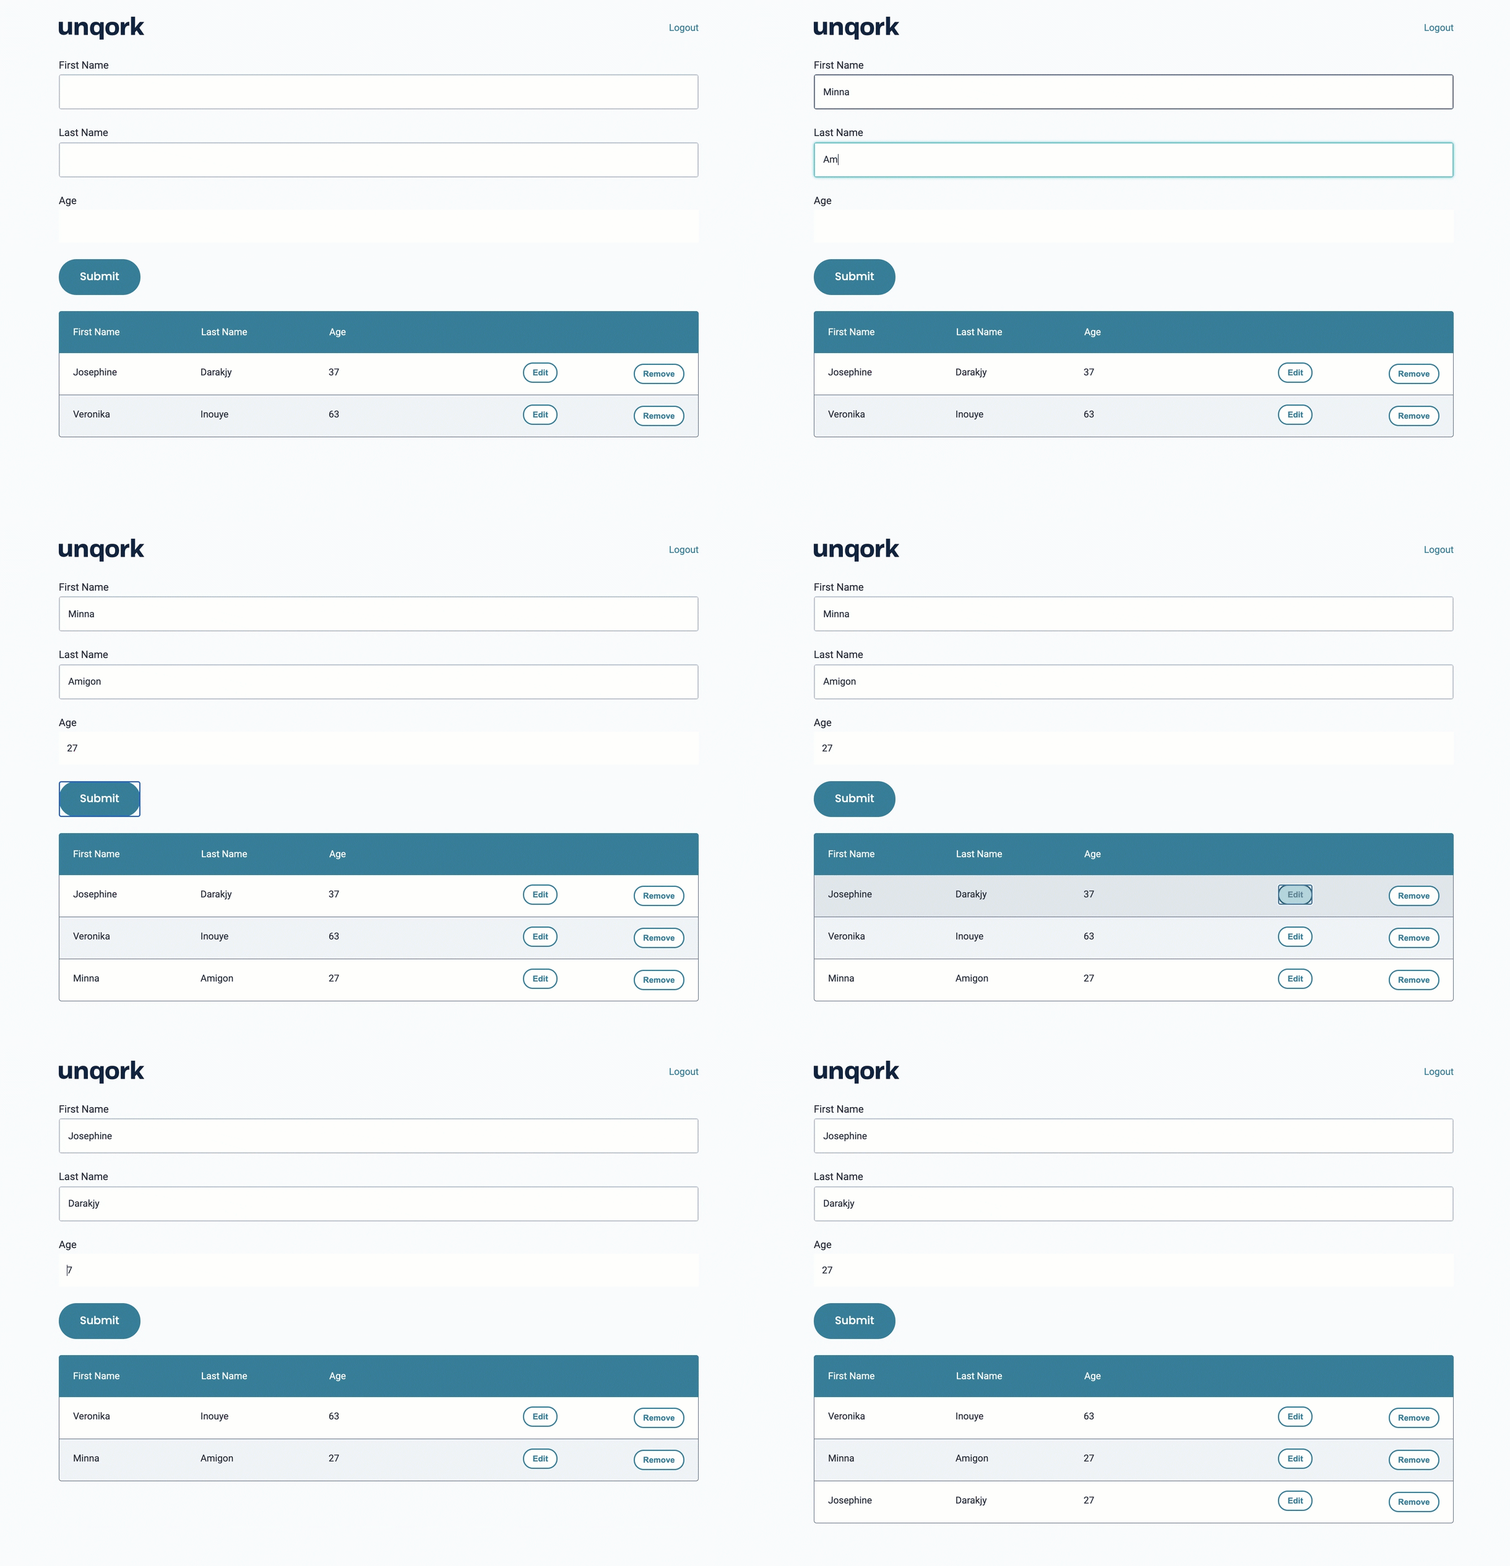
One of the most popular ways to display and review submission data in Unqork is with a dashboard. Dashboards typically pull submission data from a source module, using a Plug-In component. Sometimes, though, you might want to display and review submission data within the same module as your input fields. An inline ViewGrid makes this easy.
The term inline refers to setting up your ViewGrid on the same page as your input fields. In this use case, you'll see how to create an inline ViewGrid. Instead of using a Plug-In to populate your ViewGrid, you'll use Data Workflows. You'll also see how to add custom Edit and Remove buttons to your ViewGrid. These buttons will allow you to easily edit or remove rows of submission data from your ViewGrid.
Here’s how the completed use case works in Express View:
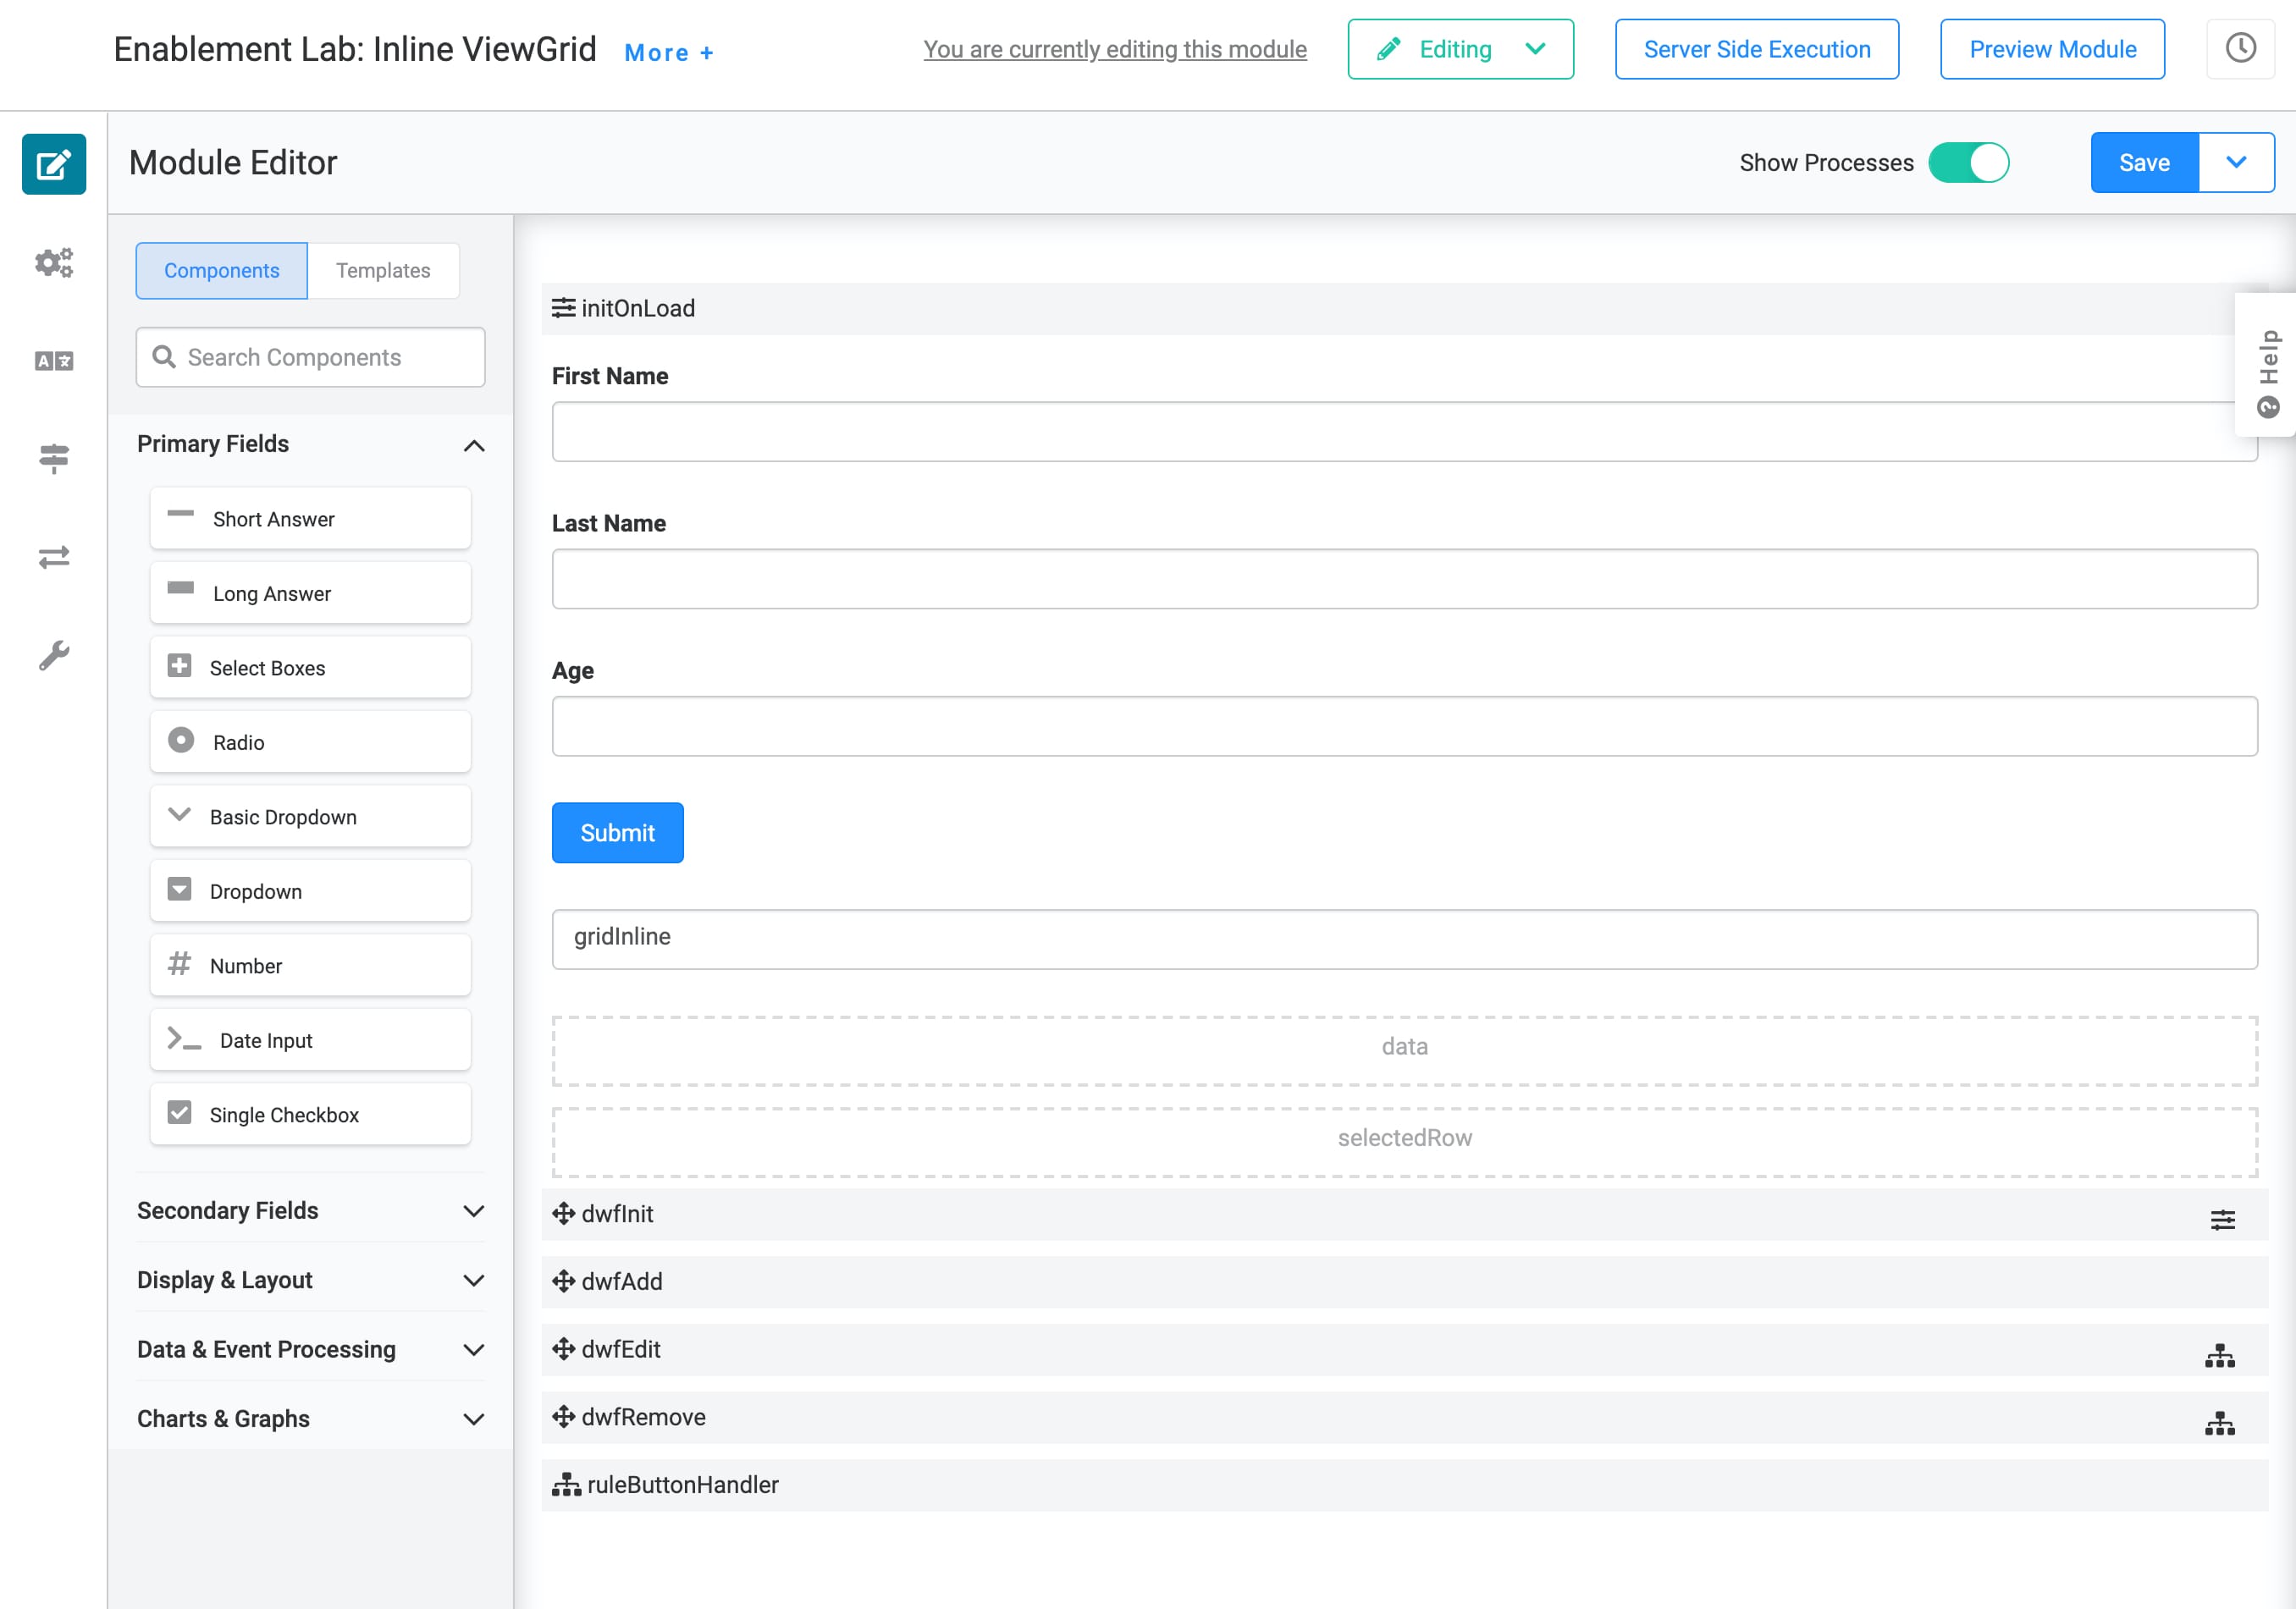
Here’s how the completed use case looks in the Module Builder:
What You’ll Learn
In this article, you’ll learn how to:
Create an inline ViewGrid, populated using Data Workflow components.
Add Edit and Remove buttons to your inline ViewGrid.
What You’ll Need
For this use case, you'll need the following components:
2 Short Answer components
1 Number component
2 Hidden components
1 Button component
1 Initializer component
4 Data Workflow components
1 ViewGrid component
1 Decisions component
Pre-configuration
First, let's set up the fields where end-users will enter values to display in the ViewGrid. You'll use 2 Short Answers and 1 Number component to collect the end-user's first name, last name, and age. Since you're creating an inline ViewGrid, you'll complete the entire configuration in the same module.
Configure the Short Answer Components
These 2 Short Answer components are the inputs for the end-user's first and last names.
Drag and drop 2 Short Answer components onto your canvas, placing them one below the other.
Enter the Labels and Property Names as follows.
Label
Property Name
First Name
firstName
Last Name
lastName
Check the Persistent checkbox for each component.
Save each component as you add it.
Configure the Number Component
Drag and drop a Number component onto your canvas. Place it below the lastName Short Answer component.
Enter Age in the Label.
Enter age in the Property Name.
Check the Persistent checkbox.
Click Save.
Now you have a way to collect the end-user's data. Now, let’s create the ViewGrid to display that data, and Data Workflows to populate the ViewGrid.
Configure the Hidden Components
Before you dive into configuring Data Workflows, let's take a moment to set up 2 Hidden components. These Hidden components will store values that you'll reference in other components later. The data Hidden component will house the data displayed in the ViewGrid. The selectedRow Hidden component will house the index number of the selected row in the ViewGrid.
Drag and drop 2 Hidden components onto your canvas.
Enter the Labels and Property Names as follows:
Label
Property Name
data
data
selectedRow
selectedRow
Save each component as you add it.
Configure the First Data Workflow Component
Here, you’ll set up your first Data Workflow component, dwfInit. This Data Workflow creates an empty data table, then stores that data table in your data Hidden component. Having an empty table ready ensures there's somewhere to add the rows of data you'll create using the second Data Workflow.
Drag and drop a Data Workflow component onto your canvas.
Enter dwfInit in the Label and Property Name.
Scroll down and select Manual from the Trigger Type drop-down.
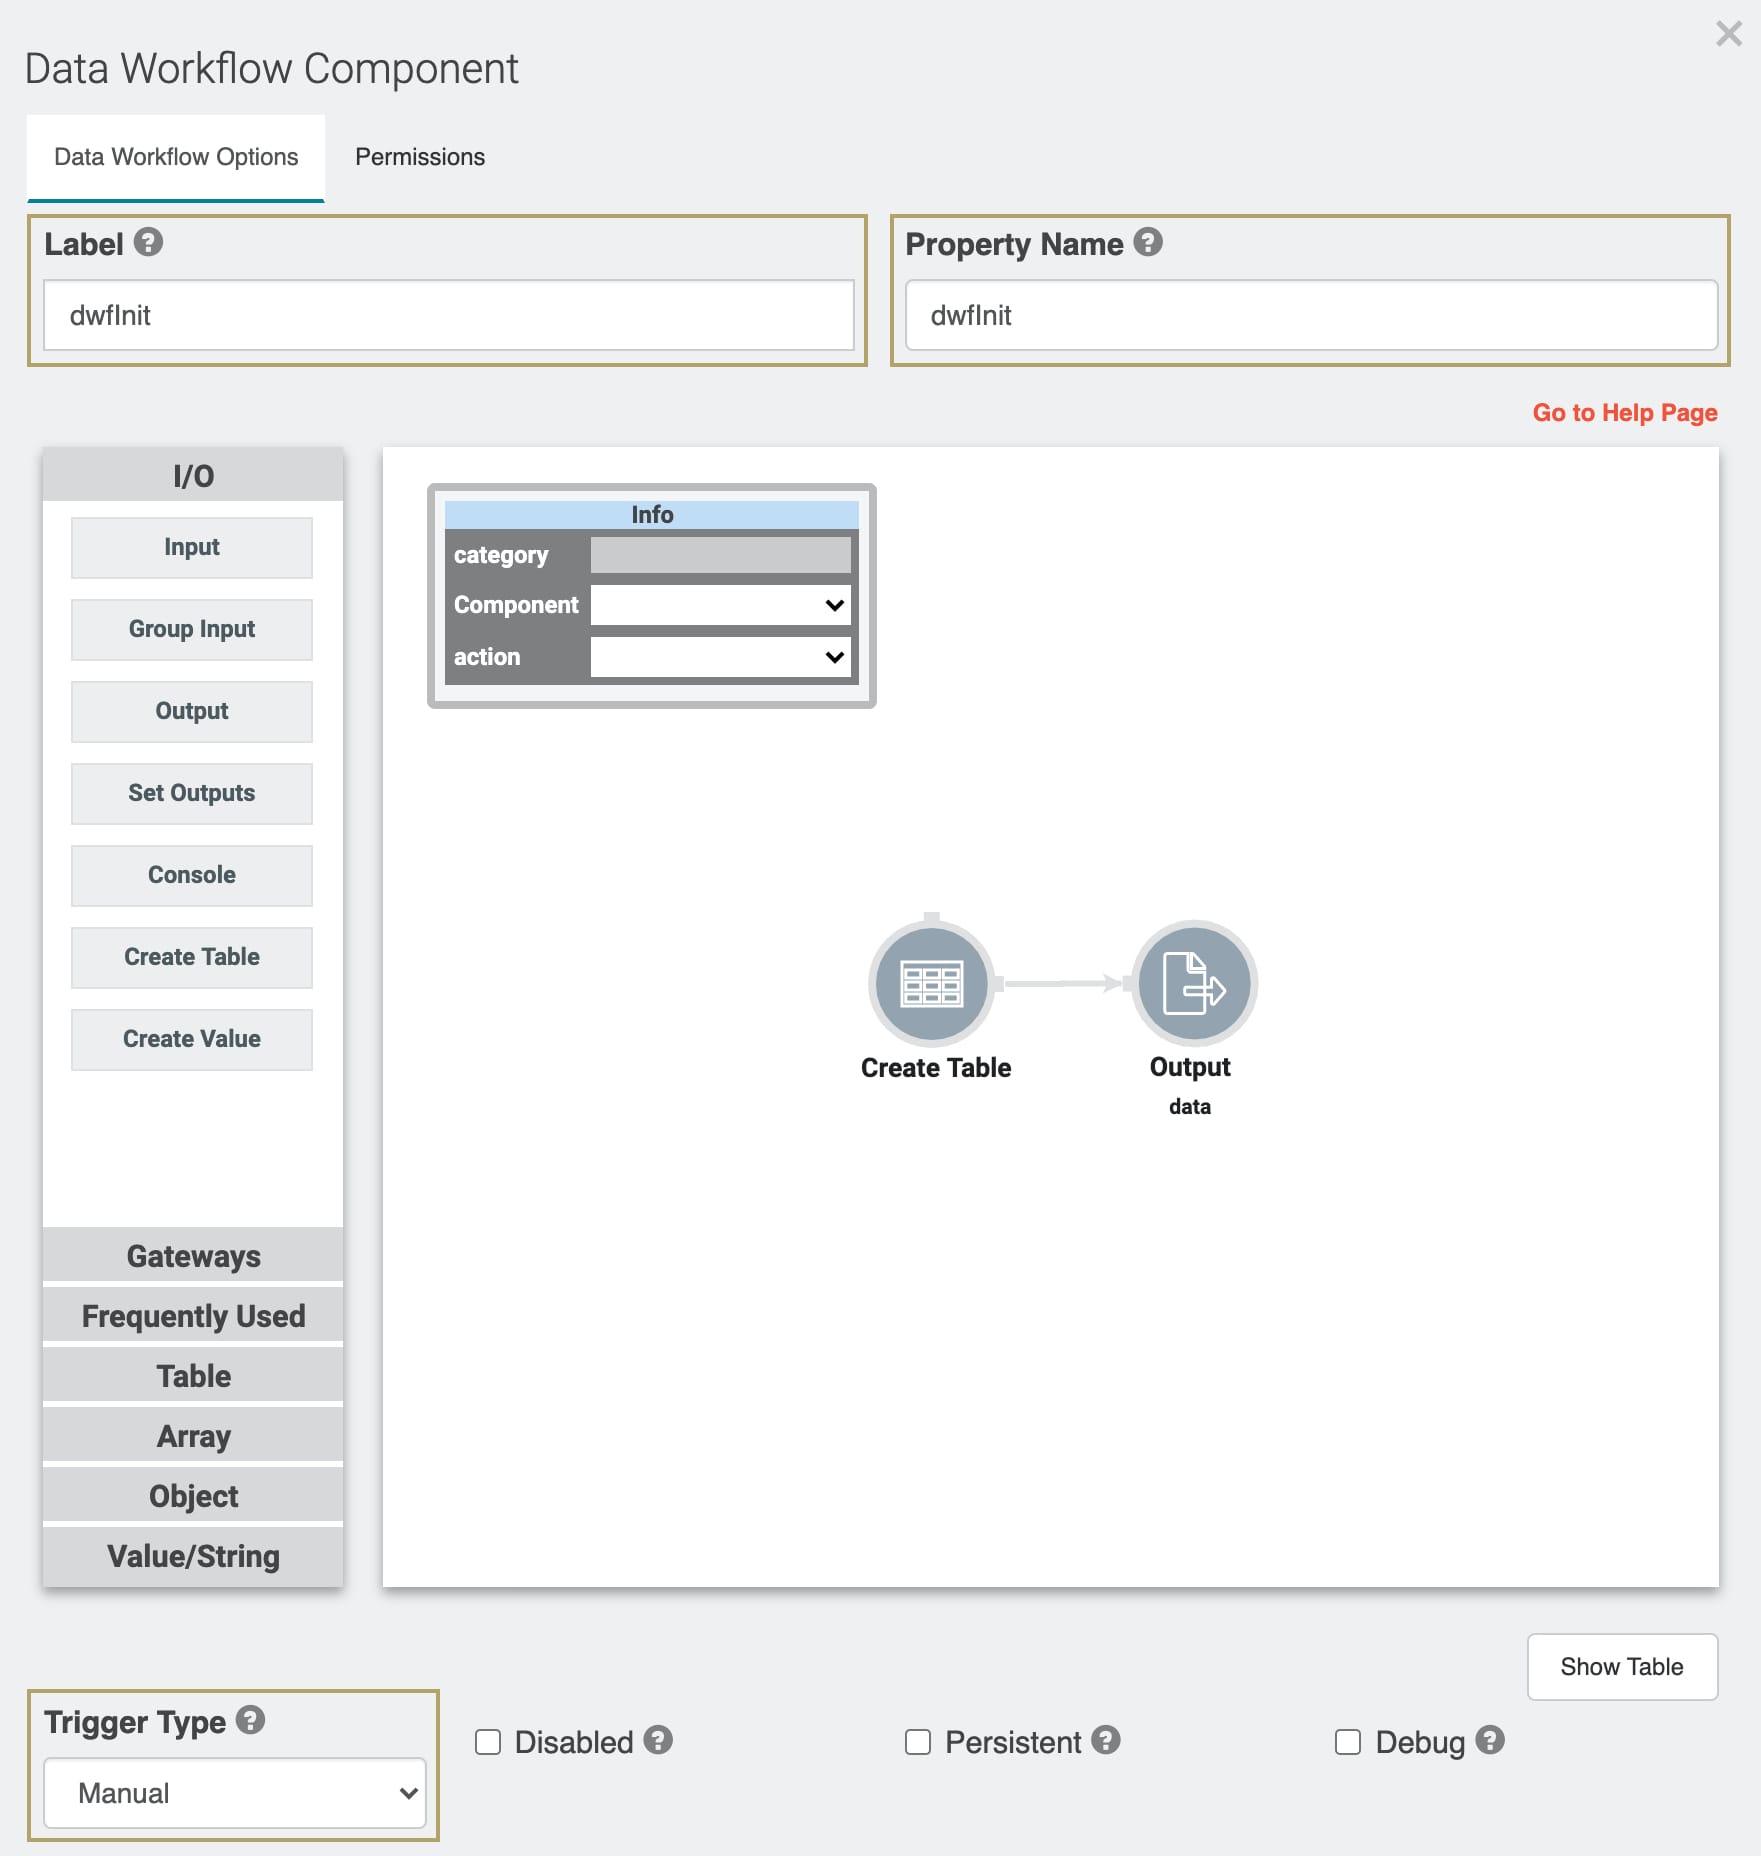
Configure the Create Table Operator
The Create Table operator you'll set up here creates an empty data table (array). You'll set up your data table to have 0 rows for now. Your dwfAdd Data Workflow appends 1 row to the table every time an end-user submits information.
Drag and drop a Create Table operator onto your Data Workflow canvas.
Configure the Create Table operator's Info window as follows:
Setting
Value
Category
Create Table
Label
Create Index
No
Number of Rows
0
Configure the Output Operator
Here you'll set up your Output operator to store the table you just created in the data Hidden component.
Drag and drop an Output operator onto your Data Workflow canvas.
Configure the Output operator's Info window as follows:
Setting
Value
Category
Output
Component
data
Action
value
Connect the output (right-hand) port of the Create Table operator, to the input (left-hand) port of the Output operator.
Click Save.
Configure the Initializer Component
Next, you'll set up an Initializer to trigger the dwfInit Data Workflow on page load. This ensures there's always an empty table ready to store values for the First Name, Last Name, and Age fields.
Drag and drop an Initializer component onto your canvas. Place your Initializer above the firstName Short Answer component.
Enter initOnLoad in the Label and Property Name.
Set the Trigger Type to New Submission.
Complete the Outputs table as follows:
ID: Enter dwfInit.
Type: Enter trigger.
Value: Enter GO.
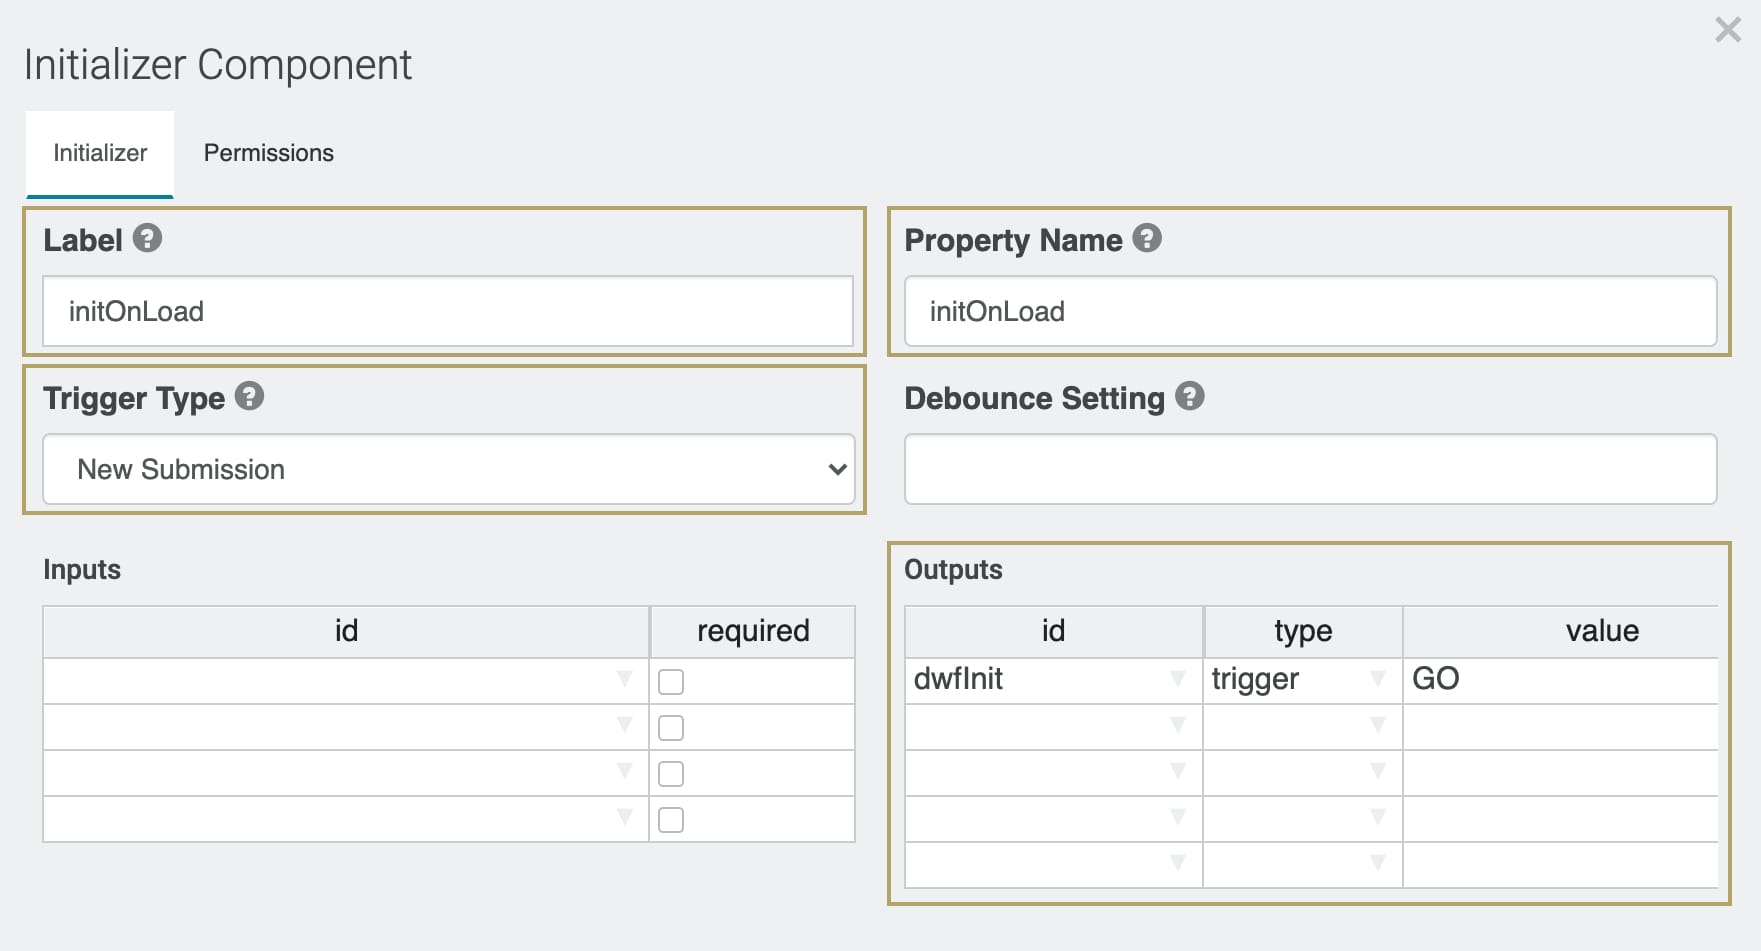
Click Save.
Configure the Second Data Workflow Component
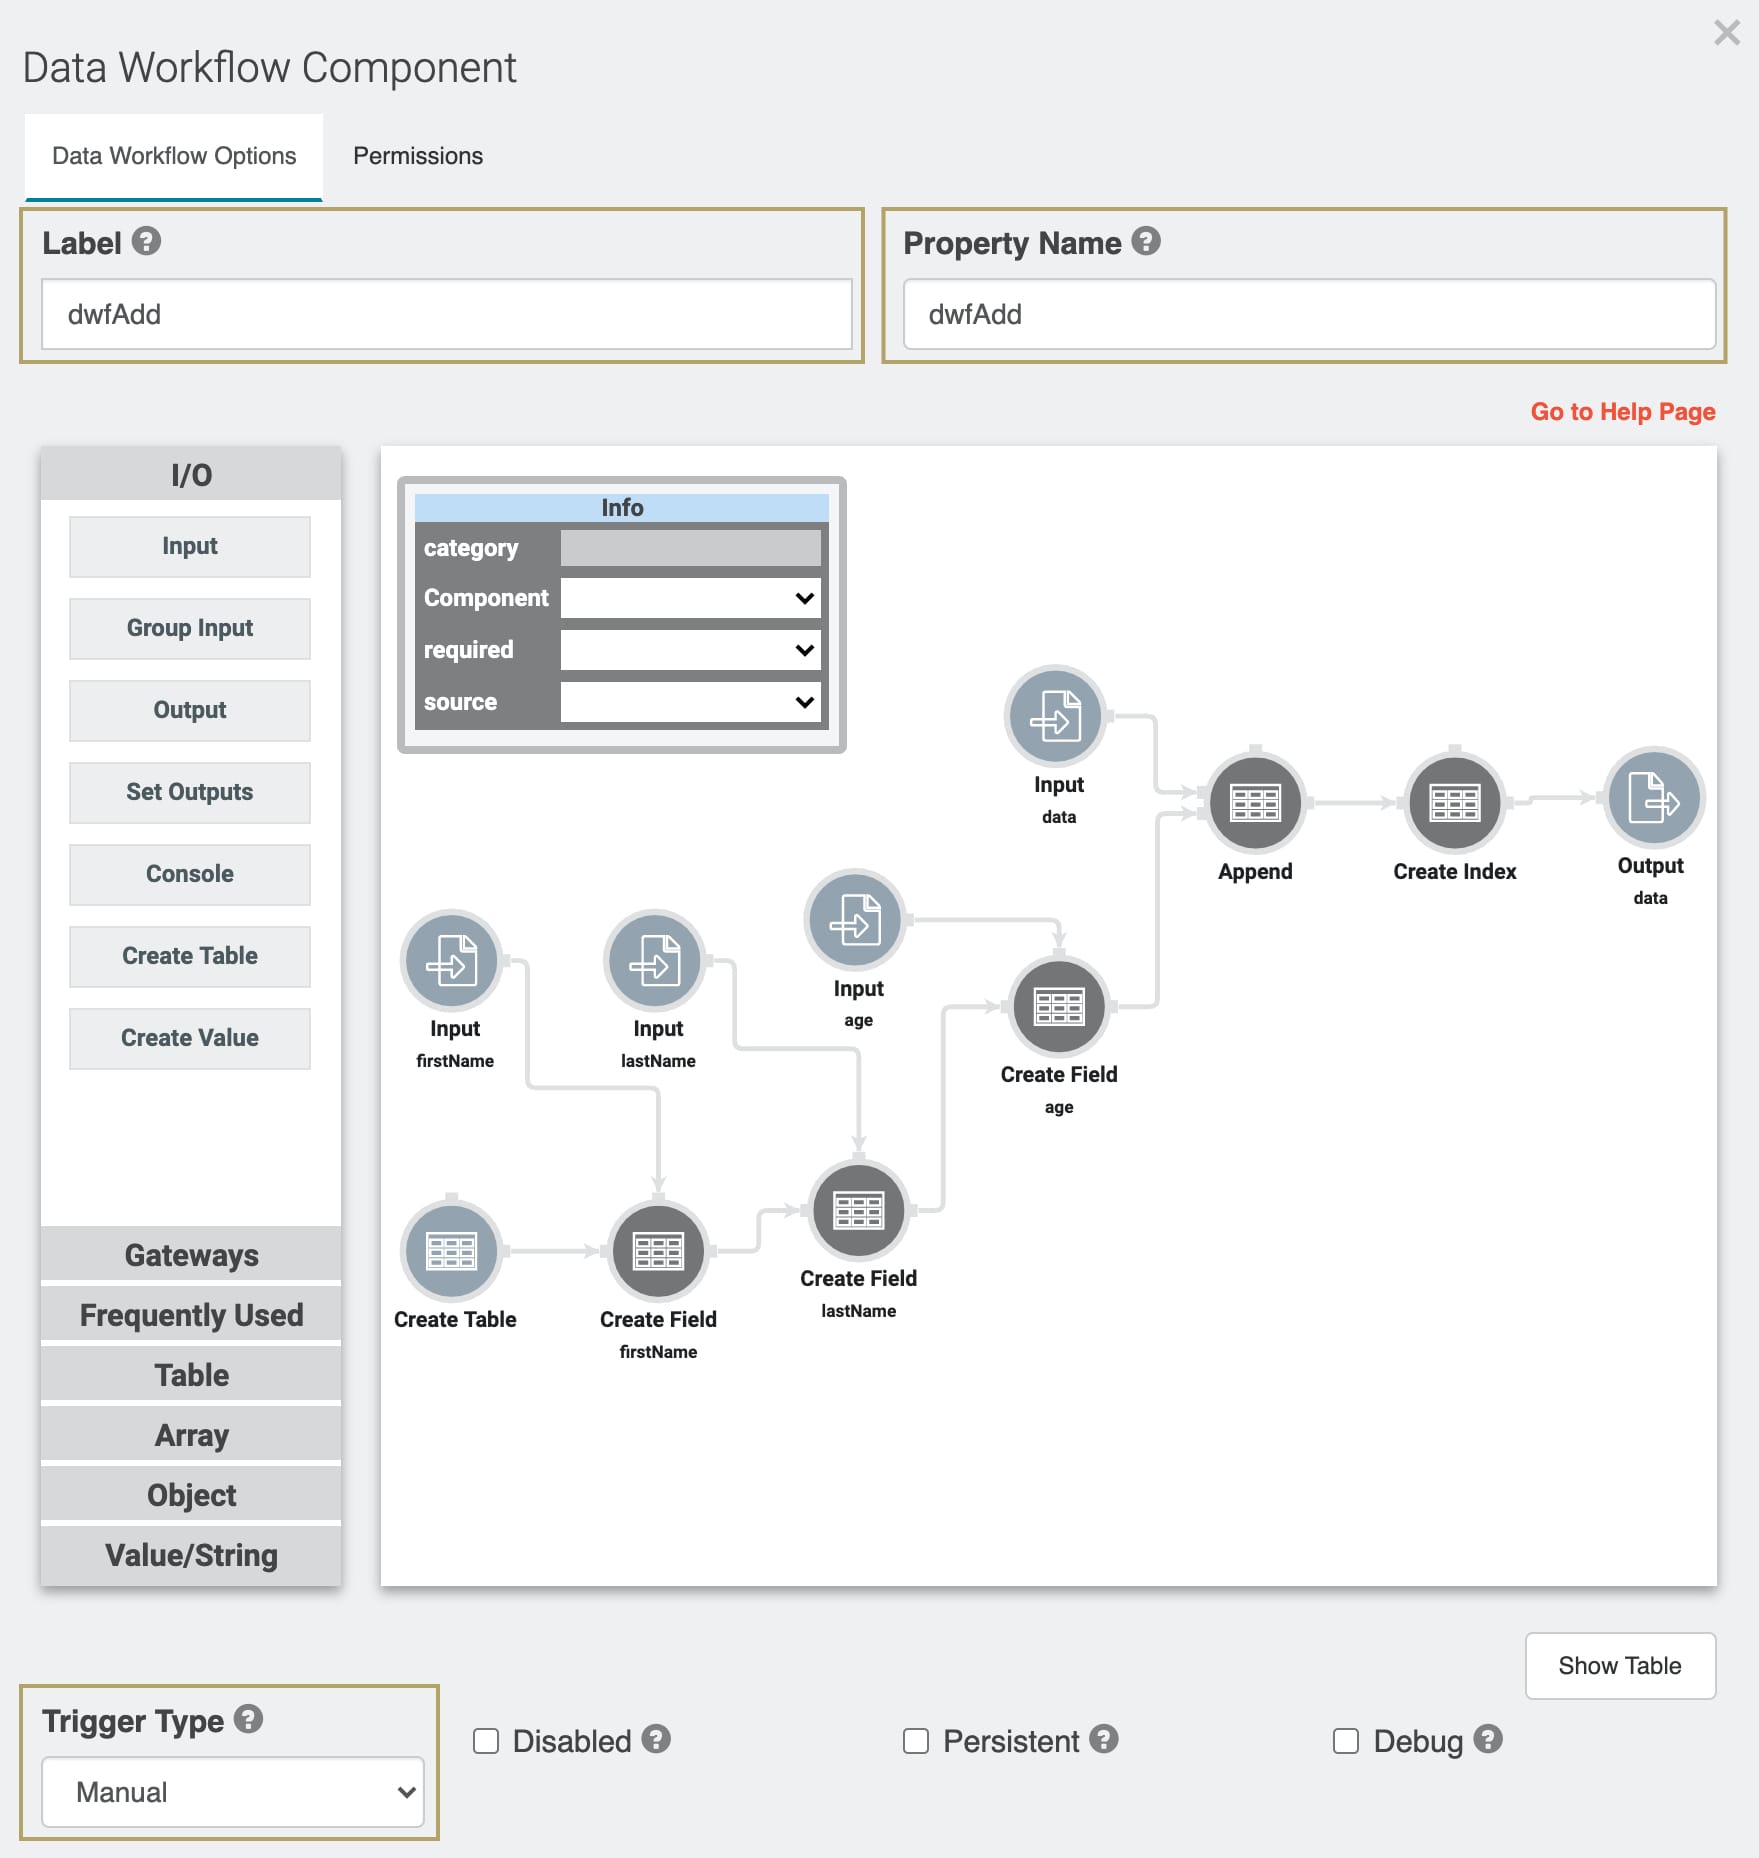
Here, you’ll set up your second Data Workflow component - dwfAdd. This Data Workflow does a few things:
Creates a single-row data table.
Pulls values entered into your First Name, Last Name, and Age fields. These add to that single row in the data table.
Appends the single row with firstName, lastName, and age values to the empty data table created in the dwfInit Data Workflow.
Sets the index number of the newly-appended row in your table to 0. (Any subsequent rows appended to the array will have Index numbers which increase by 1.)
Pushes the updated table to the data Hidden component.
Drag and drop a Data Workflow component onto your canvas. Place it below your data Hidden component.
Enter dwfAdd in the Label and Property Name.
Scroll down and select Manual from the Trigger Type drop-down.
Configure the Create Table Operator
Here, you'll use the Create Table operator to create a data table with a single row. This creates somewhere for the Data Workflow to put your input values. Later, you'll append this row to the existing empty table created by the dwfInit Data Workflow.
Drag and drop a Create Table operator onto your Data Workflow canvas.
Configure the Create Table operator's Info window as follows:
Setting
Value
Category
Create Table
Label
Create Index
No
Number of Rows
1
Configure the Input Operators
Here you'll add 3 out of the 4 Input operators in this Data Workflow. These Input operators pull the values from your First Name, Last Name, and Age fields into the Data Workflow.
Drag and drop 3 Input operators onto your Data Workflow canvas.
Configure the first Input operator’s Info window as follows:
Setting
Value
Category
Input
Component
firstName
Required
Yes
Source
Default
Configure the second Input operator's Info window as follows:
Setting
Value
Category
Input
Component
lastName
Required
Yes
Source
Default
Configure the third Input operator's Info window as follows:
Setting
Value
Category
Input
Component
age
Required
Yes
Source
Default
Configure the Create Field Operators
Next, you'll add 3 Create Field operators, one for each of your inputs. The Create Field operators will add each input to the single row you just created. Think of this as adding 3 columns to your table.
Drag and drop 3 Create Field operators onto your Data Workflow canvas.
Configure the first Create Field operator's Info window as follows:
Setting
Value
Category
Formula
Label
firstName
Do Not Sanitize Formula
No (unchecked)
Field 1
firstName = _arg
Connect the output (right-hand) port of the Create Table operator to the input (left-hand) port of the firstName Create Field operator.
Connect the output (right-hand) port of the firstName Input operator to the argument (top) port of the firstName Create Field operator.
Configure the second Create Field operator's Info window as follows:
Setting
Value
Category
Formula
Label
lastName
Do Not Sanitize Formula
No (unchecked)
Field 1
lastName = _arg
Connect the output (right-hand) port of the firstName Create Field operator to the input (left-hand) port of the lastName Create Field operator.
Connect the output (right-hand) port of the lastName Input operator to the argument (top) port of the lastName Create Field operator.
Configure the third Create Field operator's Info window as follows:
Setting
Value
Category
Formula
Label
age
Do Not Sanitize Formula
No (unchecked)
Field 1
age = _arg
Connect the output (right-hand) port of the lastName Create Field operator to the input (left-hand) port of the age Create Field operator.
Connect the output (right-hand) port of the age Input operator to the argument (top) port of the age Create Field operator.
Configure the Fourth Input Operator
This Input connects the data table stored in the data Hidden component and your dwfAdd Data Workflow.
Drag and drop an Input operator onto your Data Workflow canvas.
Configure the Input operator's Info window as follows:
Setting
Value
Category
Input
Component
data
Required
Yes
Source
Default
Configure the Append Operator
Now you'll use an Append operator to add rows from your single-row table to the table stored in the data Hidden component.
Drag and drop an Append operator onto your Data Workflow canvas. No additional configuration of the operator is necessary.
Connect the output (right-hand) port of the data Input operator to the upper input (left-hand) port of the Append operator.
Connect the output (right-hand) port of the age Create Field operator to the lower input (left-hand side) port of the Append operator.
Configure the Create Index Operator
The Create Index operator assigns an index number to each row of your table, starting at 0. Adding a unique identifier to each row of the table lets you edit or remove a specific row.
Drag and drop a Create Index operator onto your Data Workflow canvas.
Configure the Create Index operator's Info window as follows:
Setting
Value
Category
Create Index
Label
Index Name
index
Starting Index
0
Keys
Connect the output (right-hand) port of the Append operator to the input (left-hand) port of the Create Index operator.
Configure the Output Operator
Finally, you’ll create an Output operator to send the newly-appended table to the data Hidden component. This overwrites the earlier version of the table stored in the data Hidden component. So, the data Hidden component always stores the latest version, with any newly-appended and indexed rows.
Drag and drop an Output operator onto your Data Workflow canvas.
Configure the Output operator's Info window as follows:
Setting
Value
Category
Output
Component
data
Action
value
Connect the output (right-hand) port of the Create Index operator to the input (left-hand) port of the data Output operator.
Click Save.
Configure the Button Component
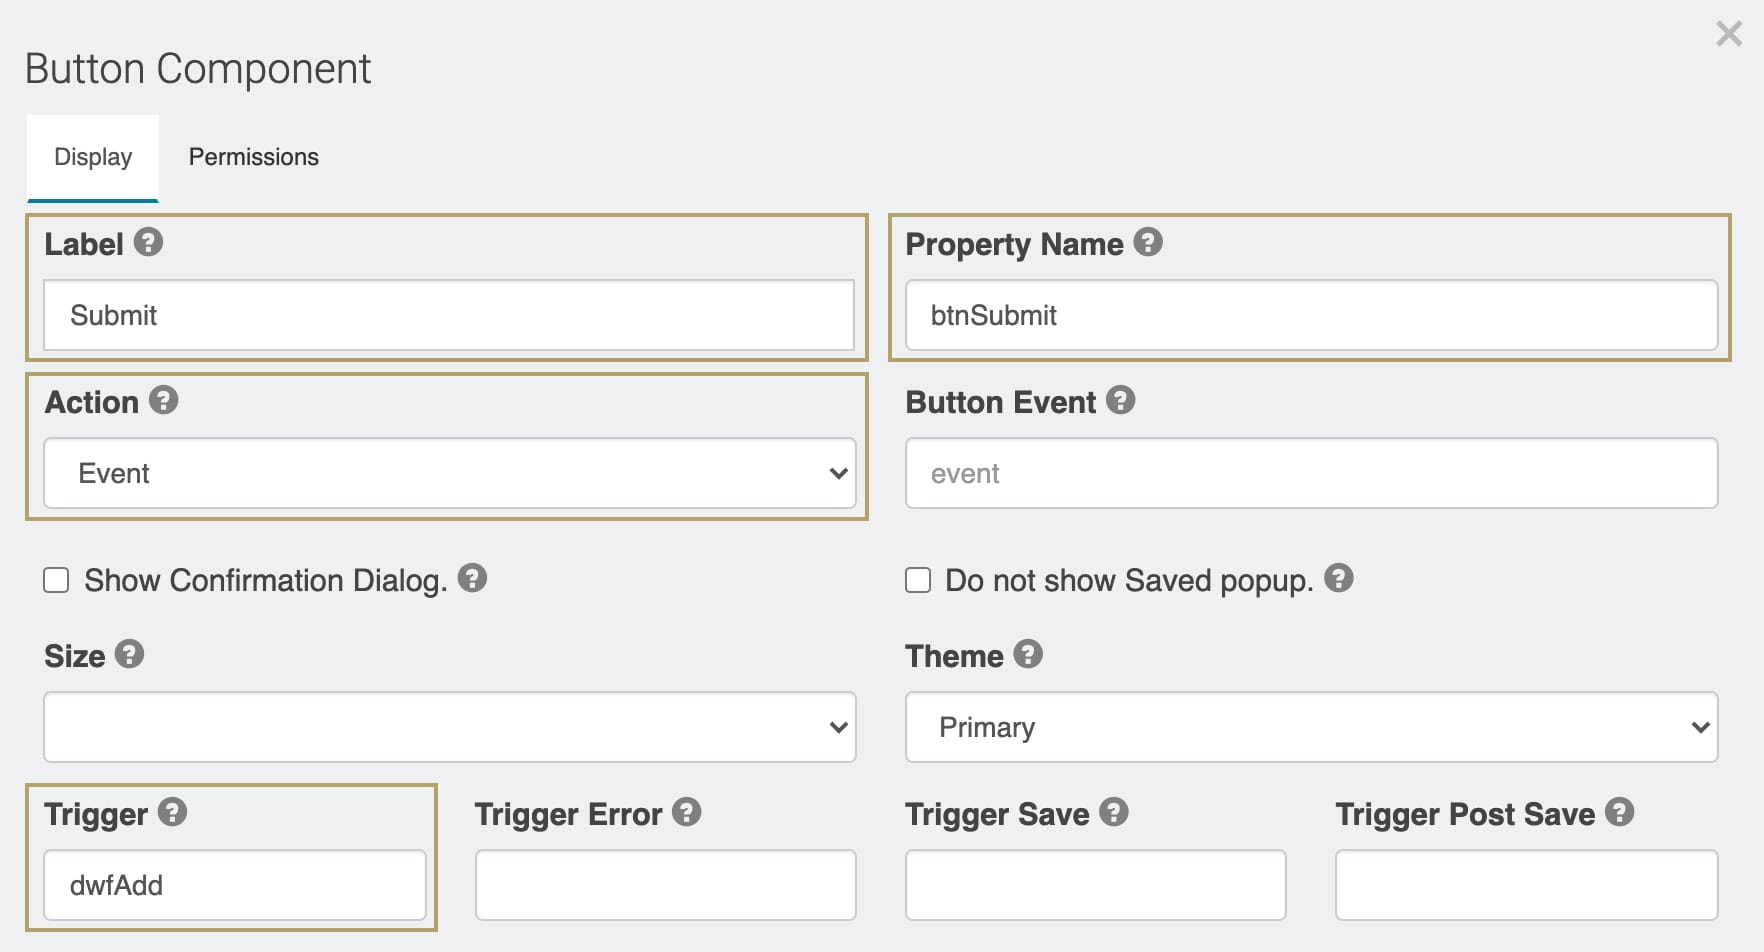
This Button component triggers the dwfAdd Data Workflow. So, after end-users enter their name and age, the dwfAdd Data Workflow adds these rows to the table stored in the data Hidden component.
Drag and drop a Button component onto your canvas. Place your Button below the age Number component.
Enter Submit in the Label.
Enter btnSubmit in the Property Name.
Select Action from the Event drop-down.
Enter dwfAdd in the Trigger field.
Click Save.
Configure the ViewGrid Component
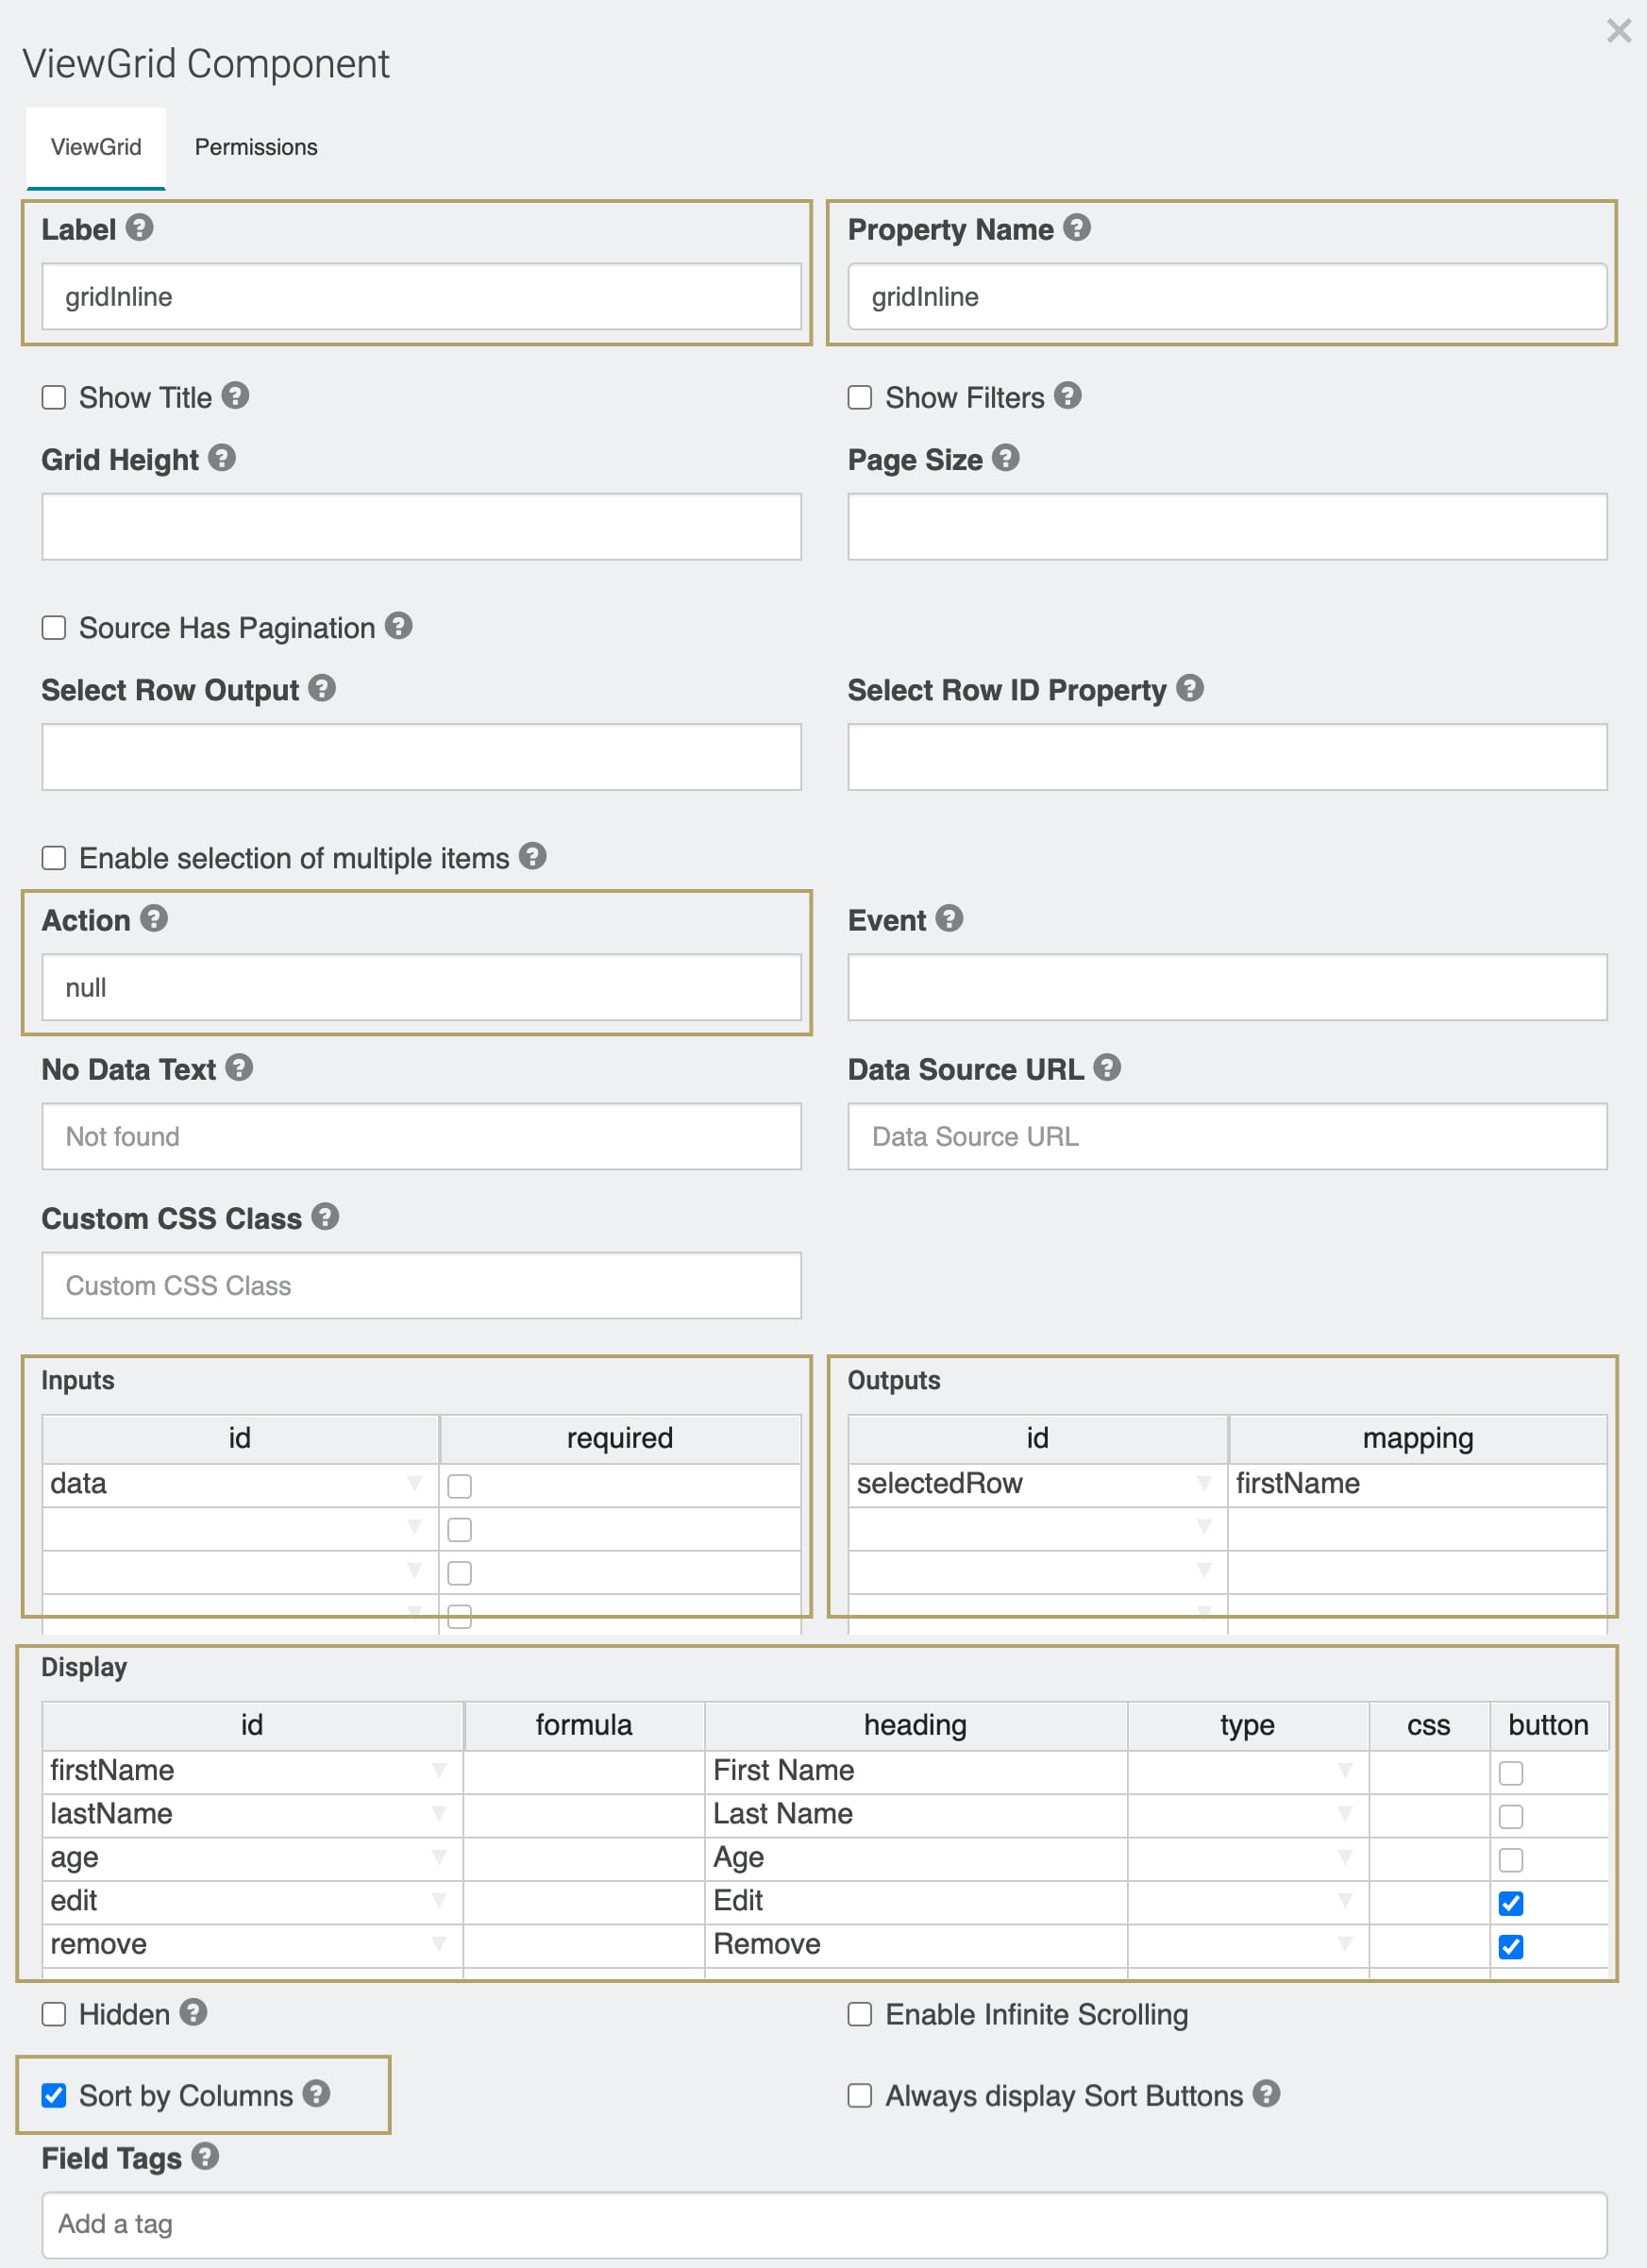
Here, you’ll set up your ViewGrid component. The ViewGrid displays details stored in the data Hidden component. You'll also add custom Edit and Remove buttons to your ViewGrid. These let you edit and remove submissions from the ViewGrid.
Drag and drop a ViewGrid component onto your canvas. Place your ViewGrid below the btnSubmit Button component.
Enter gridInline in the Label and Property Name.
Enter null in the Action field. This removes the default Submit button from your ViewGrid.
In the Inputs table, enter the following:
ID: Enter data.
In the Outputs table, enter the following:
ID: Enter selectedRow.
mapping: Enter firstName.
In the Display table, enter the following:
ID
Heading
Button
firstName
First Name
No (unchecked)
lastName
Last Name
No (unchecked)
age
Age
No (unchecked)
edit
Edit
Yes (checked)
remove
Remove
Yes (checked)
Check the Sort by Columns checkbox.
Click Save.
Configure the Third Data Workflow Component
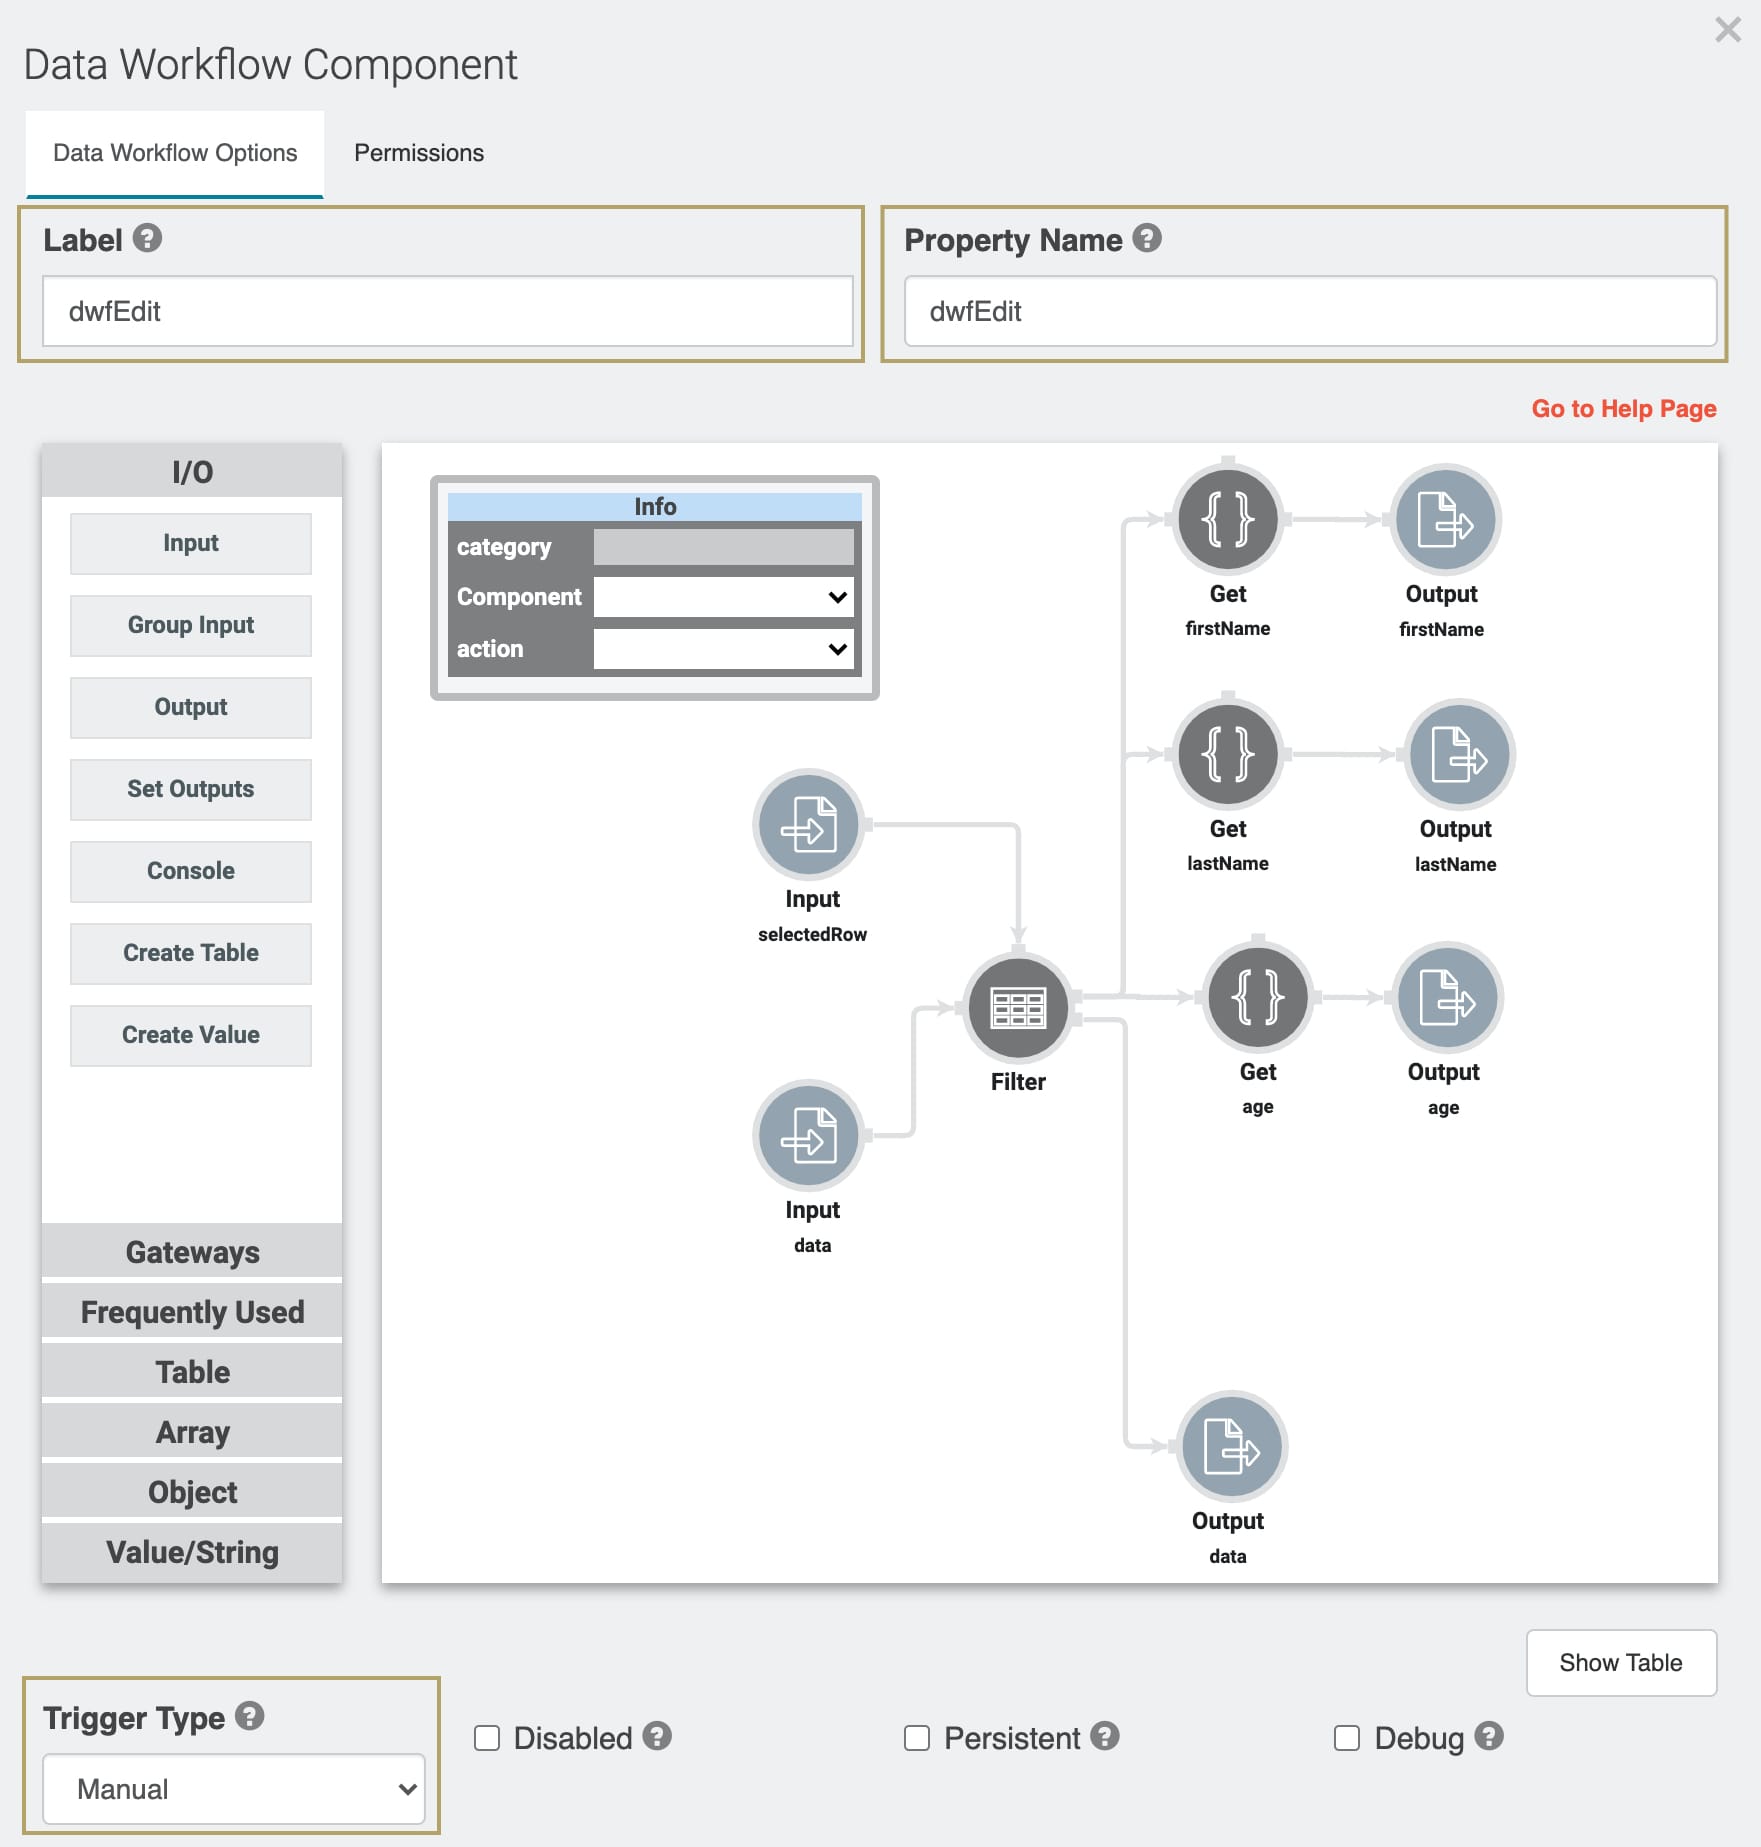
Next, you’ll set up your third Data Workflow component, dwfEdit. This Data Workflow allows you to edit a specific row from your ViewGrid. Later, you'll set up a Decisions component to connect this Data Workflow to the Edit button on your ViewGrid. On clicking the Edit button, that row's values appear in your module's input fields, ready to edit.
Drag and drop a Data Workflow component onto your canvas.
Enter dwfEdit in the Label and Property Name fields.
Scroll down and select Manual from the Trigger Type drop-down.
Configure the Input Operators
Here, you'll set up a connection between the dwfEdit Data Workflow and your data and selectedRow Hidden components.
Drag and drop two Input operators onto your Data Workflow canvas.
Configure the first Input operator’s Info window as follows:
Setting
Value
Category
Input
Component
data
Required
Yes
Source
Default
Configure the second Input operator’s Info window as follows:
Setting
Value
Category
Input
Component
selectedRow
Required
Yes
Source
Default
Configure the Filter Operator
The Filter operator lets you pull a specific row of data from the table stored in the data Hidden component. Connecting the selectedRow Input operator to the Filter's argument port sets which row to pull.
Drag and drop a Filter operator onto your Data Workflow canvas.
Configure the operator's Info window as follows:
Setting
Value
Category
Filter
Label
Do Not Sanitize Formula
No (unchecked)
Expression
firstName = _arg
Connect the output (right-hand) port of the data Input operator, to the input (left-hand) port of the Filter operator.
Connect the output (right-hand) port of the selectedRow Input operator, to the argument (top) port of the Filter operator.
Configure the Get Operators
The Get operators pull each value (firstName, lastName, age) from the selected row of the table. In the next step, you'll output these 3 values to the corresponding input fields in your module.
Drag and drop 3 Get operators onto your Data Workflow canvas.
Configure the first Get operator’s Info window as follows:
Setting
Value
Category
Get
Label
firstName
Path
[0].firstName
Connect the upper output (right-hand) port of the Filter operator to the input (left-hand) port of the firstName Get operator.
Configure the second Get operator’s Info window as follows:
Setting
Value
Category
Get
Label
lastName
Path
[0].lastName
Connect the upper output (right-hand) port of the Filter operator to the input (left-hand) port of the lastName Get operator.
Configure the third Get operator’s Info window as follows:
Setting
Value
Category
Get
Label
age
Path
[0].age
Connect the upper output (right-hand) port of the Filter operator to the input (left-hand) port of the age Get operator.
Configure the First Three Output Operators
These Outputs push values (firstName, lastName, age) back into the module's input fields. Your end-user can then edit these fields before clicking the Submit button again.
Drag and drop 3 Ouput operators onto your Data Workflow canvas.
Configure the first Output operator’s Info window as follows:
Setting
Value
Category
Output
Label
firstName
Action
value
Connect the output (right-hand) port of the firstName Get operator to the input (left-hand) port of the firstName Output operator.
Configure the second Output operator’s Info window as follows:
Setting
Value
Category
Output
Label
lastName
Action
value
Connect the output (right-hand) port of the lastName Get operator to the input (left-hand) port of the lastName Output operator.
Configure the third Output operator’s Info window as follows:
Setting
Value
Category
Output
Label
age
Action
value
Connect the output (right-hand) port of the age Get operator to the input (left-hand) port of the age Output operator.
Configure the Fourth Output Operator
Finally, you’ll create a fourth and final Output operator. This operator sends the data table back to the data Hidden component, minus the filtered row. This overwrites the earlier table. Since your end-user must click the Submit button again to save their edits, the dwfAdd Data Workflow will add the edited row back to the data table.
Drag and drop an Ouput operator onto your Data Workflow canvas.
Configure the Output operator’s Info window as follows:
Setting
Value
Category
Output
Label
data
Action
value
Connect the lower output (right-hand) port of the Filter operator to the input (left-hand) port of the data Output operator.
Click Save.
Configure the Fourth Data Workflow Component
Here, you’ll set up your fourth and final Data Workflow component, dwfRemove. This Data Workflow allows you to remove a specific row from your ViewGrid. You'll later set up a Decisions component to connect this Data Workflow to the Remove button on your ViewGrid.
Drag and drop a Data Workflow component onto your canvas.
Enter dwfRemove in the Label and Property Name.
Scroll down and select Manual from the Trigger Type drop-down.
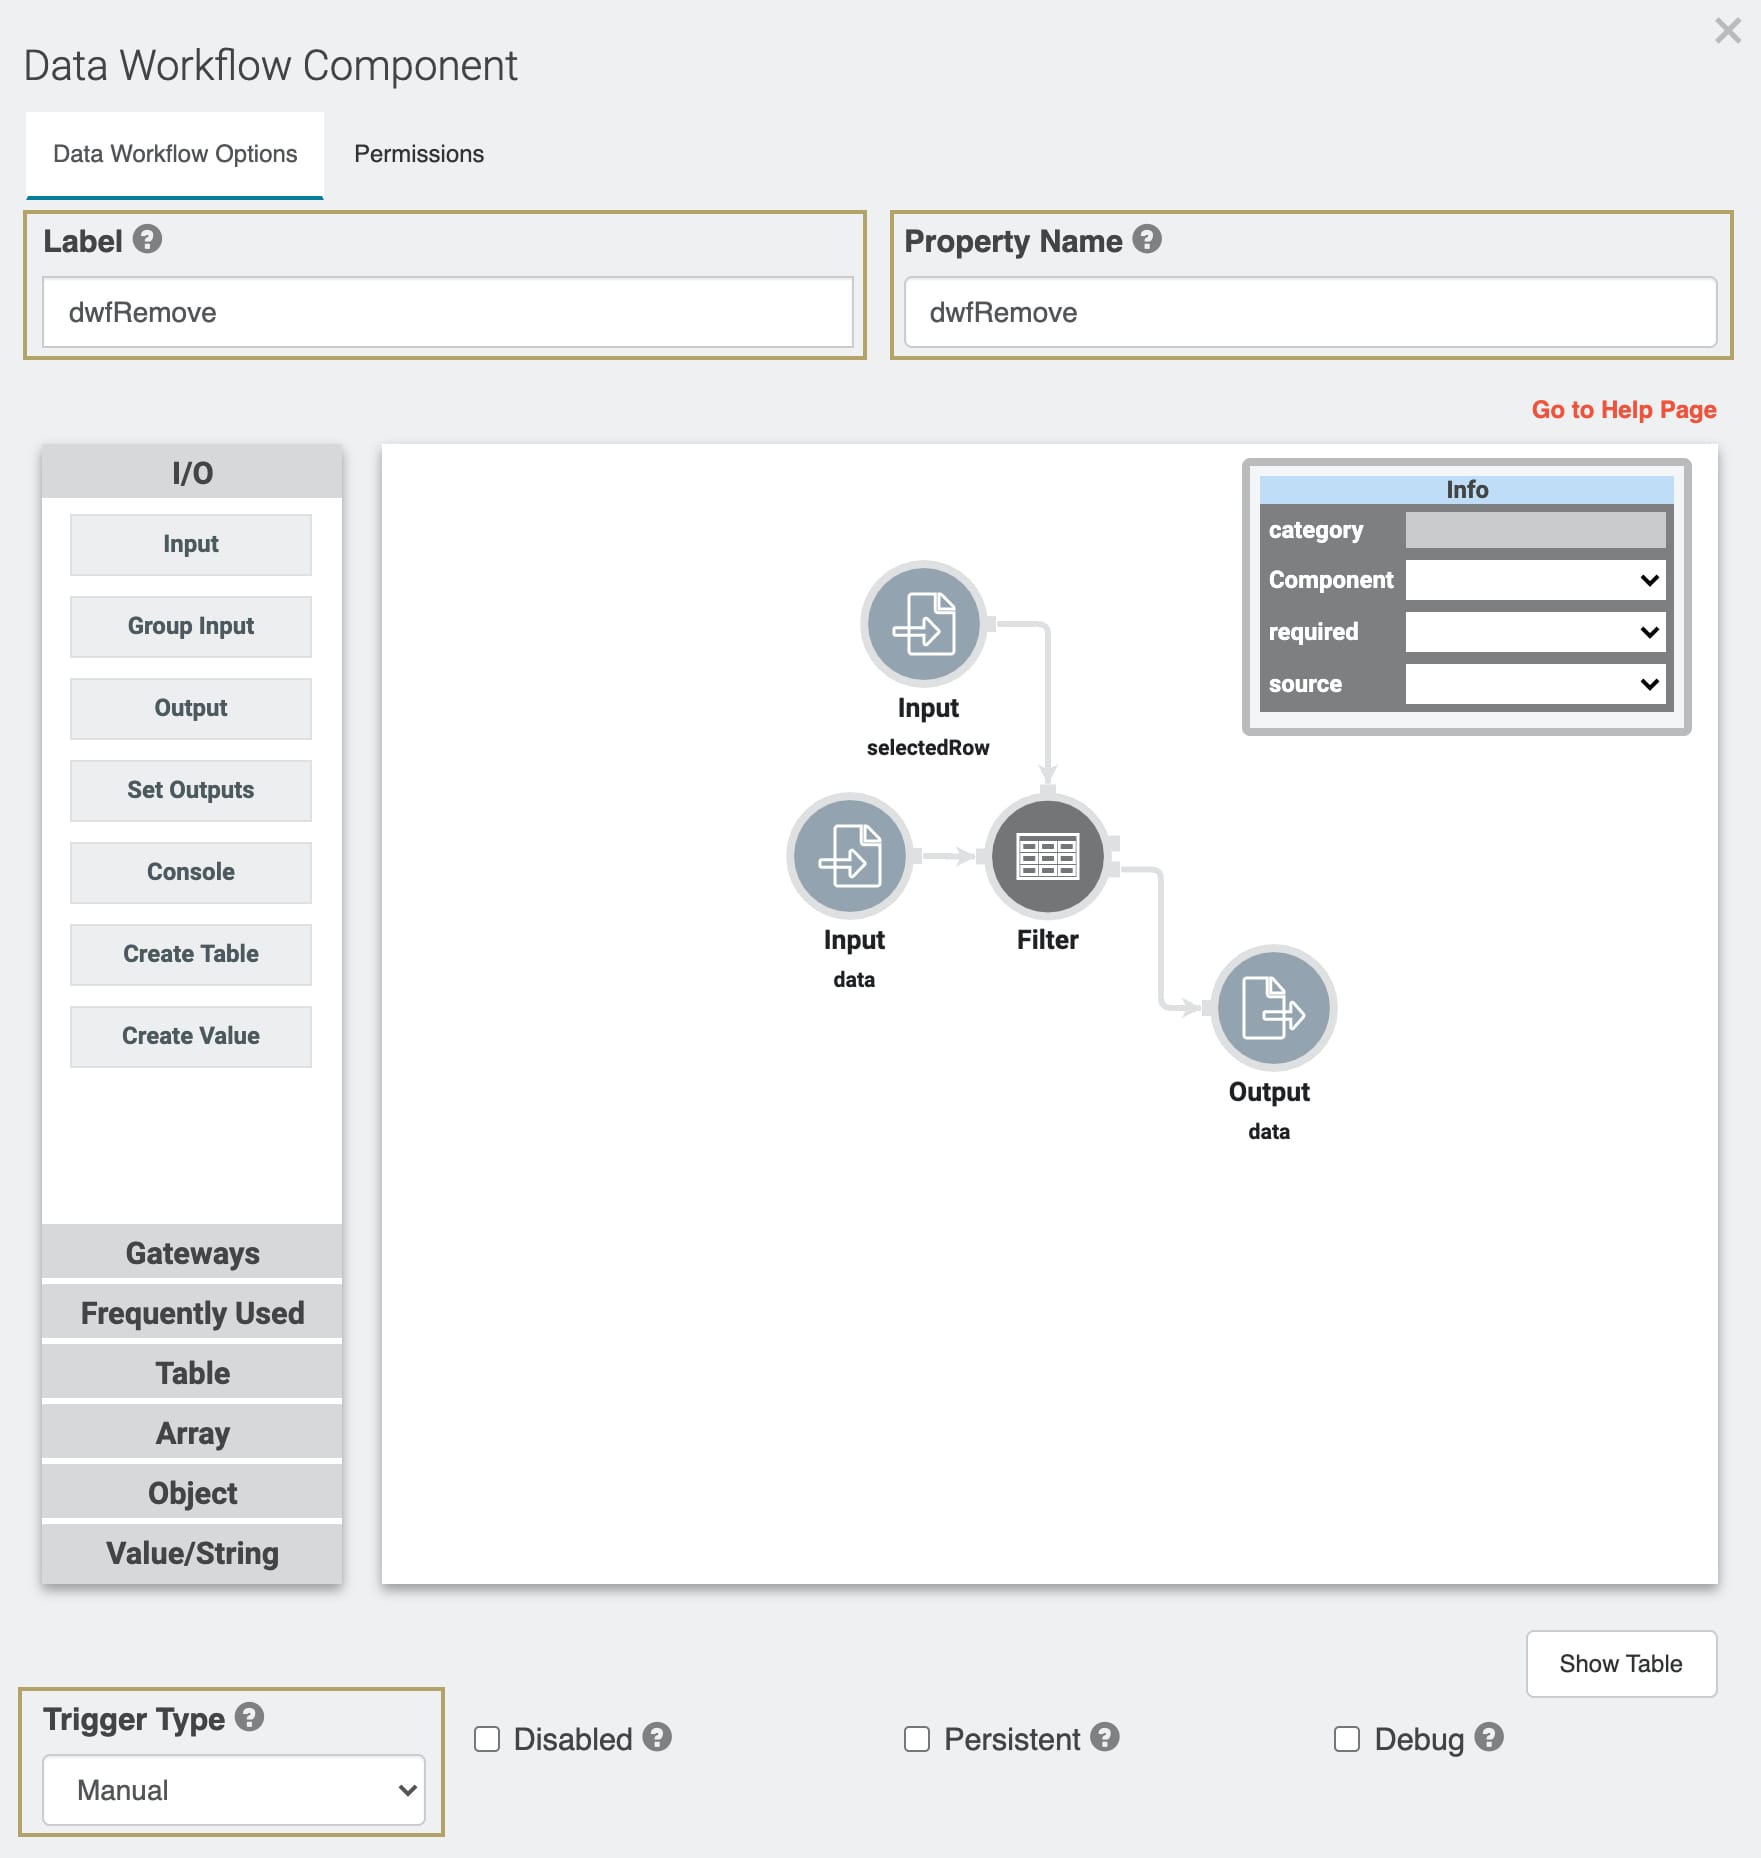
Configure the Input Operators
Drag and drop 2 Input operators onto your Data Workflow canvas.
Configure the first Input operator’s Info window as follows:
Setting
Value
Category
Input
Component
data
Required
Yes
Source
Default
Configure the second Input operator’s Info window as follows:
Setting
Value
Category
Input
Component
selectedRow
Required
Yes
Source
Default
Configure the Filter Operator
Like in the dwfEdit Data Workflow, this Filter operator lets you pull a specific row from the data table stored in the data Hidden component. Connecting the selectedRow Input to the Filter's argument port specifies which row to pull.
Drag and drop a Filter operator onto your Data Workflow canvas.
Configure the Filter operator's Info window as follows:
Setting
Value
Category
Filter
Label
Do Not Sanitize Formula
No (unchecked)
Expression
firstName = _arg
Connect the output (right-hand) port of the data Input operator, to the input (left-hand) port of the Filter operator.
Connect the output (right-hand) port of the selectedRow Input operator to the argument (top) port of the Filter operator.
Configure the Output Operator
This Output sends the data table back to the data Hidden component, minus the filtered row. This overwrites the earlier table. Since your ViewGrid pulls its data from the data Hidden component, this removes the filtered row from your ViewGrid.
Drag and drop an Ouput operator onto your Data Workflow canvas.
Configure the Output operator’s Info window as follows:
Setting
Value
Category
Output
Label
data
Action
value
Connect the lower output (right-hand) port of the Filter operator to the input (left-hand) port of the data Output operator.
Click Save.
Configure the Decisions Component
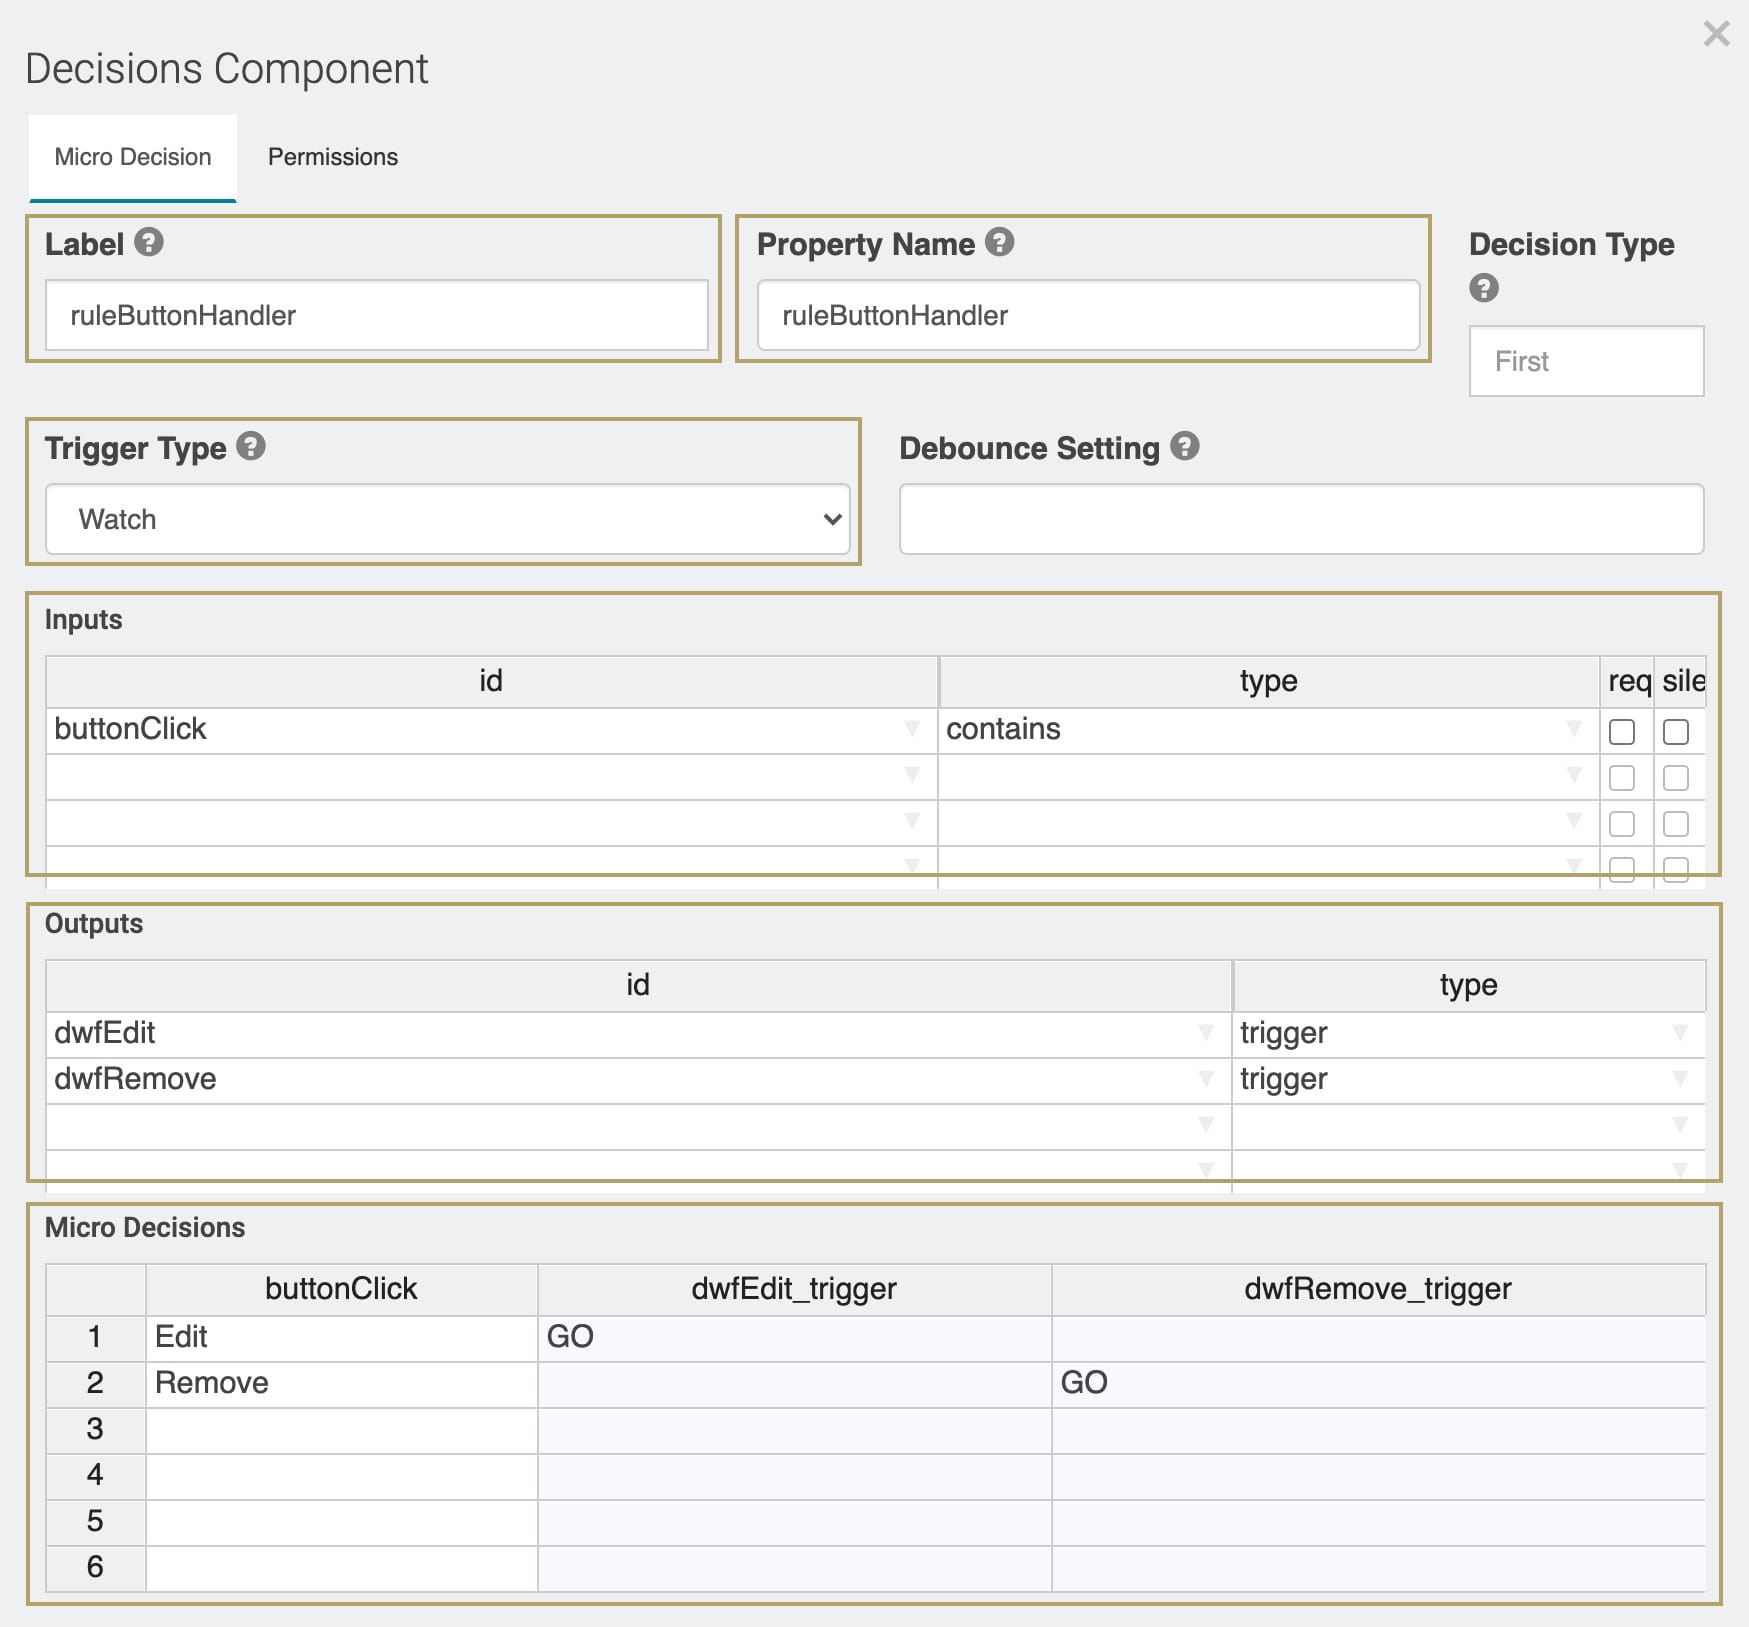
Finally you'll add a Decisions component. This Decisions component establishes 2 rules:
Trigger the dwfEdit Data Workflow on button-click of the ViewGrid's Edit button.
Trigger the dwfRemove Data Workflow on button-click of the ViewGrid's Remove button.
Drag and drop a Decisions component onto your canvas.
Enter ruleButtonHandler in the Label and Property Name.
Select Watch from the Trigger Type drop-down. This means your Decision will watch for a Button-click event before executing.
In the Inputs table, enter the following:
ID: Enter buttonClick.
Type: Enter contains.
Complete the Outputs table as follows:
ID
Type
dwfEdit
trigger
dwfRemove
trigger
Complete the Micro Decisions table as follows:
buttonClick
dwfEdit_trigger
dwfRemove_trigger
Edit
GO
Remove
GO
Click Save.
Lab
You can find the completed Inline ViewGrid use case here: https://training.unqork.io/#/form/5ee0db86a6d2e20216dadd54/edit.