Overview
Sometimes you’ll need more than one action button on your dashboard. For example, one to view a submission and one to delete a submission. You learned how to show a single button in the Simple Dashboard lesson. Let's look at how to add more buttons to your existing dashboard.
In this use case, you'll learn how to create and configure a Delete button. On button-click, the associated Plug-In deletes the submission and removes it from your dashboard.
This use case also includes steps for building a simple dashboard. The dashboard pulls submissions from the following source module: https://trainingx.unqork.io/#/display/5eb01aa6811bf80215fd706b. If you're following along from the Simple Dashboard article, you can skip pre-configuration.
Here's how the completed use case looks in Express View:
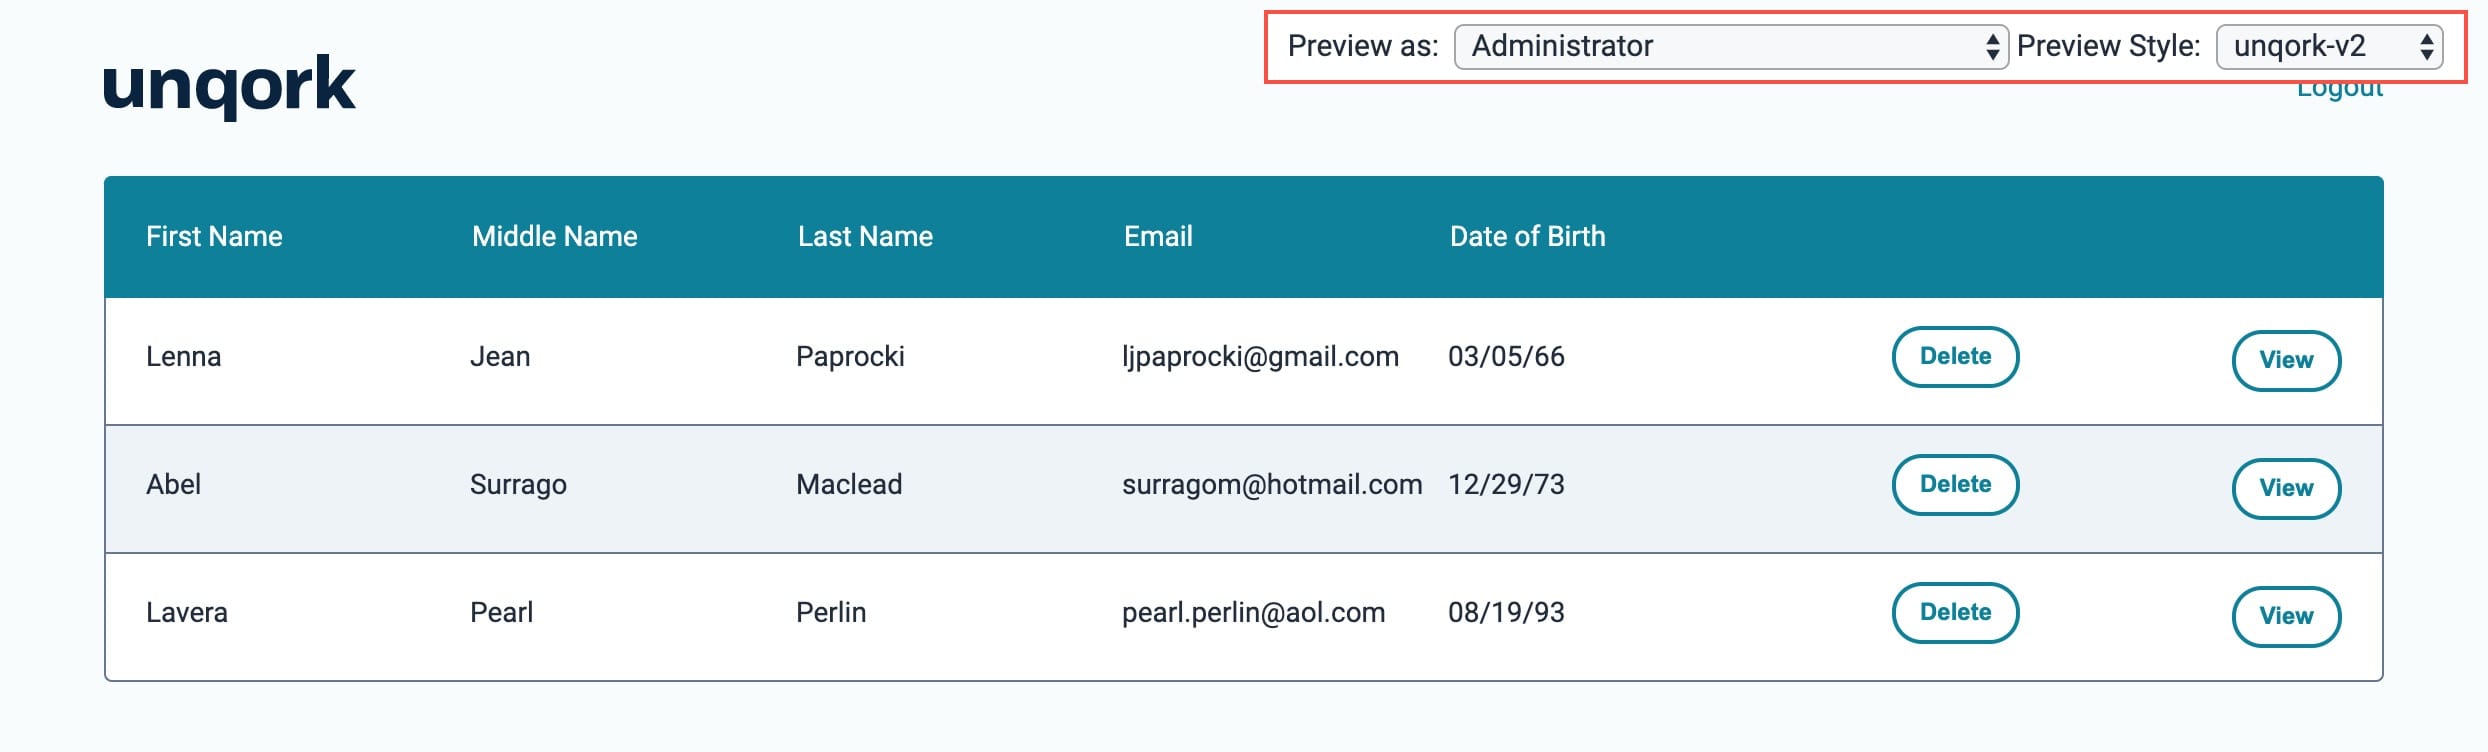
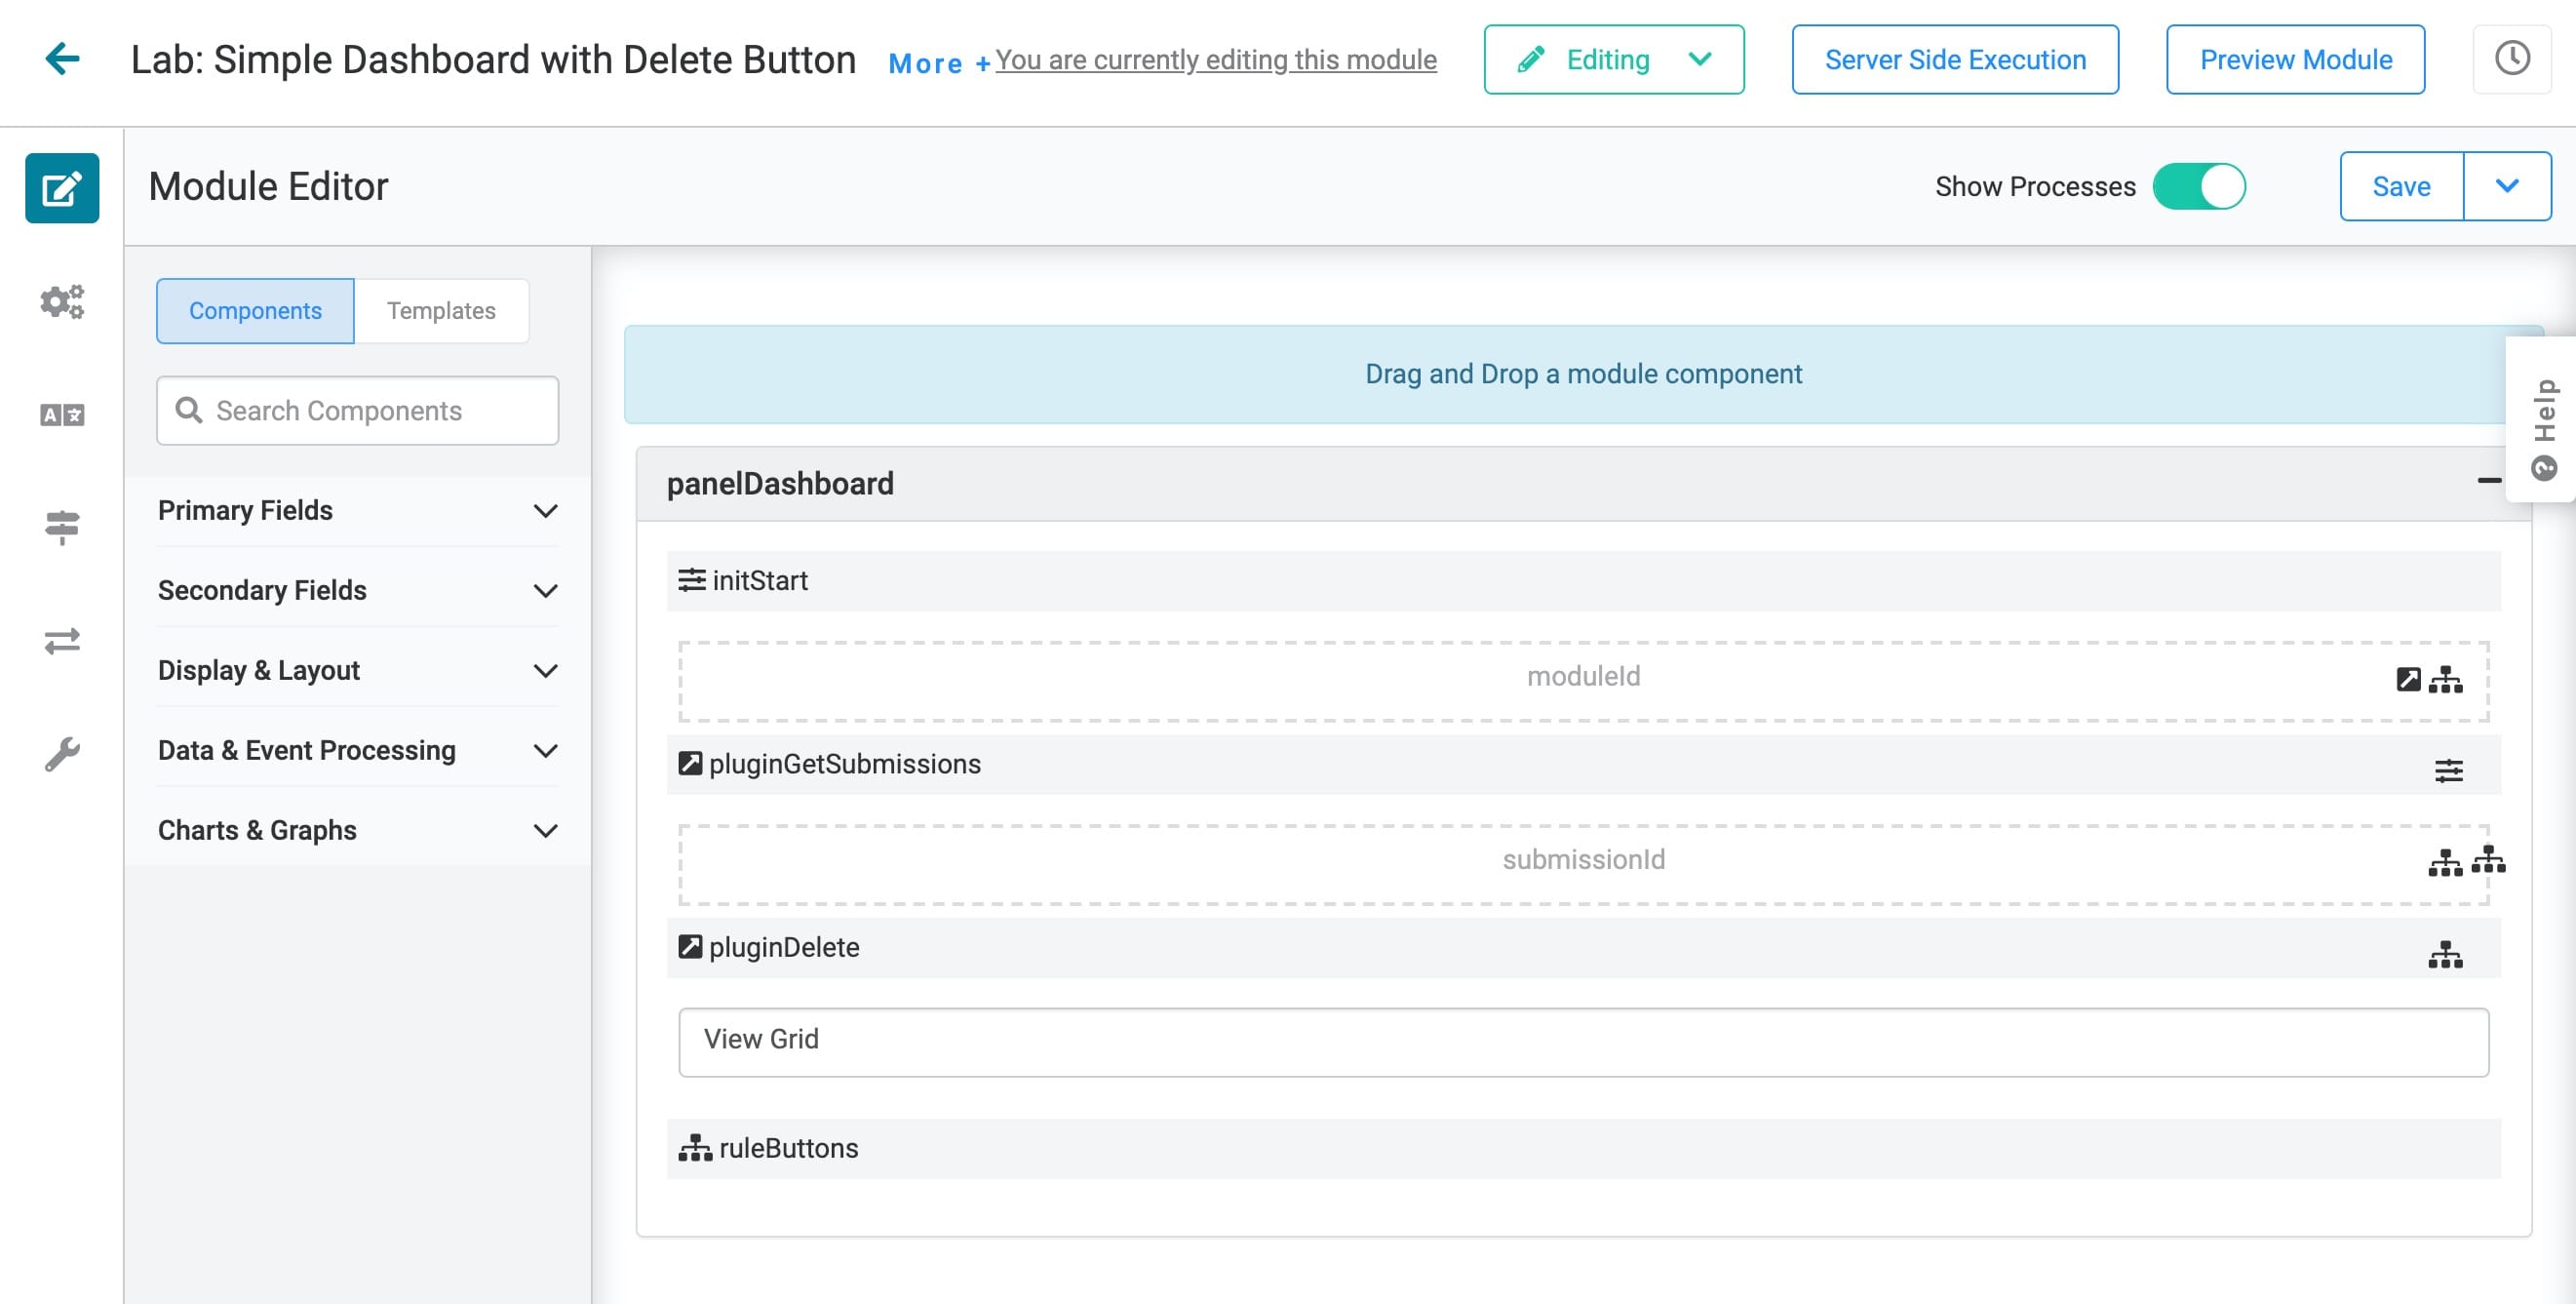
Here'show the completed use case looks in the Module Builder:
What You'll Learn
In this article, you'll learn how to:
Add a second action button to a simple dashboard.
Add and configure a Delete button.
What You'll Need
To build this dashboard, you'll need:
1 Panel component
1 Initializer component
2 Hidden components
2 Plug-In components
1 Decisions component
1 ViewGrid component
Pre-configuration
You'll pre-configure the following components for this use case.
Configure the Panel Component
This Panel acts as a container for the components that follow.
In the Module Builder, drag and drop a Panel component onto your canvas.
Enter panelDashboard in the Property ID.
Click the Save button.
Configure the Initializer Component
Next, let's add an Initializer component. This Initializer triggers the Plug-In component that you'll set up next.
Drag and drop an Initializer component onto your canvas. Place your Initializer inside the Panel.
Enter initStart in the Property ID and Label Text.
Select New Submission from the Trigger Type.
In the Outputs table, enter the following:
Property ID: enter pluginGetSubmissions.
Type: enter trigger.
Value: enter GO.
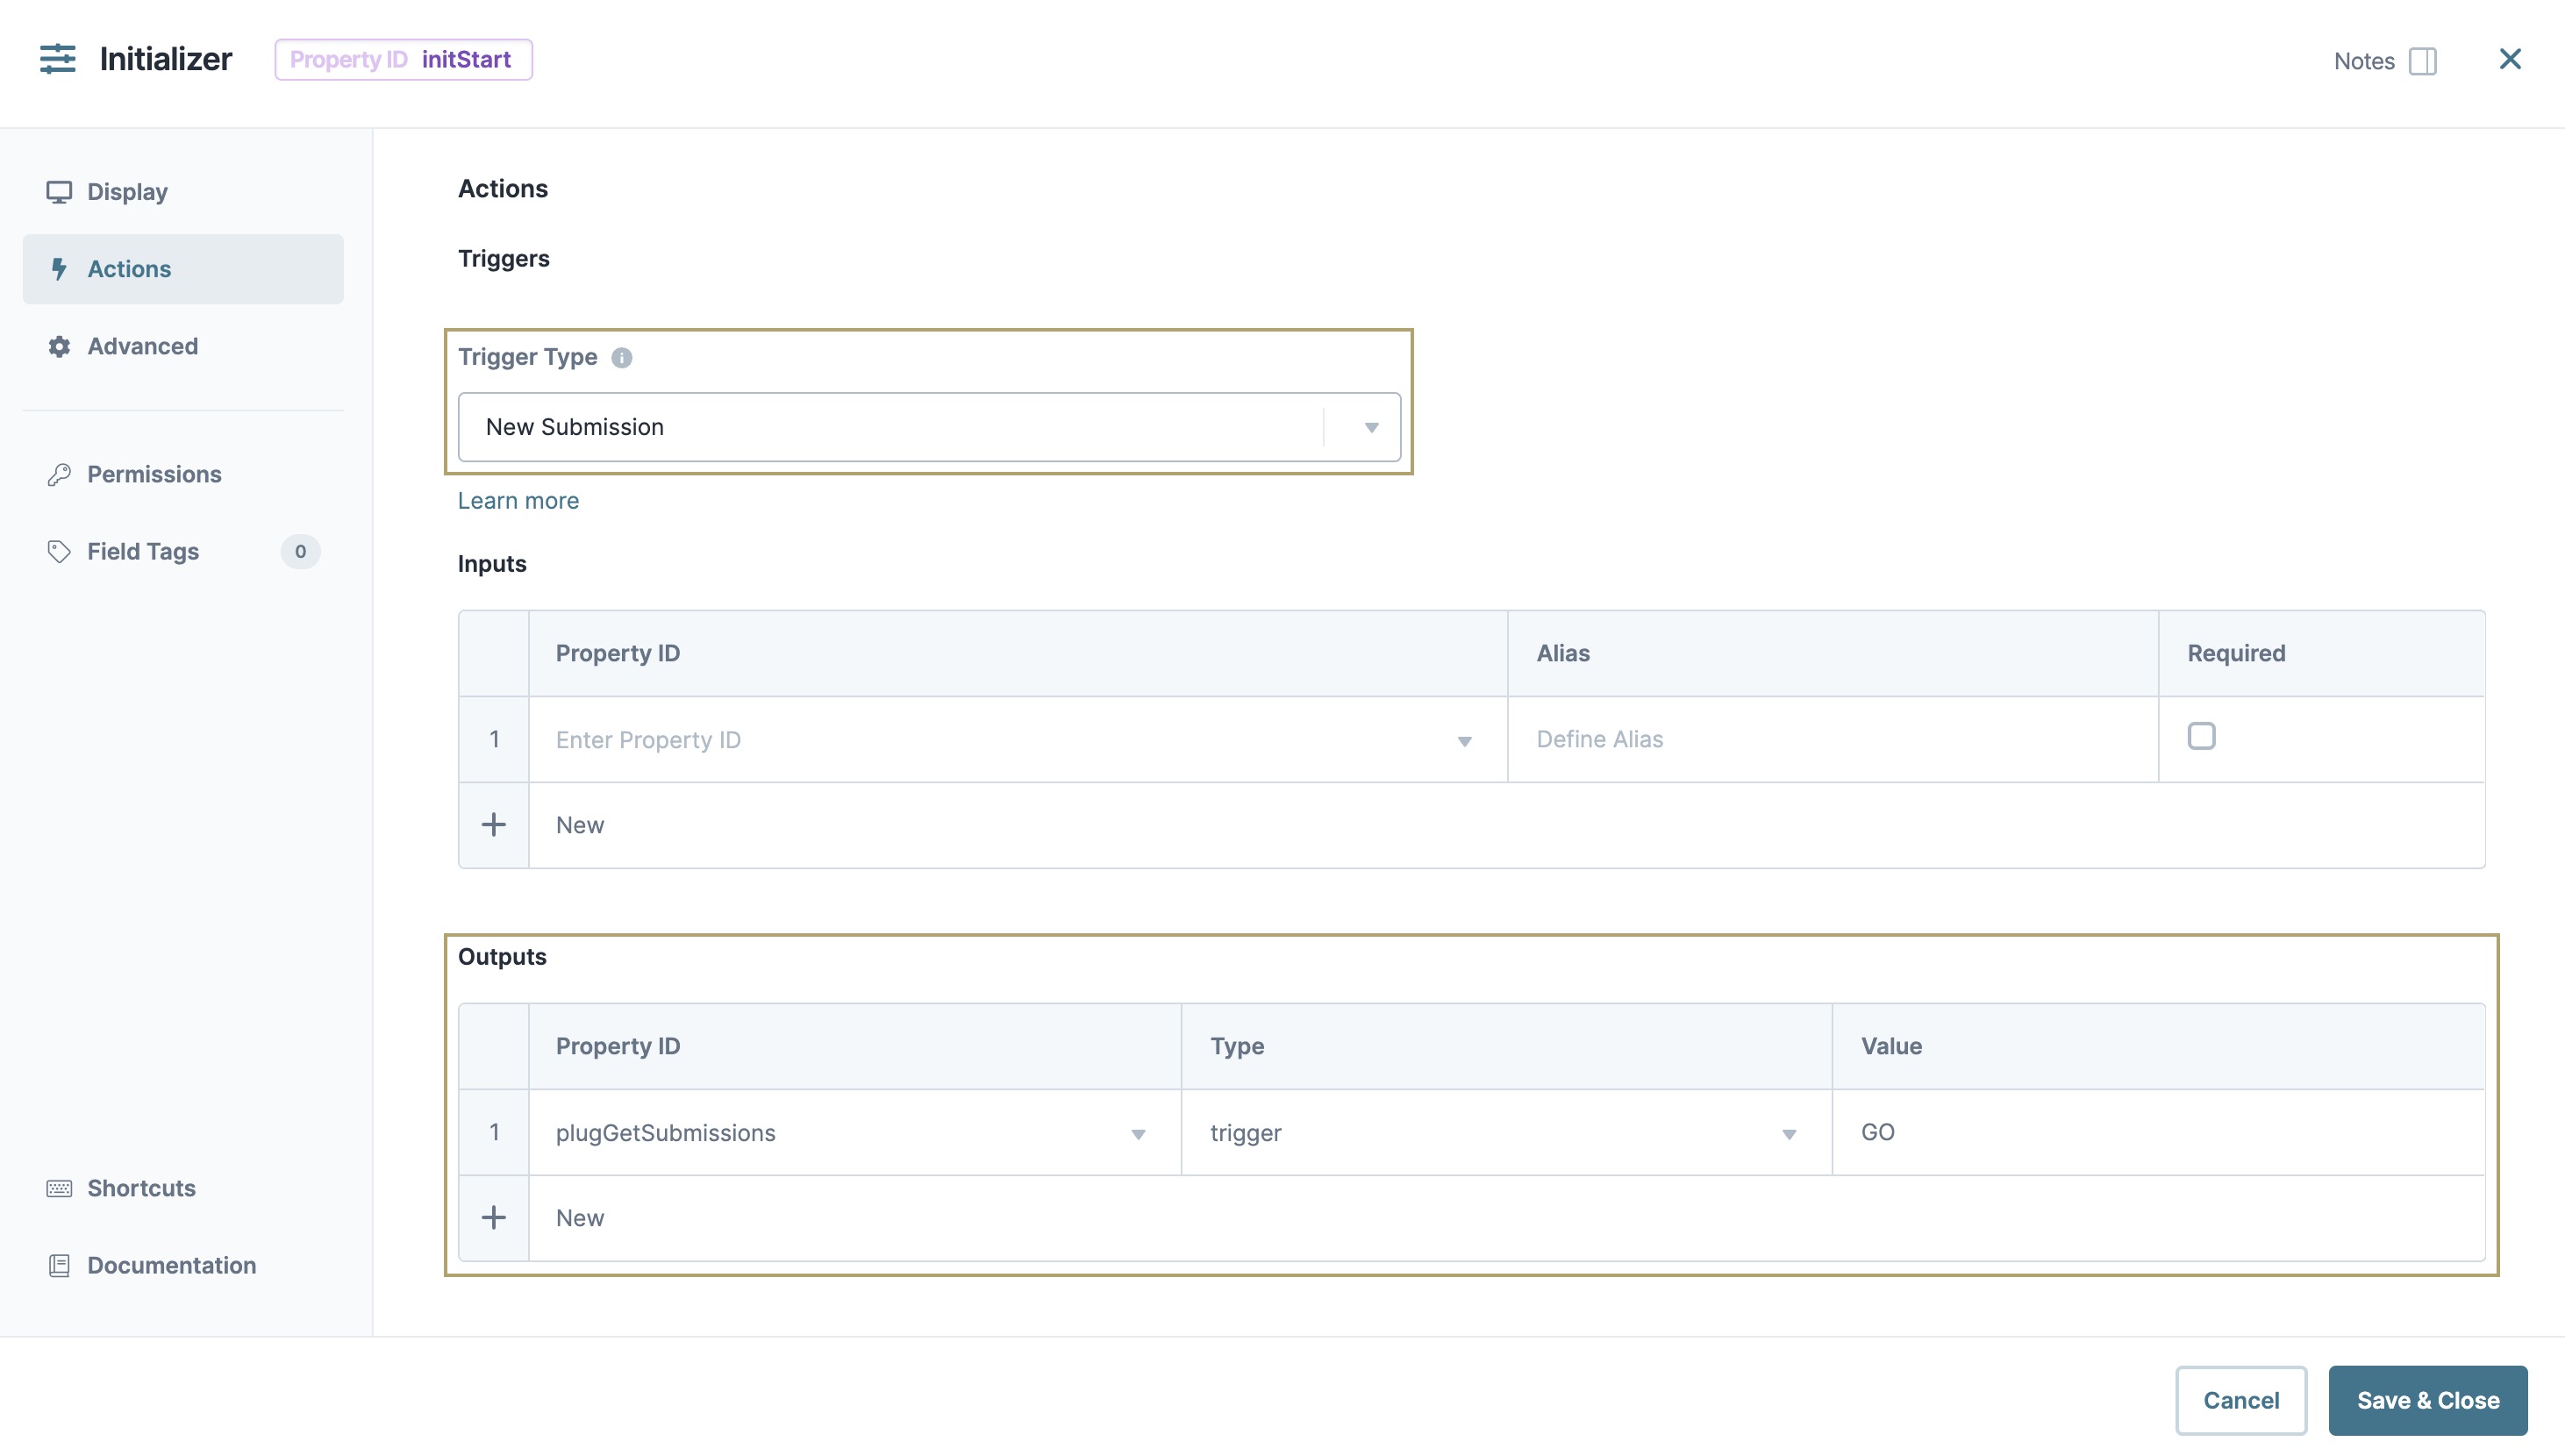
Click Save.
Configure the Hidden Component
Now, let's add a Hidden component. This is the first of 2 Hidden components in this configuration. This component houses the module ID of your source or submission module. You can pull the module ID from the source module’s hyperlink as follows: https://training.unqork.io/#/form/5eb01aa6811bf80215fd706b/edit.
Drag and drop a Hidden component onto your canvas. Place your Hidden component below the Initializer.
Enter moduleId in the Property ID and Label Text.
Enter 5eb01aa6811bf80215fd706b in the Default Value field. This is the source module's module ID.
Click Save.
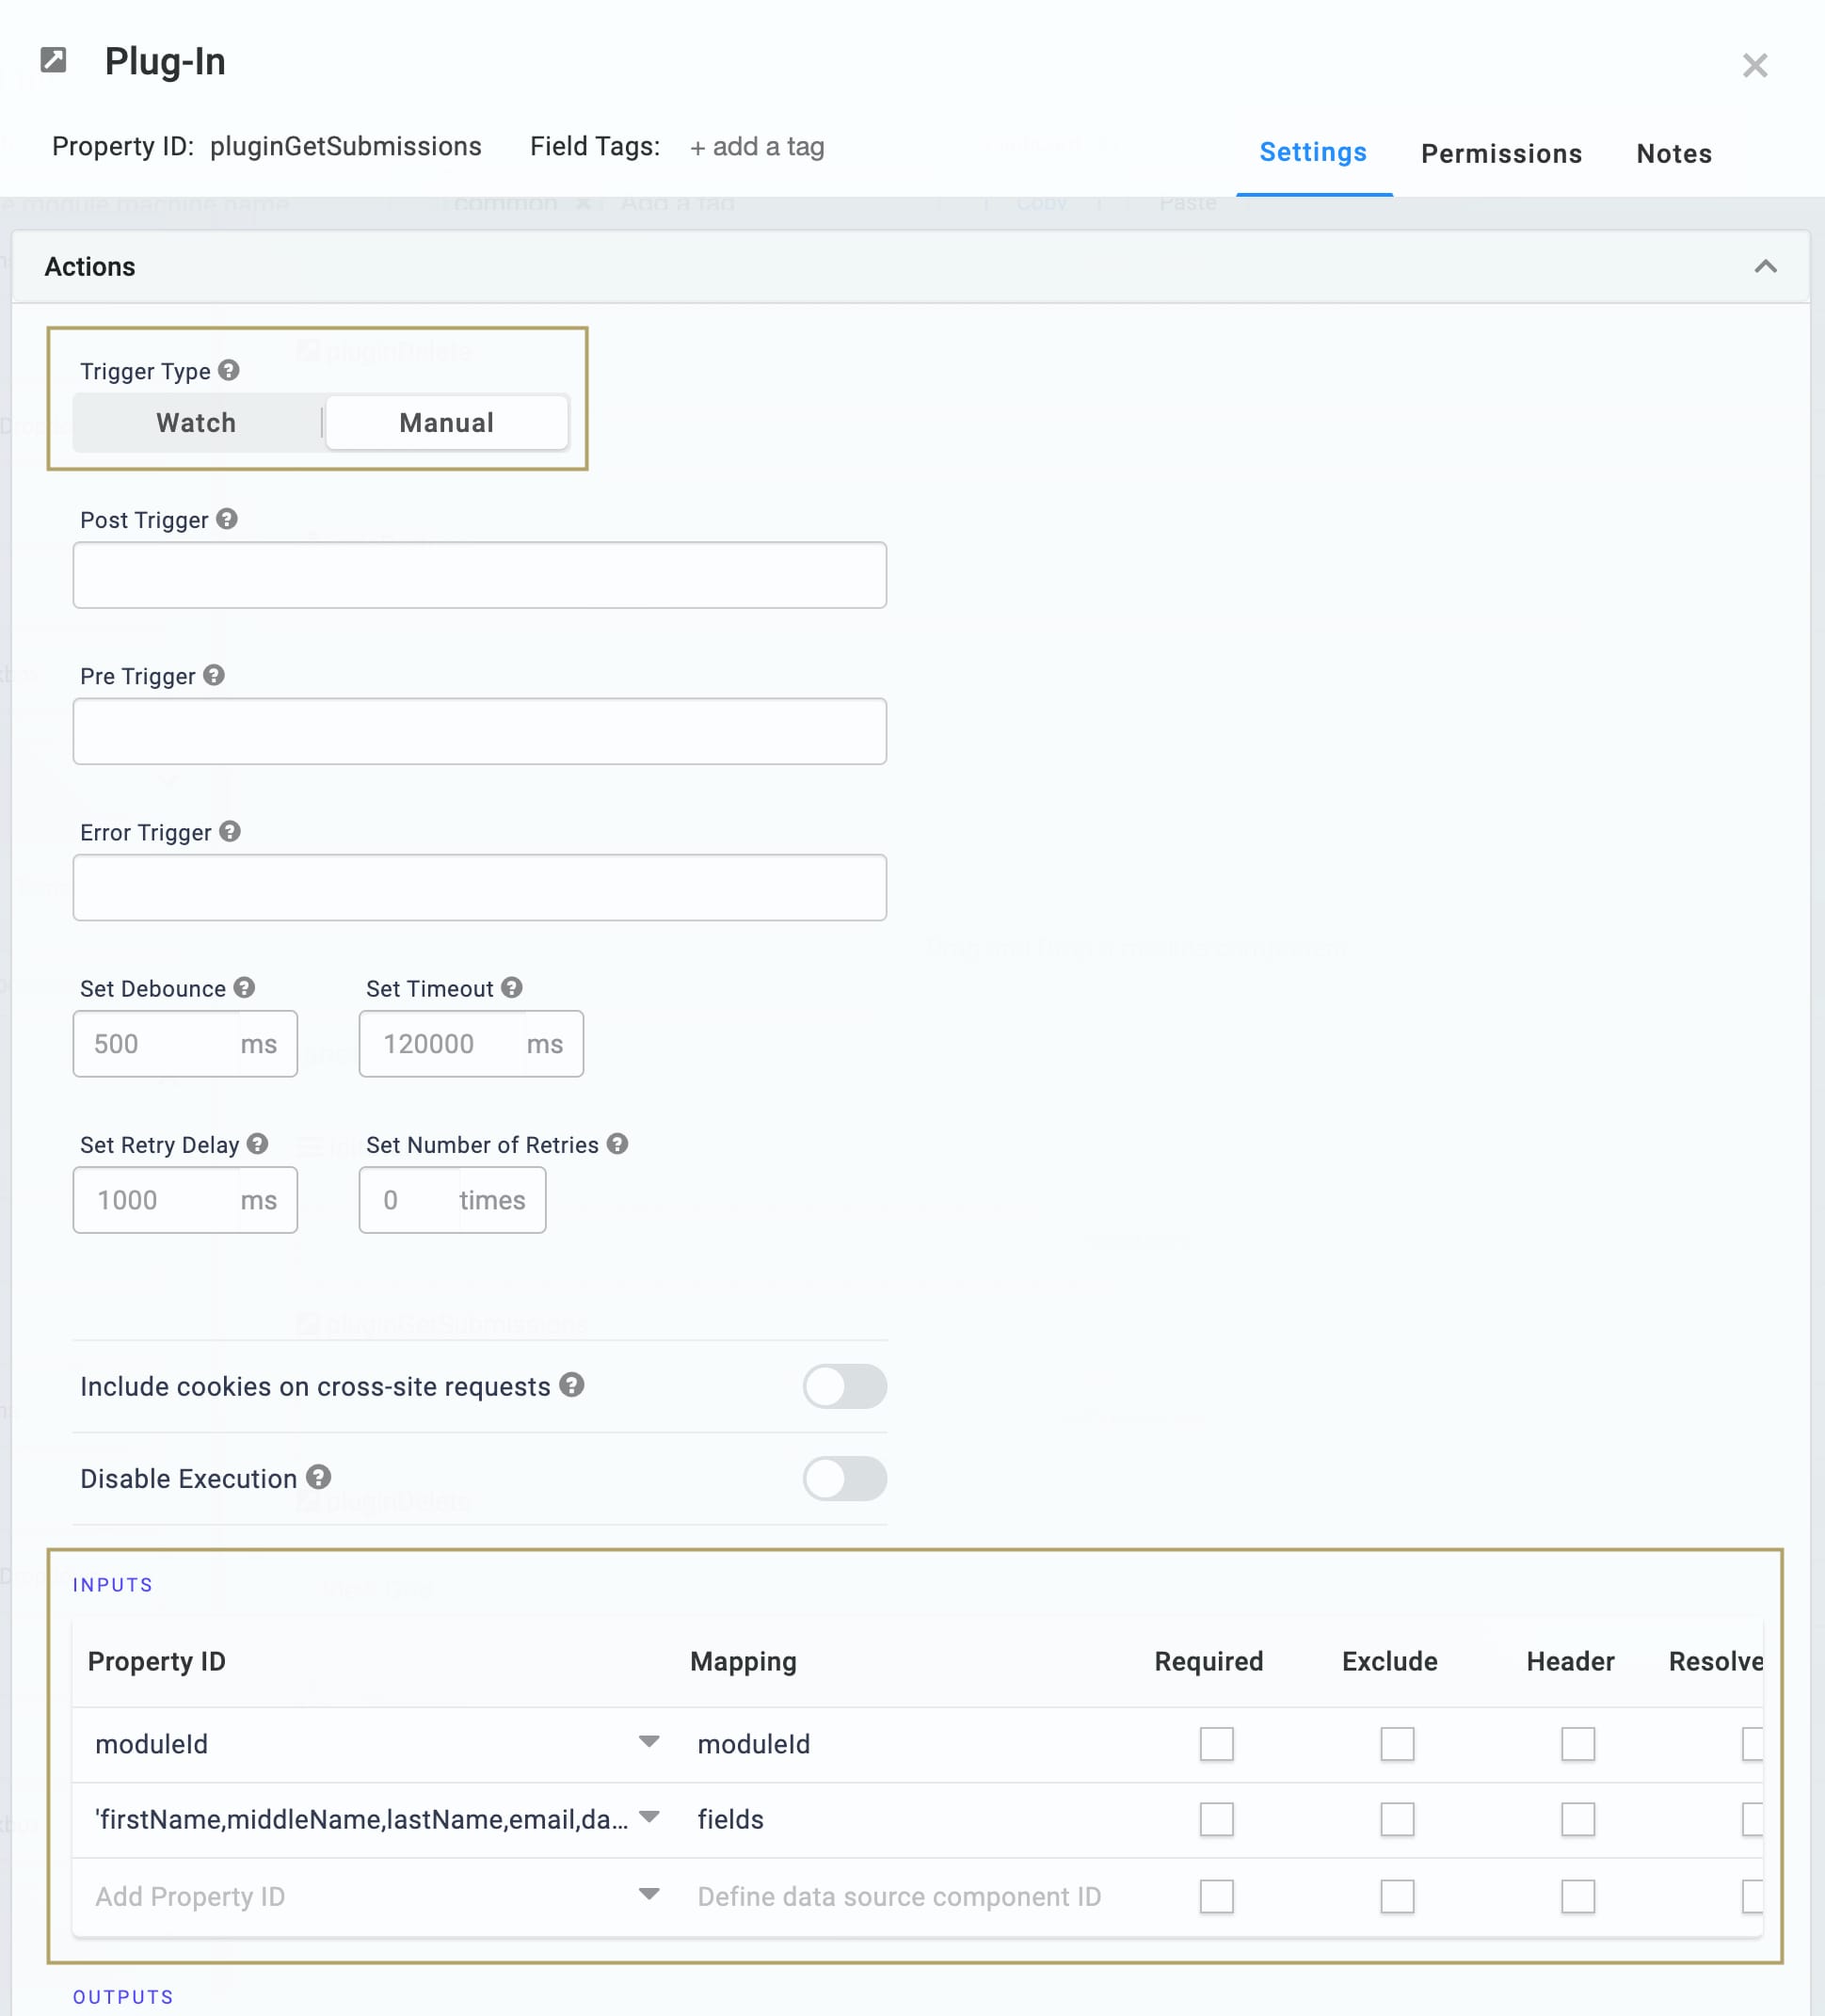
Configure the Plug-In Component
This Plug-In connects your module to the outside world. To make this connection, you'll use an application programming interface (API). You'll use this Plug-In to get submissions to display in your dashboard.
Drag and drop a Plug-In component onto your canvas. Place your Plug-In below the moduleId Hidden component.
Enter pluginGetSubmissions in the Property ID and Label Text fields.
Select Manual from the Trigger Type.
Complete the Inputs table as follows:
Property ID
Mapping
moduleId
moduleId
'firstName,middleName,lastName,email,dateOfBirth'
fields
The first row references the module ID stored in the moduleId Hidden component. The second row shows which fields you're pulling into the dashboard. Here, we'll pull the firstName, middleName, lastName, email, and dateOfBirth fields. The values entered in the Mapping column (moduleId and fields) are native values recognized by the Unqork Designer Platform. Add these as shown.
Select List Submissions for Dashboard from the Internal Services drop-down. /fbu/uapi/system/GetSubmissions appears in the Data Source URL field.
.jpg)
Click Save.
Configure the Hidden Component
This is the second Hidden component in this configuration. It houses the submission ID.
Drag and drop a Hidden component onto your canvas. Place your Hidden component below your Plug-In.
Enter submissionId in the Property ID and Label Text.
Click Save.
Configure the ViewGrid Component
Next, let's bring in a ViewGrid component to display your dashboard. Notice how the Action and Event settings create the View button.
Drag and drop a ViewGrid component onto the canvas. Place your ViewGrid below the submissionId Hidden component.
Enter View Grid in the Label.
Enter gridView in the Property Name.
Enter View in the Action field.
Enter View in the Event field.
In the Inputs table, enter the following:
ID: enter pluginGetSubmissions.
Required: select Yes.
In the Outputs table, enter the following:
ID: enter submissionId.
Mapping: enter id.
In the Display table, enter the following:
ID
Formula
Heading
firstName
First Name
middleName
Middle Name
lastName
Last Name
email
Email
dateOfBirth
=MOMENT(MOMENT(dateOfBirth), 'format', 'MM/DD/YY')
Date of Birth
The Moment.js in the Formula column formats the dateOfBirth values as MM/DD/YY.
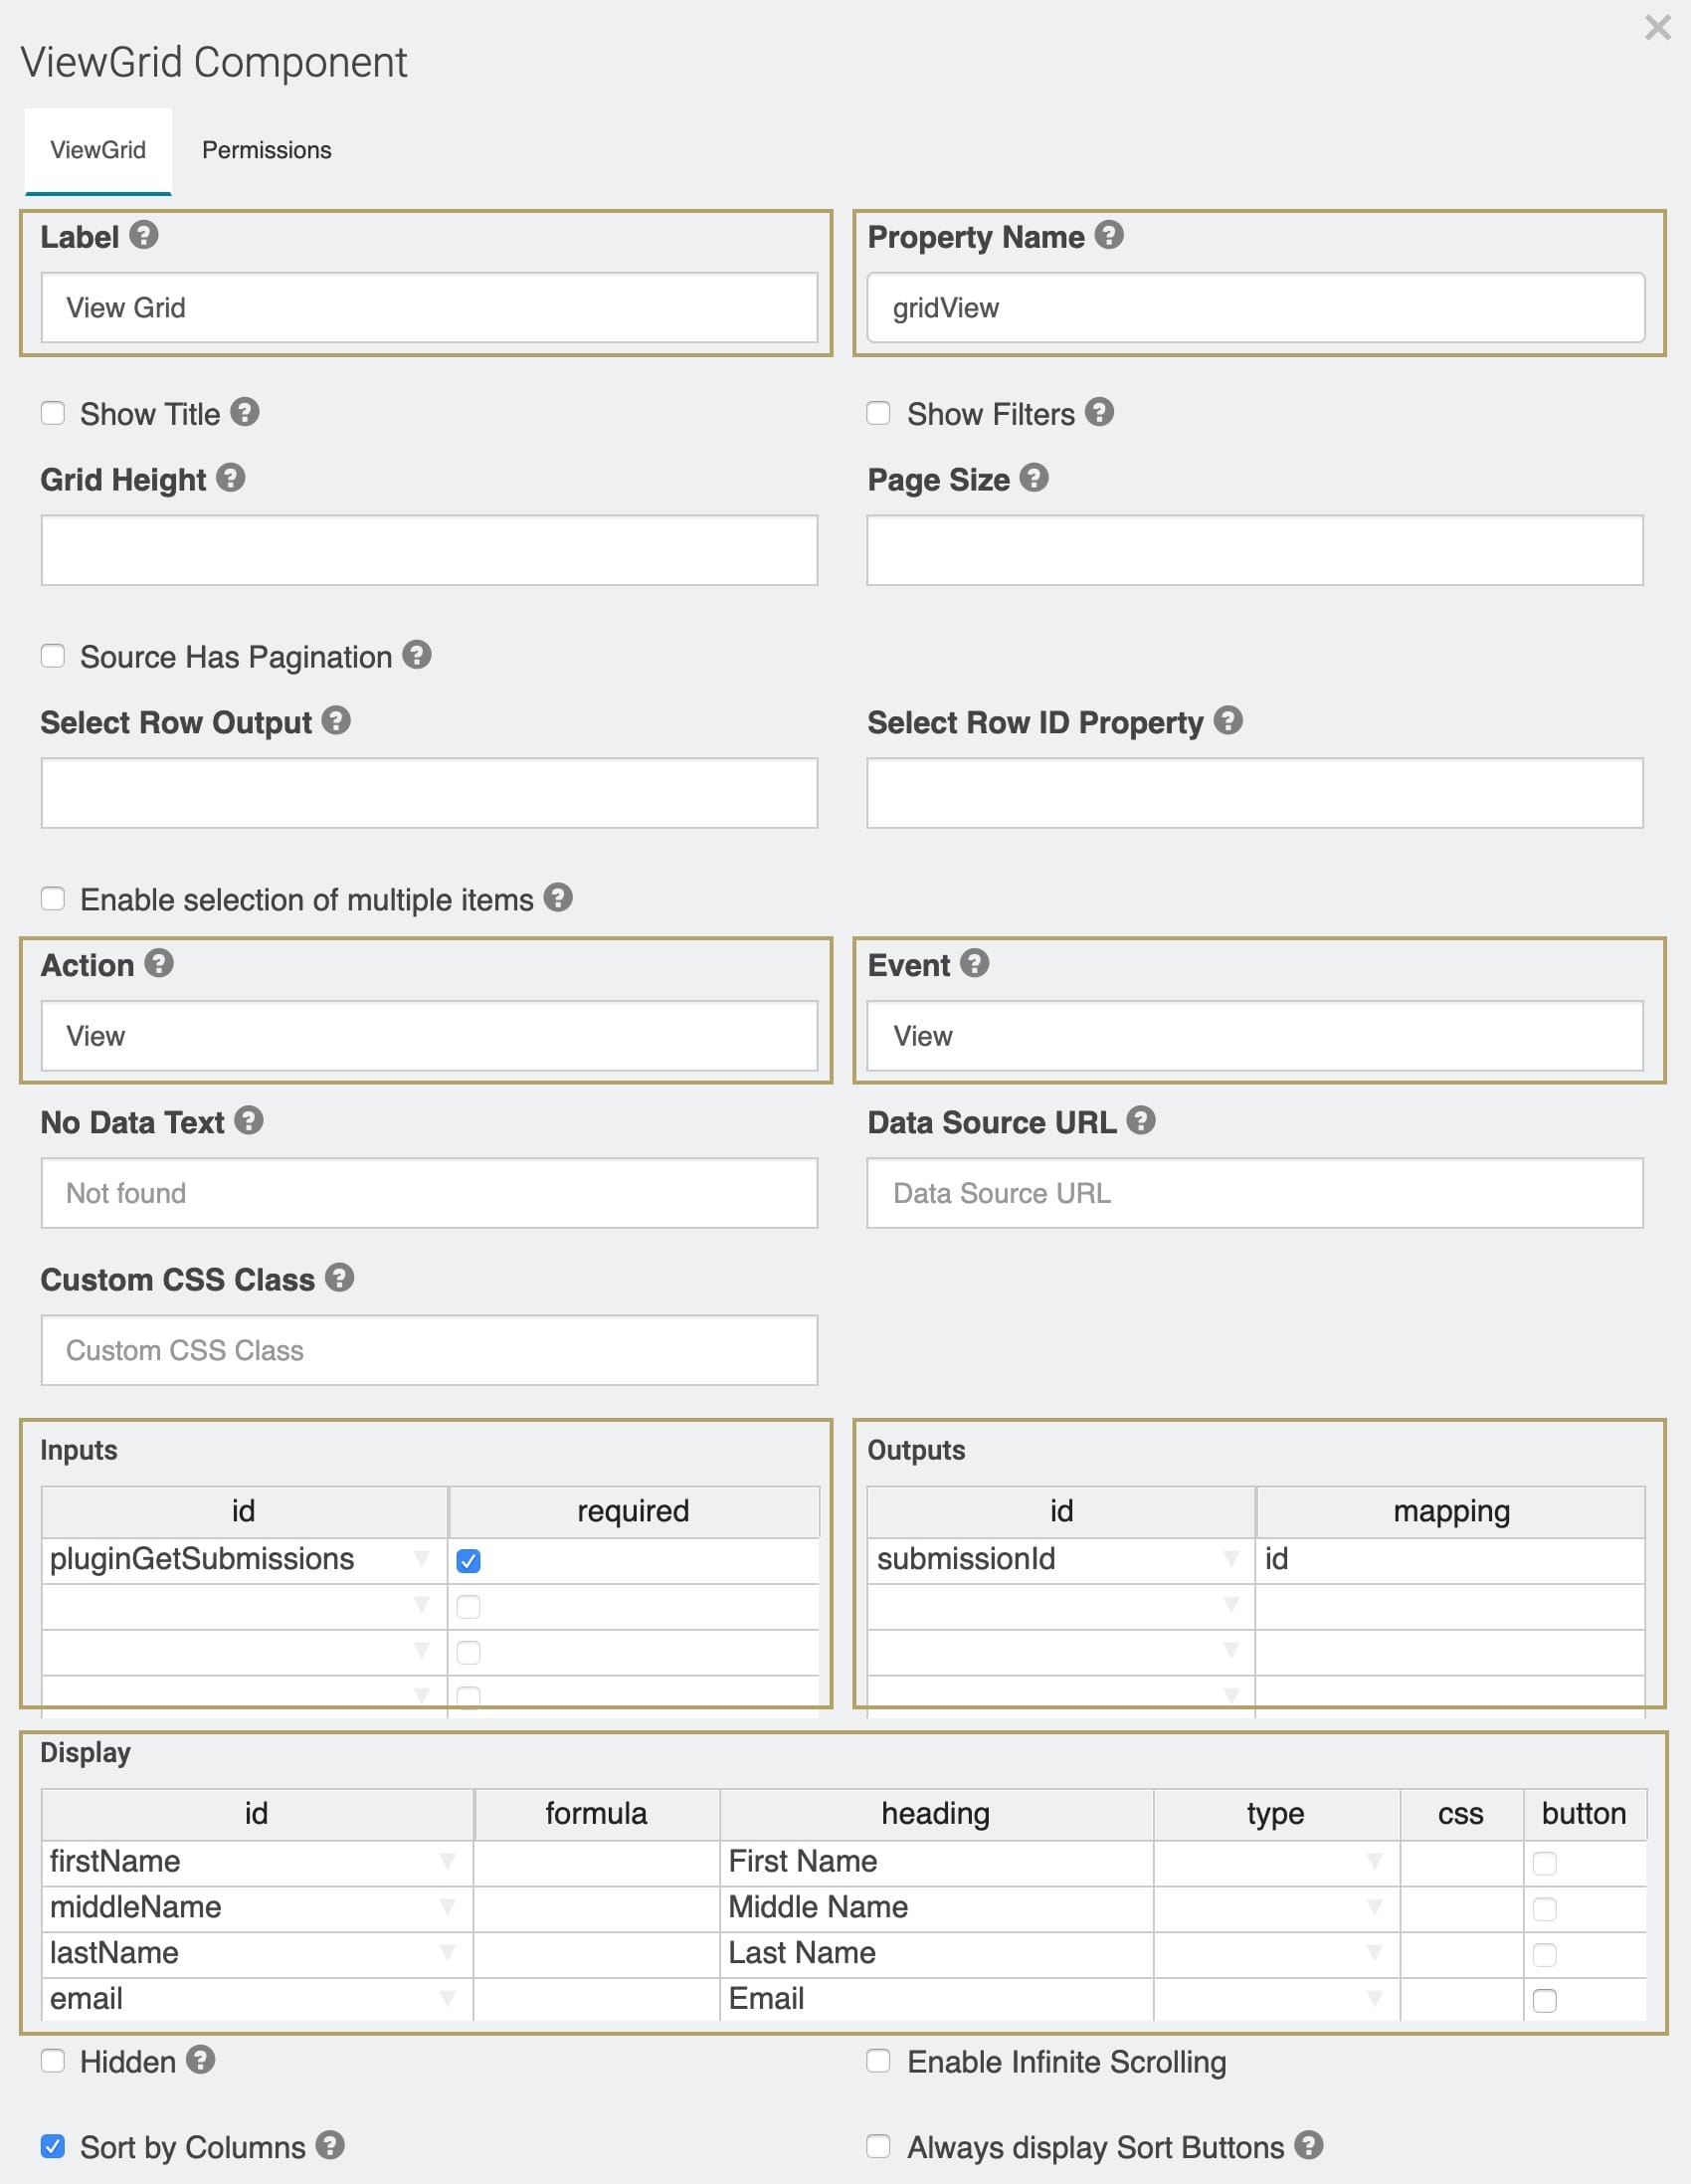
Click Save.
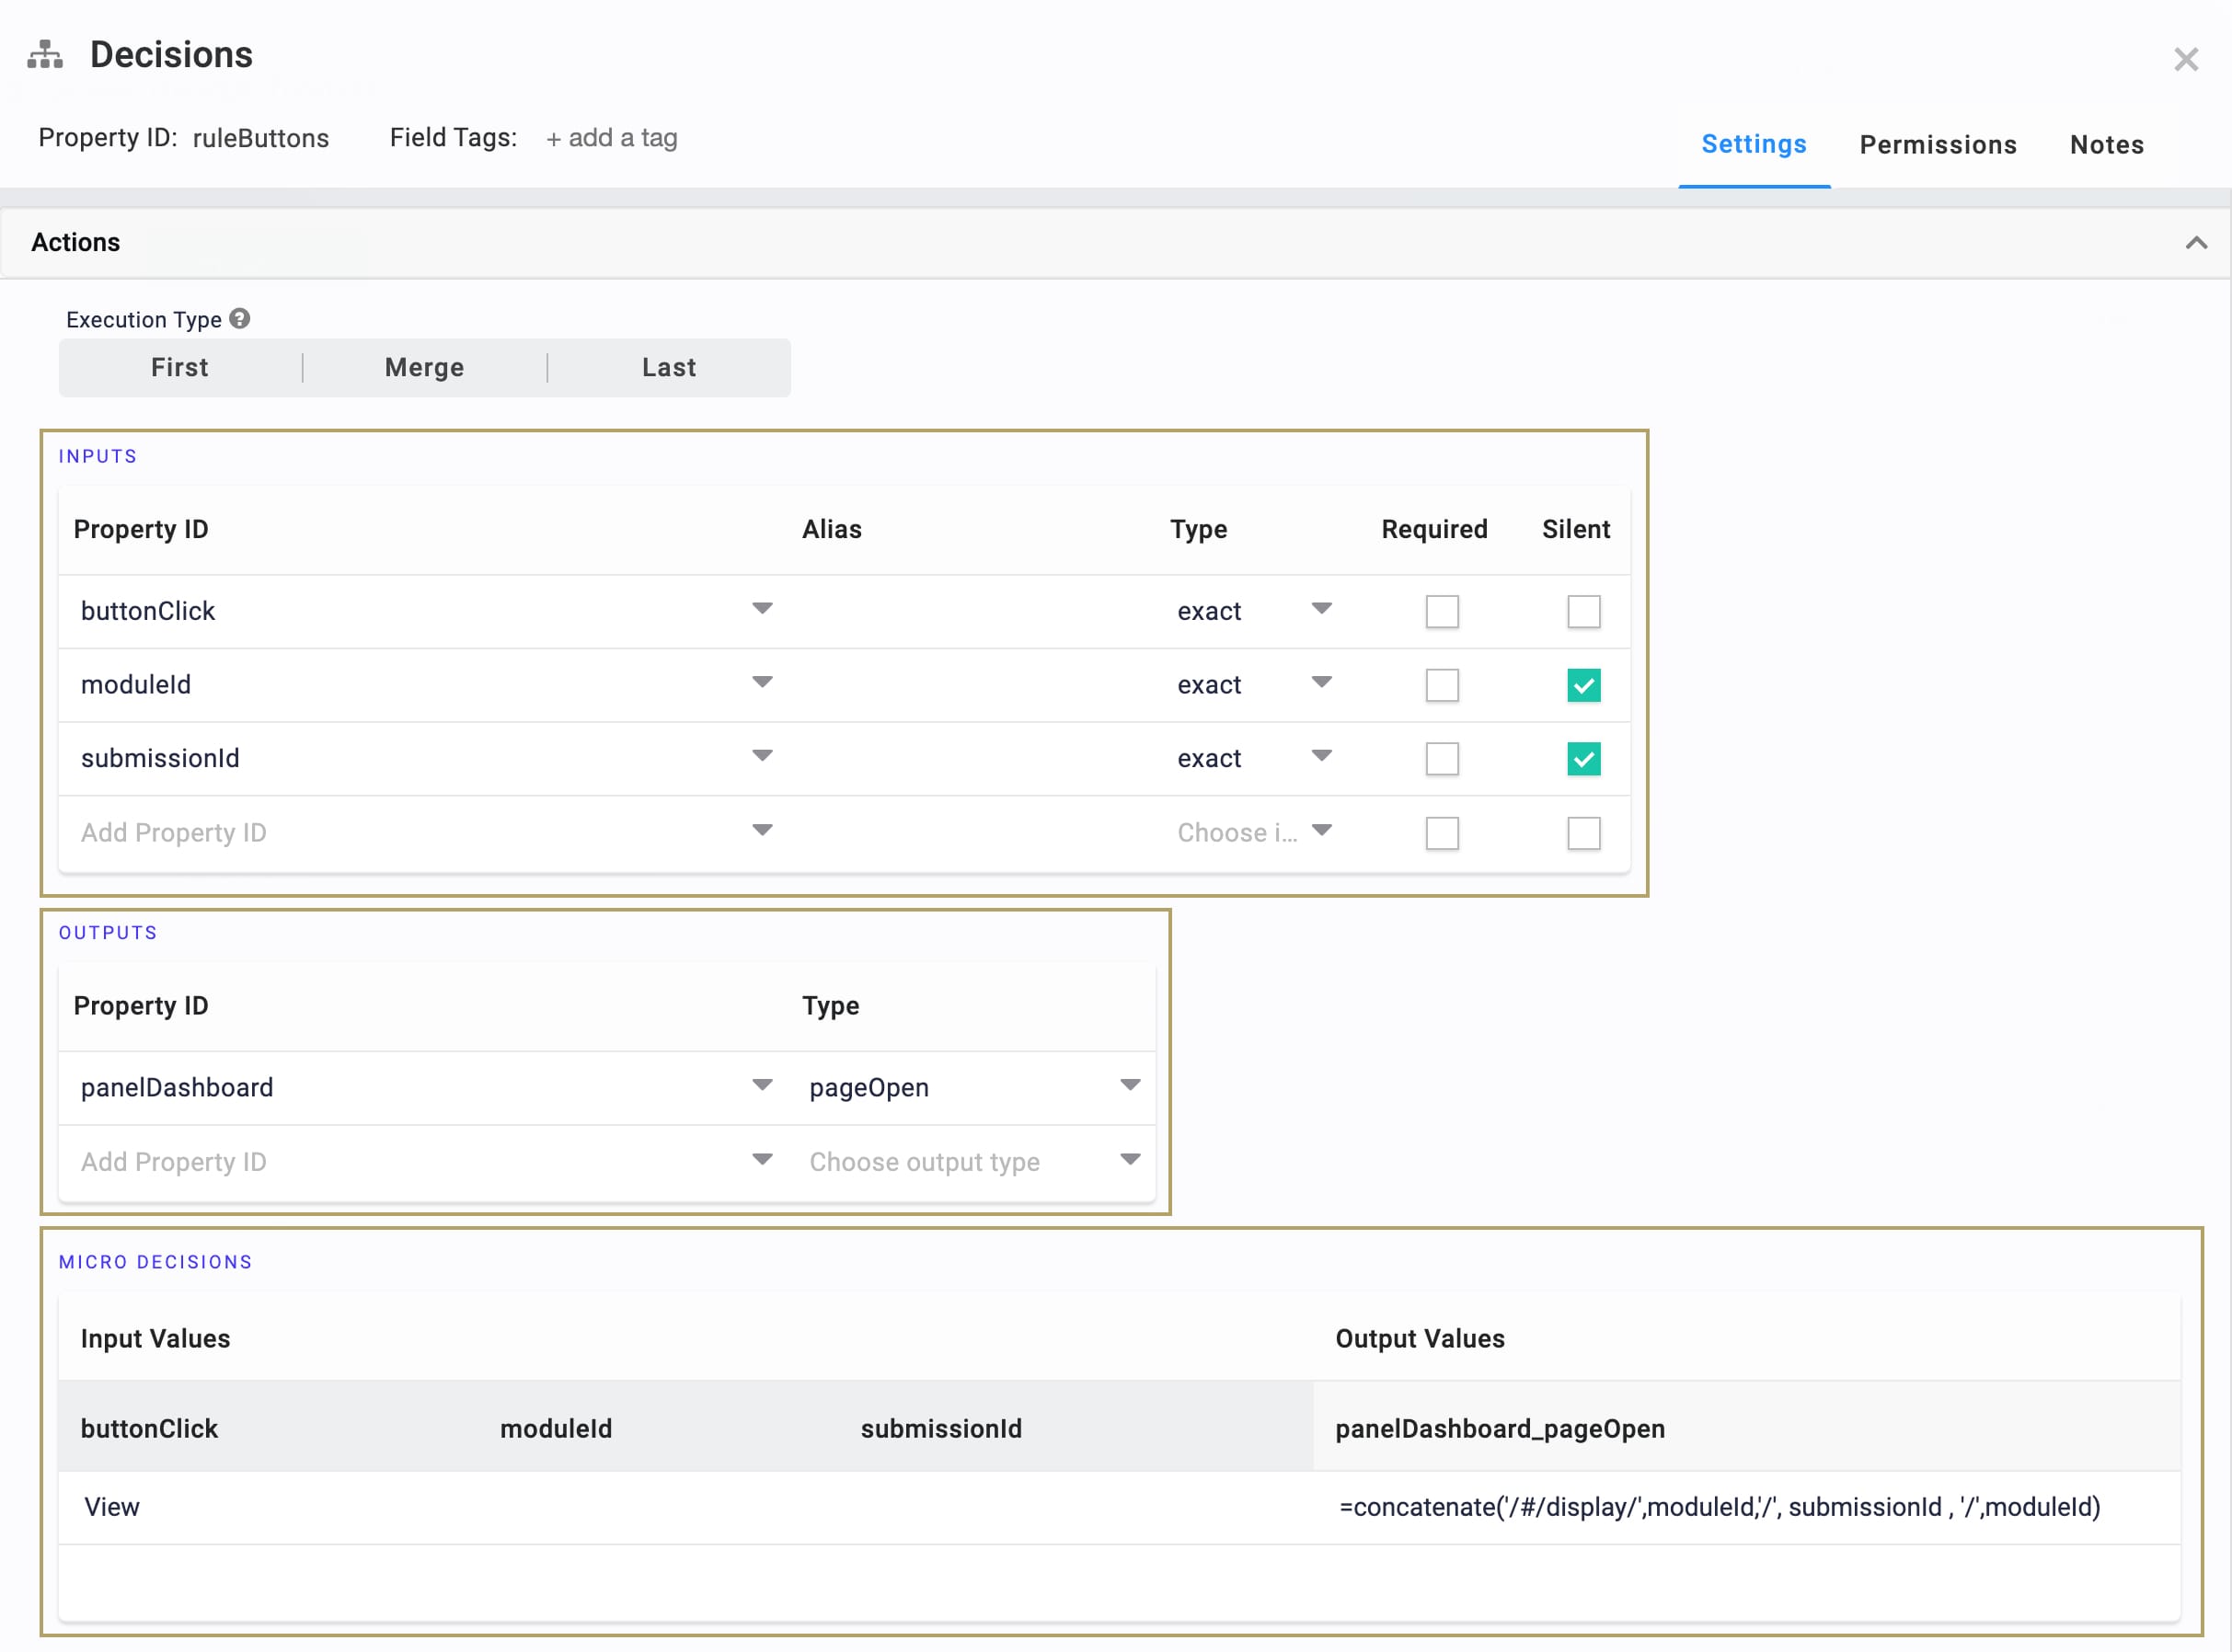
Configure the Decisions Component
This Decision provides the trigger for your dashboard's View button.
Drag and drop a Decisions component onto the canvas. Place it below your ViewGrid component.
Enter ruleButtons in the Property ID and Label Text.
In the Inputs table, enter the following:
Property ID
Type
Required
Silent
buttonClick
exact
No (not checked)
No (not checked)
moduleId
exact
No (not checked)
Yes (checked)
submissionId
exact
No (not checked)
Yes (checked)
Every row in the Inputs table gets an associated column in the Micro Decisions table. If an input doesn't have a value in its Micro Decisions column, Unqork sets it to silent. In the next steps, you won't add values to the moduleId and submissionId columns. You'll only be using these inputs in the panelDashboard_pageOpen micro decision. So, you can mark these values as silent, or let Unqork do it for you.
In the Outputs table, enter the following:
Property ID: enter panelDashboard.
Type: enter pageOpen.
In the Micro Decisions table, enter the following:
buttonClick: enter View.
panelDashboard_pageOpen: enter =concatenate('/#/display/',moduleId,'/', submissionId , '/',moduleId).
Click Save.
Update the ViewGrid Component
To add your second action button, you'll need to go back into your ViewGrid component.
Hover over the gridView ViewGrid component.
A 5-button toolbar appears above the component on hover-over.
Using the toolbar, click the (Settings) button.
Scroll to the bottom of the Display table, and enter the following:
ID
Formula
Heading
Type
CSS
Button
Delete
Delete
Yes (selected)
The ID value here isn't acting as a Property ID, so it doesn't need to be in camel case. The field simply needs a value for the button to work.
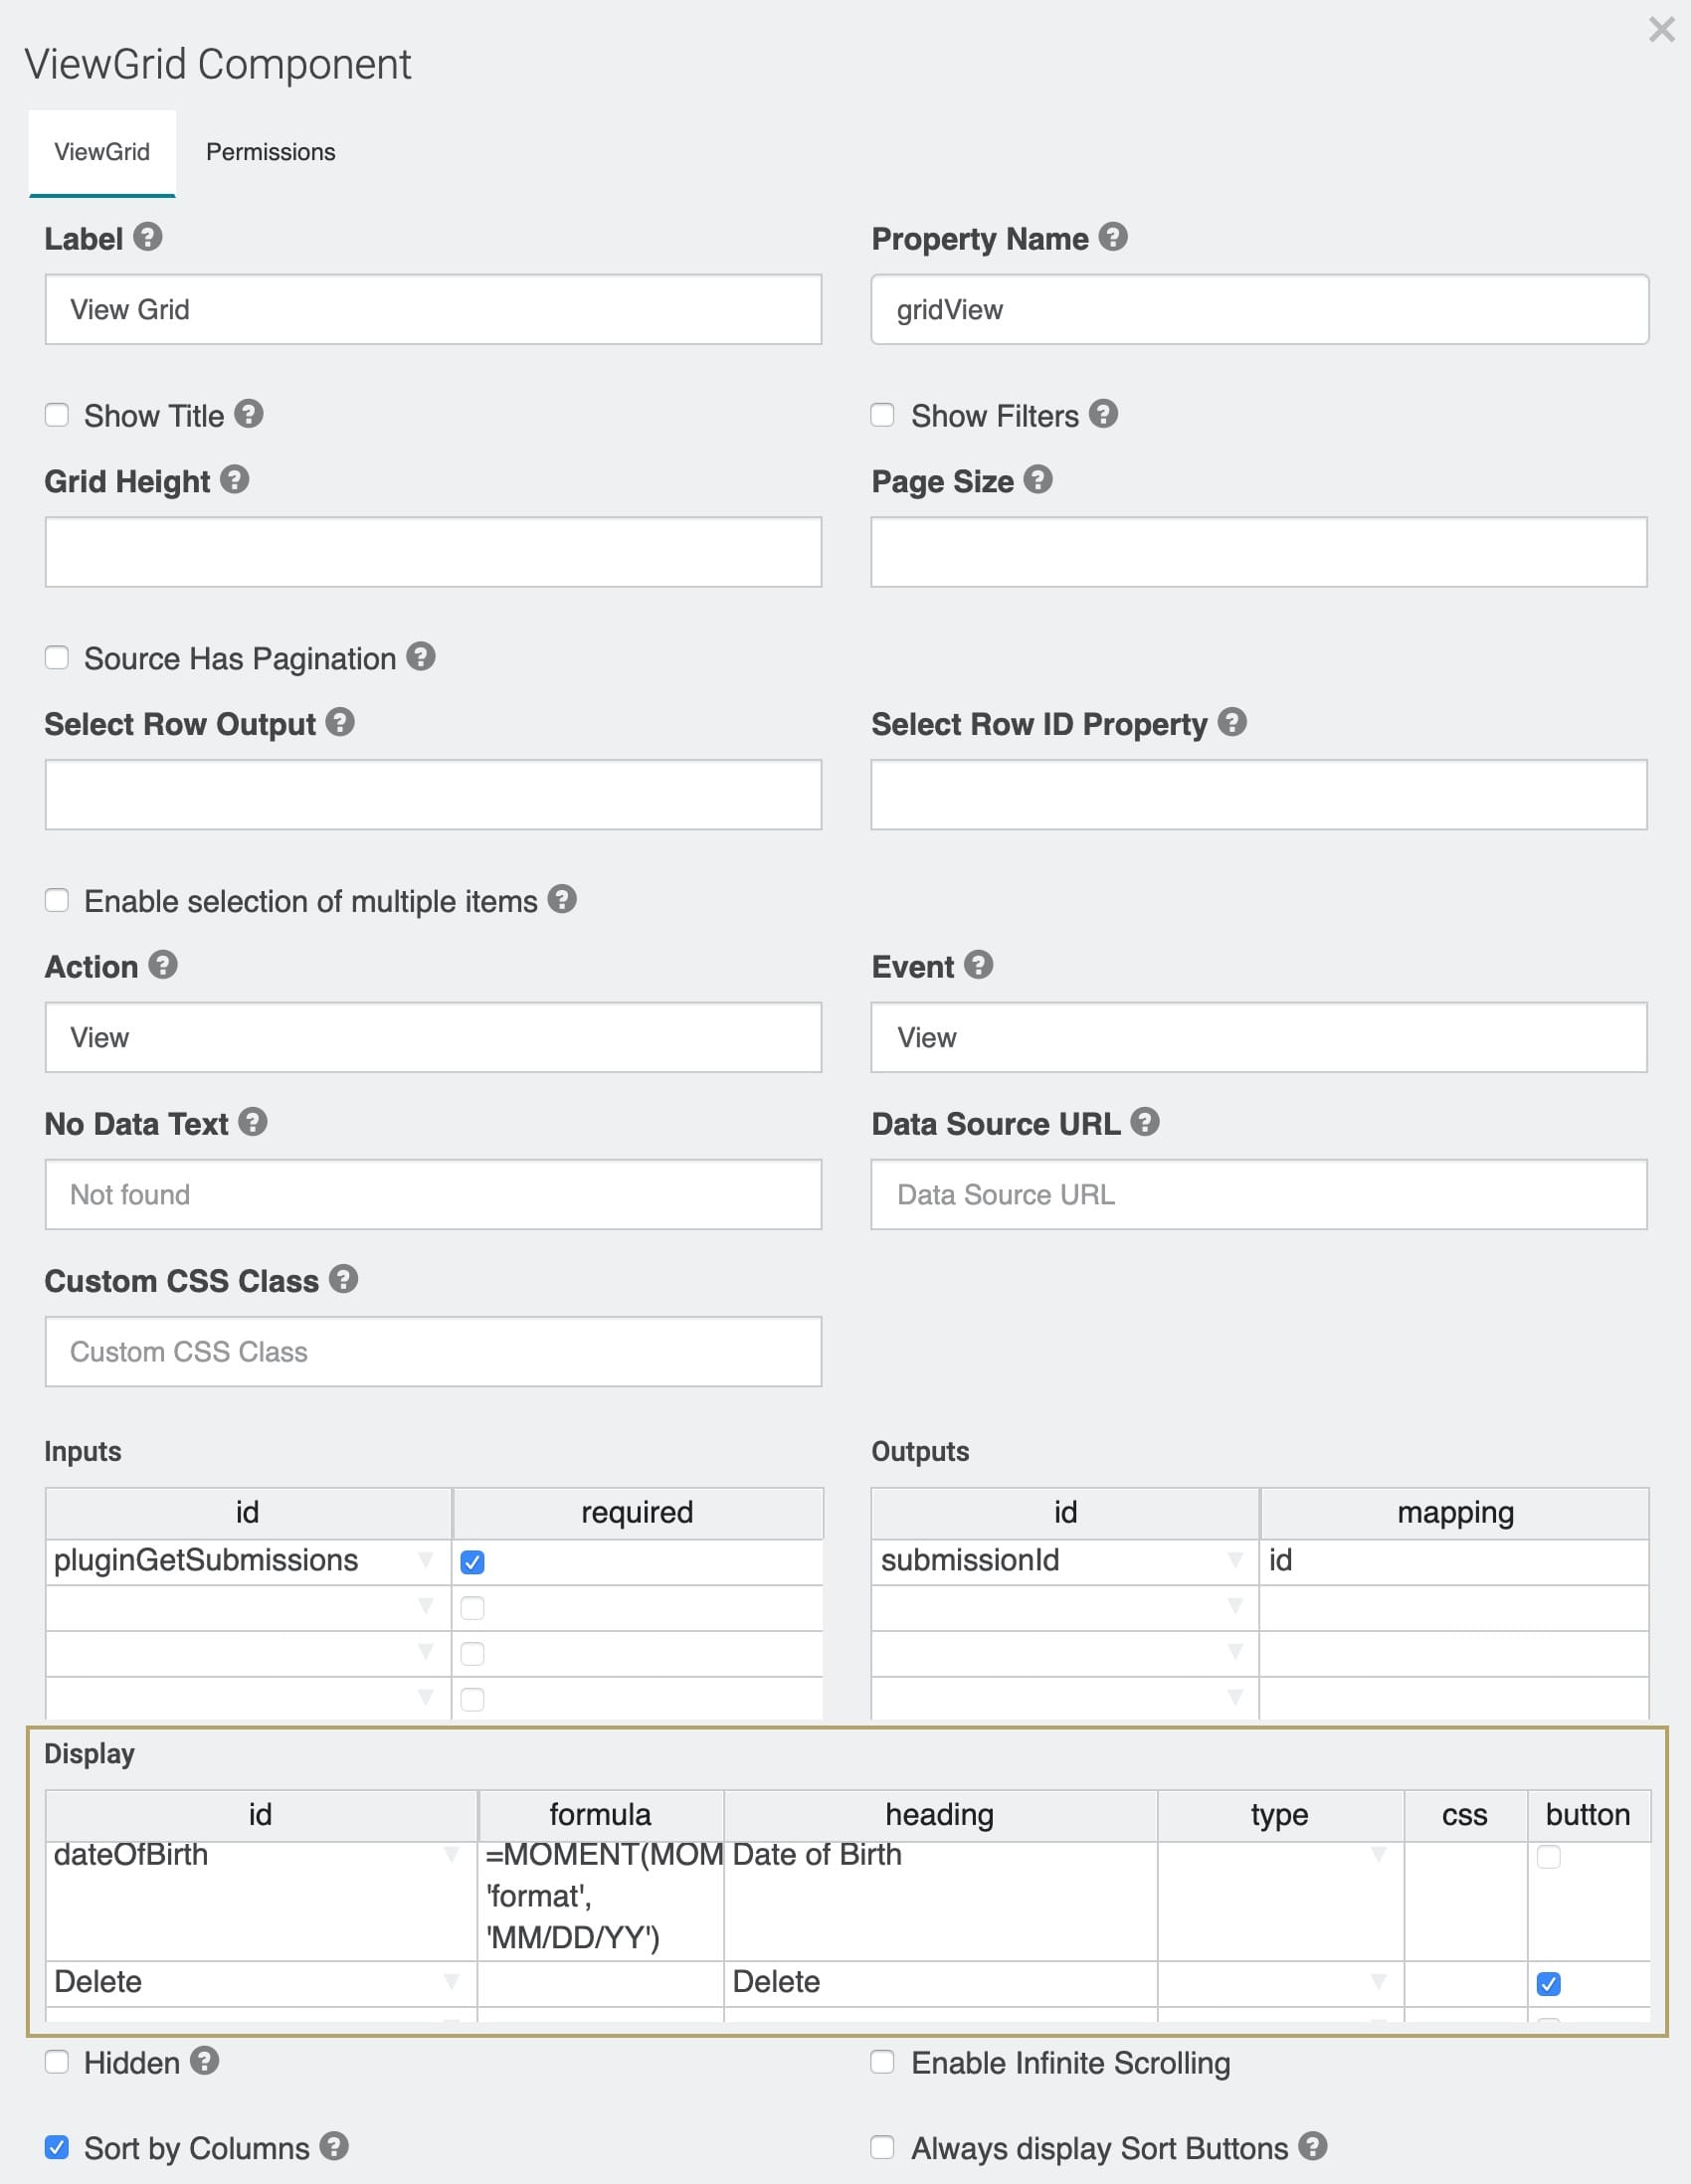
Click Save.
Configure the Plug-In Component
This is the second Plug-In in this use case. This Plug-In deletes the submission and removes it from your dashboard.
Drag and drop a Plug-In component onto your canvas. Place your Plug-In below the submissionId Hidden component.
Enter pluginDelete in the Property ID and Label Text fields.
Select Manual from the Trigger Type.
Enter pluginGetSubmissions in the Post Trigger field.
This triggers pluginGetSubmissions to refresh your dashboard after every deletion.
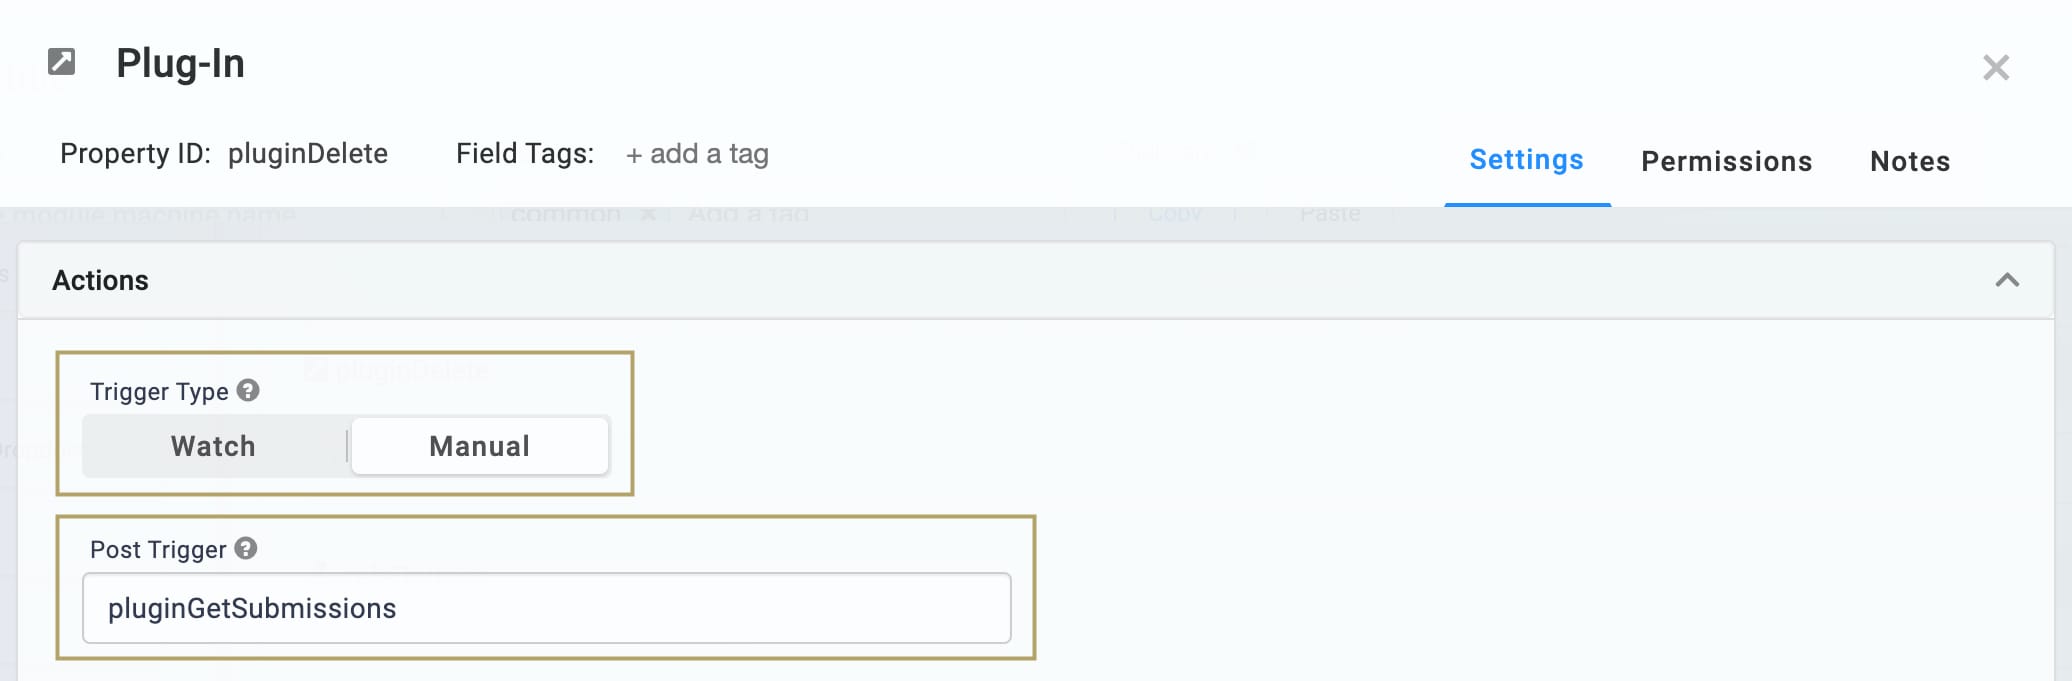
Select Deletes Multiple Module Submissions from the Internal Services drop-down.
Enter /fbu/uapi/forms/{{data.moduleId}}/submissions?ids={{data.submissionId}} in the Data Source URL field.
Here, you're adjusting the Data Source URL that populates when you select the Deletes Multiple Module Submissions service. The default value requires that you enter a module ID. The new Data Source URL references the module ID stored in the moduleID Hidden component. It also references single submission IDs, stored in the submissionId Hidden component. Now, clicking your Delete button deletes one specific submission at a time.
Select Delete from the Request Type.
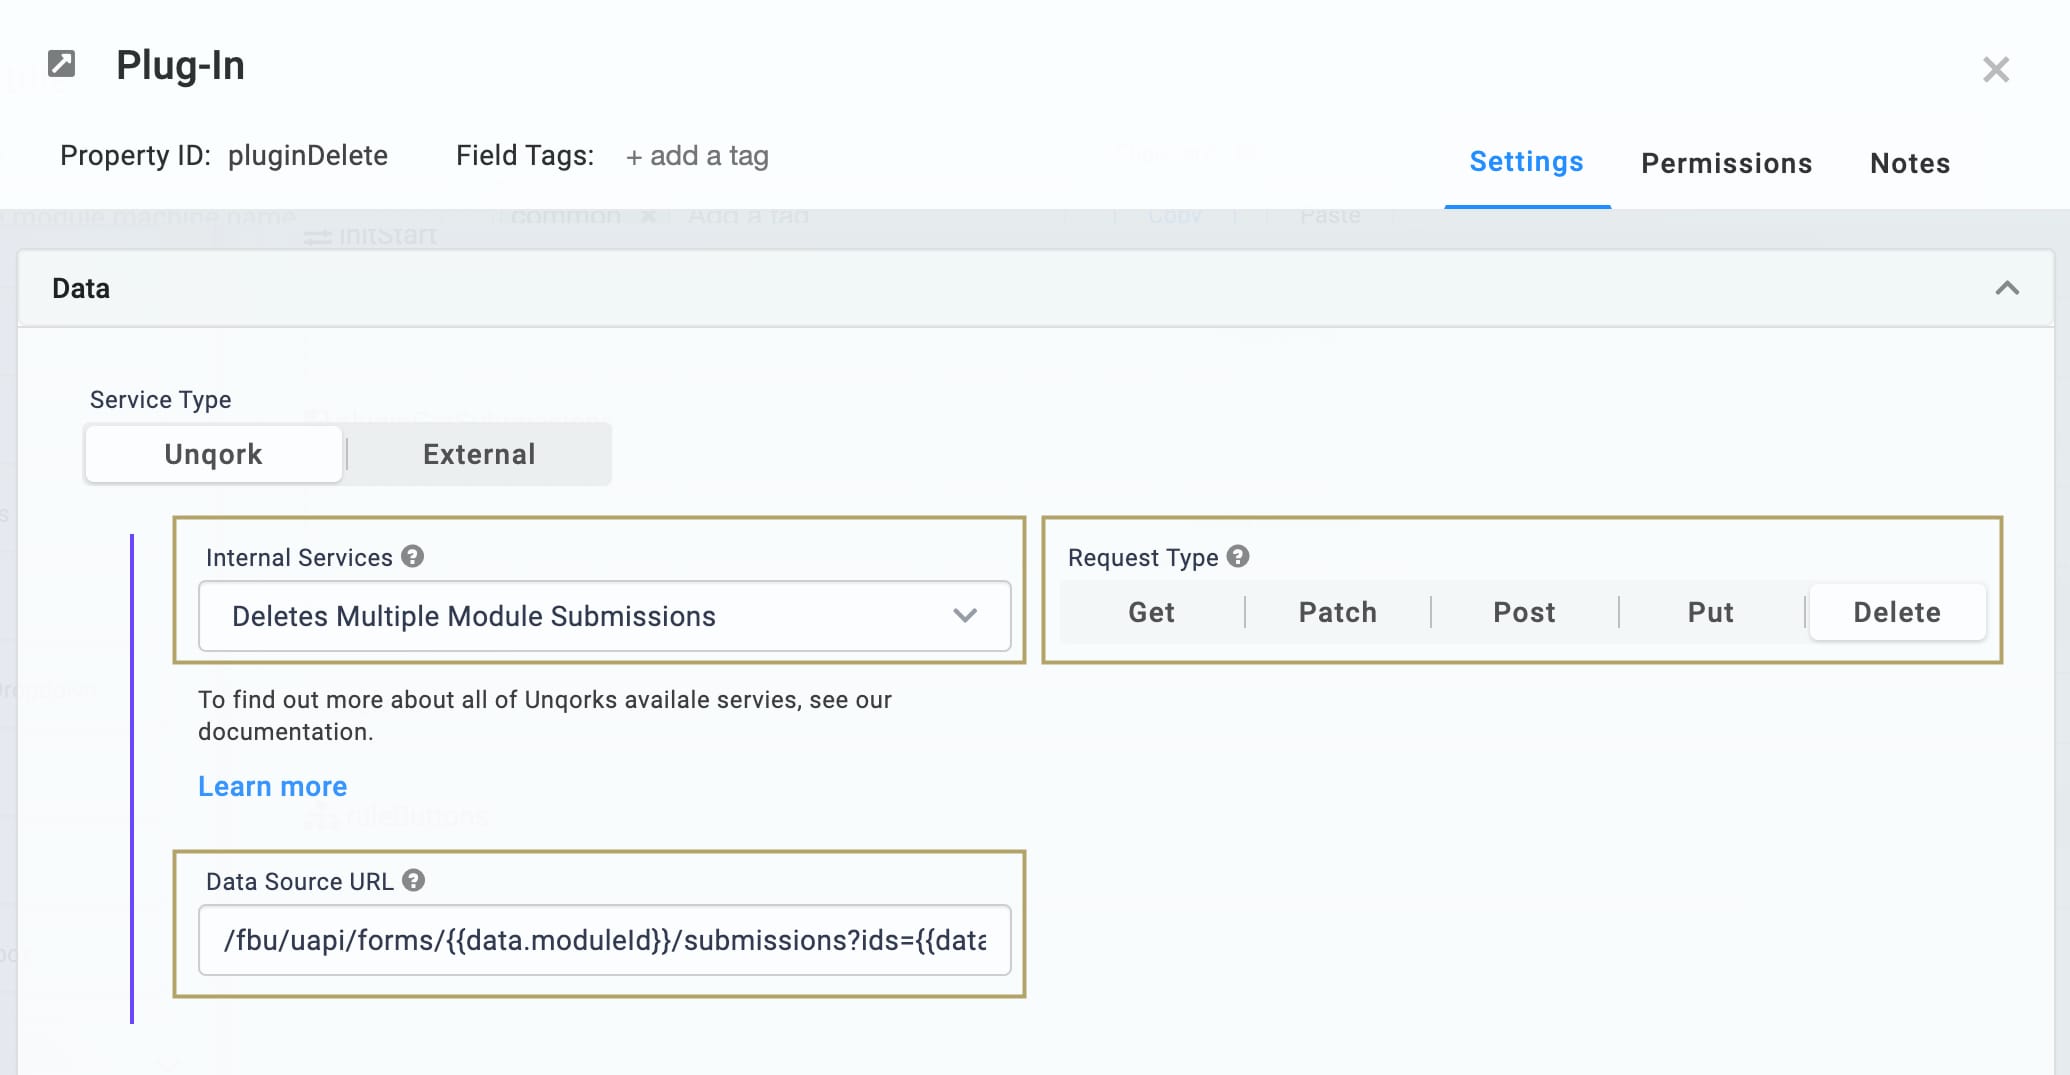
Click Save.
Update the Decisions Component
Next, you'll update your Decisions component to link your Delete button to the pluginDelete Plug-In component.
Hover over the ruleButtons Decisions component.
A 5-button toolbar appears above the component on hover-over.
Using the toolbar, click the (Settings) button.
In the Outputs table, add the following:
Property ID: enter pluginDelete.
Type: enter trigger.
In the Micro Decisions table, add the following:
buttonClick: enter Delete.
pluginDelete_trigger: enter GO.
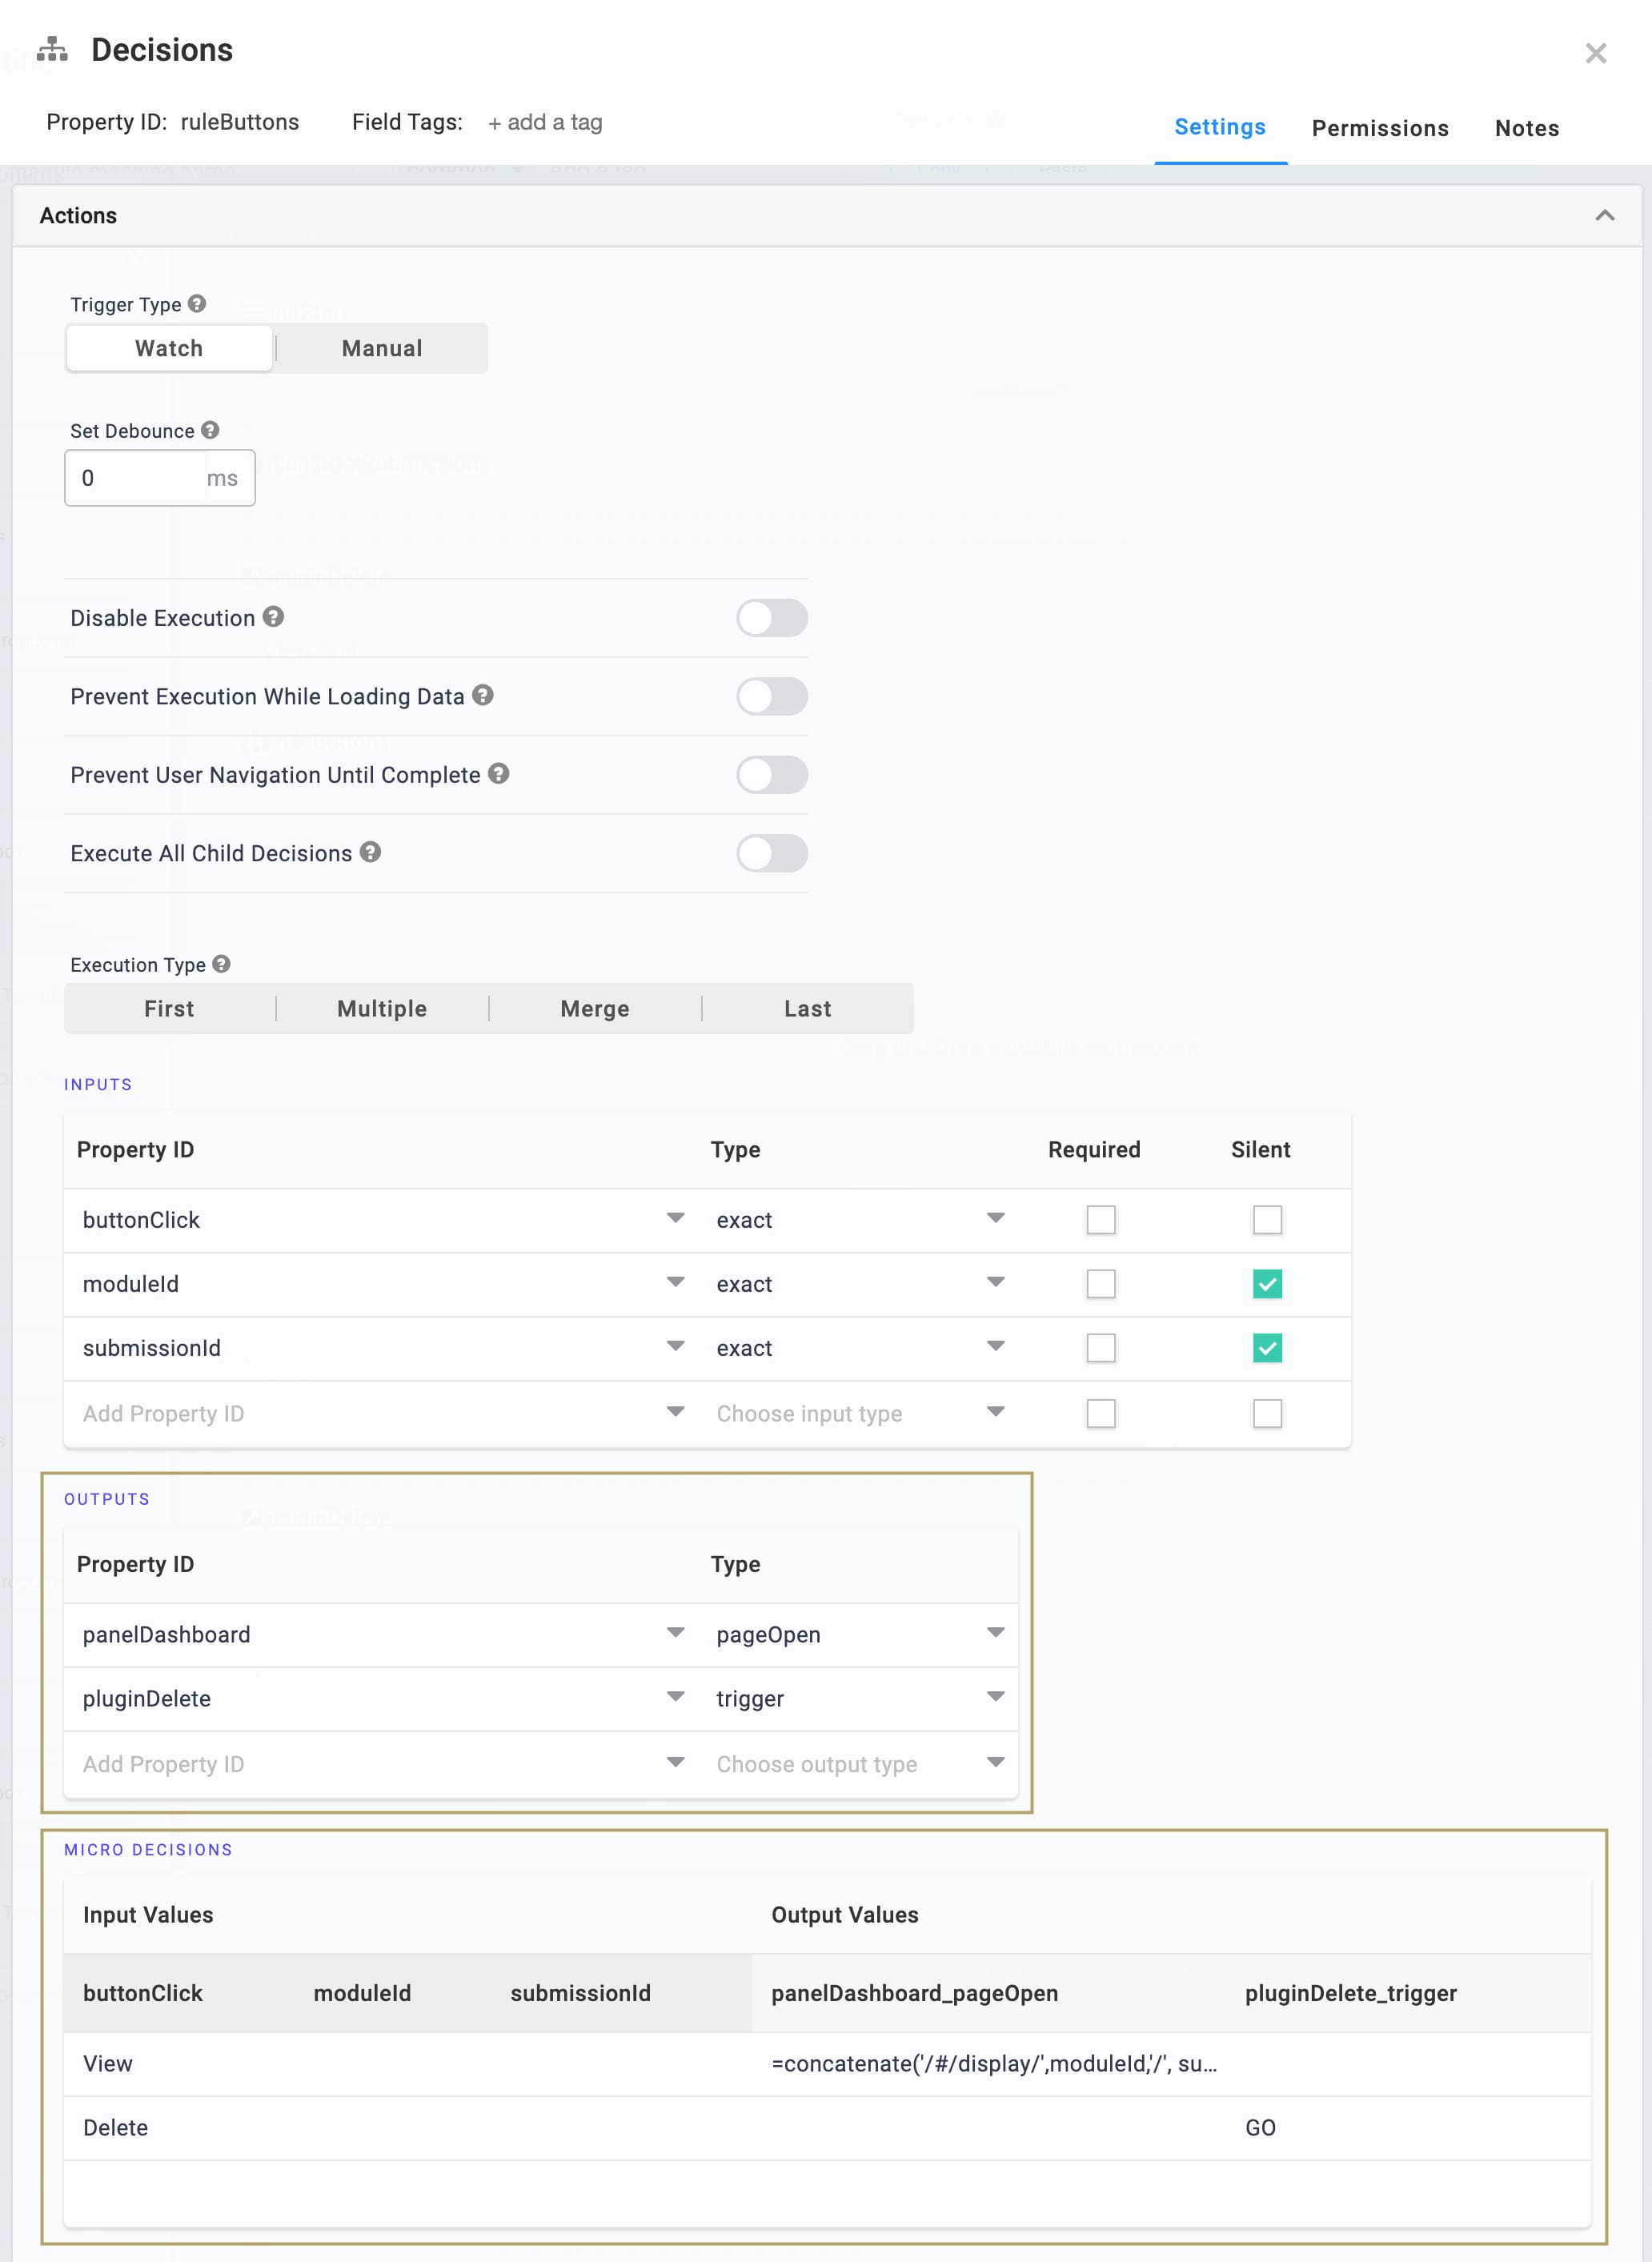
Click Save.
Save your module.
Lab
You can find the completed Simple Dashboard with a Delete Button use case here: https://training.unqork.io/#/form/5eb015d2811bf80215fd7057/edit.
You'll find the source module for this use case here: https://trainingx.unqork.io/?style=unqork-v2#/display/5eb01aa6811bf80215fd706b.