Your dashboard is only useful if it's easy to navigate. But navigation becomes more difficult as more submission data displays on your dashboard. In this how-to guide, you'll learn how to add an individual search feature to your dashboard.
What Is Individual Search?
An individual search tool lets you search for specific information on your dashboard. An individual search gives you more specificity in comparison to a global search.
To learn more about creating a global search tool in your dashboard, view our How to: Create a Dashboard With Global Search article.
Configuration
Let’s say you have a dashboard that lists the following submission data:
First Name
Last Name
Date of Birth
Phone Number
Comment
In this how-to guide, you'll set up an individual and global search function on a dashboard for comparison. Lastly, you'll set up a Radio Buttons component to toggle between these options.
For this example, we'll use sample submission data gathered from the following source module: https://training.unqork.io/#/form/5ebec714ce23f0020fbf9667/edit.
These instructions assume you have a new module open, saved, and with a title.
Select the tab that corresponds to your Unqork Designer experience:
Configure the Panel Components
These Panel components act as containers for the components that follow. Your panelGlobalSearch Panel component manages the global search operation. Your panelIndividualSearch Panel component manages the individual search operation.
In the Module Builder, drag and drop two Panel components onto your canvas.
In the Property ID field, enter the following, as well as enabling the Hide Panel setting for each component:
#
Property ID
Hide Panel
1
panelGlobalSearch
.png) (ON)
(ON)2
panelIndividualSearch
.png) (ON)
(ON)Later, you'll use a Decisions component to display these Panel components depending on which radio button option the end-users select.
Click Save Component for each component as you add it.
Configure the Submission Search Snippet
Next, you'll add the Submission Search snippet to your dashboard module to configure the global search functionality. Once you've added the snippet, you'll reconfigure a few of its components.
To add the Submission Search snippet to your module:
At the top right of the Module Builder, click the
 (ellipsis) button.
 Select Snippets.
In the Search Snippets field, enter
Submission Search.Drag and drop the Submission Search snippet inside the
panelGlobalSearchPanel component.Delete the
panelSubmissionSearchPanel component.Save your module.
Update the Text Field Component
Next, you'll update the masterSearchGlobal Text Field component in your snippet. When you open the component, you’ll see that it includes placeholder text that does not match this configuration. The placeholder text tells end-users what search parameters they can use in the global search.
Open the
masterSearchGlobalText Field component settings drawer.In the Placeholder Text field, replace the value with
Search all fields.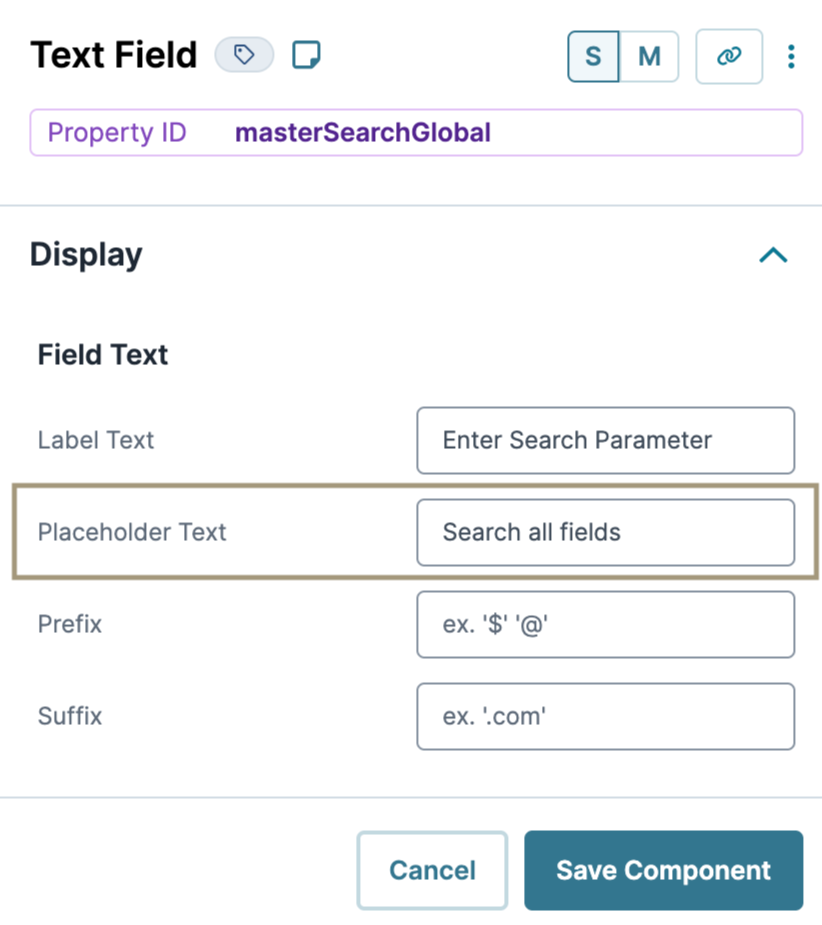
Click Save Component.
Update the Hidden Component
Next, you'll update the moduleId Hidden component in the snippet. This component stores the module ID of your source module. You can retrieve the module ID from the source module’s hyperlink as follows: https://training.unqork.io/#/form/5ebec714ce23f0020fbf9667/edit.
Open the
moduleIdHidden component settings drawer.In the Default Value field, enter
5ebec714ce23f0020fbf9667.Click Save Component.
Update the Data Workflow Component
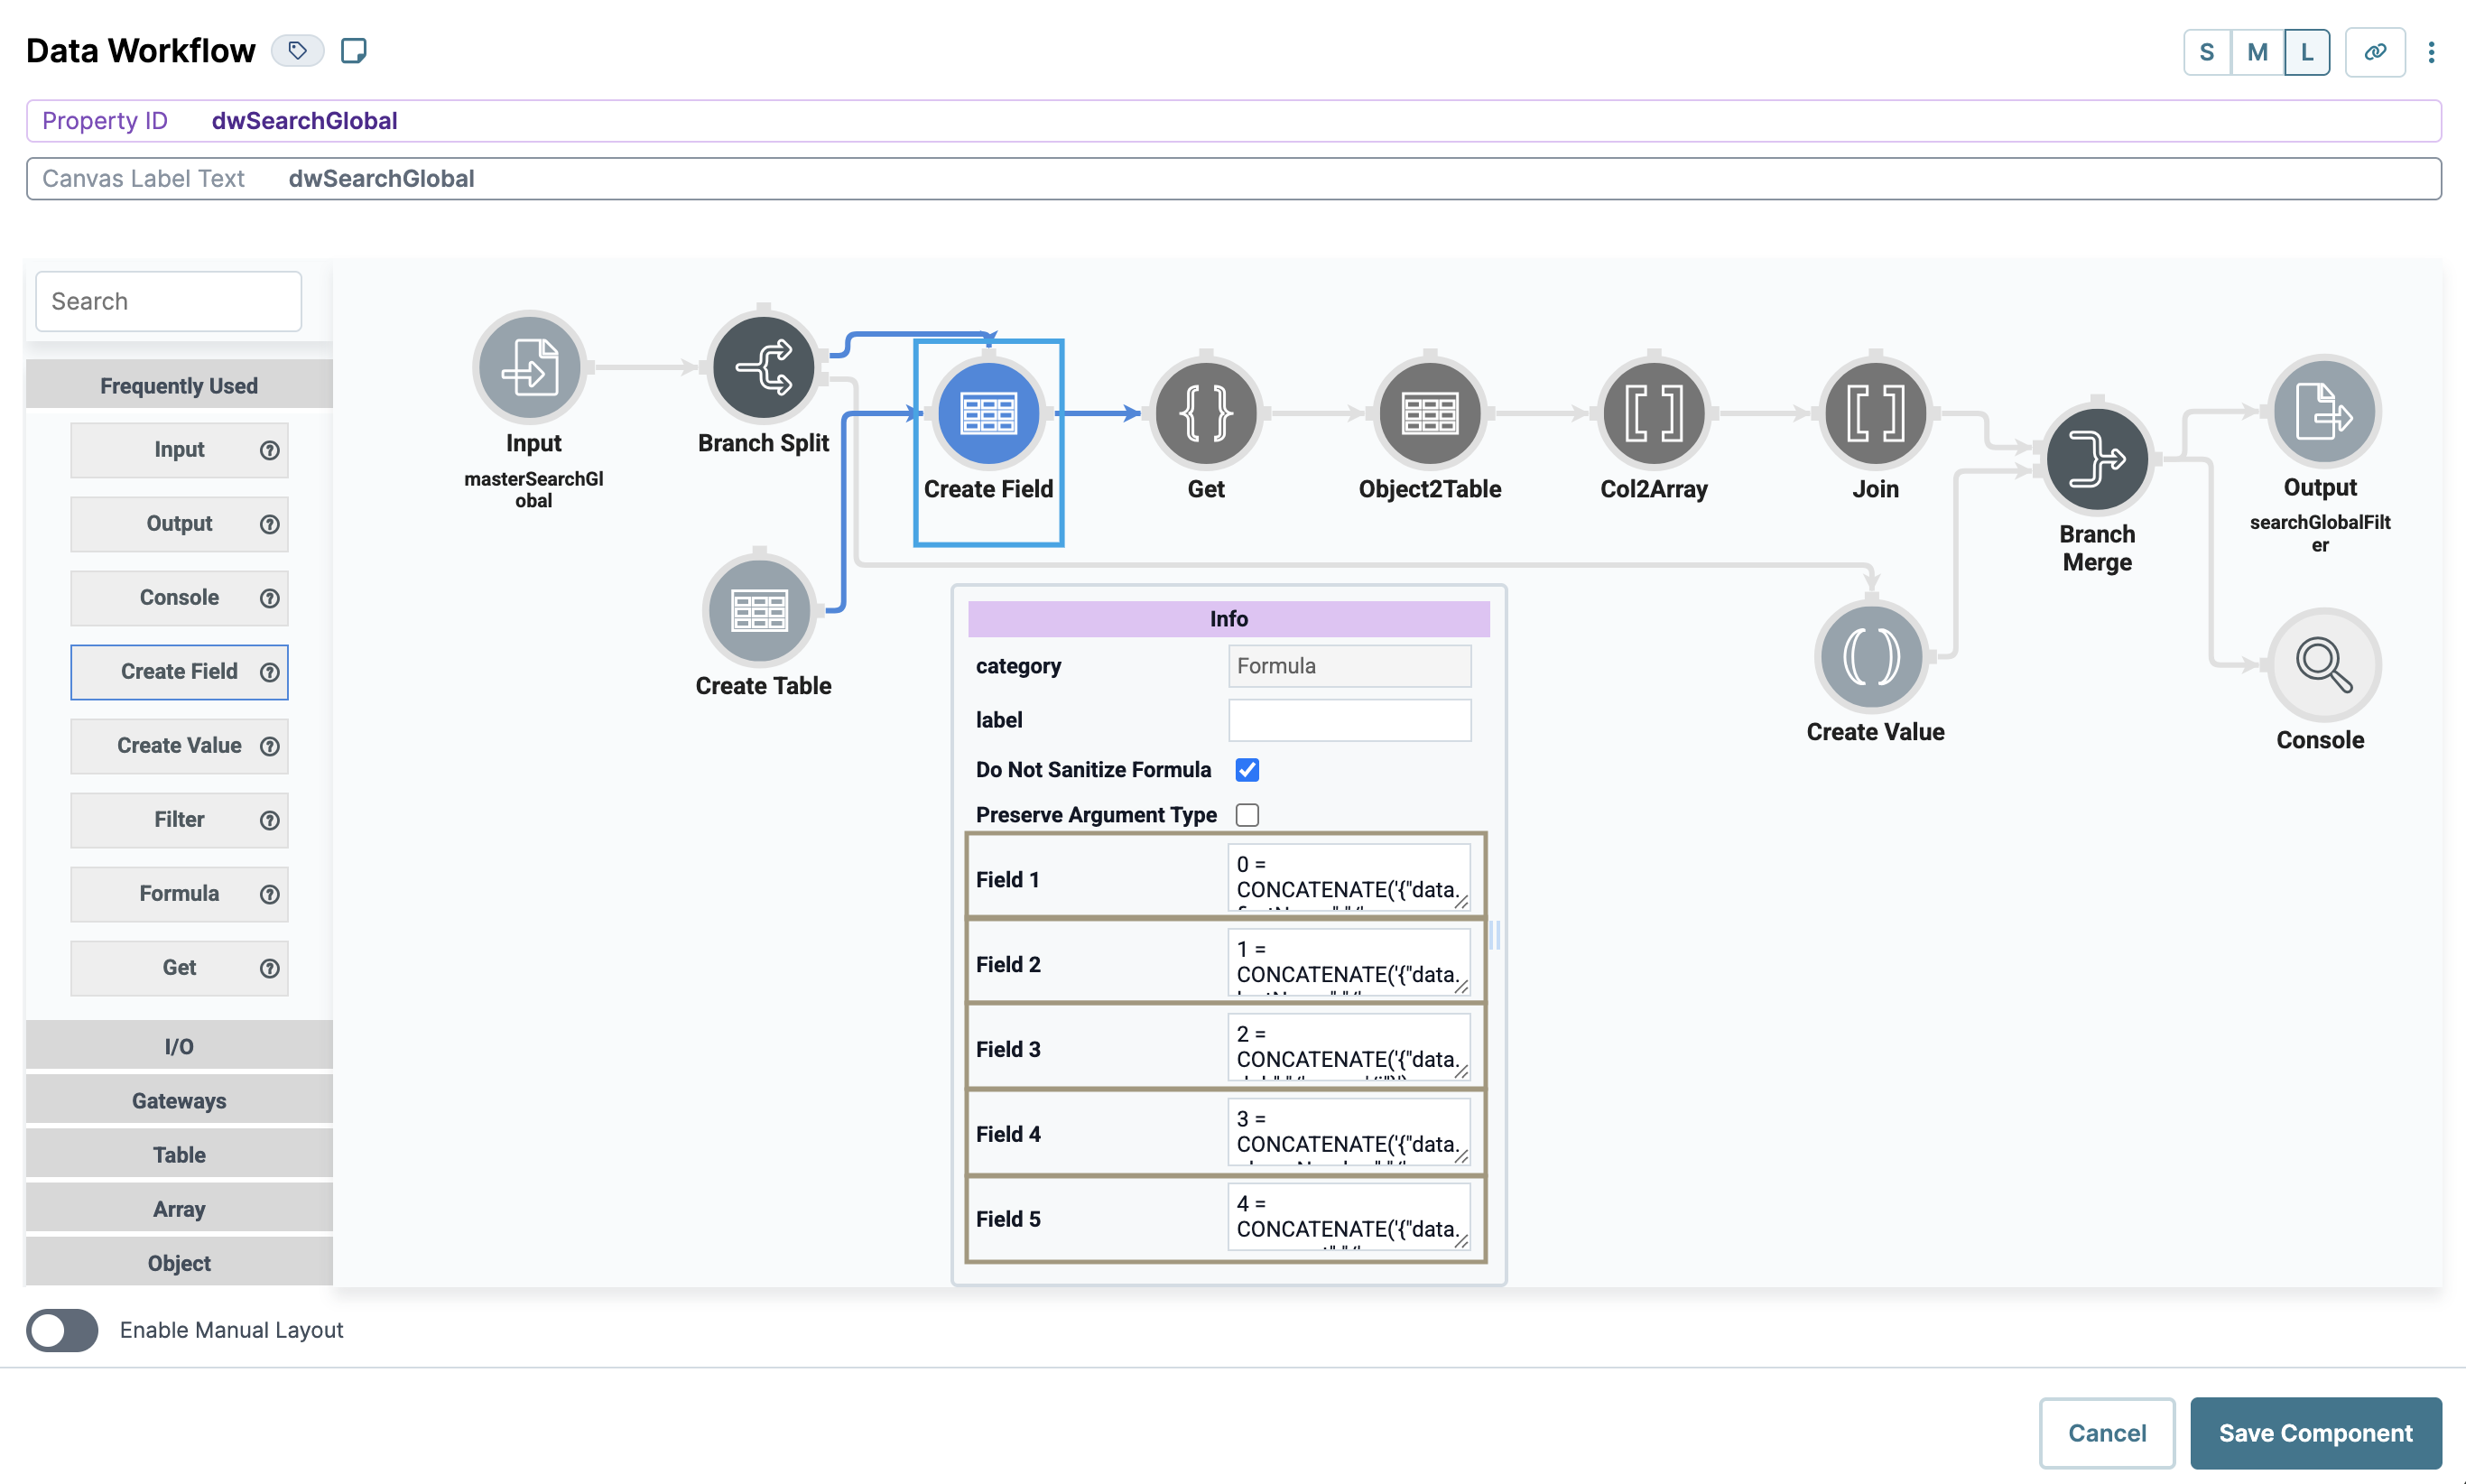
Next, you’ll update the dwSearchGlobal Data Workflow component in your snippet so it references your chosen dashboard fields.
Open the
dwSearchGlobalData Workflow component settings drawer.Select the Create Field operator to open its Info window.
Configure the operator’s Info window as follows:
Setting
Value
Category
Create Field
Label
Do Not Sanitize Formula
.png) (checked)
(checked)Preserve Argument Type
 (unchecked)
Field 1
0 = CONCATENATE('{"data.firstName":"/', _arg, '/i"}')
Field 2
1 = CONCATENATE('{"data.lastName":"/', _arg, '/i"}')
Field 3
2 = CONCATENATE('{"data.dob":"/', _arg, '/i"}')
Field 4
3 = CONCATENATE('{"data.phoneNumber":"/', _arg, '/i"}')
Field 5
4 = CONCATENATE('{"data.comment":"/', _arg, '/i"}')
Click Save Component.
Update the Plug-In Component
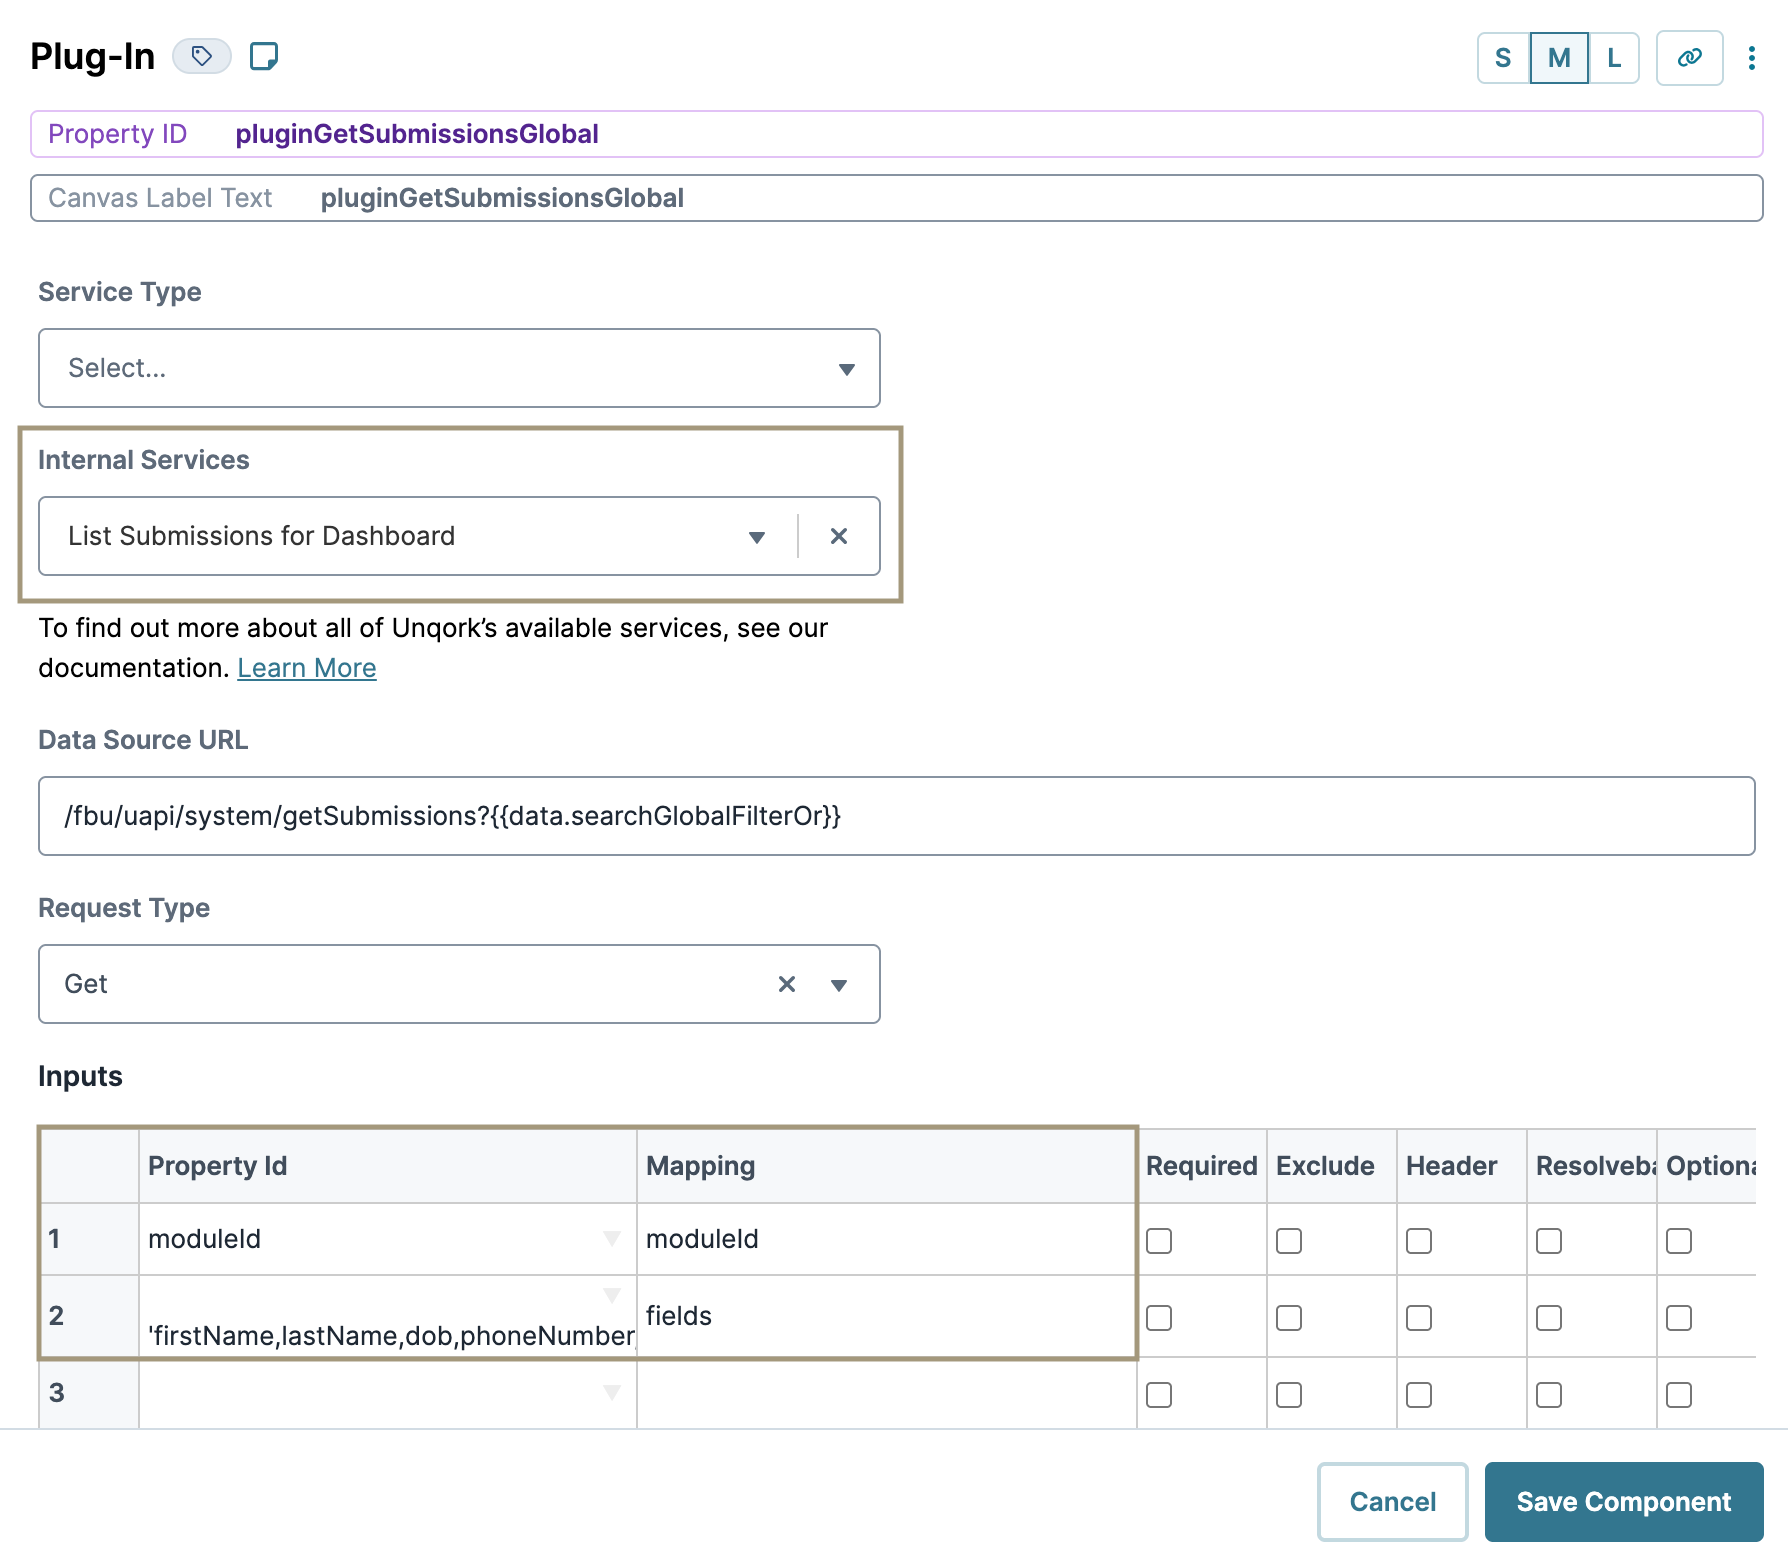
Next, you'll update the pluginGetSubmissions Plug-In component in your snippet. This Plug-In component retrieves submission data to display in your global search dashboard.
Open the
pluginGetSubmissionsPlug-In component settings drawer.In the Property ID and Canvas Label Text fields, replace the values with
pluginGetSubmissionsGlobal.In the Inputs table, enter the following:
#
Property ID
Mapping
1
moduleId
moduleId
2
'firstName,lastName,dob,phoneNumber,comment'
fields
Click Save Component.
Configure the ViewGrid Component
Next, let's configure a ViewGrid component to display your dashboard. This dashboard appears when end-users select the Global radio button.
Drag and drop a ViewGrid component inside your
panelGlobalSearchPanel component.In the Property ID and Canvas Label Text fields, enter
gridSubmissionsGlobal.In the Action field, enter
null. Doing so removes the default Submit button from your dashboard.In the Inputs table, enter
pluginGetSubmissionsGlobal.In the Display table, enter the following:
#
ID
Formula
Heading
1
dob
=MOMENT(MOMENT(dob), 'format', 'MM/DD/YYYY
Date of Birth
2
firstName
First Name
3
lastName
Last Name
4
phoneNumber
Phone Number
5
comment
Comment
The Moment.js formula in the dob row references and formats the
dobProperty ID in the snippet as MM/DD/YYYY in your dashboard. Doing so makes it easier to compare the date input search format (MM/DD/YYYY) to the dashboard value.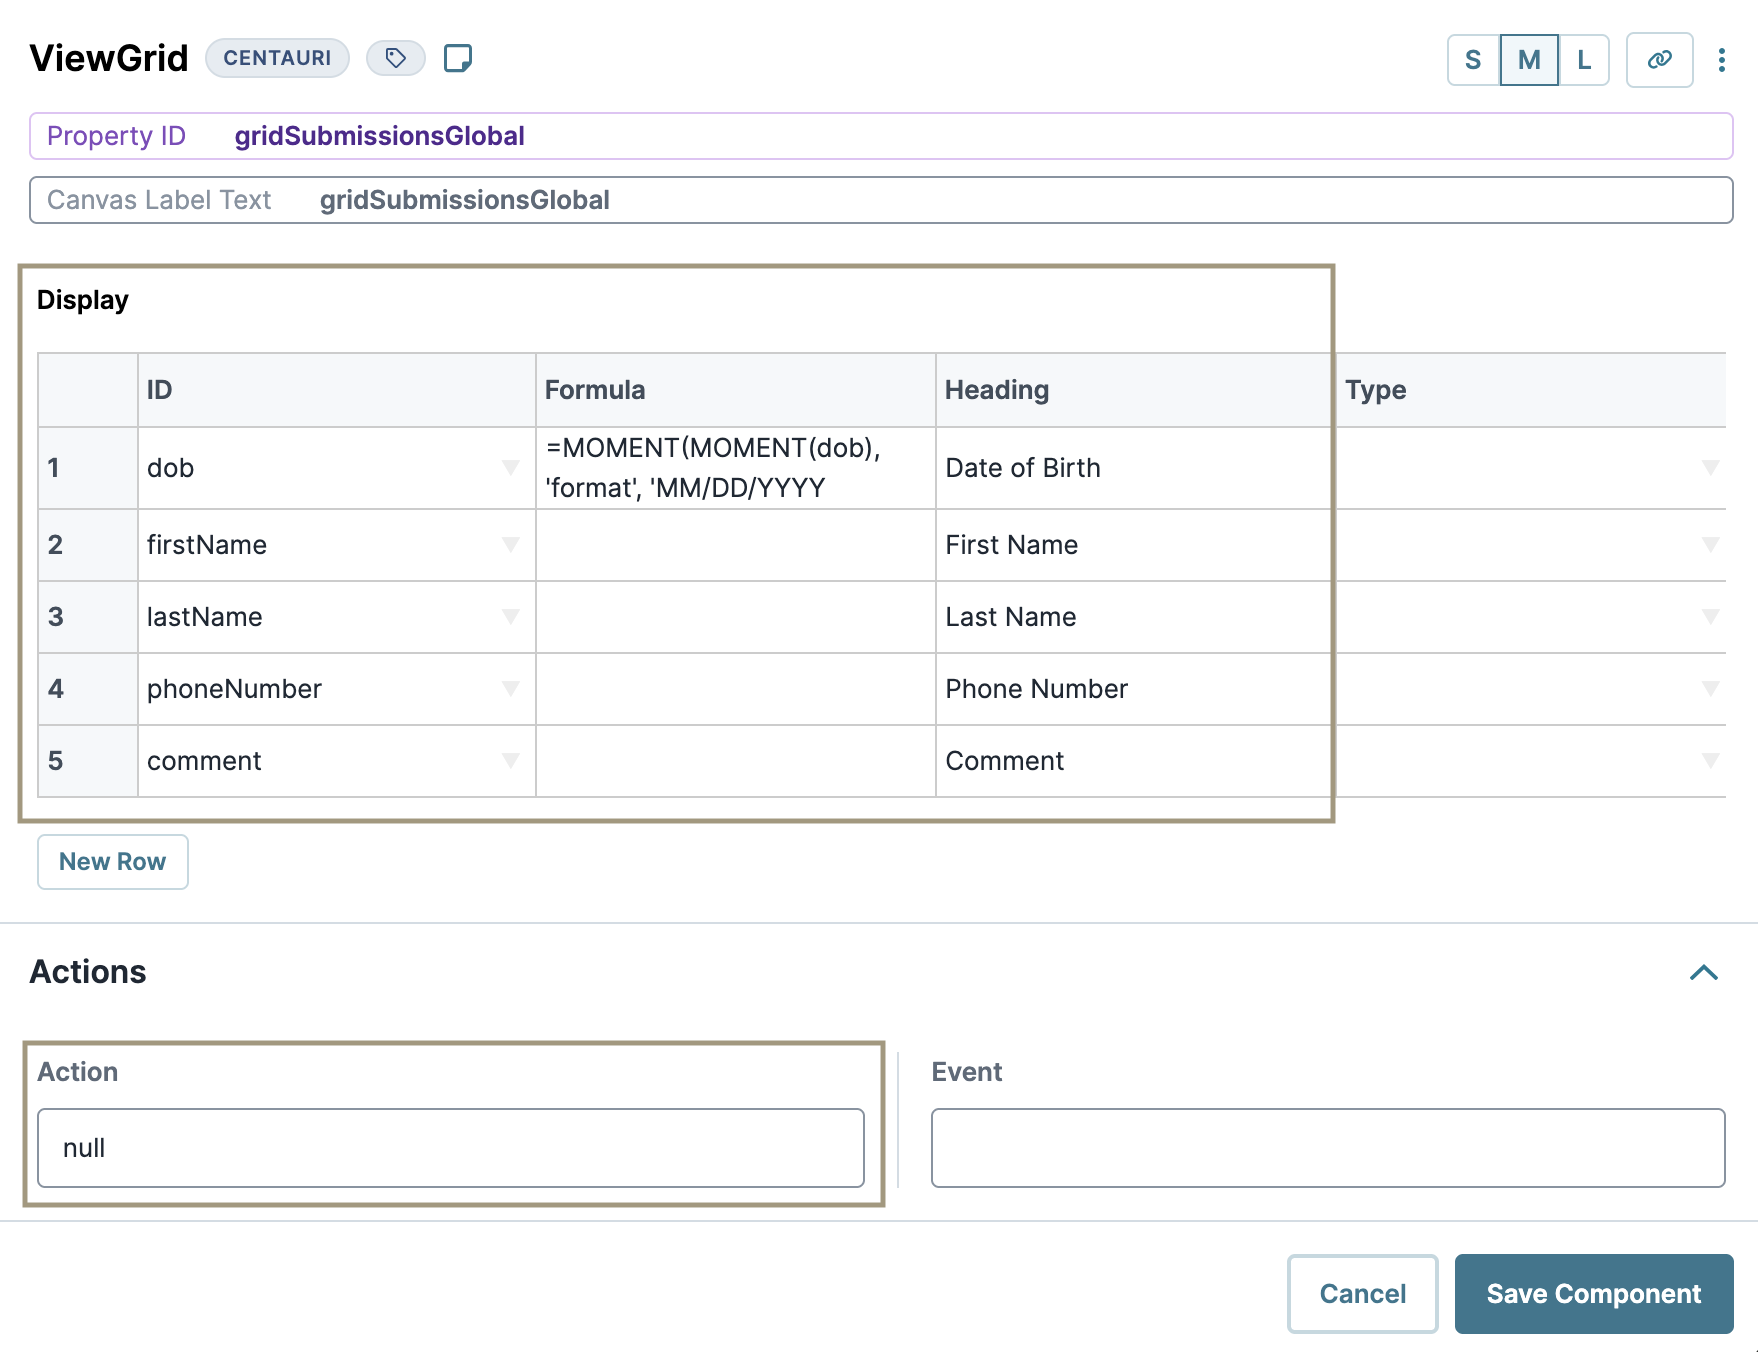
Click Save Component.
Configure the Plug-In Component
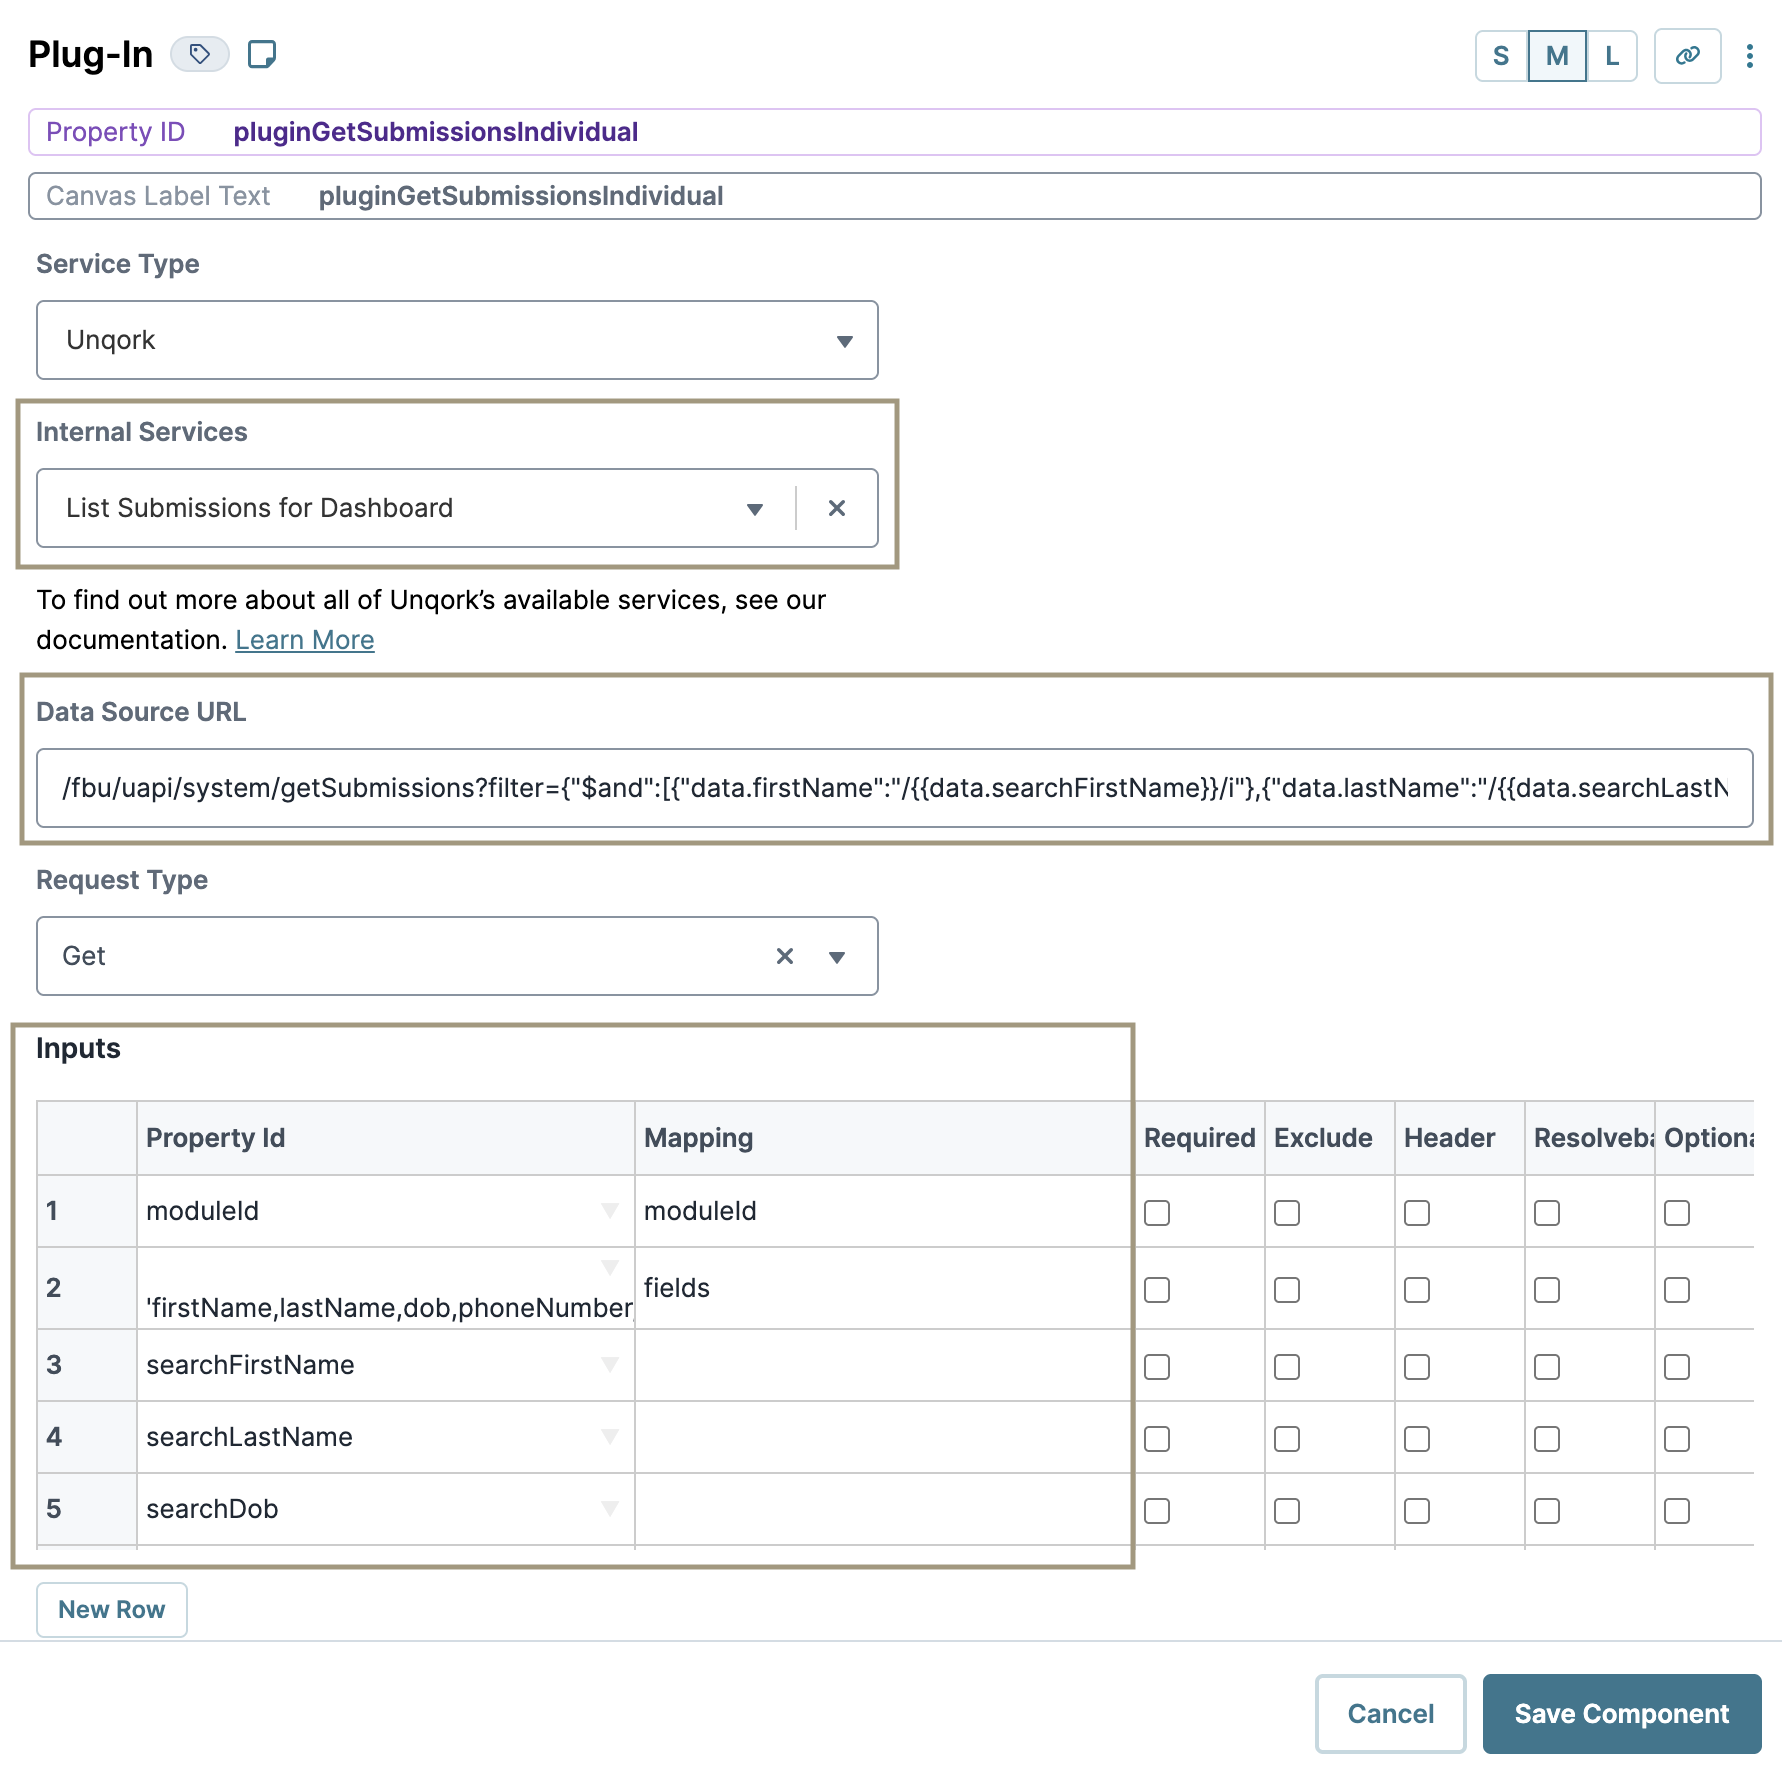
This Plug-In component performs an API call to retrieve submission data to display in your individual search dashboard.
Drag and drop a Plug-In component inside your
panelIndividualSearchPanel component.In the Property ID and Canvas Label Text fields, enter
pluginGetSubmissionsIndividual.From the Internal Services drop-down, select List Submissions for Dashboard.
In the Data Source URL, enter
/fbu/uapi/system/getSubmissions?filter={"$and":[{"data.firstName":"/{{data.searchFirstName}}/i"},{"data.lastName":"/{{data.searchLastName}}/i"},{"data.dob":"/{{data.searchDob}}/i"},{"data.phoneNumber":"/{{data.searchPhoneNumber}}/i"},{"data.comment":"/{{data.searchComment}}/i"}]}.Here, you're adding the MongoDB query to the Data Source URL that populates when you select the List Submissions for Dashboard service. This query references the search fields you'll add later.
In the Inputs table, enter the following:
#
Property ID
Mapping
1
moduleId
moduleId
2
'firstName,lastName,dob,phoneNumber,comment'
fields
3
searchFirstName
4
searchLastName
5
searchDob
6
searchPhoneNumber
7
searchComment
Set the Trigger Type as Watch.
Click Save Component.
Configure the HTML Element Component
This HTML Element component serves as a label for your individual search fields.
Drag and drop an HTML Element component onto your canvas, placing it below the
pluginGetSubmissionsIndividualPlug-In component.In the Property ID field, enter
htmlIndividualFilter.In the Content field, enter
Filter.In the Tag field, enter
h4.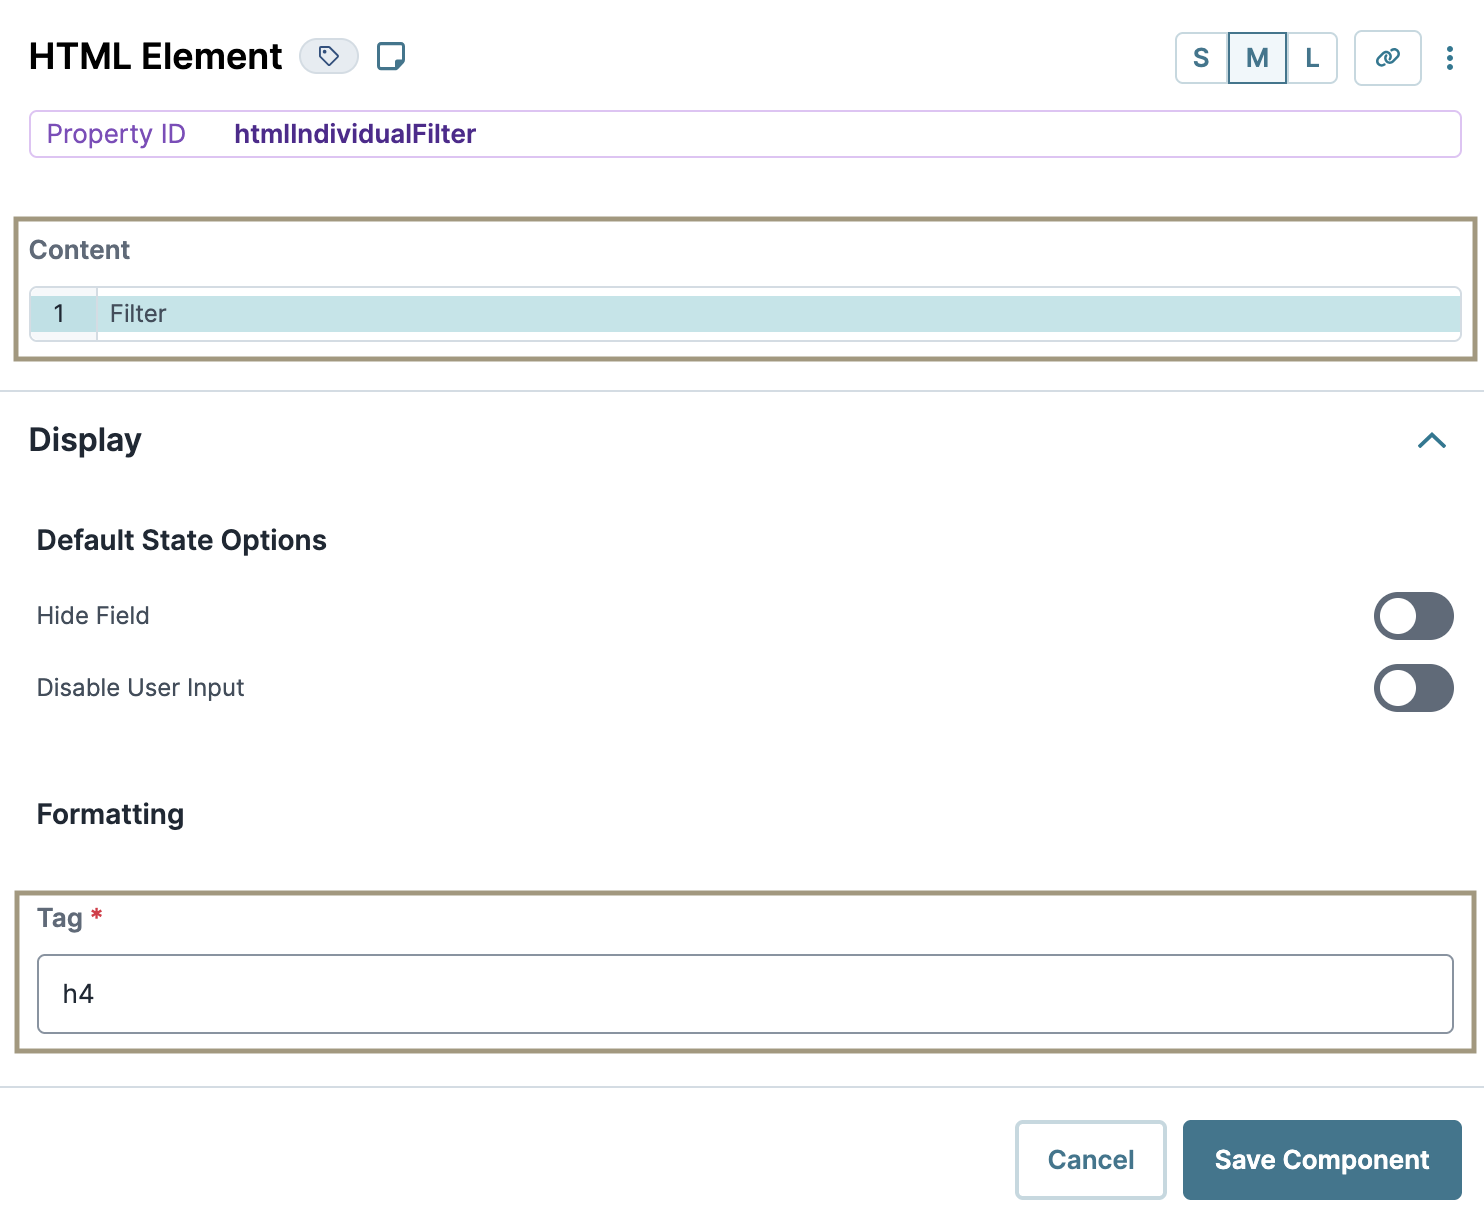
Click Save Component.
Configure the Columns Component
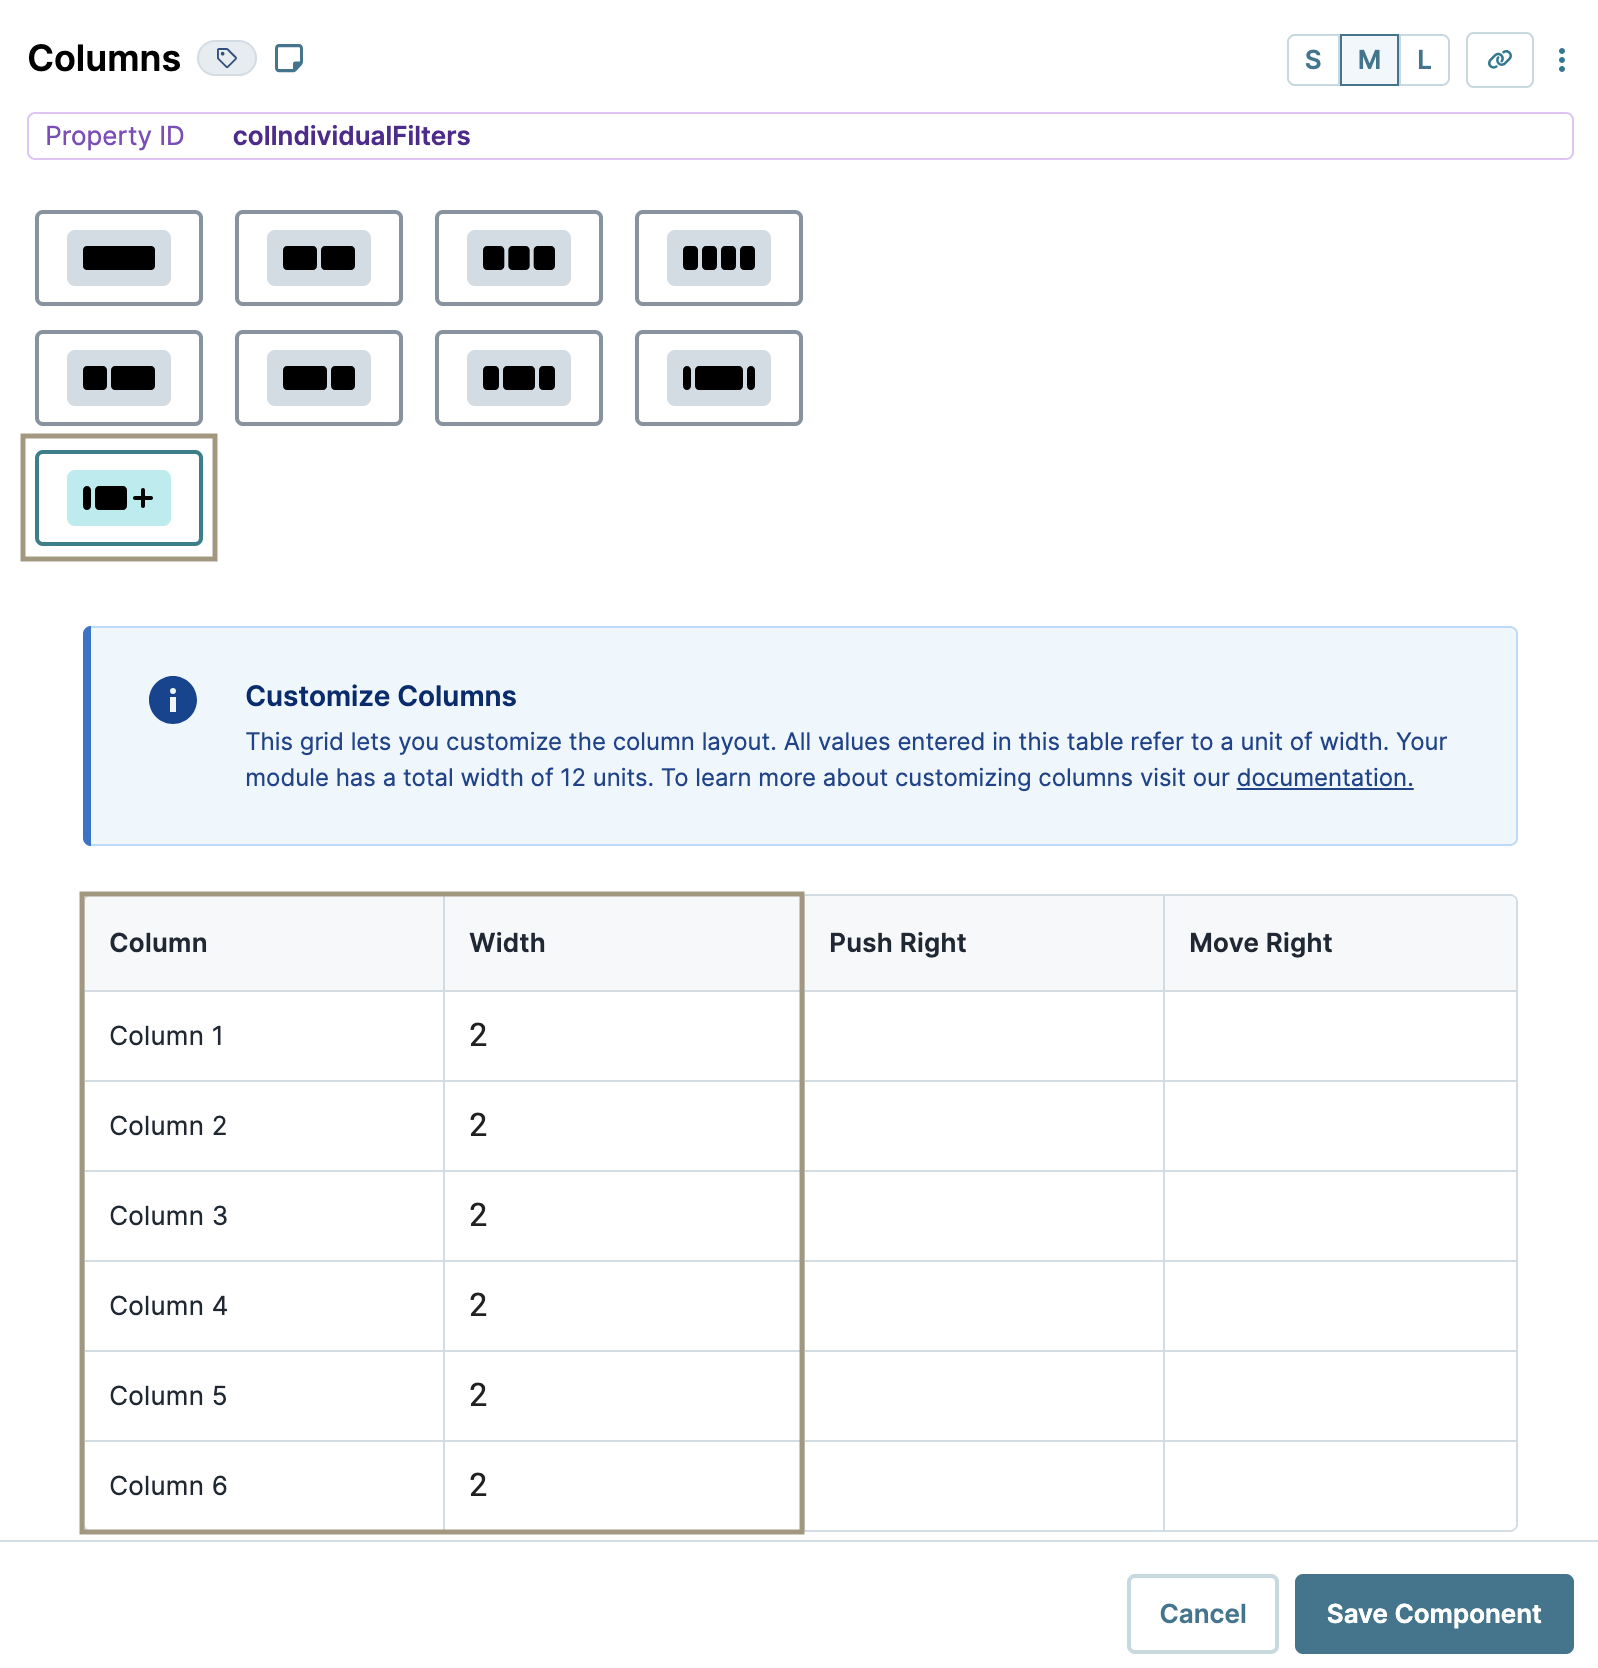
A Columns component will keep your individual search fields organized.
Drag and drop a Columns component onto your canvas, placing it below your
htmlIndividualFilterHTML Element component.In the Property ID field, enter
colIndividualFilters.Select Customize Columns as the Column Layout.
Click Add New Row until you have six columns.
In the Width field for each column, enter
2.The maximum total width of your columns is 12. You can divide this width however you'd like among your columns.
Click Save Component.
Configure the Date Input Component
Now, let's configure search fields for your end-users to add information.
Drag and drop a Date Input component inside the first (far-left) column of the
colIndividualFiltersColumns component.In the Property ID field, enter
searchDob.In the Label Text field, enter
Date of Birth.Click Save Component.
Configure the Text Field Components
Drag and drop four Text Field components inside the next four columns, from left to right, of the
colIndividualFiltersColumns component.In the Property ID and Label Text fields, enter the following for each component:
#
Property ID
Label Text
1
searchFirstName
First Name
2
searchLastName
Last Name
3
searchPhoneNumber
Phone Number
4
searchComment
Comment
Click Save Component for each component as you add it.
Configure the ViewGrid Component
Next, add another ViewGrid component to display your dashboard. This dashboard displays when end-users select the Individual radio button.
Drag and drop a ViewGrid component onto your canvas, placing it below your
colIndividualFiltersColumns component.In the Property ID and Canvas Label Text fields, enter
gridSubmissionsIndividual.In the Inputs table, enter
pluginGetSubmissionsIndividual.In the Display table, enter the following:
#
ID
Formula
Heading
1
dob
=MOMENT(MOMENT(dob), 'format', 'MM/DD/YYYY')
Date of Birth
2
firstName
First Name
3
lastName
Last Name
4
phone
Phone Number
5
comment
Comment
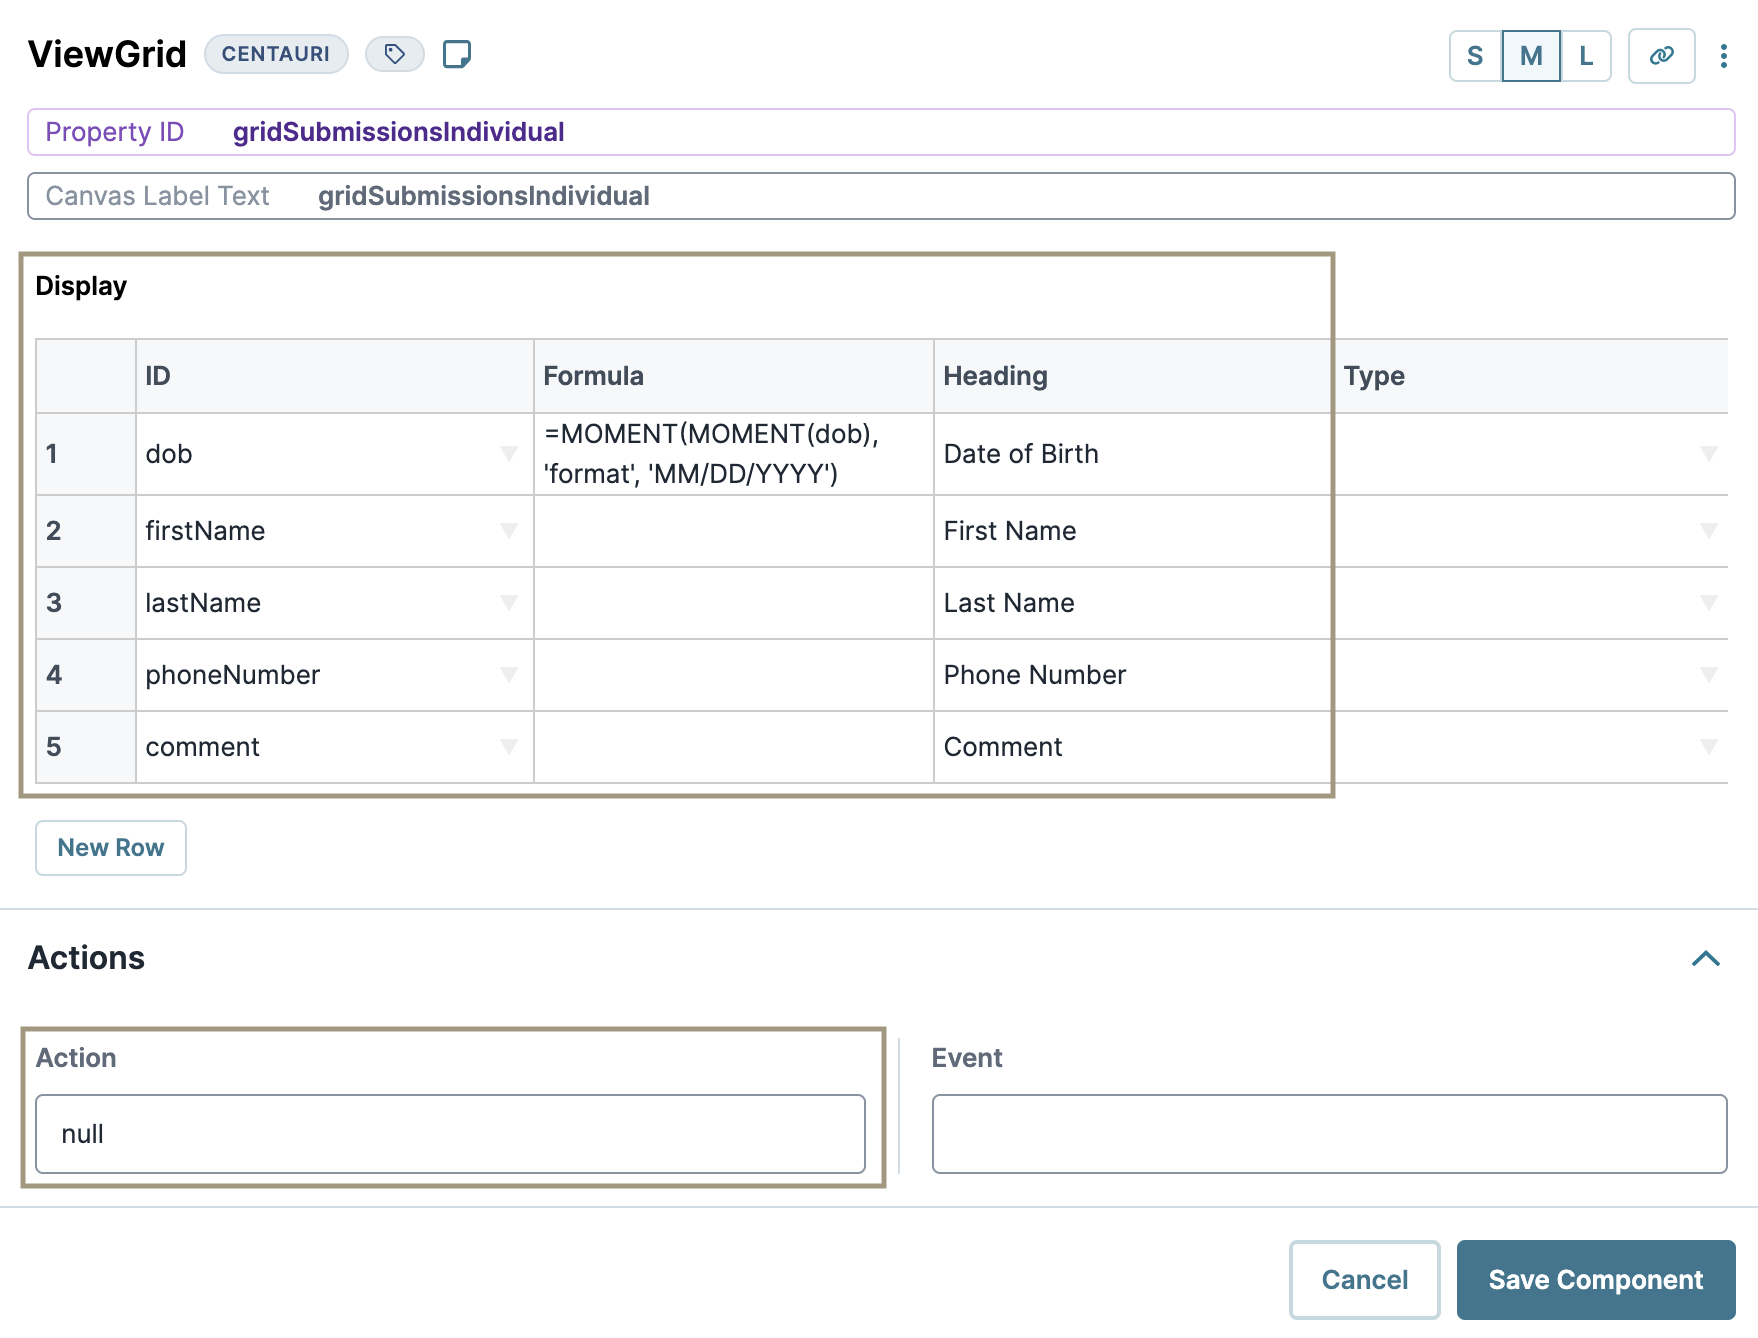
In the Action field, enter
null.Click Save Component.
Configure the Radio Buttons Component
The Radio Buttons component acts as the switch between global and individual search options. When end-users select Global, the global search options and dashboard display. When end-users select Individual, the individual search options and dashboard display.
Drag and drop a Radio Buttons component onto your canvas, placing it above your
panelGlobalSearchPanel component.In the Property ID field, enter
typeOfFilter.In the Label Text field, enter
What type of filter would you like to see?.In the Values table, enter the following:
#
Label
Value
1
Global
global
2
Individual
individual
Click Save Component.
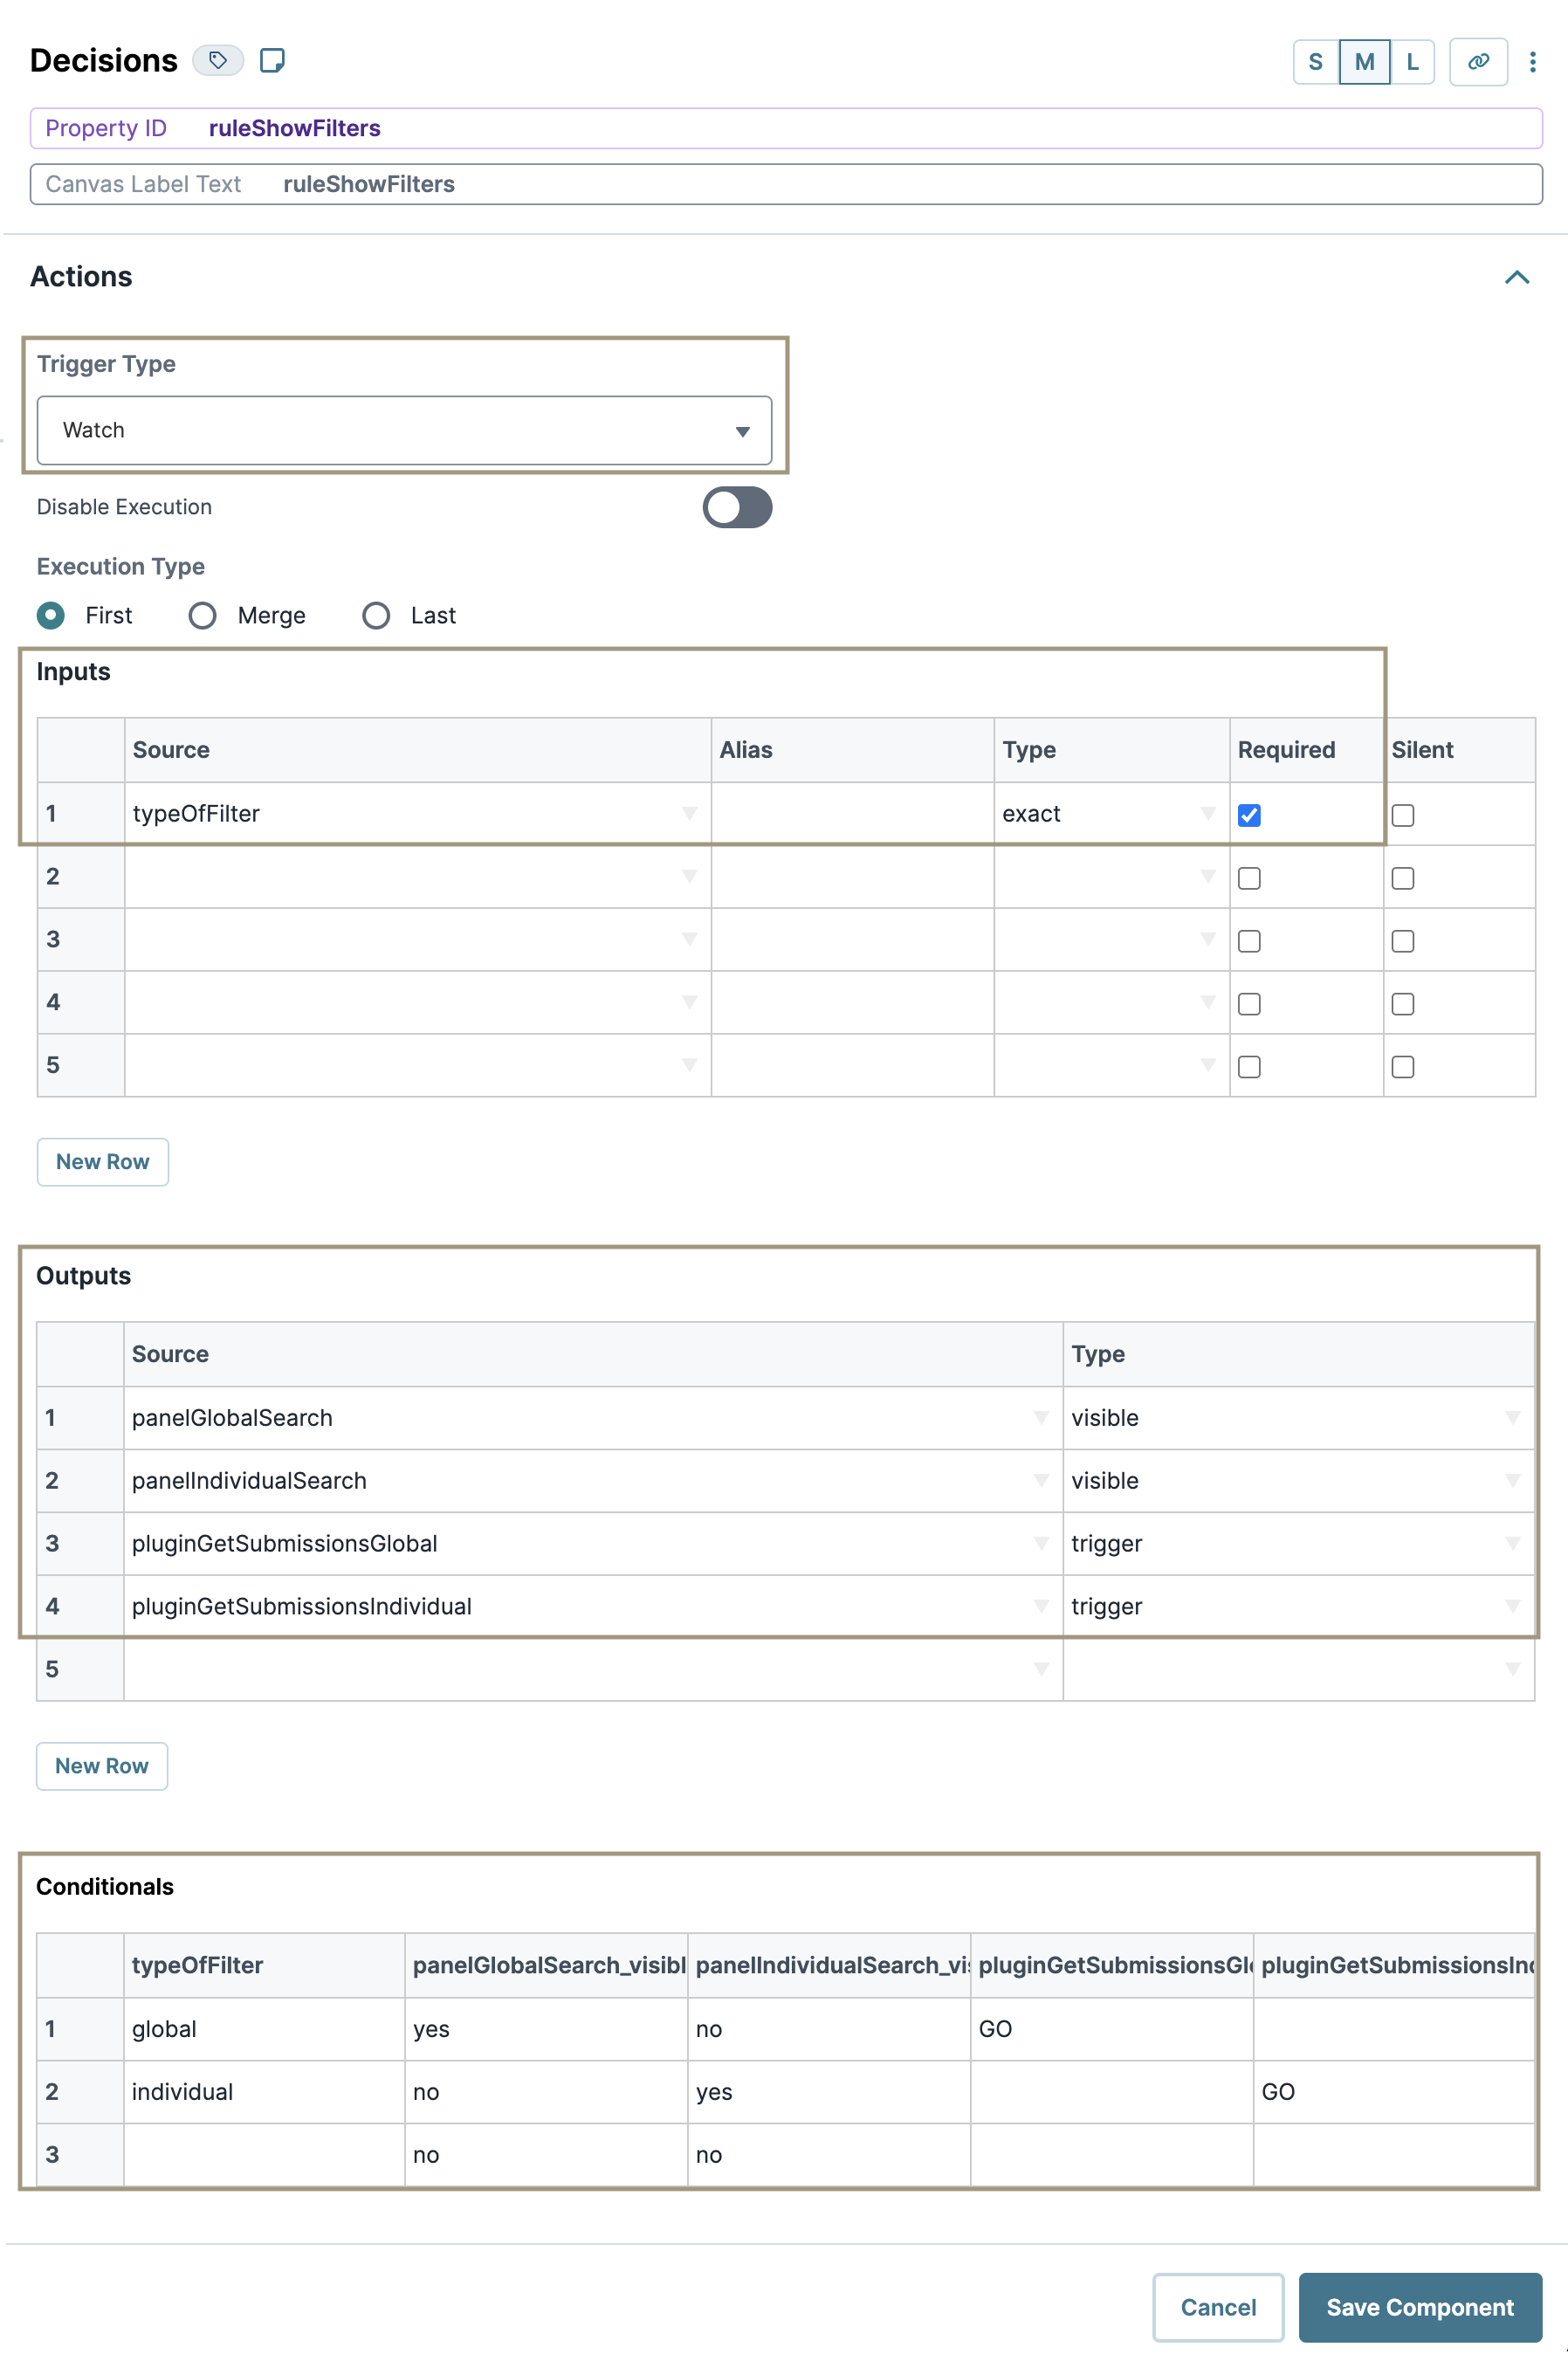
Configure the Decisions Component
Next, you’ll configure a Decisions component to display either the individual or global search options, and their respective dashboards. Which displays depends on the end-user's radio button section.
Drag and drop a Decisions component onto your canvas, placing it below your
typeOfFilterRadio Buttons component.In the Property ID and Canvas Label Text fields, enter
ruleShowFilters.Set the Trigger Type as Watch.
In the Inputs table, enter the following:
#
Property ID
Type
Required
1
typeOfFilter
exact
.png) (checked)
(checked)In the Outputs table, enter the following:
#
Property ID
Type
1
panelGlobalSearch
visible
2
panelIndividualSearch
visible
3
pluginGetSubmissionsGlobal
trigger
4
pluginGetSubmissionsIndividual
trigger
In the Conditional table, enter the following:
#
typeOfFilter
panelGlobalSearch_visible
panelIndividualSearch_visible
pluginGetSubmissionsGlobal_trigger
pluginGetSubmissionsIndividual_trigger
1
global
yes
no
GO
2
individual
no
yes
GO
3
no
no
Click Save Component.
Save your module.
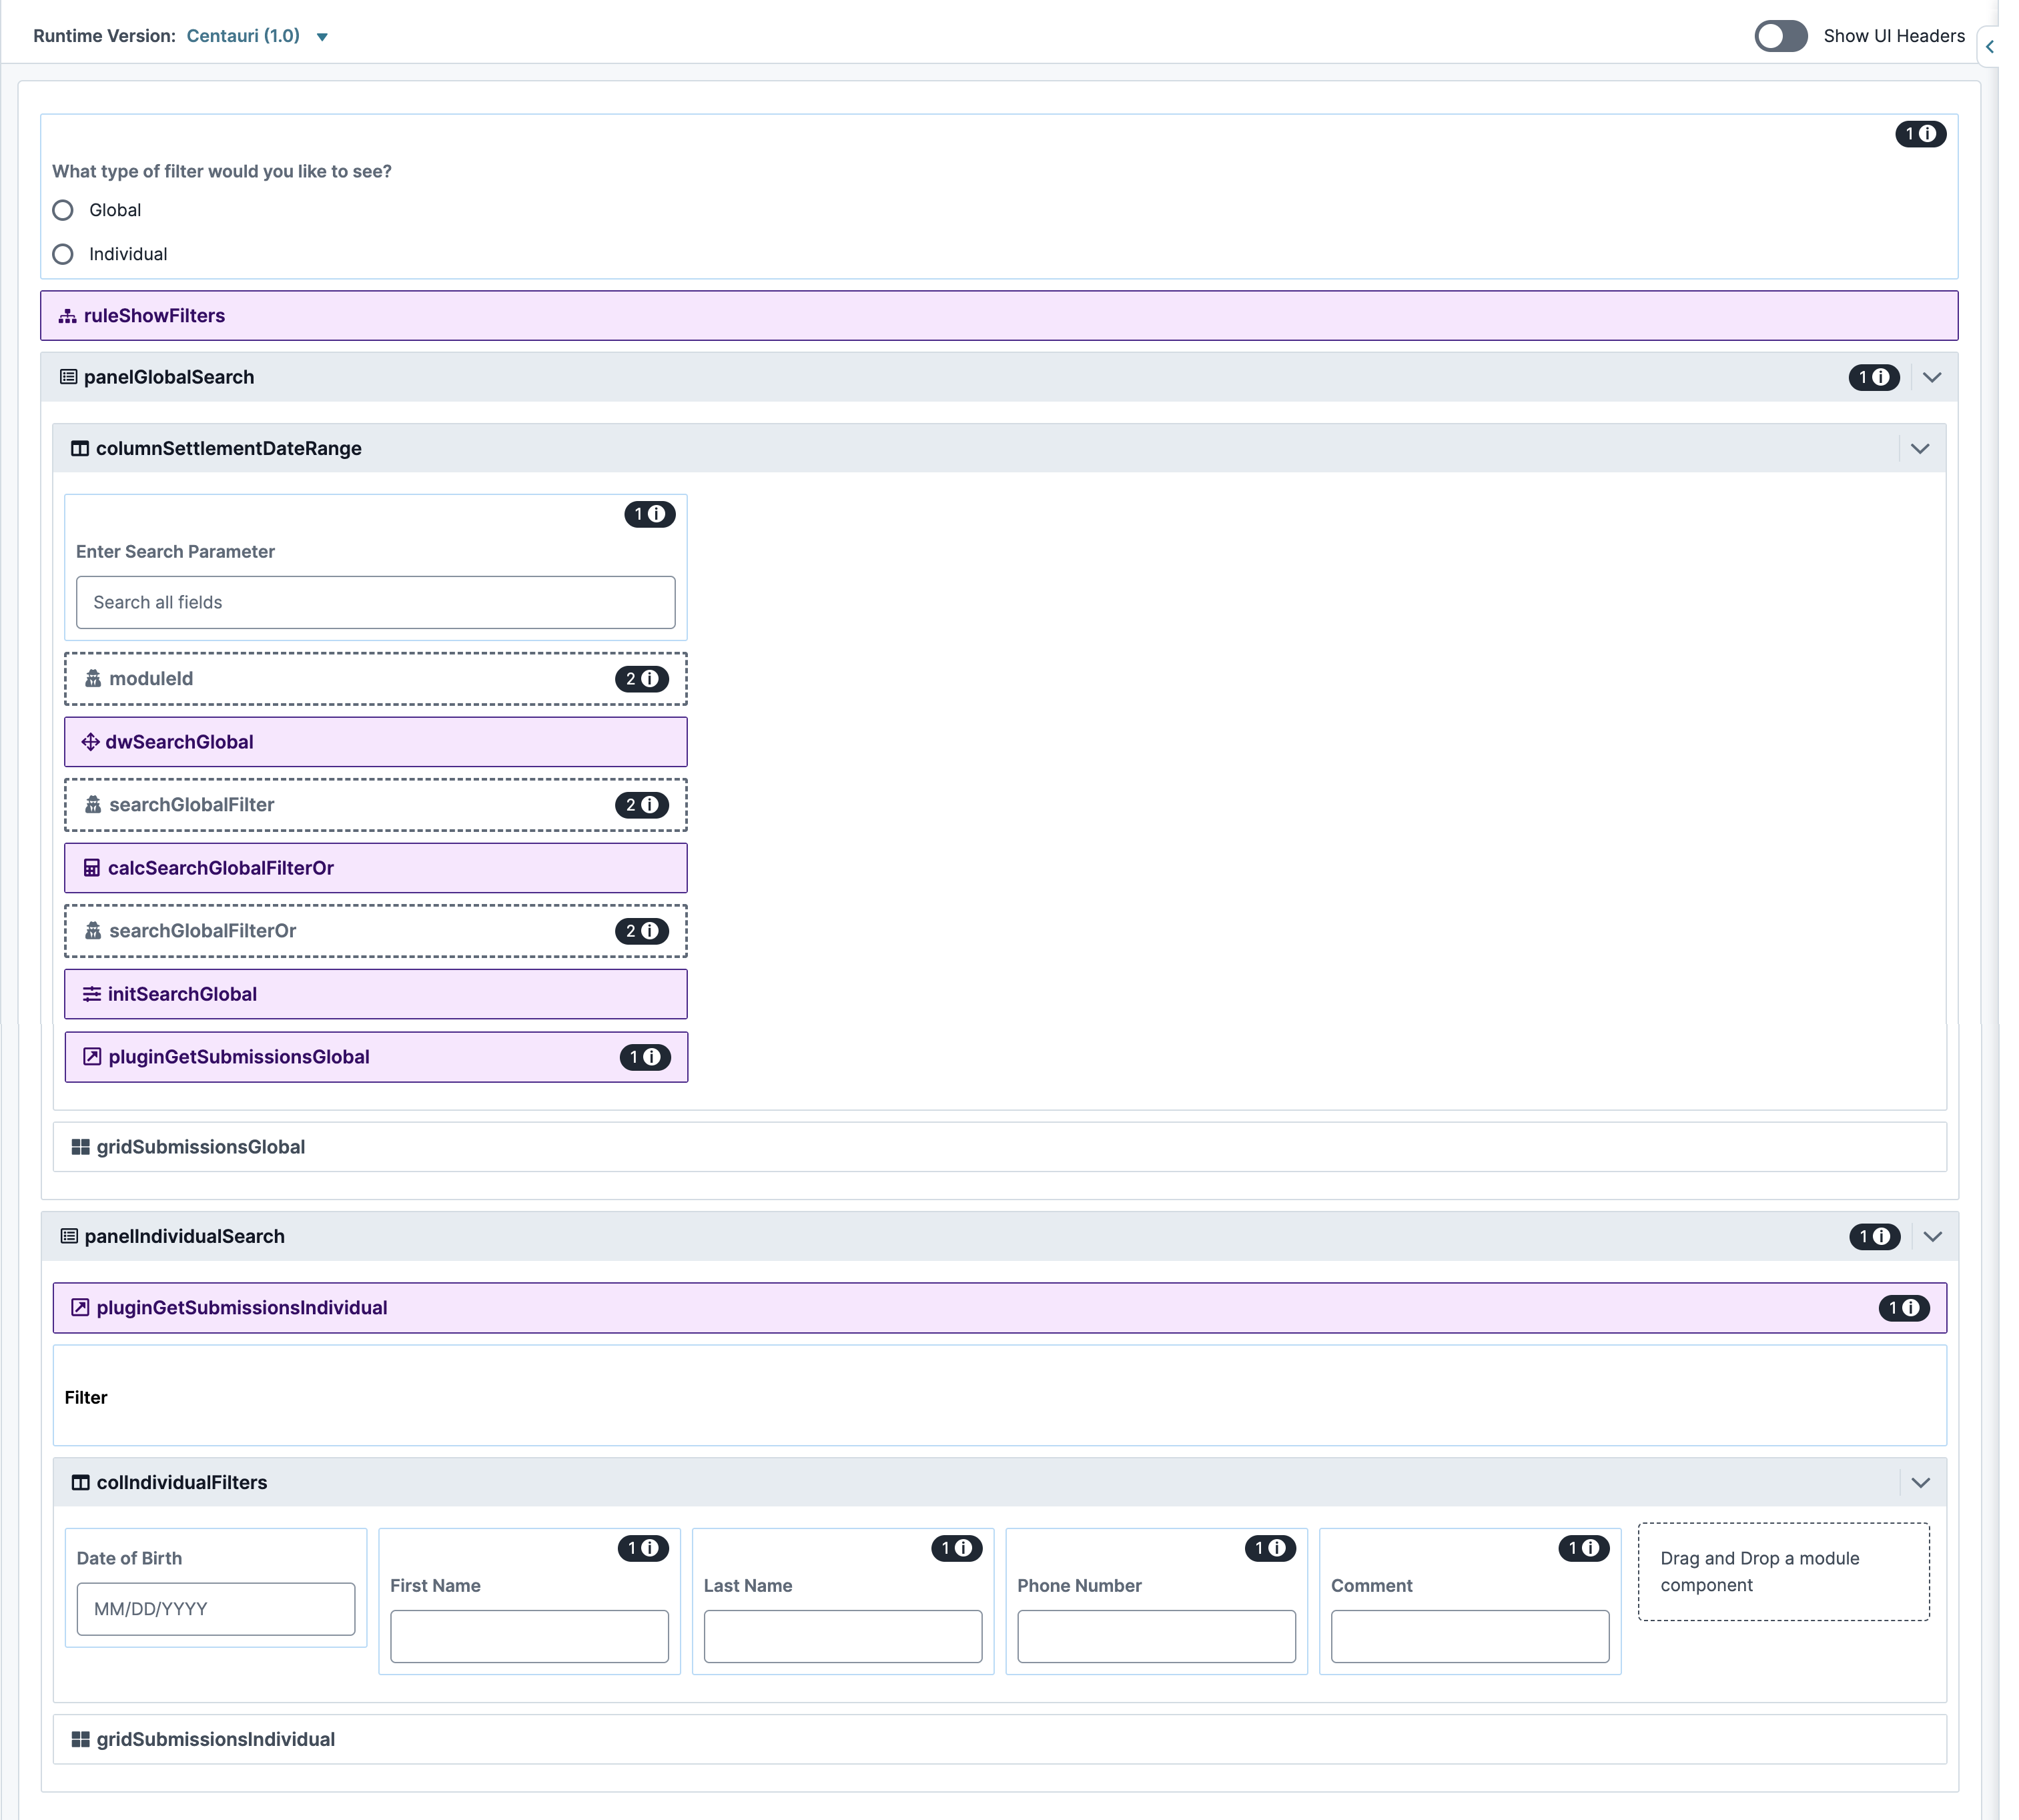
Here's how your completed dashboard looks in the Module Builder:
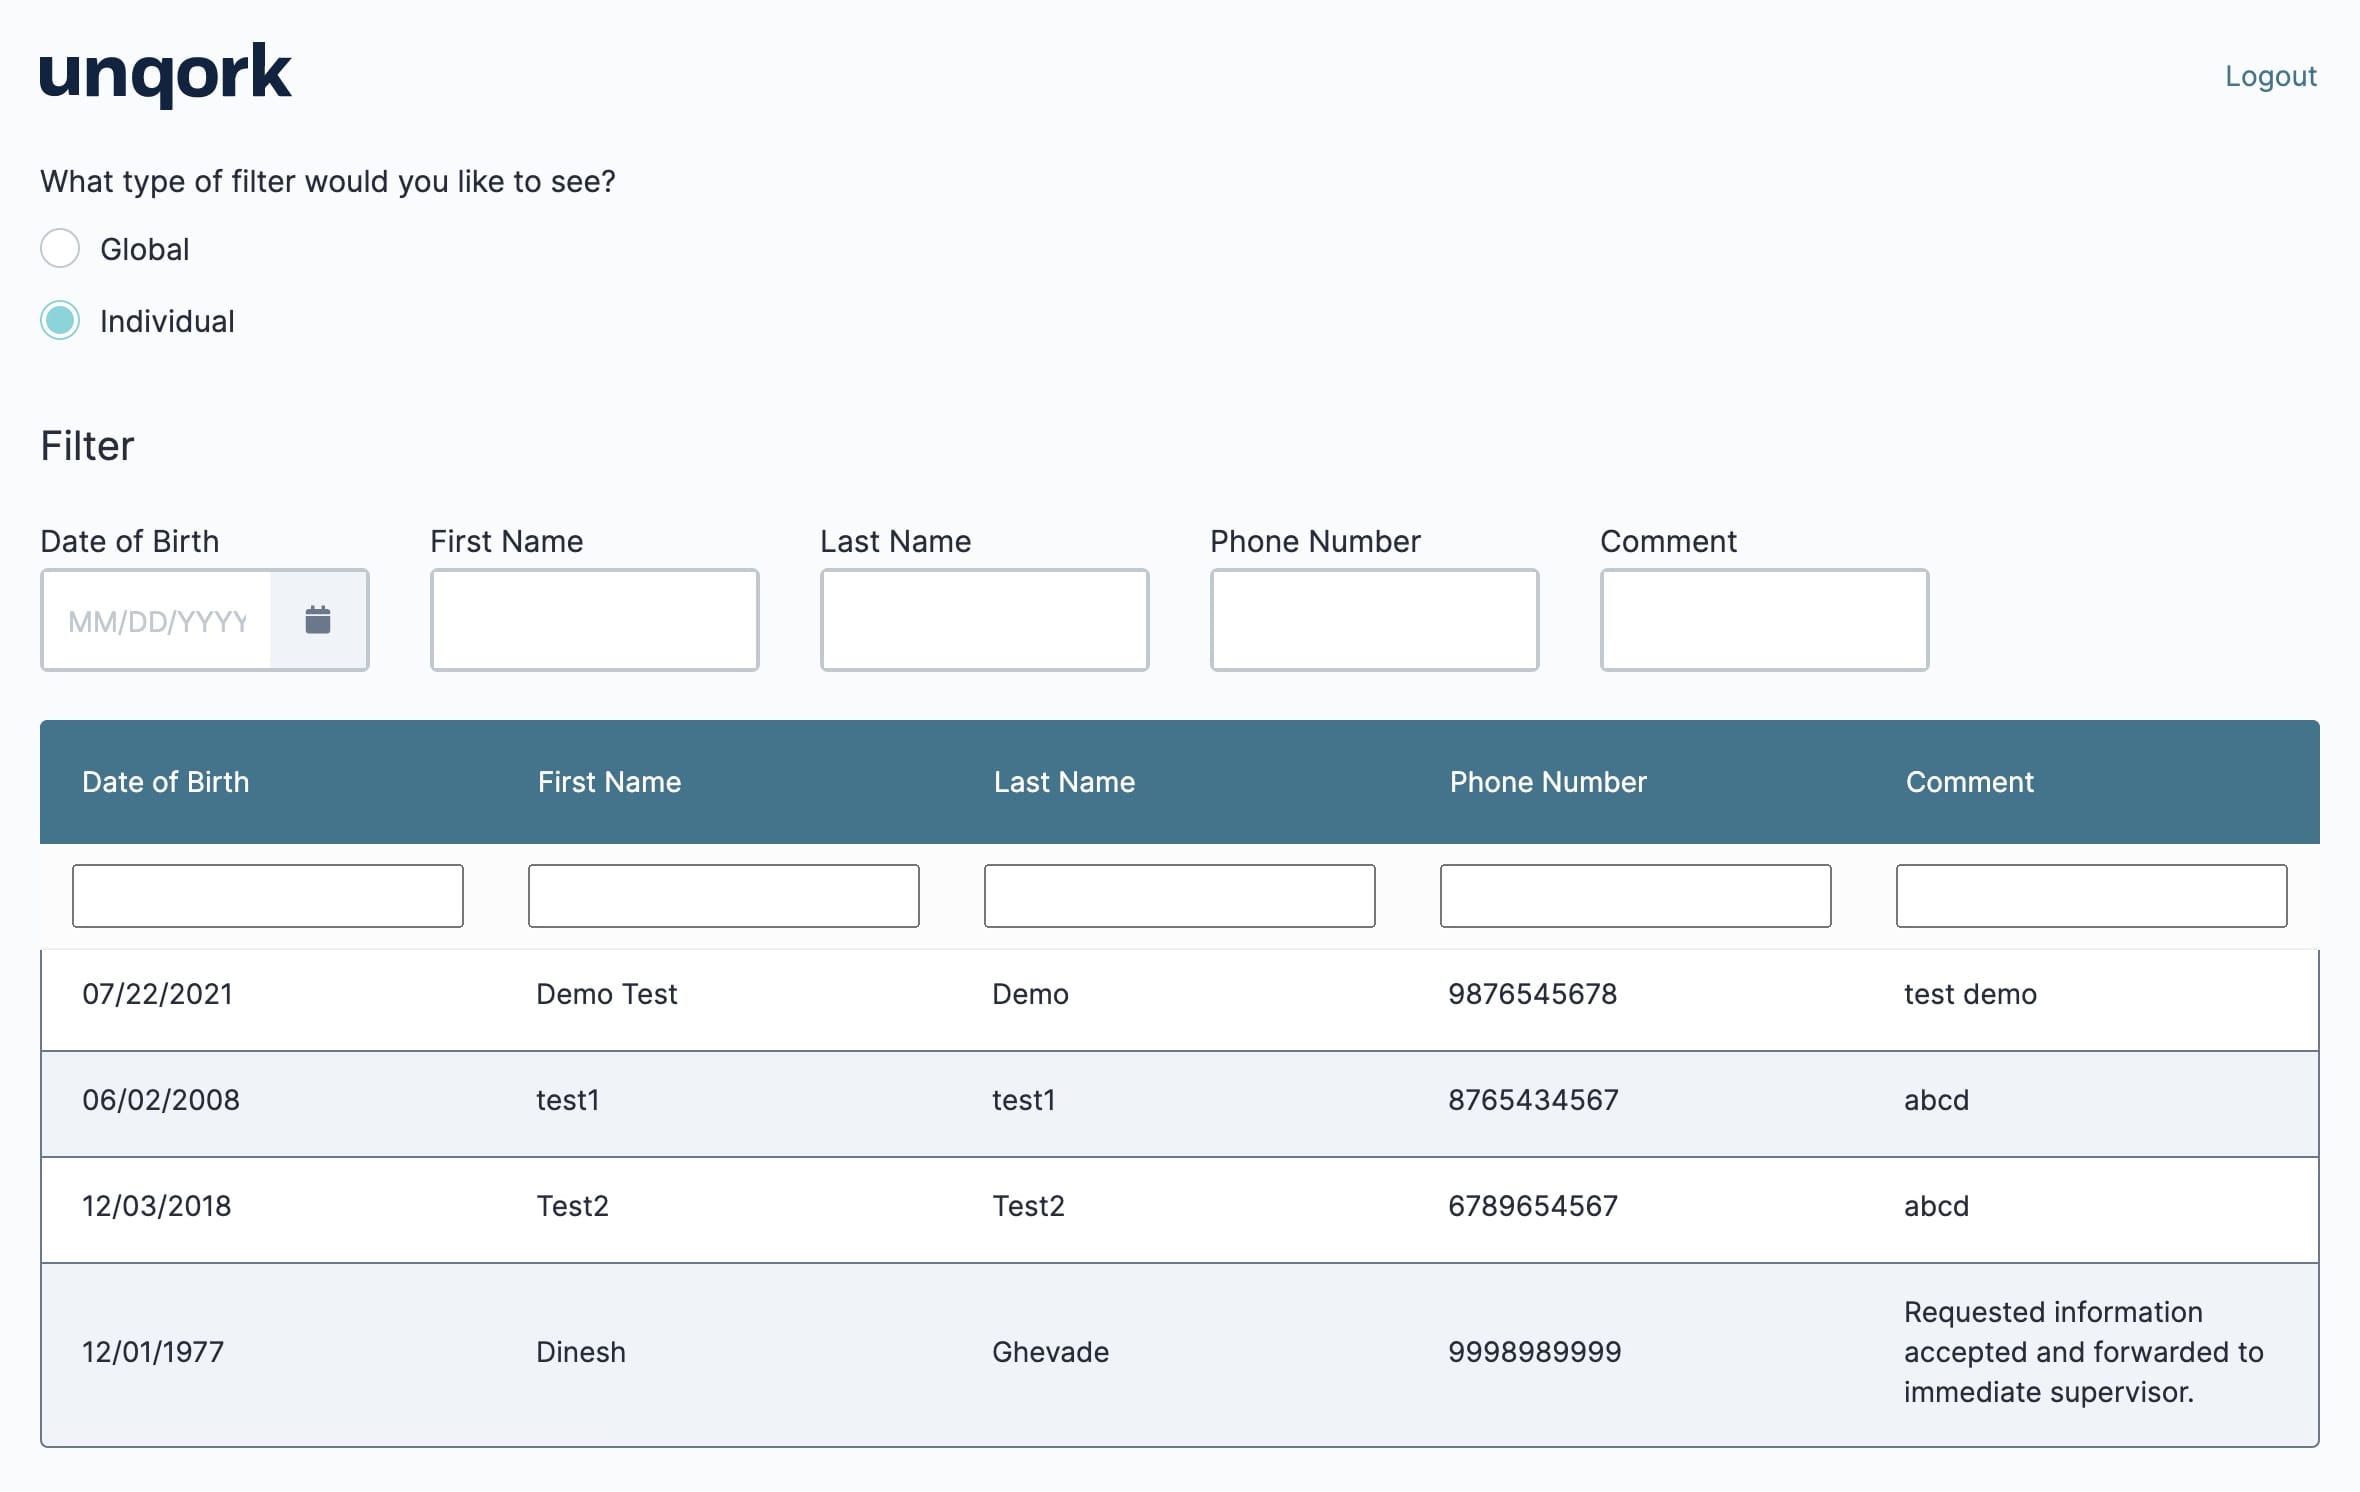
Preview your module in Express View and select the Individual radio button. Use the filters to enter information and locate specific submission data. As you enter text in the filters, the dashboard populates with matches automatically.
Configure the Panel Components
These Panel components act as containers for the components that follow. Your panelGlobalSearch Panel component manages the global search operation. Your panelIndividualSearch Panel component manages the individual search operation.
In the Module Builder, drag and drop two Panel components onto your canvas.
In the Property ID field, enter the following, as well as enabling the Hide Panel setting for each component:
#
Property ID
Hide Panel
1
panelGlobalSearch
.png) (ON)
(ON)2
panelIndividualSearch
.png) (ON)
(ON)Later, you'll use a Decisions component to display these Panel components depending on which radio button option the end-users select.
Click Save for each component as you add it.
Add the Submission Search Snippet
Next, you'll add the Submission Search snippet to your dashboard module to configure the global search functionality. Once you've added the snippet, you'll reconfigure a few of its components.
To add the Submission Search snippet to your module:
Above the Component Tray, to the left of the Module Builder, click Snippets.
In the search bar, enter
Submission Search.Drag and drop the Submission Search snippet inside the
panelGlobalSearchPanel component.Delete the
panelSubmissionSearchPanel component.Save your module.
Update the Text Field Component
Next, you'll update the masterSearchGlobal Text Field component in your snippet. When you open the component, you’ll see that it includes placeholder text that does not match this configuration. The placeholder text tells end-users what search parameters they can use in the global search.
Open the
masterSearchGlobalText Field component settings.In the Placeholder Text field, replace the value with
Search all fields.
Click Save.
Update the Hidden Component
Next, you'll update the moduleId Hidden component in the snippet. This component stores the module ID of your source module. You can retrieve the module ID from the source module’s hyperlink as follows: https://training.unqork.io/#/form/5ebec714ce23f0020fbf9667/edit.
Open the
moduleIdHidden component settings.In the Default Value field, enter
5ebec714ce23f0020fbf9667.Click Save.
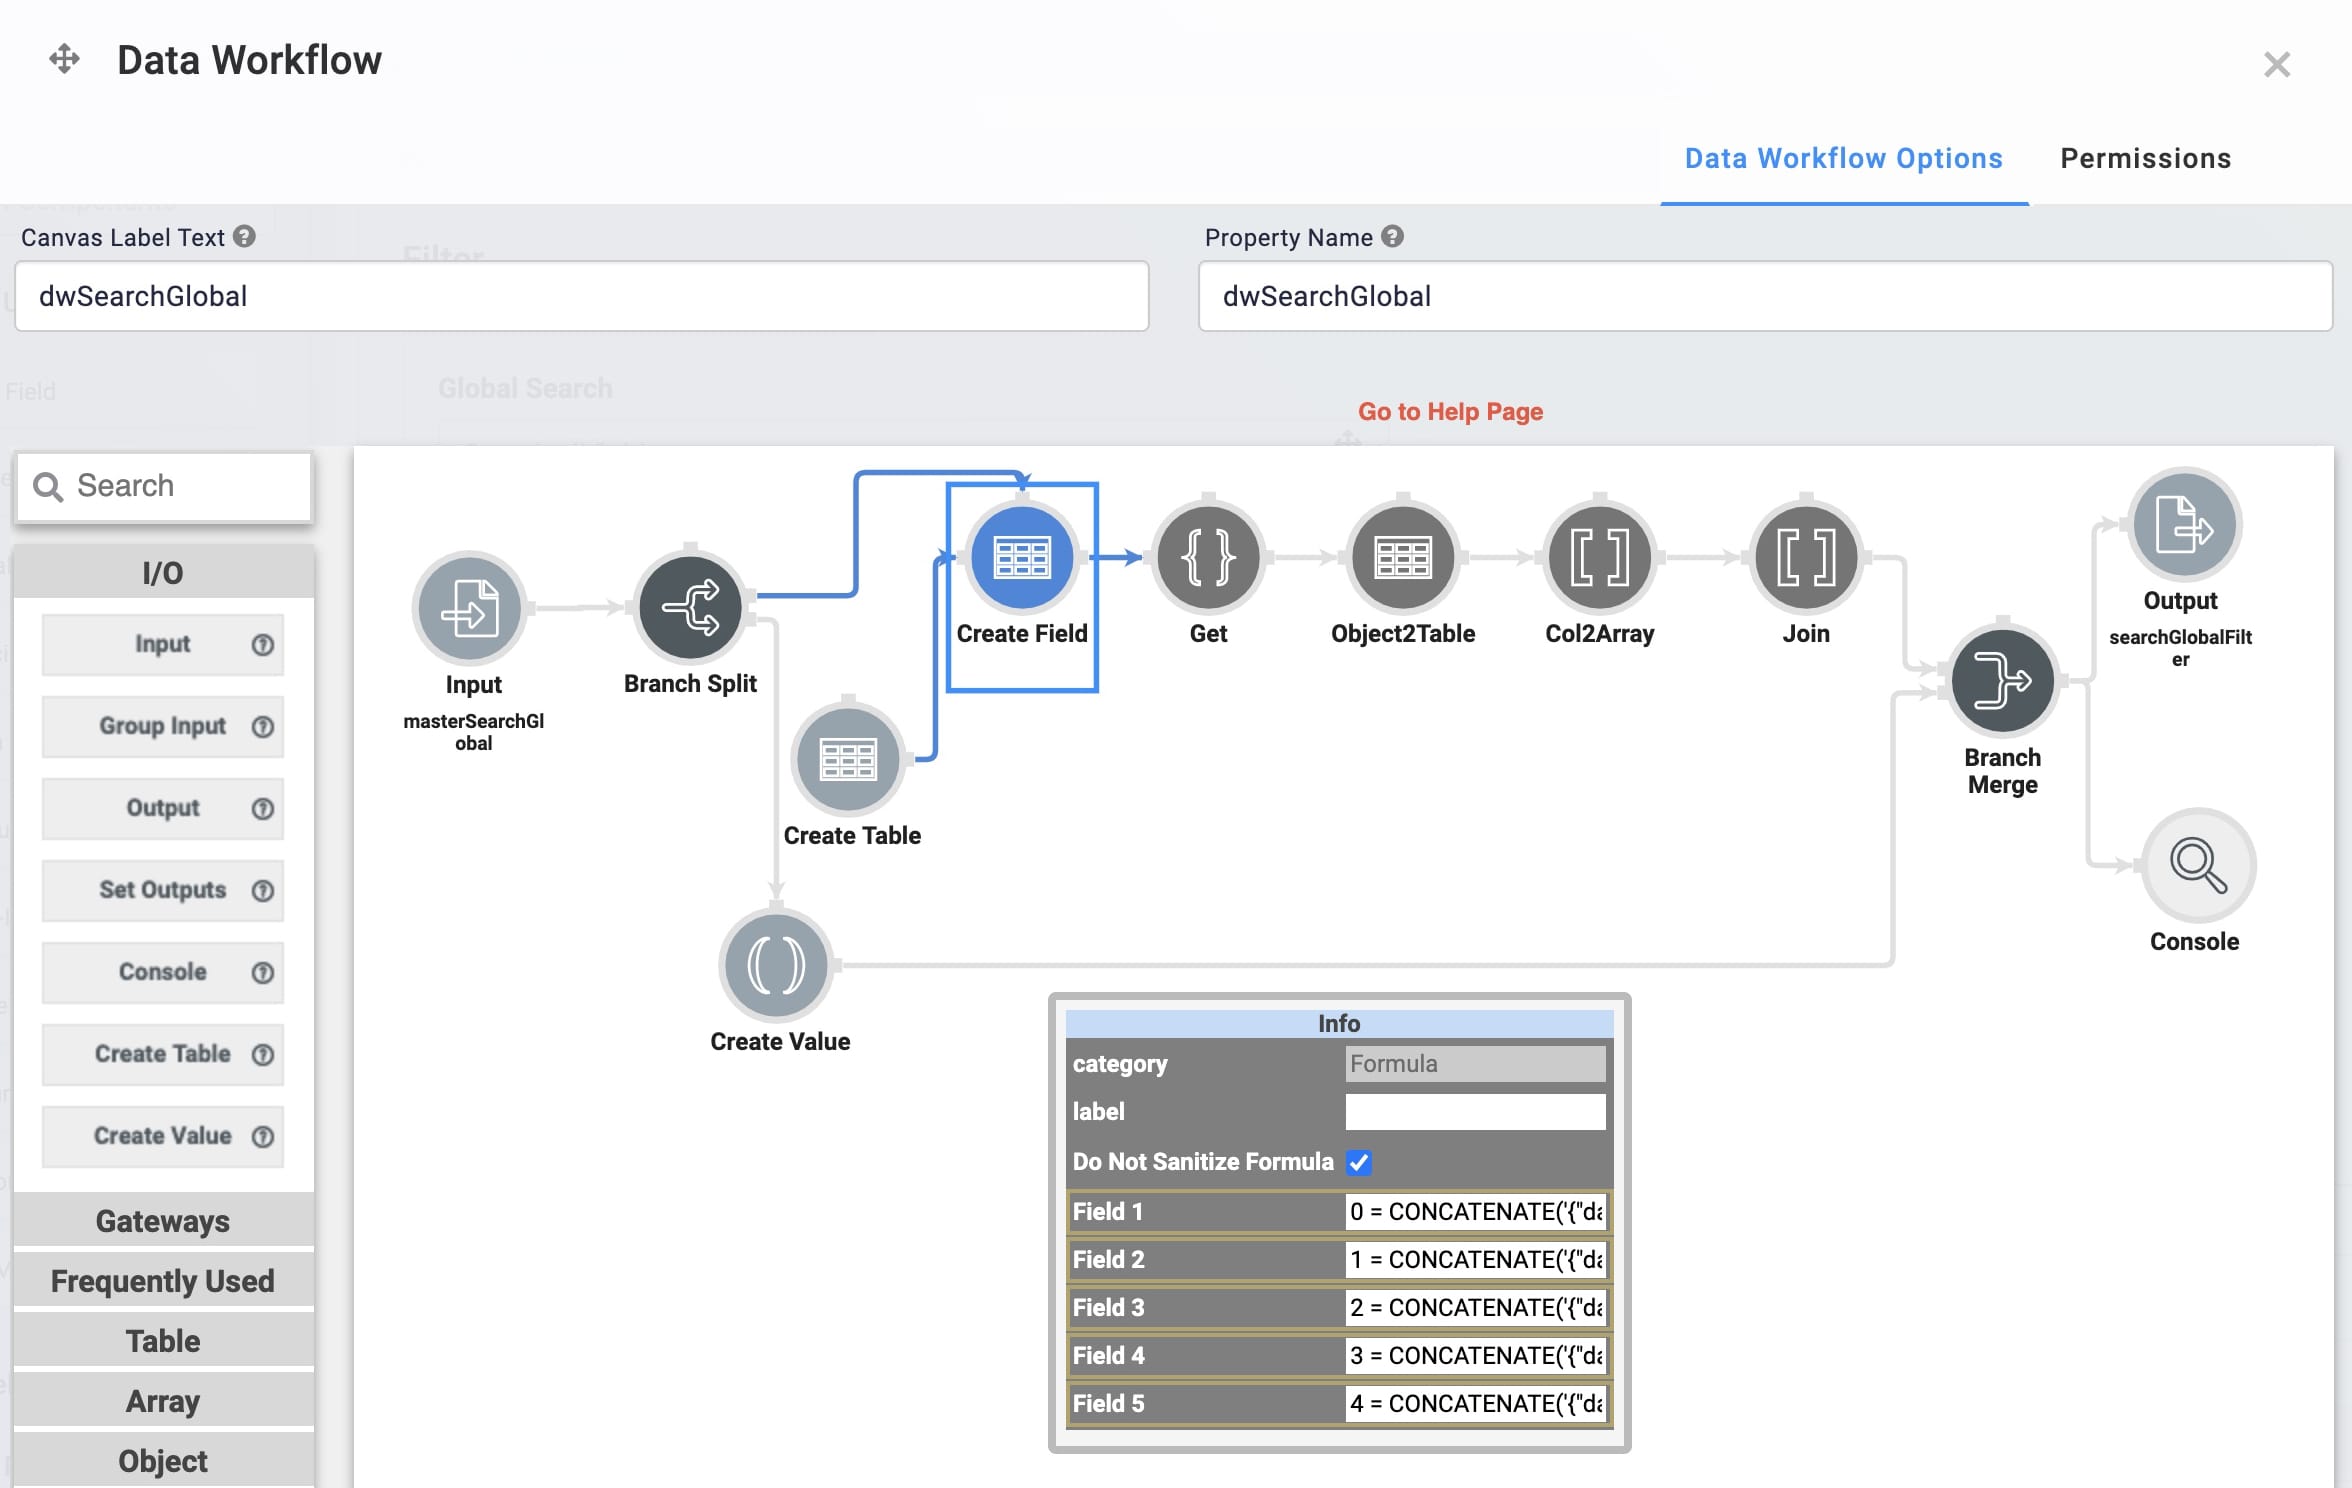
Update the Data Workflow Component
Next, you’ll update the dwSearchGlobal Data Workflow component in your snippet so it references your chosen dashboard fields.
Open the
dwSearchGlobalData Workflow component settings.Select the Create Field operator to open its Info window.
In the Info window, enter the following:
Setting
Value
Category
Create Field
Label
Do Not Sanitize Formula
.png) (checked)
(checked)Preserve Argument Type
 (unchecked)
Field 1
0 = CONCATENATE('{"data.firstName":"/', _arg, '/i"}')
Field 2
1 = CONCATENATE('{"data.lastName":"/', _arg, '/i"}')
Field 3
2 = CONCATENATE('{"data.dob":"/', _arg, '/i"}')
Field 4
3 = CONCATENATE('{"data.phoneNumber":"/', _arg, '/i"}')
Field 5
4 = CONCATENATE('{"data.comment":"/', _arg, '/i"}')
Click Save.
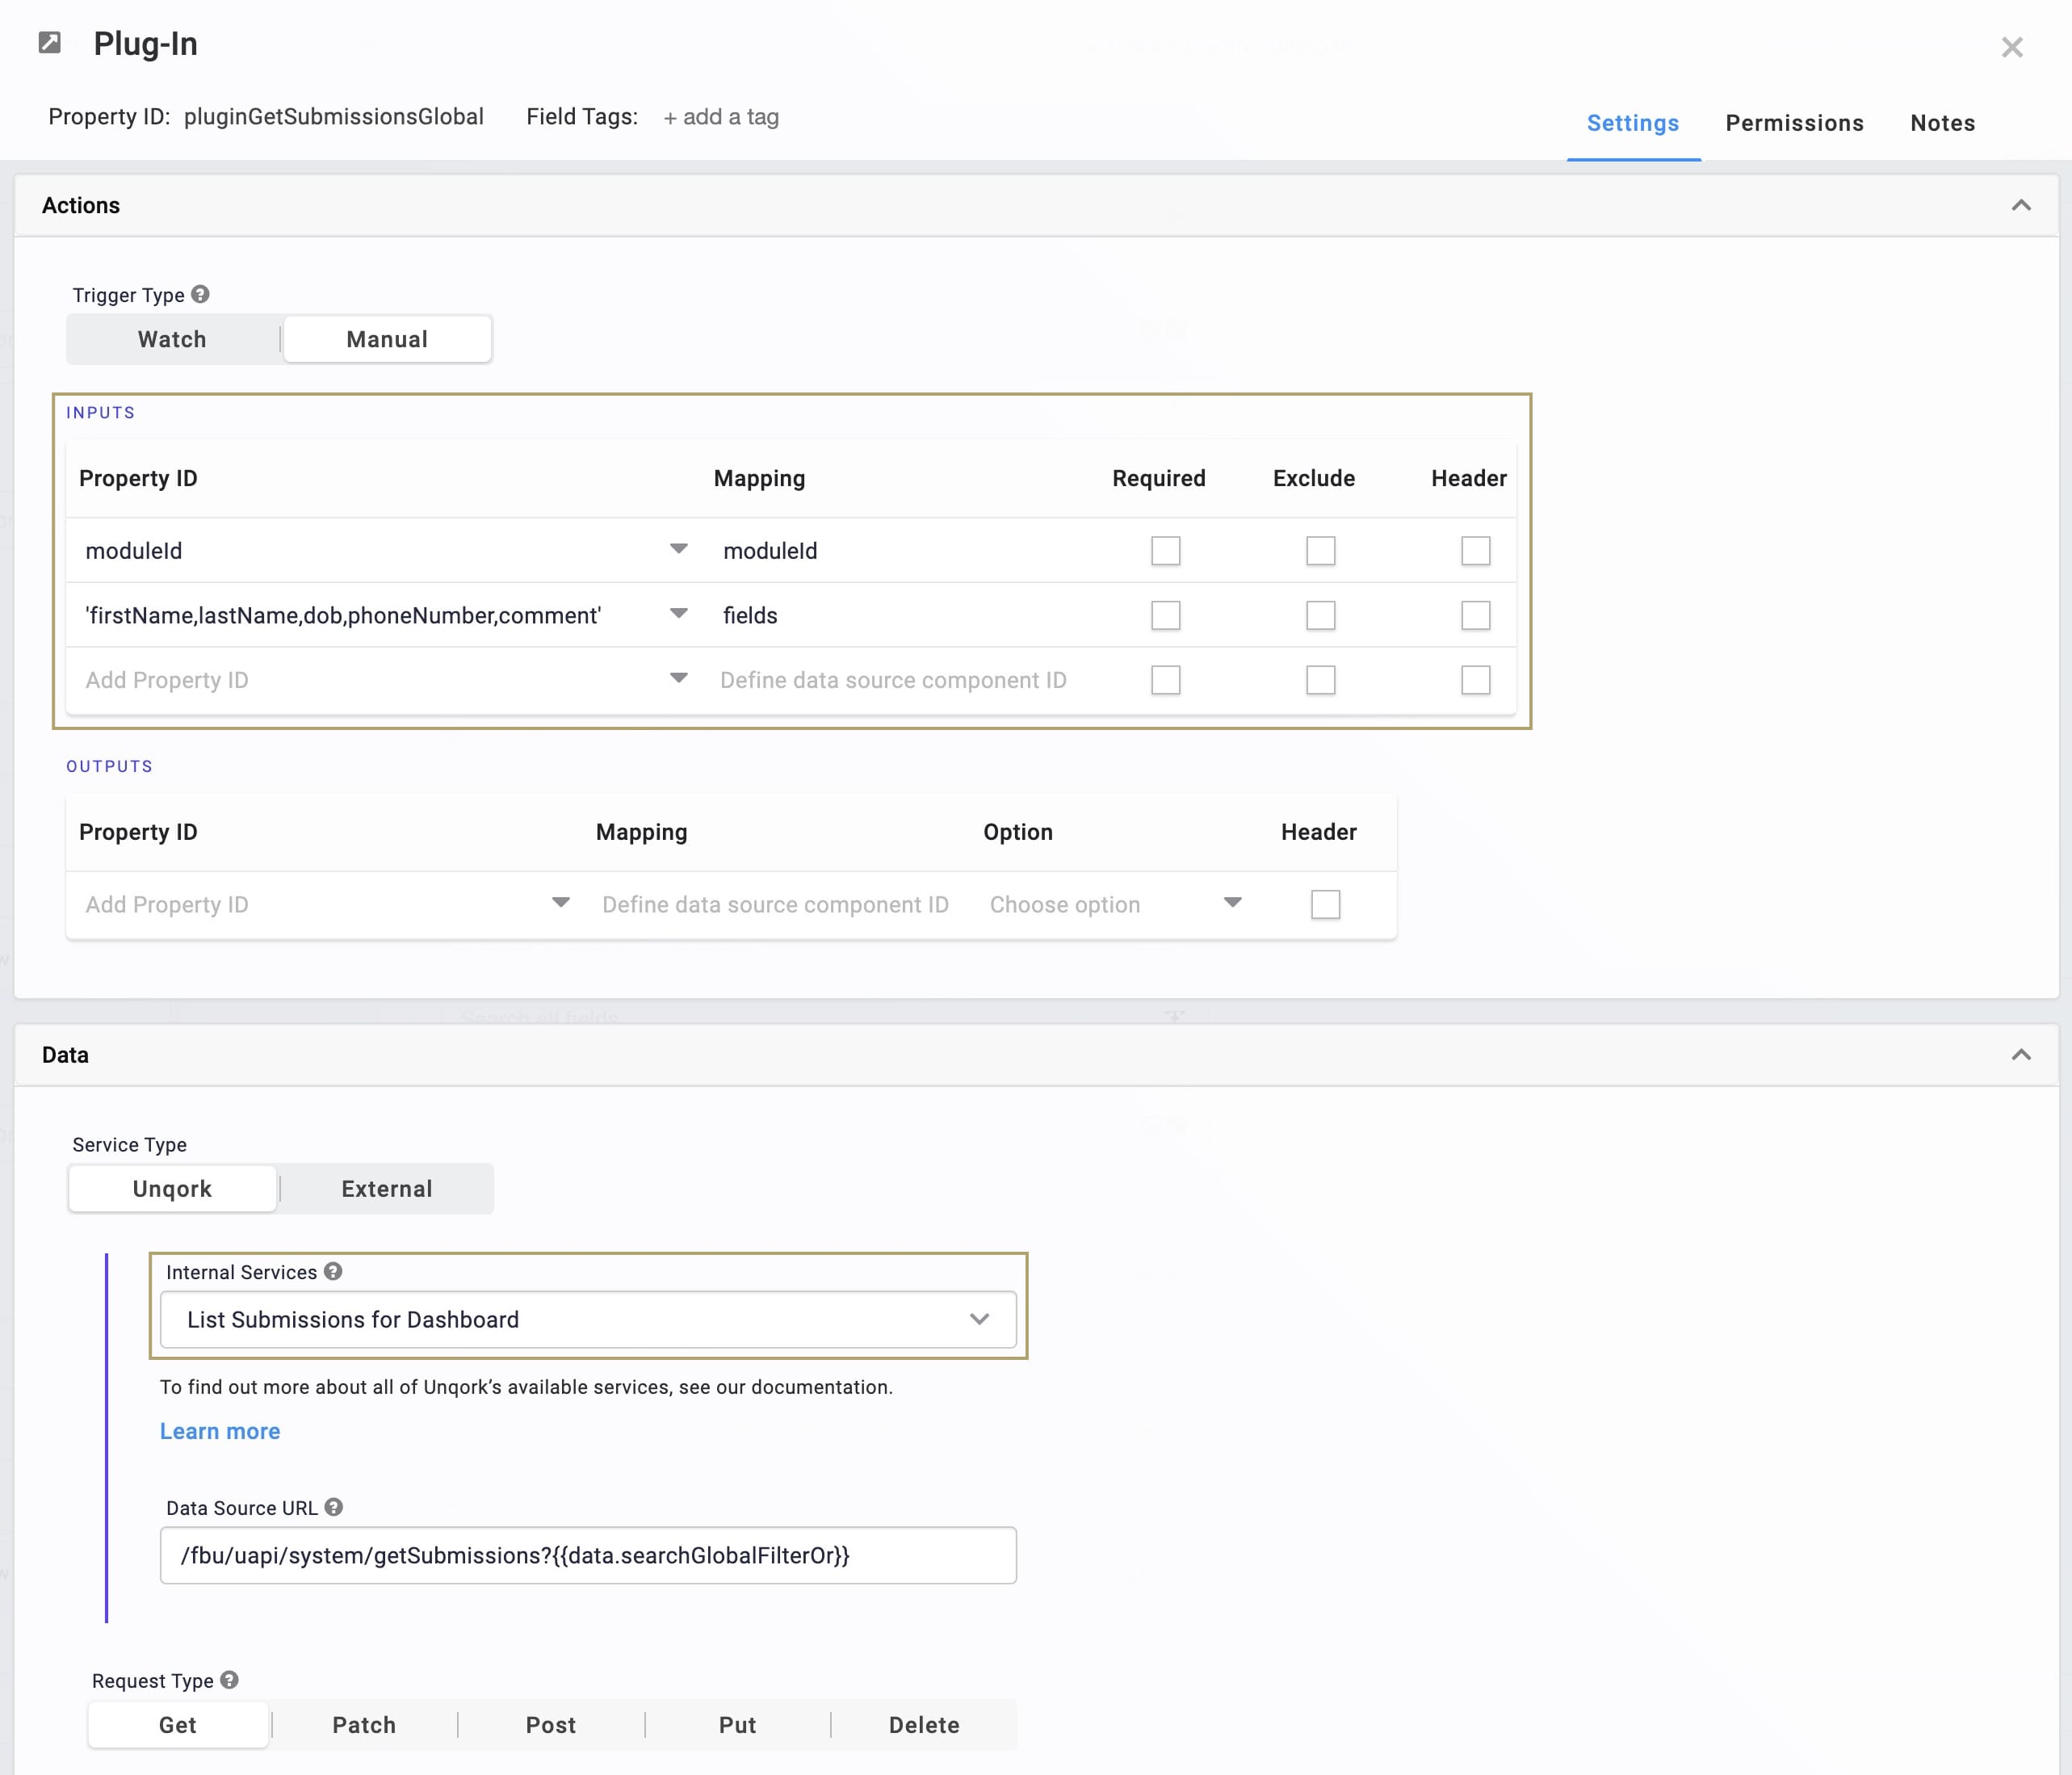
Update the Plug-In Component
Next, you'll update the pluginGetSubmissions Plug-In component in your snippet. This Plug-In component retrieves submission data to display in your global search dashboard.
Open the
pluginGetSubmissionsPlug-In component settings.In the Property ID and Label Text fields, replace the values with
pluginGetSubmissionsGlobal.In the Inputs table, enter the following:
Property ID
Mapping
moduleId
moduleId
'firstName,lastName,dob,phoneNumber,comment'
fields
Click Save.
Configure the ViewGrid Component
Next, let's configure a ViewGrid component to display your dashboard. This dashboard appears when end-users select the Global radio button.
Drag and drop a ViewGrid component inside your
panelGlobalSearchPanel component.In the Label and Property Name fields, enter
gridSubmissionsGlobal.In the Action field, enter
null. Doing so removes the default Submit button from your dashboard.In the Inputs table, enter
pluginGetSubmissionsGlobal.In the Display table, enter the following:
ID
Formula
Heading
dob
=MOMENT(MOMENT(dob), 'format', 'MM/DD/YYYY
Date of Birth
firstName
First Name
lastName
Last Name
phoneNumber
Phone Number
comment
Comment
The Moment.js formula in the dob row references and formats the
dobProperty ID in the snippet as MM/DD/YYYY in your dashboard. Doing so makes it easier to compare the date input search format (MM/DD/YYYY) to the dashboard value.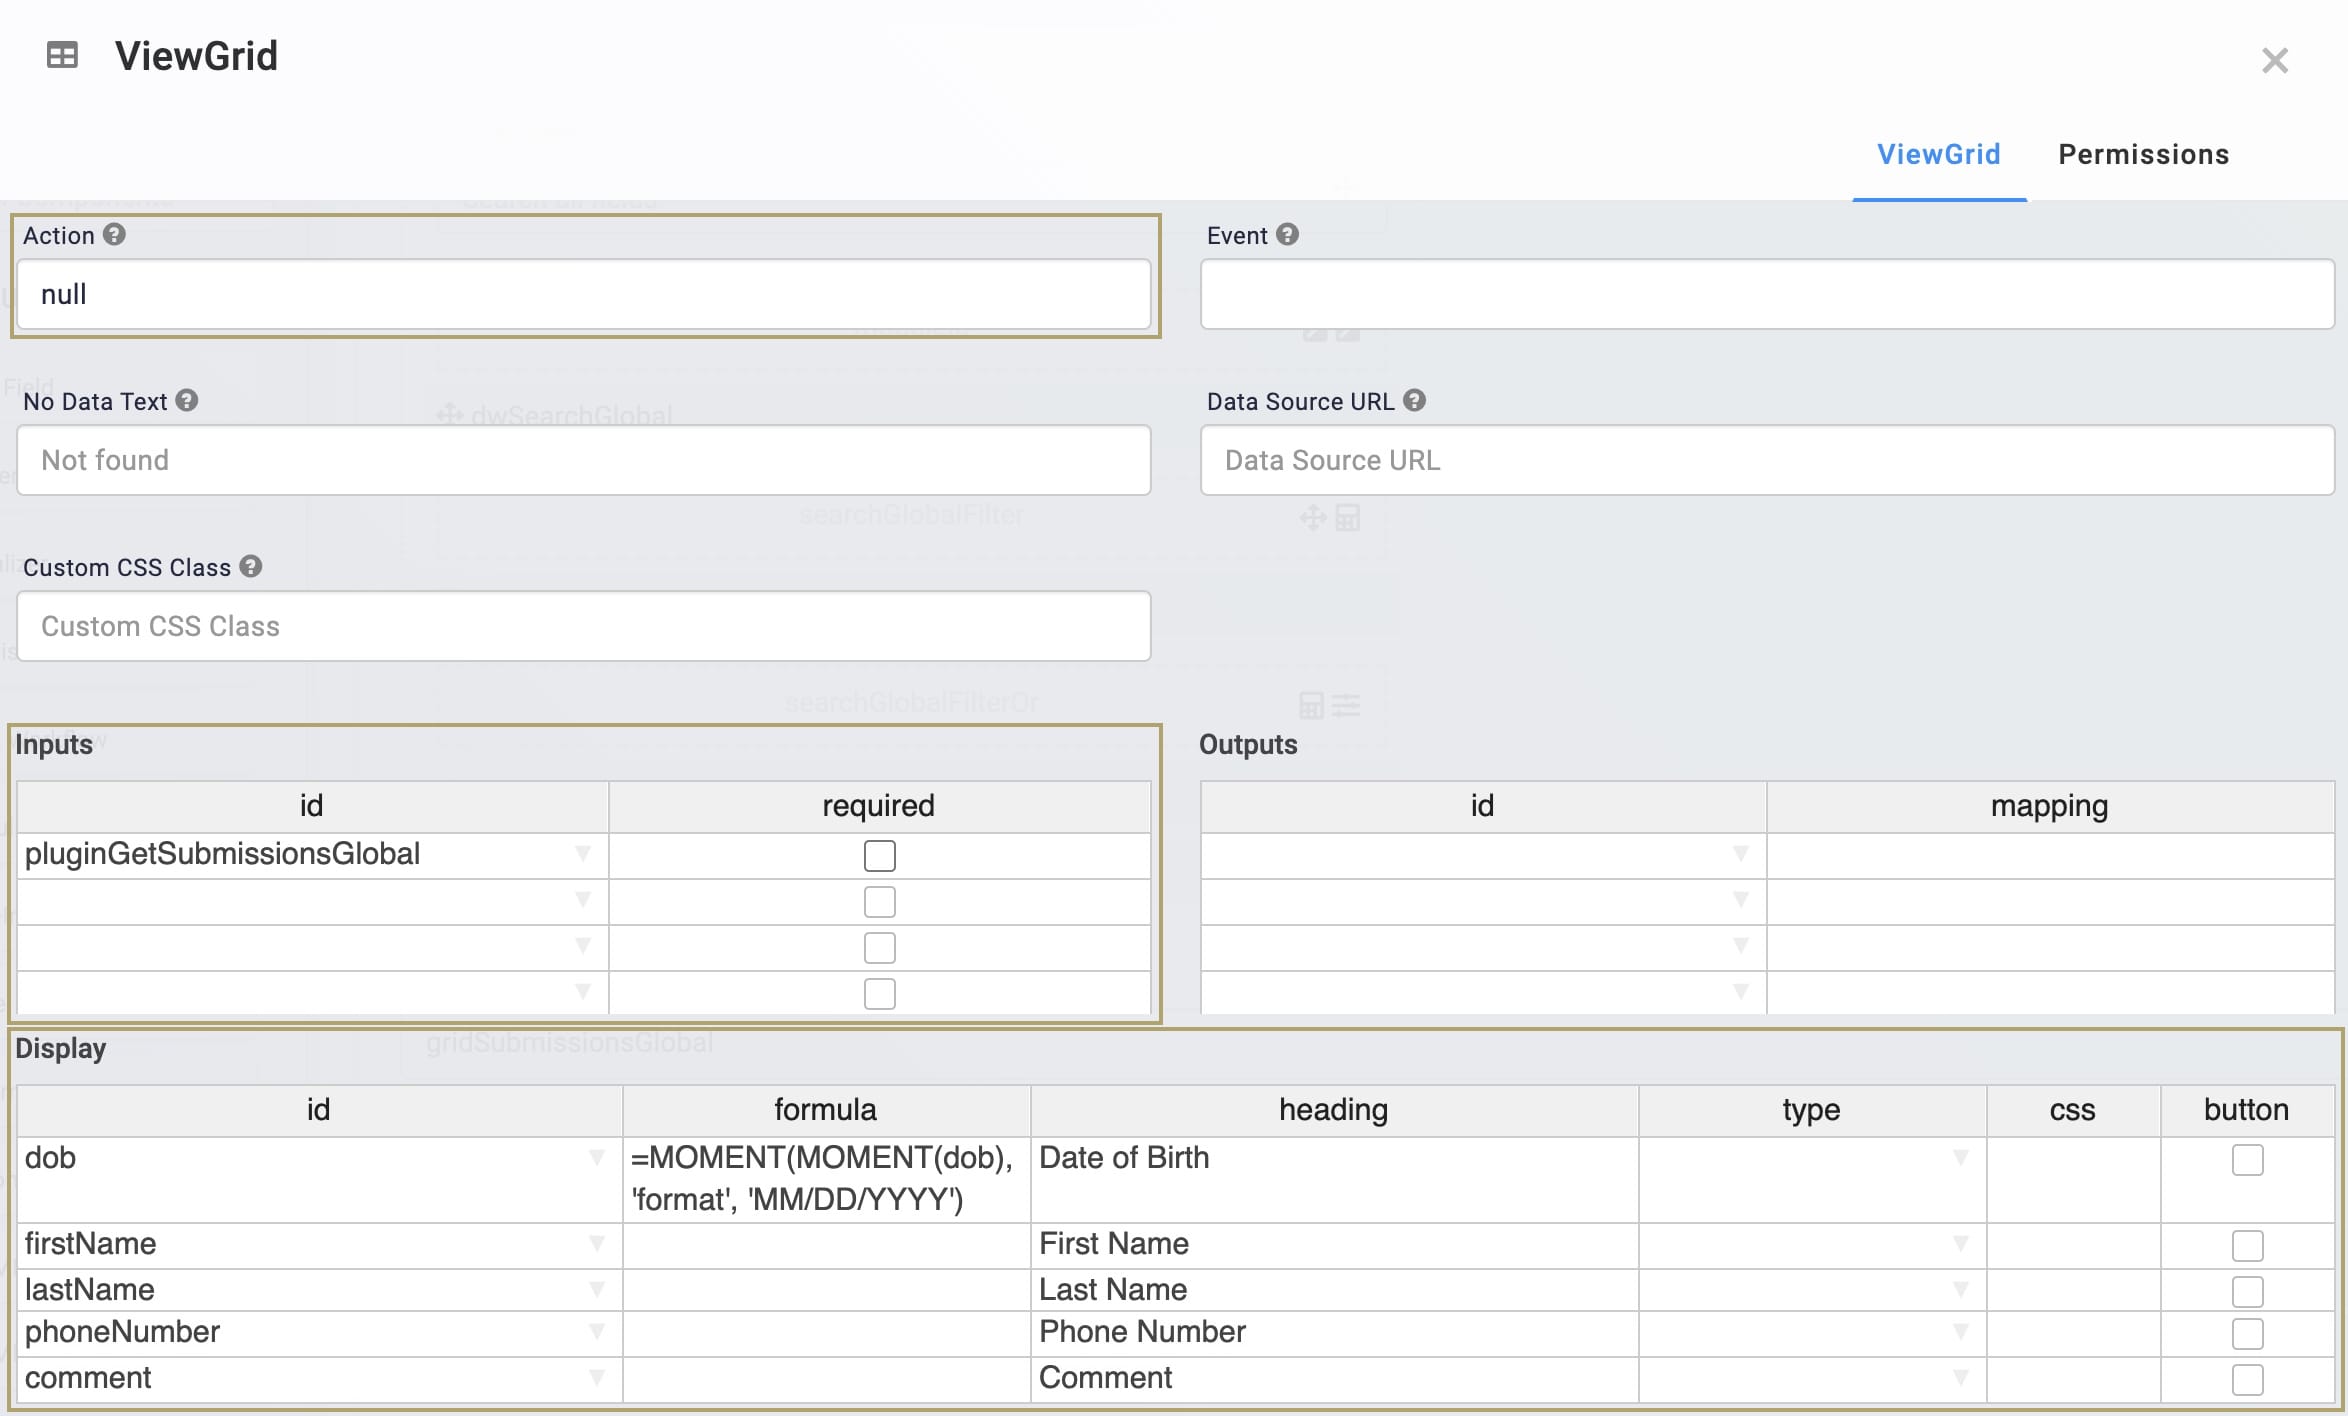
Click Save.
Configure the Plug-In Component
This Plug-In component performs an API call to retrieve submission data to display in your individual search dashboard.
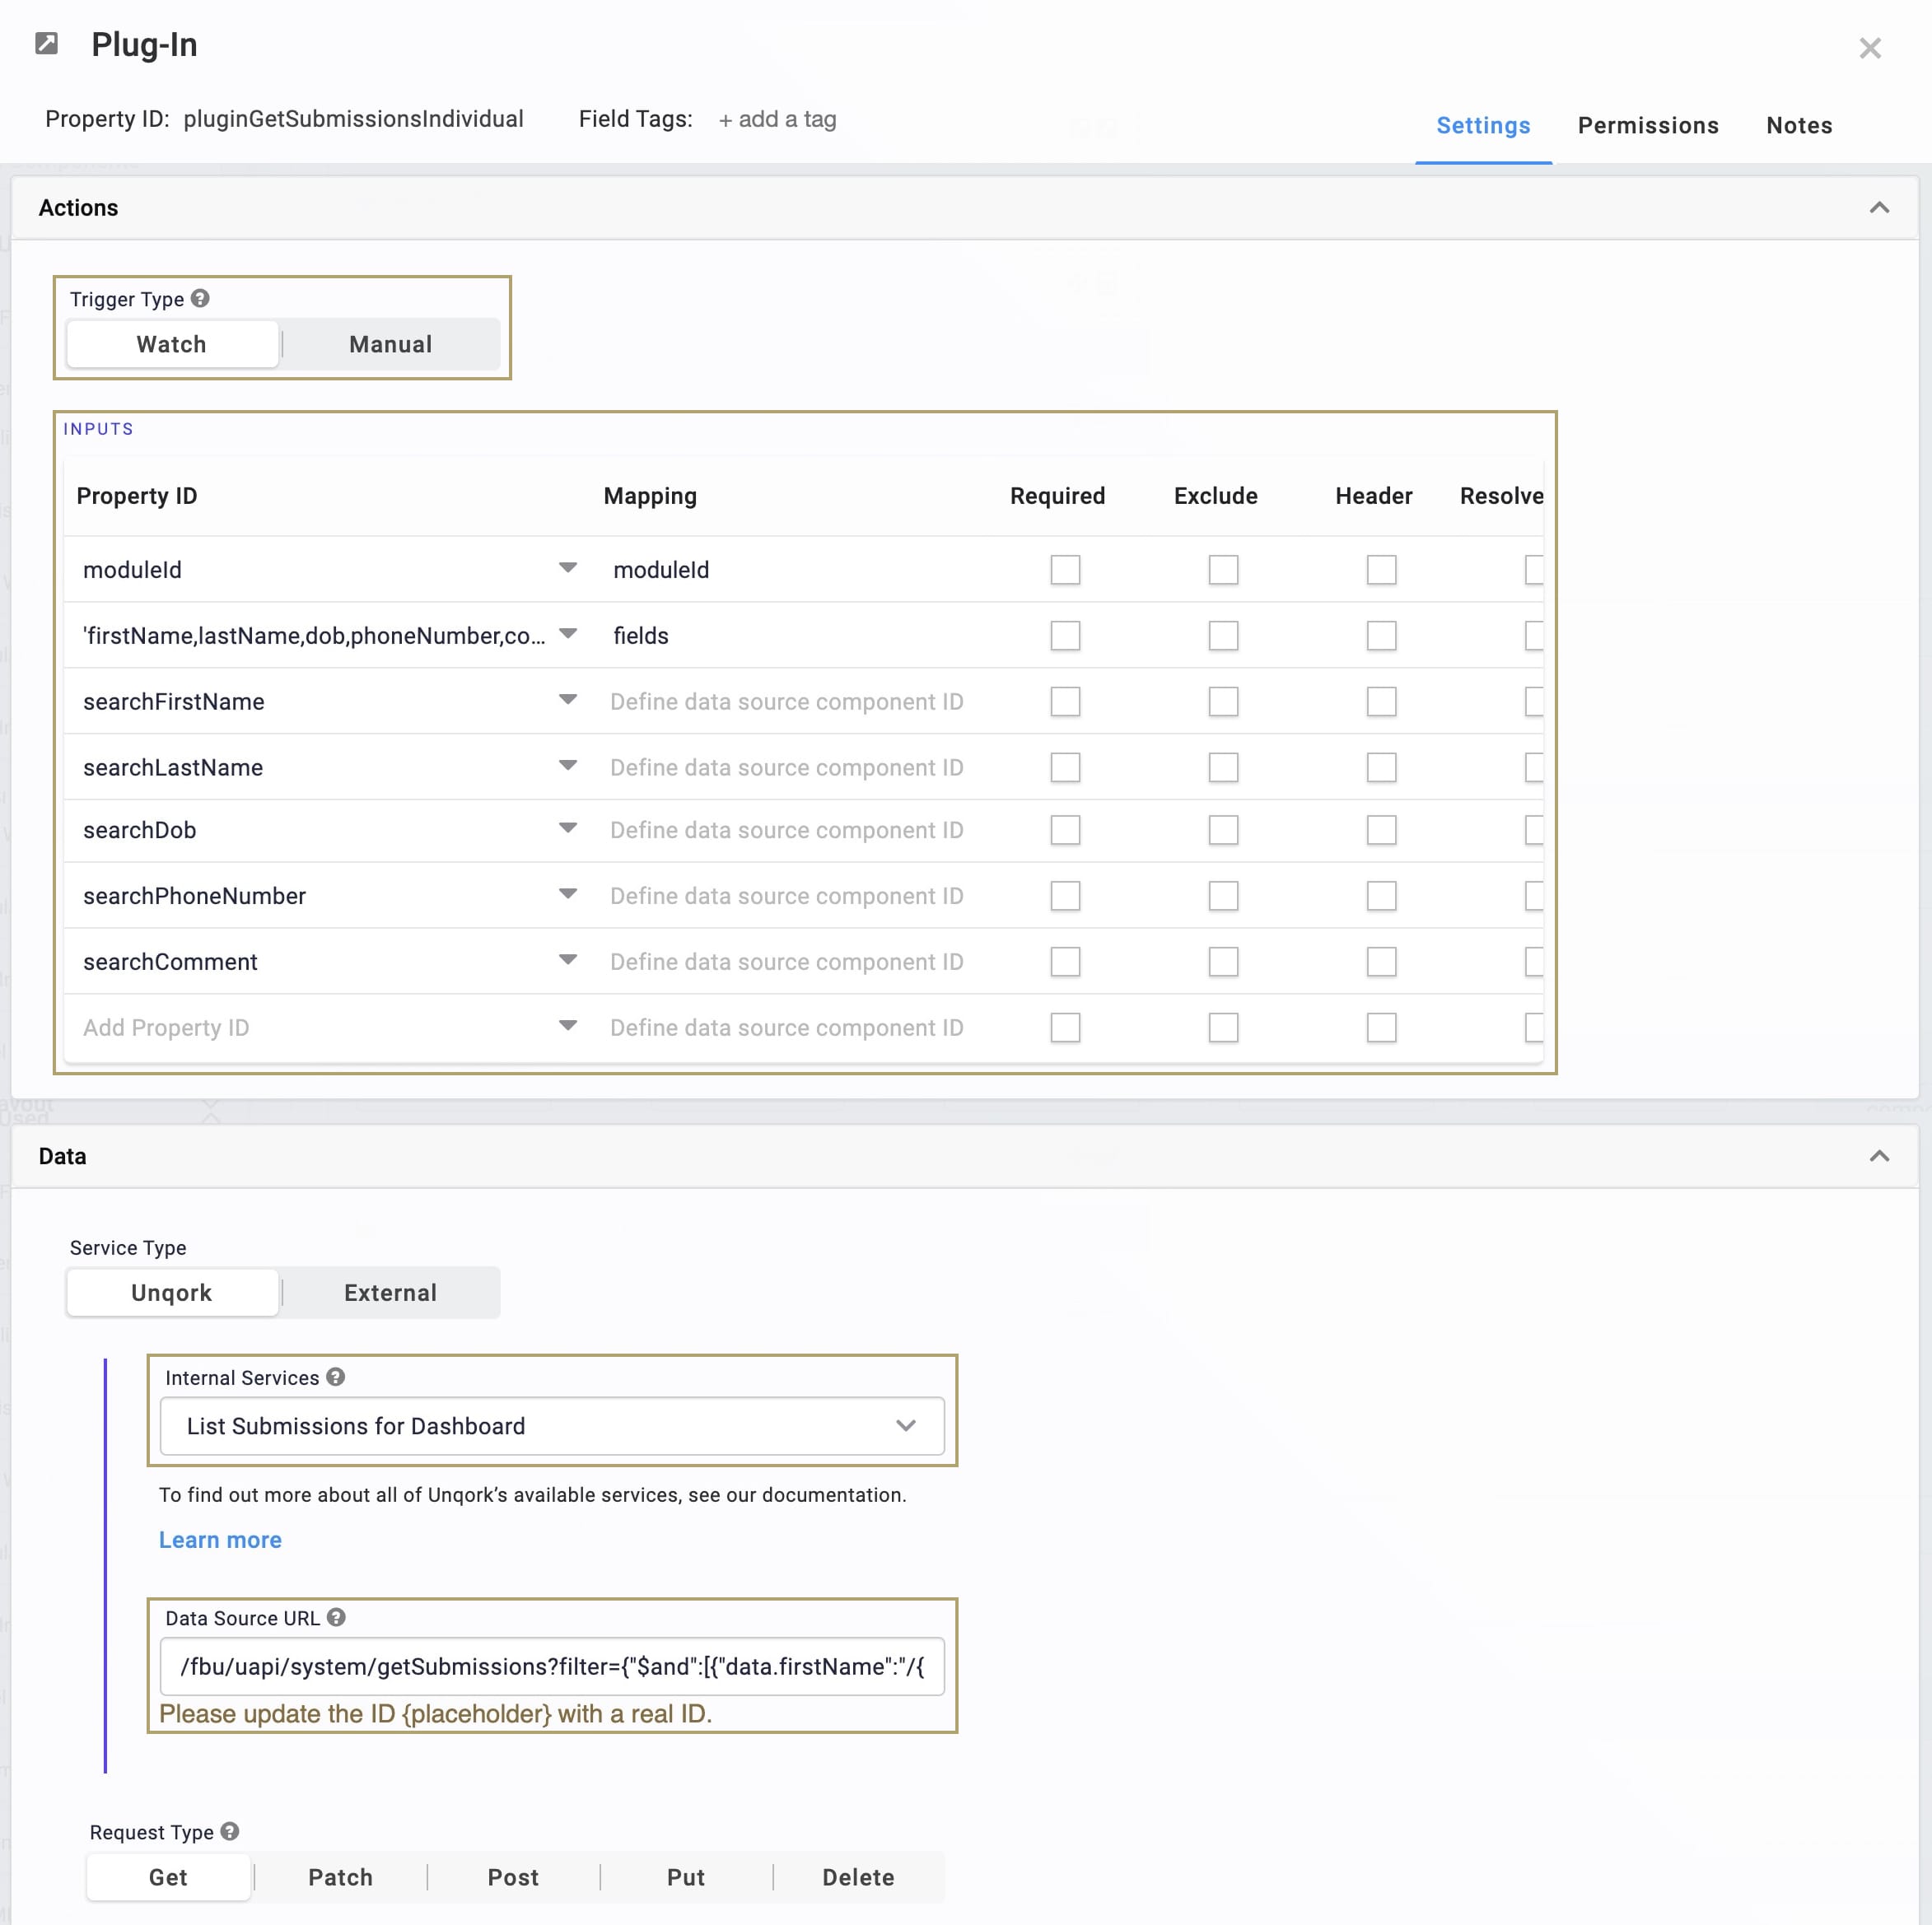
Drag and drop a Plug-In component inside your
panelIndividualSearchPanel component.In the Property ID and Canvas Label Text fields, enter
pluginGetSubmissionsIndividual.Set the Trigger Type as Watch.
In the Inputs table, enter the following:
Property ID
Mapping
moduleId
moduleId
'firstName,lastName,dob,phoneNumber,comment'
fields
searchFirstName
searchLastName
searchDob
searchPhoneNumber
searchComment
From the Internal Services drop-down, select List Submissions for Dashboard.
In the Data Source URL, enter
/fbu/uapi/system/getSubmissions?filter={"$and":[{"data.firstName":"/{{data.searchFirstName}}/i"},{"data.lastName":"/{{data.searchLastName}}/i"},{"data.dob":"/{{data.searchDob}}/i"},{"data.phoneNumber":"/{{data.searchPhoneNumber}}/i"},{"data.comment":"/{{data.searchComment}}/i"}]}.Here, you're adding the MongoDB query to the Data Source URL that populates when you select the List Submissions for Dashboard service. This query references the search fields you'll add later.
Click Save.
Configure the HTML Element Component
This HTML Element component serves as a label for your individual search fields.
Drag and drop an HTML Element component onto your canvas, placing it below the
pluginGetSubmissionsIndividualPlug-In component.In the Property ID field, enter
htmlIndividualFilter.In the HTML Tag field, enter
h4.In the Content field, enter
Filter.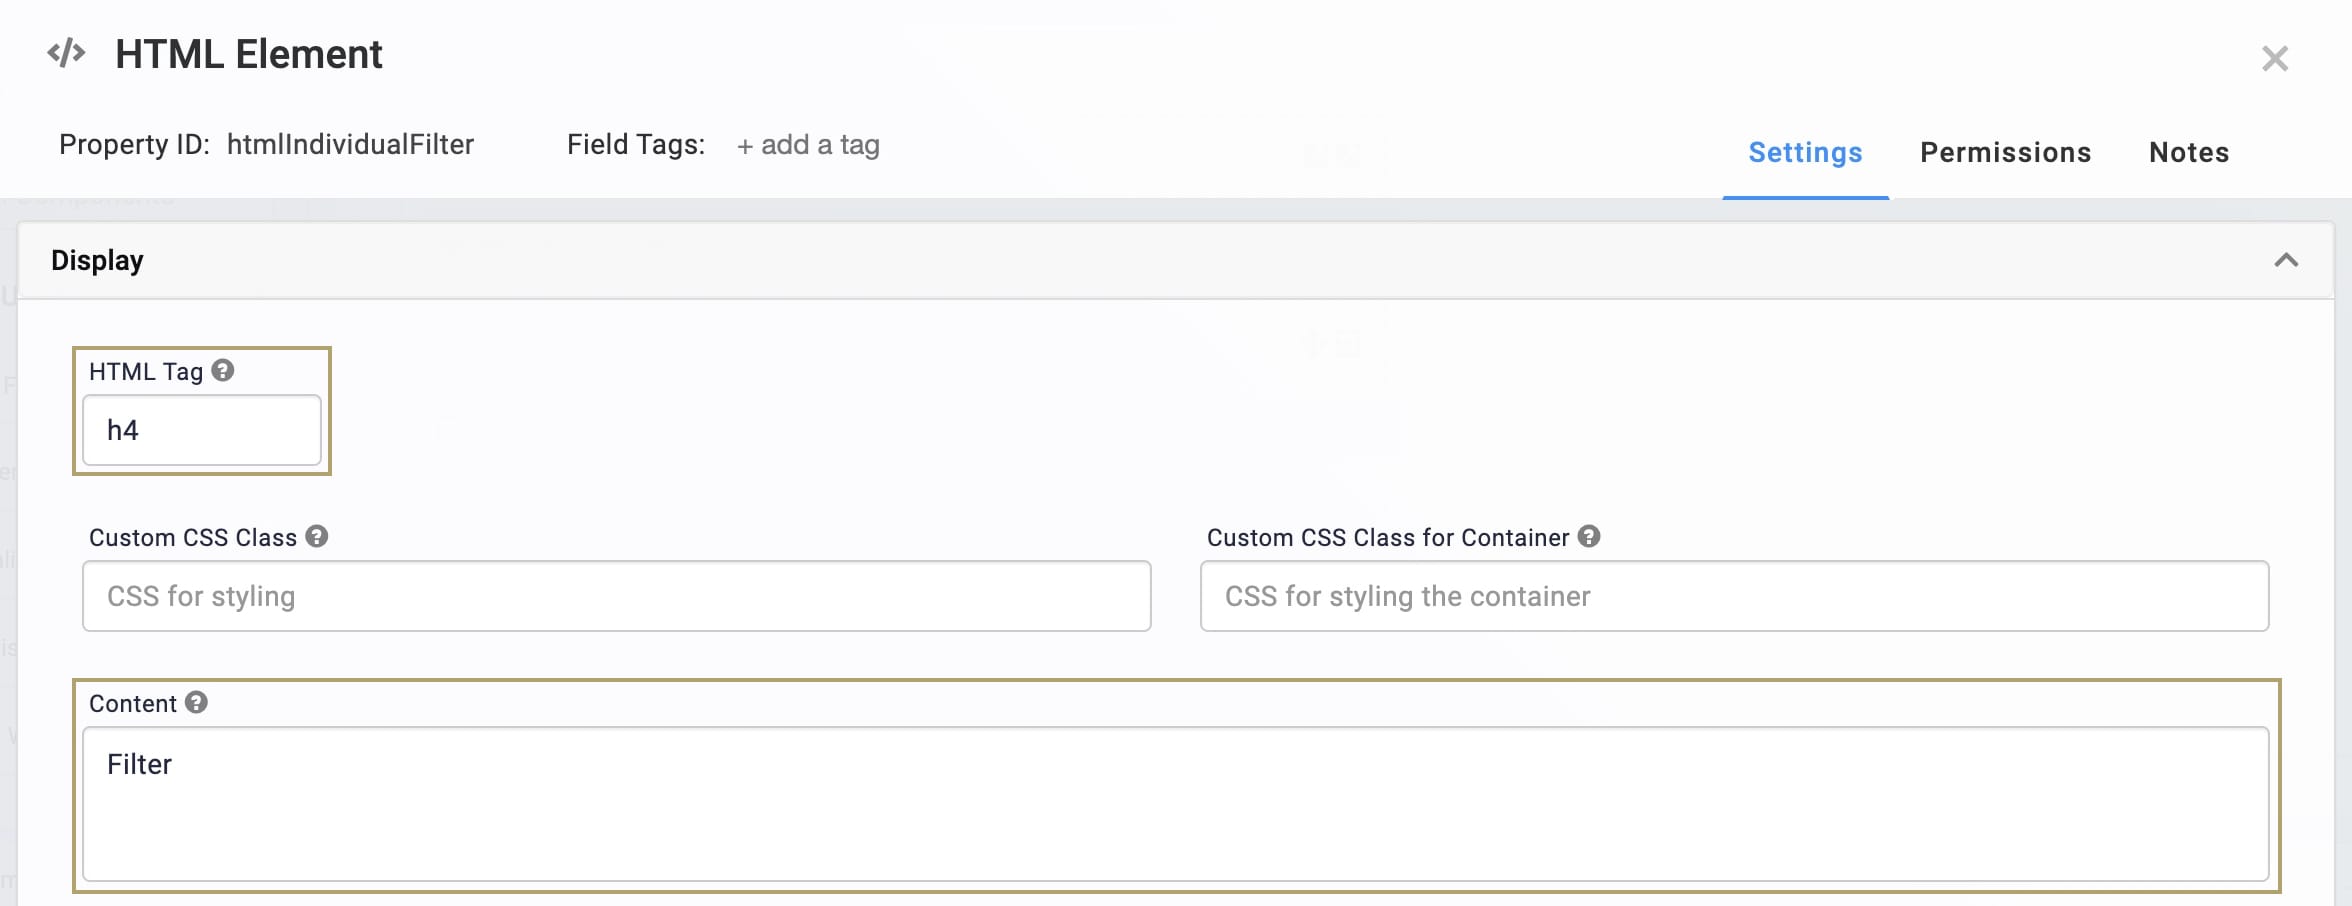
Click Save.
Configure the Columns Component
A Columns component will keep your individual search fields organized.
Drag and drop a Columns component onto your canvas, placing it below your
htmlIndividualFilterHTML Element component.In the Property ID field, enter
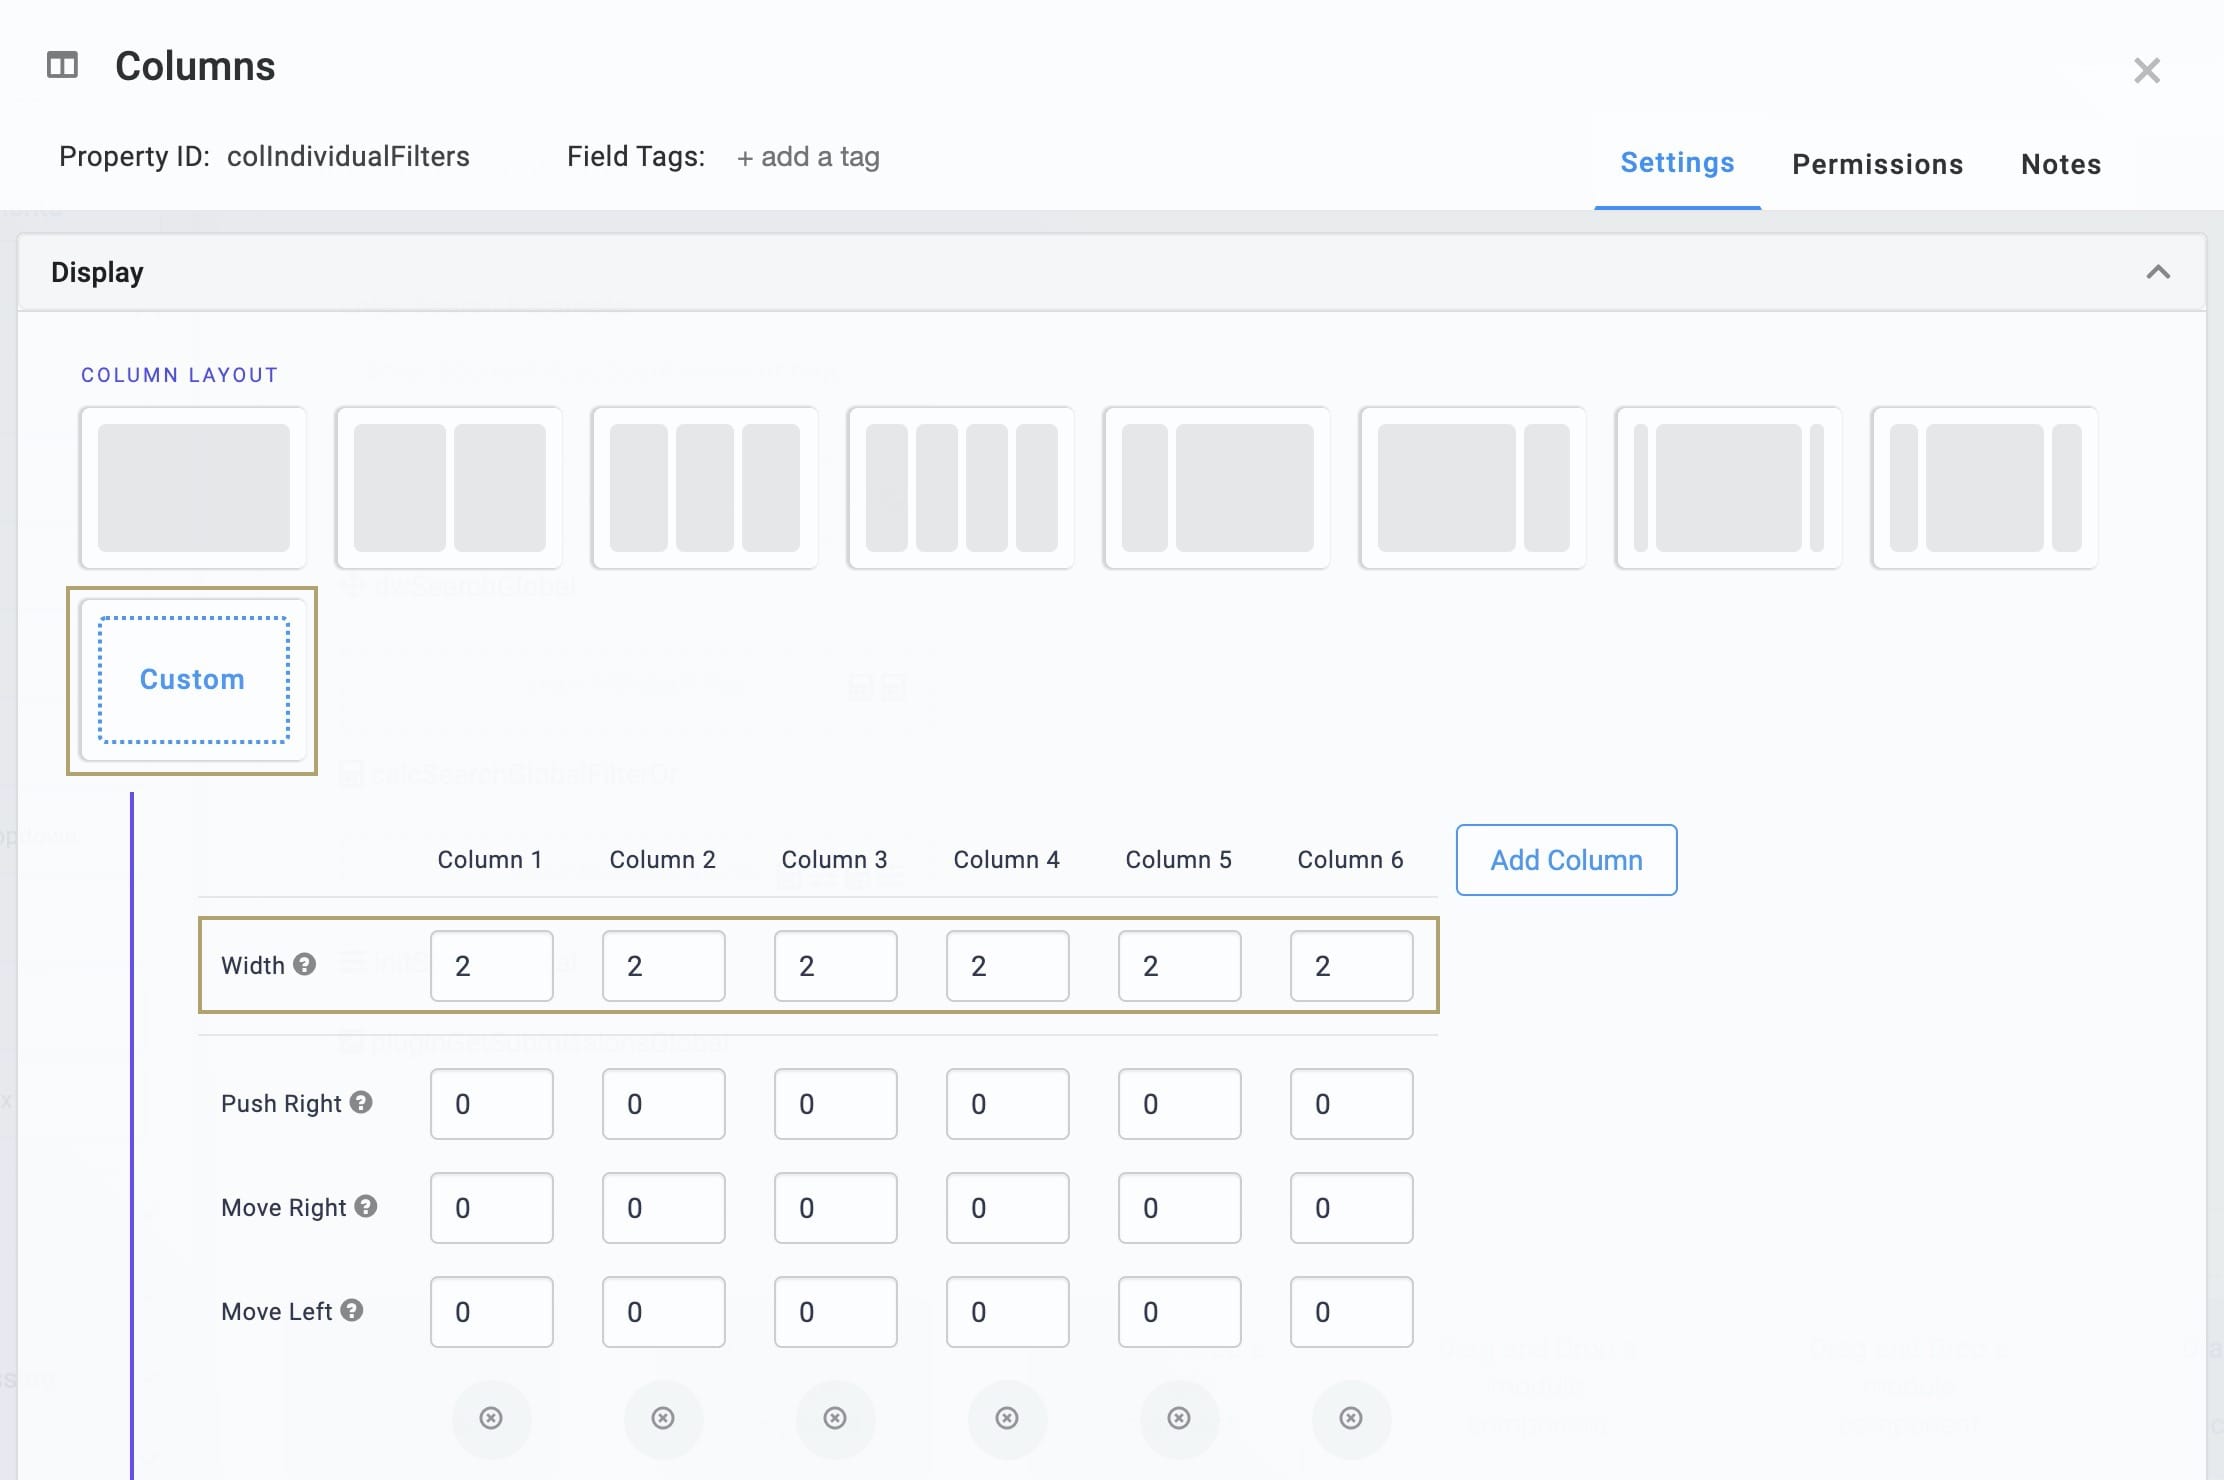
colIndividualFilters.Select Custom as the Column Layout.
Click Add Column until you have six columns.
In the Width field for each column, enter
2.The maximum total width of your columns is 12. You can divide this width however you'd like among your columns.
Click Save.
Configure the Date Input Component
Now, let's configure search fields for your end-users to add information.
Drag and drop a Date Input component inside the first (far-left) column of the
colIndividualFiltersColumns component.In the Property ID field, enter
searchDob.In the Label Text field, enter
Date of Birth.Click Save.
Configure the Text Field Components
Drag and drop four Text Field components inside the next four columns, from left to right, of the
colIndividualFiltersColumns component.In the Property ID and Label Text fields, enter the following for each component:
#
Property ID
Label Text
1
searchFirstName
First Name
2
searchLastName
Last Name
3
searchPhoneNumber
Phone Number
4
searchComment
Comment
Save each component as you add it.
Configure the ViewGrid Component
Next, add another ViewGrid component to display your dashboard. This dashboard displays when end-users select the Individual radio button.
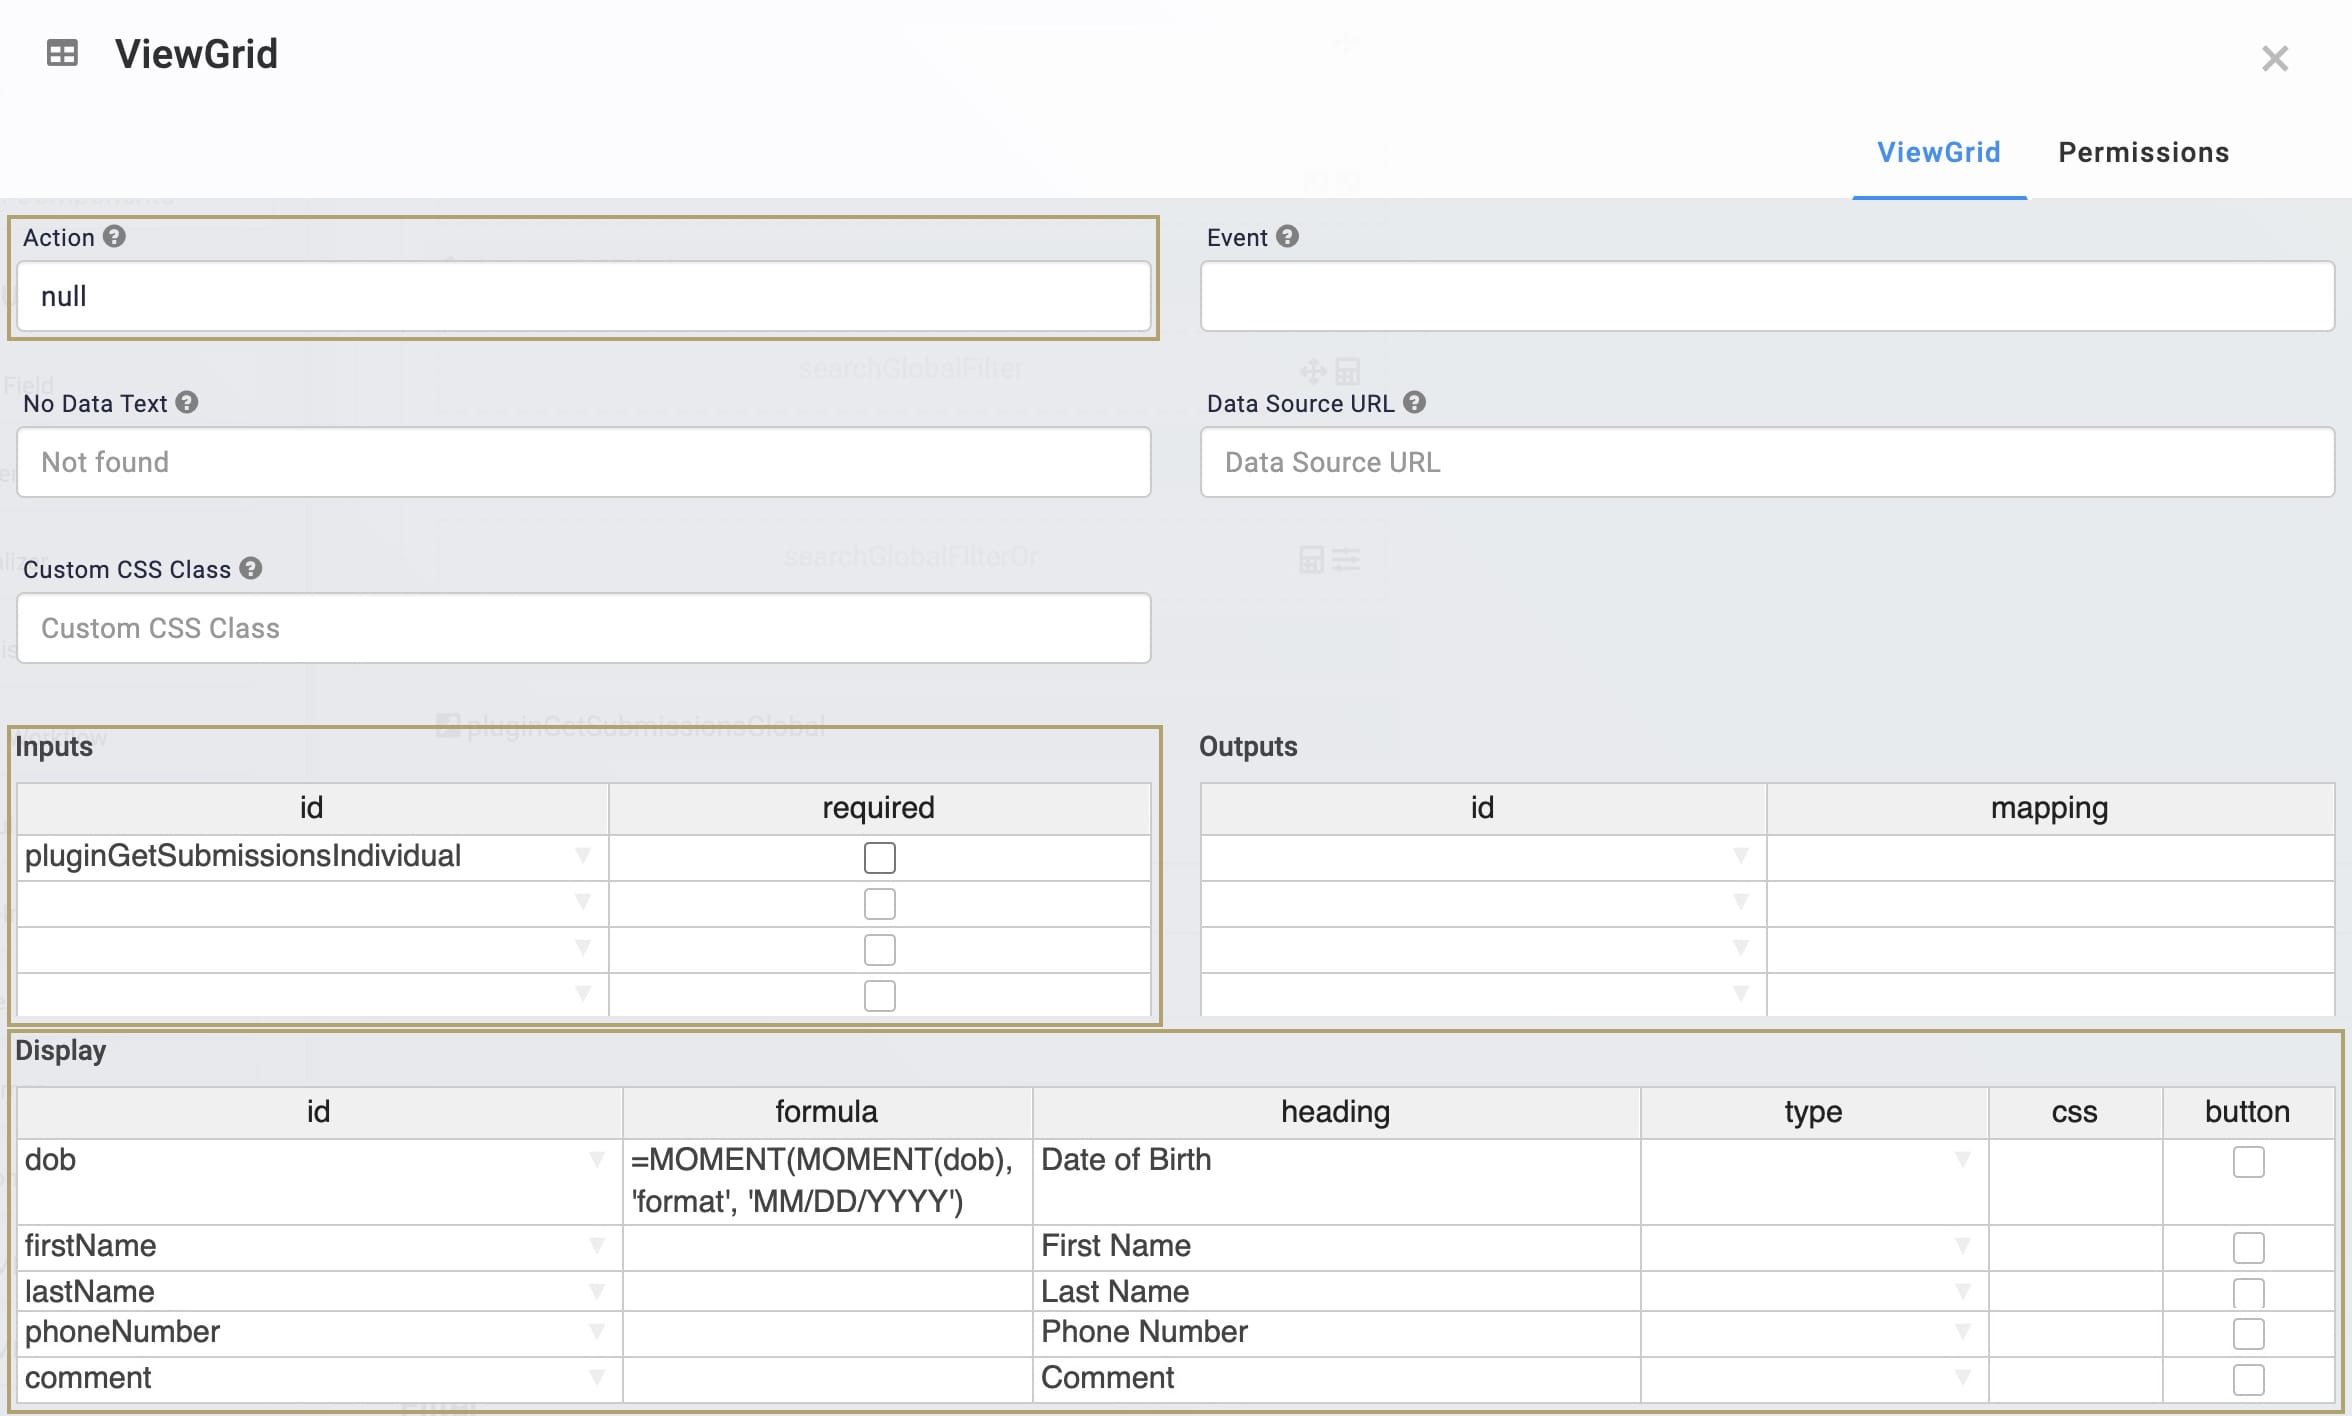
Drag and drop a ViewGrid component onto your canvas, placing it below your
colIndividualFiltersColumns component.In the Label and Property Name fields, enter
gridSubmissionsIndividual.In the Action field, enter
null.In the Inputs table, enter
pluginGetSubmissionsIndividual.In the Display table, enter the following:
ID
Formula
Heading
dob
=MOMENT(MOMENT(dob), 'format', 'MM/DD/YYYY')
Date of Birth
firstName
First Name
lastName
Last Name
phone
Phone Number
comment
Comment
Click Save.
Configure the Radio Buttons Component
The Radio Buttons component acts as the switch between global and individual search options. When end-users select Global, the global search options and dashboard display. When end-users select Individual, the individual search options and dashboard display.
Drag and drop a Radio Buttons component onto your canvas, placing it above your
panelGlobalSearchPanel component.In the Property ID field, enter
typeOfFilter.In the Label Text field, enter
What type of filter would you like to see?.Set your Option Label and Value to Store in Submission Data as shown below:
Option Label
Value to Store in Submission Data
Global
global
Individual
individual
Click Save.
Configure the Decisions Component
Next, you’ll configure a Decisions component to display either the individual or global search options, and their respective dashboards. Which displays depends on the end-user's radio button section.
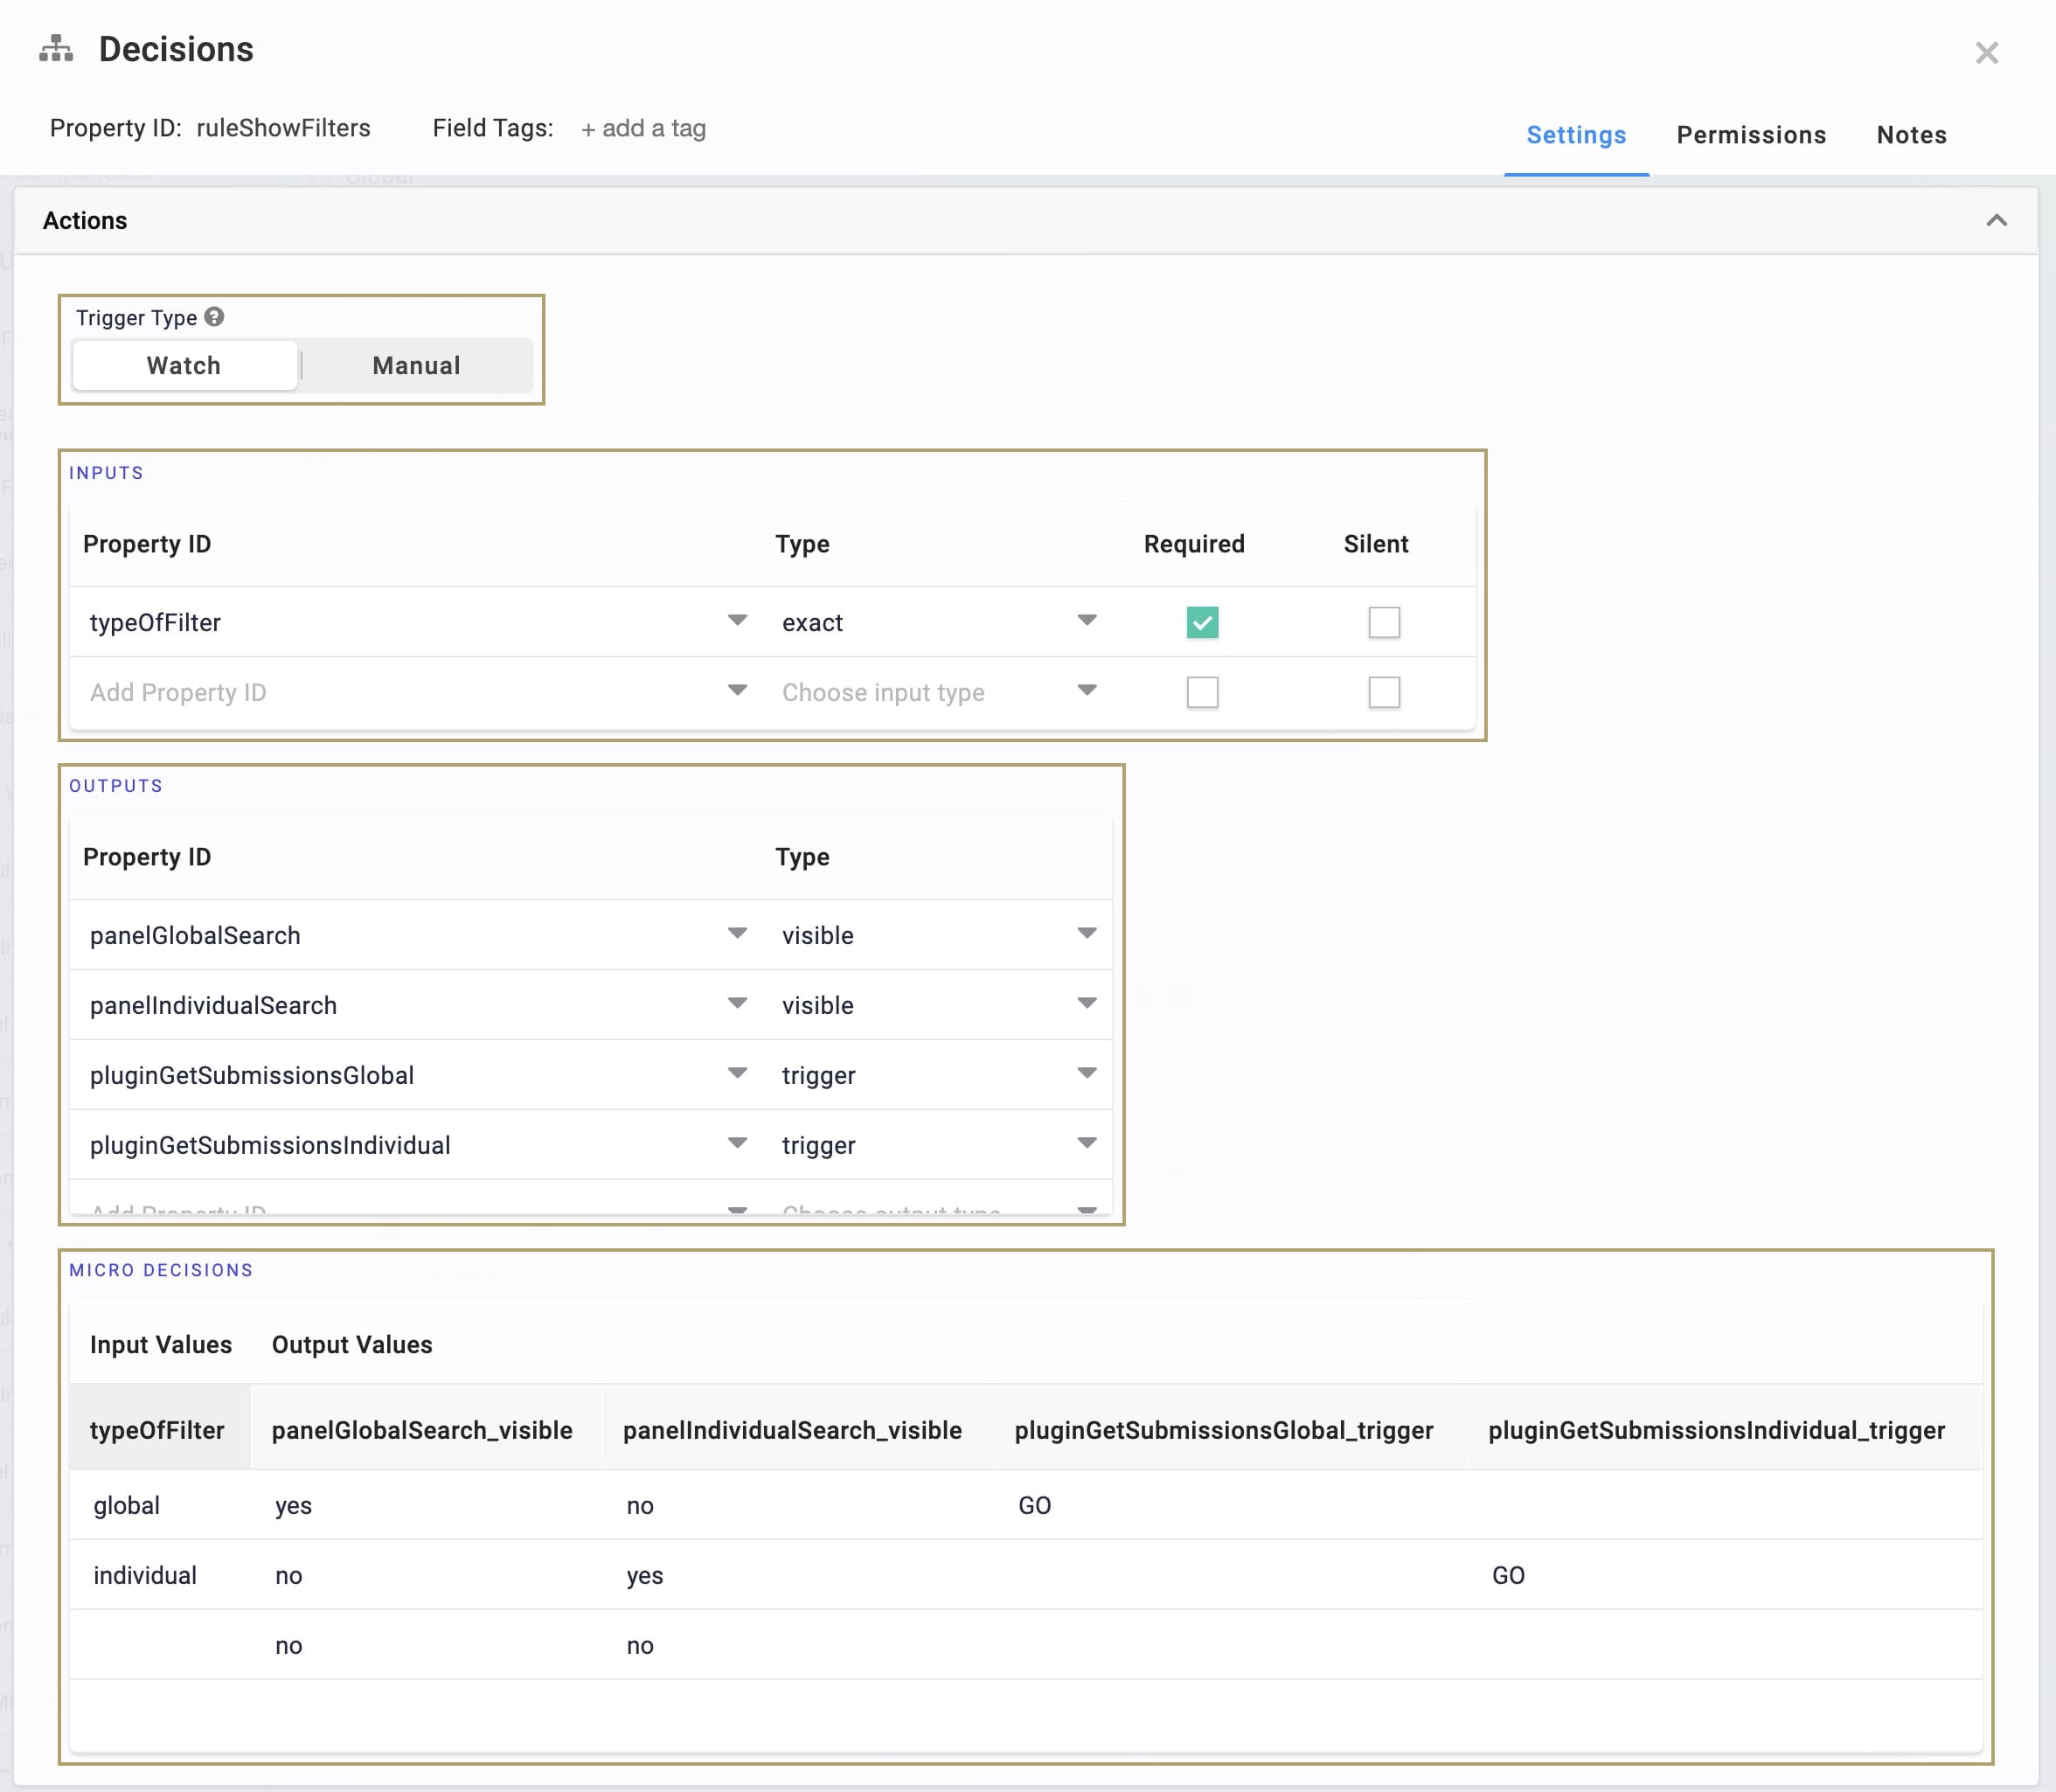
Drag and drop a Decisions component onto your canvas, placing it below your
typeOfFilterRadio Buttons component.In the Property ID and Canvas Label Text fields, enter
ruleShowFilters.Set the Trigger Type as Watch.
In the Inputs table, enter the following:
Property ID
Type
Required
typeOfFilter
exact
.png) (checked)
(checked)In the Outputs table, enter the following:
Property ID
Type
panelGlobalSearch
visible
panelIndividualSearch
visible
pluginGetSubmissionsGlobal
trigger
pluginGetSubmissionsIndividual
trigger
In the Micro Decisions table, enter the following:
typeOfFilter
panelGlobalSearch_visible
panelIndividualSearch_visible
pluginGetSubmissionsGlobal_trigger
pluginGetSubmissionsIndividual_trigger
global
yes
no
GO
individual
no
yes
GO
no
no
Click Save.
Save your module.
Here's how your completed dashboard looks in the Module Builder:
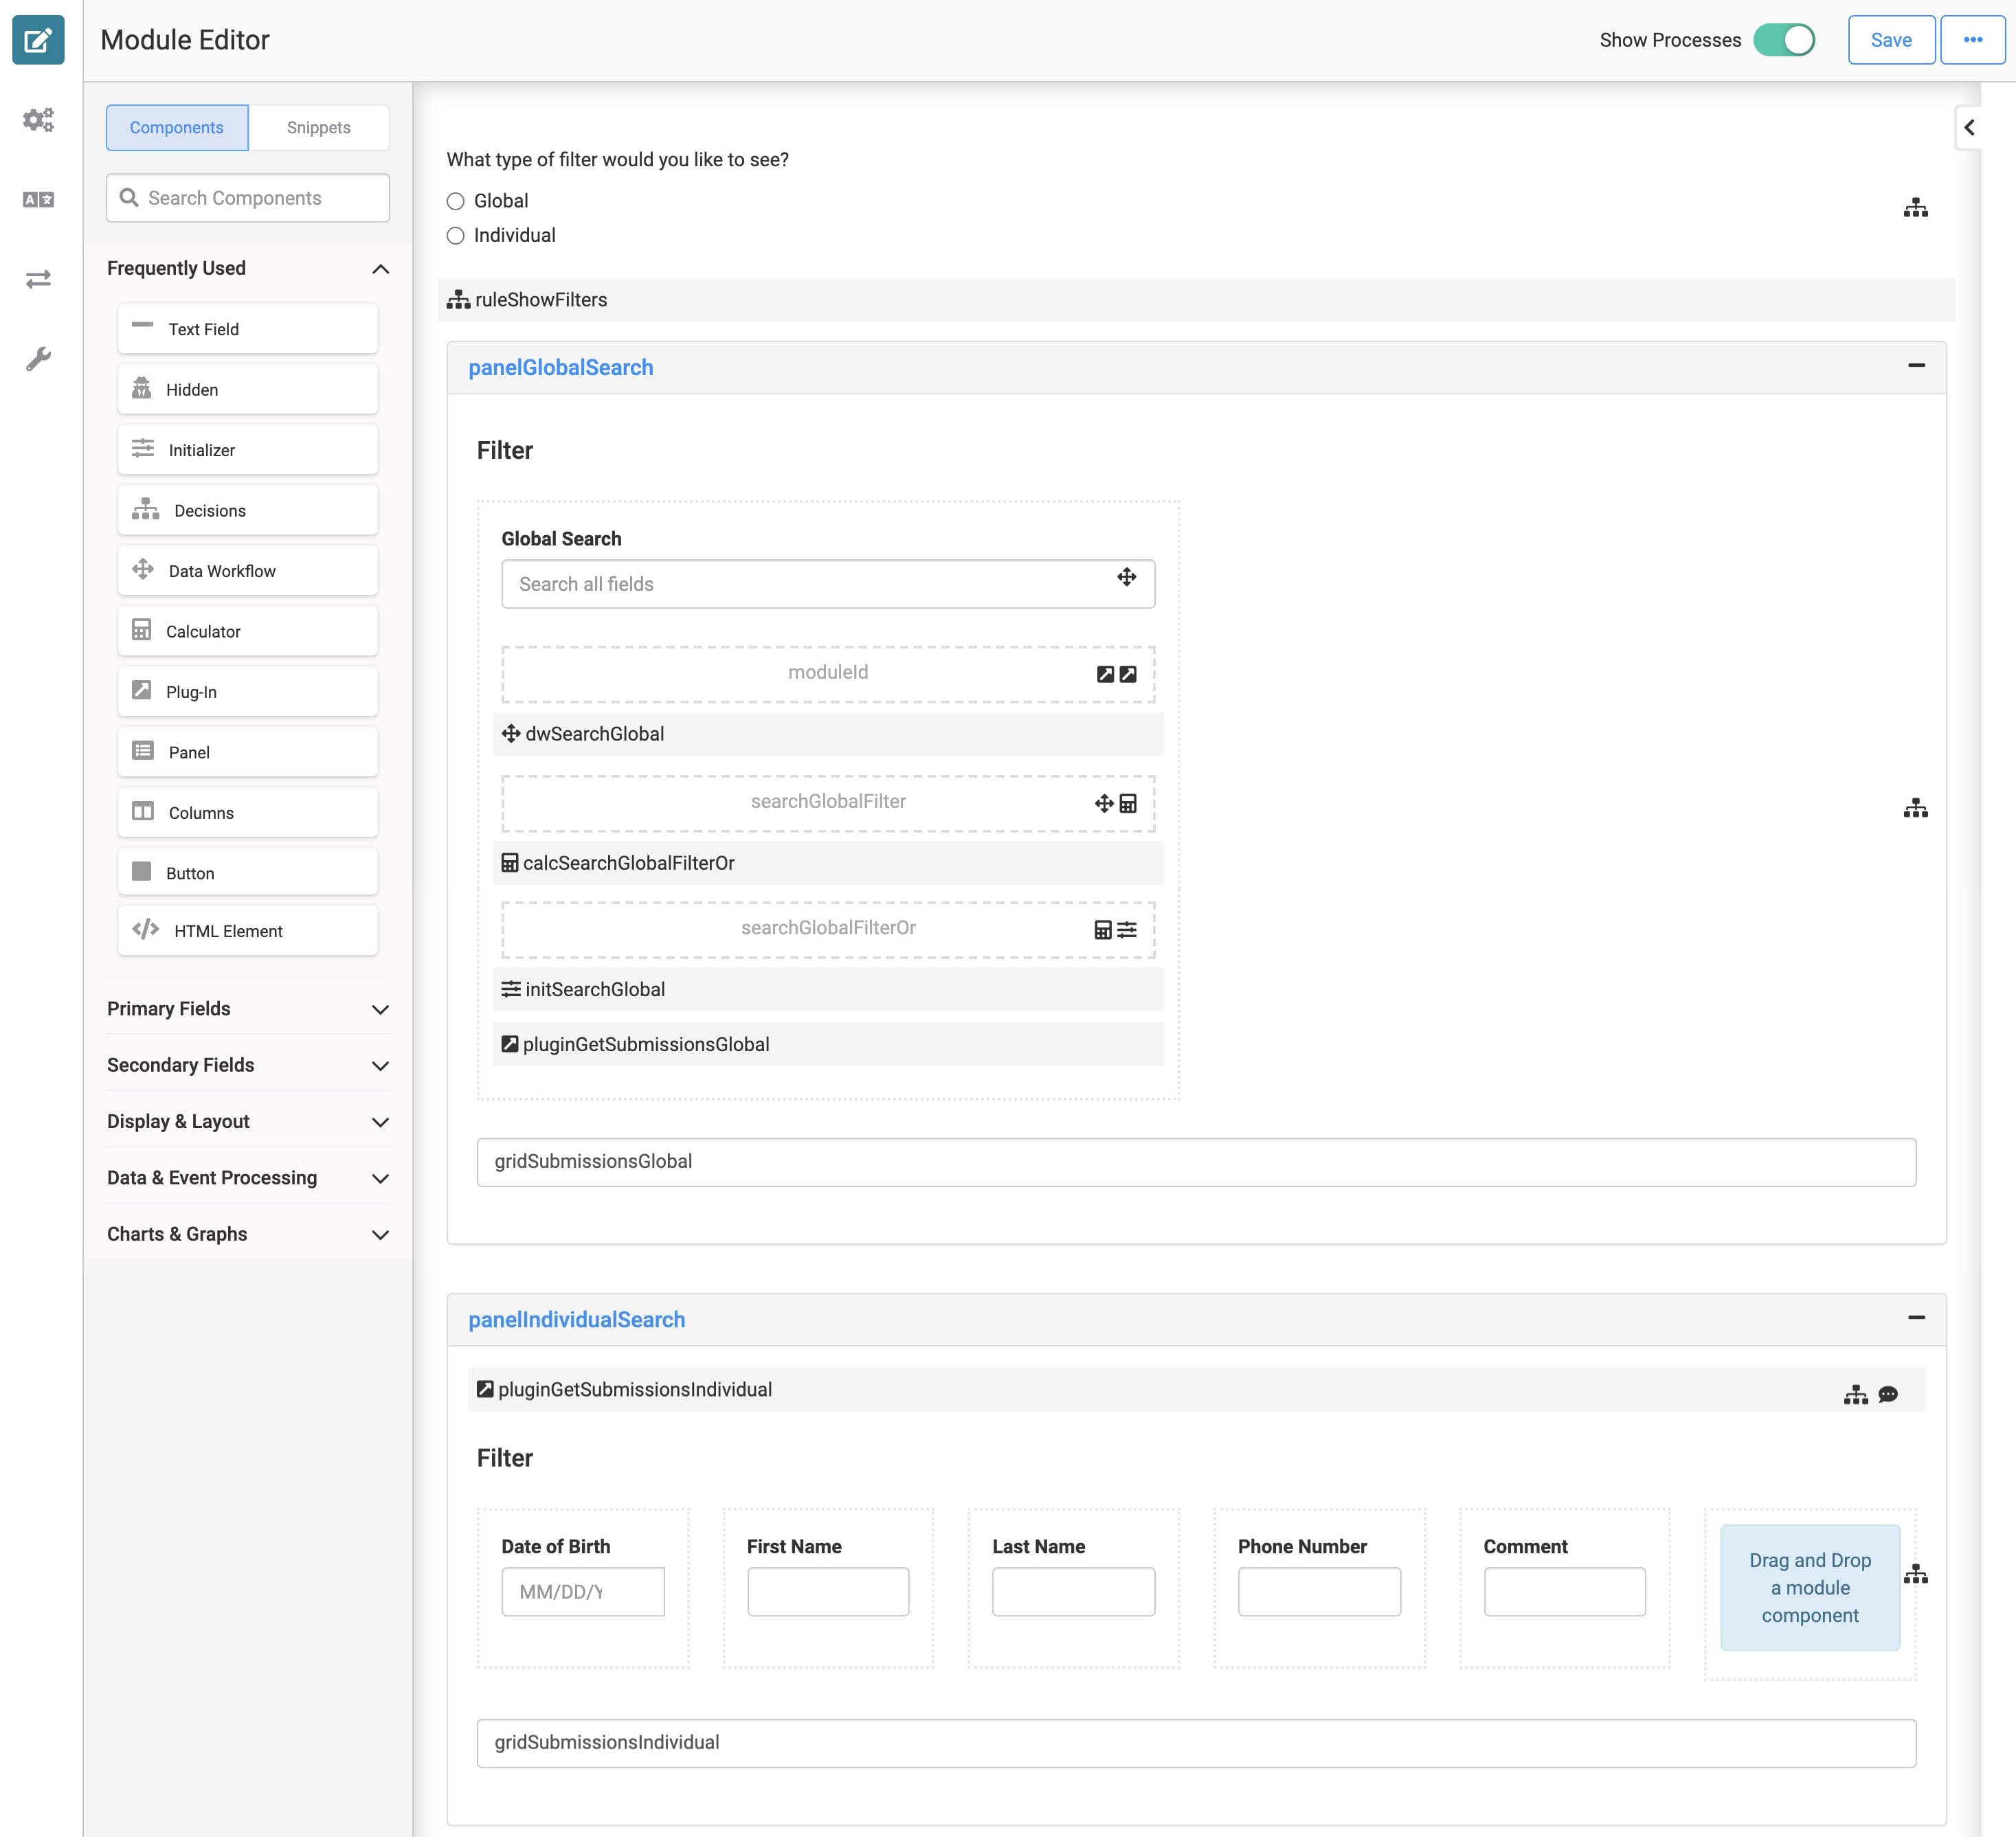
Preview your module in Express View and select the Individual radio button. Use the filters to enter information and locate specific submission data. As you enter text in the filters, the dashboard populates with matches automatically.
