External APIs enable Creators to build versatile Centauri (v1.0) and Vega (v2.0) applications connecting to thousands of other services. For example, if you need to add a map feature to your application, you might use a Google Maps API. Doing so lets you avoid having to build the map yourself.
About External APIs
Unqork lets Creators integrate external API services into environments. For example, connecting to a CRM (customer relationship management) system, or integrating with a Salesforce instance and DocuSign account.
Making an external API call requires a little extra work compared to an internal API call. First, set up the external service in Services Administration. Then, configure the API with a Plug-In component to make the call.
The maximum size of your HTTP response content must be less than 100 MB.
Setting Up an External Service
To make an external API call, the first step is to set up the service in your Unqork environment. To set up that integration, you need four pieces of information:
Setting | Description |
|---|---|
Service Title | This title displays in the External Services drop-down in the Plug-In component. Typically, you use the name of the application or service. |
Service Name | The Service Name is permanent. As a best practice, keep Service Names simple and avoid spaces. For example, you might use googlemaps when setting up a Google Maps integration. |
Service Protocol + Host | This refers to the URI for all API calls made with this service. The URI serves as a locator, telling the API where to direct the call. If any part of the URI is consistent for every call, enter that part here. You can always add to the URI when configuring a specific API call. |
Type of Authentication | This is the method of authentication the service or application uses. The service provider determines which method to use. If you're unsure of the authentication type, refer to the API service's documentation. |
These are not the only settings on the page, but they’re the minimum required for an external API call. In rare cases, Creators might need to specify certain Request Headers for all calls made using the API. Or, you might need to include certain items in each request body. For more details on each setting, visit the Services Administration article.
Learn how to create and add a service in our How To: Add a Service article.
How to Make an External API Call
For this example, set up a SendGrid API call to send emails automatically. In Unqork, you can trigger an API call to SendGrid based on end-user interaction. When an end-user clicks a button, it triggers an API call to SendGrid. Then, SendGrid sends the email.
When configuring API calls, it's best practice to use a Proxy module. Because this example focuses on configuring the API call, you won't create a Proxy module. To learn more about setting up Proxy modules, see our How to: Add a Proxy Module to a Remote Execute article.
Preconfiguration
Configure the External Service
First, configure the SendGrid service in Services Administration. To get the necessary information, use SendGrid's API documentation: https://sendgrid.com/docs/API_Reference/Web_API_v3/Mail/index.html.
At the top right of the Unqork Designer Platform, click Administration.
Under Integration, click Services Administration.
Click + Add a Service. The Create New Service modal displays.
In the Service Title* and Service Name* fields, enter
SendGrid.Click Next.
In the Share To field, specify if the service is shared with the Environment or a specific Workspace.
Click Create. The service page loads for the new service. The service can now be configured.
In the top right of the page, click Edit.
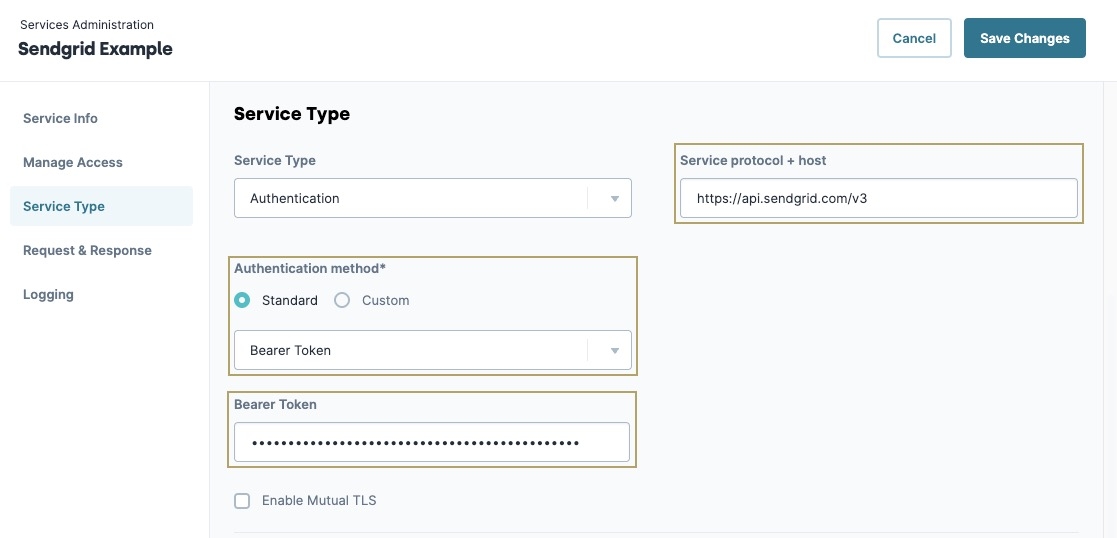
From the left menu, click the Service Type button.
In the Service Protocol + Host* field, enter
https://api.sendgrid.com/v3.From the Authentication Method* drop-down, select Bearer Token.
In the Bearer Token field, enter your Bearer Token value.
This Bearer Token is unique to every SendGrid user. The Unqork Training environment uses Unqork's SendGrid Bearer Token.
Click Save Changes.
Configuration
Configure a module to use the SendGrid API service. Set up an Email and Text Area component to contain an end-user's message, then send that data using the SendGrid API.
Configure the Columns Component
This Columns component acts as a container to keep a module organized. You'll use the component to contain an Email and Text Area component.
In the Module Builder, drag and drop a Columns component onto your canvas.
In the Property ID field, enter
colEmail.Click Save Component.
Configure the Email Component
This Email component serves as the recipient of the email. In a later step, you'll map this to the SendGrid API call using a Plug-In component.
Drag and drop an Email component onto your canvas, placing it inside the left-hand column of the colEmail Columns.
In the Property ID field, enter
emailAddress.In the Label Text field, enter
Email Address.Click Save Component.
Configure the Text Area Component
This Text Area component serves as the body of the email. In the next step, map this to your API call using the Plug-In component.
Drag and drop a Text Area component onto your canvas, placing it inside the right-hand column of the colEmail Columns component.
In the Property ID field, enter
emailMessage.In the Label Text field, enter
Email Message.Click Save Component.
Configure the Plug-In Component
Use a Plug-In component to map the data parameters into a single request body.
Drag and drop a Plug-In component onto your canvas, placing it below the colEmail Columns component.
In the Property ID field, enter pluginSendEmail
In the Canvas Label Text field, enter
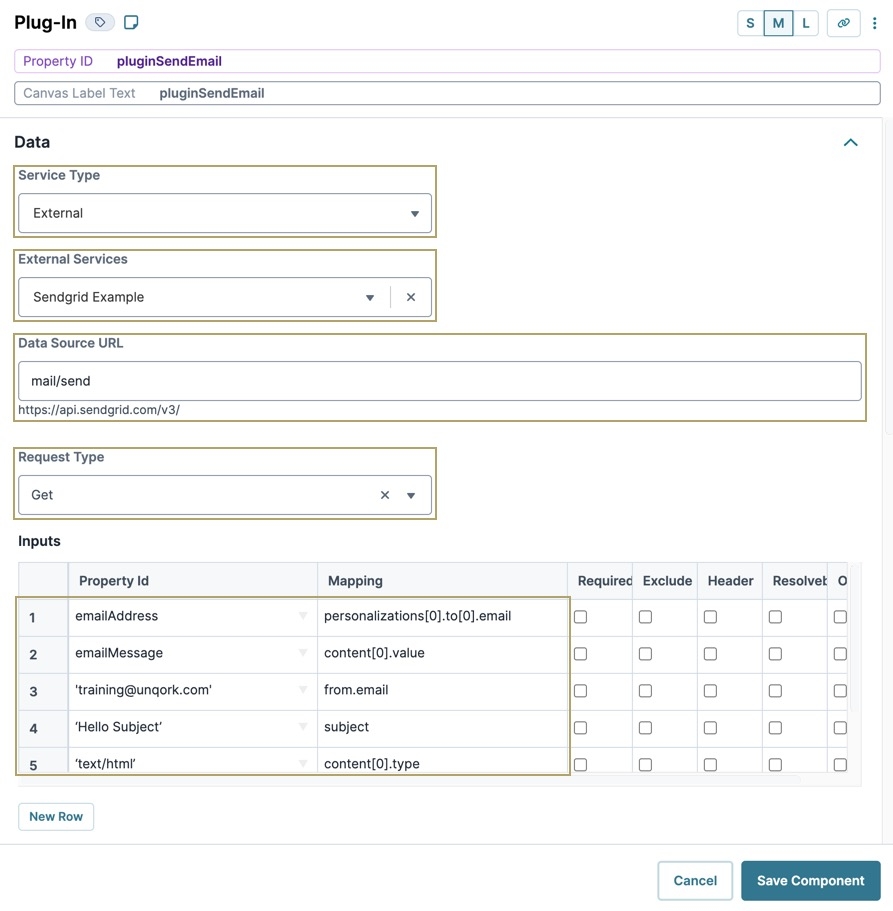
pluginSendEmail.From the Service Type drop-down, select External.
From the External Services drop-down, select the Sendgrid service set up in the Pre-Configuration steps.
In the Data Source URL field, enter
mail/send.From the Request Type drop-down, select Post.
The Service Protocol + Hostvalue entered earlier pre-populates here. This is consistent for any call made using SendGrid. Adding
mail/sendspecifies that you are sending an email in this specific call.In the Inputs table, enter the following:
#
Property ID
Mapping
1
emailAddress
personalizations[0].to[0].email
2
emailMessage
content[0].value
3
'training@unqork.com'
from.email
4
‘Hello Subject’
subject
5
‘text/html’
content[0].type
Setting any of these inputs as Required stops the API call from sending if the value is not present. Setting an input as Optional means the call sends without the parameter rather than as a blank value if that parameter is empty.
You can find the parameters for external API calls in the service's documentation. You need to include every required parameter for your call to succeed. You can find the SendGrid documentation here: https://sendgrid.com/docs/API_Reference/Web_API_v3/Mail/index.html.
Click Save Component.
Configure the Button Component
Lastly, configure a Button component to trigger your Plug-In component. When you click this button in Express View, the Plug-In component makes the API call.
Drag and drop a Button component onto your canvas, placing it between the colEmail Columns and pluginSendEmail Plug-In components.
In the Property ID field, enter
btnSendEmail.In the Label Text field, enter
Send Email.Navigate to the Actions settings.
From the Action Type drop-down, select Event.
In the On Click field, enter
plugSendEmail.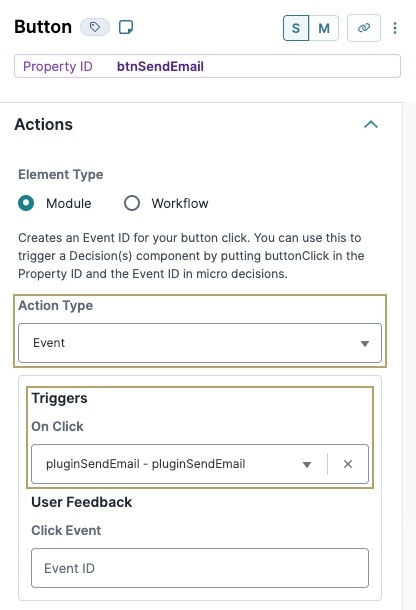
Click Save Component.
Save your module.
Your completed module configuration looks like the following in the Module Builder:

Click Preview to test your configuration in Express View. Fill out the fields and click the Send Email button. If your call is successful, you'll receive an email at the email address you entered in Express View.
Overview
External APIs enable Creators to build versatile applications connecting to thousands of other services. For example, if you need to add a map feature to your application, you might use a Google Maps API. Doing so lets you avoid having to build the map yourself.
About External APIs
Unqork lets Creators integrate external API services into your environment that Unqork’s API doesn't already offer. For example, connecting to a CRM (customer relationship management) system, or integrating with a Salesforce instance and DocuSign account.
Making an external API call requires a little extra work compared to an internal API call. First, you need to set up the external service in Services Administration. Then, to make the call, you need to configure the API with a Plug-In component.
The maximum size of your HTTP response content must be less than 100 MB.
Setting Up an External Service
To make an external API call, the first step is to set up the service in your Unqork environment. To set up that integration, you need four pieces of information:
Setting | Description |
|---|---|
Service Title | This title displays in the External Services drop-down in the Plug-In component. Typically, you use the name of the application or service. |
Service Name | The Service Name is permanent. As a best practice, keep Service Names simple and avoid spaces. For example, you might use googlemaps when setting up a Google Maps integration. |
Service Protocol + Host | This refers to the URI for all API calls made with this service. The URI serves as a locator, telling the API where to direct the call. If any part of the URI is consistent for every call, enter that part here. You can always add to the URI when configuring a specific API call. |
Type of Authentication | This is the method of authentication the service or application uses. The service provider determines which method to use. If you're unsure of the authentication type, refer to the API service's documentation. |
These aren't the only settings on the page, but they’re the minimum you need for an external API call. In rare cases, you might need to specify certain Request Headers for all calls made using the API. Or, you might need to include certain items in each request body. For more details on each setting, visit the Services Administration article.
Learn how to create and add a service in our How To: Add a Service article.
How to Make an External API Call
For this example, you'll set up a SendGrid API call to send emails automatically. In Unqork, you can trigger an API call to SendGrid based on end-user interaction. When an end-user clicks a button, it triggers an API call to SendGrid. Then, SendGrid sends the email.
When configuring API calls, it's best practice to use a Proxy module. Because this example focuses on configuring the API call, you won't create a Proxy module. To learn more about setting up Proxy modules, see our How to: Add a Proxy Module to a Remote Execute article.
Preconfiguration
Configure the External Service
First, configure the SendGrid service in Services Administration. To get the necessary information, use SendGrid's API documentation found here: https://sendgrid.com/docs/API_Reference/Web_API_v3/Mail/index.html. This is where you find the authentication method and information for the API call.
At the top right of the Unqork Designer Platform, click Administration.
Under Integration, click Services Administration.
Click + Add a Service. The Create New Service modal displays.
In the Service Title* and Service Name* fields, enter
SendGrid.Click Next.
In the Share To field, specify if the service is shared with the Environment, or a specific Workspace.
Click Create. The service page loads for the new service. The service can now be configured.
In the top right of the page, click Edit.
From the left menu, click the Service Type button.
In the Service Protocol + Host* field, enter
https://api.sendgrid.com/v3.From the Authentication Method* drop-down, select Bearer Token.
In the Bearer Token field, enter your Bearer Token.
This Bearer Token is unique to every SendGrid user. The Unqork Training environment uses Unqork's SendGrid Bearer Token.
.jpg)
Click Save Changes.
Configuration
With your service configured, open your module to finish the configuration to make a SendGrid API call.
Configure the Columns Component
This Columns component acts as container to keep the module organized. Use the component to contain an Email and Text Area component.
In the Module Builder, drag and drop a Columns component onto your canvas.
In the Property ID field, enter colEmail.
Click Save & Close.
Configure the Email Component
This Email component serves as the recipient of your email. In a later step, you'll map this to the API call using a Plug-In component.
Drag and drop an Email component onto your canvas, placing it inside the left-hand column of the colEmail Columns component.
In the Property ID field, enter emailAddress.
In the Label Text field, enter
Email Address.Click Save & Close.
Configure the Text Area Component
This Text Area component serves as the body of the email. In the next step, you'll map this to the API call using the Plug-In component.
Drag and drop a Text Area component onto your canvas, placing it inside the right-hand column of the colEmail Columns component.
In the Property ID field, enter emailMessage.
In the Label Text field, enter
Email Message.Click Save & Close.
Configure the Plug-In Component
Use a Plug-In component to map the parameters into a single request body.
Drag and drop a Plug-In component onto your canvas, placing it below the colEmail Columns component.
In the Property ID and Canvas Label Text fields, enter
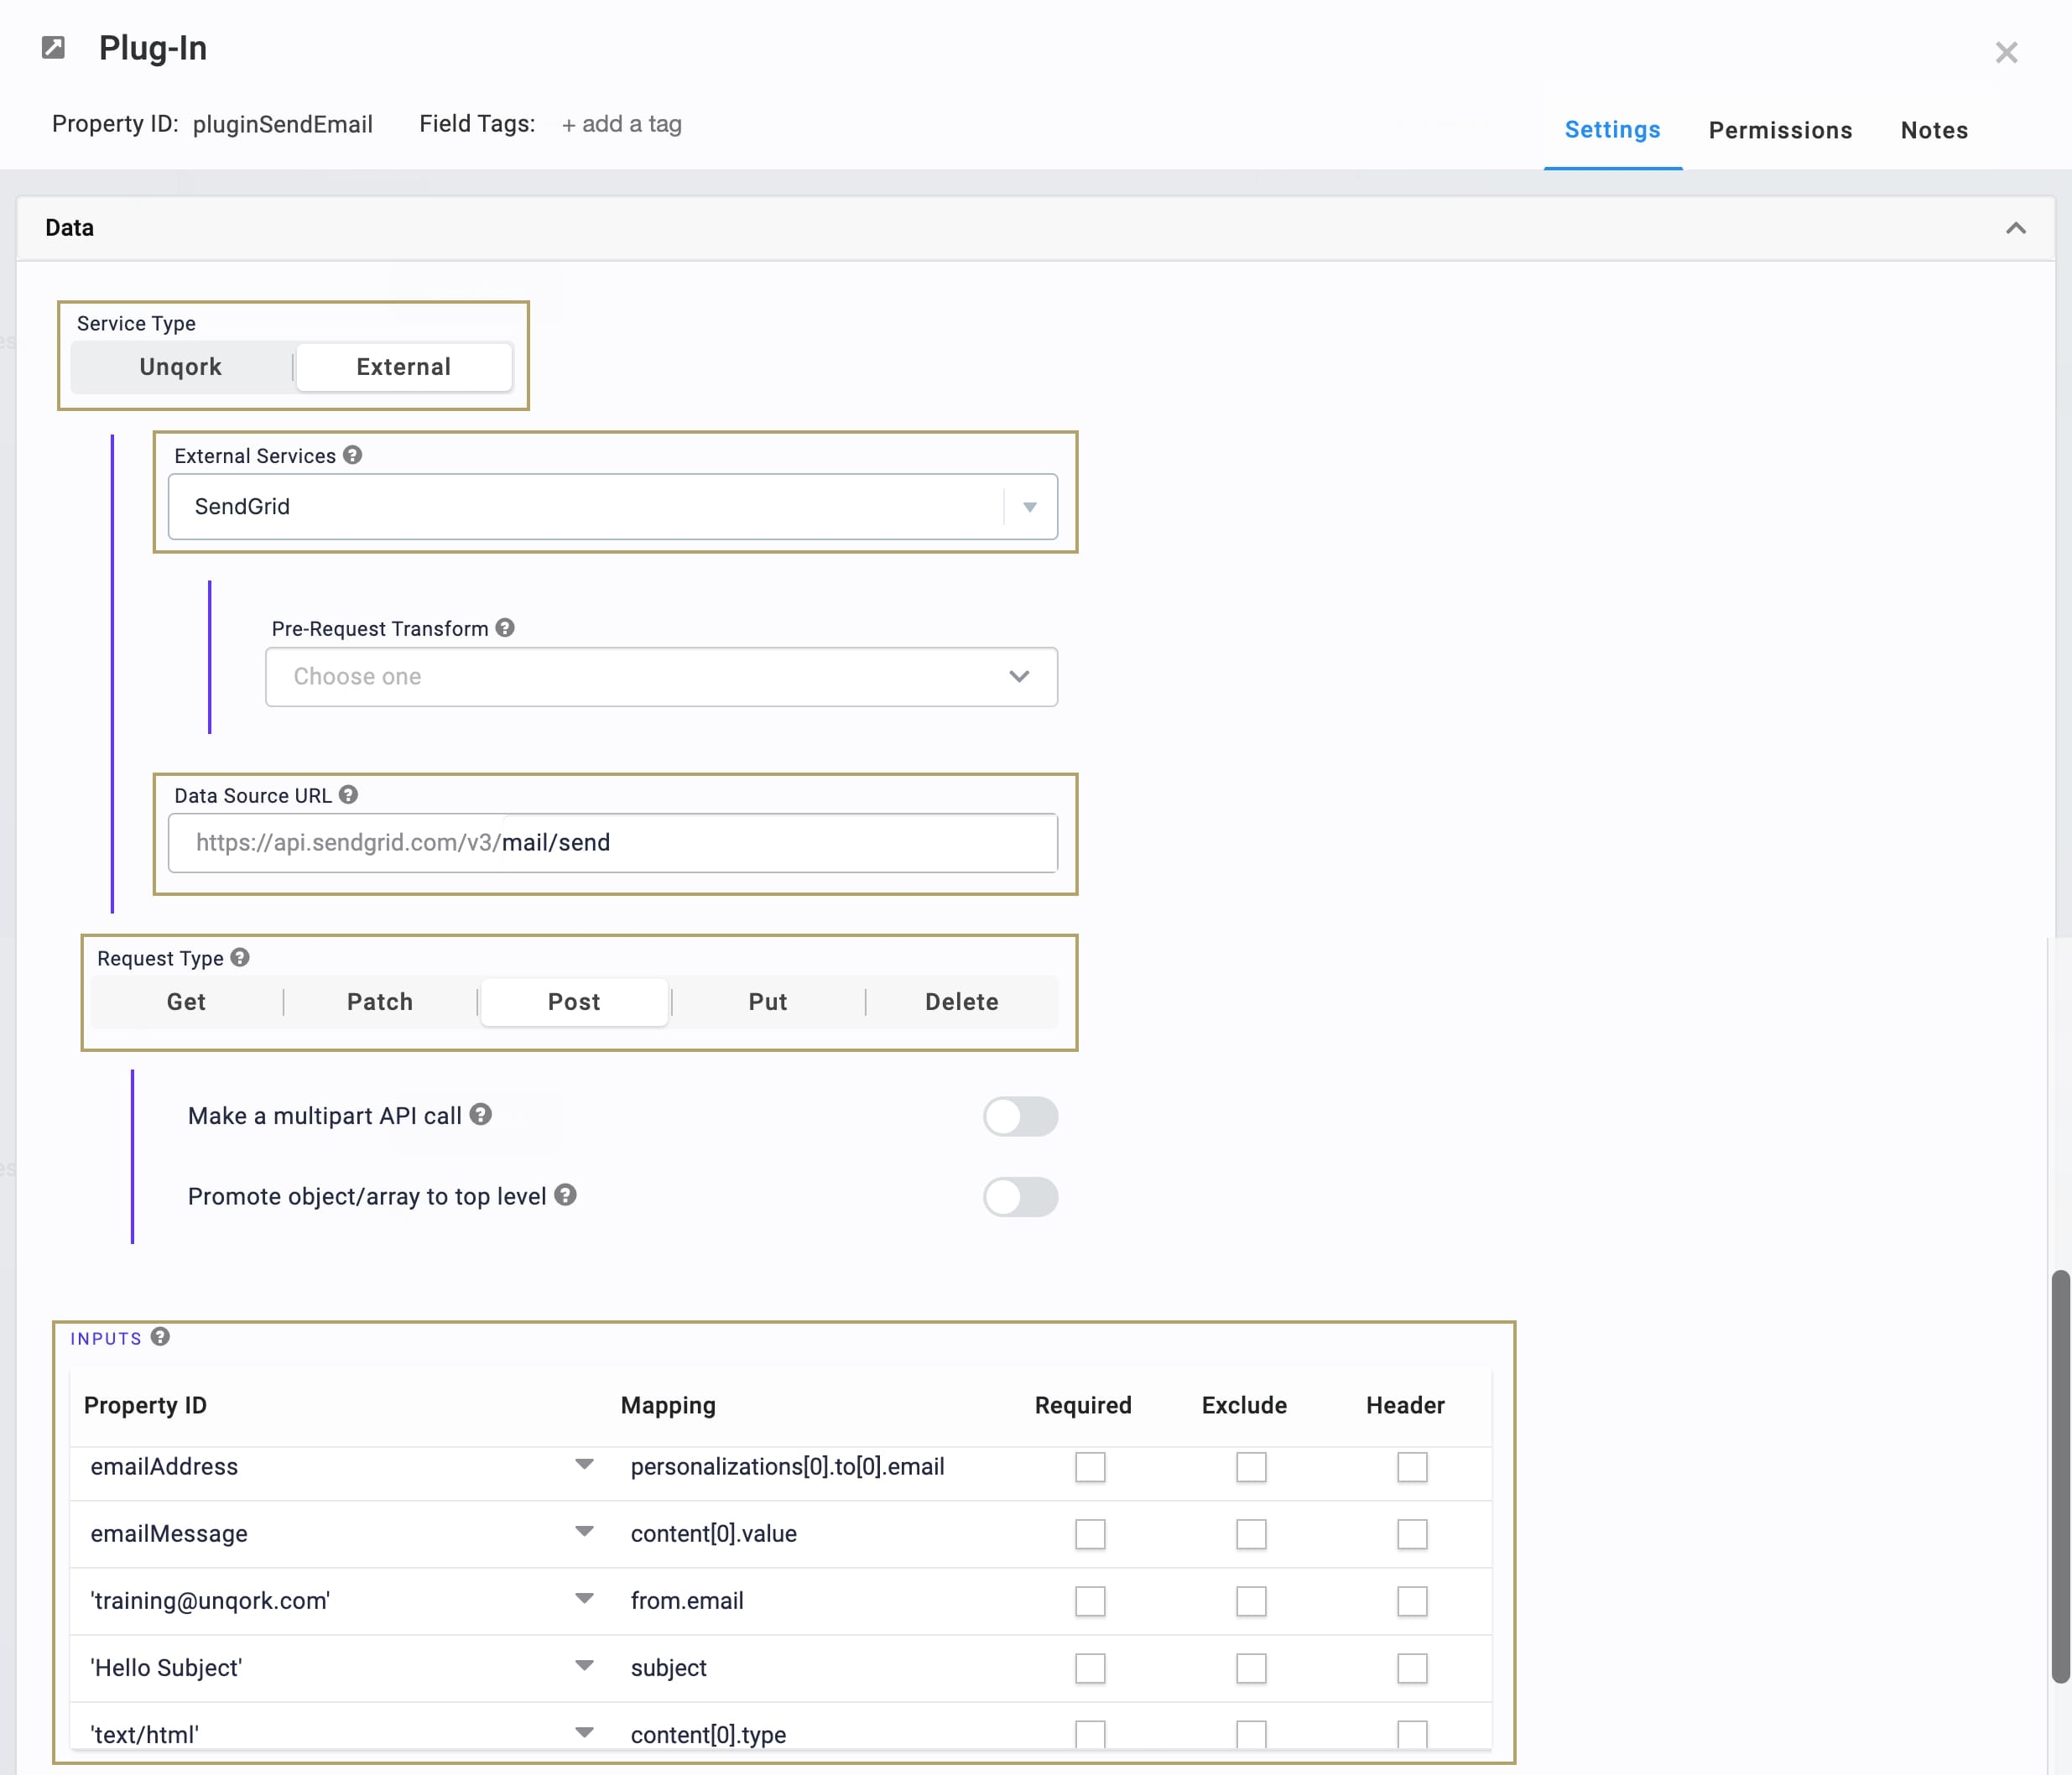
pluginSendEmail.From the Service Type chips, select External.
From the External Services drop-down, select the Sendgrid service set up in the Pre-Configuration steps.
In the Data Source URL field, enter mail/send.
From the Request Type chips, select Post .
The Service Protocol + Host you entered earlier prepopulates here. That is consistent for any call made using SendGrid. Adding mail/send specifies that you are sending an email in this specific call.
In the INPUTS table, enter the following:
Property ID
Mapping
emailAddress
personalizations[0].to[0].email
emailMessage
content[0].value
'training@unqork.com'
from.email
‘Hello Subject’
subject
‘text/html’
content[0].type
Setting any of these inputs as Required stops the API call from sending if the value is not present. Setting an input as Optional means the call sends without the parameter rather than as a blank value if that parameter is empty.
You can find the parameters for external API calls in the service's documentation. You need to include every required parameter for your call to succeed. You can find the SendGrid documentation here: https://sendgrid.com/docs/API_Reference/Web_API_v3/Mail/index.html.
Click Save.
Configure the Button Component
Finally, configure a Button component to trigger your Plug-In component. When you click this button, the Plug-In sends the API call.
Drag and drop a Button component onto your canvas, placing it between the colEmail Columns and pluginSendEmail Plug-In components.
In the Property ID field, enter btnSendEmail.
In the Label Text field, enter
Send Email.To the left of the component's configuration window, click Actions.
From the Action Type chips, select Event.
In the On Click field, select or enter pluginSendEmail.

Click Save & Close.
Save your module.
Your completed module configuration looks like the following in the Module Builder:
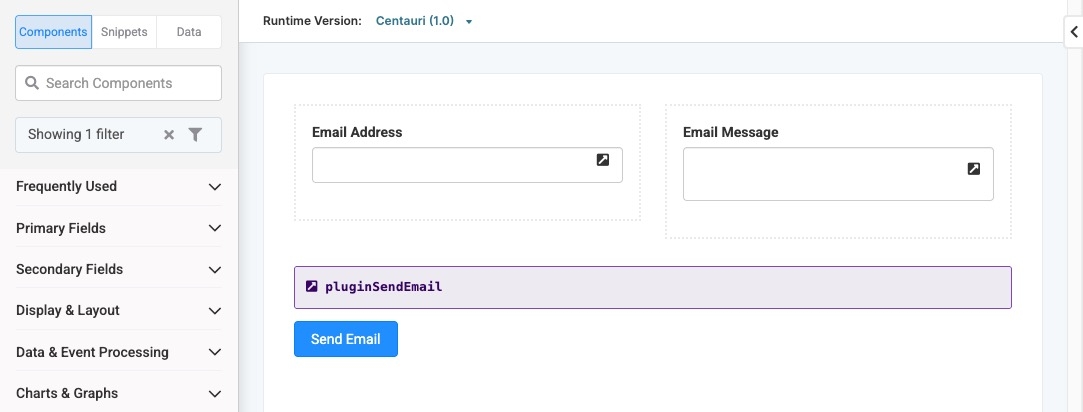
Click Preview to test your configuration in Express View. Fill out the fields and click the Send Email button. If your call is successful, you'll receive an email at the email address you entered in Express View.
.jpg)