Unqork allows you to consume data payloads using webhooks, which retrieve real-time data integration from external systems into your Unqork application. A webhook lets one server send data to another automatically when a specific event occurs. Unlike a typical API (application programming interface) call, where you must initiate the request for information, a webhook enables another server to request on your behalf. In this case, the Unqork server acts as the listener for the incoming request, allowing it to receive real-time data.
Webhooks Versus APIs
APIs and webhooks both move data from one place to another. While they're similar, they're not quite the same thing. When you send an API request, it travels to a series of URL endpoints. But the URL endpoint for a webhook is one of your choosing. In this case, the endpoint is your module's URL. So, this endpoint receives data from the external service or pushes data to you. On the basic level, the main difference between each type of call is that:
To pull data from an external service, you must make a request to an external API call.
A webhook sends data from an external service to you. An event typically triggers the sending of the request.
This image shows a simple comparison of APIs and webhooks:

Examples of trigger events could be the submission of an application. When an end-user submits an application, a webhook could send a request to your module's URL. Once received, you could configure your response as an email to your end-user.
Using Webhooks
An example of webhooks in action is DocuSign. After signing a contract, DocuSign can send a request to the URL provided to DocuSign. You can then configure the response to be a notification email sent out to all signers. If you consider the alternative, doing the same action with an API call would be inefficient. You'd have to keep sending requests to find out if all parties signed the document. That means either manually triggering the call or setting it up on a timer.
Using webhooks to send email notifications with DocuSign is just one example. You can also use webhooks to:
Synchronize data across many web applications.
Receive real-time data in your application.
Another example of using webhooks is the payment platform Stripe. It uses them to:
Send notifications for invoice payment failures.
Handle payments that need more action, such as authorization.
Track the active or inactive status of subscriptions.
Catch subscription changes and restrict access to products or services.
It's important to note that external services usually send webhook requests in JSON. But requests can also be in XML. But how does that work when the Unqork platform is in JSON? Well, Unqork has an extra endpoint for webhooks called Execute via Proxy. Execute via Proxy lets your module receive any data format request. It also lets you receive the typical GET, POST, PUT, PATCH, and DELETE requests. As a note, webhooks usually send POST requests. An issue may arise with the XML format when your module sends a response back to the external service. Responses from Unqork are always from data.resolved, and always in JSON. Sometimes an external service needs an XML response to work correctly. If this is the case, you won't be able to use that service. Does that mean there's no way to make your configuration work? No, you just can't use a webhook call. Instead, you'll need to set up your module with an API call.
Using Webhooks Securely
To use webhooks at Unqork, you'll need to change some of your module's security features. External services qualify as anonymous users because they're outside of Unqork. You'll need to set anonymous user RBAC (role-based access control) permissions to receive requests. Then you'll provide your external service with your module's URL endpoint. It's important to note that sharing a URL will make it publicly accessible. While discovering the URL and using it maliciously is unlikely, the risk does exist. If you don't want to take the risk, you can always use an API call instead of a webhook.
How to Configure a Webhook Module
Let's look at the general steps you should take to use webhooks. When you set up a module, you'll enter a title that includes postback and a brief description of the module's purpose. That way, you're following best practices for webhook module configuration. For instance, you could enter postbackDocuSign as the ID for a module receiving DocuSign requests.
Creating an API module
To use webhooks, let's first set up an API module.
These instructions assume you have a workspace open, saved, and with a title.
To create an API module:
Click on the +Create New drop-down menu on the top right of your workspace.
From the drop-down, select Module.
In theModule Name field, use postback as a prefix, then enter a name for the module.
From the Module Type drop-down, select API.
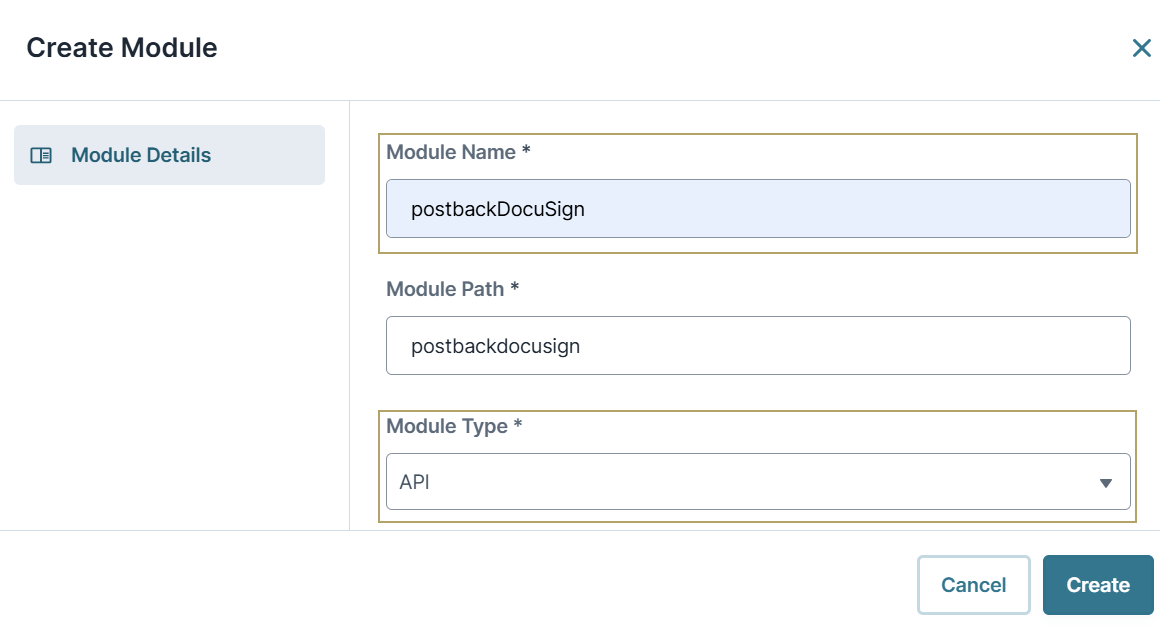
Click Create.
Save your module.
Enabling Execute via Proxy
Now you'll access the Settings to configure your new module. You'll enable a few settings for the Execute via Proxy endpoint to work correctly. For one, you'll set the Anonymous role's permissions to Write. This setting lets you receive a request from your webhook service.
In the Module Builder, click the
.png) (ellipsis) button.
(ellipsis) button.Click ModuleSettings.
Click User Permissions.
Set Allow Access to Anonymous Users to
.png) (ON).
(ON).From the Anonymous role's Permission drop-down, select Write.
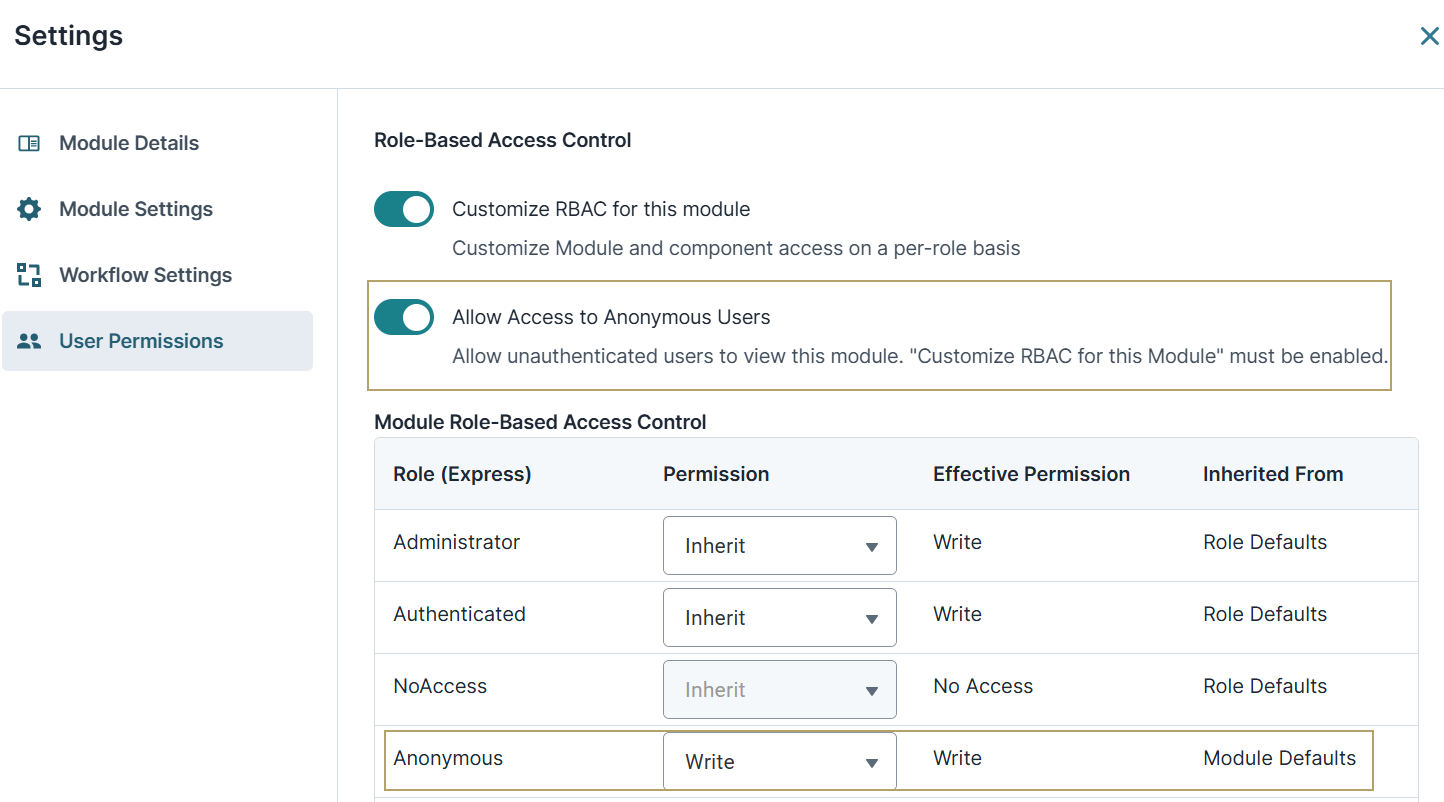
Click Save & Close.
Save your module.
Sharing the Postback Module URL
After you've set up your module to receive webhook requests, you'll provide your URL to the sender. Your URL looks something like this: https://{yourSubdomain}x.unqork.io/fbu/uapi/modules/{moduleId}/api/{path}. Here's a description of the undefined sections of this URL example:
yourSubdomain: This is your postback module's environment.
moduleId: This is the module ID of your postback module.
path: This is optional, but you could use it to help specify the purpose of your postback module. For instance, you could enter
docuSignEmailas the path to use this module to receive DocuSign requests.
Best Practices
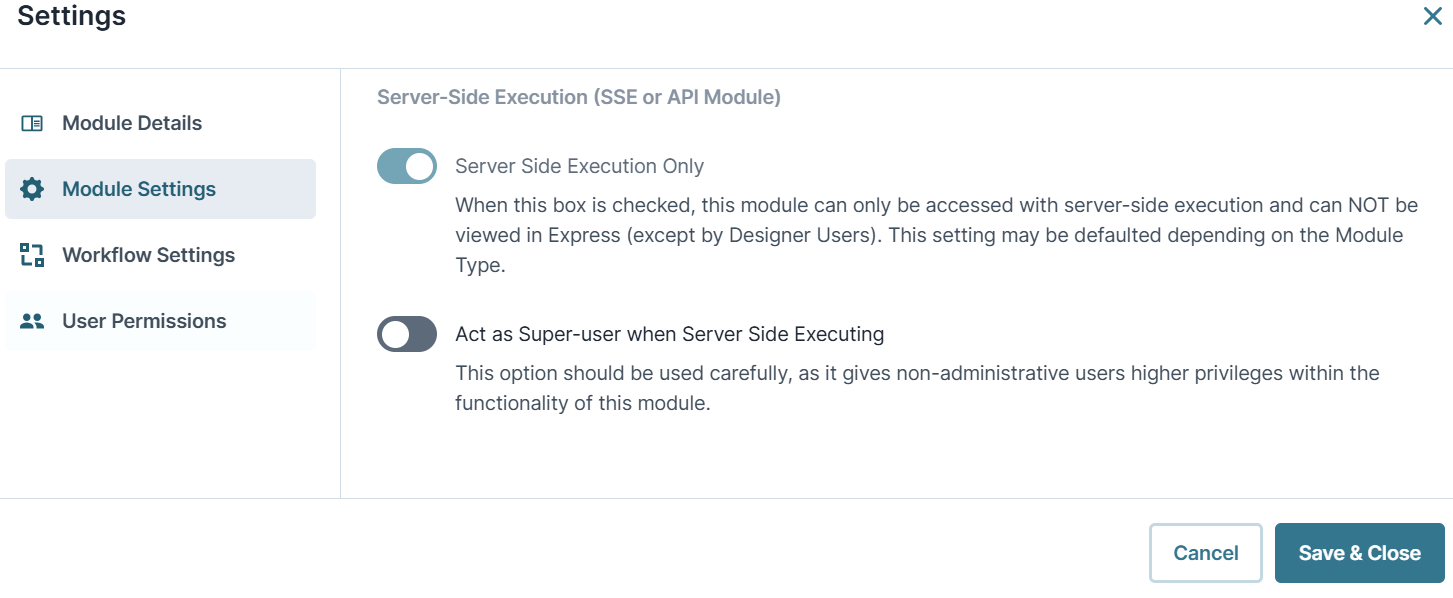
Avoid enabling the Act as Super-user when Server Side Executing setting. This setting can weaken the security of your application.
Resources
For more information, you can read about the APIs in our Documentation Hub.