Unqork's GenAI Connector enables Creators to add GenAI capabilities to Unqork applications. To use the GenAI Connector, Creators install the template to their environment, then connect it to the OpenAI or Google AI API services. Creators can then customize LLM usage using the GenAI Connector's Plug-In components. Once the connector is set up, Creators and end-users can interact with the LLM in Express View.
The GenAI Connector is available only in the UDesigner platform.
What Is the GenAI Connector?
The GenAI Connector is a template that provides a starting point for creating GenAI-enabled applications. The template contains a sample module configuration for a chatbot experience that can be customized to suit your needs.
The GenAI Connector package includes the following:
Pre-made services to connect to your LLM provider using an API key.
Creators are responsible for acquiring an API key for the LLM provider of their choice. Never share your API key with outside sources.
API modules containing instructions on adjusting parameters and customizing your AI interactions.
Front-End modules containing a sample configuration of a chatbot experience for your end-users.
Installing and Configuring the GenAI Connector
To use an LLM in Express View, you must first install and configure the GenAI Connector.
Requirements
To install and configure GenAI in Unqork, you need:
Access to the UDesigner Platform.
Subscription to OpenAI's ChatGPT or Google's Gemini AI.
Environment Administrator Access.
Install the GenAI Connector Template
The GenAI Connector template creates all the modules and services required to use ChatGPT or Gemini in Unqork. After installing the template, you'll connect it to your preferred service using your private LLM API key.
To install the GenAI Connector template:
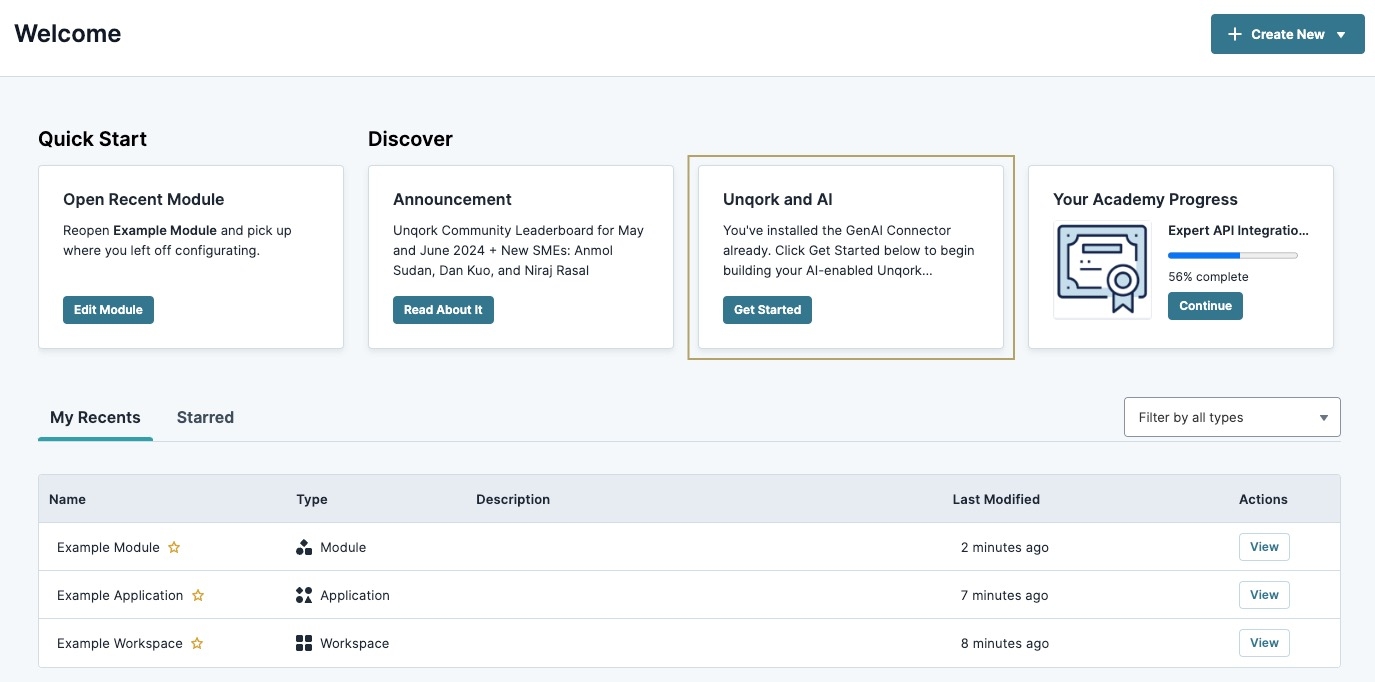
From the UDesigner Homepage, navigate to the Unqork and AI card.
Click Get Started.

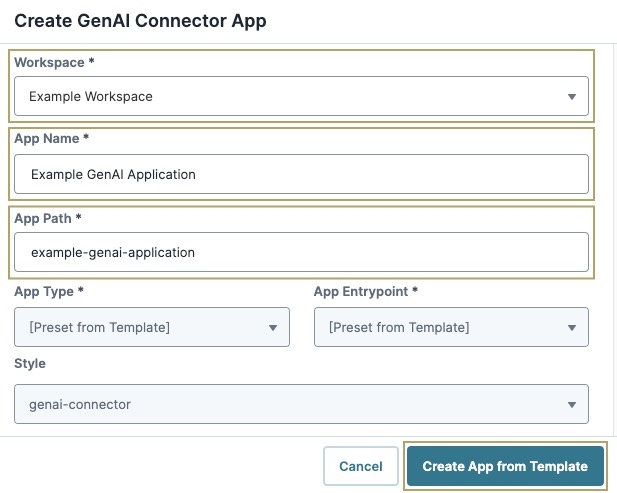
In the confirmation modal, click Create GenAI Connector App. The Create GenAI Connector App modal displays.
From the Workspace* drop-down, enter or select an existing workspace.
In the App Name* field, enter a name for your GenAI Connector application. The App Path* populates using the App Name field value.
The App Type*, App Entrypoint* and Style values are predefined and cannot be changed at this time.
Click Create App from Template.

The GenAI Connector app displays in the Application Element table of the chosen workspace.
Configuring GenAI Connector Services
The GenAI Connector comes with two preconfigured services, Google's Gemini and OpenAI's ChatGPT. You can connect one or both services to the GenAI Connector application.
Connect the OpenAI Service
Now that the GenAI Connector template is installed in the environment, connect it to the OpenAI service using the appropriate API key.
For this example, connect the OpenAI API to Unqork using the Services Administration page:
From the UDesigner platform, click Administration.
Under Integration, click Integration Administration. The Integration Gateway page displays.
If you do not have Integration Administration enabled in your environment, click Services Administration.
From the left menu, click Services Administration.
In the Services list, the GenAI Connector template automatically creates the Google Gemini and OpenAI connectors.
From the Services list, click OpenAI - GenAI Connector 1.0.0 20XX-XX-XXT00:00:00.000Z. The date and Zulu time correspond to the GenAI Connector template installation date. The OpenAI - GenAI Connector's Service page displays.

At the top right, click Edit. The service fields become available to edit.
If multiple GenAIs connectors exist in the environment, update the Service Title* field to a unique value for easier navigation.
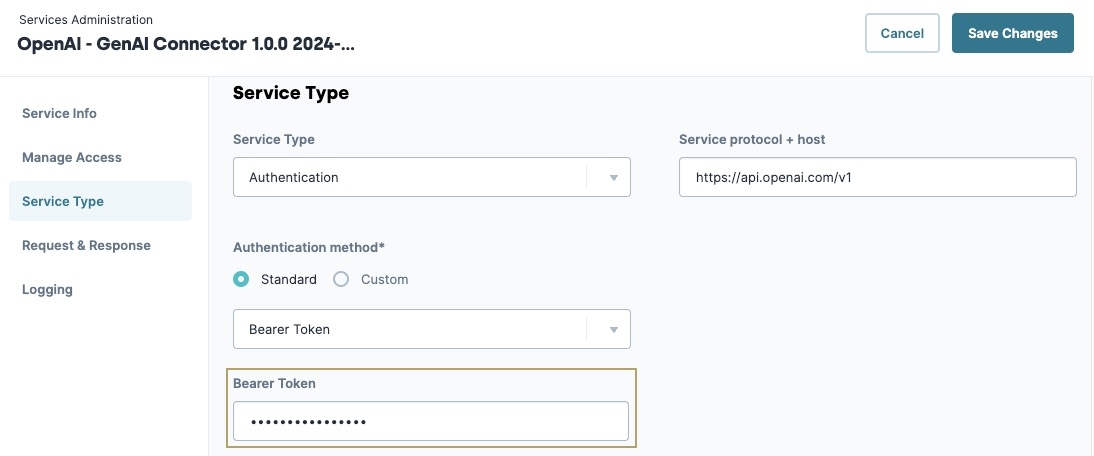
From the left menu, click Service Type.
In the Bearer Token field, enter your OpenAI API access key.
To obtain an API key, view OpenAI's documentation here: https://platform.openai.com/docs/api-reference/authentication

Click Save Changes.
The GenAI Connector's OpenAI application is now ready to use.
Connect the Google Gemini API Service
Now that the GenAI Connector template is installed in the environment, connect it to the Gemini AI service using the appropriate API key.
For this example, connect the Google Gemini API to Unqork using the Services Administration page:
From the UDesigner platform, click Administration.
Under Integration, click Integration Administration. The Integration Gateway page displays.
If you do not have Integration Administration enabled in your environment, click Services Administration.
From the left menu, click Services Administration.
In the Services list, the GenAI Connector template automatically creates the Google Gemini and OpenAI connectors.
From the Services list, click Google Gemini - GenAI Connector 1.01.0.0 20XX-XX-XXT00:00:00.000Z. The date and Zulu time correspond to the GenAI Connector template installation date.

The Google Gemini connector's Service page displays.
In the UDesigner's top-right corner, click Edit. The service fields become available to edit.
If multiple GenAIs connectors exist in the environment, update the Service Title* field to a unique value for easier navigation.
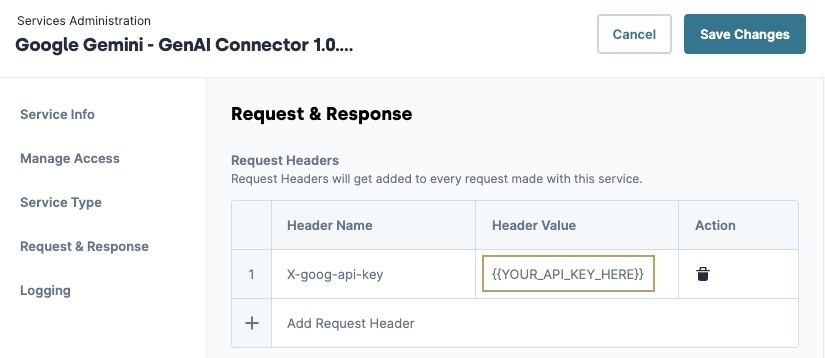
From the left menu, click Request & Response.
In the Request Headers table, replace the Header Value of
{{YOUR_API_KEY_HERE}}with your Google Gemini API key.To obtain an API key, view Google's documentation here: https://ai.google.dev/gemini-api/docs/api-key

Click Save Changes.
The GenAI Connector's Google Gemini application is now ready to use.
Customizing the GenAI Connector's LLM
ChatGPT and Gemini use modifiable parameters for customizing their response to end-user questions. To modify these values, open the OpenAI or Google Gemini API module and modify the Inputs & Outputs settings of the pluginOpenAI or pluginGoogleGCP Plug-In components.
The GenAI Connector template includes the following required and optional parameters:
Parameter Name | Plug-In Inputs Field | Description |
|---|---|---|
Messages* |
| Information from the Front-End module is mapped into the messages field to be processed by the LLM. *This parameter is required. |
Model* |
| Indicates which LLM model from the provider to use. To balance cost and performance, use the model that best fits your use case.
*This parameter is required.
|
Role* | Role is initially set to *This parameter is required. | |
Maximum Tokens |
| Set the limit on token usage per request.
|
Temperature |
| Restrict the LLM’s response types from creative to precise to ensure that your end users have the experience that you desire.
|
Additional model parameters can be added in the Inputs table of the Inputs and & Outputs settings.
Using the GenAI Connector Template in Express View
After installing and configuring the GenAI Connector, preview it in Express View to use the LLM.
To use the GenAI Connector in Express View:
From the AI Application page, click
···. The application's Options menu displays.Select Preview. A new browser page displays the application.
Depending on what model you set up, click Google Gemini or OpenAI.
You can set up one or both of the available GenAI models.
Enter a message in the prompt.
Click the send button. The GenAI model responds to the message prompt.