Overview
As you build applications, you might need to deliver them in one or more languages. You can easily set up translations that display based on the end-user's location (determined by the data.currentUser.locale value). To translate module-level content, you'll use the Module Builder's Translate Settings. For workflows, you'll use the Workflow Builder Translate Settings. These settings let you translate the labels of Task nodes, navigation buttons, and so on.
What You'll Learn
In this article, you'll learn how to enable translations, add language to the Translate table, and translate elements in a workflow.
Enabling the Workflow Translate Settings
The first step to setting up translations in any workflow is enabling the Translate Settings. When enabled, translatable elements in your workflow display in the Translate table.
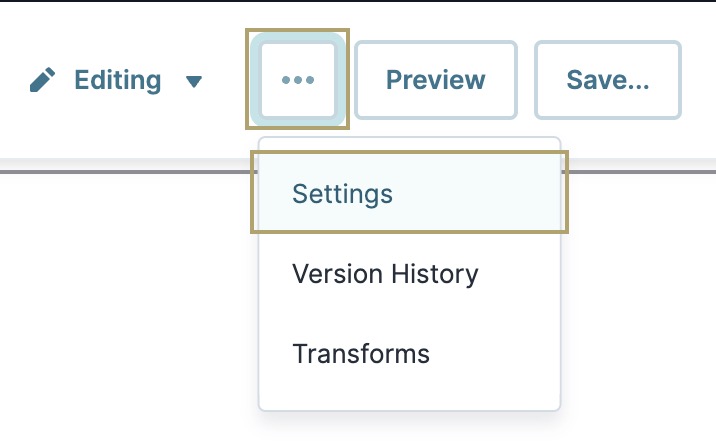
To enable translations for a workflow:
Open your workflow in the Workflow Builder.
Click the
···(ellipsis) button.Select Settings.
At the bottom of the Workflow Settings modal, set Enable Translations to
 (ON).
(ON).Click Save.
In the Translate table, you can see all languages supported in your environment. Next, you'll learn how to add languages to your environment to be used in your workflows.
Accessing the Workflow Translate Settings
Next, access Workflow Translate Settings and view your current languages. You can check which languages your environment supports by looking at the Translate table of any workflow in the environment. If the language you need doesn’t appear in the Translate table, you can add it manually. We'll look at how to add languages to your Translate table later.
To view languages in the Workflow Translate table:
Open your workflow in the Workflow Builder.
In the left side menu, select
.jpg) (Translate).
(Translate).
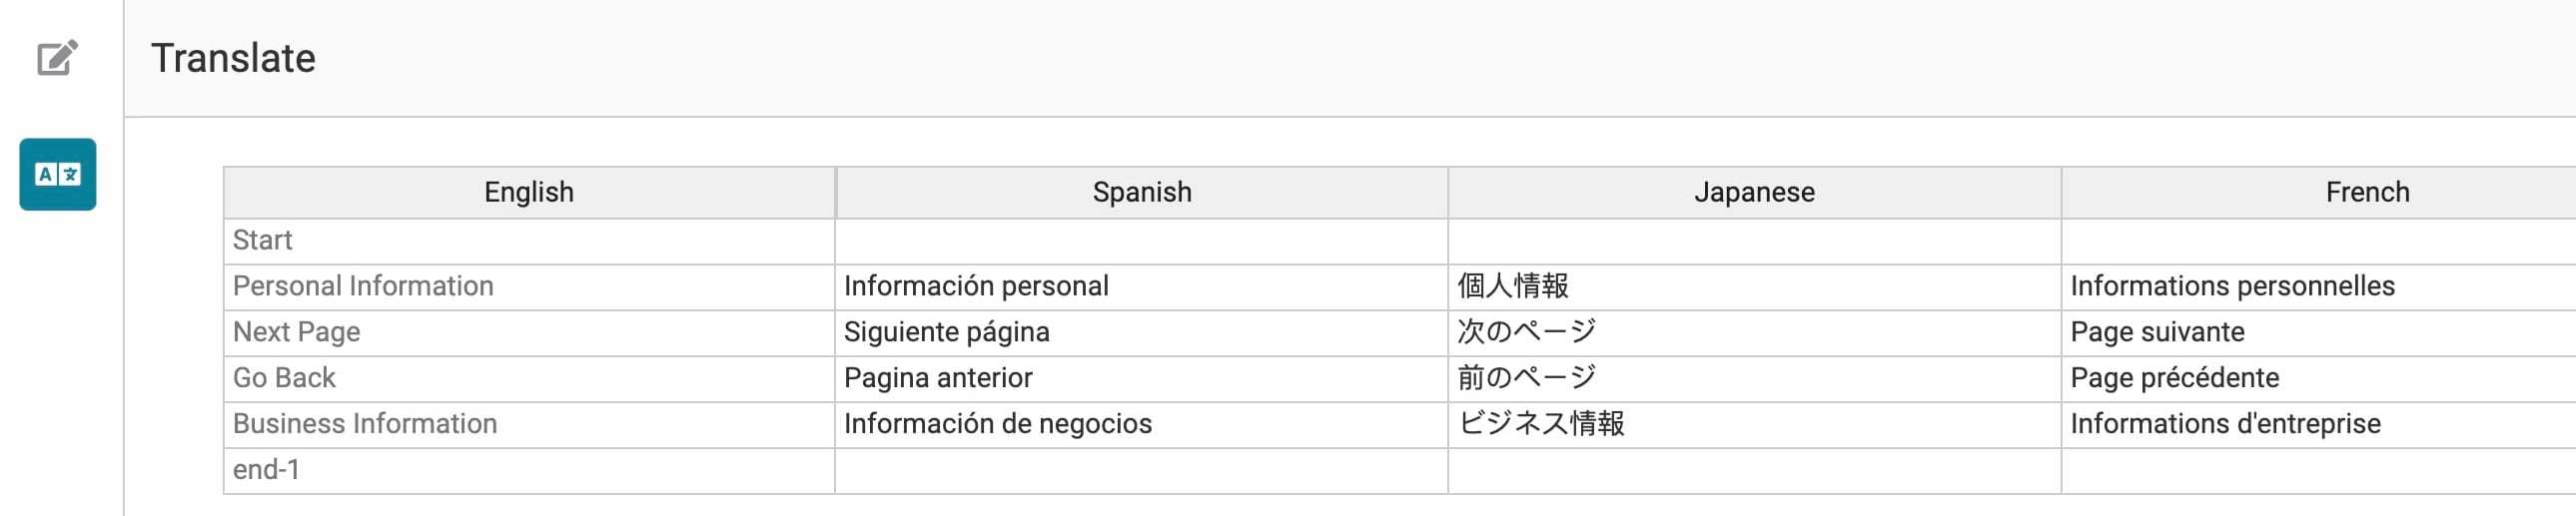
In the Translate table, you can see all languages supported in your environment. For example, this Translate table currently supports Spanish and Japanese translations. The English column shows translatable elements, including Task node labels and custom navigation button labels.

Adding Languages to Your Environment
When Unqork sets up client environments, we add a Locale module to each environment. You can access this Locale module in your environment's Library Elements. Use the Locale module to add languages to the Translate Settings Translate table. Languages added to the Locale module appear in the Translate table of every module in your environment.
Contact your Unqork rep if you can't locate your Locale module or if it's been deleted.
Be sure to add any languages you want to support to the Locale module in your environments. If not, you can lose translations when promoting between environments. Say you promote a module with French and Japanese translations to an environment only set up to support French. You'd lose your Japanese translations in the new environment.
To add a language to your environment:
Navigate to the Workspaces page of your environment. Or, open a workflow.
In the top right of the page, from the Library ▾ drop-down, select Library Elements.
Locate the Locale module.
From the the
···(ellipsis) button to the right of the tile, select Preview. The module opens in Express View..jpg)
In the Language field, enter the name of the language. For example, French.
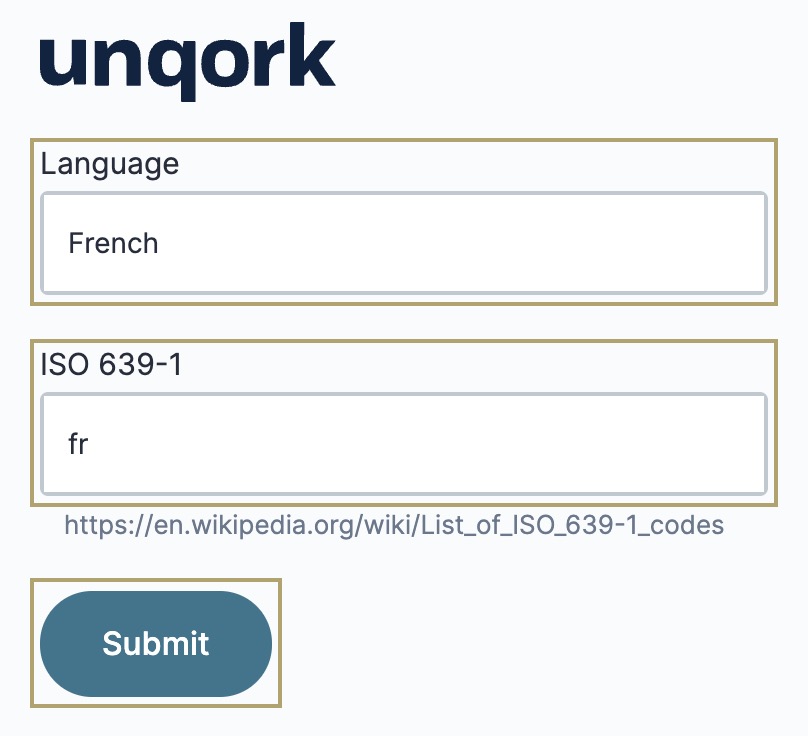
In the ISO 639-1 field, enter the language's ISO 639-1 code. For example, fr for French.
You can find a ISO 639-1 language code list at the following link: https://en.wikipedia.org/wiki/List_of_ISO_639-1_codes.
Click Save. The specified language now appears as a column in the Translate table.
.jpg?sv=2022-11-02&spr=https&st=2025-09-17T16%3A15%3A25Z&se=2025-09-17T16%3A30%3A25Z&sr=c&sp=r&sig=hUTuUdPSFVxNmLGPxr6HlzjSF9UxllXY7bpAY2%2B8Cek%3D)
Adding Translations to a Workflow
So far, you've seen how to enable translations and set up target languages. Now you're ready to start adding translations to your workflow. Each workflow's Translate table autopopulates with translatable items for that workflow. These items appear as individual rows in the English column of the Translate table.
Here are a few tips on adding translations:
You don't need to enter translations for elements invisible to users. For example, Start or End node labels.
Add translations for all visible elements, particularly Task node labels. Otherwise, that node's label might display blank in your workflow's navigation.
Use a spreadsheet to make the process of adding translations easier. Copy and paste your Translate table into a spreadsheet. Then, add translations in the spreadsheet. When ready, copy and paste your spreadsheet to the Translate table.
Remember to also set up module-level translations in the Module Builder.
To learn more about module-level translations, see our Module Builder Translate Settings article.
To add translations to the Translate table:
1Open your workflow in the Workflow Builder.
In the left side menu, select
(Translate).In the Translate table, enter translations for each element in the same row and its respective language column. For example, translating the English word Next Page to the Spanish word Siguiente Página.
Scroll to the bottom of the page and click Save Translations.
