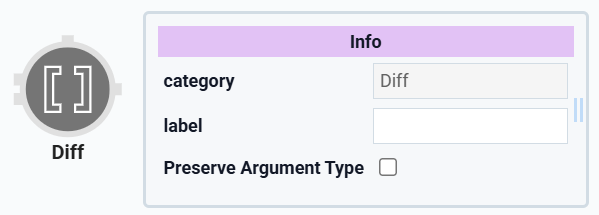
The Diff operator lets you determine the differences between two sets of data. The operator uses the deep-diff npm package to determine the structural differences between objects. You'll input each of your data sets or JSON objects into the operator, where it examines each data source and outputs a list of the differences. Each difference is identified by a single letter that represents a type of difference.
Below are the letters and what they represent:
N: A key or value was added.
D: A key or value was deleted.
E: A key or value was edited.
A: A change occurred in an array index. Maining, an entire row was added or deleted.
The operator includes an upper and lower input port, an argument port, and an output port. You'll see the upper input port referred to as the lhs (left-hand side) port. The data input into this port serves as the starting point for your Diff operator. The lower input port is referred to as the rhs (right-hand side) port. So, if you see an N in the operator's output, that means there is a new value in the data connected to the rhs. It's a new value because it was not included in the data connected to the lhs.
About the Info Window
And here's a breakdown of each setting in the Info window:
Setting | Description |
|---|---|
Category | Grayed out and non-adjustable setting indicating the operation type. |
Label | Sets the label for your operator, displaying below the operator on your Data Workflow canvas. This field is optional, but set a label if you use more than one of the same operator type. A label helps you identify your operators without opening any Info windows. |
Preserve Argument Type | When selected, this setting ensures the argument data type is respected when the operator executes. |
Adding a Diff Operator
In this example, you'll configure two Data Table components that store customer order information. Then, you’ll use a Data Workflow component with a Diff operator to identify the differences.
These instructions assume you have a new module open, saved, and with a title.
Configure the First Data Table Component
You'll use a Data Table component to create a set of data as your starting point.
In the Module Builder, drag and drop a Data Table component onto your canvas.
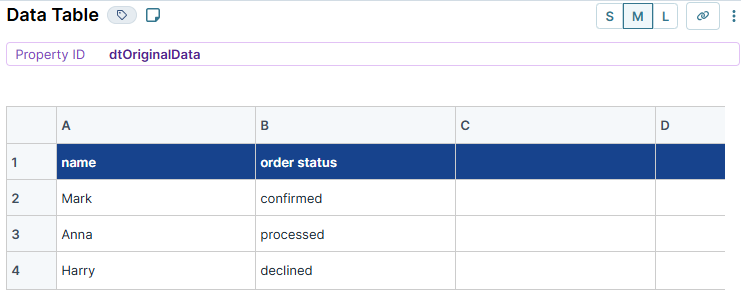
In the Property ID field, enter
dtOriginalData.In the data table, enter the following:
name
order status
Mark
confirmed
Anna
processed
Harry
declined
Click Save Component.
Configure the Second Data Table Component
Add an updated version of your original data. This data set is similar to your first one, with only slight changes. Later, you’ll use a Data Workflow with a Diff operator to identify the differences.
Drag and drop another Data Table component onto your canvas, placing it below the
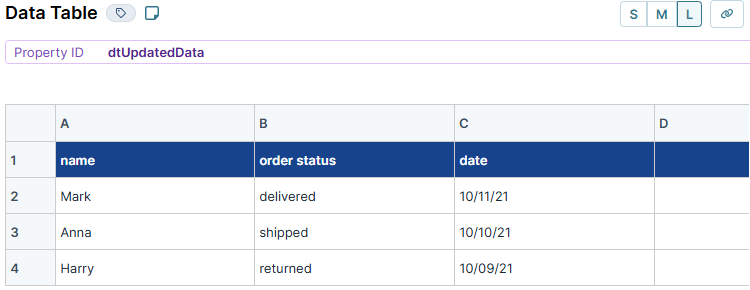
dtOriginalDataData Table component.In the Property ID field, enter
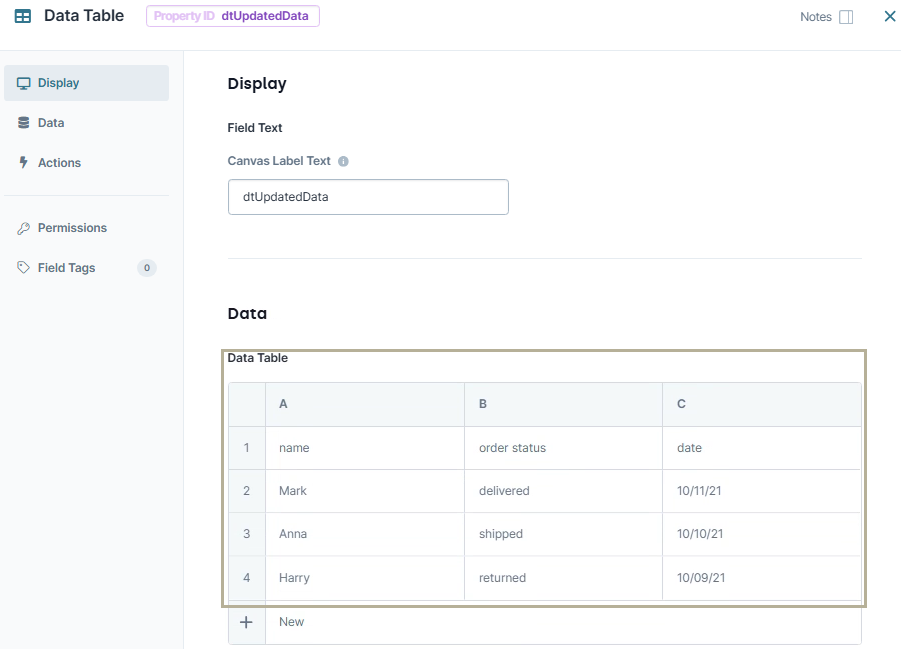
dtUpdatedData.In the data table, enter the following:
name
order status
date
Mark
delivered
10/11/21
Anna
shipped
10/10/21
Harry
returned
10/09/21
Click Save Component.
Configure the Data Workflow Component
Add a Data Workflow that uses two Input operators to bring in your data sets. Connect them to a Diff operator to compare the sets and find differences. Add three Console operators to view the data at each step.
Drag and drop a Data Workflow component onto your canvas, placing it below the
dtUpdatedDataData Table component.In the Property ID and Canvas Label Text fields, enter
dwfDiff.
Configure the First Input Operator
Drag and drop an Input operator onto your Data Workflow canvas.
Configure the operator's Info window as follows:
Setting
Value
Category
Input
Component
dtOriginalData
Required
Yes
Source
Default
Configure the First Console Operator
Drag and drop a Console operator onto your Data Workflow canvas.
Configure the operator's Info window as follows:
Setting
Value
Category
Console
Label
Original Data
Connect the output port (right) of the
dtOriginalDataInput operator to the input port (left) of theOriginal DataConsole operator.
Configure the Diff Operator
Drag and drop a Diff operator onto your Data Workflow canvas.
Configure the operator's Info window as follows:
Setting
Value
Category
Console
Label
Order Status Changes
Connect the output port (right) of the
dtOriginalDataInput operator to the upper input port (left) of theOrder Status ChangesDiff operator.
Configure the Second Input Operator
Drag and drop another Input operator onto your Data Workflow canvas.
Configure the operator's Info window as follows:
Setting
Value
Category
Input
Component
dtUpdatedData
Required
Yes
Source
Default
Connect the output port (right) of the
dtUpdatedDataInput operator to the lower input port (left) of theOrder Status ChangesDiff operator.
Configure the Second Console Operator
Drag and drop another Console operator onto your Data Workflow canvas.
Configure the operator's Info window as follows:
Setting
Value
Category
Console
Label
Updated Data
Connect the output port (right) of the
dtUpdatedDataInput operator to the input port (left) of theUpdated DataConsole operator.
Configure the Third Console Operator
Drag and drop a third Console operator onto your Data Workflow canvas.
Configure the operator's Info window as follows:
Setting
Value
Category
Console
Label
Diff Output
Connect the output port (right) of the
Diff OutputDiff operator to the input port (left) of theDiff OutputConsole operator.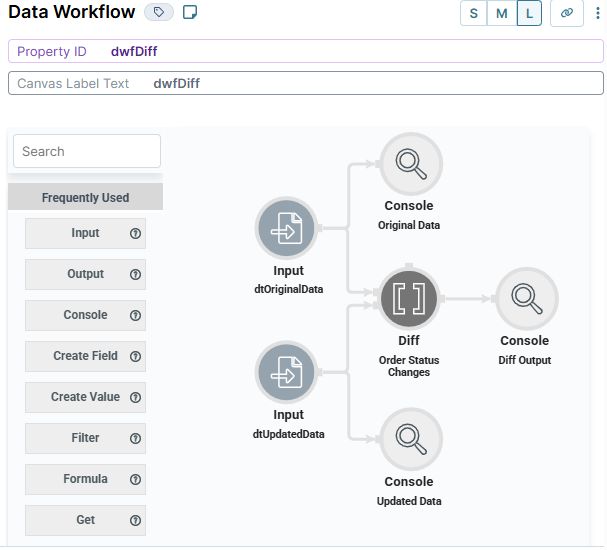
Click Save Component.
Configure the Button Component
Add a Button component to trigger the operation.
Drag and drop a Button component onto your canvas, placing it above the
dwfDiffData Workflow component.In the Property ID field, enter
btnDiffDwf.In the Label Text field, enter
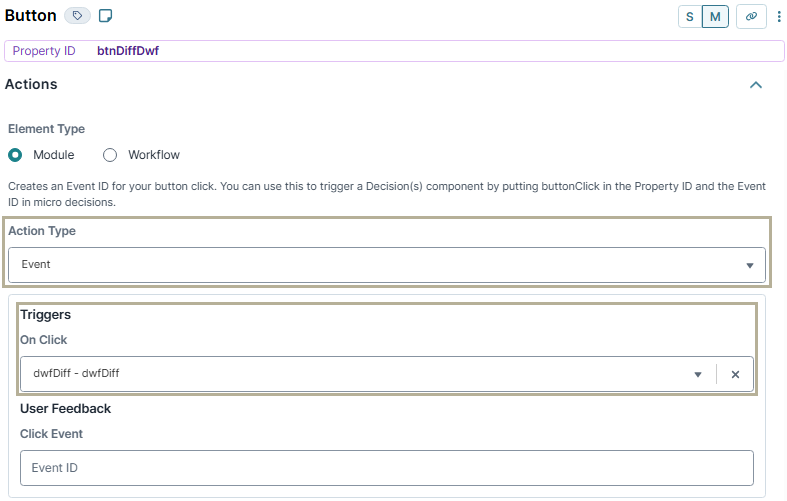
Find Difference.In the Action Type tab, select Event.
In the Triggers On Click field, select dwfDiff.
Click Save Component.
Save your module.
Here's how the completed example looks in the Module Builder:

Preview your module in Express View and open the DevTools Console. Click the Find Difference button, and you'll see the outputs of the three Console operators. In the Diff Output Console, you'll see each element that has changed between the dtOriginalData and dtUpdatedData Data Table components.
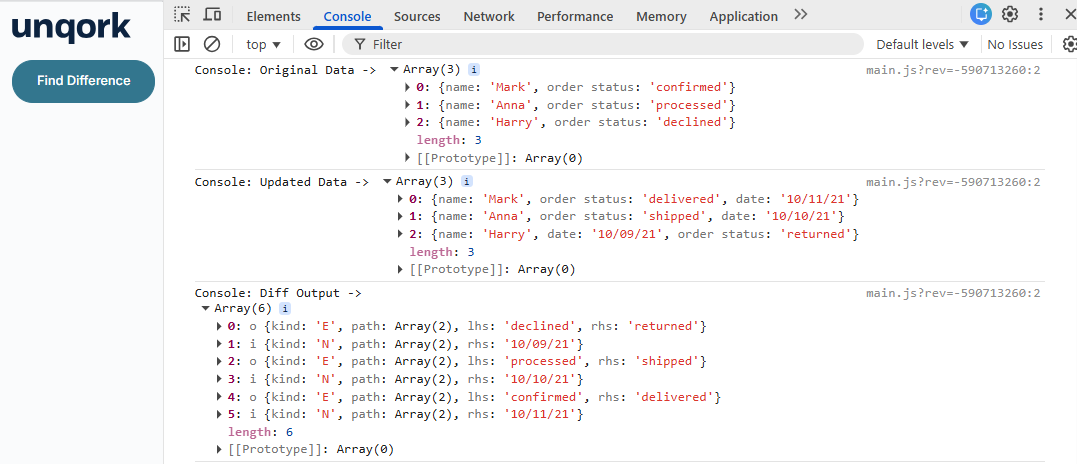
In the index 0, you'll see the kind key listed as E, which means an entry has been edited. The Diff operator refers to the upper input port as lhs (left-hand side), so the lhs key is declined because it represents the original value. Below that value, you'll see rhs as returned. Because the Diff operator refers to the lower input port as rhs (right-hand side), this value is in the updated data set.
The
pathin this output shows where the change occurred. In this case, it's theorder statuscolumn of the data set. You'll also notice the number2. That value represents the index where the change occurred. This index only displays when working with data from a data table. If you're working with JSON objects, you will not see the index here.
Ensure your Diff operator inputs have differences. If your inputs have no differences, your Data Workflow returns a circular reference error.

The Diff operator lets you determine the differences between two sets of data. The operator uses the deep-diff npm package to determine the structural differences between objects. You'll input each of your data sets or JSON objects into the operator, where it examines each data source and outputs a list of the differences. Each difference is identified by a single letter that represents a type of difference.
Below are the letters and what they represent:
N: A key or value was added.
D: A key or value was deleted.
E: A key or value was edited.
A: A change occurred in an array index. Maining, an entire row was added or deleted.
The operator includes an upper and lower input port, an argument port, and an output port. You'll see the upper input port referred to as the lhs (left-hand side) port. The data input into this port serves as the starting point for your Diff operator. The lower input port is referred to as the rhs (right-hand side) port. So, if you see an N in the operator's output, that means there is a new value in the data connected to the rhs. It's a new value because it was not included in the data connected to the lhs.
About the Info Window
And here's a breakdown of each setting in the Info window:
Setting | Description |
|---|---|
Category | Grayed out and non-adjustable setting indicating the operation type. |
Label | Sets the label for your operator, displaying below the operator on your Data Workflow canvas. This field is optional, but set a label if you use more than one of the same operator type. A label helps you identify your operators without opening any Info windows. |
Preserve Argument Type | When selected, this setting ensures the argument data type is respected when the operator executes. |
Adding a Diff Operator
In this example, you'll configure two Data Table components that store customer order information. Then, you’ll use a Data Workflow component with a Diff operator to identify the differences.
These instructions assume you have a new module open, saved, and with a title.
Configure the First Data Table Component
You'll use a Data Table component to create a set of data as your starting point.
Drag and drop a Data Table component onto your canvas.
In the Property ID and Canvas Label Text fields, enter
dtOriginalData.In the data table, enter the following:
name
order status
Mark
confirmed
Anna
processed
Harry
declined
.png)
Click Save & Close.
Configure the Second Data Table Component
Add an updated version of your original data. This data set is similar to your first one, with only slight changes. Later, you’ll use a Data Workflow with a Diff operator to identify the differences.
Drag and drop another Data Table component onto your canvas, placing it below the
dtOriginalDataData Table component.In the Property ID and Canvas Label Text fields, enter
dtUpdatedData.In the data table, enter the following:
name
order status
date
Mark
delivered
10/11/21
Anna
shipped
10/10/21
Harry
returned
10/09/21
Click Save & Close.
Configure the Data Workflow Component
Add a Data Workflow that uses two Input operators to bring in your data sets. Connect them to a Diff operator to compare the sets and find differences. Add three Console operators to view the data at each step.
Drag and drop a Data Workflow component onto your canvas, placing it below the
dtUpdatedDataData Table component.In the Canvas Label Text and Property Name fields, enter
dwfDiff.
Configure the First Input Operator
Drag and drop an Input operator onto your Data Workflow canvas.
Configure the operator's Info window as follows:
Setting
Value
Category
Input
Component
dtOriginalData
Required
Yes
Source
Default
Configure the First Console Operator
Drag and drop a Console operator onto your Data Workflow canvas.
Configure the operator's Info window as follows:
Setting
Value
Category
Console
Label
Original Data
Connect the output port (right) of the
dtOriginalDataInput operator to the input port (left) of theOriginal DataConsole operator.
Configure the Diff Operator
Drag and drop a Diff operator onto your Data Workflow canvas.
Configure the operator's Info window as follows:
Setting
Value
Category
Console
Label
Order Status Changes
Connect the output port (right) of the
dtOriginalDataInput operator to the upper input port (left) of theOrder Status ChangesDiff operator.
Configure the Second Input Operator
Drag and drop another Input operator onto your Data Workflow canvas.
Configure the operator's Info window as follows:
Setting
Value
Category
Input
Component
dtUpdatedData
Required
Yes
Source
Default
Connect the output port (right) of the
dtUpdatedDataInput operator to the lower input port (left) of theOrder Status ChangesDiff operator.
Configure the Second Console Operator
Drag and drop another Console operator onto your Data Workflow canvas.
Configure the operator's Info window as follows:
Setting
Value
Category
Console
Label
Updated Data
Connect the output port (right) of the
dtUpdatedDataInput operator to the input port (left) of theUpdated DataConsole operator.
Configure the Third Console Operator
Drag and drop a third Console operator onto your Data Workflow canvas.
Configure the operator's Info window as follows:
Setting
Value
Category
Console
Label
Diff Output
Connect the output port (right) of the
Diff OutputDiff operator to the input port (left) of theDiff OutputConsole operator.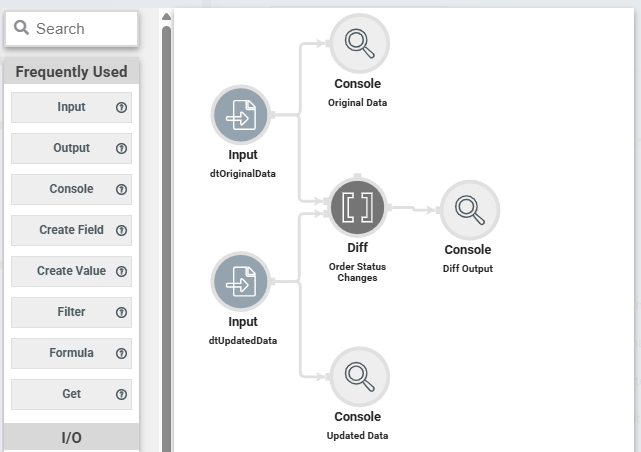
Click Save.
Configure the Button Component
Add a Button component to trigger the operation.
Drag and drop a Button component onto your canvas, placing it above the
dwfDiffData Workflow component.In the Property ID field, enter
btnDiffDwf.In the Label Text field, enter
Find Difference.Set the Action Type as Event.
In the On Click field, enter
dwfDiff.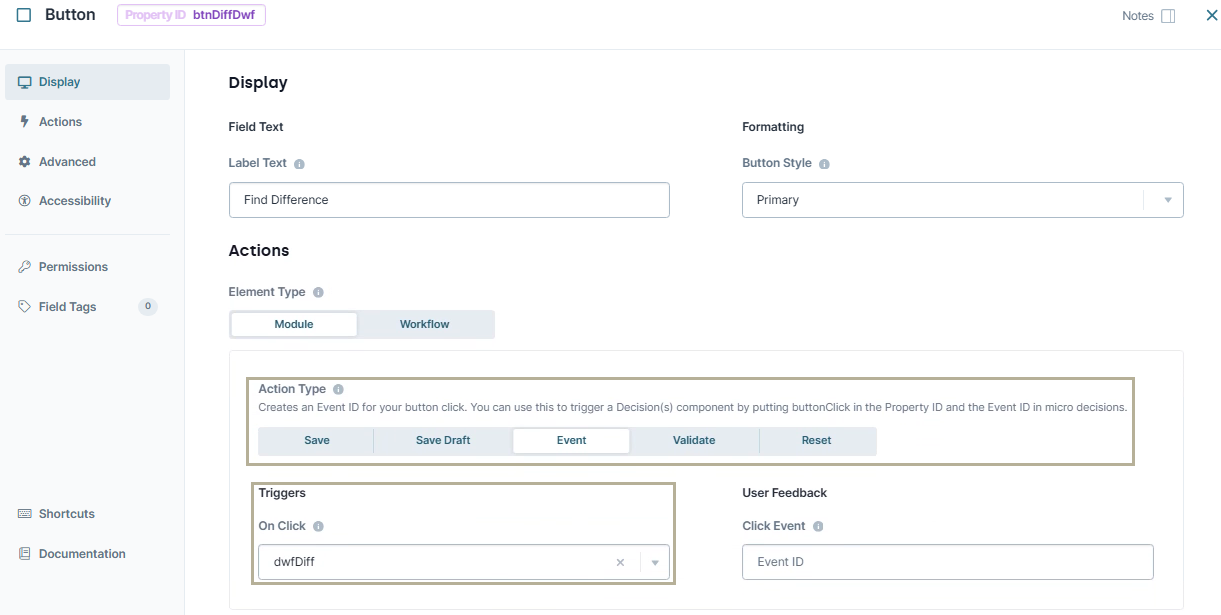
Click Save & Close.
Save your module.
Here's how the completed example looks in the Module Builder:
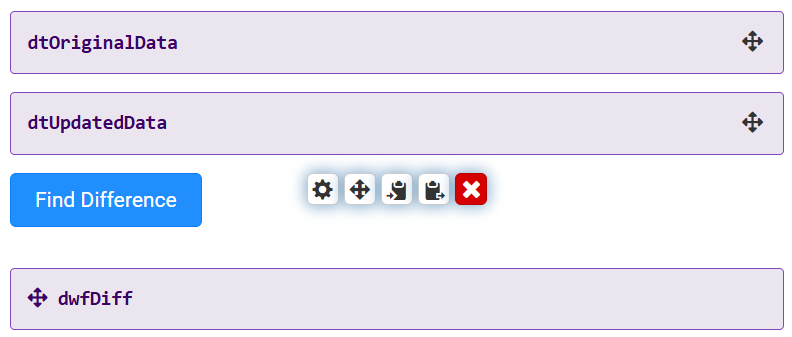
Preview your module in Express View and open the DevTools Console. Click the Find Difference button, and you'll see the outputs of the three Console operators. In the Diff Output Console, you'll see each element that has changed between the dtOriginalData and dtUpdatedData Data Table components.

In the index 0, you'll see the kind key listed as E, which means an entry has been edited. The Diff operator refers to the upper input port as lhs (left-hand side), so the lhs key is declined because it represents the original value. Below that value, you'll see rhs as returned. Because the Diff operator refers to the lower input port as rhs (right-hand side), this value is in the updated data set.
The
pathin this output shows where the change occurred. In this case, it's theorder statuscolumn of the data set. You'll also notice the number2. That value represents the index where the change occurred. This index only displays when working with data from a data table. If you're working with JSON objects, you will not see the index here.
Ensure your Diff operator inputs have differences. If your inputs have no differences, your Data Workflow returns a circular reference error.