Overview
Using a Button component, you can trigger any operational component. This allows your end-user to begin the configured operation with the click of a button on your application.
Discover how to trigger operations in Vega using the Operations Builder tool, view our Operations Builder article.
Here are few components a Button can trigger:
When to Trigger Operations Using a Button Component
There are several use cases where you can use a Button to trigger operations. A few examples include:
Using a Button to trigger a Calculator component after your end-user enters their information. This ensures all the necessary input is there before the Calculator runs.
Using a Button to trigger a Plug-In component's Create Submission or Update Submissions API (application programming interface) call.
Adding custom navigation Buttons to your module. The Buttons can trigger Initializer components that trigger a Navigation component.
When you want to improve your application's performance—having many Decisions or other components set to a Watch Trigger Type slows down a page's load time.
How to Trigger Operations Using a Button Component
At the basic level, here's what you'll do to manually trigger a component using a Button component:
In the Module Builder, drag and drop a
.png) Button component onto your canvas.
Button component onto your canvas.Navigate to the Actions settings.
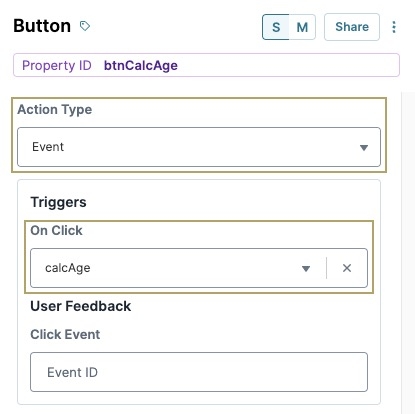
From the Action Type drop-down, select Event.
You can use the On Click field with any Action Type selection. Here, we've selected Event, but you could use Save, Save Draft, Validate, or Reset depending on your use case. For more information on these Action Types, you can read the Button component article in our Documentation Hub.
Under Triggers, in the On Click field, enter or select the Property ID of the component you want to trigger.
Click Save Component.
Save your module.
Let's look at an example. You can see the basic configuration that triggers a .png) Calculator component called calcAge.
Calculator component called calcAge.
The Action Type is set to Event and, in the On Click field, the Calculator's Property ID, calcAge, is entered.
After saving both components, your Calculator will only run after the end-user clicks the Button.
