When an end-user clicks a button on an application, the component selected in the Button component’s On Click setting is triggered. The process is straightforward to use. But sometimes you might want a button to trigger more than one component. Using the Button component’s Event ID setting lets you trigger multiple components from a single button-click event.
Configuration
In this how-to guide, you’ll use the Button component’s Event ID to trigger multiple components simultaneously. When an end-user clicks the button, the Username and Last 4 Digits of SSN fields become disabled so they cannot enter values. At the same time, the Name and Email Address fields become visible so they can enter values.
Click on the tab below that matches your Unqork Platform:
Configure the Panel Component
This Panel component acts as a container for the components that follow.
In the Module Builder, drag and drop a Panel component onto your canvas.
In the Property ID field, enter
panelEvent.Click Save Component.
Configure the Button Component
Next, you'll configure the Button component that, when clicked, triggers the Decisions components you'll add later.
Drag and drop a Button component onto your canvas, placing it inside your Panel component.
In the Property ID field, enter
btnNewUser.In the Label Text field, enter
I'm a New User.From the Action Type drop-down, select Event.
In the Click Event field, enter
btnEventShowFields..png)
Click Save Component.
Configure the First Text Field Component
Configure the first Text Field component for your Username field. When your end-user clicks the I'm a New User button, the field becomes disabled. You'll set up the disable function using a Decisions component later.
Drag and drop a Text Field component onto your canvas, placing it above the
btnNewUserButton component.In the Property ID field, enter
username.In the Label Text field, enter
Username.Click Save Component.
Configure the Protected Field Component
You’ll configure a Protected Field component for your Last 4 Digits of SSN field. When your end-user clicks the I'm a New User button, this field becomes disabled.
Drag and drop a Protected Field component onto your canvas, placing it between the
UsernameText Field and theI'm a New UserButton components.In the Property ID field, enter
ssnDigits.In the Label Text field, enter
Last 4 Digits of SSN.Click Save Component.
Configure the Second Text Field Component
This Text Field component represents your hidden Name field. When your end-user clicks the I'm a New User button, this field becomes visible. You'll set up the visible function with a Decisions component later.
Drag and drop a Text Field component onto your canvas, placing it below the
I'm a New UserButton component.In the Property ID field, enter
name.In the Label Text field, enter
Name.Set Hide Field to
.png) (ON).
(ON).Click Save Component.
Configure the Email Component
This Email component represents your hidden Email Address field. When your end-user clicks the I'm a New User button, this field becomes visible.
Drag and drop an Email component onto your canvas, placing it below the
nameText field component.In the Property ID field, enter
emailAddress.In the Label Text field, enter
Email Address.Set Hide Field to
(ON).Click Save Component.
Configure the First Decisions Component
You'll use two Decisions components to disable your Username and Last 4 Digits of SSN fields when the end-user clicks the I'm a New User button.
Drag and drop a Decisions component onto your canvas, placing it below the
I'm a New UserButton component.In the Property ID and Canvas Label Text fields, enter
ruleDisableFields.From the Trigger Type drop-down, select Watch.
In the Inputs table, enter the following:
#
Source
Type
1
buttonClick
exact
The
buttonClicksyntax is native to Unqork and looks for any button-clicks in your module.In the Outputs table, enter the following:
#
Source
Type
1
username
disabled
2
ssnDigits
disabled
In the Conditionals table, enter the following:
#
buttonClick
userName_disabled
ssnDigits_disabled
1
btnEventShowFields
yes
yes
2
no
no
.png)
Click Save Component.
Configure the Second Decisions Component
This second Decisions component makes the Name and Email Address fields visible when your end-user clicks the I'm a New User button.
Drag and drop a Decisions component onto your canvas, placing it below your
ruleDisableFieldsDecisions component.In the Property ID and Canvas Label Text fields, enter
ruleShowFields.From the Trigger Type drop-down, select Watch.
In the Inputs table, enter the following:
#
Source
Type
1
buttonClick
exact
In the Outputs table, enter the following:
#
Source
Type
1
name
visible
2
emailAddress
visible
In the Conditionals table, enter the following:
#
buttonClick
name_visible
emailAddress_visible
1
btnEventShowFields
yes
yes
2
no
no
.png)
Click Save Component.
Save your module.
Here’s how your completed module looks in the Module Builder:
.png)
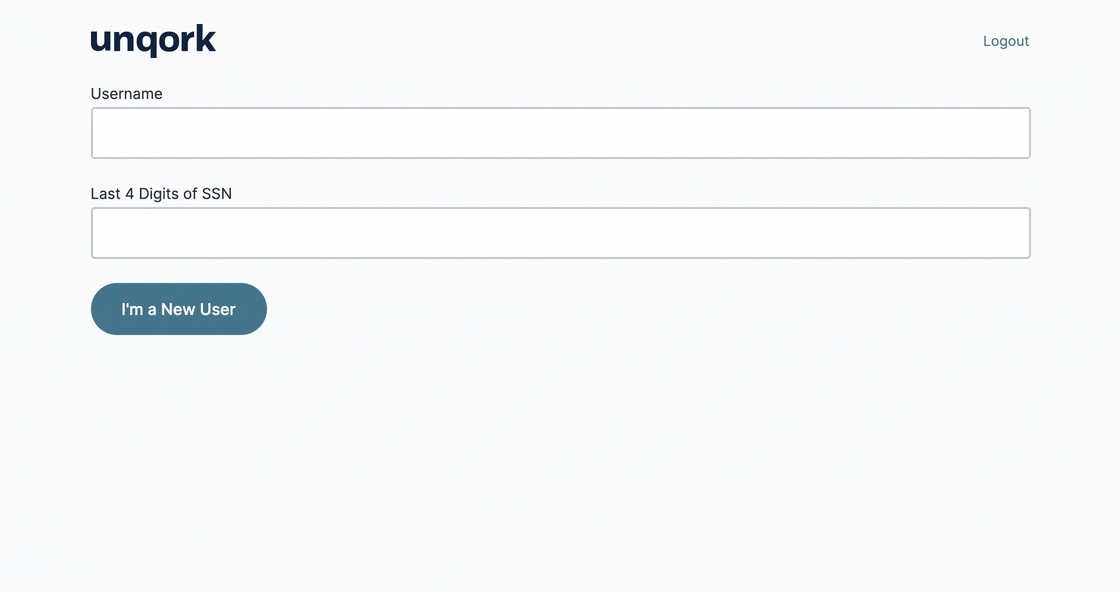
Preview your module in Express View. You'll see the Username and Last 4 Digits of SSN fields. Once you click the I'm a New User button, those fields become disabled, and the Name and Email Address fields become visible.
In a real-life scenario, you'd add further configuration for a new user to submit their information. In this example, we’ve kept it simple to show you the functionality of an Event ID.
Configure the Panel Component
This Panel component acts as a container for the components that follow.
In the Module Builder, drag and drop a Panel component onto your canvas.
In the Property ID field, enter
panelEvent.Click Save & Close.
Configure the Button Component
Next, you'll configure the Button component that, when clicked, triggers the Decisions components you'll add later.
Drag and drop a Button component onto your canvas, placing it inside your Panel component.
In the Property ID field, enter
btnNewUser.In the Label Text field, enter
I'm a New User.Set the Action Type as Event.
In the Click Event field, enter
btnEventShowFields..png)
Click Save & Close.
Configure the First Text Field Component
Configure the first Text Field component for your Username field. When your end-user clicks the I'm a New User button, the field becomes disabled. You'll set up the disable function using a Decisions component later.
Drag and drop a Text Field component onto your canvas, placing it above the
btnNewUserButton component.In the Property ID field, enter
username.In the Label Text field, enter
Username.Click Save & Close.
Configure the Protected Field Component
You’ll configure a Protected Field component for your Last 4 Digits of SSN field. When your end-user clicks the I'm a New User button, this field becomes disabled.
Drag and drop a Protected Field component onto your canvas, placing it between the
UsernameText Field andI'm a New UserButton components.In the Property ID field, enter
ssnDigits.In the Label Text field, enter
Last 4 Digits of SSN.Click Save & Close.
Configure the Second Text Field Component
This Text Field component represents your hidden Name field. When your end-user clicks the I'm a New User button, this field becomes visible. You'll set up the visible function with a Decisions component later.
Drag and drop a Text Field component onto your canvas, placing it below the
I'm a New UserButton component.In the Property ID field, enter
name.In the Label Text field, enter
Name.Set Hide Field to
(ON).Click Save & Close.
Configure the Email Component
This Email component represents your hidden Email Address field. When your end-user clicks the I'm a New User button, this field becomes visible.
Drag and drop an Email component onto your canvas, placing it below the
nameText field component.In the Property ID field, enter
emailAddress.In the Label Text field, enter
Email Address.Set Hide Field to
(ON).Click Save & Close.
Configure the First Decisions Component
You'll use two Decisions components to disable your Username and Last 4 Digits of SSN fields when the end-user clicks the I'm a New User button.
Drag and drop a Decisions component onto your canvas, placing it below the
I'm a New UserButton component.In the Property ID and Canvas Label Text fields, enter
ruleDisableFields.From the Trigger Type field options, select
Watch.In the Inputs table, enter the following:
Property ID
Type
buttonClick
exact
The
buttonClicksyntax is native to Unqork and looks for any button-clicks in your module.In the Outputs table, enter the following:
Property ID
Type
username
disabled
ssnDigits
disabled
In the Micro Decisions table, enter the following:
buttonClick
userName_disabled
ssnDigits_disabled
btnEventShowFields
yes
yes
no
no
.png)
Click Save.
Configure the Second Decisions Component
This second Decisions component makes the Name and Email Address fields visible when your end-user clicks the I'm a New User button.
Drag and drop a Decisions component onto your canvas, placing it below your
ruleDisableFieldsDecisions component.In the Property ID and Canvas Label Text fields, enter
ruleShowFields.Set the Trigger Type as Watch.
In the Inputs table, enter the following:
Property ID
Type
buttonClick
exact
In the Outputs table, enter the following:
Property ID
Type
name
visible
emailAddress
visible
In the MIcro Decisions table, enter the following:
buttonClick
name_visible
emailAddress_visible
btnEventShowFields
yes
yes
no
no
.png)
Click Save.
Save your module.
Here’s how your completed module looks in the Module Builder:
.png)
Preview your module in Express View. You'll see the Username and Last 4 Digits of SSN fields. Once you click the I'm a New User button, those fields become disabled, and the Name and Email Address fields become visible.
In a real-life scenario, you'd add further configuration for a new user to submit their information. In this example, we’ve kept it simple to show you the functionality of an Event ID.