Unqork as a SAML service provider secures applications that work with sensitive information. Having end-users use SSO (single sign-on) to access your application is a great solution. When setting up SSO, you can select the authentication provider for your Unqork application. Instead of Unqork needing to store the end-users' credentials, the SSO provider takes care of it. Using SSO also gives your end-user fewer sets of credentials to remember. Your end-user gets a seamless login experience, and you can trust your SSO provider to ensure the right people have access to your app.
SAML (Security Assertion Markup Language) is one of the SSO methods Unqork supports. SAML makes granting access to your Unqork application easier by:
Letting you grant access to end-users without Unqork credentials.
Letting Unqork users log in without having to input their credentials.
In this article, you'll learn about using Unqork as a SAML Service Provider.
Unqork also supports SSO using the OIDC (OpenID Connect) authentication method. To learn more, search OpenID Connect (OIDC) in our In-Product Help.
What Is a SAML Service Provider?
SAML is a secure exchange of information between an Identity Provider (IdP) and a Service Provider (SP). The SP in this case is Unqork. The IdP is any SSO provider, such as Okta or Microsoft Azure Entra ID.
As an SP, Unqork supports three SAML request/response flows:
IdP-Initiated Flow
SP-Initiated Flow (AuthnRequest HTTP-Redirect Binding)
SP-Initiated Flow (AuthnRequest HTTP-POST Binding)
IdP-Initiated Flows are the most common configuration used in Unqork. In this flow, an end-user starts on a client’s website, clicks a link, and gains access to an Unqork application without having to log in. In this case, the client has already established the user’s identity and uses SAML to pass proof of that identity to Unqork.
One Unqork environment can support multiple SAML configurations.
How SSO Using SAML Works in Unqork
Let's take a high-level look at how the authentication process works when using SAML as the authentication method. In this explanation, the SSO provider is the IdP and Unqork is the SP.
If the end-user is already logged in to the SSO provider when they open your application, they'll experience a seamless login flow, without needing to log in a second time. If your end-user does need to log in first, it's up to you to decide how they log in. For example, setting up an automatic redirect to a provider-hosted login page. Or, using a series of API (application programming interface) calls to communicate between an Unqork-hosted page and the SSO provider's API.
When the end-user successfully logs in to the IdP, the IdP issues a SAML assertion and sends it to your Unqork environment. A SAML assertion is an encoded XML document that contains identity information about the end-user. The SAML assertion is what authenticates your end-user's identity. The assertion also contains information that tells your Unqork application if the end-user has authorization to access your app. For example, if the end-user has specific role permissions or characteristics your app recognizes. The XML document structures this information as a series of Attribute elements. Each Attribute element contains an attribute name and an attribute value.
The IdP doesn't send the SAML assertion directly to the front-end of your application, or even to a module you can access from Designer view. This is because your application shouldn't have access to all the information in the assertion. Instead, it should only have access to the attributes specified in the SAML configuration. So, the IdP sends the assertion to the Callback URL entered in the SAML configuration on the IdP's end. The Callback URL is an endpoint of the SP's underlying platform. For Unqork applications, that endpoint typically looks like https://<host>/auth/saml/consume?idp=<SAMLname>. There, the Unqork platform decodes the SAML assertion and creates a session for the end-user. Unqork also strips the assertion, holding onto only the attributes listed in your SAML configuration. These attributes map to attributes in the currentUser object of the session's submission data.
When configuring what attributes to pull from the SAML assertion, you also note what Unqork attribute to map the attribute value to. You control this mapping in the Attribute Mappings section of the SAML configuration. You can leverage attribute mapping to improve your end-user's experience. For example, using the email address returned by the IdP to autofill an email address field in your application.
Understanding the SAML Settings in Single Sign-On (SSO) Management
To connect the SAML configuration on the SSO provider's end to your Unqork application, use the Single Sign-On (SSO) Management page. So, start by looking at each setting in the SSO configuration modal.
Available settings in the SSO configuration modal vary between Express View and Designer SSO configurations. The following images reflect the Express View SSO configuration modal. Settings that are specific to Express View or Designer SSO configurations are noted in the settings description tables.
To learn more about using the Single Sign-On Management page, view our Single Sign-On Management article.
Basic Information Tab
.jpg)
Setting | Description |
|---|---|
SSO Name* | Enter a name for your configuration. Use a descriptive name that relates to your configuration. For example,
|
Default Role | Select a default role for users who authenticate using the SSO configuration. The default role applies when a role is not explicitly defined. The available roles vary between Express View and Designer SSO configurations:
|
Default Group | This setting only displays in Express View SSO configurations. Select a default group for end-users who authenticate using the SSO configuration. The default group applies when a group is not explicitly defined. You can select multiple groups by selecting more than one option from the Default Group drop-down. The Default Group drop-down populates with groups defined in Express Group Administration.
|
Configure Protocol Tab
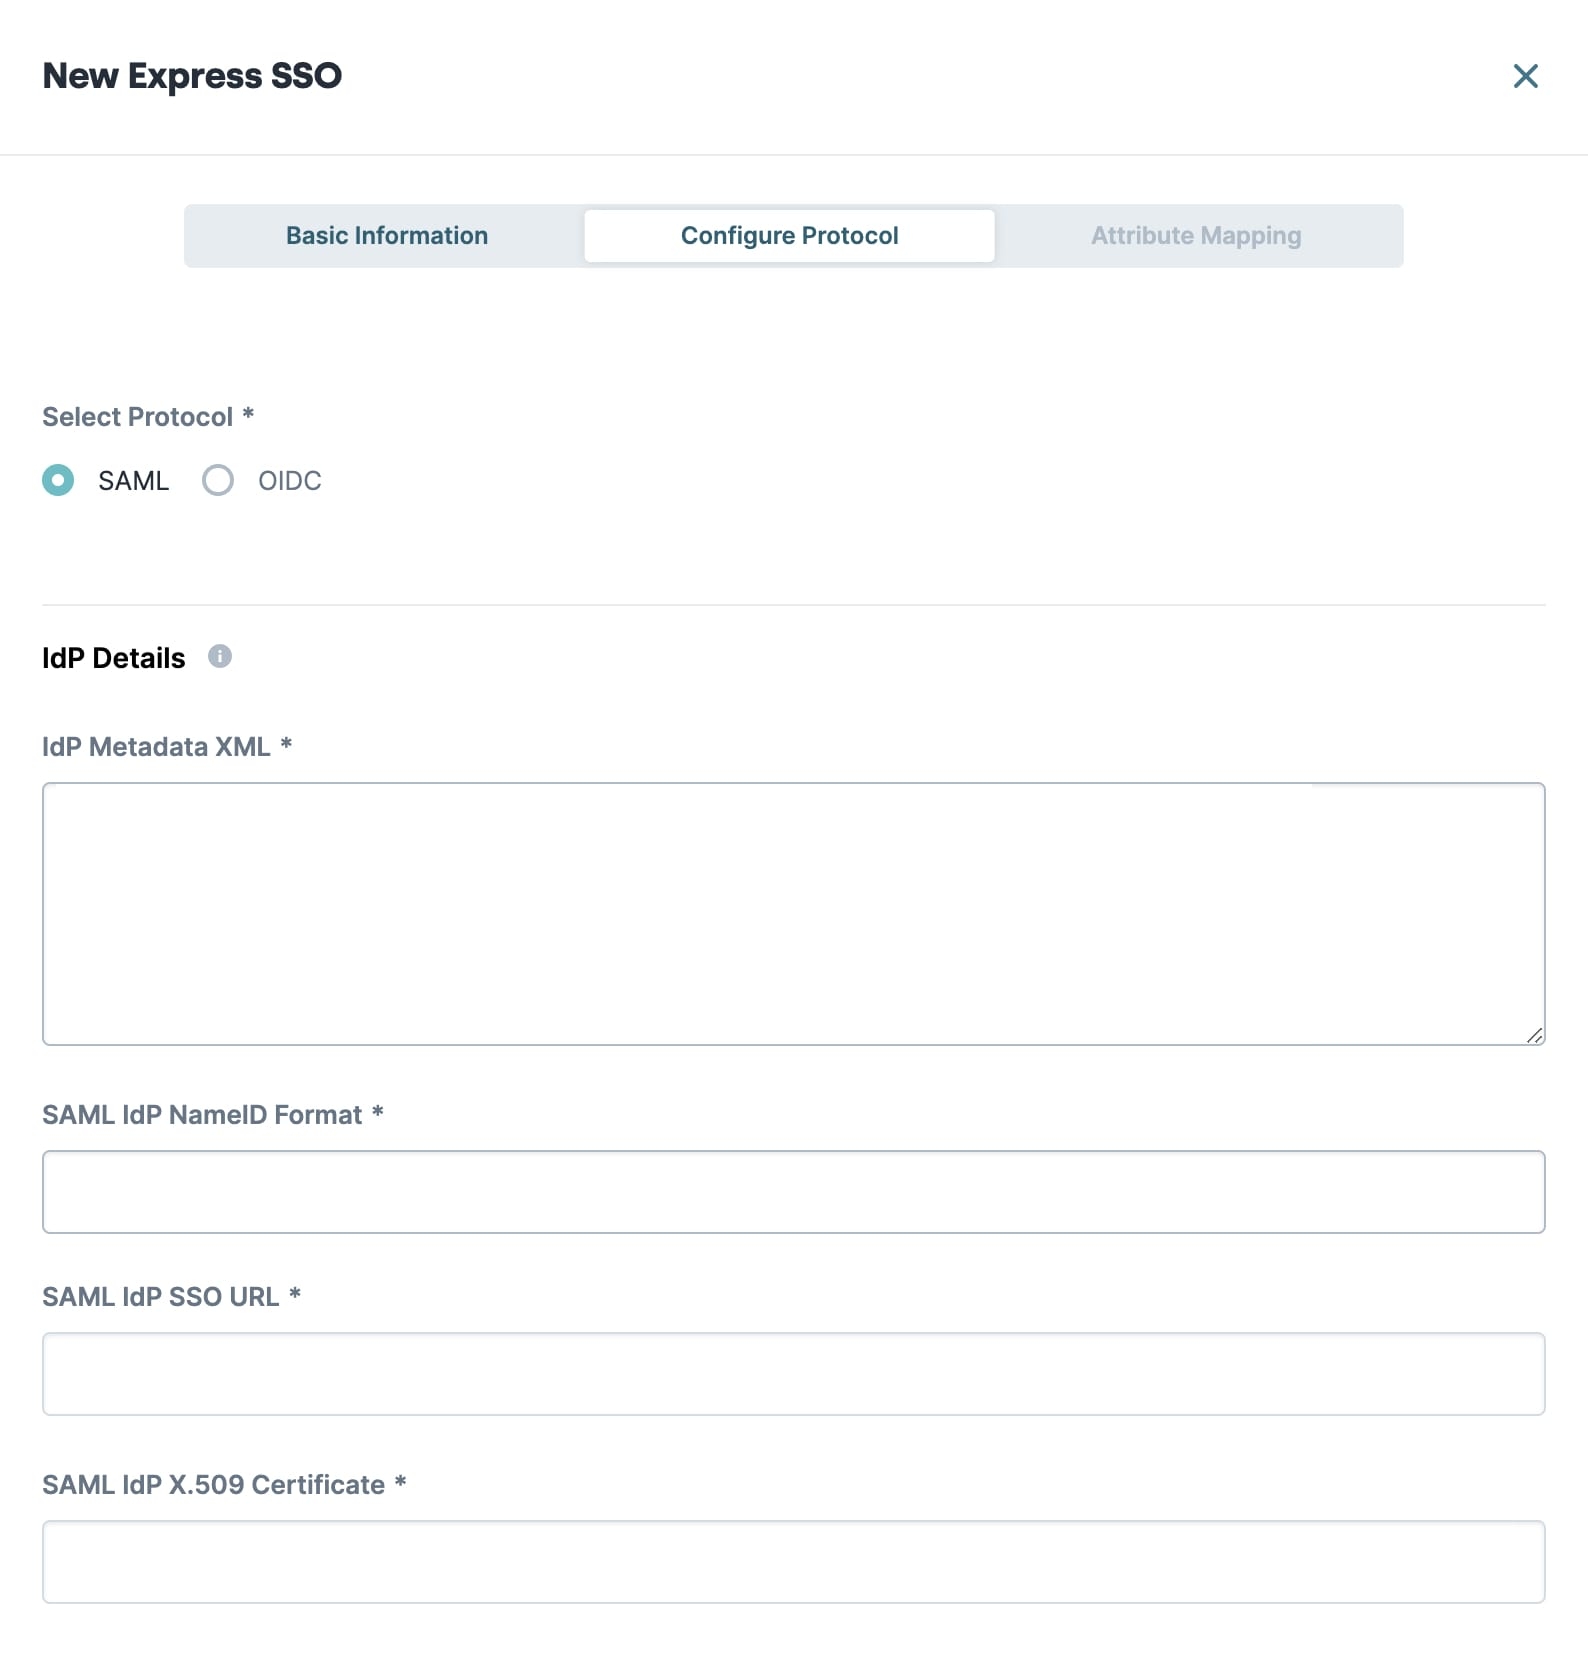
Select SAML from Select Protocol to access the following SAML configuration settings.
The Configure Protocol tab is where you enter the IdP metadata XML file. The underpinning of any SAML setup is creating a relationship between the IdP and SP. You can do this by exchanging IdP and SP metadata XML files. The administrator of the SSO provider account issues an IdP metadata XML file, which you use to complete your SAML configuration. Then, in return, you give the IdP the SP metadata XML file. This is the preferred method of configuration.
You can also set up a SAML configuration without parsing an IdP metadata file. However, using a metadata file is the preferred and most common set up method.
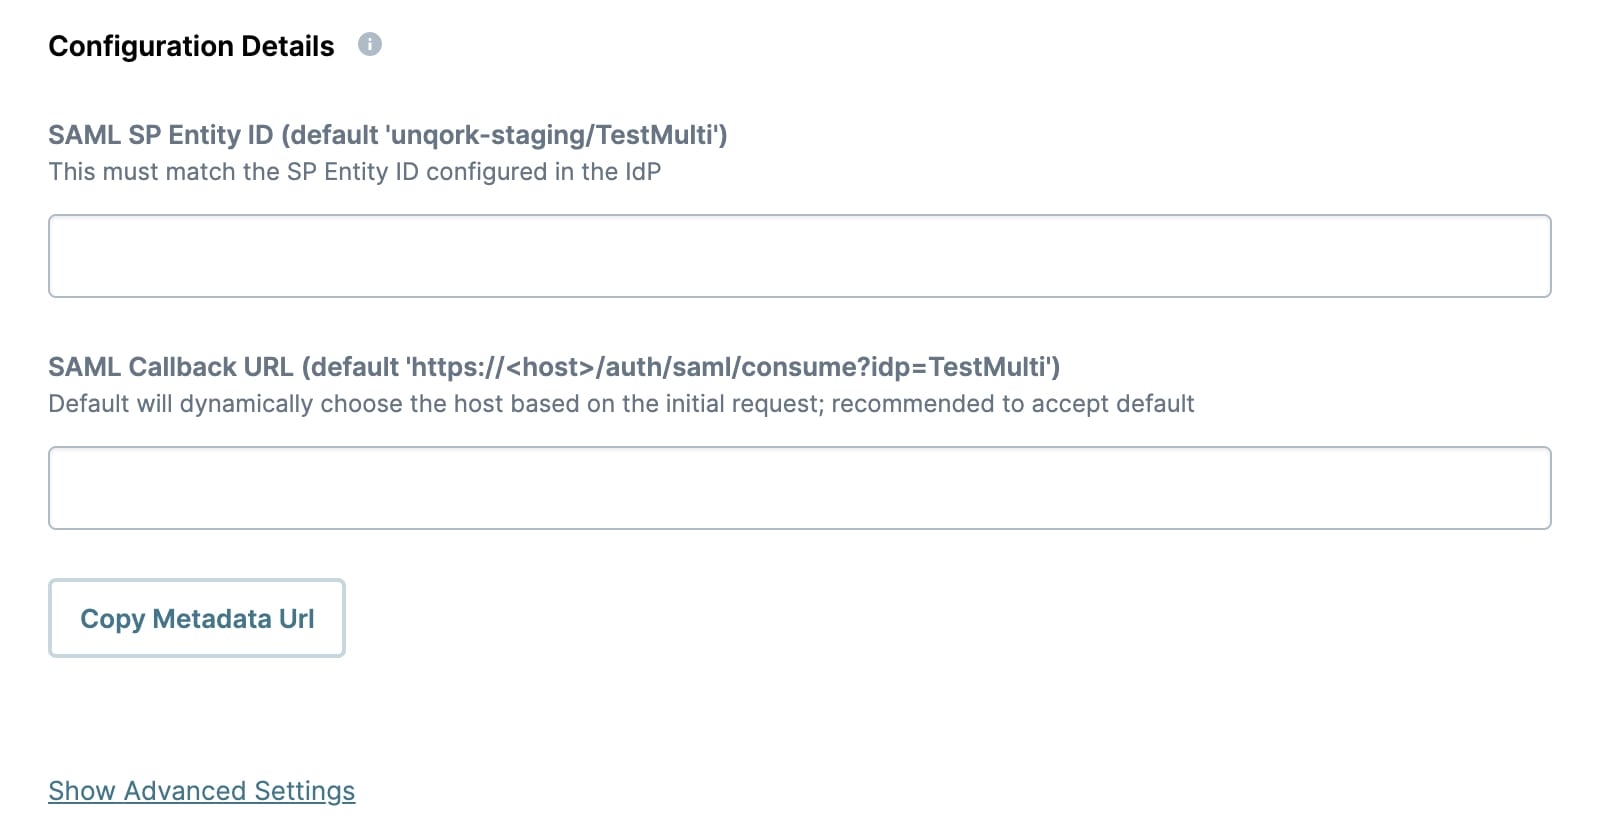
In some cases, the administrator of the SSO provider account requests the SP metadata XML file before they issue the IdP metadata XML file. So, the configuration modal offers the option to generate a placeholder SP metadata XML file. Click the Copy Metadata Url button to generate an SP metadata XML file based on default configuration values. The URL for the file copies to your clipboard.
IdP Details
After pasting the contents of the IdP metadata XML file in the IdP Metadata XML field, Unqork automatically parses the file. If the file is valid, the other fields in this section display and autofill based on the contents of the file.

Setting | Description |
|---|---|
IdP Metadata XML | Paste the contents of the IdP metadata XML file provided by the IdP. Unqork automatically parses the file. If the file is valid, the other fields in this section display and autofill based on the contents of the file. |
SAML IdP NameID Format | A unique identifier that matches a user across multiple Unqork sessions. Leave this field empty to accept the default. The default NameID format is |
SAML IdP SSO URL | The point of origin for the SAML response. This is where the end-user switches from a non-Unqork site to an Unqork application. This is usually the client’s website. This is a required setting and autofills based on the IdP metadata XML file. |
SAML IdP X.509 Certificate | Grants Unqork access to the Entrypoint URL. This is a required setting and autofills based on the IdP metadata XML file. |
Configuration Details

Setting | Description |
|---|---|
SAML SP Entity ID | Sets the ID of your Unqork application. Your SSO provider provides this value if they require something other than the default. Leave this field empty to accept the default. The default value reflects the environment and the name of your SAML configuration, as defined in the SSO Name field. For example, |
SAML Callback URL | This is where Unqork directs the SAML response. The default value is This setting is optional. However, it's best practice to complete the field with your environment-specific SAML Callback URL.
|
Copy Metadata URL | Click to generate the SP metadata XML file and copy the URL of the file to your clipboard.
|
Advanced Settings
Click Show Advanced Settings to display the following settings:

Setting | Description |
|---|---|
Use HTTP-POST Binding | When selected, the SAML request is sent using HTTP-POST Binding. This setting is optional. The default setting is ☐ (unchecked). |
Use Signed AuthnRequest | When selected, the IdP requires a signed AuthnRequest. This setting is optional. The default setting is ☐ (unchecked). |
Expect Encrypted Assertions | When selected, the IdP sends encrypted assertions in the SAML response. This setting is optional. The default setting is ☐ (unchecked). |
Do Not Request a Specific Authentication Context | This setting is optional and defaults to clear. Some IdPs don't support specific authentication context (RequestedAuthnContext) in a SAML request. When selected, this removes RequestedAuthnContext from the response. This setting is optional. The default setting is ☐ (unchecked). |
Attribute Mapping Tab

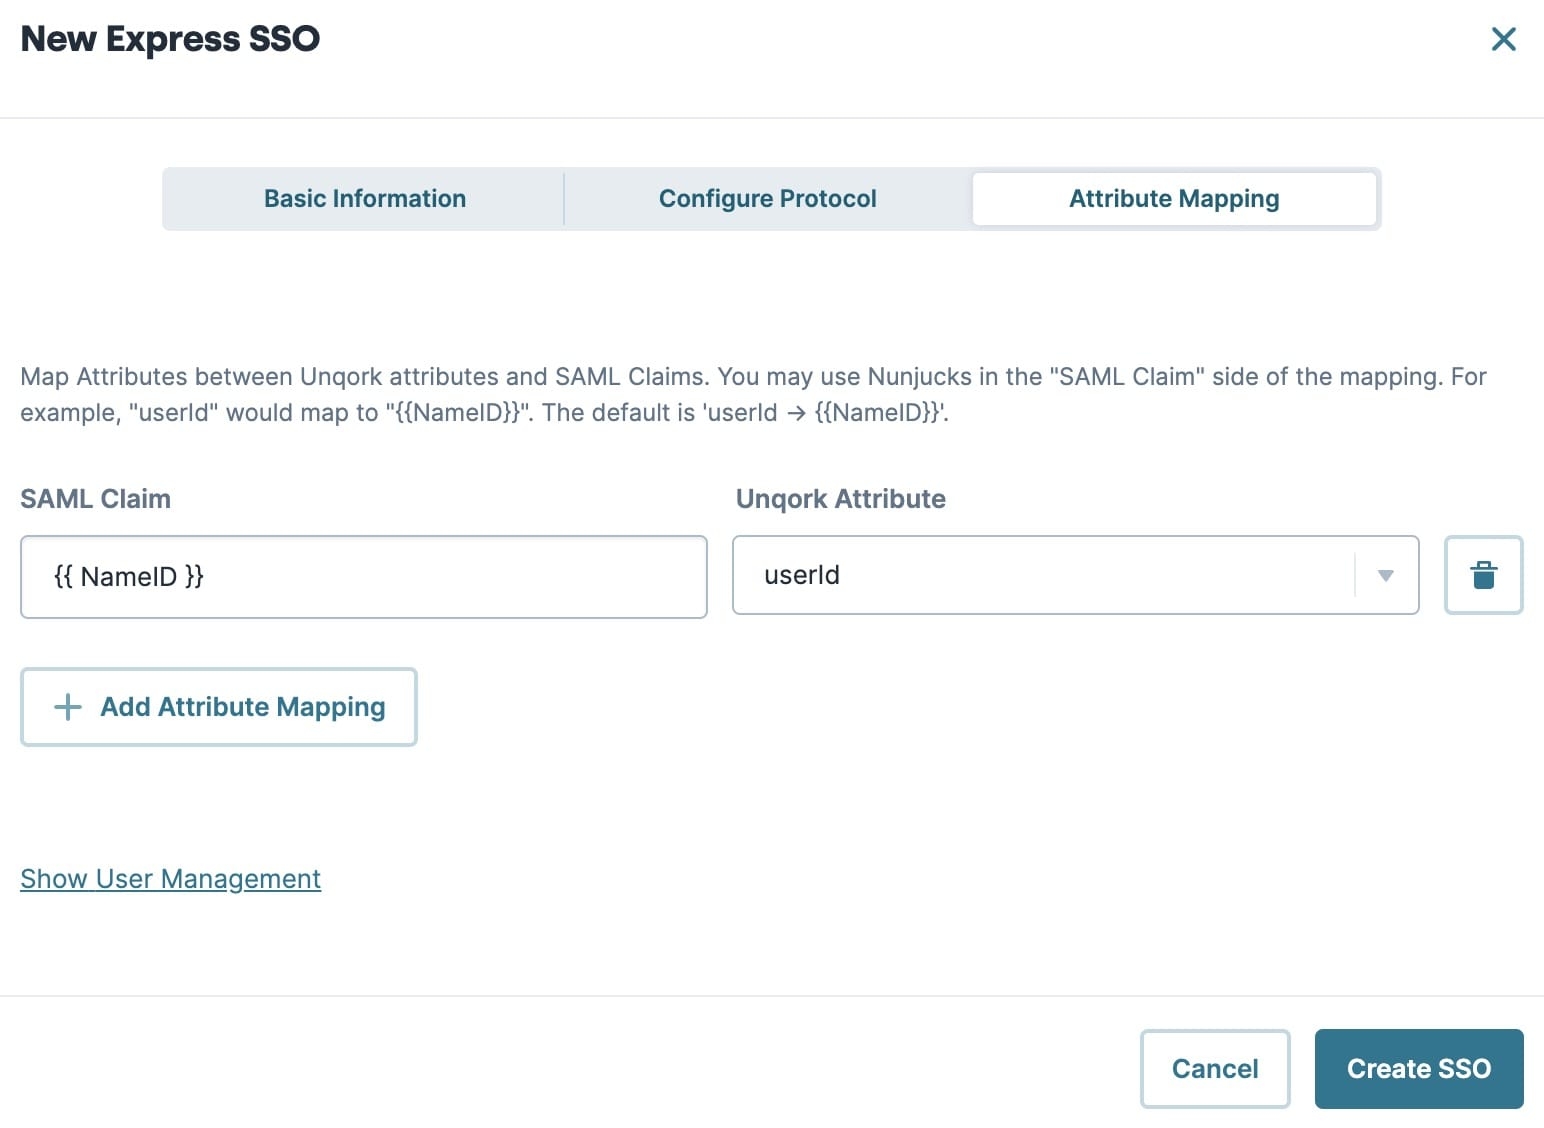
The Attribute Mapping tab is where you map attributes in the SAML assertion to attributes in Unqork. Specifically, you map the SAML attributes to attributes in the currentUser object in the session's submission data. In addition to mapping SAML attributes to existing Unqork attributes, you can also create custom attributes. Attribute mapping provides a more seamless experience for your end-user. For example, you can map the email address returned by the IdP to the email attribute in the currentUser object. Then, you can use that value to autofill any email address fields in your application.
The Attribute Mapping tab refers to SAML attributes as SAML claims.
See the Creating Attribute Mappings section for detailed examples of how to create dynamic, conditional, and static attribute mappings.
Click + Add Attribute Mapping to add a new attribute mapping.
By default, the Attribute Mapping tab includes the mapping
{{NameID}}touserId. Do not delete this mapping or your SSO configuration will fail.
Setting | Description |
|---|---|
SAML Claim | Enter an attribute in the SAML assertion to map to an attribute in the This field accepts Nunjucks formatting, letting you create dynamic and conditional attribute mappings. |
Unqork Attribute | Select or enter an Unqork attribute for the SAML attribute to map to. Attributes are mapped to the currentUser object within the session's submission data. By default, the Unqork Attribute drop-down contains the following commonly-referenced attributes found in the To create a custom attribute, type the custom attribute's name in the Unqork Attribute field, then press Enter/Return or select Create {attribute name}. |
User Management
Click Show User Management to display the following settings:
Setting | Description |
|---|---|
Require User Exists | When selected, your end-user must have an existing Unqork account in your environment to gain access using SSO. End-users don't need to log in using their credentials, but Unqork does verify an end-user has credentials before logging them in.
The default setting is ☐ (unchecked). |
Disable User Creation | When selected, Unqork doesn't create an Unqork user account if the end-user doesn't already exist in the system.
The default setting is (checked). |
Match Attribute | This setting lets you customize what SAML attribute Unqork uses to identify an existing user in your Unqork environment. The default is to match against the This setting is optional. |
Creating Attribute Mappings
You can create three types of attribute mappings: dynamic, conditional, and static.
Dynamic Attribute Mappings
When creating an attribute mapping, you most commonly use Nunjucks. This lets you dynamically populate the attribute with the value returned by the IdP. For example, here's how you'd map the email SAML attribute to the email attribute in Unqork:
On the Attribute Mapping tab, click + Add Attribute Mapping.
Enter
{{email}}in the SAML Claim side of the mapping.When filling out the SAML Claim side of the mapping, use the exact spelling and capitalization of the attribute as found on the IdP's end.
The name of your Unqork Attribute doesn't need to match the name of the SAML attribute.
Select email from the Unqork Attribute drop-down.
The Unqork Attribute drop-down lists some commonly-referenced attributes. To create a custom attribute, type the attribute in the Unqork Attribute field, then press Enter/Return or select Create {attribute name}.
.jpg)
Conditional Attribute Mappings
You can also use more complex Nunjucks in the SAML Claim side of the mapping. For example, conditionally mapping values to your Unqork attribute, based on the contents of one or more attributes. This is useful in many scenarios, including when you want to automatically redirect some users to certain pages of your application. For example, if you want to send users with admin permissions directly to an administrators' dashboard. Your app can only have a single point of entry for all users, regardless of their role permissions. But, you can conditionally assign a currentUser attribute based on the attribute values returned by the IdP. Then, you can reference that attribute to create custom redirect rules.
Custom redirects based on roles and attributes cannot be configured in the SSO Configuration modal.
Here's an example of a conditional attribute mapping:
.jpg)
And here are the contents of the SAML Claim side of the mapping:
1 {% if dynamic_group | length %}
2 {% if 'MMC-Admin' in dynamic_group | string %}{{ 'MMC-Admin' }}
3 {% elif  'Eforms-Admin'  in dynamic_group | string %}{{userState}}
4 {% endif %}{% elif  userState | length %}{{userState}}
5 {% else %}{{ 'Unverified' }}{% endif %}
When completing the SAML Claim side of the mapping, entered values show as a single line of text. This explanation uses a multiple-line display for clarity.
In this example, the Nunjucks is looking at the contents of the dynamic_group and userState SAML attributes, in order to determine what value to map to the Unqork attribute role. This is because both the dynamic_group and userState attributes contain values that could map to an Unqork role.
Let's take a look at what this means, line by line:
Line 1: {% if dynamic_group | length %}
This line checks that there is a value in the dynamic_group SAML attribute sent by the IdP.
Line 2: {% if 'MMC-Admin' in dynamic_group | string %}{{ 'MMC-Admin' }}
The next line checks if the value in the dynamic_group SAML attribute is the string 'MMC-Admin'. And, if the value is 'MMC-Admin', maps 'MMC-Admin' to the role attribute in Unqork.
Line 3: {% elif 'Eforms-Admin' in dynamic_group | string %}{{userState}}{% endif %}
Next, this line checks if the value in the dynamic_group SAML attribute is the string 'Eforms-Admin' instead. And, if the value is 'Eforms-Admin', maps the value in the userState SAML attribute to the role attribute in Unqork.
Line 4: {% elif userState | length %}{{userState}}
This line checks if there even is a value in the userState SAML attribute. And, if there is, maps the value in the userState attribute to the role attribute in Unqork.
Line 5: {% else %}{{ 'Unverified' }}{% endif %}
And finally, if none of the previous conditions are true, the mapped value is the string 'Unverified'. So, if the dynamic_group and userState attributes have no values at all, map 'Unverified' to the role attribute in Unqork. In this example, Unverified is the name of a role in the Unqork environment.
Static Attribute Mappings
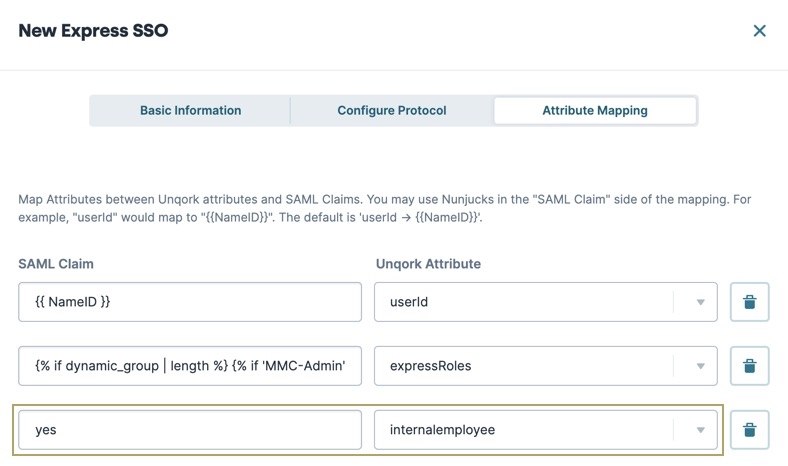
You have one more option for how to use the Attribute Mappings section. Instead of using Nunjucks to reference an attribute in the SAML assertion, you can hardcode a value. For example, you might need to set a static value that always displays in the currentUser object. But, the IdP can't or doesn't provide that value as an attribute in the SAML assertion. To set a static value, type the value in the SAML Claim side of the mapping. No additional formatting is necessary. For example:

Configuring SSO Using SAML With Different SSO Providers
Now that you know about all the SAML configuration settings, you're ready to start setting up connections between Unqork and your chosen SSO provider. View our SSO guides below to get started:
SSO in Express View (SAML)
Set Up Microsoft Entra ID for SSO in Express View (SAML)
Set Microsoft Entra ID as an SSO (single sign-on) provider using the SAML (Security Assertion Markup Language) authentication method.
Set Up Okta for SSO in Express View (SAML)
Learn how to use Okta as an SSO (single sign-on) provider utilizing the SAML (Security Assertion Markup Language) authentication method.
SSO in Designer (SAML)
Set Up Microsoft Entra ID for SSO in Designer (SAML)
Learn how to use Microsoft Entra ID as an SSO (single sign-on) provider, using the SAML (Security Assertion Markup Language) authentication method.
Set Up Okta for SSO in Designer (SAML)
Learn how to use Okta as an SSO (single sign-on) provider, using the SAML (Security Assertion Markup Language) authentication method.
SSO Certificates
Using Certificates with SAML Assertions
Create a certificate for SAML assertion, then add it to a new or existing SSO configuration.