Overview
Unqork as a OIDC service provider secures applications that work with sensitive information. Having end-users use SSO(single sign-on) to access your application is a great solution. When setting up SSO, you can select the authentication provider for your Unqork application. Instead of Unqork needing to store the end-users' credentials, the SSO provider takes care of it. Using SSO also gives your end-user fewer sets of credentials to remember. Your end-user gets a seamless login experience, and you can trust your SSO provider to ensure the right people have access to your app.
OIDC (OpenID Connect) is one of the SSO methods Unqork supports. OIDC makes granting access to your Unqork application easier by:
Letting you grant access to users who do not have Unqork credentials.
Letting Unqork users log in without having to enter their credentials.
In this article, you'll learn about using the OIDC authentication method, where Unqork is the Relying Party.
What Is OIDC?
OIDC is a secure exchange of information between an OpenID Provider (OP) and a Relying Party (RP). The RP in this case is Unqork. The OP is any SSO provider, such as Okta, Microsoft Entra ID, or Amazon Cognito.
At its very highest level, OIDC is another identity layer built on the OAuth 2.0 protocol. While OAuth 2.0 gives authorization, it doesn't actually identify your end-user. For example, with only OAuth 2.0, you can't greet your end-user by name in your application. OIDC bridges the gap and lets you add that customization.
You can think of OAuth 2.0 as the Gateway leading to a series of vaults containing user identities. Those vaults are OPs. An OIDC configuration requests the identity data from an OP in an OIDC claim.
How SSO Using OIDC Works in Unqork
Let's take a high-level look at how the authentication process works when using OIDC as the authentication method. In this explanation, the SSO provider is the OP and Unqork is the RP.
First, your end-user must log in. It's up to you to decide how your end-users logs in to your chosen SSO provider. For example, setting up an automatic redirect to a provider-hosted login page. Or, using a series of API calls to communicate between an Unqork-hosted page and the SSO provider's API.
Once the end-user logs in, the OP issues a JWT (JSON Web Token) and sends it to your Unqork environment. A JWT is a structured security token format that encodes JSON data. The JWT is the access token that authenticates your end-user's identity. The JWT also contains information that tells your Unqork application if the end-user has the authorization to access your app. For example, your app recognizes the end-user has specific role permissions or characteristics.
Inside the JWT, the information the OP has about your end-user stores as a set of claims. Claims are simply key/value pairs. For example, the email claim stores the end-user's email address. For Unqork to access those claims, though, you must list the associated scope(s) in your OIDC configuration.
Scopes are a way of grouping related claims together. By listing a scope, you formally request access to the claims grouped under that scope. For example, listing the profile scope requests access to claims like name (the end-user's first name) and family_name (the end-user's last name).
The OP doesn't send the JWT directly to the front-end of your application, or even to a module you can access from Designer view. This is because your application shouldn't have access to all the information in the JWT. Instead, it only has access to the claims specified in the OIDC configuration. So, the OP sends the JWT to the Redirect URI entered in the OIDC configuration on the OP's end. The Redirect URI is an endpoint of the RP's underlying platform. For Unqork applications, that endpoint typically looks like https://<host>/auth/oidc/<OIDCname>/cb. There, the Unqork platform decodes the JWT and creates a session for the end-user. Unqork also strips the token, holding onto only the claims listed in your OIDC configuration. These claims map to attributes in the currentUser object of the session's submission data.
When configuring what claims to pull from the JWT, you also note what Unqork attribute to map the claim value to. You control this mapping in the Attribute Mappings section of the OIDC configuration. You can leverage attribute mapping to improve your end-user's experience. For example, using the email address returned by the OP to autofill an email address field in your application.
Understanding the OIDC Settings in Single Sign-On (SSO) Management
To connect the OIDC configuration on the SSO provider's end to your Unqork application, use the Single Sign-On (SSO) Management page. So, start by looking at each setting in the SSO configuration modal.
Available settings in the SSO configuration modal vary between Express View and Designer SSO configurations. The following images reflect the Express View SSO configuration modal. Settings that are specific to Express View or Designer SSO configurations are noted in the settings description tables.
To learn more about using Single Sign-On Management, view our Single Sign-On (SSO) Management article.
Basic Information Tab
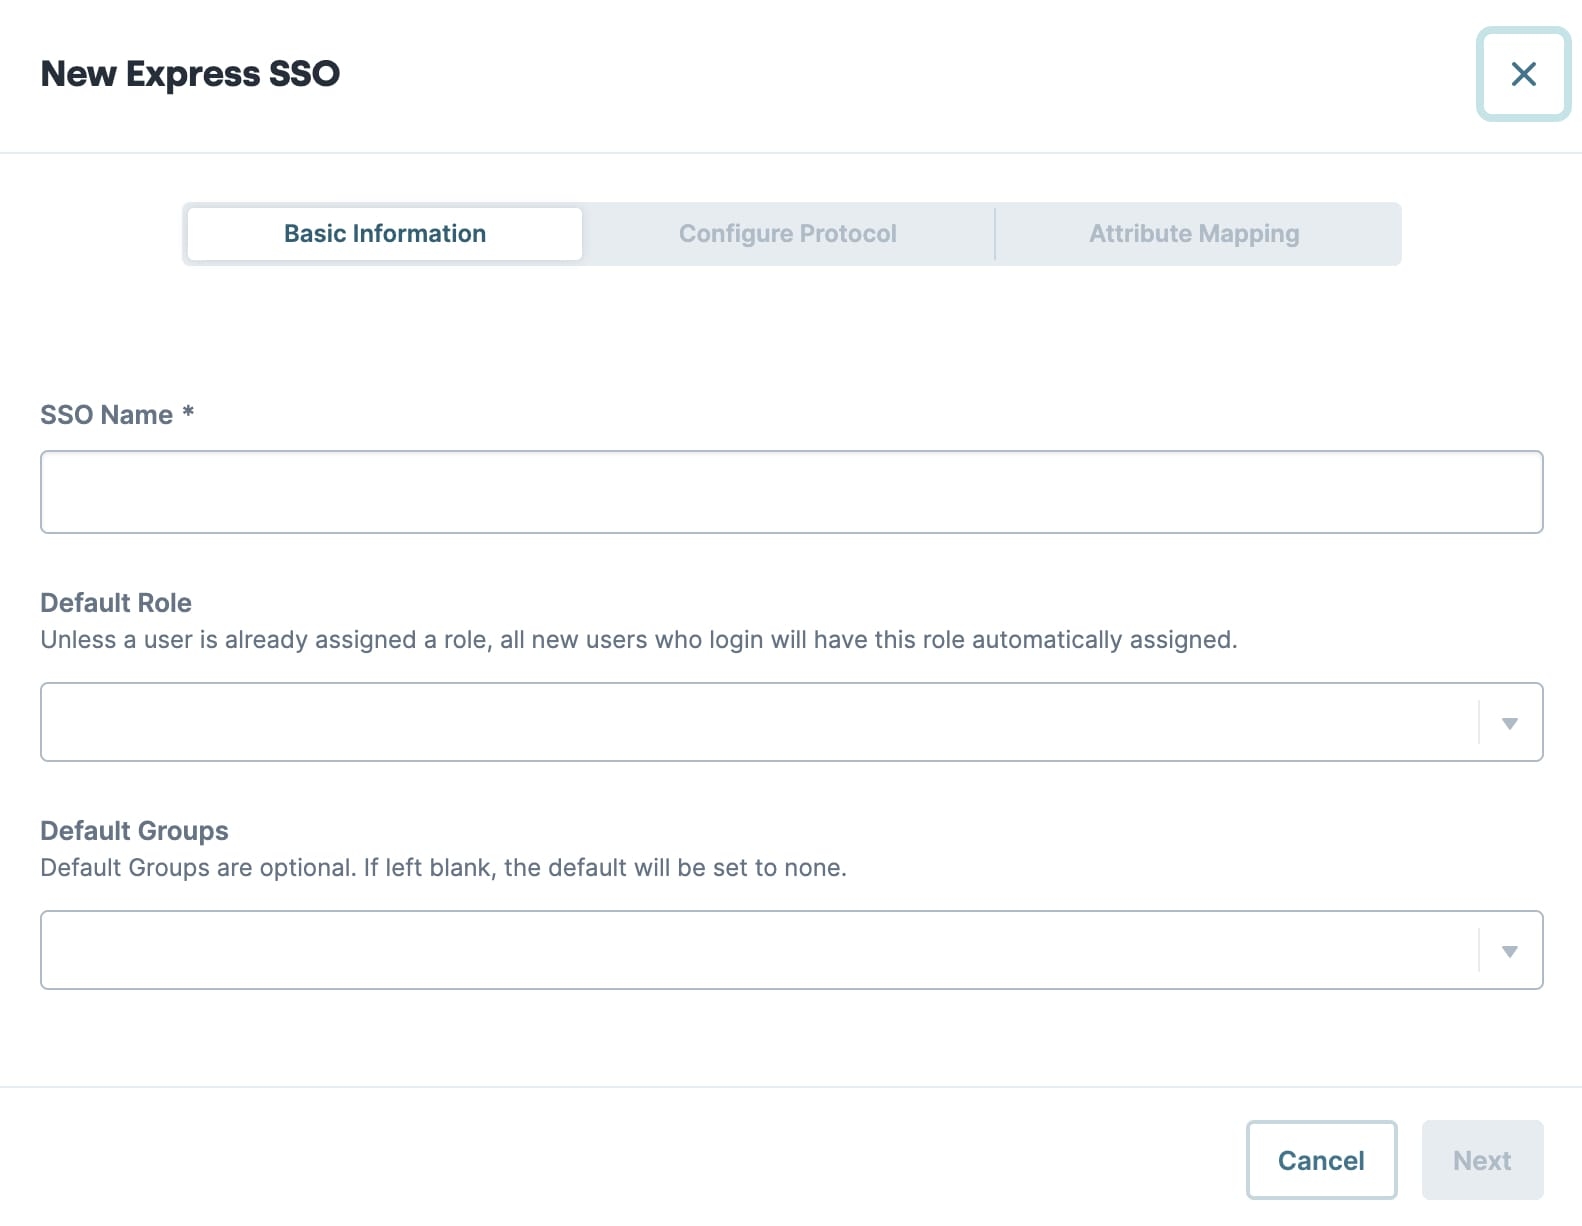
Setting | Description |
|---|---|
SSO Name* | Enter a name for your configuration. Use a descriptive name that relates to your configuration. For example, {environment name and codebase}-{application name}-oidc. *This setting is required. |
Default Role | Select a default role for users who authenticate using the SSO configuration. The default role applies when a role is not explicitly defined. The available roles vary between Express View and Designer SSO configurations:
|
Default Groups | This setting displays only in Express View SSO configurations. Select a default group for end-users who authenticate using the SSO configuration. The default group applies when a group is not explicitly defined. You can select multiple groups by selecting more than one option from the Default Group drop-down. The Default Groups drop-down populates with groups defined in Express Group Administration.
|
Configure Protocol Tab
Select OIDC from Select Protocol to access the following OIDC configuration settings.
The Configure Protocol tab is where you enter the required information, including the:
OP Discovery URL
OP Client ID
OP Client Secret
There are also several optional settings. For example, requesting access to additional scopes beyond the default openid.
IdP Details
.jpg)
Setting | Description |
|---|---|
OIDC OP Discovery URL/Issuer* | The location of the OP. This is where Unqork sends the OIDC claim.
*This setting is required. |
OIDC OP Client ID* | Works as a username for Unqork to log into the OP. *This setting is required. |
OIDC OP Client Secret* | Works as a password for Unqork to log into the OP. *This setting is required. |
Configuration Details
.jpg)
Setting | Description |
|---|---|
Scope | This setting is important if you want to map attributes from claims that aren't part of the default openid scope. To add scope to the list, enter the scope name in the field and click Enter/Return,. Or, select Create {scope name}. This setting is optional. However, it's best practice to at least select openid from the OIDC Scope drop-down. |
Redirect URI | Where Unqork directs the OIDC response once received from the OP. The default value is https://<host>/auth/oidc/<OIDCname>/cb where <host> is the name of your environment and <OIDCname> is the name of your OIDC configuration, as defined in the SSO Name field. This setting is optional. However, it's best practice to complete the field with your environment-specific OIDC Redirect URI.
|
Advanced Settings
Click Show Advanced Settings to display the following settings:
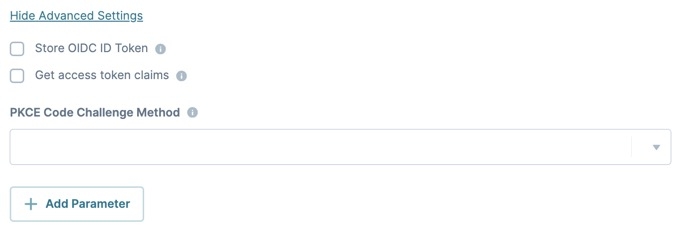
Setting | Description |
|---|---|
Store OIDC ID Token | This setting lets you store your OIDC ID token so you can use it elsewhere. For example, using it to send service requests. To access your OIDC ID token on the server, you must configure the following Nunjucks definition in Services Administration: {{ _id_token }}. Entering this Nunjucks definition to the Request Header in Services Administration lets you retrieve the ID token value for future reference. By default, this setting is
|
Get Access Token Claims | This checkbox ensures Unqork calls the OIDC /userinfo endpoint. By default, this setting is
|
PKCE Code Challenge Method | PKCE (Proof of Key Code Exchange) is an authorization flow type that lets the RP sign their authorization request using a code challenge. When enabled, the RP generates a code verifier sent along with the request. The PKCE Code Challenge Method drop-down has three options:
|
+ Add Parameter | Clicking + Add Parameter displays the Parameter Key and Value settings. Together, these let you set additional static parameters in authorization requests. These parameters are sent as part of the query string to the RP (Unqork), instead of in the request object. Setting static parameters is useful when you know there's a parameter you always want to pass in every request. Or if you want to include a parameter that the OP doesn't have or can't include in the request object. For example, when the parameter isn't stored with the end-user's information. But, you must balance the risk that sending information in the query string is less secure than sending it in the request object. |
Parameter Key | Enter the parameter's name. |
Value | Enter the parameter's value. |
Attribute Mapping Tab
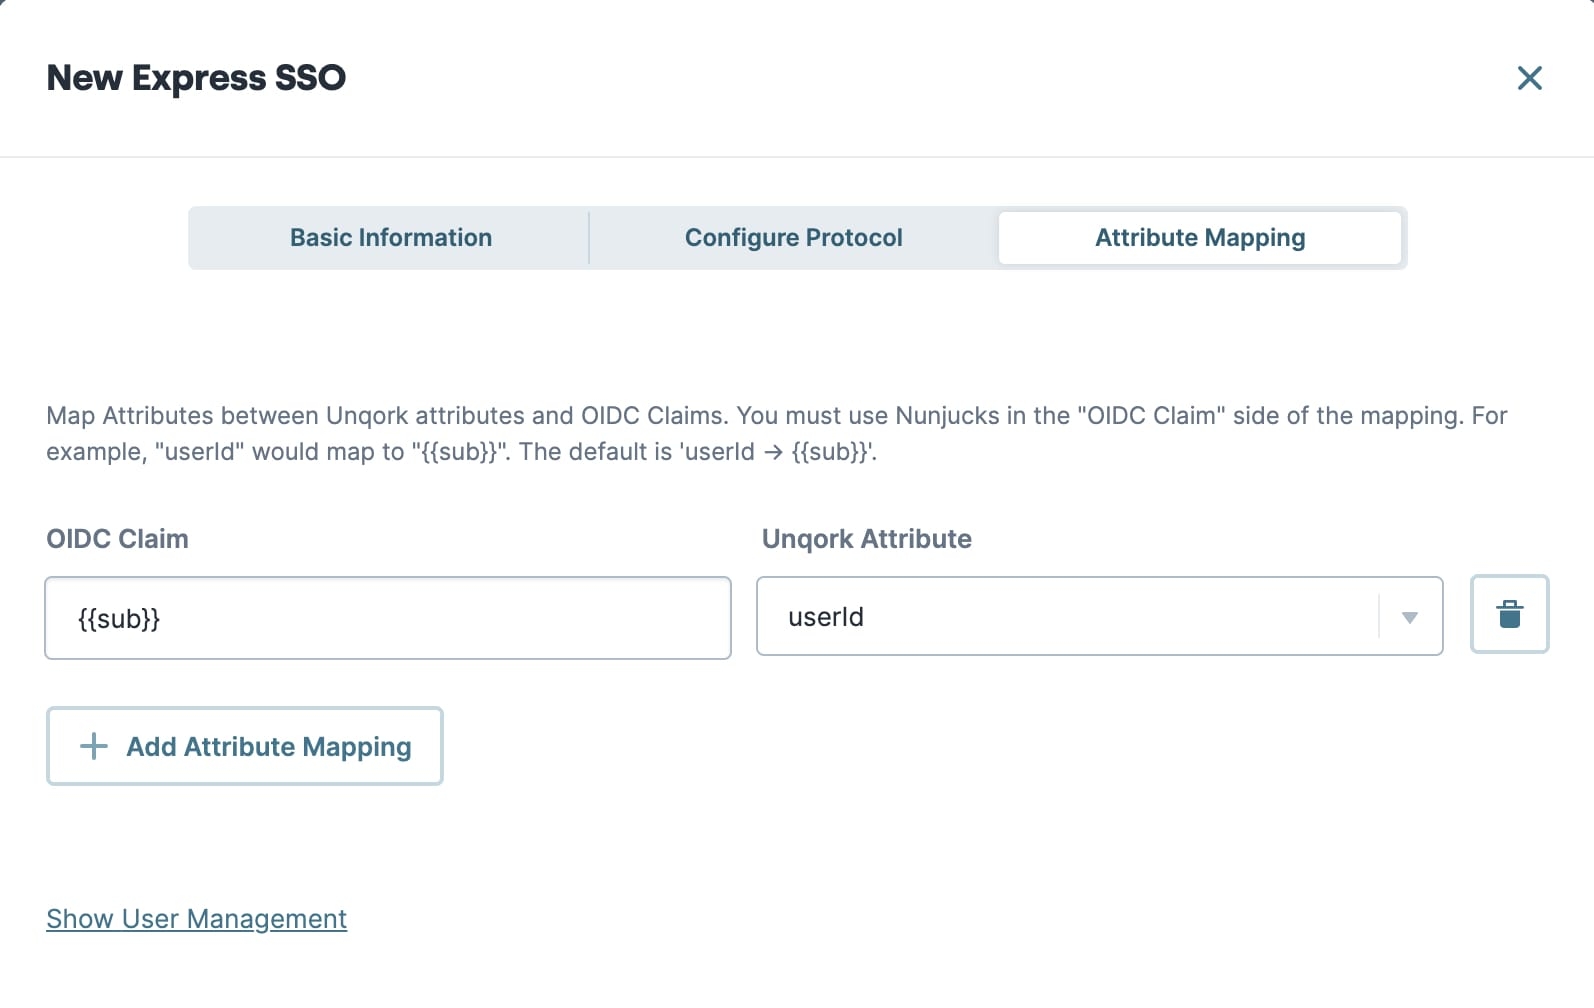
The Attribute Mapping tab is where you map claims in the JWT to attributes in Unqork. Specifically, you map the claims to attributes in the currentUser object in the session's submission data. In addition to mapping claims to existing attributes in Unqork, you can create custom attributes. Attribute mapping provides a more seamless experience for your end-user. For example, you can map the email address returned by the OP to the email attribute in the currentUser object. Then, you can use that value to autofill any email address fields in your application.
Be aware of the relationship between scopes and claims. If you want to list a claim in your Attribute Mapping, you must request access to the scope where that claim is grouped. For example, the email claim is part of the email scope. The OP doesn't grant access to the email claim unless you enter email in the OIDC Scope setting. Only adding the email claim to your Attribute Mapping doesn't work.
See the Creating Attribute Mappings section for detailed examples for creating dynamic, conditional, and static attribute mappings.
Click + Add Attribute Mapping to add a new attribute mapping.
By default, the Attribute Mapping tab includes the mapping {{sub}} to userId. Do not delete this mapping or your SSO configuration fails.
Setting | Description |
|---|---|
OIDC Claim | Enter a claim in the JWT to map to an attribute in the currentUser object. Or, enter a static value to map to the currentUser object. This field accepts Nunjucks formatting, letting you create dynamic and conditional attribute mappings. |
Unqork Attribute | Select or enter an Unqork attribute for the OIDC claim to map to. Attributes are mapped to the currentUser object within the session's submission data. By default, the Unqork Attribute drop-down contains the following commonly-referenced attributes found in the currentUser object: email, name, userId. To create a custom attribute, type the custom attribute's name in the Unqork Attribute field, then press Enter/Return or select Create {attribute name}. |
User Management
Click Show User Management to display the following settings:
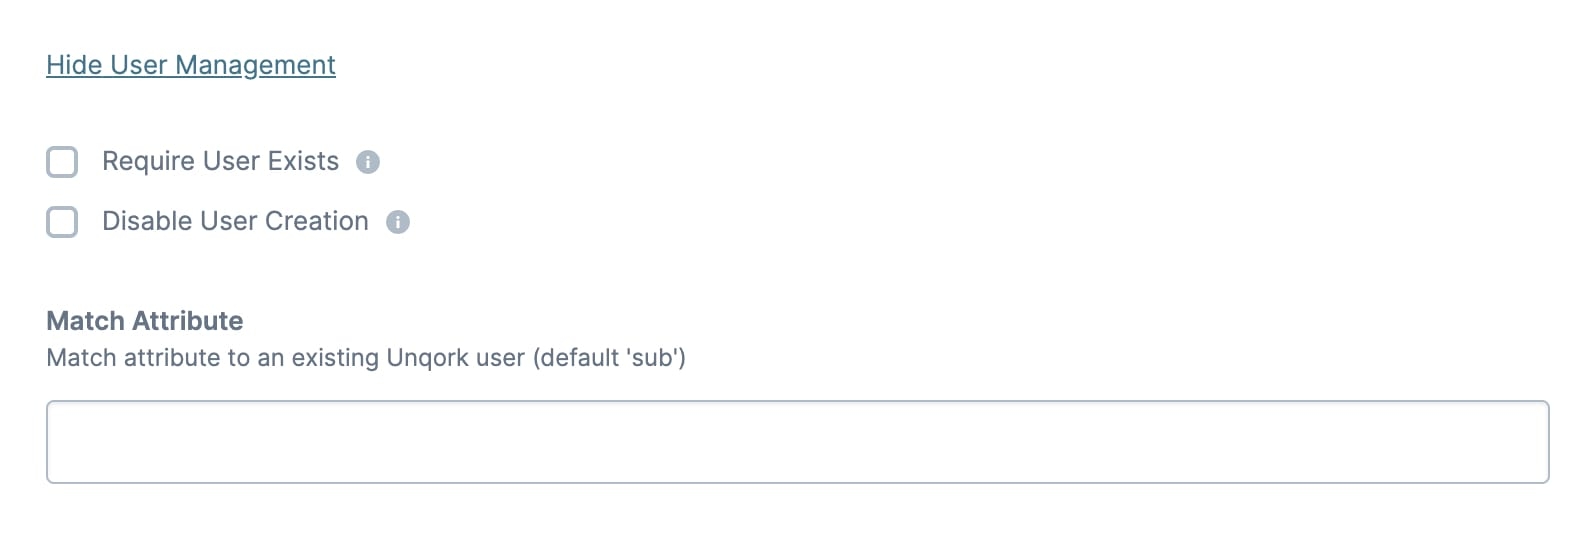
Setting | Description |
|---|---|
Require User Exists | When selected, your end-user must have an existing Unqork account in your environment to gain access using SSO. End-users don't need to log in using their credentials, but Unqork does verify an end-user has credentials before logging them in.
The default setting is |
Disable User Creation | When selected, Unqork doesn't create an Unqork user account if the end-user doesn't already exist in the system.
The default setting is |
Match Attribute | This setting lets you customize what OIDC claim (attribute) Unqork uses to identify an existing user in your Unqork environment. The default is to match against the sub claim. This setting is optional. |
Creating Attribute Mappings
You can create three types of attribute mappings: dynamic, conditional, and static.
Dynamic Attribute Mappings
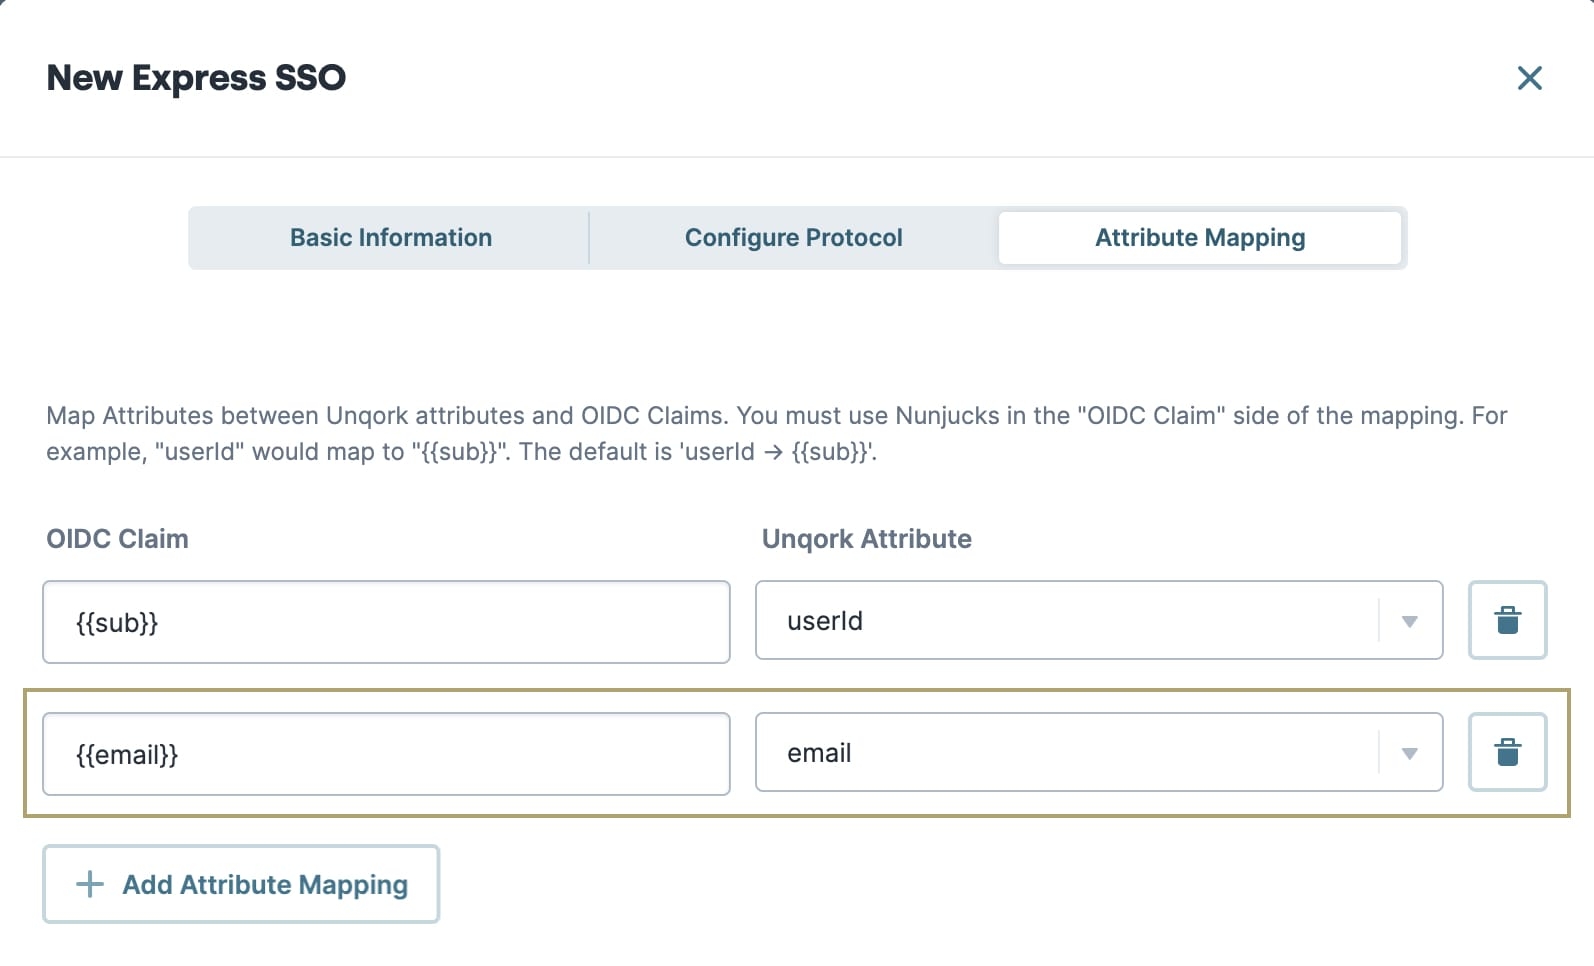
When creating an attribute mapping, you most commonly use Nunjucks. This lets you dynamically populate the attribute with the value returned by the OP. For example, here's how you map the email OIDC claim to the email attribute in Unqork:
On the Attribute Mapping tab, click + Add Attribute Mapping.
Enter {{email}} in the OIDC Claim side of the mapping.
When filling out the OIDC Claim side of the mapping, use the exact spelling and capitalization of the claim as found on the OP's end.
The name of your Unqork Attribute doesn't need to match the name of the OIDC Claim.×
Select email from the Unqork Attribute drop-down.
The Unqork Attribute drop-down contains some commonly-referenced attributes by default. To create a custom attribute, enter the attribute in the Unqork Attribute field and click Enter/Return. Or, select Create {attribute name}.
Conditional Attribute Mappings
You can also use more complex Nunjucks in the OIDC Claim side of the mapping. For example, conditionally mapping values to your Unqork attribute based on the contents of one or more claims. This is useful in many scenarios, including when you want to automatically redirect some users to certain application pages. For example, if you want to send users with admin permissions directly to an administrator's dashboard. Your app can only have a single entry point for all users, regardless of their role permissions. But, you can conditionally assign a currentUser attribute based on the claim values returned by the OP. Then, you can reference that attribute to create custom redirect rules.
Here's an example of a conditional attribute mapping:
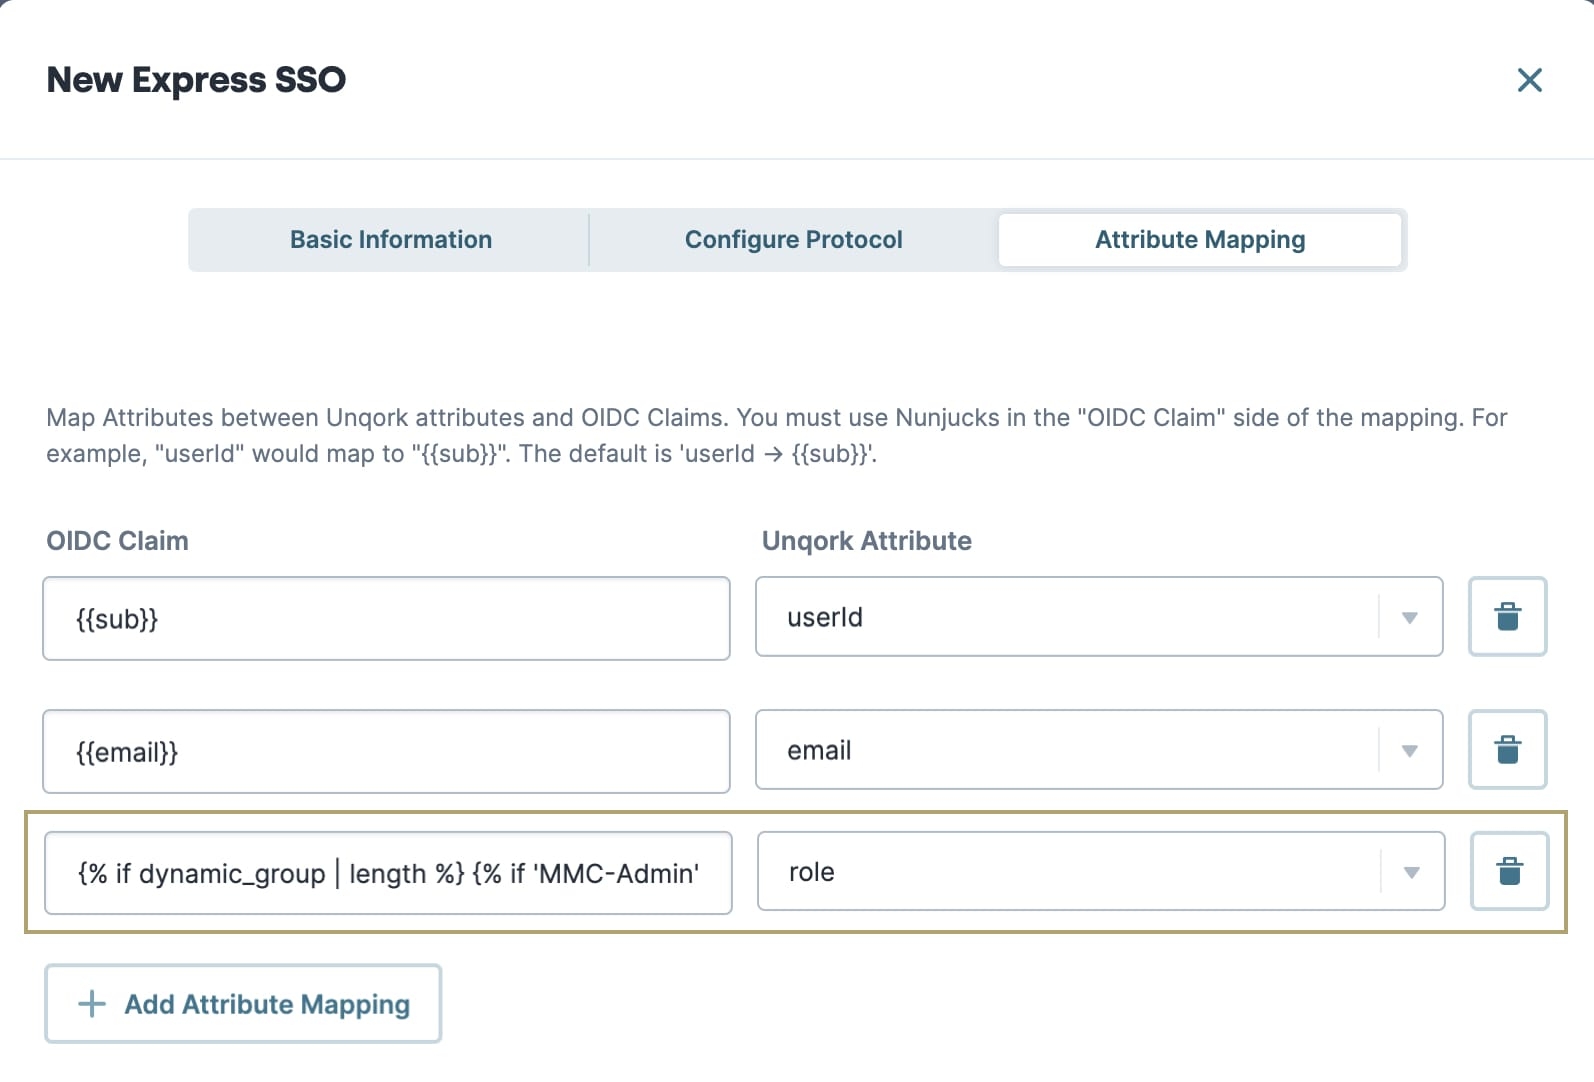
And here are the contents of the OIDC Claim side of the mapping:
1 {% if dynamic_group | length %}
2 {% if 'MMC-Admin' in dynamic_group | string %}{{ 'MMC-Admin' }}
3 {% elif  'Eforms-Admin'  in dynamic_group | string %}{{userState}}
4 {% endif %}{% elif  userState | length %}{{userState}}
5 {% else %}{{ 'Unverified' }}{% endif %}
When completing the OIDC Claim side of the mapping, entered values show as a single line of text. This explanation uses a multiple-line display for clarity.
In this example, the Nunjucks is looking at the contents of the dynamic_group and userState claims to determine what value to map to the Unqork attribute role. This is because both the dynamic_group and userState claims contain values that could map to an Unqork role.
Take a look at what this means, line by line:
Line 1: {% if dynamic_group | length %}
This line checks that there is a value in the dynamic_group claim sent by the OP.
Line 2: {% if 'MMC-Admin' in dynamic_group | string %}{{ 'MMC-Admin' }}
The next line checks if the value in the dynamic_group claim is the string 'MMC-Admin'. And, if the value is 'MMC-Admin', maps 'MMC-Admin' to the role attribute.
Line 3: {% elif 'Eforms-Admin' in dynamic_group | string %}{{userState}}{% endif %}
Next, this line checks if the value in the dynamic_group claim is the string 'Eforms-Admin' instead. And, if the value is 'Eforms-Admin', map the value in the userState claim to the role attribute.
Line 4: {% elif userState | length %}{{userState}}
This line checks if there even is a value in the userState claim. And, if there is, maps the value in the userState claim to the role attribute.
Line 5: {% else %}{{ 'Unverified' }}{% endif %}
And finally, if none of the previous conditions are true, the mapped value is the string 'Unverified'. So, if the dynamic_group and userState claims have no values, map 'Unverified' to the role attribute. In this example, Unverified is the name of a role in the Unqork environment.
Static Attribute Mappings
You have one more option for how to use the Attribute Mappings section. Instead of using Nunjucks to reference a claim in the JWT, you can hardcode a value. For example, you might need to set a static value that always displays in the currentUser object. But, the OP can't or doesn't provide that value as a claim in the JWT. To set a static value, type the value into the OIDC Claim side of the mapping. No additional formatting is necessary. For example:
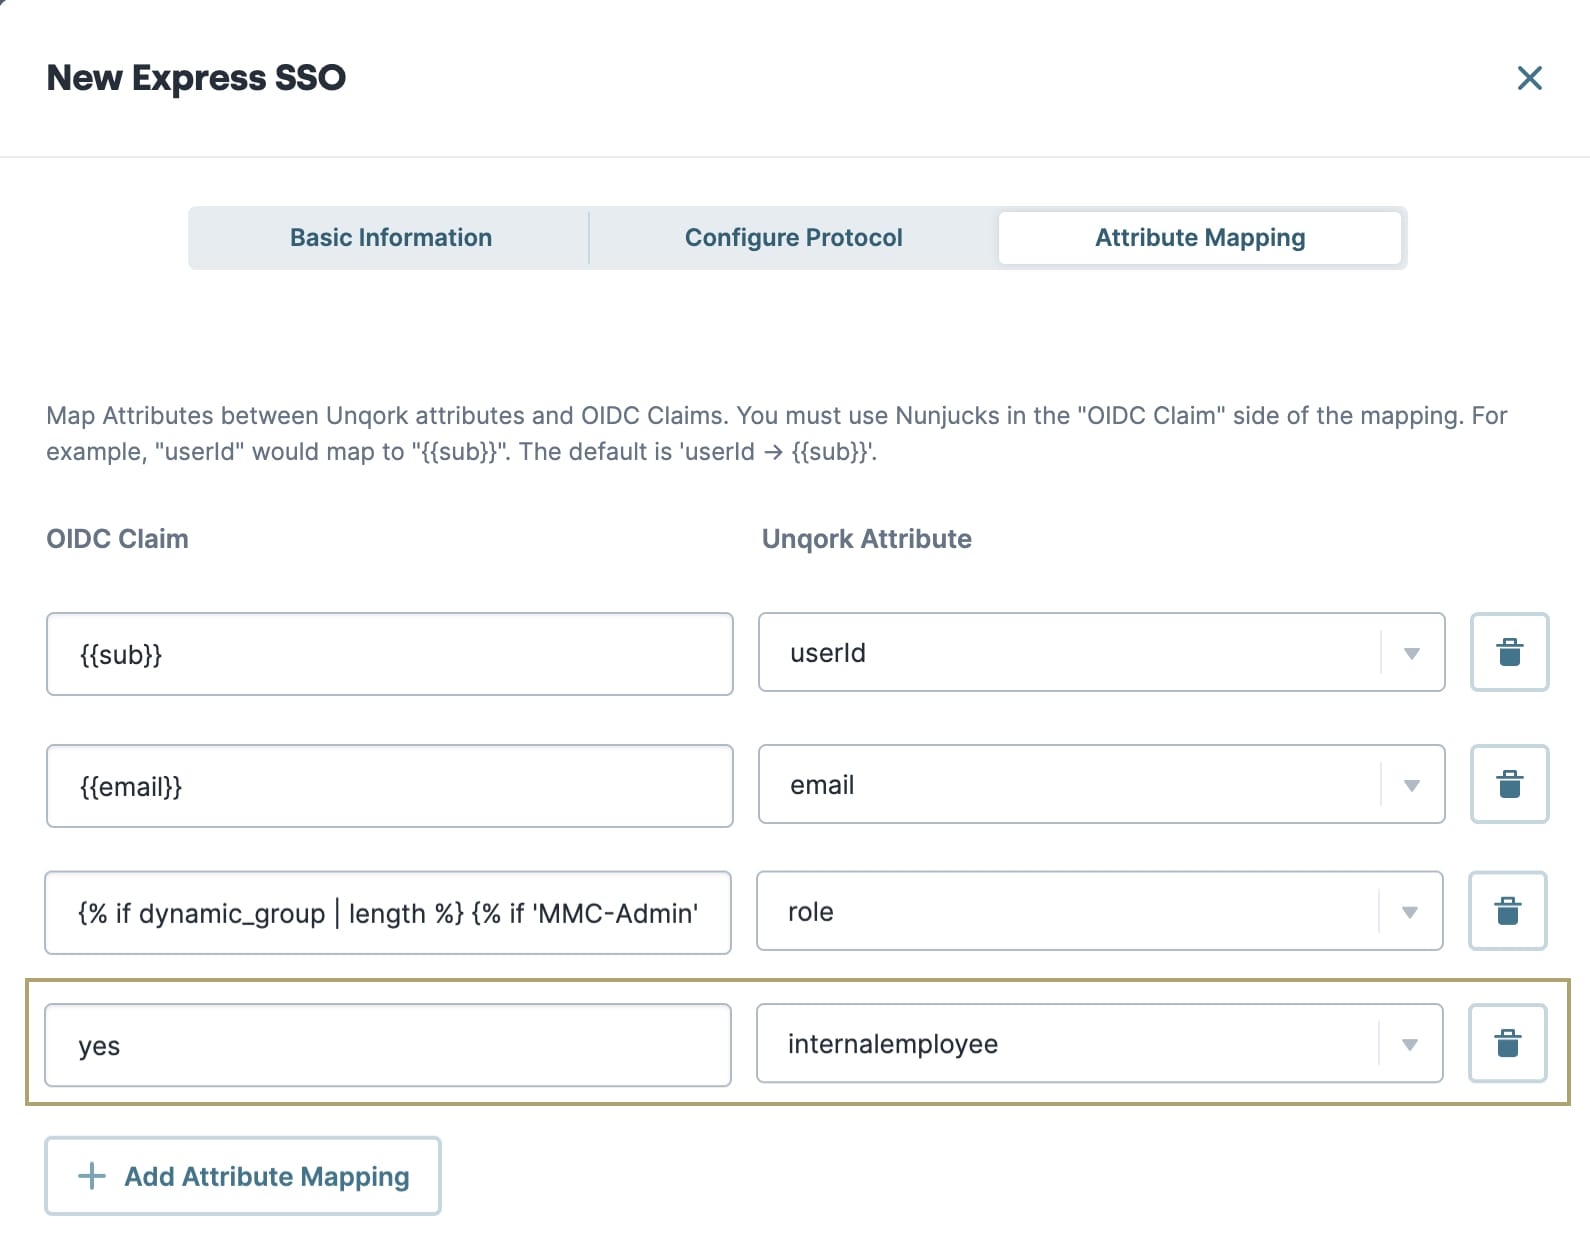
In this example, the OIDC Claim yes is a static value mapped to the Unqork Attribute internalemployee. Even though this is not a valid claim in the JWT, it stores the attribute in the currentUser object of Unqork's session submission data.
Setting Up SSO Using OIDC With Different SSO Providers
Now that you know about all the OIDC configuration settings, you're ready to start setting up connections between Unqork and your chosen SSO provider. Using our provider-specific SSO set-up articles makes this easy.