Setting Up Microsoft Entra ID for SSO in Designer (SAML)
Overview
In this article, you'll learn how to use Microsoft Entra ID as an SSO (single sign-on) provider, using the SAML (Security Assertion Markup Language) authentication method. Microsoft Entra ID acts as the IdP (Identity Provider) and Unqork is the SP (Service Provider). You'll set up your SAML configuration on Unqork's Single Sign-On (SSO) Management page.
You can set up SSO configurations for:
-
Express View access: For authentication into the front-end of an application in your environment.
-
Designer access: For authentication in your Unqork environment, known as Designer.
This article shows how to set up SSO for Designer access, rather than Express View access. Using SSO for Designer access is useful when you want to use your organization's existing SSO provider for authentication in Unqork.
To connect Microsoft Entra ID to your Unqork application as an SSO provider, your Microsoft Entra ID administrator needs to set up your application as a new Enterprise Application in Microsoft Entra ID. To learn more, see Microsoft Entra ID's Quickstart: Set up SAML-based single sign-on for an application article here: https://docs.microsoft.com/en-us/azure/active-directory/manage-apps/add-application-portal-setup-sso.
To learn more about using Unqork as an SP, including a description of all SAML configuration settings in Environment Administration, view our Unqork as a SAML Service Provider article. To learn about using Unqork as an IdP, view our Unqork as a SAML Identity Provider article.
How Settings Map Between Microsoft Entra ID and Unqork
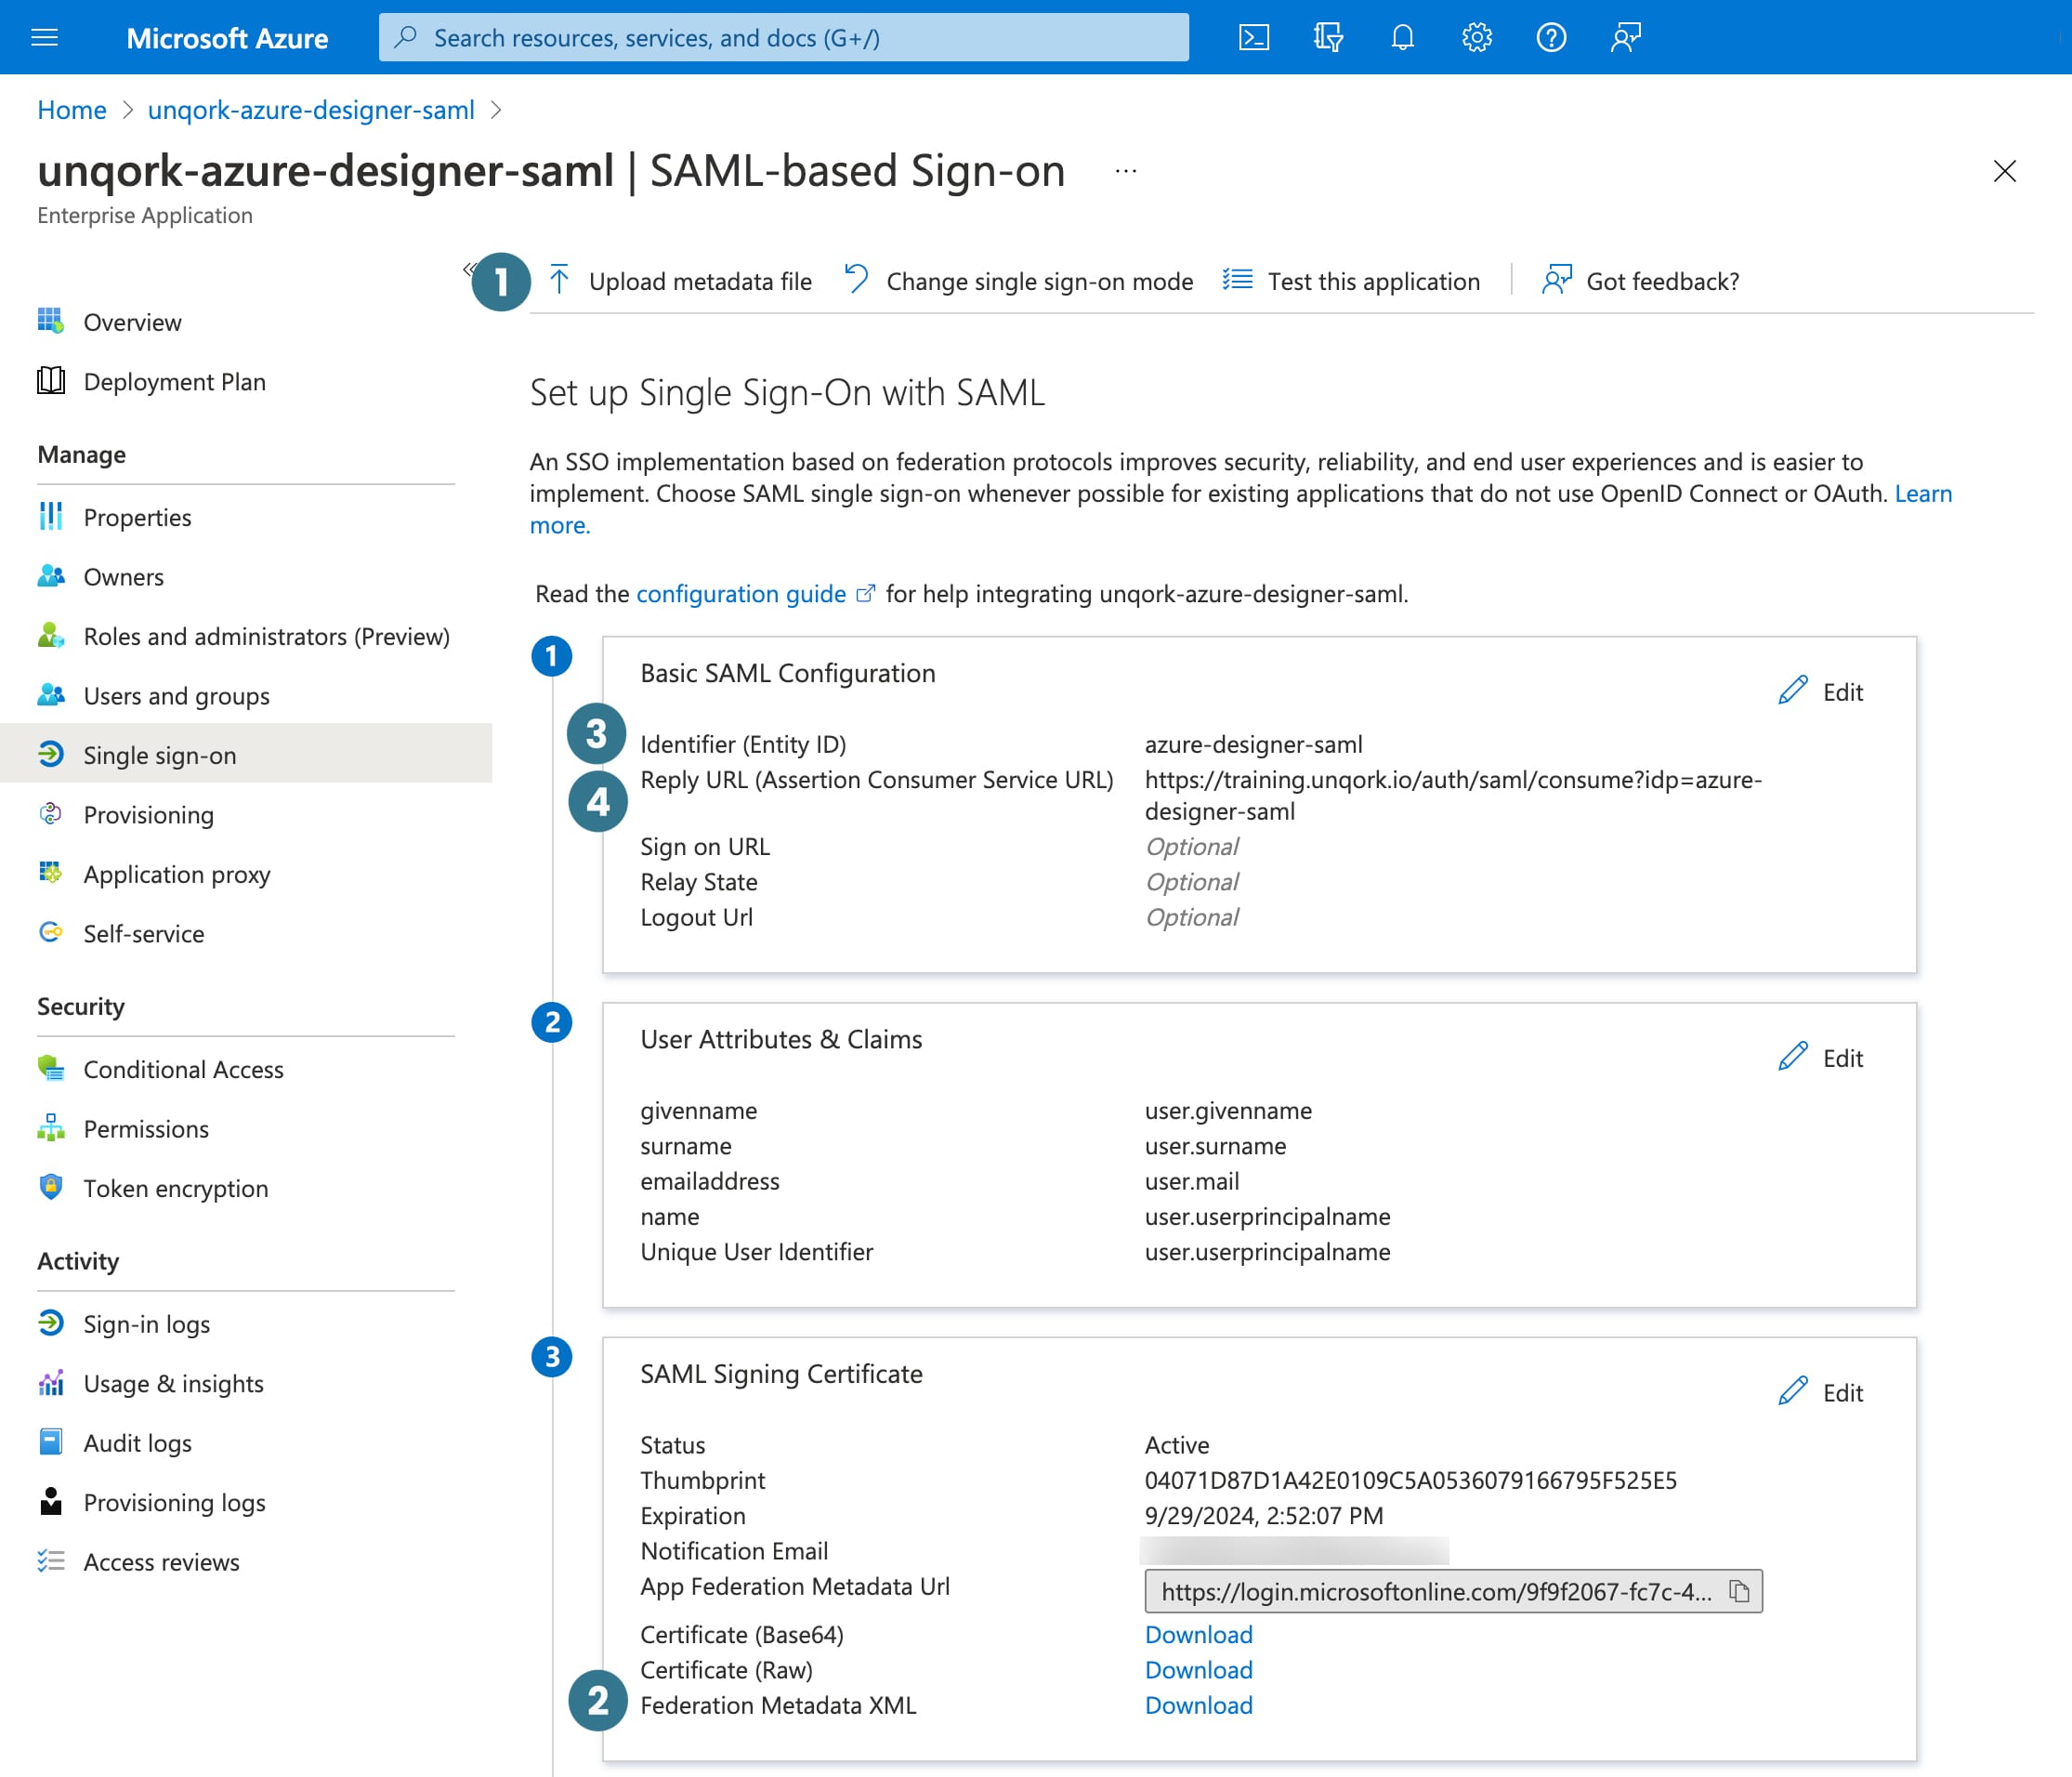
In the following table and images, you can see how key SAML configuration settings in Microsoft Entra ID map to the SAML configuration fields in Unqork.
| # | Unqork Setting | Related Microsoft Entra ID Setting |
|---|---|---|
|
1 |
Copy Metadata URL This setting location is where you copy the URL of the SP metadata XML file. |
Upload Metadata File This Azure setting location is where you upload the SP metadata XML file. |
|
2 |
IdP Metadata XML This setting location is where you insert the IdP metadata XML data. |
Federation Metadata XML This Azure setting location is where you download the IdP metadata XML file. |
|
3 |
SAML SP Entity ID |
Identifier (Entity ID) |
|
4 |
SAML Callback URL |
Reply URL (Assertion Consumer Service URL) Be sure the URL shows the Designer-specific host value. For example unqork-uat.unqork.io, not unqork-uatx.unqork.io. |

Setting Up Microsoft Entra ID as a SAML Configuration in Single Sign-On (SSO) Management
This is a step-by-step walkthrough of how to set up Microsoft Entra ID as a SAML configuration. This approach ensures Microsoft Entra ID is the single source of truth for your end-user's permissions.
To learn more about all the SAML configuration settings in Single Sign-On (SSO) Management, view our Unqork as a SAML Service Provider article. To learn more about using the Single Sign-On (SSO) Management dashboard, view our Single Sign-On (SSO) Management article.
What You Need
For this sample configuration, you need the following information:
-
The IdP metadata XML file (SAML metadata) from Microsoft Entra ID.
In some cases, the Microsoft Entra ID administrator requests the SP metadata XML file before they provide the IdP metadata XML file. To learn how to generate a placeholder SP metadata XML file, see the Provide Microsoft Entra ID With a Placeholder SP metadata XML File section.
-
A list of SAML attributes to map to Unqork attributes.
Your specific values vary based on your use case. Work with the Microsoft Entra ID administrator to ensure both sides are clear on what information your application needs to access.
Start the Configuration
| 1. | At the top right of the Unqork Designer Platform, click the Settings drop-down. |
| 2. | Click Administration. |
| 3. | Under Environment, select Single Sign-On (SSO). |
| 4. | Click + New SSO. |
| 5. | From the + New SSO drop-down, select Designer. |
Basic Information Tab
The Basic Information tab is the first tab you see when the New Designer SSO configuration modal opens. In this tab, name your configuration and assign user permissions.
| 1. | In the SSO Name field, enter a unique name for your configuration. |
This name is used to generate the default SP Entity ID.
| 2. | In the Default Role drop-down, select a role. |
When setting up SSO for Designer, select a default role with the lowest-level permissions. This lets you rely on the value stored in Okta to determine higher-level permissions.
| 3. | Click Next. |
You progress from the Basic Information tab to the Configure Protocol tab.
Configure Protocol Tab
Now, select the SAML protocol from the Configure Protocol tab. Then, add the IdP metadata XML file you received from Microsoft Entra ID. Once added, the XML file is automatically parsed and used to autofill related configuration fields.
| 1. | Select SAML as the Protocol. |
| 2. | In a text editor, open the IdP metadata XML file provided by Microsoft Entra ID. |
| 3. | In the IdP Metadata XML field, copy and paste the contents of the file. |
The SAML IdP NameID Format, SAML IdP SSO URL, and SAML IdP X.509 Certificate fields autofill. If the metadata is incorrect, an error message displays asking you to check the XML.
The SAML IdP NameID Format field is optional. The default value for this field is urn:oasis:names:tc:SAML:1.1:nameid-format:emailAddress. The NameID is a unique identifier that matches an end-user across multiple Unqork sessions.
| 4. | In the SAML SP Entity ID field, enter a value. |
This value must match the value used by the IdP. If you're asked to define the Entity ID, use a value that relates to your configuration. For example, {environment name and codebase}-{application name}-saml. The Microsoft Entra ID administrator might also have their own preferred Entity ID naming conventions.
| 5. | You can leave the default value for the SAML Callback URL field unless the Microsoft Entra ID app integration uses a different value. |
| 6. | Click Next. |
You progress from the Configure Protocol tab to the Attribute Mapping tab.
To learn more about all the SAML configuration settings in Single Sign-On (SSO) Management, view our Unqork as a SAML Service Provider article. To learn more about using the Single Sign-On (SSO) Management dashboard, view our Single Sign-On (SSO) Management article.
Attribute Mapping Tab
Next, map attributes in the IdP response to custom Unqork attributes. Mapping attributes help validate an end-user by their user ID, email address, or any other attribute you want to map. It's important to note that you must use Nunjucks in the SAML side of the mapping.
By default, the Attribute Mapping tab includes the mapping {{NameID}} to userId. Do not delete this mapping or your SSO configuration can fail.
You can create dynamic, conditional, or static attribute mappings. See the Creating Attribute Mappings section in our Unqork as a SAML Service Provider article for more information and detailed examples.
To add an attribute mapping:
| 1. | Click + Add Attribute Mapping. |
| 2. | Complete the SAML Claim side of the mapping using Nunjucks. |
| 3. | From the Unqork Attribute drop-down, select a default Unqork attribute. Or, enter the attribute's name in the Unqork Attribute field then press Enter/Return or select Create {attribute name}. |
Unqork attributes include email, userId, name, and phone.
| 4. | Repeat the above steps as needed. |
To learn more about attribute mapping, see the Attribute Mappings section in our Unqork as a SAML Service Provider article.
User Management
These user management settings are more variable and highly dependent on your unique use case. However, in this configuration Microsoft Entra ID is the single source of truth for authentication. This means the user doesn't need to exist in Unqork, as Unqork isn't acting as the user management system. So, consider the following settings:
| 1. | Click Show User Management. |
| 2. | Verify Disable User Creation is selected. |
Don’t enable Disable User Creation if you plan to modify users via an API call in the platform. Enabling this setting prevents user modification using an API call.
| 3. | Click Create SSO. |
Verify the SSO configuration in Environment Administration matches the SSO configuration in Single Sign-On (SSO) Management. If you are encountering issues, visit the Troubleshooting Tips section below.
Your SSO configuration is now complete. The configuration modal closes and returns your focus to the Single Sign-On (SSO) Management dashboard.
Providing Azure With a Placeholder or Final SP Metadata XML File
There are two scenarios where you might need to provide the Microsoft Entra ID administrator with an SP metadata XML file:
-
Providing a placeholder XML file: The Microsoft Entra ID administrator requests the SP metadata XML file before they provide the IdP metadata XML file. Receiving the SP metadata XML file first lets the administrator configure the Microsoft Entra ID side of the SSO integration around Unqork's default settings or an Unqork-defined SAML SP Entity ID.
-
Providing a final XML file: The Microsoft Entra ID administrator requests the XML file after you complete your SSO configuration based on the IdP metadata XML file.
It's possible neither scenario occurs when you create your SSO configuration. However, this section covers how to proceed in both scenarios.
Provide Microsoft Entra ID With a Placeholder SP Metadata XML File
If the Microsoft Entra ID administrator requests the SP metadata XML file first, you can configure with a placeholder SP metadata XML file. To do this, you need to create a SAML configuration using Environment Administration.
To add a SAML configuration to your environment:
| 1. | At the top right of the Unqork Designer Platform, click the Settings drop-down. |
| 2. | Click Administration. |
| 3. | Under Environment, select Single Sign-On (SSO). |
| 4. | Click + New SSO. |
| 5. | From the + New SSO drop-down, select Designer. |
| 6. | In the SSO Name field, enter a unique name for your configuration. |
This name is used to generate the default SP Entity ID. Use a descriptive name that relates to your configuration. For example, {environment name and codebase}-{application name}-saml.
| 7. | Select a Default Role as needed. |
| 8. | Click Next. |
| 9. | From Select Protocol, select SAML. |
| 10. | Click Copy Metadata Url. |
The SP metadata XML file generates based on the current state of your SAML configuration. When generating the SP metadata XML file before parsing an IdP metadata XML file, the SP metadata XML file uses default configuration values.
| 11. | Open a new tab in your browser. |
| 12. | Paste the URL in the address bar and press Enter/Return. |
| 13. | Copy the XML from your browser tab into a text editor like Sublime Text. |
| 14. | Save the XML as a .xml file. |
Now you can send the SP Metadata XML file to the Azure administrator.
Provide Microsoft Entra ID With the Final SP Metadata XML File
If you already provided the Microsoft Entra ID administrator with a placeholder SP metadata XML file, you can skip this step. However, if you made any changes to your SAML configuration after receiving the IdP metadata XML file, you might need to resend the SP metadata XML file.
If you started your SAML configuration by parsing an IdP metadata XML file, you might need to provide the IdP with the SP metadata XML file.
To download the SP metadata XML file:
| 1. | From the Single Sign-On (SSO) Management dashboard, open your SSO configuration and navigate to the Configure Protocol tab. |
| 2. | Click Copy Metadata Url. |
| 3. | Open a new tab in your browser. |
| 4. | Paste the URL in the address bar and press Enter/Return. |
| 5. | Copy the XML from your browser tab into a text editor like Sublime Text. |
| 6. | Save the XML as a .xml file. |
Now you can send the SP metadata XML file to the Microsoft Entra ID administrator.
Testing Your Configuration
After providing Microsoft Entra ID with the SP metadata XML file, test the configuration.
You need to obtain a set of test credentials from the Microsoft Entra ID administrator. The test user must be assigned to the Enterprise Application in Microsoft Entra ID, on the Users and Groups page.
Testing an SP-Initiated Flow
From the SSO dashboard, you can preview the Unqork entrypoint and use a set of test credentials from your SSO provider to test the configuration.
To test the SP-initiated flow:
| 1. | At the top right of the Unqork Designer Platform, click the Settings drop-down. |
| 2. | Click Administration. |
| 3. | Under Environment, select Single Sign-On (SSO). |
| 4. | In the SSO dashboard, find the SSO configuration to preview. |
| 5. | Under the Actions column, click Manage. |
| 6. | From the Manage drop-down, right-click Preview. |
| 7. | Click Open Link in Incognito Window. |
With login successful, you're redirected to the default Unqork entrypoint URL of https://training.unqork.io/display/123. This URL isn't a valid Designer URL, so you won't gain access to Designer immediately. To load Workspaces, change the URL in the browser to https://<host>/#/workspaces, where <host> is the Designer-specific host value. For example, https://test.unqork.io/#/workspaces
If you see an error page, there are issues with your configuration. If you can successfully log in to Unqork and access Designer, your SAML configuration of Microsoft Entra ID as SSO provider is working.
Testing an IdP-Initiated Flow
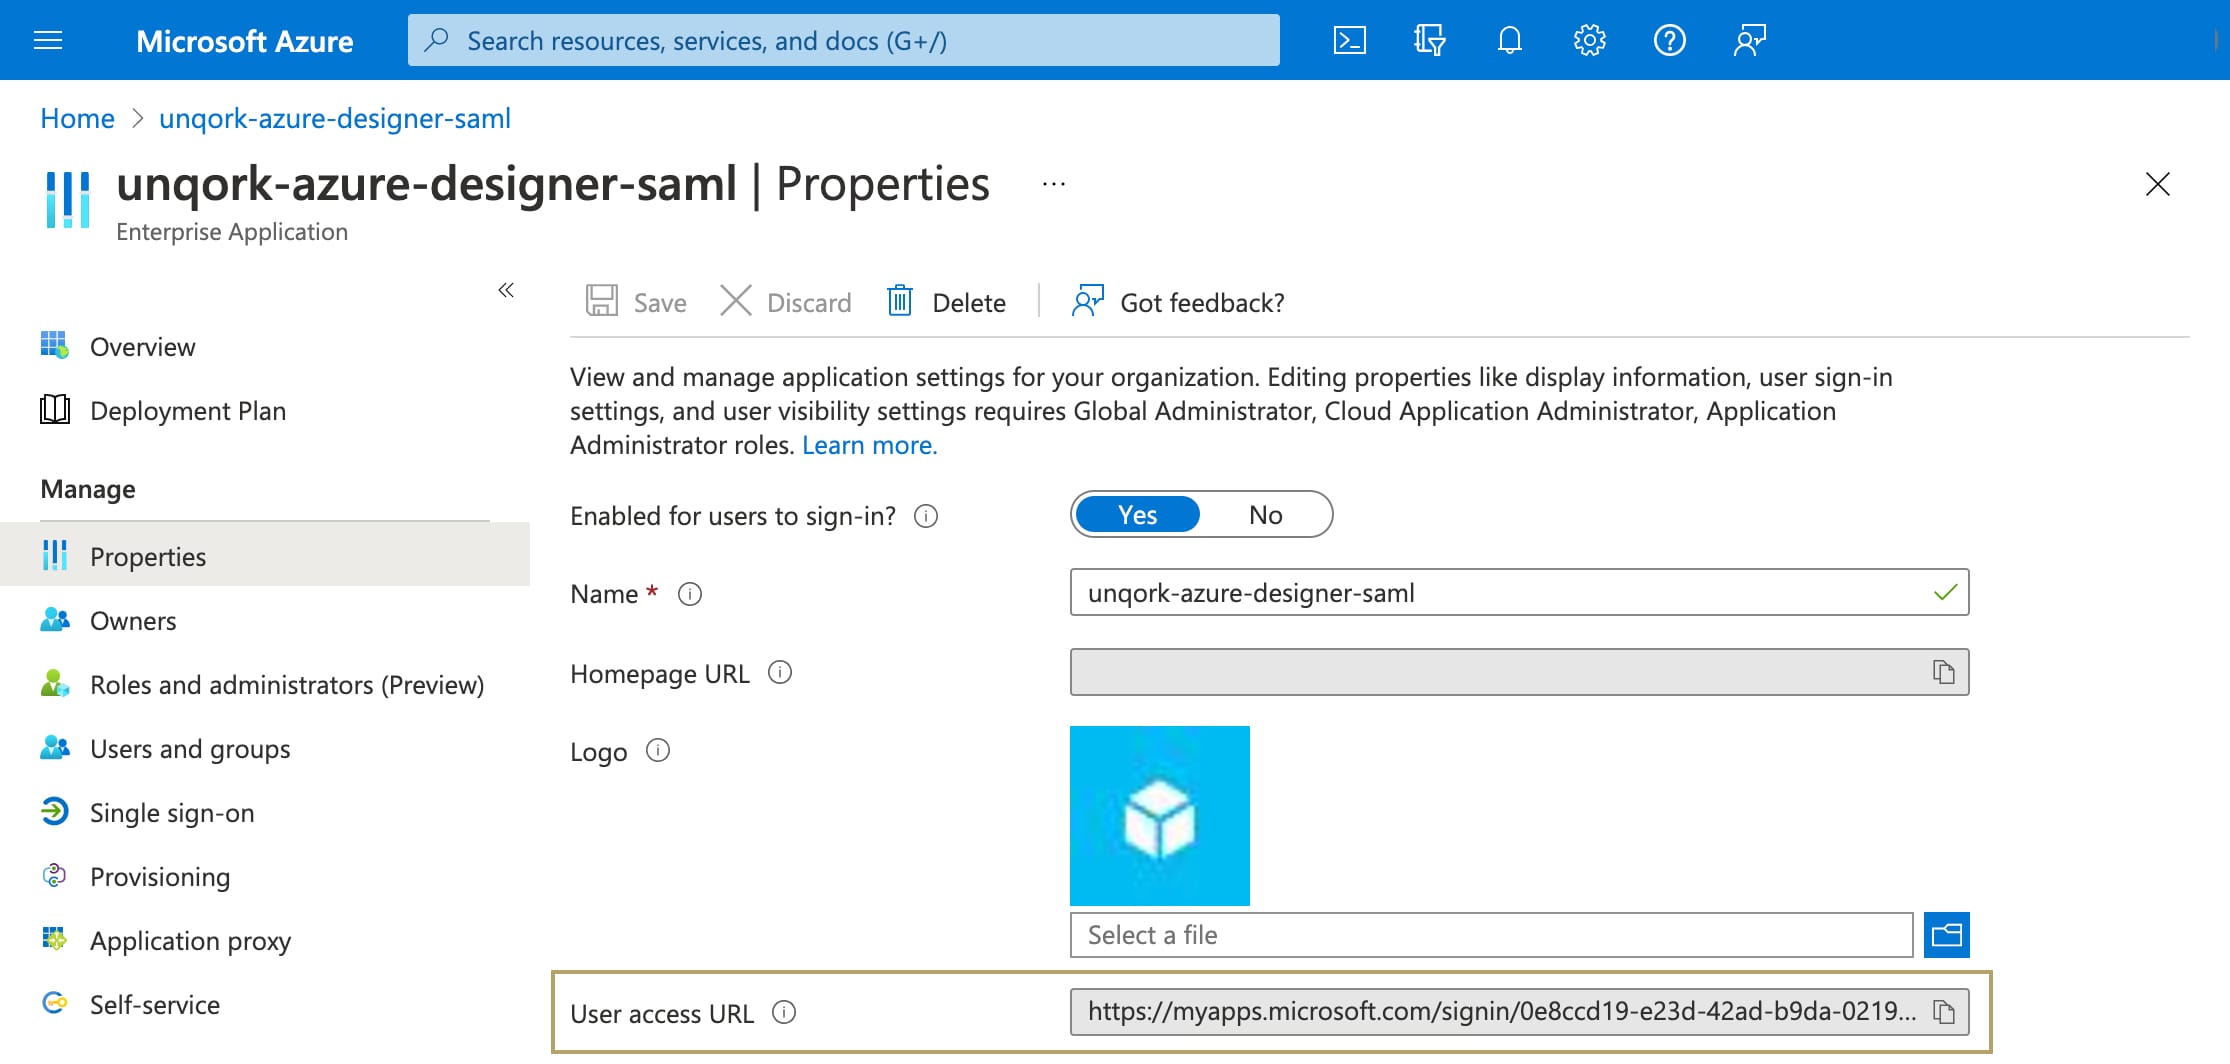
To test the IdP-initiated login flow, you need the User Access URL found in Microsoft Entra ID.
| 1. | In Microsoft Entra ID, open your Enterprise Application. |
| 2. | Navigate to the Properties page. |
| 3. | In the User Access URL field, copy the value. |
| 4. | Open a new Incognito window of your browser. |
| 5. | Paste the User Access URL into the browser. |
| 6. | Log in using your test credentials. |
If you see an error page, there are issues with your configuration. If you can successfully log in to Unqork, your SAML configuration of Microsoft Entra ID as SSO provider is complete.
Troubleshooting Tips
Understanding what's causing an error is one of the most frustrating parts of creating a new configuration. Some of the most common sources of error include:
-
Not using the Designer-specific host value in the SAML Callback URL field.
-
Not removing the default namespace from claims sent as part of the SAML assertion. If the namespace is included, Unqork might have trouble decoding the assertion.
To remove the namespace from claims in Microsoft Entra ID:
| 1. | In Microsoft Entra ID, open your Enterprise Application. |
| 2. | Navigate to the Single Sign-On page. |
| 3. | On the User Attributes & Claims tile, select the Edit button. |
| 4. | Select a claim from the claims list. |
| 5. | From the Namespace field, remove the default value. |
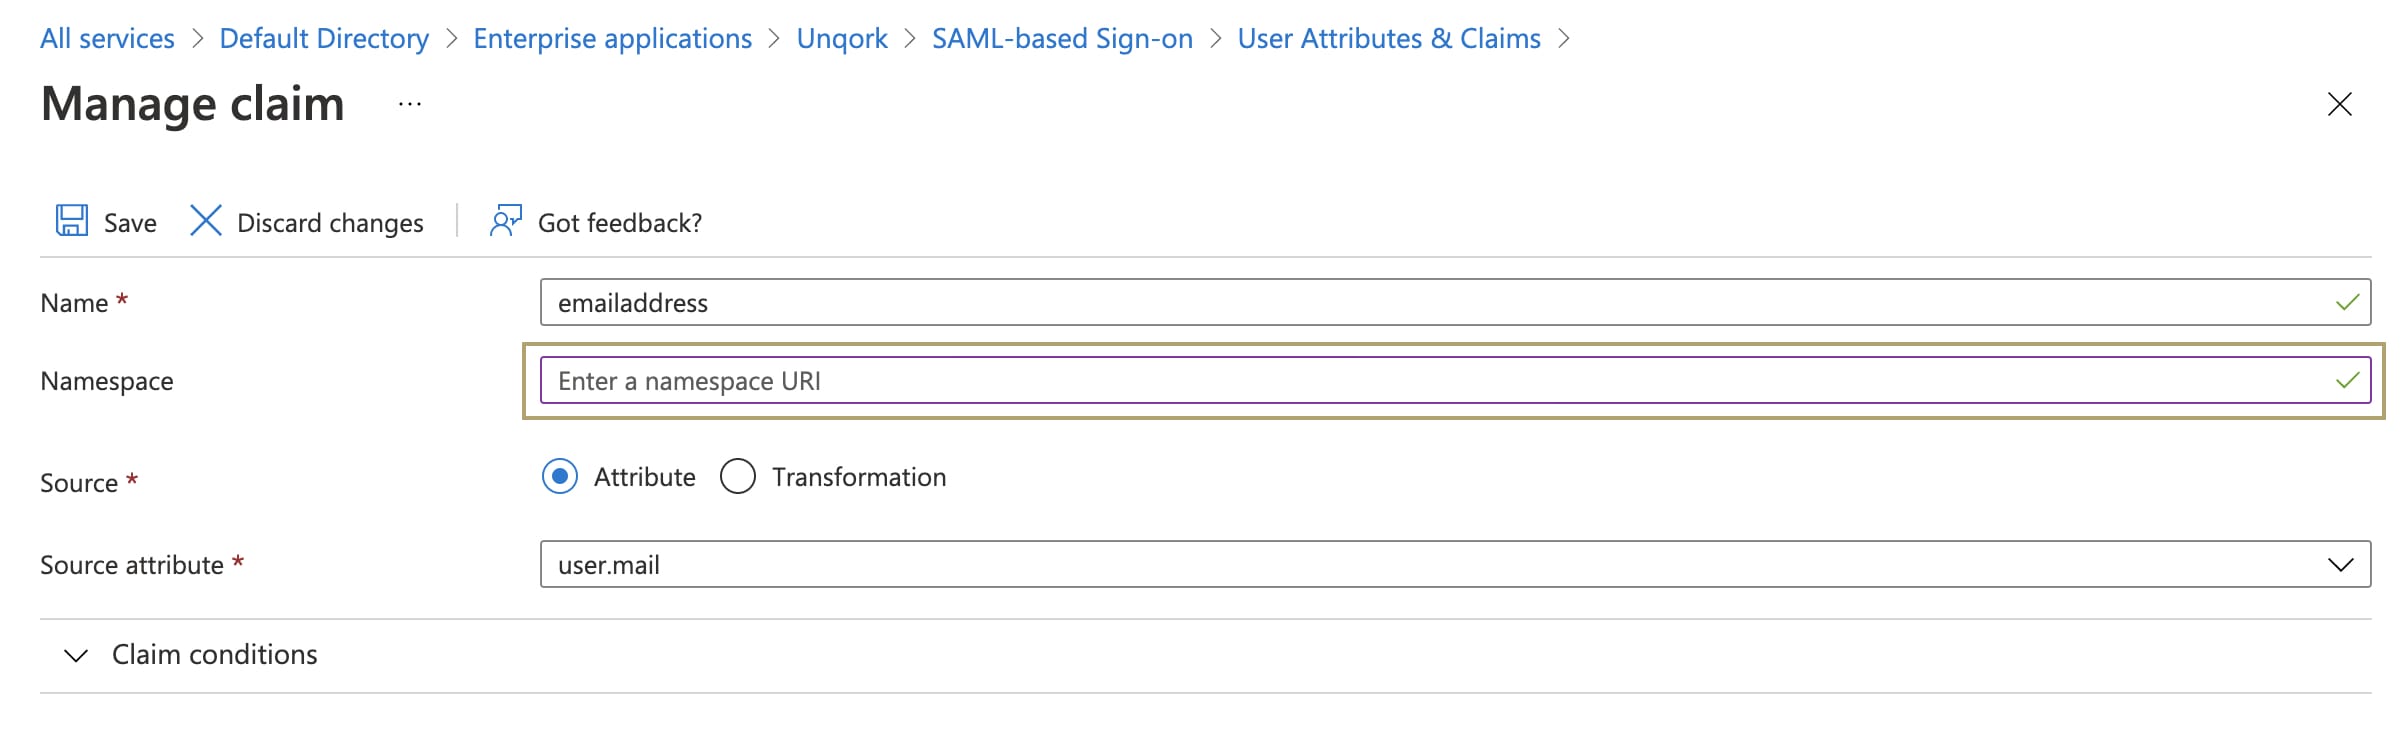
| 6. | Click Save. |
| 7. | Repeat for other claims included in the assertion. |
To figure out what exactly is wrong, it's useful to view what assertions your application receives from Microsoft Entra ID. Assertions aren't logged in Service Logs. Instead, you can use Google Chrome extensions such as SAML Chrome Panel or SAML Message Decoder for this. Comparing the assertions you receive against the assertions you expect can help with debugging.
