Overview
Iterators often handle only one element of an array at a time. So how can you repeat the same process for every row in an array? To do that, use a looping Data Workflow.
What You'll Learn
In this how-to guide, you’ll learn what a looping Data Workflow is and how to build one.
What is a Looping Data Workflow?
Looping Data Workflows let you perform operations on consecutive rows of an array. Before diving into the details of building a looping Data Workflow, take a look at a situation in which you'd use one.
Imagine you have a list of clients you need to email a renewal notice. You might have that list in a table like this:
clientName | clientEmail | product | renewalPrice |
|---|---|---|---|
Chelsea | chelsea@therainbowcompany.com | Many Hue | $1,999 |
Noor | noor@thebuildingcompany.com | Construct It | $3,500 |
Jadzia | jadzia@thebigcompany.com | Oversize | $70,000 |
Alejandro | alejandro@thestartup.com | Grow Up | $1,000 |
But you don't want to send a generic email to every person on your list. Instead, you want to send a personalized email that follows this template:
To: {{clientEmail}}
Hello {{clientName}},
This is a notification that your product license for {{product}} will renew next year for {{renewalPrice}}. Please reach out to your account manager if you have any questions.
Best,
Our Company Services
To do this by hand, you'd go through these steps:
Look at the list of clients, seeing who needs to be emailed.
Get the necessary details from the first row.
Fill in and send the email to the first client.
Return to the list and see if others need to be emailed.
Repeating steps 2 through 4 until each client on the list has been emailed.
To see how this works in Unqork, look at the following diagram.
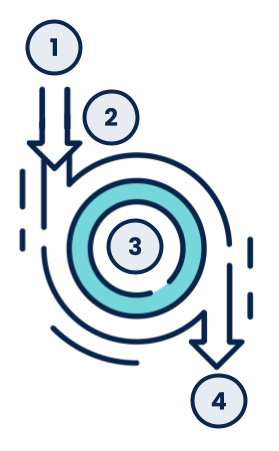
Here, 1 is some form of input. In our example, this would be a table holding your client data. And 2 is some form of logic to check which row is next. In our case, this checks for which index in your table is next. Data from the next index is sent into the operation. That operation is 3 in the above diagram. In our case, this would be sending an email to your client. At step 2, if there are no additional indexes to process, the loop finishes. That leads to step 4.
Now, build out the example. This configuration can seem complex, but keeping in mind the 5 steps you'd take to send these emails manually can help. So, refer to these as you build the process out.
Here's how your module will look in the Module Builder:

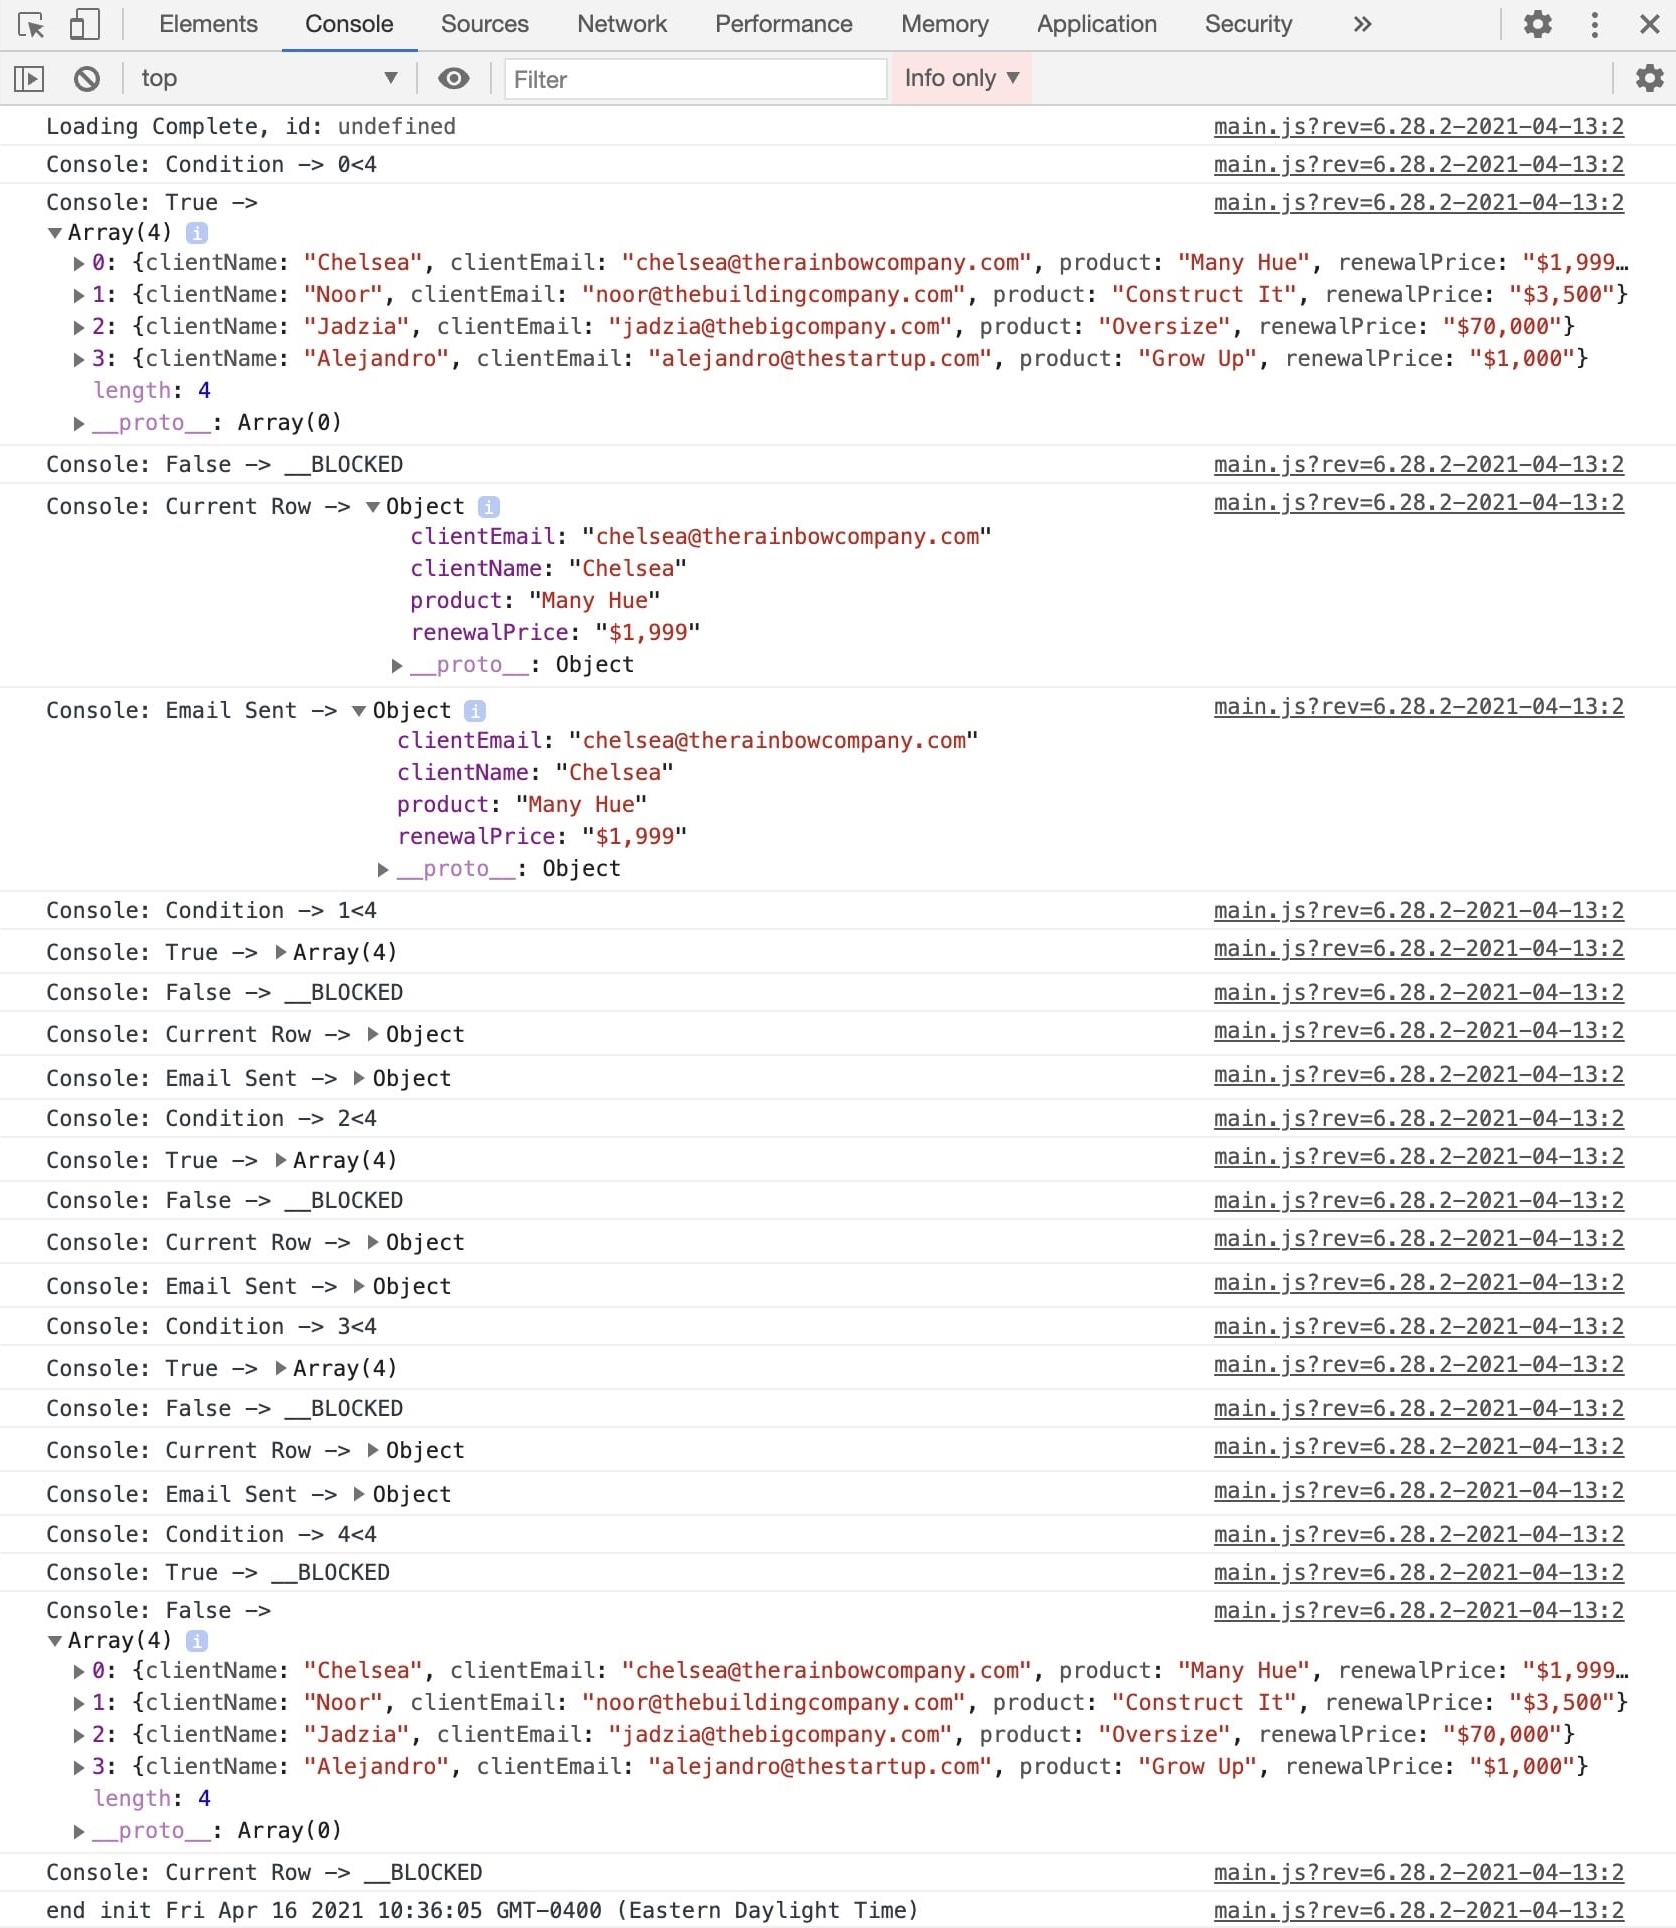
Your completed how-to won't show anything in Express View because the loop happens behind the scenes. So, you only see activity in the DevTools Console. Here's how that looks:
What You Need
For this how-to, you'll need:
To set up your first Data Workflow, you'll need:
To set up your second Data Workflow, you'll need:
These instructions assume you have a new module open, saved, and with a title.
Building and Configuring a Looping Data Workflow
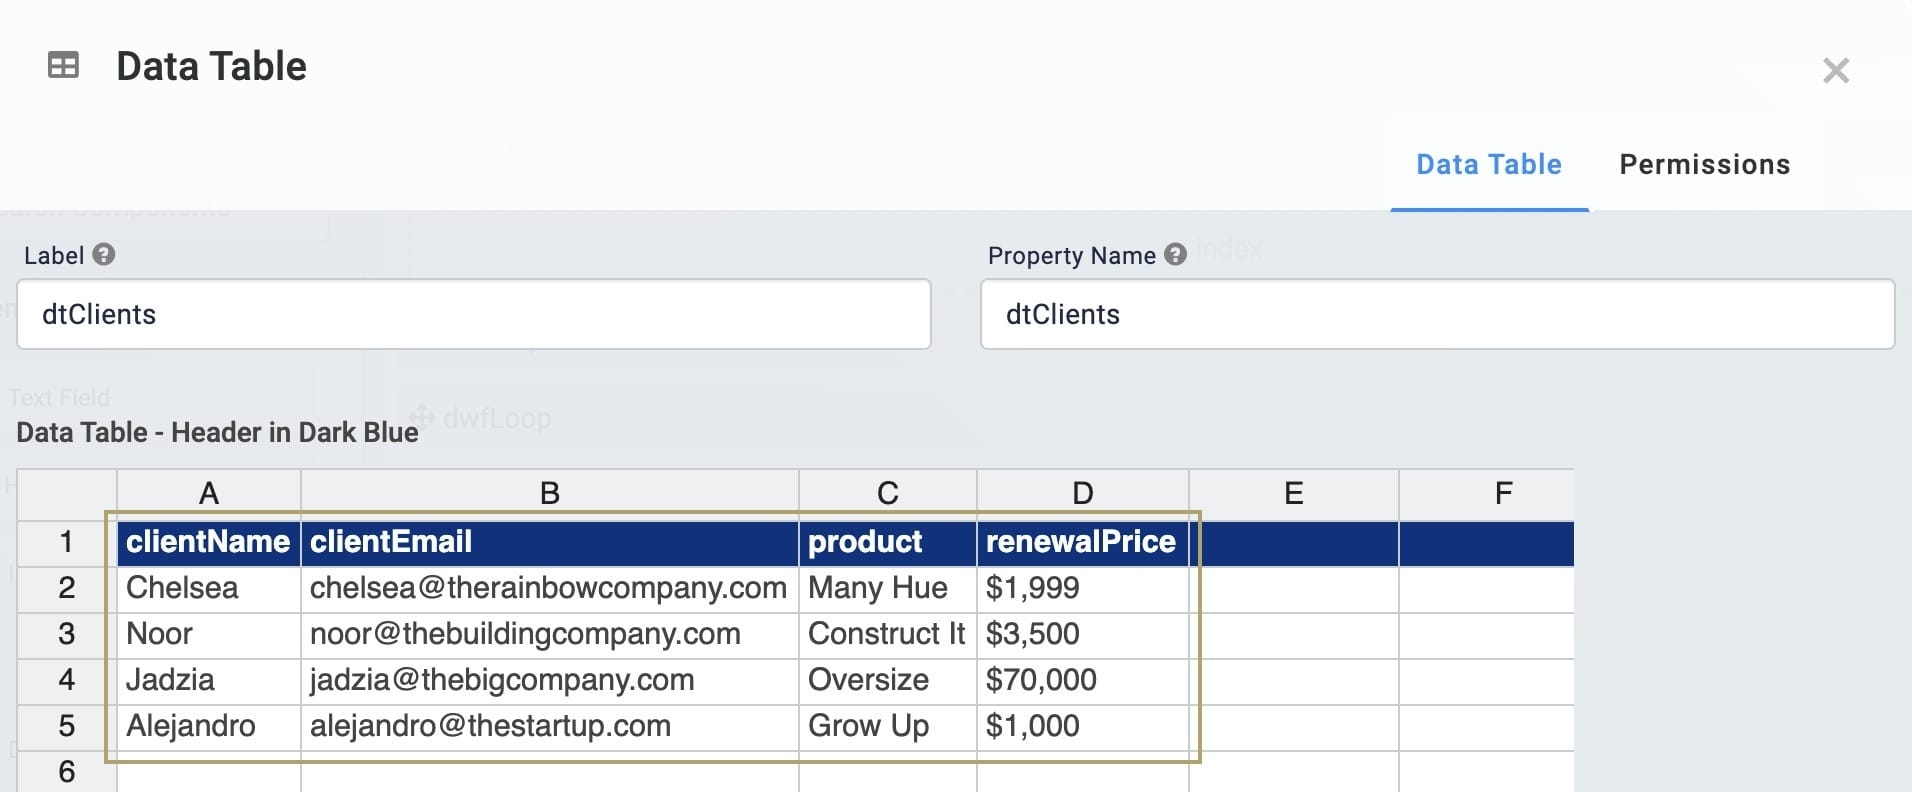
Configure the Data Table Component
To send your emails, you need a list of clients. To hold this in Unqork, use a Data Table. You'd reference this yourself if you were sending emails manually. To run the process in Unqork, configure the rest of your components to reference this table.
Drag and drop a
.png) Data Table component onto your canvas.
Data Table component onto your canvas.Enter dtClients in the Label and Property Name fields.
In the data table, enter the following:
clientName
clientEmail
product
renewalPrice
Chelsea
chelsea@therainbowcompany.com
Many Hue
$1,999
Noor
noor@thebuildingcompany.com
Construct It
$3,500
Jadzia
jadzia@thebigcompany.com
Oversize
$70,000
Alejandro
alejandro@thestartup.com
Grow Up
$1,000
Click Save & Close.
Configure the First Hidden Component
When sending emails by hand, you would work your way down your list one row at a time. As a free-thinking human, you're able to recognize where you left off each time you refer back to your list. To automate the process, give your application a little help. Each row in your table has a number assigned to it. That number is called the index. Use a Hidden component to add a place for your application to keep track of which row it last processed. Indexes start at 0, indicating the first row. So, set the Default Value to 0. Later, add logic that adds to this as your emails are sent.
Drag and drop a Hidden component onto your canvas. Place your Hidden component below your Data Table.
Enter index in the Property ID and Canvas Label Text fields.
Enter 0 in the Default Value field.
Click Save.
Configure the First Data Workflow Component
Next, start building out your loop. You manage that with a Data Workflow component. The configuration here looks complex, but each operator's purpose is explained in these directions as you add it. Remember to keep in mind the 5 steps you'd use to complete this process by hand as you build out your Data Workflow.
Drag and drop a Data Workflow component onto your canvas. Place your Data Workflow below your Hidden component.
Enter dwfLoop in the Canvas Label Text and Property Name fields.
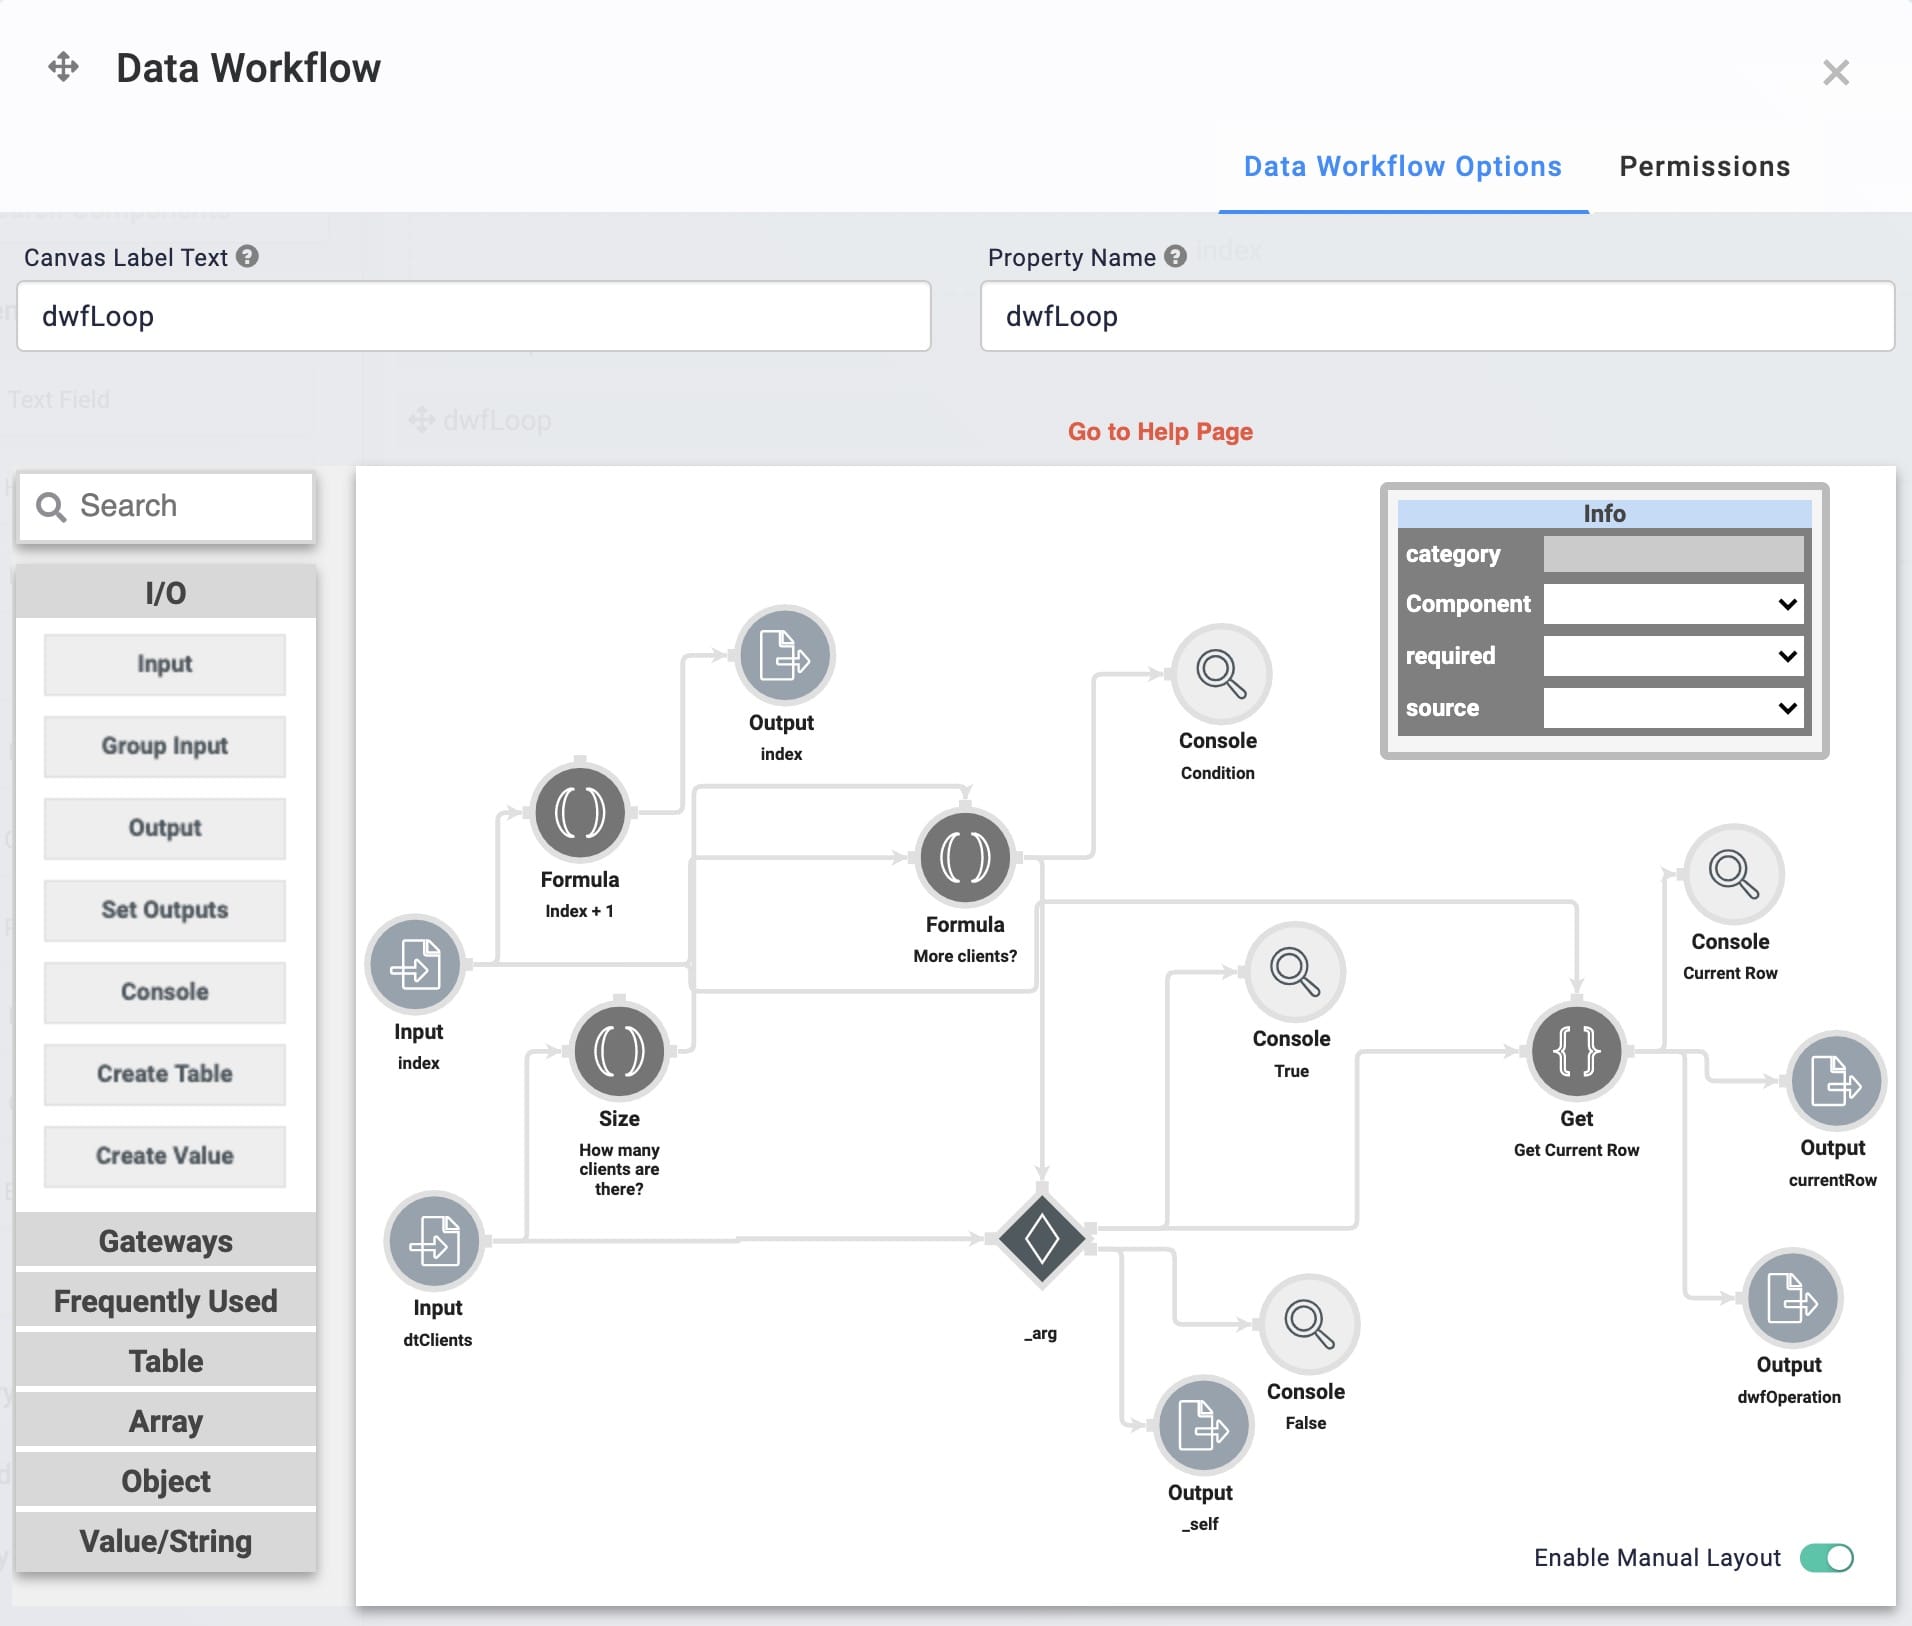
This image shows how your Data Workflow looks at the end of this configuration. You'll add some operators shown here later.
Configure the First Input Operator
This Input operator references your index Hidden component. This is how your Data Workflow knows which row in your data table needs to be processed next.
Drag and drop an Input operator onto your Data Workflow canvas.
Configure the Input operator's Info window as follows:
Setting
Value
Category
Input
Component
index
Required
Yes
Source
Default
Configure the First Formula Operator
This Formula operator adds 1 to the index of the previous row processed. This is how your Data Workflow notes that it's processed each row for when the loop comes back around. The formula =SUM(A,1) takes the value passed to the operator (A) and adds 1 to it.
Using A acts as an alias for values entering an operator's input port.
Drag and drop a Formula operator onto your Data Workflow canvas.
Configure the Formula operator's Info window as follows:
Setting
Value
Category
Formula Value
Label
Index + 1
Formula/Expression
=SUM(A,1)
Connect the output port (right) of the Input operator to the input port (left) of the Formula operator.
Configure the First Output Operator
This Output operator replaces the value in your index Hidden component with the result of your Formula operator. If you didn't do this, your Data Workflow would always process the row at index 0 because that's the Hidden component's Default Value. Now with each loop of the Data Workflow, the value coming into the index Input operator increases by 1.
Drag and drop an Output operator onto your Data Workflow canvas.
Configure the Output operator's Info window as follows:
Setting
Value
Category
Output
Component
index
Action
value
Connect the output port (right) of the Formula operator to the input port (left) of the Output operator.
Configure the Second Input Operator
This Input operator is what brings your actual client data into your Data Workflow.
Drag and drop another Input operator onto your Data Workflow canvas.
Configure the Input operator's Info window as follows:
Setting
Value
Category
Input
Component
dtClients
Required
Yes
Source
Default
Configure the Size Operator
When sending your emails manually, you could easily tell when you're done. You know when you run out of data because you can see the end of your list. For your Data Workflow to know when your data ends, use a Size operator to count how many objects are in the array. Or, in other words, how many clients are in your list.
Drag and drop a Size operator onto your Data Workflow canvas.
Configure the Size operator's Info window as follows:
Setting
Value
Category
Size
Label
How many clients are there?
Connect the output port (right) of the dtClients Input operator to the input port (left) of the Size operator.
Configure the Second Formula Operator
This Formula operator creates an expression stating that the value in your index Hidden component is less than the value found by your Size operator. So, use the formula =CONCATENATE(A,"<",_arg) to do that. Here, A is the value in your index Hidden component. And _arg is the value found by your Size operator. Later, use a Decision operator to find whether this statement is true or not.
Drag and drop another Formula operator onto your Data Workflow canvas.
Configure the Formula operator's Info window as follows:
Setting
Value
Category
Formula Value
Label
More clients?
Formula/Expression
=CONCATENATE(A,"<",_arg)
Connect the output port (right) of the index Input operator to the input port (left) of the Formula operator.
Connect the output port (right) of the Size operator to the argument port (top) of the Formula operator.
Configure the First Console Operator
Add several Console operators during this configuration. These come in handy so you can see what's happening behind the scenes. You can reference these in the DevTools Console in Express View for troubleshooting purposes. This Console lets you view the result of your More Clients? Formula operator.
Drag and drop a Console operator onto your Data Workflow canvas.
Configure the Console operator's Info window as follows:
Setting
Value
Category
Console
Label
Condition
Connect the output port (right) of the More clients? Formula operator to the input port (left) of the Console operator.
Configure the Decision Operator
The Decision operator decides whether there are more emails to send. It does this by looking at the expression created by your More clients? Formula operator. If this expression is true, the Decision passes your data through the upper output port. If this expression is false, the Decision passes your data through the lower output port. So, your dtClients serves as the input here and your More clients? Formula operator serves as the argument.
Take a moment to understand why you're having the Decision operator check whether the statement A<_arg is true. You need a way to tell your Data Workflow when to stop the loop. It should stop when there are no more rows to process in your Data Table. So, you're creating a way for the Data Workflow to check if the number stored in the index Hidden component is less than the total number of rows in the table. That's what A<_arg represents here.
After the first loop of the Data Workflow, the value stored in the index Hidden component is 1. So, on the next loop, the Data Workflow processes the second row of the table (index 1). After your Data Workflow processes the 4th and final row of the table, the value stored in the index Hidden component is 4. This is no longer less than 4, so on the next loop, the Decision operator evaluates the A<_arg statement as false. You now have a pathway to stop the Data Workflow when the statement is false.
Drag and drop a Decision operator onto your Data Workflow canvas.
Configure the Decision operator's Info window as follows:
Setting
Value
Category
Decision
Input List
Condition
_arg
Connect the output port (right) of the dtClients Input operator to the input port (left) of the Decision operator.
Connect the output port (right) of the More clients? Formula operator to the argument port (top) of the Decision operator.
Configure the Second Console Operator
This is the second Console in this configuration. This Console lets you see when your Decision passes data through the upper input port.
Drag and drop another Console operator onto your Data Workflow canvas.
Configure the Console operator's Info window as follows:
Setting
Value
Category
Console
Label
True
Connect the upper output port (right) of the Decision operator to the input port (left) of the True Console operator.
Configure the Third Console Operator
This is the third Console in this configuration. This Console lets you see when your Decision passes data through the lower input port.
Drag and drop another Console operator onto your Data Workflow canvas.
Configure the Console operator's Info window as follows:
Setting
Value
Category
Console
Label
False
Connect the lower output port (right) of the Decision operator to the input port (left) of the False Console operator.
Configure the Get Operator
Once you've determined if there are more emails to send, your next step is to get the data needed to send the next email. For your Data Workflow to do that, you need a Get operator. Connect this to your Decision operator so your dtClients data passes through. And set your index Input operator as the argument. Using this as your argument reminds the Get operator which row of your table is next. The Get operator then retrieves the data found at that index.
Drag and drop a Get operator onto your Data Workflow canvas.
Configure the Get operator's Info window as follows:
Setting
Value
Category
Get
Label
Get Current Row
Path
[_arg]
Connect the upper output port (right) of the Decision operator to the input port (left) of the Get operator.
Connect the output port (right) of the index Input operator to the argument port (top) of the Get operator.
Configure the Fourth Console Operator
This is the fourth Console in this configuration. This Console lets you see when the Get operator retrieves the data.
Drag and drop another Console operator onto your Data Workflow canvas.
Configure the Console operator's Info window as follows:
Setting
Value
Category
Console
Label
Current Row
Connect the output port (right) of the Get operator to the input port (left) of the Current Row Console operator.
Click Save.
Configure the Second Hidden Component
Before configuring the rest of your Data Workflow, add a place to store its result. Use another Hidden component for that. This Hidden component stores each row of data as it's retrieved by your Get operator. Your loop overwrites this each time it runs. So, this only holds the row you're currently emailing.
Drag and drop a Hidden component onto your canvas. Place your Hidden component below your Data Workflow.
Enter currentRow in the Property ID and Canvas Label Text fields.
Click Save.
Update the First Data Workflow Component
Now that you have a Hidden component to hold your output, add it to your Data Workflow. This tells your Get operator where to store the data it retrieves. You reference this data in a separate Data Workflow later. That second Data Workflow processes your actual operation. In this how-to, that's where you'd actually send your emails. This first Data Workflow only manages your loop.
Hover over the dwfLoop Data Workflow.
A 5-button toolbar appears above the component on hover-over.
Using the toolbar, click the
.png) (Settings) button.
(Settings) button.
Configure the Second Output Operator
This Output operator shows your Get operator where to store the data it retrieves. So, select the currentRow Hidden component you just added.
Drag and drop another Output operator onto your Data Workflow canvas.
Configure the Output operator's Info window as follows:
Setting
Value
Category
Output
Component
currentRow
Action
value
Connect the output port (right) of the Get operator to the input port (left) of the currentRow Output operator.
Click Save.
Configure the Second Data Workflow Component
Now that you have your loop configured, you can set up a Data Workflow to perform your operation. In this how-to, this is where you would configure your emailing process.
This article is focused on the looping aspect of a Data Workflow. Focus on what's needed in this second Data Workflow so your loop runs.
Drag and drop another Data Workflow component onto your canvas. Place your Data Workflow below your currentRow Hidden component.
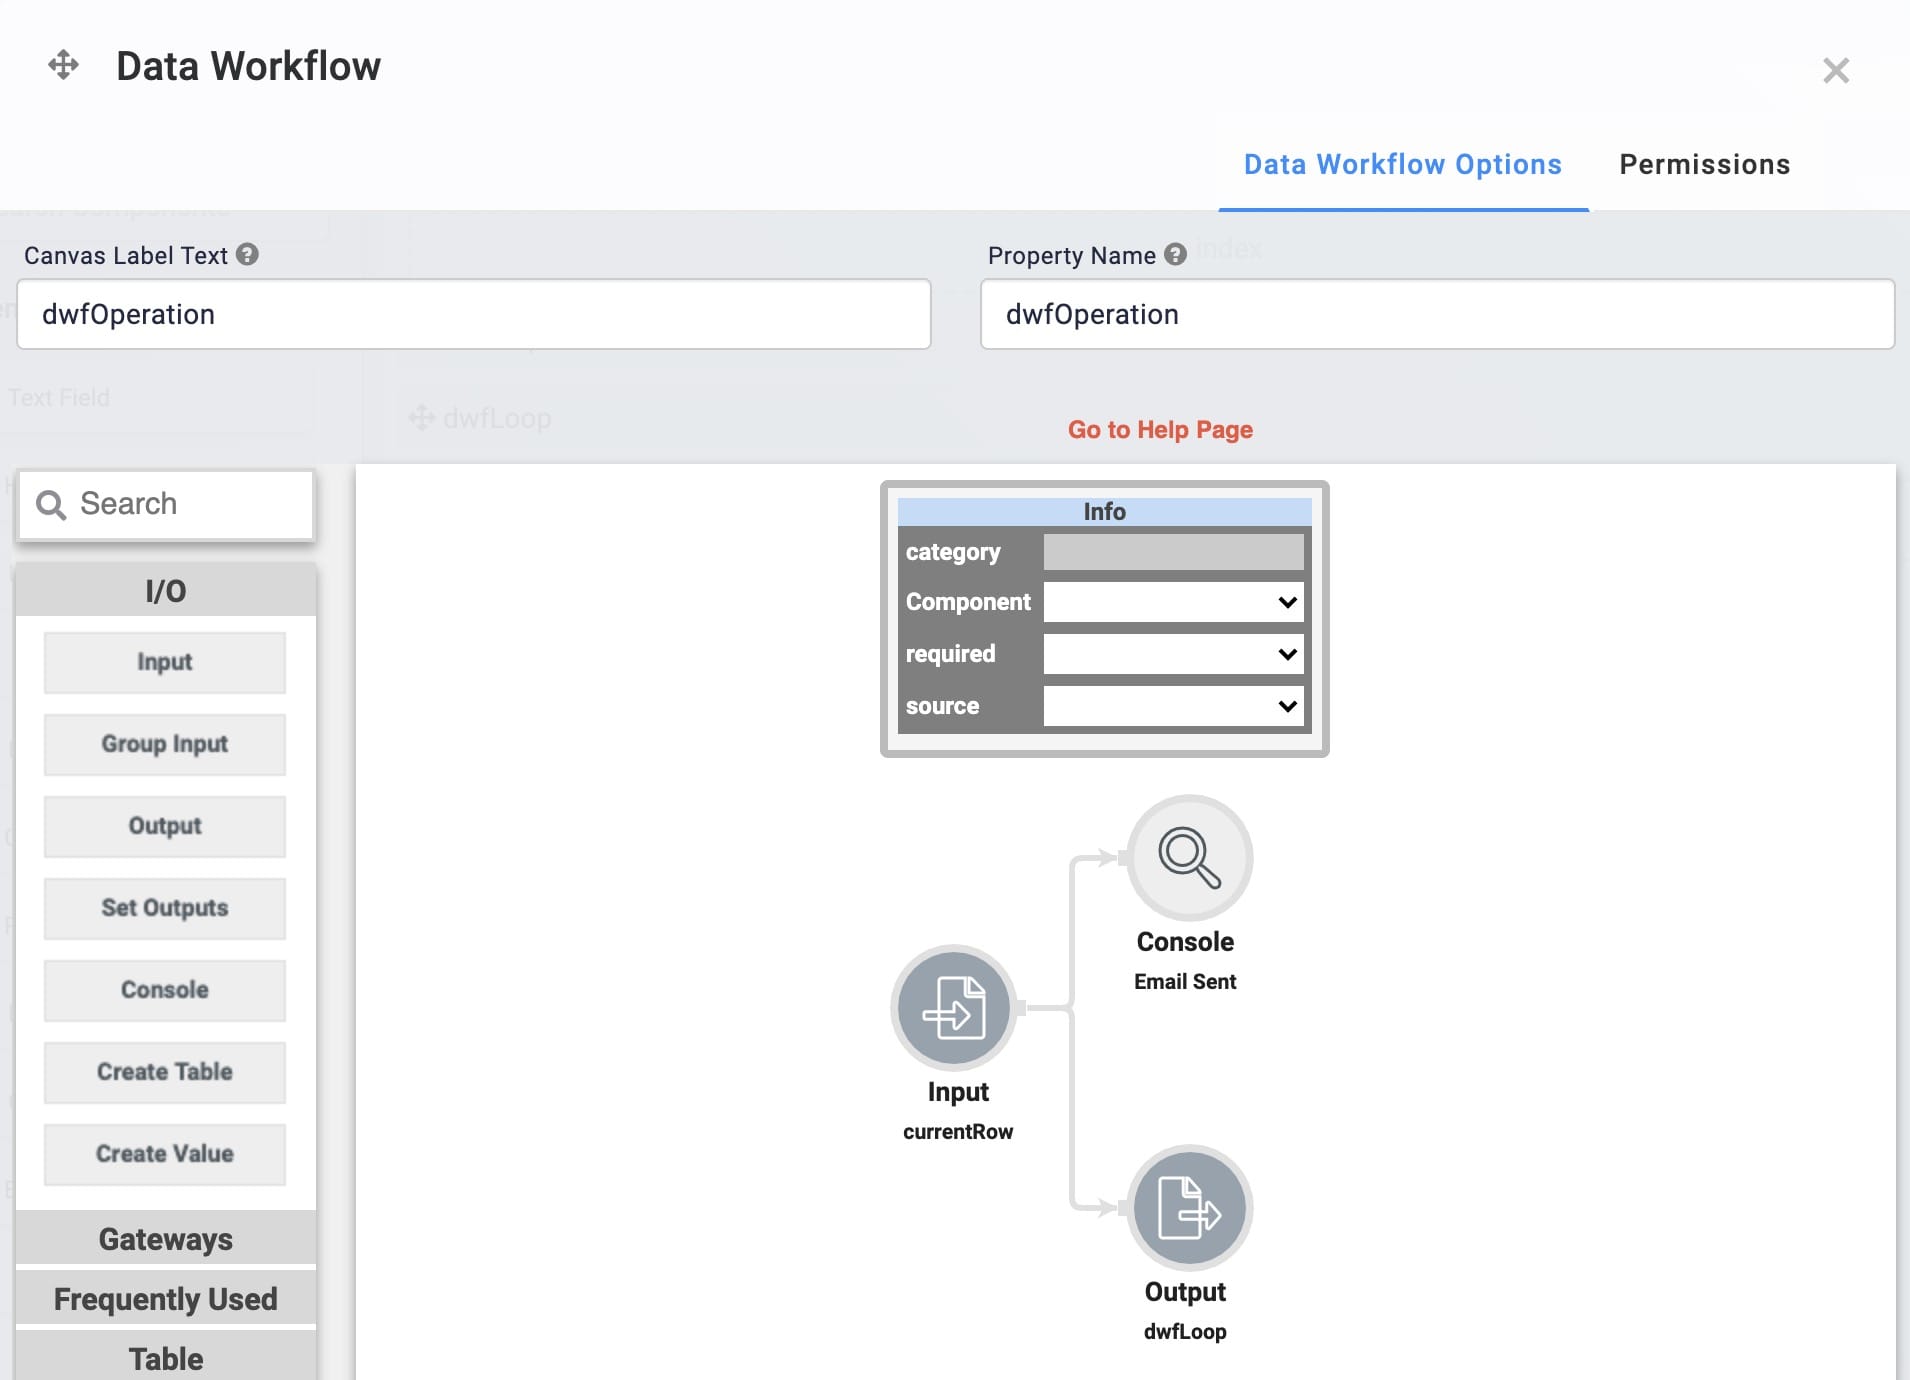
Enter dwfOperation in the Canvas Label Text and Property Name fields.
Configure the Input Operator
This Input operator brings in the data stored in your currentRow Hidden component. When sending your emails, you would reference this instead of your larger data table. That's because this Hidden component holds only the data for one client at a time.
Drag and drop an Input operator onto your Data Workflow canvas.
Configure the Input operator's Info window as follows:
Setting
Value
Category
Input
Component
currentRow
Required
Yes
Source
Default
Configure the Console Operator
This is the only Console operator added in this Data Workflow. This Console lets you see the data pulled into your Data Workflow from the currentRow Hidden component.
Drag and drop a Console operator onto your Data Workflow canvas.
Configure the Console operator's Info window as follows:
Setting
Value
Category
Console
Label
Email Sent
Connect the output port (right) of the Input operator to the input port (left) of the Console operator.
Configure the Output Operator
If you were sending your emails manually, you would know to return to your list once you've sent an email. Your application won't know that on its own. So, add an Output operator here to trigger your first Data Workflow to run again once an email is sent.
Drag and drop an Output operator onto your Data Workflow canvas.
Configure the Output operator's Info window as follows:
Setting
Value
Category
Output
Component
dwfLoop
Action
trigger
Connect the output port (right) of the Input operator to the input port (left) of the Output operator.
Click Save.
Update the First Data Workflow Component
Now that you have a Data Workflow configured to run your operation. Configure your first Data Workflow to trigger it. This step adds a way to stop the loop once everyone is emailed everyone on the list.
Hover over the dwfLoop Data Workflow.
A 5-button toolbar appears above the component on hover-over.
Using the toolbar, click the
.png) (Settings) button.
(Settings) button.
Configure the Third Output Operator
When sending your emails manually, you'd know when you have your client's data ready. In your application, you need to tell your second Data Workflow that the data it needs is ready. So, use an Output operator to tell the second Data Workflow to run.
Drag and drop another Output operator onto your Data Workflow canvas.
Configure the Output operator's Info window as follows:
Setting
Value
Category
Output
Component
dwfOperation
Action
trigger
Connect the lower output port (right) of the Get operator to the input port (left) of the dwfOperation Output operator.
Configure the Fourth Output Operator
You know that when you reach the end of your list, you've sent all the emails you need to. But your application needs a little help knowing it's done. Remember that your Decision operator knows whether there are more emails to send. If there aren't, the Decision passes data through its lower output port. So, add an Output operator there to stop the looping process.
Drag and drop another Output operator onto your Data Workflow canvas.
Configure the Output operator's Info window as follows:
Setting
Value
Category
Output
Component
_self
Action
value
Connect the lower output port (right) of the Decision operator to the input port (left) of the _self Output operator.
Click Save.
Configure the Initializer Component
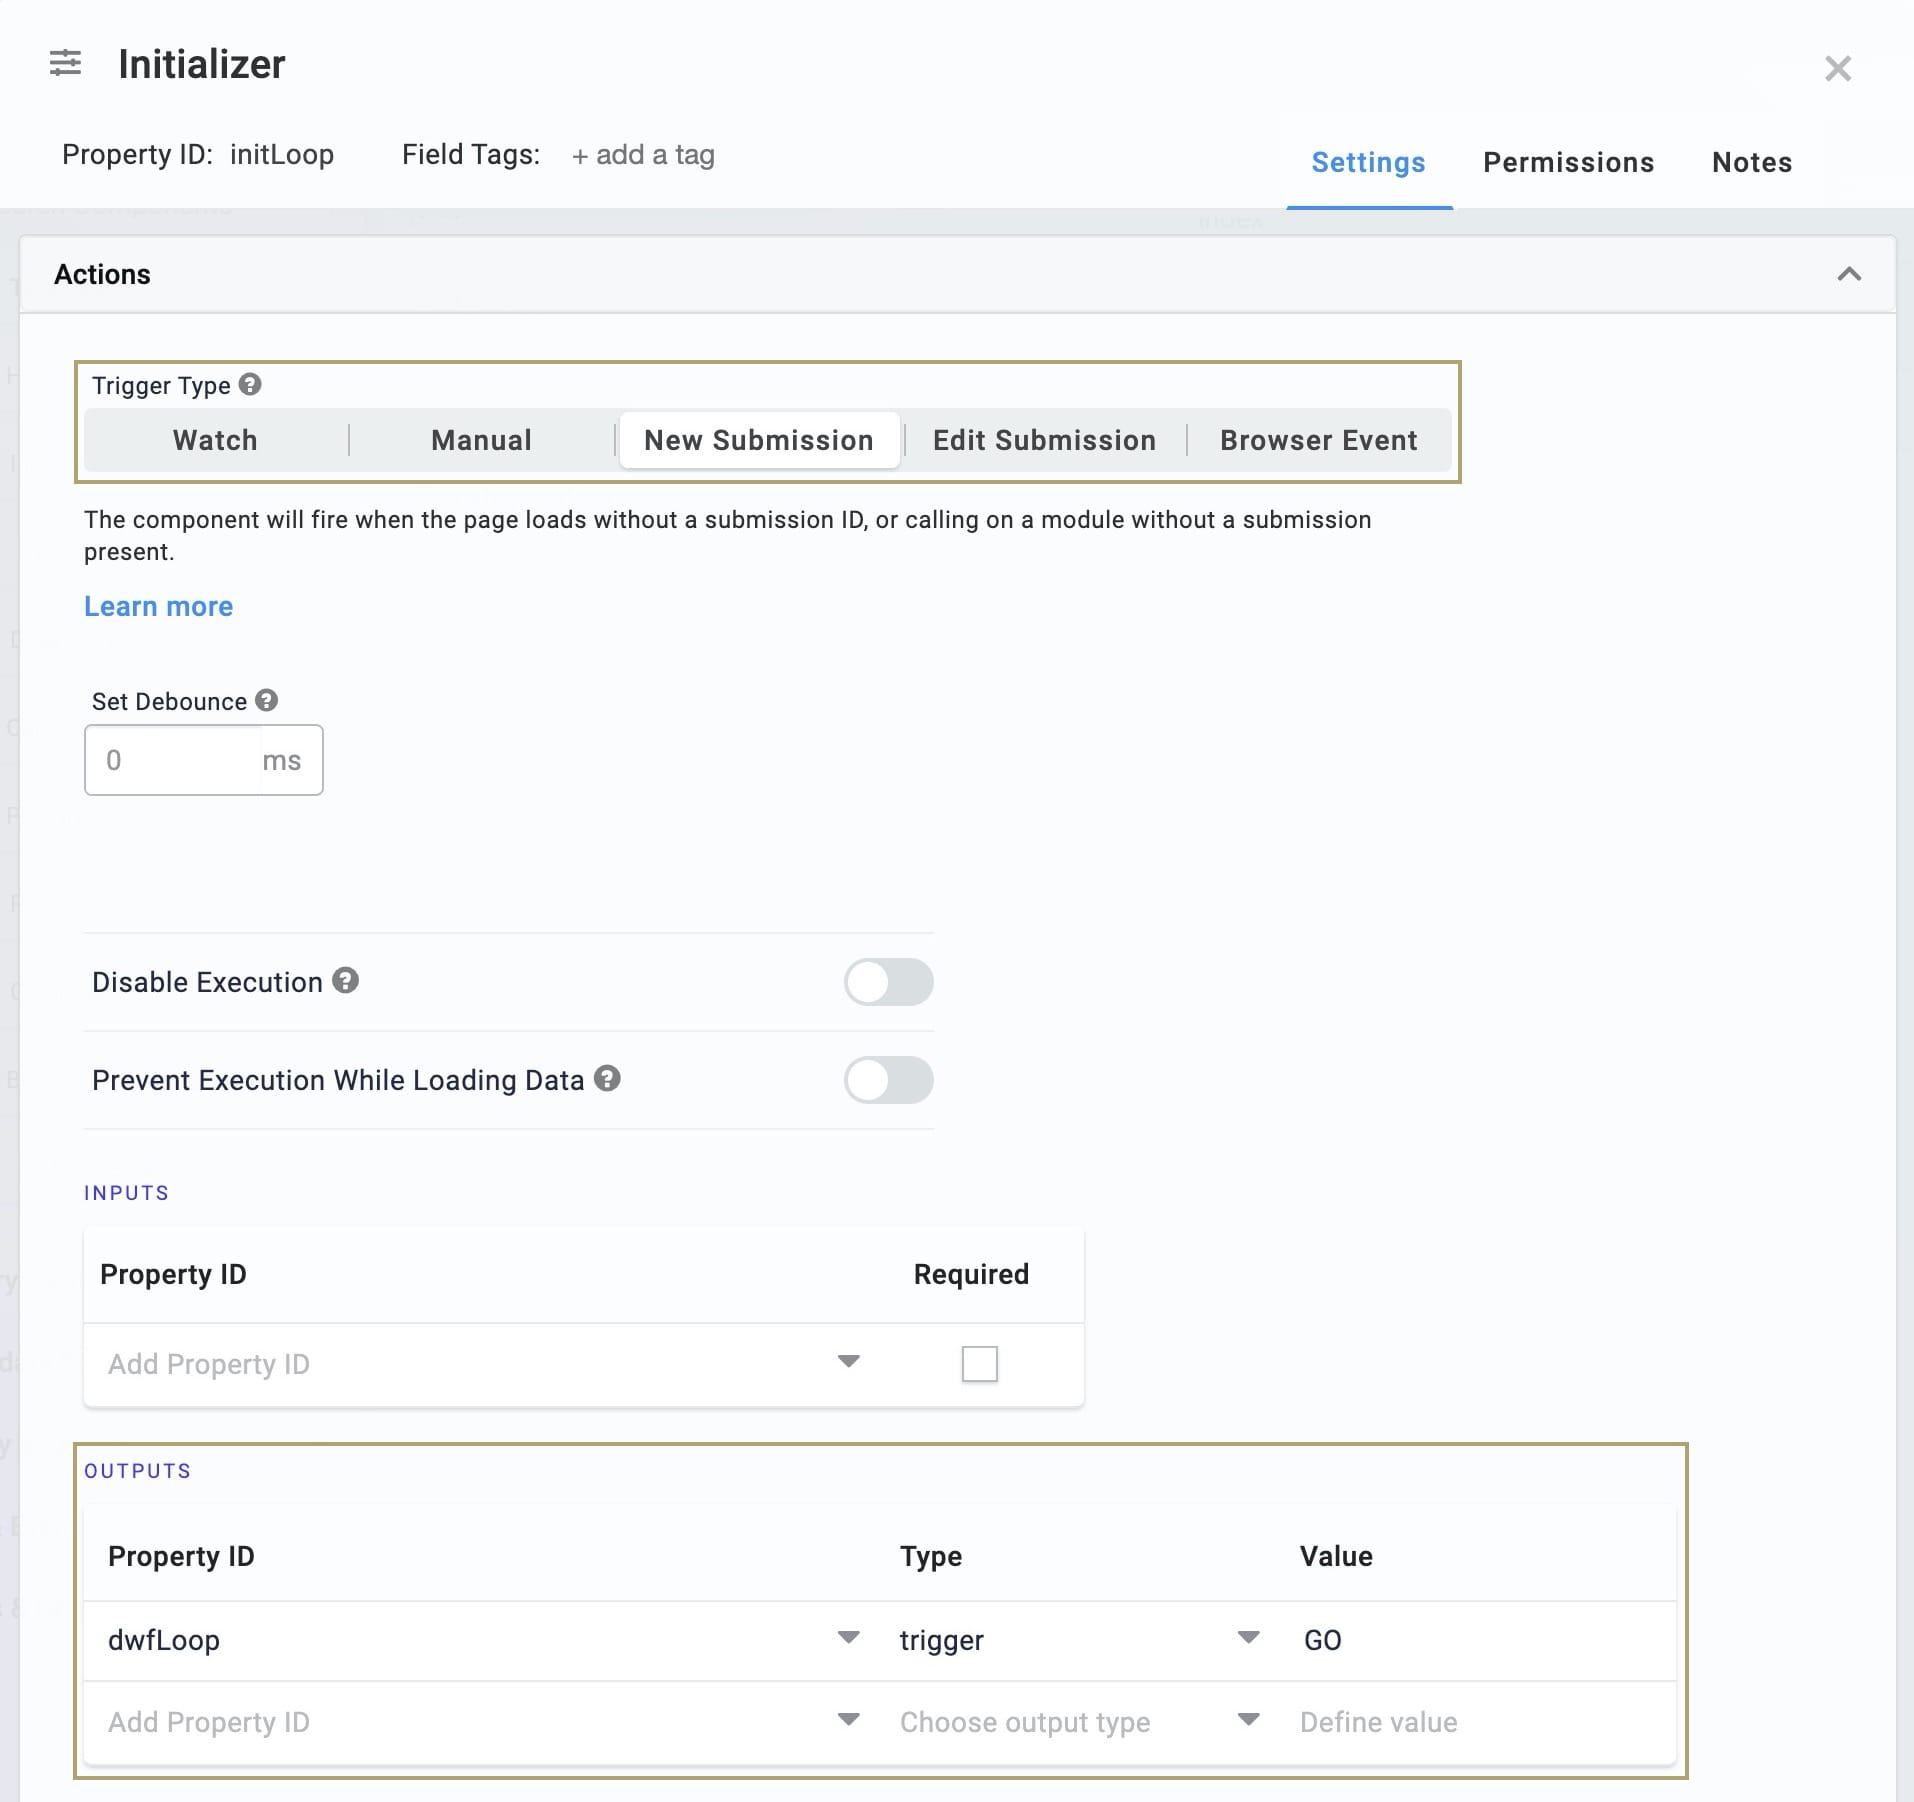
Finally, add an Initializer component to start the whole process. This Initializer triggers your looping Data Workflow whenever this part of your application opens.
Drag and drop an Initializer component onto your canvas. Place your Initializer above your Data Table.
Enter initLoop in the Property ID and Canvas Label Text fields.
Select New Submission as the Trigger Type.
In the Outputs table, enter the following:
Property ID
Type
Value
dwfLoop
trigger
GO
Click Save.
Save your module.
Now you can check your work. Preview your module in Express View and open the DevTools Console. Activity from your various Consoles populates. That shows the loop is working properly. Take a look at some key points in the below image.
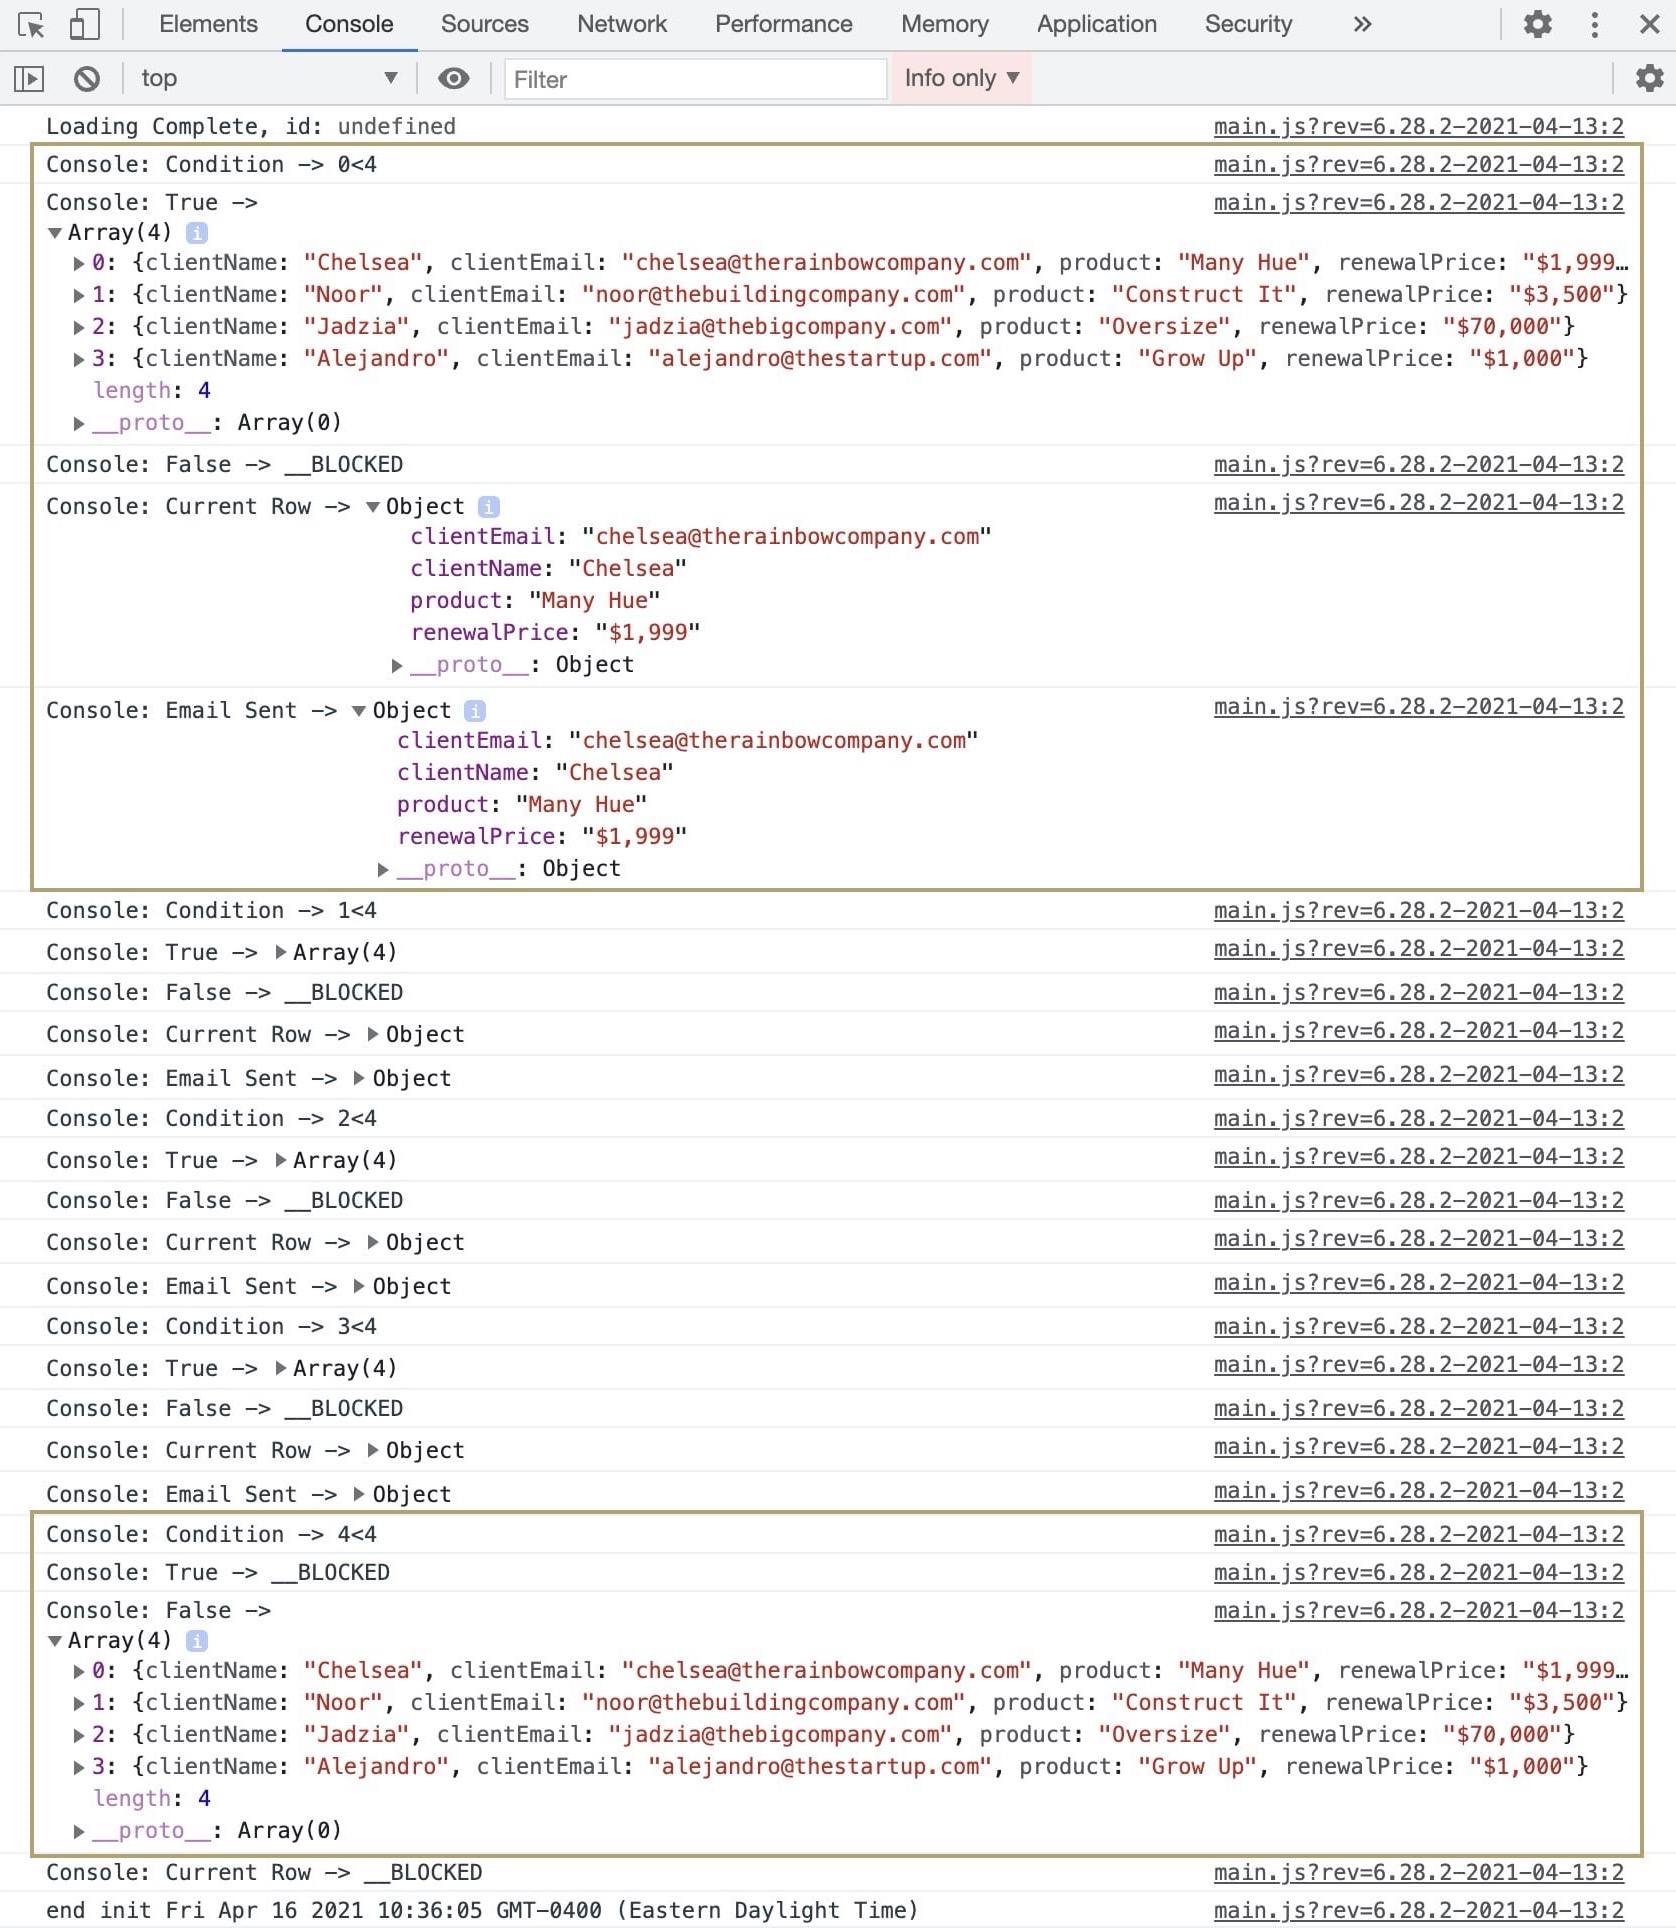
The first gold box shows the path your first row of data takes through your Data Workflows. Your Condition Console shows the expression 0<4. That's because you're at the 0 index in your data and there are 4 items in your table. The True Console shows your original data and the False Console shows _BLOCKED. That's because the expression 0<4 is true. From there, your first row of data is separated out. You can see this in your Current Row Console. Then, you also see that data in your Email Sent Console, indicating the data has made its way through your second Data Workflow as well. The Consoles below this show the rest of your data going through the same process. You can expand these in your DevTools Console to see more details.
The second gold box shows where your loop ends. Here, you see 4<4 in the Condition Console. This shows that your Data Workflow has processed your data with an index of 4. And since 4<4 is a false statement, your data takes that path instead. This is where the True Console shows _BLOCKED and now your data shows under the False Console. Once your loop reaches this point, the process stops.
Best Practices
Data Workflows timeout after 5 minutes. Build looping Data Workflows to complete operations within 5 minutes to prevent timeouts.
If you don't plan to use disabled components in your application, remove them to ensure optimal performance. Remember to check all active components that connect to disabled components. Ensure active components still function properly after you remove the disabled ones.
Add labels to all Data Workflow operators to describe their function. These labels make it easier to know the purpose of an operator without having to open the Info window.
Select the Do Not Sanitize setting in all your operators to improve application performance.
Organize Data Workflow components based on their function in your application.
Use the component's Notes tab to comment on complex data processes. Add notes to explain what components are being triggered, trigger types, and the importance of each component.