The TEXTJOIN function is a formula that combines multiple variables or strings into a single string. You can also specify a delimiter that's inserted between each joined value. This could be a character (like a comma or ampersand) or an empty space. You can also choose to include or skip empty cells.
Consider a practical example of when you'd use the TEXTJOIN formula. Suppose you have an application where end-users enter a first and last name in separate Text Field components. But you also want to create a field that stores their full name as a single value. You can use the TEXTJOIN formula in a .png) Calculator component to join those strings. And an empty space would be a fitting delimiter.
Calculator component to join those strings. And an empty space would be a fitting delimiter.
The TEXTJOIN formula isn't suitable for joining an array of values into a single string. When using TEXTJOIN on an array, the Calculator only outputs a comma-separated list of all values in the array. The Calculator ignores the delimiter and ignore_empty parts set in the formula. To join values from an array, use the Join operator in a Data Workflow component.
To learn about additional formulas supported in the Initializer, Calculator, and Data Workflow components, view our Supported Formulas documentation.
What You'll Learn
After completing this article, you’ll learn about the parts of a TEXTJOIN formula and how to use one in a Calculator component.
Parts of the TEXTJOIN Formula
The function signature for the TEXTJOIN formula is:=TEXTJOIN("{delimiter}", {ignore_empty}, {"value1"}, {"value2"}, {…}).
This outputs a string of concatenated values, all separated by a delimiter.
Argument | Description |
|---|---|
delimiter | Specify a delimiter used to separate your values. For example, a space (" "), comma (","), ampersand ("&"), or even a combination of characters. If you don't set a delimiter, the function concatenates all values without a delimiter. You must surround the delimiter in quotation marks. If you use a number as a string delimiter, the Calculator treats the number as text. |
ignore_empty | Specify whether to exclude empty values from the final output. If you enter TRUE, the Calculator excludes any empty values from the final output. If you enter FALSE, the Calculator does not exclude empty values from the output. |
value1, value2... | Lists the strings you want to be concatenated. You can use an alias to dynamically reference input from another component in your module. Or, you can hard-code the value. You can also combine alias values and hard-coded values. For example,
|
Using The TEXTJOIN Formula in the Calculator Component
For this example, you'll build an app that takes a first and last name and joins them together in a sentence. The final output becomes "My name is {firstName} {lastName}", separated by spaces.
These instructions assume that you have an open module saved with a title.
Configure the Text Field Components
Start the configuration by adding three Text Field components for a first name, last name, and a field to display the joined sentence.
From the Module Builder, drag and drop a Text Field component onto your canvas.
In the Property ID field, enter firstName.
In the Label Text field, enter First Name.
Click Save & Close.
Repeat this process for the two remaining Text Field components, placing them under the firstName Text Field component:
Property ID
Label Text
lastName
Last Name
yourName
Your Name
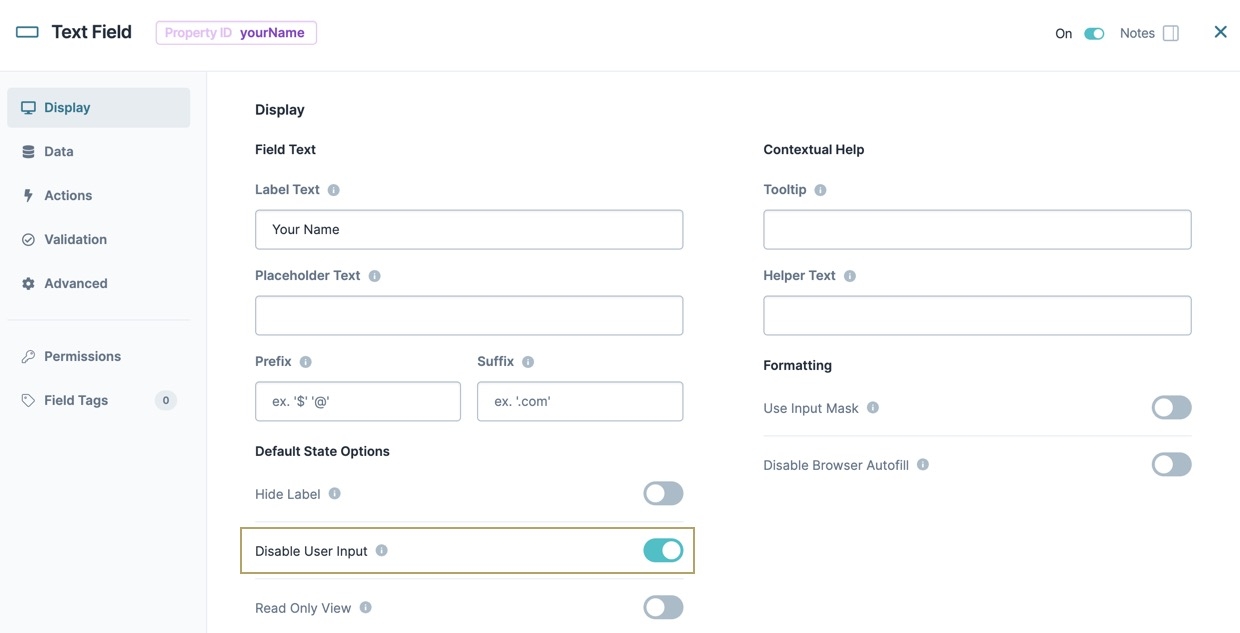
In the yourName Text Field component, set Disable User Input to
 (ON). This field auto-populates with the joined sentence and does not need to be editable.
Save & Close each component as you add it.
Configure the Calculator Component
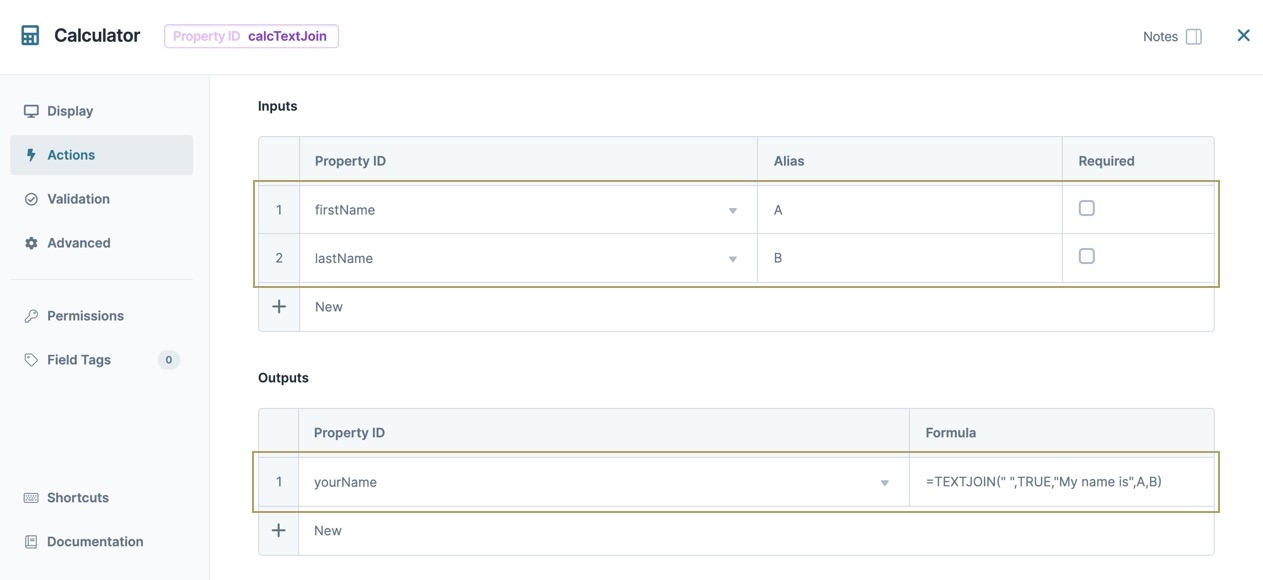
The calcTextJoin .png) Calculator component contains the TEXTJOIN formula. The formula combines hard-coded values with aliases, allowing you to dynamically substitute the end-user's first and last name in the formula.
Calculator component contains the TEXTJOIN formula. The formula combines hard-coded values with aliases, allowing you to dynamically substitute the end-user's first and last name in the formula.
Drag and drop a
.png) Calculator component onto your canvas, placing it between the lastName and yourName Text Field components.
Calculator component onto your canvas, placing it between the lastName and yourName Text Field components.In the Property ID and Canvas Label Text fields, enter calcTextJoin.
From the component's configuration window, select
.png) Actions.
Actions.In the Inputs table, enter the following:
Property ID
Alias
Required
1
firstName
A
☐ (unchecked)
2
lastName
B
☐ (unchecked)
In the Outputs table, enter the following:
Property ID
Formula
1
yourName
=TEXTJOIN(" ",TRUE,"My name is",A,B)
You could also write this formula as =TEXTJOIN(" ", TRUE, "My", "name", "is", A, B).
Click Save & Close.
Configure the Button Component
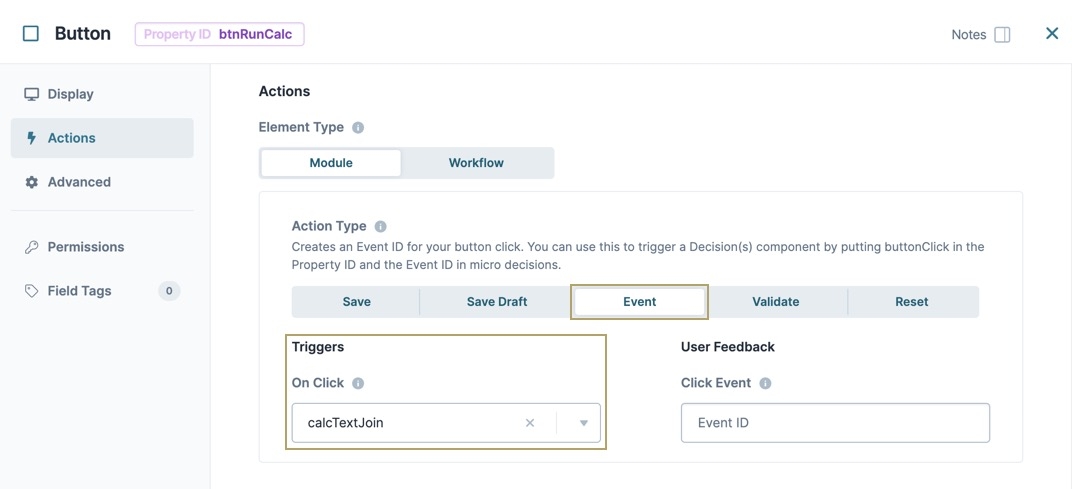
Finally, the btnRunCalc ![]() Button component triggers the calcTextJoin
Button component triggers the calcTextJoin .png) Calculator component.
Calculator component.
Drag and drop a
.png) Button component onto your canvas, placing it below the yourName Text Field component.
Button component onto your canvas, placing it below the yourName Text Field component.In the Property ID field, enter btnRunCalc.
In the Label Text field, enter Run Calculator.
From the component's configuration window, select
.png) Actions.
Actions.Set the Action Type as Event.
In the On-Click field, enter or select calcTextJoin.
Click Save & Close.
Save your module.
Preview your module in Express View. Fill out the first and last name fields and click Submit. My name is {firstName} {lastName} appears in the Your Name text field:


