How to: Configure a Pop-Up Error Message
Overview
It's important for end-users End-users, also known as Express Users, are the individuals accessing an application through Express View. In most cases, end-users are the customers using the product. to understand when an error occurs in an application. Configuring a pop-up error message using a Plug-In component lets end-users know of errors and report them to developers. The method explained in this how-to guide creates a pop-up modal A modal is a window that appears on top of the content you are currently viewing. informing users when an error occurs from a Plug-In component API APIs (application programming interfaces) are a set of protocols and definitions developers use to build and integrate application software. APIs act as the connective tissue between products and services. call.
Configuring a Pop-Up Error Message
For this example, configure a Plug-In component to generate an error. Then, configure a Panel component to display the error to the end-user End-users, also known as Express Users, are the individuals accessing an application through Express View. In most cases, end-users are the customers using the product..
Create an Improperly Configured API Call
First, create a broken API call so you can prompt a pop-up error message. If you are creating error handling for an existing Plug-In component, skip to Create a Pop-up Error Message section of this article.
Configure the Field Group Component
The Field Group component acts as a container for the components that follow.
| 1. | In the Module Builder, drag and drop a Field Group component onto your canvas. |
| 3. | Click Save Component. |
Configure the Plug-In Component
The goal of this guide is to create an error. So, you'll configure the Plug-In component to reference a module ID that does not exist.
| 1. | Drag and drop a Plug-In component onto your canvas, placing it inside the fgPlugin Field Group component. |
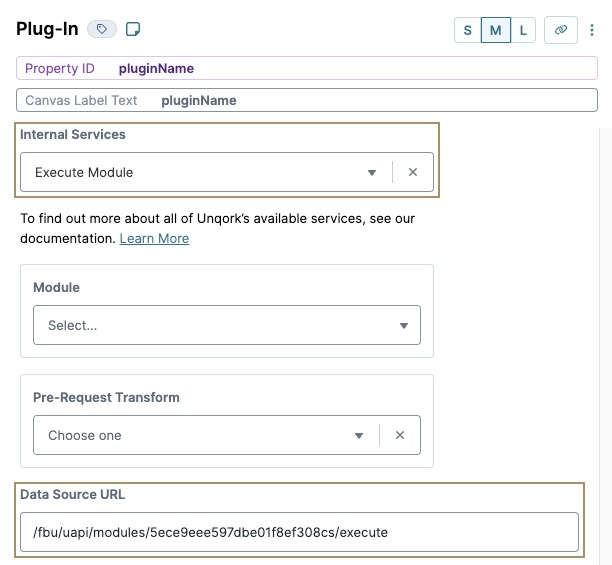
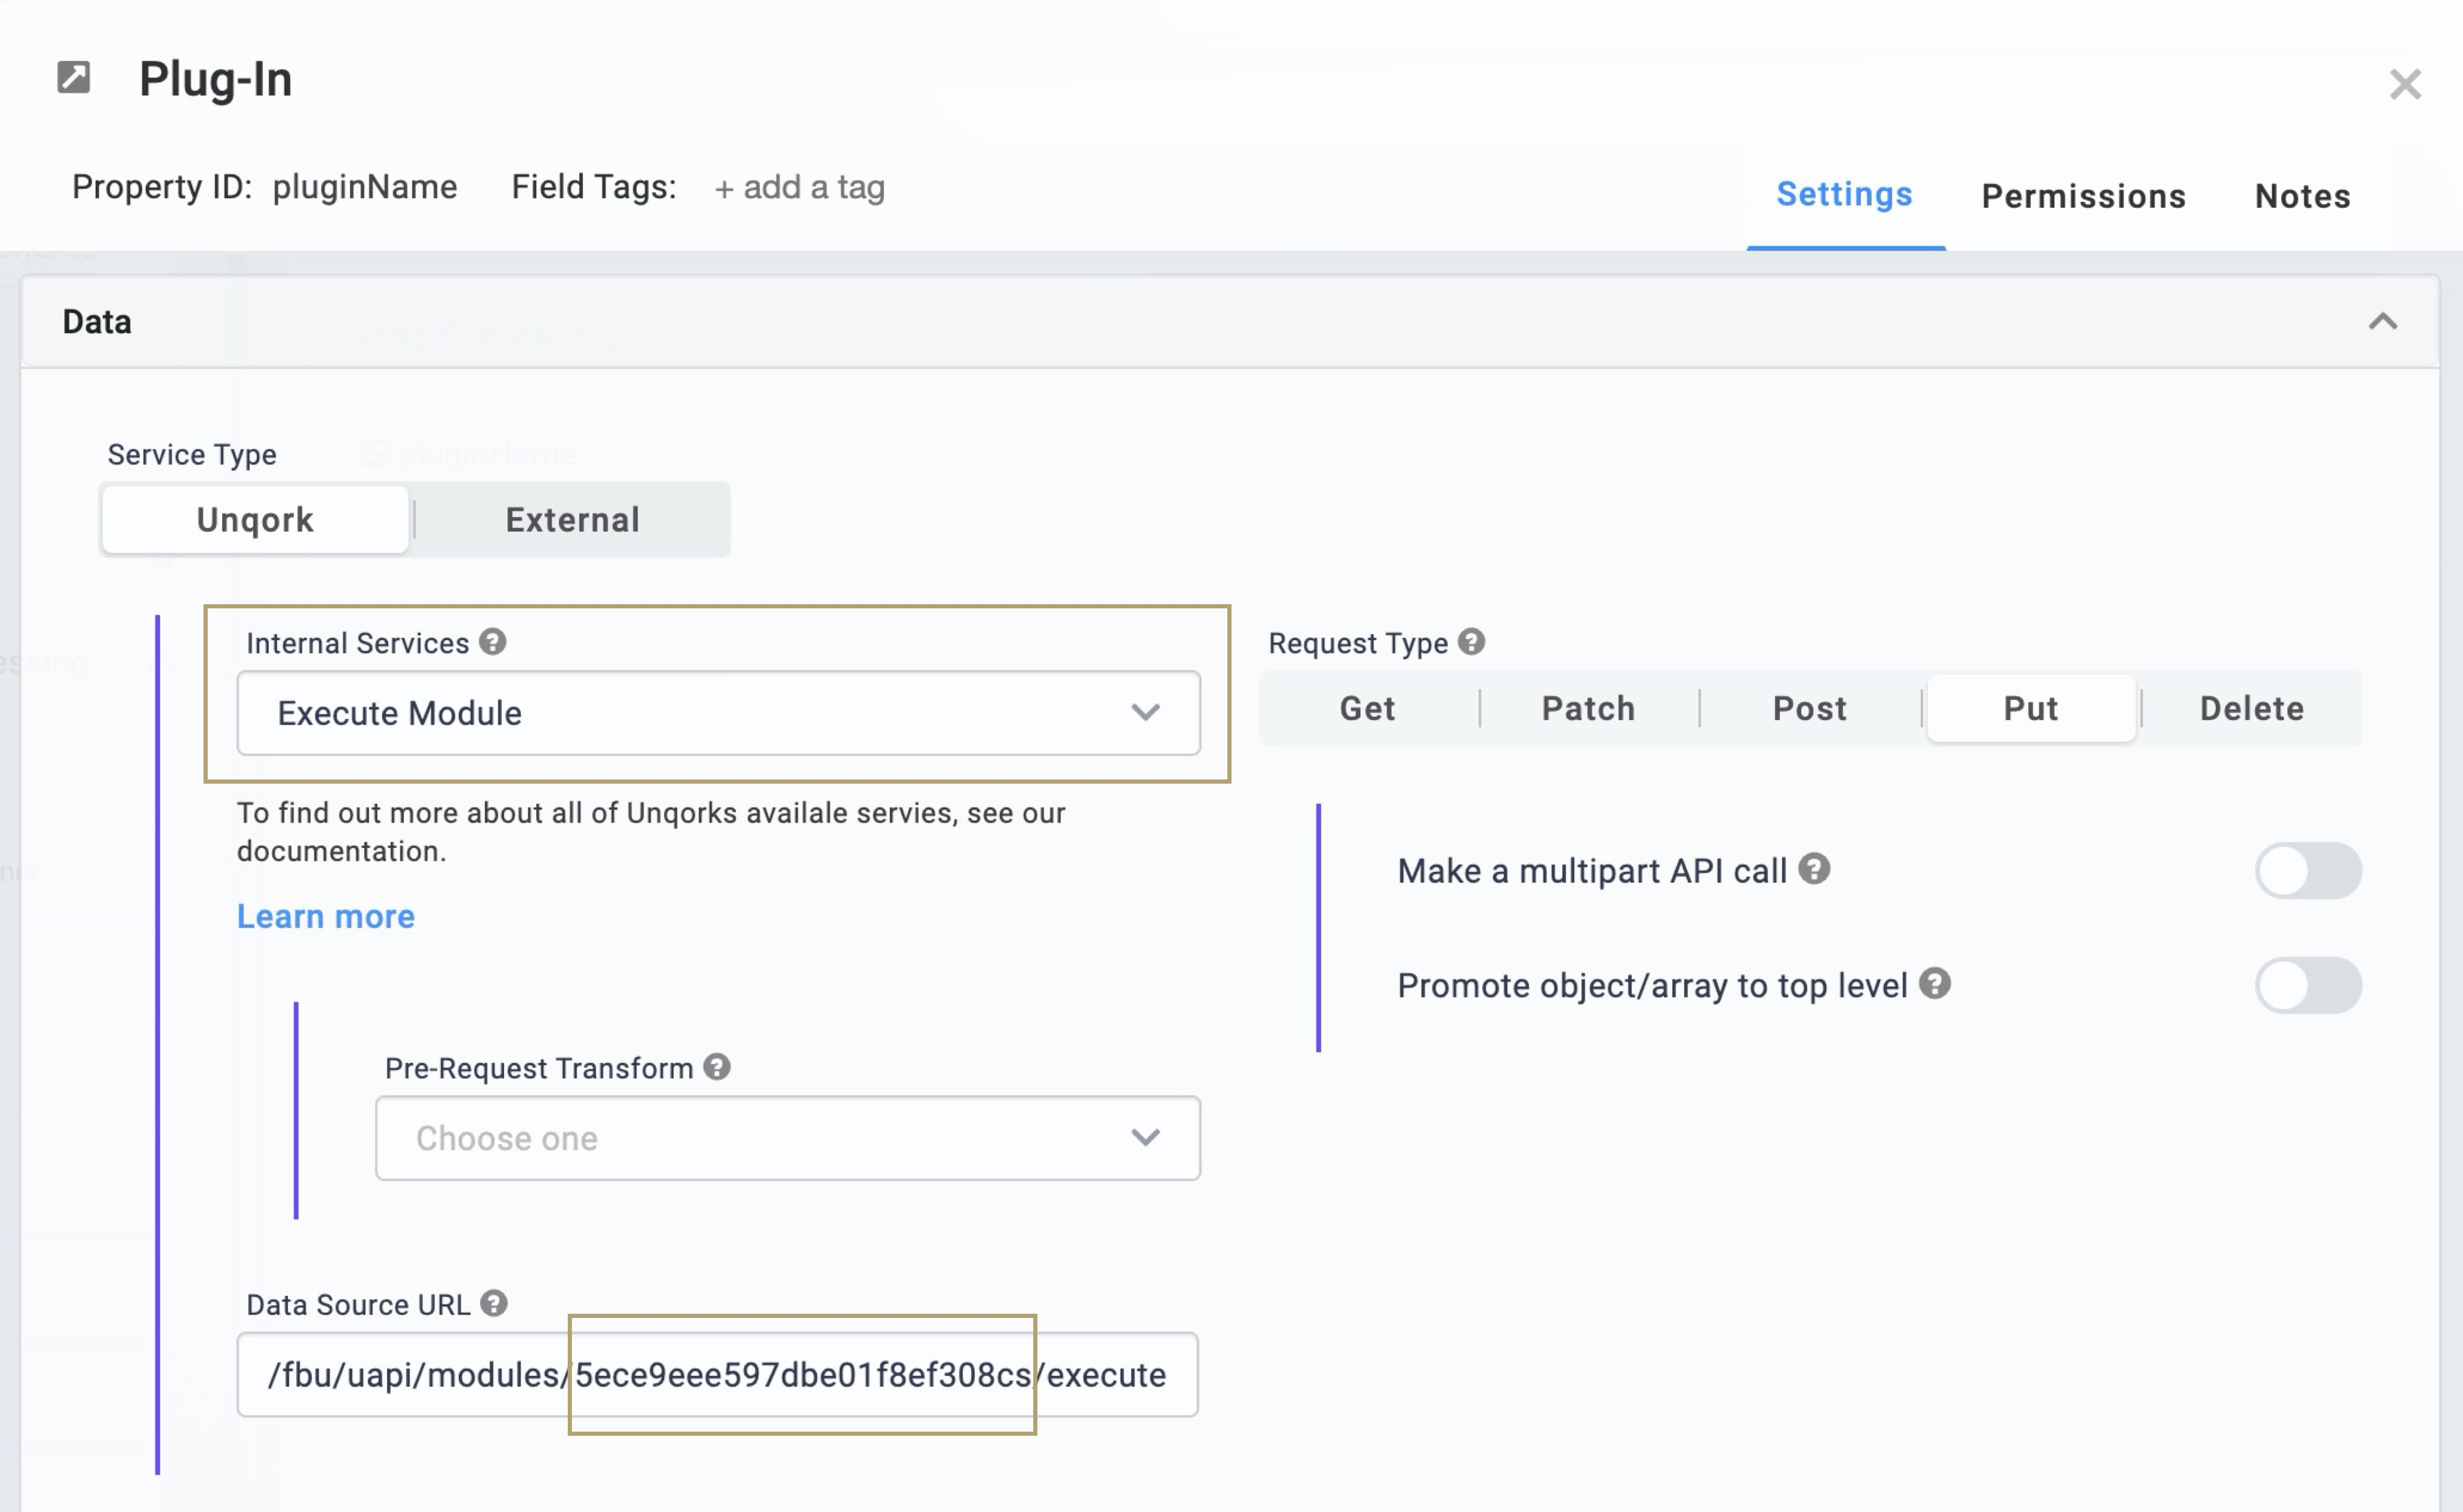
| 3. | From the Internal Services drop-down, select Execute Module. The Data Source URL autopopulates with placeholder text. |
| 4. | In the Data Source URL field, replace /fbu/uapi/modules/{moduleId}/execute with /fbu/uapi/modules/5ece9eee597dbe01f8ef308cs/execute. |
For this example, the Data Source URL is an invalid address. The invalid address acts as an error for the purpose of demonstrating an error message popup.
| 5. | Click Save Component. |
Configure the Button Component
Configure a Button component to trigger the improperly configured Plug-In component.
| 1. | Drag and drop a |
| 2. | In the Property ID A Property ID is the unique field ID used by Unqork to track and link components in your module. field, enter btnTest. |
| 3. | In the Label Text Label Text conveys what the input component is and what information it displays. Enter the purpose of the corresponding component or field. field, enter Test Error. |
| 4. | Navigate to the Actions settings. |
| 5. | From the Action Type drop-down, select Event. |
| 6. | From the On Click drop-down, enter or select pluginName. |
| 7. | Click Save Component. |
Create a Pop-Up Error Message
The following steps use a Calculator component to retrieve error codes from a Plug-In component. Then, it sends the codes to the Panel component to display as a pop-up modal A modal is a window that appears on top of the content you are currently viewing. to the end-user End-users, also known as Express Users, are the individuals accessing an application through Express View. In most cases, end-users are the customers using the product..
Configure the Panel Component
This Panel component contains the error message handling, and also acts a modal A modal is a window that appears on top of the content you are currently viewing. to display errors.
| 1. | Drag and drop a Panel component onto your canvas, placing it below the fgPlugin Field Group component. |
| 2. | In the Property ID A Property ID is the unique field ID used by Unqork to track and link components in your module. field, enter panelErrorHandling. |
| 3. | Click Save Component. |
Configure the Calculator Component
Configure a Calculator component to extract and concatenate the error message and code from the integratorErrorsobject An object is a type of data structure that represents a single, self-contained entity that acts as a container for the characteristics of that entity..
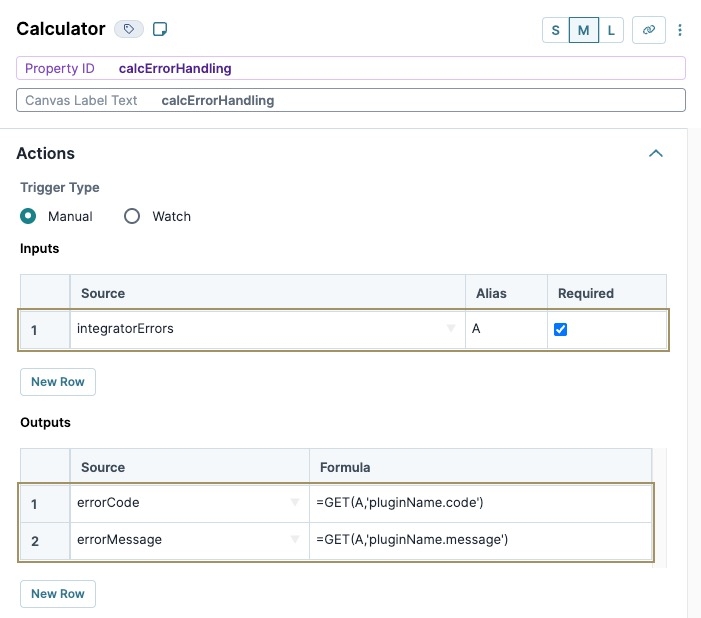
| 1. | Drag and drop a  Calculator component onto the canvas, placing it inside the panelErrorHandling Panel component. Calculator component onto the canvas, placing it inside the panelErrorHandling Panel component. |
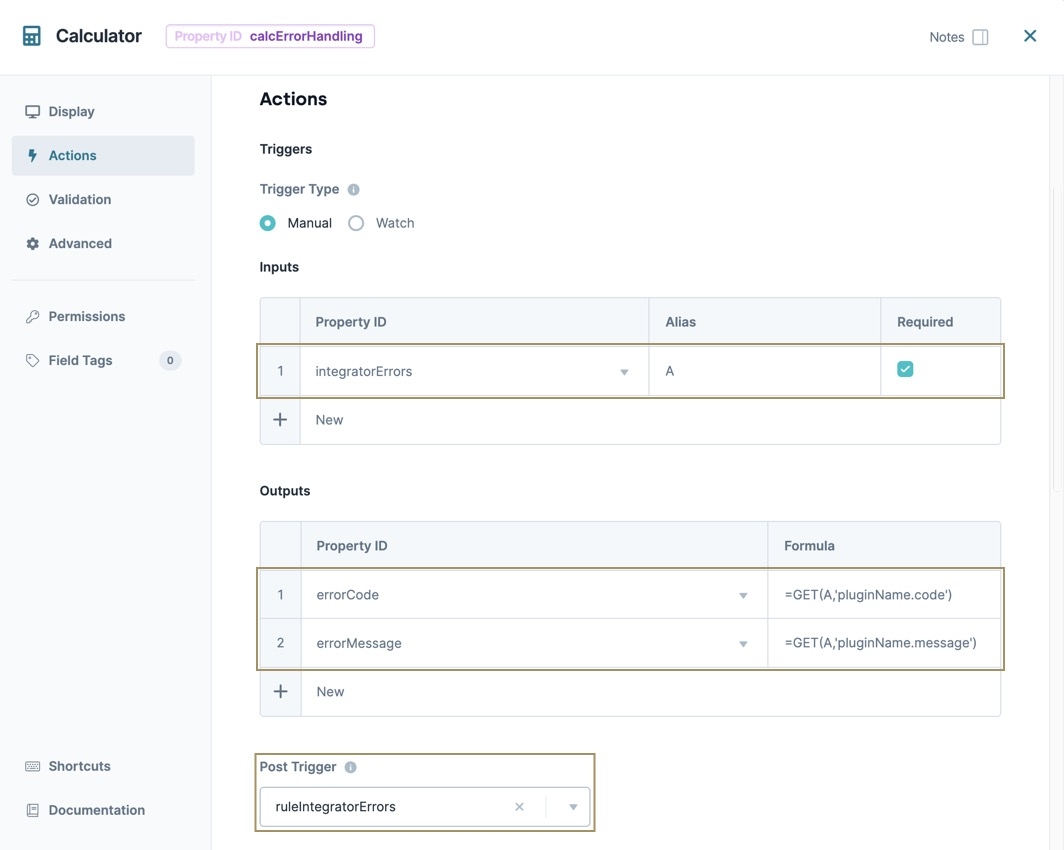
| 3. | In the Inputs table Enter inputs components and actions you want the component to perform., enter the following: |
|
|
Source |
Alias |
Type |
Required |
|---|---|---|---|---|
|
1 |
integratorErrors |
A |
|
(checked) |
The integratorErrors value is apart of a module's data object An object is a type of data structure that represents a single, self-contained entity that acts as a container for the characteristics of that entity.. In Express View Express View is how your end-user views your application. Express View also lets you preview your applications to test your configuration and view the styling. This is also the view your end-users will see when interacting with your application. After configuring a module, click Preview in the Module Builder to interact with the module in Express View., you can view this key array An array is a type of object that stores one or more data types. Data types supported in arrays include numbers, strings, and objects. by opening the DevTools Console The DevTools Console helps you securely store, build, test, and deploy your software. and running the Angular command The Angular command, or data command, is a tool that displays submission data in a browser's developer console. In Express View, enter the following command in the devtool console: angular.element('.unqorkio-form').scope().submission.
| 4. | In the Outputs table Enter outputs components and actions you want the component to perform., enter the following: |
|
|
Source |
Formula |
|---|---|---|
|
1 |
errorCode |
=GET(A,'pluginName.code') |
|
2 |
errorMessage |
=GET(A,'pluginName.message') |
You'll create two Hidden components in the next section that match these Output IDs.
| 5. | In the Post Trigger field, enter or select ruleIntegratorErrors |
| 6. | Click Save Component. |
Configure the Hidden Components
Configure two Hidden components to contain the error code and error messages retrieved by the calcErrorHandling Calculator component.
| 1. | Drag and drop two Hidden components onto your canvas, placing them inside the panelErrorHandling Panel component and below the calcErrorHandling  Calculator component. Calculator component. |
|
Property ID |
Label Text |
|
|---|---|---|
|
1 |
errorCode |
errorCode |
|
2 |
errorMessage |
errorMessage |
| 3. | After configuring each component, click Save Component. |
Configure the Decisions Component
The Decisions component creates a pop-up error message using the Panel component.
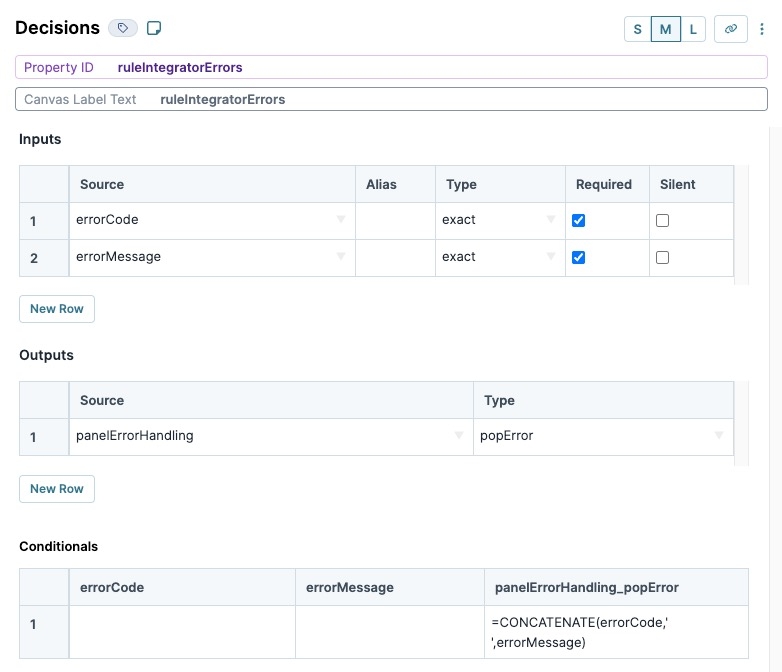
| 1. | Drag and drop a Decisions component onto the canvas, placing it inside the panelErrorHandling Panel component and below the Hidden components. |
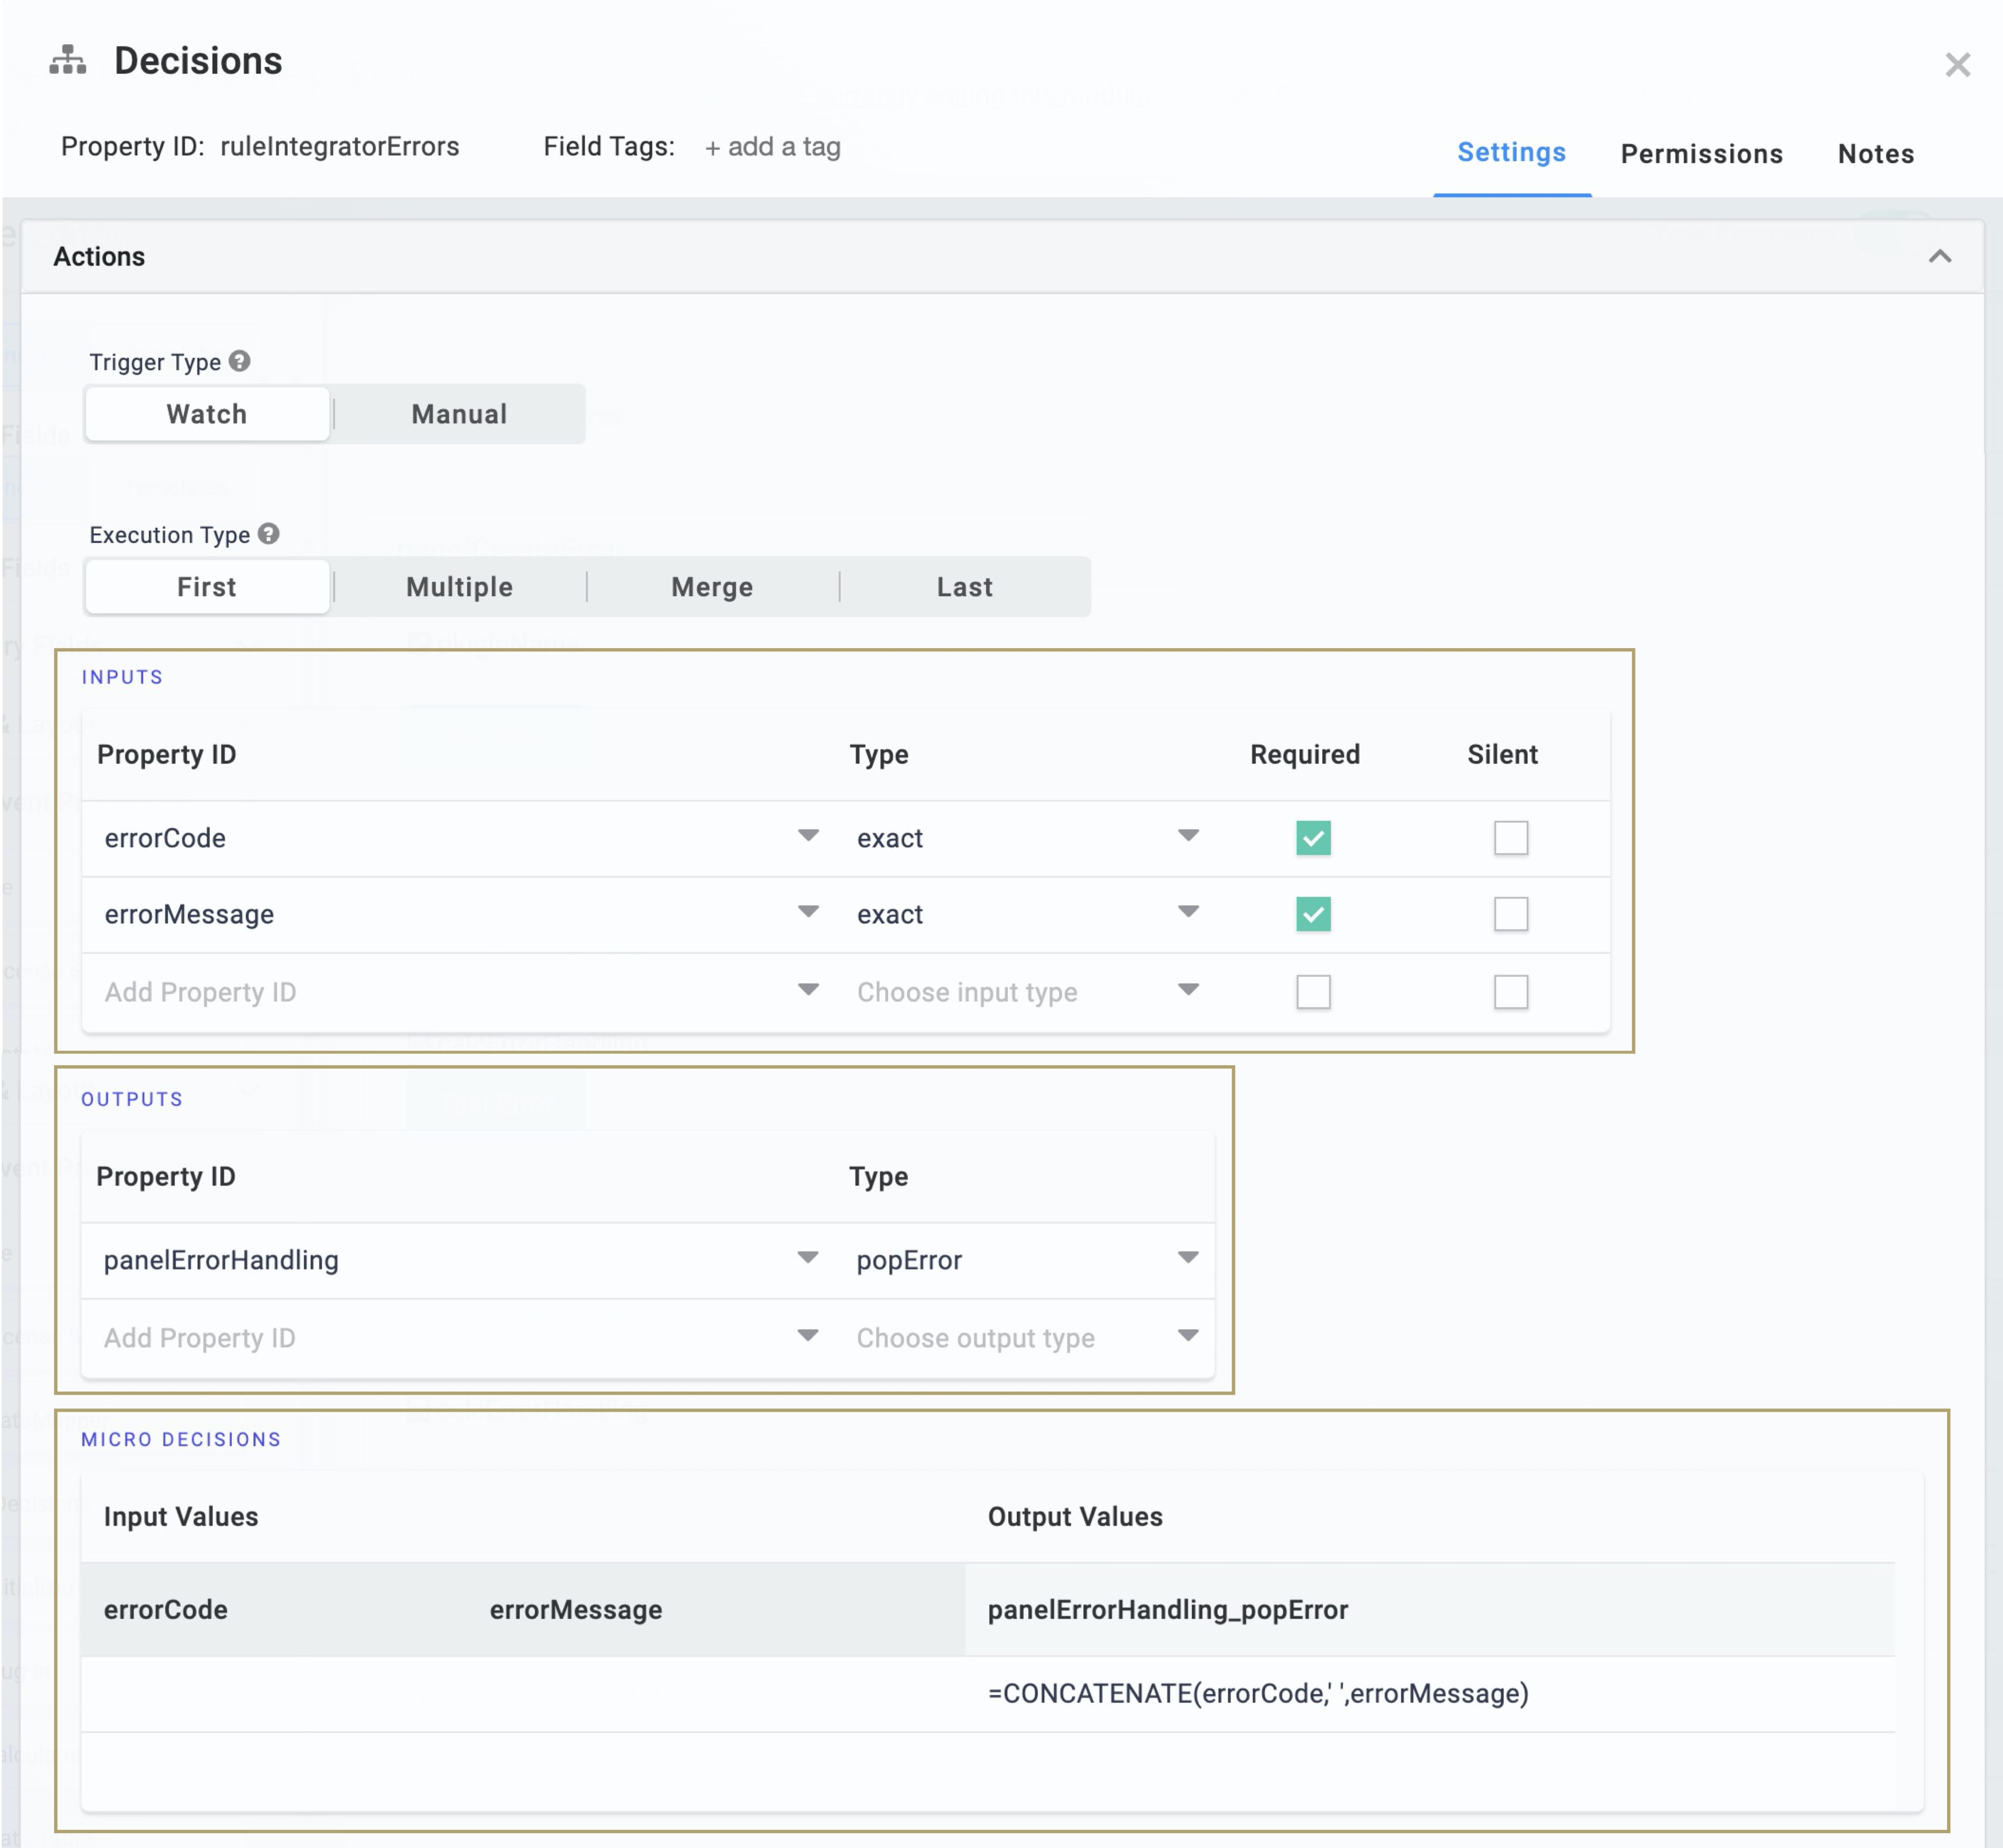
| 3. | In the Inputs table Enter inputs components and actions you want the component to perform., enter the following: |
|
|
Source |
Alias |
Type |
Required |
Silent |
|---|---|---|---|---|---|
|
1 |
errorCode |
|
exact |
(checked) |
☐ (unchecked) |
|
2 |
errorMessage |
|
exact |
(checked) |
☐ (unchecked) |
| 4. | In the Outputs table Enter outputs components and actions you want the component to perform., enter the following: |
|
|
Source |
Type |
|---|---|---|
|
1 |
panelErrorHandling |
popError |
The popError type triggers the panelErrorHandling Panel component to display data in a modal A modal is a window that appears on top of the content you are currently viewing., regardless of the Panel component's display settings.
| 5. | In the Conditionals table, enter the following: |
|
|
errorCode |
errorMessage |
panelErrorHandling_popError |
|---|---|---|---|
|
1 |
|
|
=CONCATENATE(errorCode,' ',errorMessage) |
If you want a customized message, update the Conditionals field. For example, in the panelErrorHandling_popError column, enter =CONCATENATE('Enter your customized text here. ',errorCode,' ',errorMessage).
| 6. | Click Save Component. |
Learn more about the CONCATENATE function here: https://support.office.com/en-us/article/concatenate-function-8f8ae884-2ca8-4f7a-b093-75d702bea31d.
Update the Plug-In Component's Error Trigger
Lastly, set calcErrorHandling  Calculator component as the error trigger of the Plug-In component. Whenever an error occurs in the Plug-In component, the calcErrorHandling
  Calculator component fires.
To update your Plug-In component's error trigger:
| 1. | Hover over the pluginName Plug-In component. |
A 4-button toolbar displays above the component on hover-over.
| 2. | Click the (Settings) button. |
| 3. | Navigate to the Actions settings. |
| 4. | In the Error Trigger field, enter calcErrorHandling. |
| 5. | Click Save Component. |
| 6. | Save your module. |
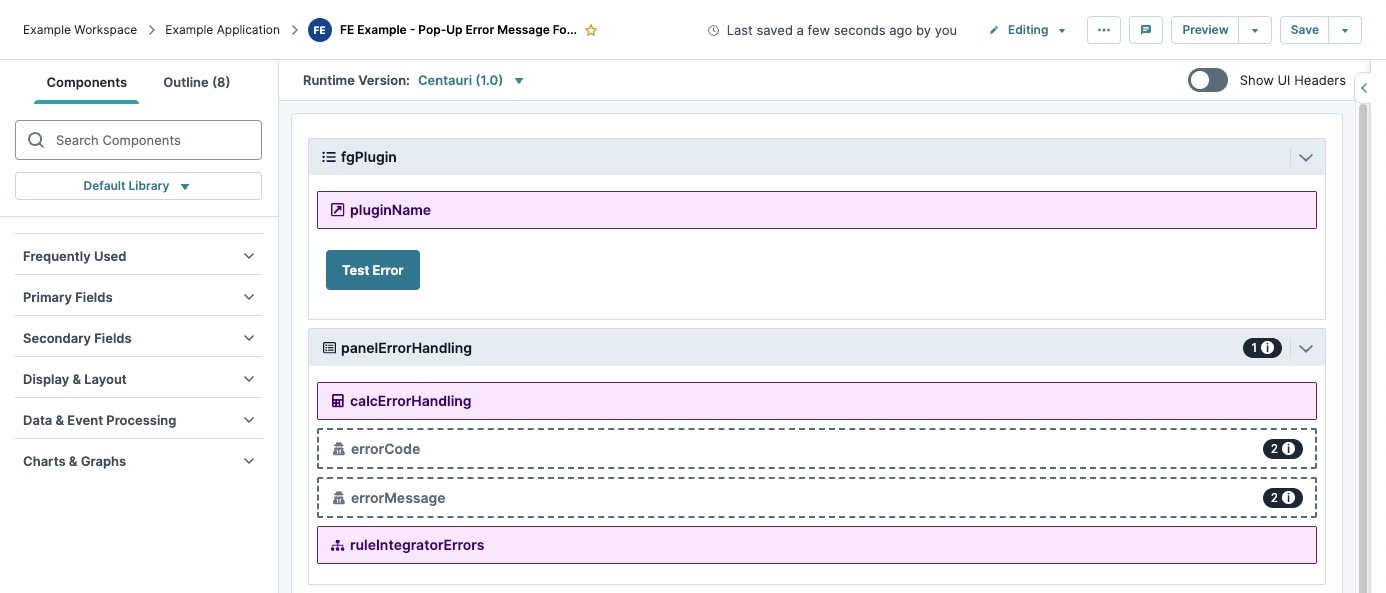
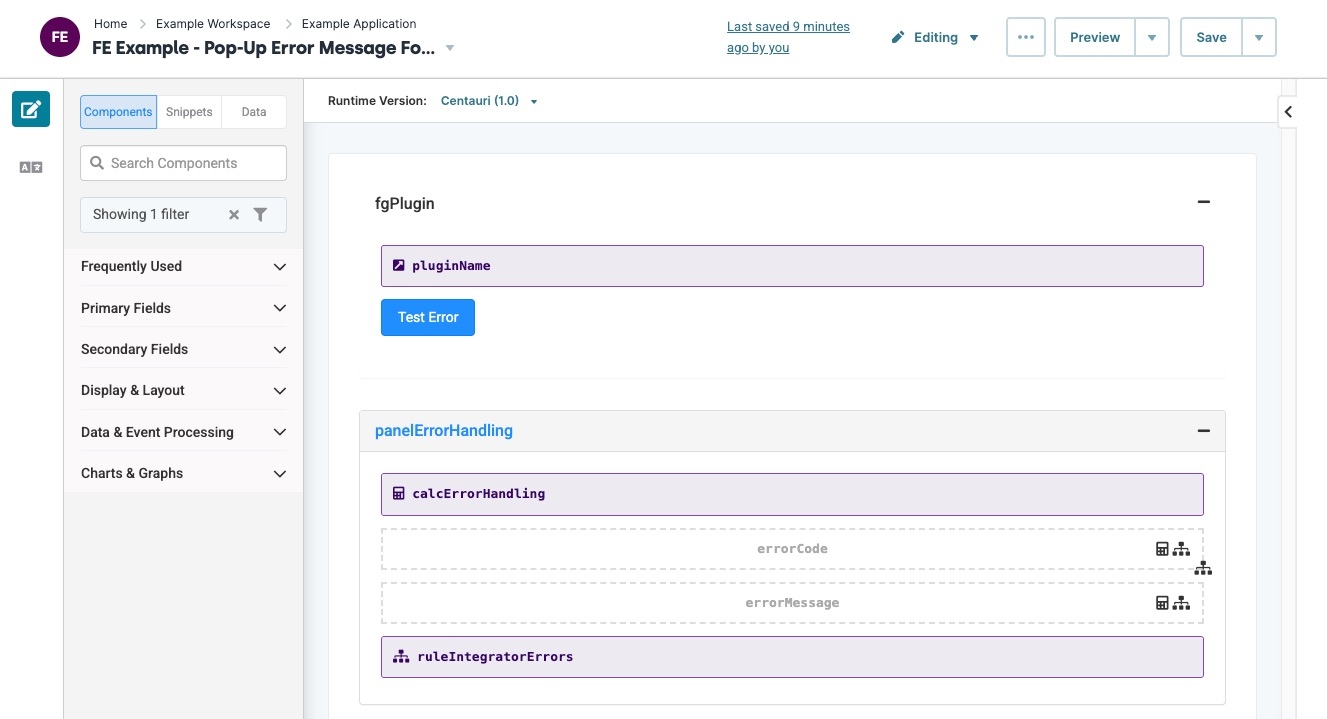
Here's how your completed module looks in the Module Builder:
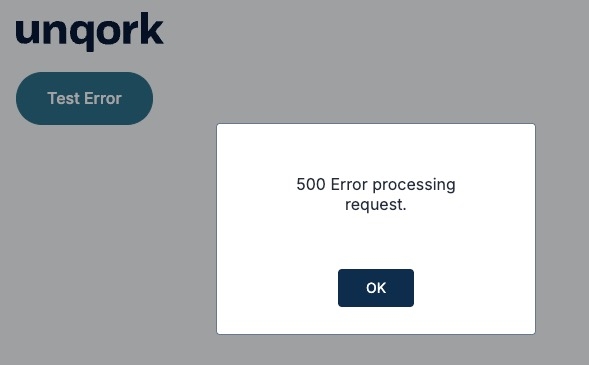
Preview your module in Express View Express View is how your end-user views your application. Express View also lets you preview your applications to test your configuration and view the styling. This is also the view your end-users will see when interacting with your application. After configuring a module, click Preview in the Module Builder to interact with the module in Express View. and click Test Error. A modal displays the error generated by the improperly configured Plug-In component.
If your pop-up is blank, test your component settings for the correct spelling. In equations, verify your work contains straight quotation marks rather than curly quotation marks. Double-check your spelling and quotation marks, save your updates, and try again.
Overview
It's important for end-users End-users, also known as Express Users, are the individuals accessing an application through Express View. In most cases, end-users are the customers using the product. to understand when an error occurs in an application. Configuring a pop-pp error message using a Plug-In component lets end-users know of errors and report them to developers. The method explained in this how-to guide creates a pop-up modal A modal is a window that appears on top of the content you are currently viewing. informing users when an error occurs from a Plug-In component API APIs (application programming interfaces) are a set of protocols and definitions developers use to build and integrate application software. APIs act as the connective tissue between products and services. call.
Configuring a Pop-Up Error Message for Plug-Ins
For this example, configure a Plug-In component to generate an error. Then, configure a Panel component to display the error to the end-user End-users, also known as Express Users, are the individuals accessing an application through Express View. In most cases, end-users are the customers using the product..
Create an Improperly Configured API Call
First, create a broken API call so you can prompt a pop-up error message. If you are creating error handling for an existing Plug-In component, skip to Create a Pop-up Error Message section of this article.
Configure the Field Group Component
The Field Group component acts as a container for the components that follow.
| 1. | In the Module Builder, drag and drop a Field Group component onto your canvas. |
| 3. | Click Save & Close. |
Configure the Plug-In Component
The goal of this guide is to create an error. So, you'll configure the Plug-In component to reference a module ID that does not exist.
| 1. | Drag and drop a Plug-In component onto your canvas, placing it inside the fgPlugin Field Group component. |
| 3. | From the Internal Services drop-down, select Execute Module. The Data Source URL autopopulates with placeholder text. |
| 4. | In the Data Source URL field, replace /fbu/uapi/modules/{moduleId}/execute with /fbu/uapi/modules/5ece9eee597dbe01f8ef308cs/execute. |
For this example, the Data Source URL is an invalid address. The invalid address acts as an error for the purpose of demonstrating an error message popup.
| 5. | Click Save & Close. |
Configure the Button Component
Configure a Button component to trigger the improperly configured Plug-In component.
| 1. | Drag and drop a |
| 2. | In the Property ID A Property ID is the unique field ID used by Unqork to track and link components in your module. field, enter btnTest. |
| 3. | In the Label Text Label Text conveys what the input component is and what information it displays. Enter the purpose of the corresponding component or field. field, enter Test Error. |
| 4. | Navigate to the Actions settings. |
| 5. | From the Action Type drop-down, select Event. |
| 6. | From the On Click drop-down, enter or select pluginName. |
| 7. | Click Save & Close. |
Create a Pop-Up Error Message
The following steps use a Calculator component to retrieve error codes from a Plug-In component. Then, it sends the codes to the Panel component to display as a pop-up modal A modal is a window that appears on top of the content you are currently viewing. to the end-user End-users, also known as Express Users, are the individuals accessing an application through Express View. In most cases, end-users are the customers using the product..
Configure the Panel Component
This Panel component contains the error message handling, and also acts a modal A modal is a window that appears on top of the content you are currently viewing. to display errors.
| 1. | Drag and drop a Panel component onto your canvas, placing it below the fgPlugin Field Group component. |
| 2. | In the Property ID A Property ID is the unique field ID used by Unqork to track and link components in your module. field, enter panelErrorHandling. |
| 3. | Click Save & Close. |
Configure the Calculator Component
Configure a Calculator component to extract and concatenate the error message and code from the integratorErrorsobject An object is a type of data structure that represents a single, self-contained entity that acts as a container for the characteristics of that entity..
| 1. | Drag and drop a  Calculator component onto the canvas, placing it inside the panelErrorHandling Panel component. Calculator component onto the canvas, placing it inside the panelErrorHandling Panel component. |
| 3. | In the Inputs table, enter the following: |
|
|
Source |
Alias |
Type |
Required |
|---|---|---|---|---|
|
1 |
integratorErrors |
A |
|
(checked) |
The integratorErrors value is apart of a module's data object An object is a type of data structure that represents a single, self-contained entity that acts as a container for the characteristics of that entity.. In Express View Express View is how your end-user views your application. Express View also lets you preview your applications to test your configuration and view the styling. This is also the view your end-users will see when interacting with your application. After configuring a module, click Preview in the Module Builder to interact with the module in Express View., you can view this key array An array is a type of object that stores one or more data types. Data types supported in arrays include numbers, strings, and objects. by opening the DevTools Console The DevTools Console helps you securely store, build, test, and deploy your software. and running the Angular command The Angular command, or data command, is a tool that displays submission data in a browser's developer console. In Express View, enter the following command in the devtool console: angular.element('.unqorkio-form').scope().submission.
| 4. | In the Outputs table, enter the following: |
|
|
Source |
Formula |
|---|---|---|
|
1 |
errorCode |
=GET(A,'pluginName.code') |
|
2 |
errorMessage |
=GET(A,'pluginName.message') |
You'll create two Hidden components in the next section that match these Output IDs.
| 5. | In the Post Trigger field, enter or select ruleIntegratorErrors |
| 6. | Click Save & Close. |
Configure the Hidden Components
Configure two Hidden components to contain the error code and error messages retrieved by the calcErrorHandling Calculator component.
| 1. | Drag and drop two Hidden components onto your canvas, placing them inside the panelErrorHandling Panel component and below the calcErrorHandling  Calculator component. Calculator component. |
|
Property ID |
Label Text |
|
|---|---|---|
|
1 |
errorCode |
errorCode |
|
2 |
errorMessage |
errorMessage |
| 3. | After configuring each component, click Save & Close. |
Configure the Decisions Component
The Decisions component creates a pop-up error message using the Panel component.
| 1. | Drag and drop a Decisions component onto the canvas, placing it inside the panelErrorHandling Panel component and below the Hidden components. |
| 3. | In the Inputs table, enter the following: |
|
|
Source |
Alias |
Type |
Required |
Silent |
|---|---|---|---|---|---|
|
1 |
errorCode |
|
exact |
(checked) |
☐ (unchecked) |
|
2 |
errorMessage |
|
exact |
(checked) |
☐ (unchecked) |
| 4. | In the Outputs table, enter the following: |
|
|
Source |
Type |
|---|---|---|
|
1 |
panelErrorHandling |
popError |
The popError type triggers the panelErrorHandling Panel component to display data in a modal A modal is a window that appears on top of the content you are currently viewing., regardless of the Panel component's display settings.
| 5. | In the Conditionals table, enter the following: |
|
|
errorCode |
errorMessage |
panelErrorHandling_popError |
|---|---|---|---|
|
1 |
|
|
=CONCATENATE(errorCode,' ',errorMessage) |
If you want a customized message, change the Conditionals field as follows: In the panelErrorHandling_popError column enter =CONCATENATE('Enter your customized text here. ',errorCode,' ',errorMessage).
| 6. | Click Save & Close. |
Learn more about the CONCATENATE function here: https://support.office.com/en-us/article/concatenate-function-8f8ae884-2ca8-4f7a-b093-75d702bea31d.
Update the Plug-In Component's Error Trigger
Lastly, set calcErrorHandling  Calculator component as the error trigger of the Plug-In component. Whenever an error occurs in the Plug-In component, the calcErrorHandling
  Calculator component fires.
To update your Plug-In's error trigger:
| 1. | Hover over the pluginName Plug-In component. |
A 4-button toolbar displays above the component on hover-over.
| 2. | Click the (Settings) button. |
| 3. | Navigate to the Actions settings. |
| 4. | In the Error Trigger field, enter calcErrorHandling. |
| 5. | Click Save & Close. |
| 6. | Save your module. |
Here's how your completed module looks in the Module Builder:
Preview your module in Express View Express View is how your end-user views your application. Express View also lets you preview your applications to test your configuration and view the styling. This is also the view your end-users will see when interacting with your application. After configuring a module, click Preview in the Module Builder to interact with the module in Express View. and click Test Error. A modal displays the error generated by the improperly configured Plug-In component.
If your pop-up is blank, test your component settings for the correct spelling. In equations, verify your work contains straight quotation marks rather than curly quotation marks. Double-check your spelling and quotation marks, save your updates, and try again.

