Some configurations require layers of remote executes or multiple Plug-In component calls. It's a best practice to create error handling for every Plug-In component in your configuration. That way, if an error occurs, your end-user will see the error message.
Every Plug-In component needs an error trigger with Hidden components that store the data in the database to carry the error responses to the front-end. Always create error handling for a Plug-In component in the module where that Plug-In component exists. Then, you'll continue the error handling configuration on any module(s). Lastly, you'll bring the error responses to the front-end, completing the assembly line.
In this how-to guide, you'll learn how to handle remote execute calls that trigger other calls. Once you learn how this configuration works, you can apply it to any number of calls.
Let's look at the two modules in this error handling example:
Module | Description |
|---|---|
Front-End Remote Execute Module | Your end-users interact with this module by clicking a button that fires a Plug-In component. The Plug-In component remote executes to the Back-End API module.
|
Back-End API Module | This module makes the API call using the Get Submissions API to retrieve submission data. End-users are unable to view or interact with this module.
|
Because there are two calls (one remote execute and one internal), there are two potential places where issues can occur. The goal is to error handle all Plug-In components and configure error messages that display on the front-end module. From there, any error down the line triggers messages for the end-user. The end-user stays informed no matter where the error occurs.
Here's how your error message might look in Express View if a remote execute call fails:
.jpg)
Here's how your error message might look in Express View if the Get Submissions API call fails:
.jpg)
In a real-life configuration, you can choose to have a generic message. End-users might not know what a remote execute or API does, so use a message that's easy to understand. For this example, each call has a unique error message. Use this approach to test the error handling of both calls.
Configure the Back-End API Module
This back-end module makes the API call. For this use case, use the Get Submissions API call. The front-end module remote executes this back-end module, which fires the API call. If the API call fails, the back-end module tells the front-end module about the failure. The front-end module then fires a pop-up message for the end-user in Express View. This process all happens behind the scenes.
Configure the API Module
An API module contains four Panel components to help with the API setup. You can hover over the panelConfig and delete it, as it is not used further in the configuration.
To create an API module at the Application level:
At the top right of the page, click the + Create New drop-down.
Select Module. The Create Module modal displays.
In the Module Name* field, enter a unique name for your module. The Module Path* field populates automatically.
From the Module Type* drop-down, select API.
To learn more about Module Types, view our What Is a Module? article.
(Optional) In the Module Description field, describe the purpose of the API module.
(Optional) From the Tags drop-down, select any tags you want to add.
Click Create.
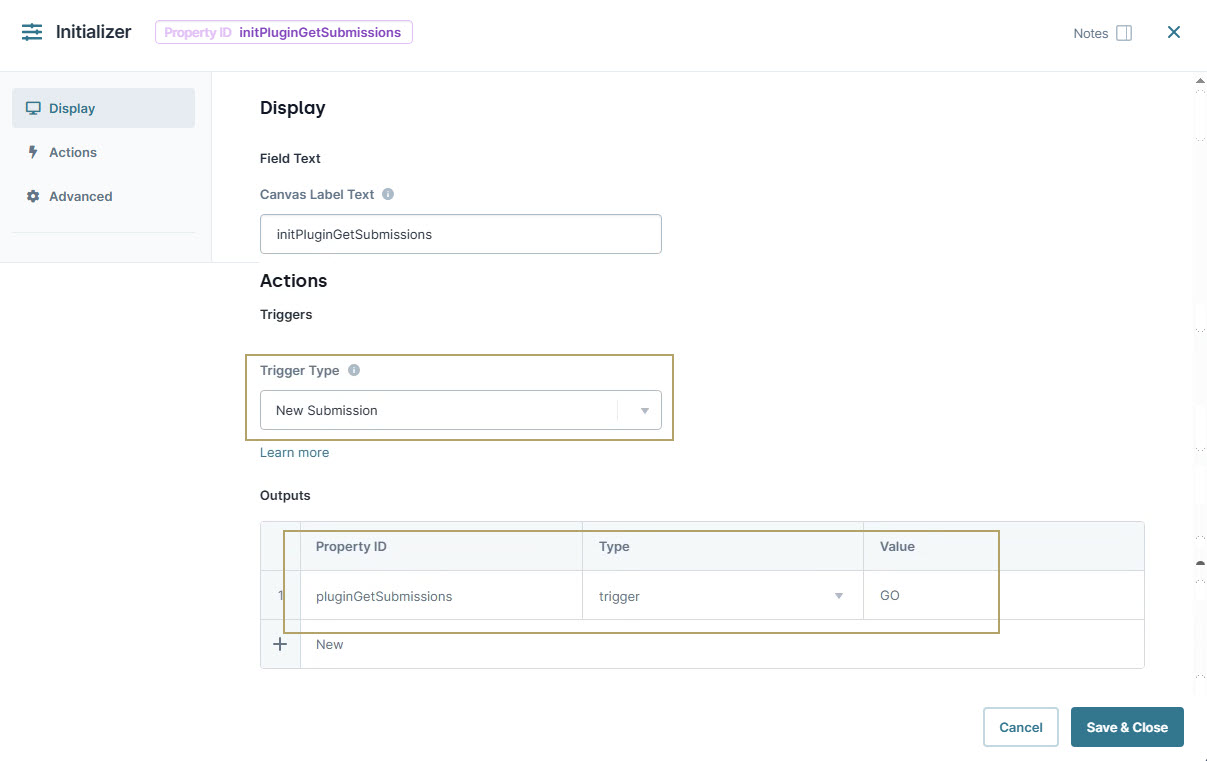
Configure the Initializer Component
Begin by adding an Initializer component to trigger the Plug-In component that you’ll set up next.
In the Module Builder, drag and drop an Initializer component inside the
panelInfoPanel component.In the Property ID and Canvas Label Text fields, enter
initPluginGetSubmissions.From the Trigger Type drop-down, select New Submission
In the Outputs table, enter the following:
#
Source
Type
Value
1
pluginGetSubmissions
trigger
GO
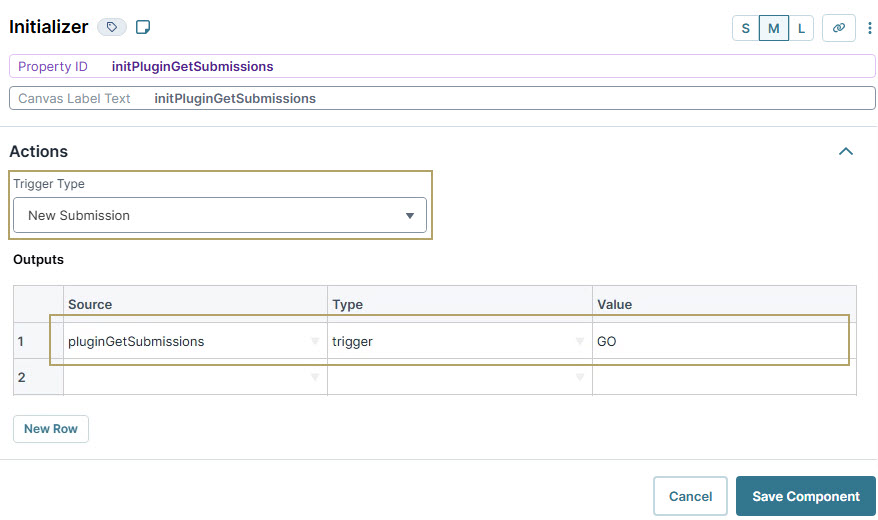
Click Save Component.
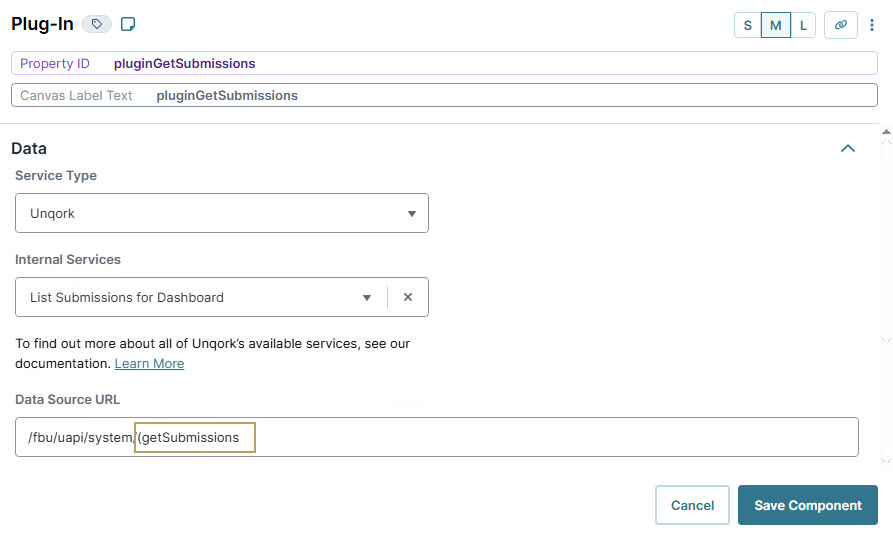
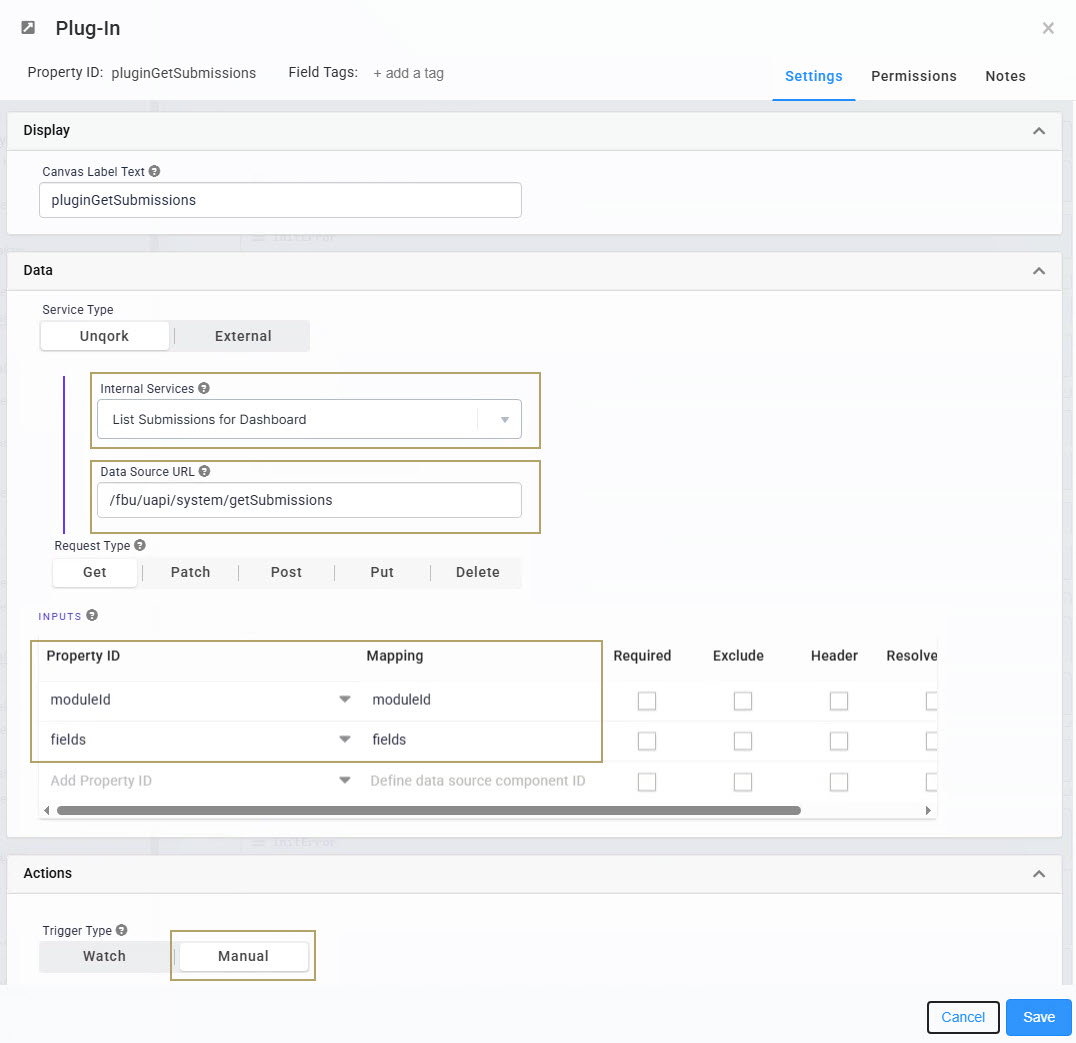
Configure the Plug-In Component
Next, you’ll configure a Plug-In component to run the Get Submissions API.
Drag and drop a Plug-In component inside the
panelInfoPanel component, below theinitPluginGetSubmissionsInitializer componentIn the Property ID and Canvas Label Text fields, enter
pluginGetSubmissions.From the Internal Services drop-down, select List Submissions for Dashboard. The Data Source URL autopopulates.
In the Inputs table, enter the following:
Property ID
Mapping
1
moduleId
moduleId
2
fields
fields
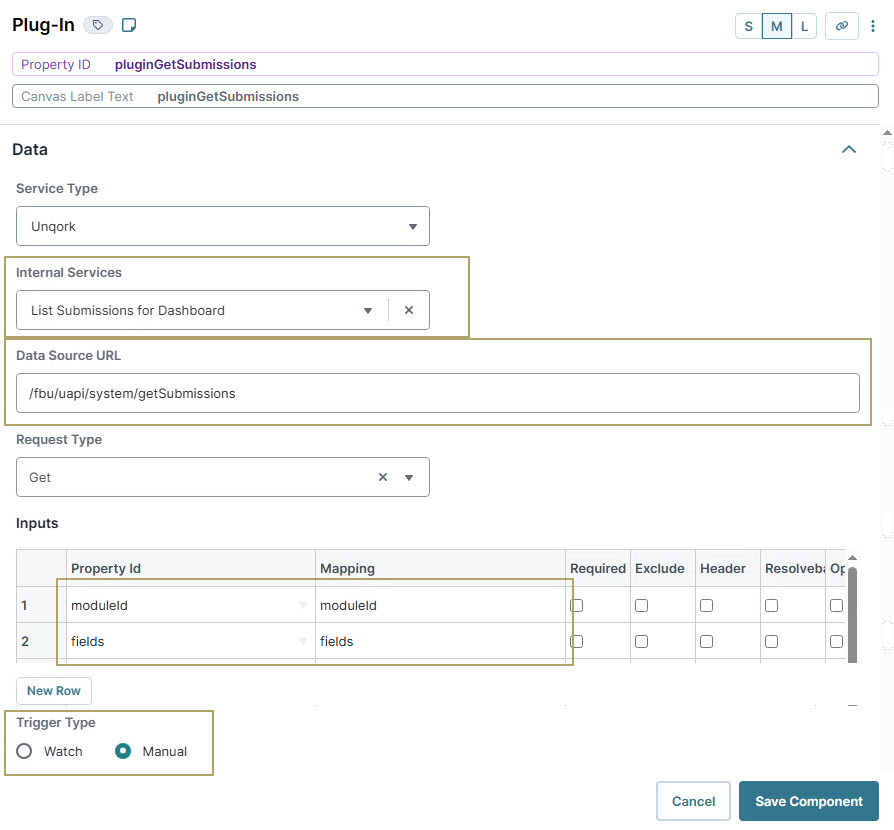
Click Save Component.
Configure the First Hidden Component
Next, configure two Hidden components. The first component stores the fields of the submission data, and the second component stores the module ID of the Front-End Remote Execute module.
Because this example is about error handling, you don't have actual submission data. These Hidden components are placeholders for the purpose of this guide.
To configure the first Hidden component:
Drag and drop a Hidden component inside the
panelRequestPanel component.In the Property ID and Label Text fields, enter
fields.Click Save Component.
Configure the Second Hidden Component
To configure the second Hidden component:
Drag and drop a Hidden component inside the
panelRequestPanel component.In the Property ID and Label Text fields, enter
moduleId.In the Default Value field, enter
5f0f5dc4a7aaa20205d8a48e.This value is the module ID of our Front-End Remote Execute Module. You can locate this ID from your front-end module's URL: https://training.unqork.io/#/form/5f0f5dc4a7aaa20205d8a48e/edit
If you created your own front-end module, enter your module's unique module ID.
Click Save Component.
Save your module.
Front-End Remote Execute Module
Now, create a Front-End module so your end-user can interact with it.
Configure the Panel Component
Configure a Panel component that acts as a container for the other components.
In the Module Builder, drag and drop a Panel component onto your canvas.
In the Property ID and Canvas Label Text fields, enter
panelRemoteExecute.Click Save Component.
Configure the Plug-In Component
Next, configure a Plug-In component that remote executes and sends the end-user's information to the back-end module.
Drag and drop a Plug-In component inside the
panelRemoteExecutePanel component.In the Property ID and Canvas Label Text fields, enter
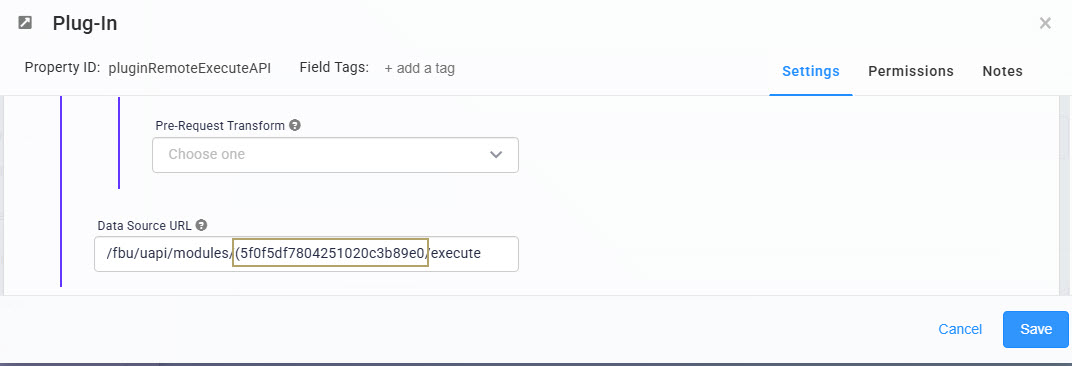
pluginRemoteExecuteAPI.From the Internal Services drop-down, select ExecuteModule.
In the Data Source URL field, replace {moduleId} with the back-end module's ID. In this case, enter
5f0f5df7804251020c3b89e0.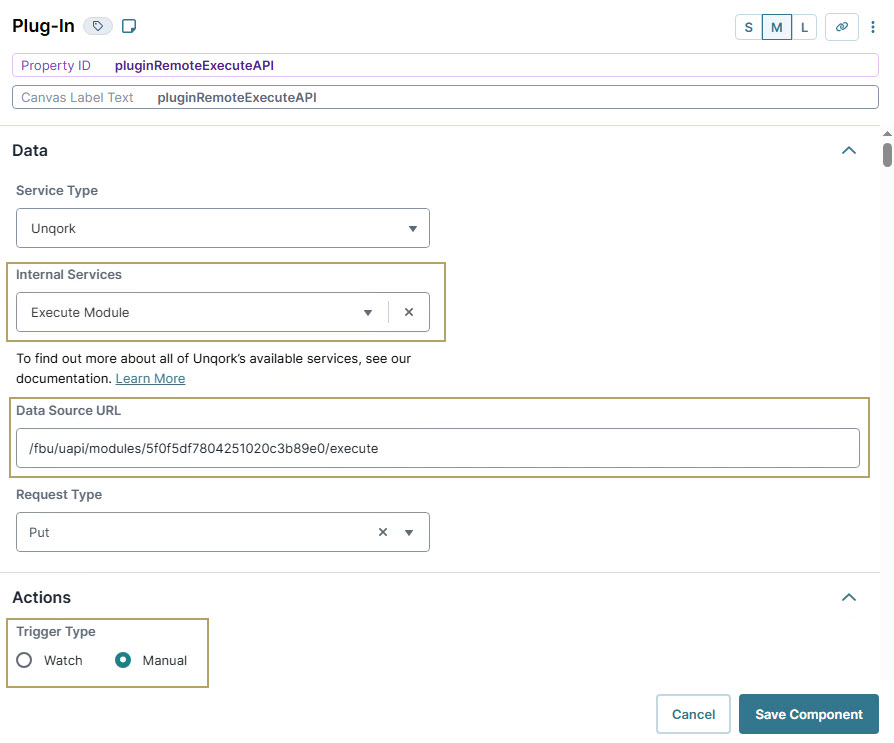
Click Save Component.
Configure the Button Component
Next, configure a Button component that triggers the pluginRemoteExecuteAPI Plug-In component, which prompts the remote execute.
Drag and drop a Button component inside the
panelRemoteExecutePanel component.In the Property ID field, enter
btnGetSubmissionsAPI.In the Label Text field, enter
Execute Get Submissions API.From the Action Type drop-down, select Event.
From the On Click drop-down, select pluginRemoteExecuteAPI.
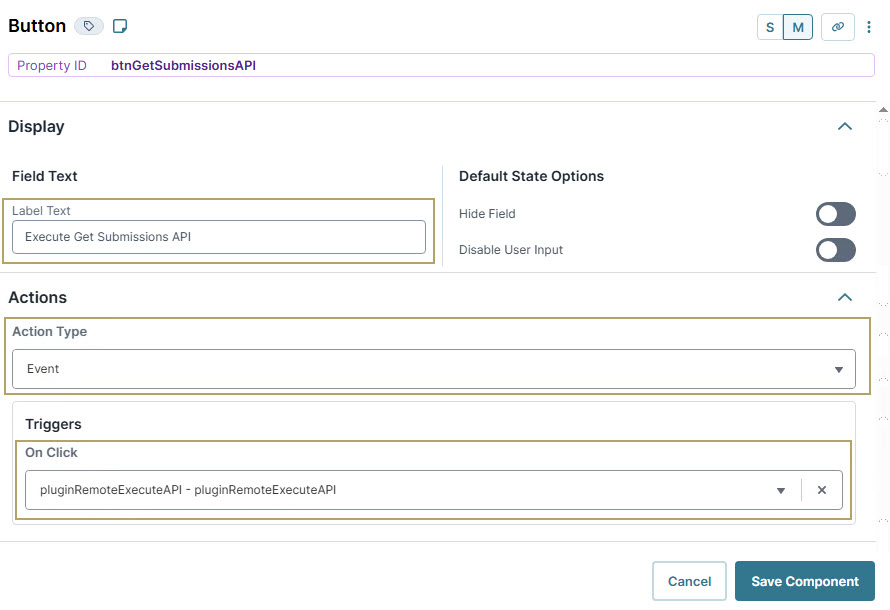
Click Save Component.
Save your module.
Error Handling Configuration
Now configure pop-up modal error messages for multiple calls on the front-end module. Doing so ensures end-users see error messages if a call fails. Error handling involves both back-end and front-end configuration.
It’s important to note that all pop-up error messages should be configured in the front-end module. This ensures that if any calls fail, the end-user will receive an error message in Express View.
Error Handling the Back-End API Module
Add an Initializer component as the error trigger for the back-end module's API call. Then, add a Hidden component to store the error response if the API call fails.
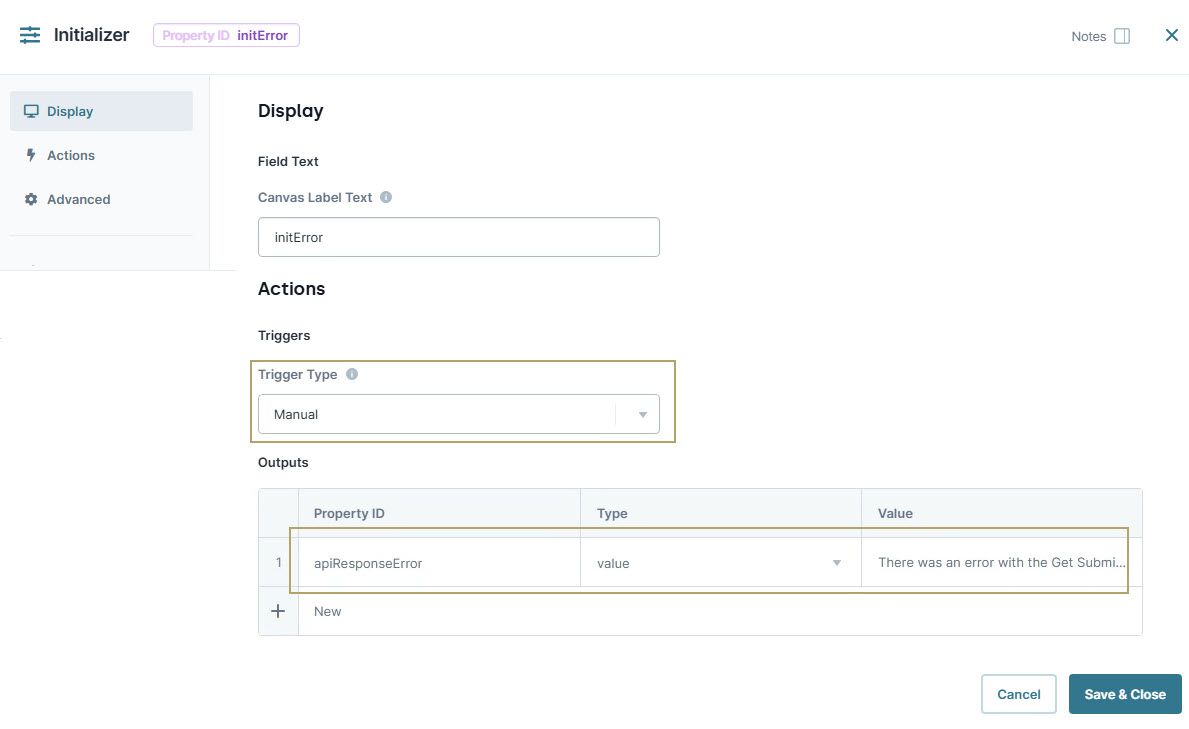
Configure the Initializer Component
Drag and drop an Initializer component inside the
panelInfoPanel component, below thepluginGetSubmissionsPlug-In component.In the Property ID and Canvas Label Text fields, enter
initError.In the Outputs table, enter the following:
#
Source
Type
Value
1
apiResponseError
value
There was an error with the Get Submissions call.
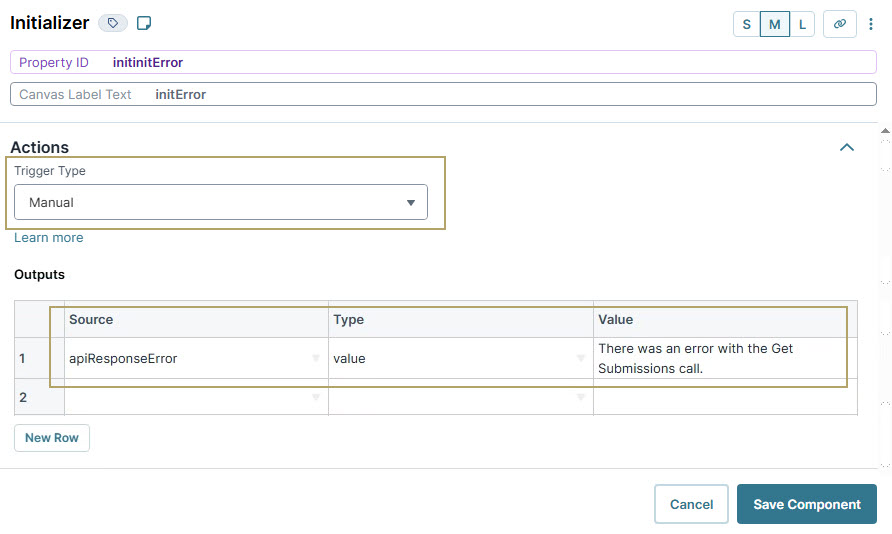
Click Save Component.
Update the Plug-In Component's Error Trigger
Next, set initError Initializer component as the error trigger of your pluginGetSubmissions Plug-In component. This configuration indicates that when an error occurs in your Plug-In component, the Initializer component is triggered.
Hover over the
pluginGetSubmissionsPlug-In component.A 5-button toolbar displays above the component on hover-over.
Using the toolbar, click the
.jpg) (Settings) button.
(Settings) button.In the Error Trigger field, enter
initError.Click Save Component.
Configure the Hidden Component
This Hidden component stores the error response for the API call. When the API call fails, the initError Initializer component is triggered and outputs an error response into the Hidden component.
Drag and drop a Hidden component inside the
panelResponsePanel component.In the Property ID and Label Text fields, enter
apiResponseError.Set Store Data in Database to
 (ON).
(ON). Storing this Hidden component in the database means you can map to it. You'll use mapping when you bring the API's error response to the front-end module.
Click Save Component.
Save your module.
Error Handling the Front-End Remote Execute Module
Next, set up error handling for the remote execute call in the front-end module.
It’s important to note that all pop-up error messages should be configured in the front-end module. This ensures that if any calls fail, the end-user will receive an error message in Express View.
Configure the Panel Component
Configure a Panel component that acts as a container for the other components.
In the Module Builder, drag and drop a Panel component onto your canvas.
In the Property ID and Canvas Label Text fields, enter
panelRemoteExecuteError.Click Save Component.
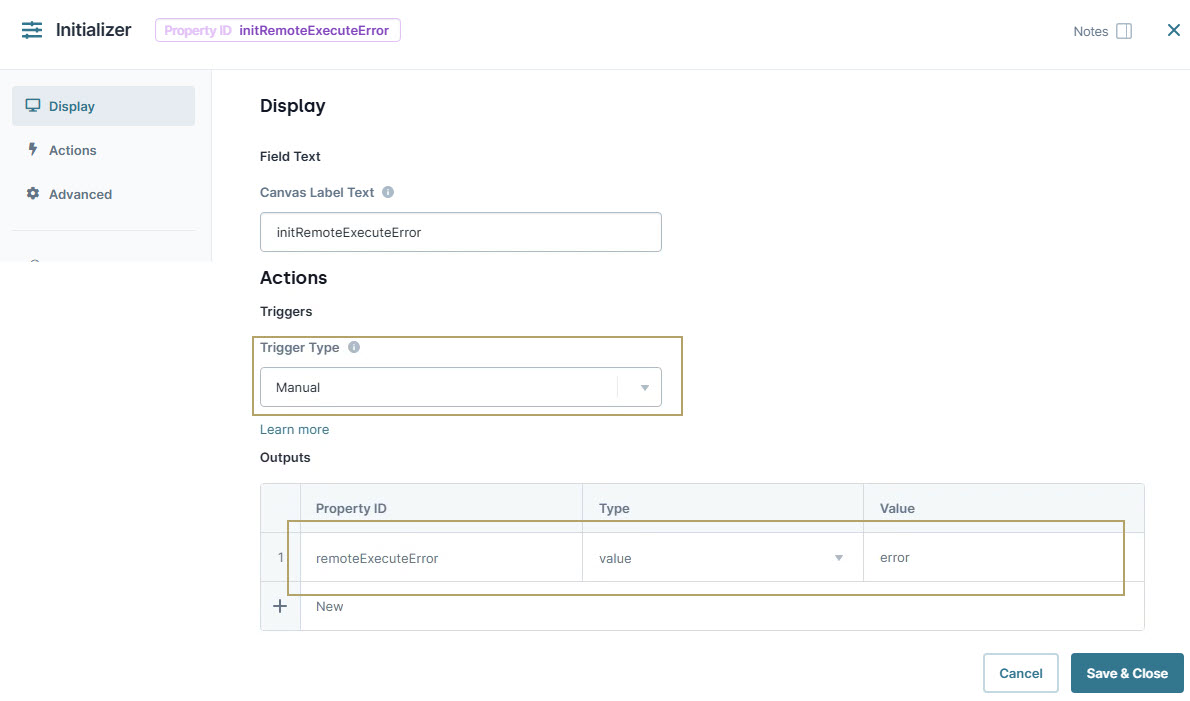
Configure the Initializer Component
Now, configure an Initializer component as the error trigger for the pluginRemoteExecuteAPI Plug-In component. If the remote execute call fails, the Initializer component outputs the error response to a Hidden component.
Drag and drop an Initializer component inside the
panelRemoteExecuteErrorPanel component.In the Property ID and Canvas Label Text fields, enter
initRemoteExecuteError.In the Outputs table, enter the following:
#
Source
Type
Value
1
remoteExecuteError
value
error
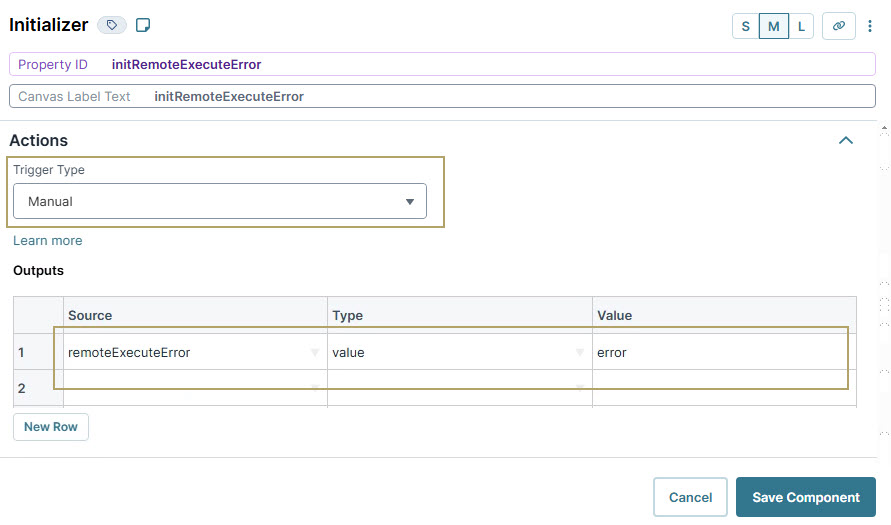
Click Save Component.
Update the Plug-In Component's Error Trigger
Next, configure the initRemoteExecuteError Initializer component as the error trigger of your pluginRemoteExecuteAPI Plug-In component. So, when an error occurs in your Plug-In component, the initRemoteExecuteError Initializer component is triggered.
Hover over the
pluginRemoteExecuteAPIPlug-In component.A 5-button toolbar displays above the component on hover-over.
Using the toolbar, click the
.jpg) (Settings) button.
(Settings) button.In the Error Trigger field, enter
initRemoteExecuteError.Click Save Component.
Configure the Hidden Component
This Hidden component stores the error response when the front-end's remote execute fails.
Drag and drop a Hidden component inside the
panelRemoteExecuteErrorPanel component, below theinitRemoteExecuteErrorInitializer component.In the Property ID and Label Text fields, enter
remoteExecuteError.Click Save Component.
Configure the Decisions Component
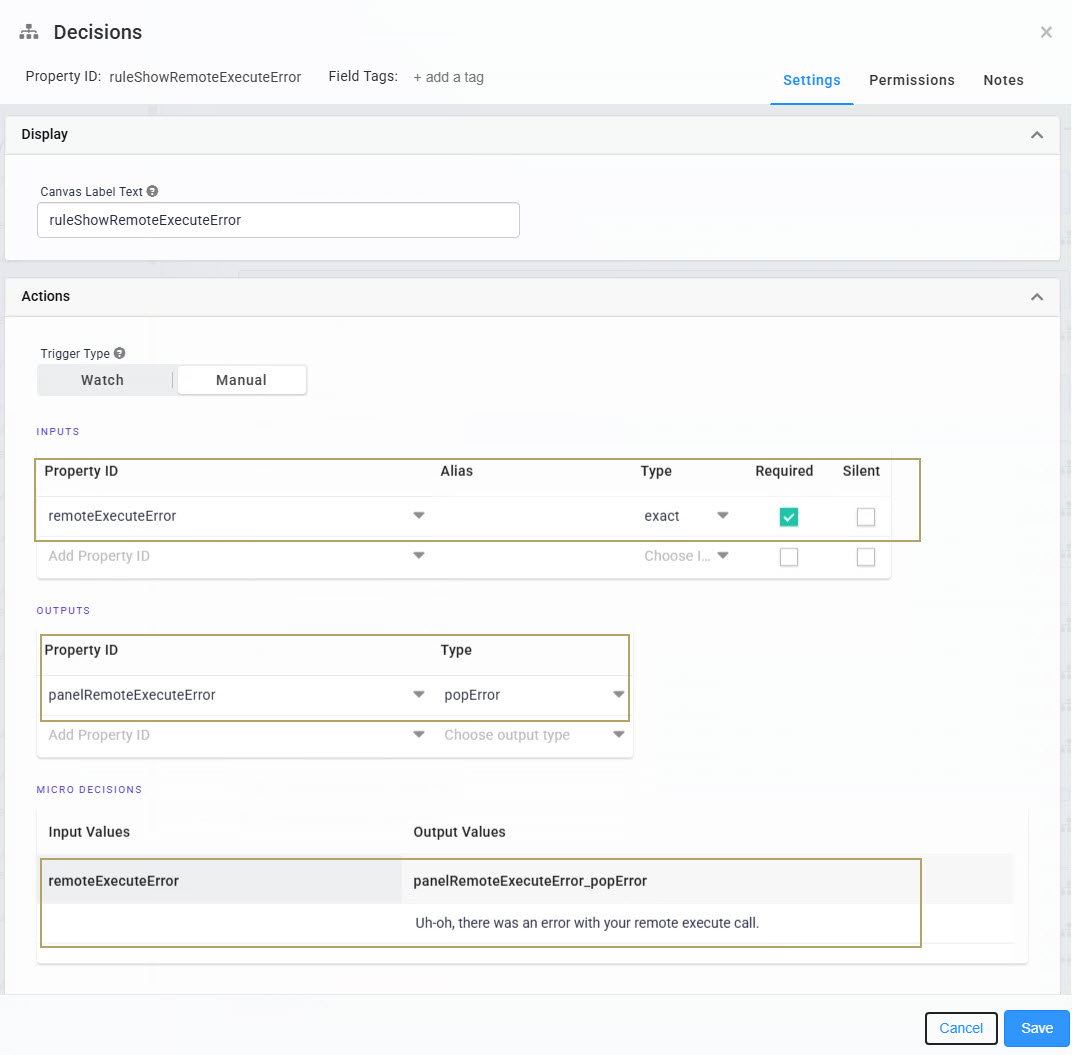
Now, configure a Decisions component to display an error message when the remote execute operation fails.
Drag and drop a Decisions component inside the
panelRemoteExecuteErrorPanel component, below theremoteExecuteErrorHidden component.In the Property ID and Canvas Label Text fields, enter
ruleShowRemoteExecuteError.In the Inputs table, enter the following:
#
Source
Type
Required
1
remoteExecuteError
exact
.png) (checked)
(checked)In the Outputs table, enter the following:
#
Source
Type
1
panelRemoteExecuteError
popError
In the Conditionals table, enter the following:
#
remoteExecuteError
panelRemoteExecuteError_popError
1
Uh-oh, there was an error with your remote execute call.
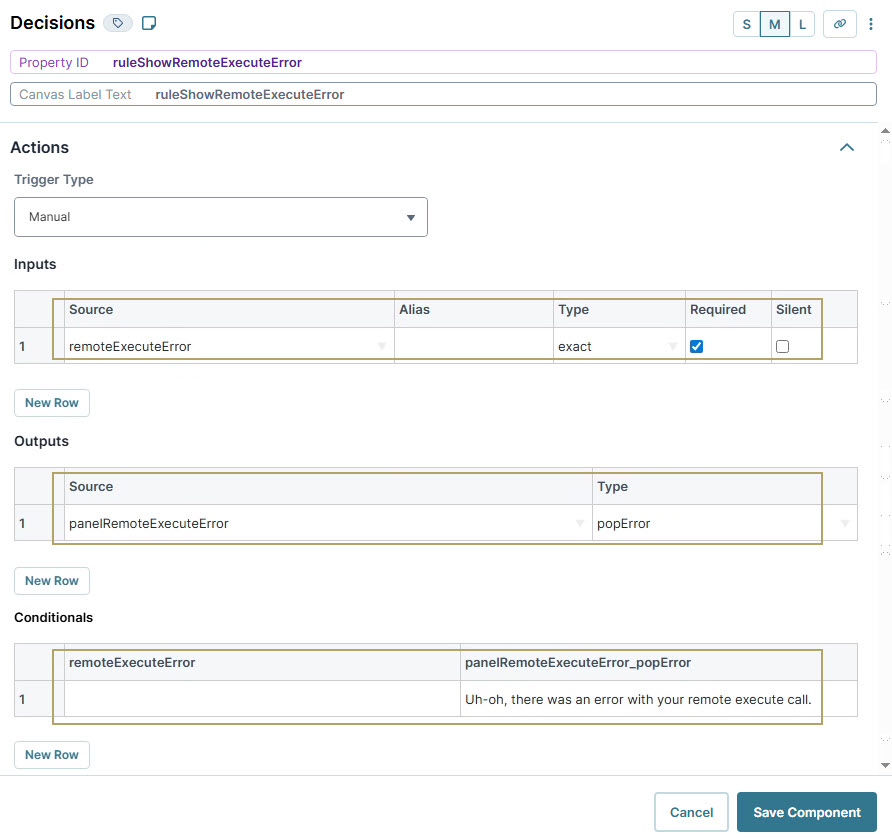
Click Save Component.
Save your module.
Now, if your remote execute fails, the end-user can see the message set in your Decisions component.
Adding a Pop-Up Error Message for the API Call
Next, create a pop-up error message for the back-end module's API call.
It’s important to note that all pop-up error messages should be configured in the front-end module. This ensures that if any calls fail, the end-user will receive an error message in Express View.
Update the Plug-In Component's Output Mapping
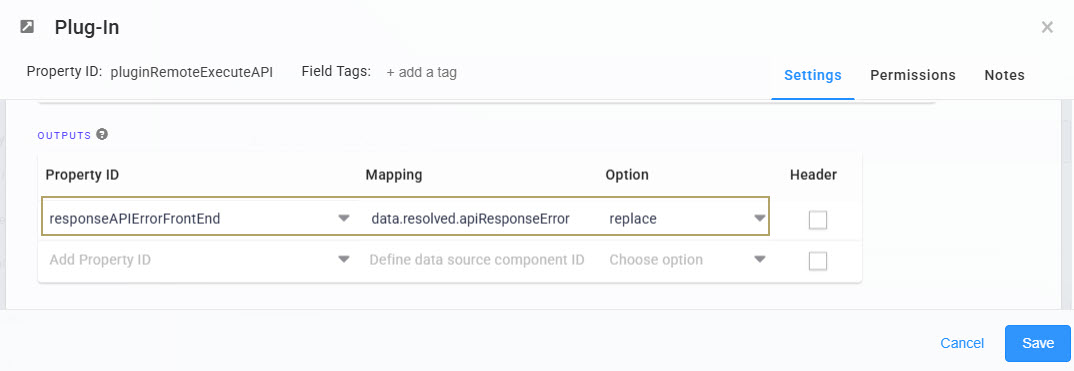
Update your pluginRemoteExecuteAPI Plug-In component to map the back-end module's apiResponseError Hidden component to a Hidden component you'll add in the front-end module.
Hover over the
pluginRemoteExecuteAPIPlug-In component.A 5-button toolbar displays above the component on hover-over.
Using the toolbar, click the
.jpg) (Settings) button.
(Settings) button.In the Outputs table, enter the following:
#
Source
Mapping
Option
1
responseAPIErrorFrontEnd
data.resolved.apiResponseError
replace
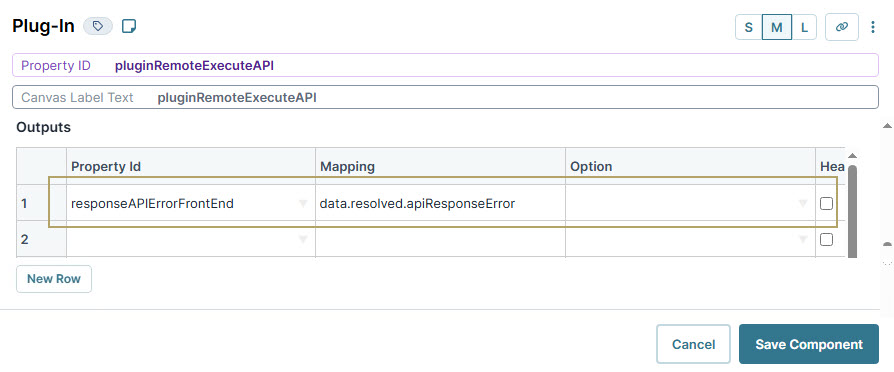
The
apiResponseErrorvalue is the name of the Hidden component on the back-end module. Because you setapiResponseErrorto store in the database, you can now map to that field. You can find mapping values using the Angular command in the DevTools Console.Click Save Component.
Configure the Panel Component
This Panel component acts as a container for the components that follow.
In the Module Builder, drag and drop a Panel component onto your canvas, placing it below the
panelRemoteExecuteErrorPanel component.In the Property ID and Canvas Label Text fields, enter
panelAPIError.Click Save Component.
Configure the Hidden Component
This Hidden component stores the error response if the back-end API call fails.
Drag and drop a Hidden component onto your canvas, placing it inside the
panelAPIErrorPanel component.In the Property ID and Label Text fields, enter
responseAPIErrorFrontEnd.Click Save Component.
Configure the Decisions Component
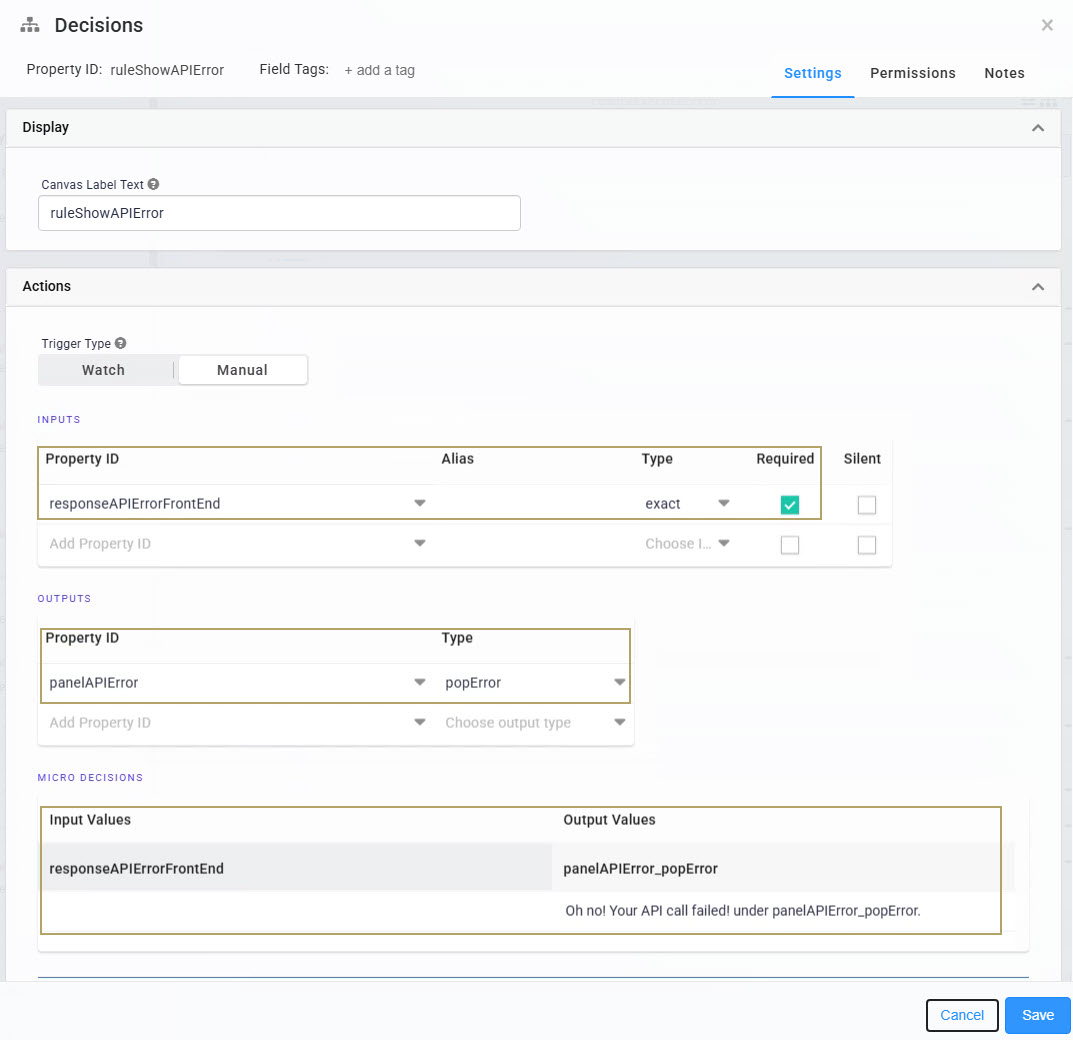
This Decisions component displays an error message on the front-end if the back-end's API call fails.
Drag and drop a Decisions component inside the
panelAPIErrorPanel component, below theresponseAPIErrorFrontEndHidden component.In the Property ID and Canvas Label Text fields, enter
ruleShowAPIError.In the Inputs table, enter the following:
#
Source
Type
Required
1
responseAPIErrorFrontEnd
exact
(checked)In the Outputs table, enter the following:
#
Source
Type
1
panelAPIError
popError
In the Conditionals table, enter the following:
#
responseAPIErrorFrontEnd
panelAPIError_popError
1
Oh no! Your API call failed!
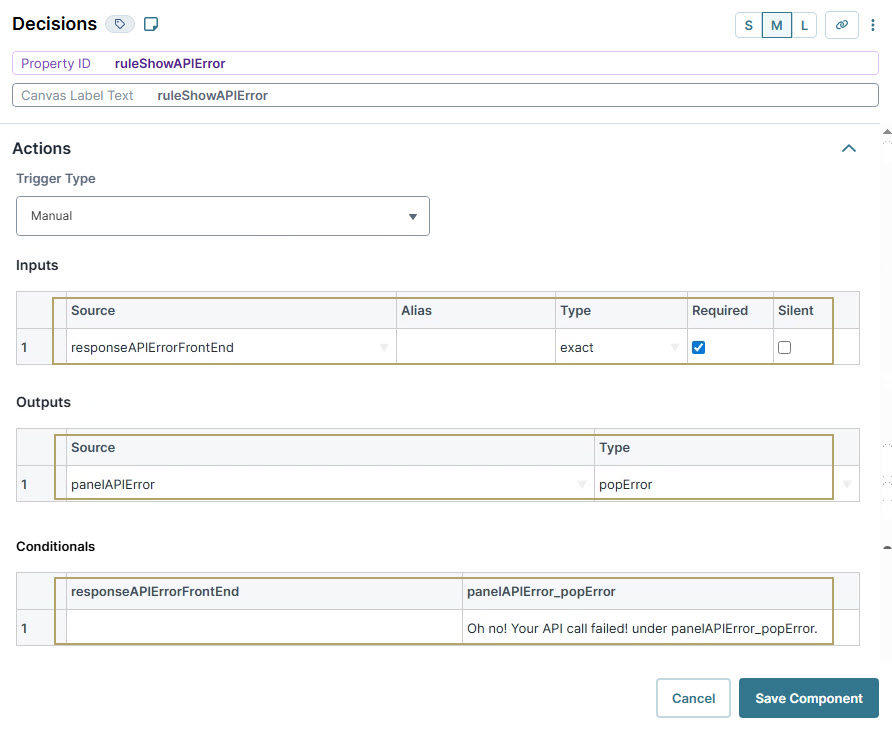
Click Save Component.
Save your module.
Test Your Pop-Up Error Messages
You have two different Plug-In component calls, and each has its own error handling. To test the error messages, you must fail each call. When a call fails, the error trigger fires, which triggers a pop-up error message on the front-end module.
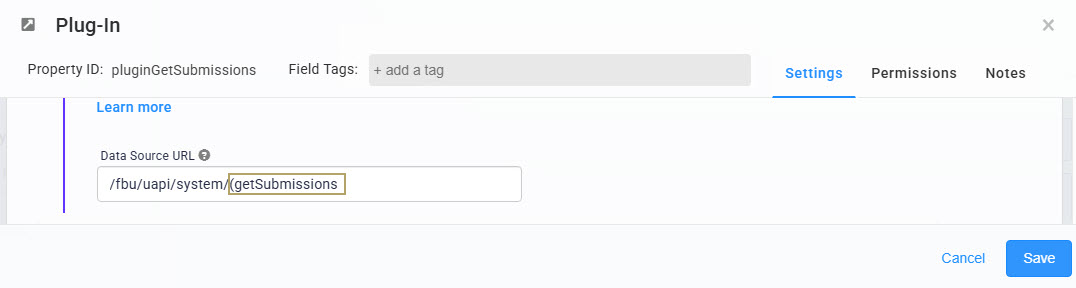
An easy way to fail a call is to add a bracket to the Plug-In component's Data Source URL. If the URL is incorrect, the call fails, and you receive a pop-up error message. Once you verify that your error message works, you can remove the bracket from the Data Source URL.
Error Message for the Remote Execute Call
First, force the Plug-In component to fail and return an error. Then, check that the error message displays in Express View.
Open the front-end module in the Module Builder.
Hover over the
pluginRemoteExecuteAPIPlug-In component.A 5-button toolbar displays above the component on hover-over.
Using the toolbar, click the
.jpg) (Settings) button.
(Settings) button.In the Data Source URL field, enter a bracket anywhere in the URL.

Click Save Component.
Save your module.
To test that your pop-up error message works:
Open your front-end module in Express View.
Click the Execute Get Submissions API button.
A pop-up displays with the error message that you set in the ruleShowRemoteExecuteError Decisions component.
Error Message for the API Call
You can now test your error handling for the Get Submissions API call. First, cause the Plug-In component to fail and return an error. Then, check that the error message displays in Express View. Remember, you want all error messages to display in the front-end module.
Open the Back-End API Module in the Module Builder.
Hover over the
pluginGetSubmissionsPlug-In component.A 5-button toolbar displays above the component on hover-over.
Using the toolbar, click the
.jpg) (Settings) button.
(Settings) button.In the Data Source URL field, enter a bracket anywhere in the URL.
Click Save Component.
Save your module.
To test that the pop-up error message works:
Open your front-end module in Express View.
Click the Execute Get Submissions API button.
You'll see a pop-up with the error message that you set in the ruleShowAPIError Decisions component.
Some configurations require layers of remote executes or multiple Plug-In component calls. It's a best practice to create error handling for every Plug-In component in your configuration. That way, if an error occurs, your end-user will see the error message.
Every Plug-In component needs an error trigger with Hidden components that store the data in the database to carry the error responses to the front-end. Always create error handling for a Plug-In component in the module where that Plug-In component exists. Then, you'll continue the error handling configuration on any module(s). Lastly, you'll bring the error responses to the front-end, completing the assembly line.
In this how-to guide, you'll learn how to handle remote execute calls that trigger other calls. Once you learn how this configuration works, you can apply it to any number of calls.
Let's look at the two modules in this error handling example:
Module | Description |
|---|---|
Front-End Remote Execute Module | Your end-users interact with this module by clicking a button that fires a Plug-In component. The Plug-In component remote executes to the Back-End API module.
|
Back-End API Module | This module makes the API call using the Get Submissions API to retrieve submission data. End-users are unable to view or interact with this module.
|
Because there are two calls (one remote execute and one internal), there are two potential places where issues can occur. The goal is to error handle all Plug-In components and configure error messages that display on the front-end module. From there, any error down the line triggers messages for the end-user. The end-user stays informed no matter where the error occurs.
Here's how your error message might look in Express View if a remote execute call fails:
Here's how your error message might look in Express View if the Get Submissions API call fails:
In a real-life configuration, you can choose to have a generic message. End-users might not know what a remote execute or API does, so use a message that's easy to understand. For this example, each call has a unique error message. Use this approach to test the error handling of both calls.
Configure the Back-End API Module
This back-end module makes the API call. For this use case, use the Get Submissions API call. The front-end module remote executes this back-end module, which fires the API call. If the API call fails, the back-end module tells the front-end module about the failure. The front-end module then fires a pop-up message for the end-user in Express View. This process all happens behind the scenes.
Configure the API Module
An API module contains four Panel components to help with the API setup. You can hover over the panelConfig and delete it, as it is not used further in the configuration.
To create an API module at the Application level:
At the top right of the page, click the + Create New drop-down.
Select Module. The Create Module modal displays.
In the Module Name* field, enter a unique name for your module. The Module Path* field populates automatically.
From the Module Type* drop-down, select API.
To learn more about Module Types, view our What Is a Module? article.
(Optional) In the Module Description field, describe the purpose of the API module.
(Optional) From the Tags drop-down, select any tags you want to add.
Click Create.
Configure the Initializer Component
Begin by adding an Initializer component to trigger the Plug-In component that you’ll set up next.
Drag and drop an Initializer component inside the
panelInfoPanel component.In the Property ID and Canvas Label Text fields, enter
initPluginGetSubmissions.From the Trigger Type drop-down, select New Submission
In the Outputs table, enter the following:
#
Property ID
Type
Value
1
pluginGetSubmissions
trigger
GO
Click Save & Close.
Configure the Plug-In Component
Next, you’ll configure a Plug-In component to run the Get Submissions API.
Drag and drop a Plug-In component inside the
panelInfoPanel component, below theinitPluginGetSubmissionsInitializer component.In the Property ID and Canvas Label Text fields, enter
pluginGetSubmissions.From the Internal Services drop-down, select List Submissions for Dashboard.
In the Inputs table, enter the following:
Property ID
Mapping
moduleId
moduleId
fields
fields
Click Save.
Configure the First Hidden Component
Next, configure two Hidden components. The first component stores the fields of the submission data, and the second component stores the module ID of the Front-End Remote Execute module.
Because this example is about error handling, you don't have actual submission data. These Hidden components are placeholders for the purpose of this guide.
To configure the first Hidden component:
Drag and drop a Hidden component inside the
panelRequestPanel component.In the Property ID and Label Text fields, enter
fields.Click Save & Close.
Configure the Second Hidden Component
To configure the second Hidden component:
Drag and drop a Hidden component inside the
panelRequestPanel component.In the Property ID and Label Text fields, enter
moduleId.In the Default Value field, enter
5f0f5dc4a7aaa20205d8a48e.This value is the module ID of our Front-End Remote Execute Module. You can locate this ID from your front-end module's URL: https://training.unqork.io/#/form/5f0f5dc4a7aaa20205d8a48e/edit
If you created your own front-end module, enter your module's unique module ID.
Click Save & Close.
Save your module.
Front-End Remote Execute Module
Now, create a Front-End module so your end-user can interact with it.
Configure the Panel Component
Configure a Panel component that acts as a container for the other components.
In the Module Builder, drag and drop a Panel component onto your canvas.
In the Property ID and Label Text fields, enter
panelRemoteExecute.Click Save & Close.
Configure the Plug-In Component
Next, configure a Plug-In component that remote executes and sends the end-user's information to the back-end module.
Drag and drop a Plug-In component inside the
panelRemoteExecutePanel component.In the Property ID and Canvas Label Text fields, enter
pluginRemoteExecuteAPI.From the Internal Services drop-down, select ExecuteModule.
In the Data Source URL field, replace {moduleId} with the back-end module's ID. In this case, you’ll enter
5f0f5df7804251020c3b89e0.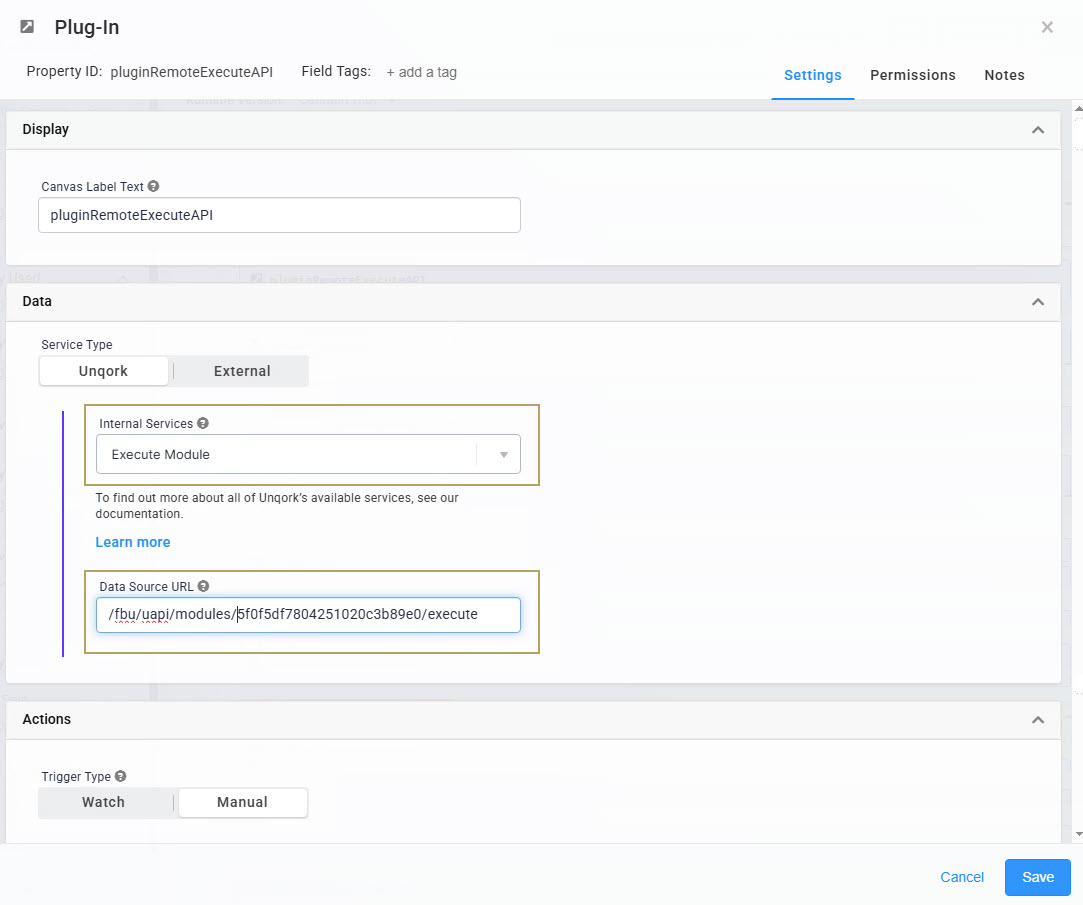
Click Save.
Configure the Button Component
Next, configure a Button component that triggers the pluginRemoteExecuteAPI Plug-In component, which prompts the remote execute.
Drag and drop a Button component inside the panelRemoteExecute Panel. You can place the Button above or below the
pluginRemoteExecutePlug-In.In the Property ID field, enter
btnGetSubmissionsAPI.In the Label Text field, enter
Execute Get Submissions API.Set the Action Type as Event.
From the On Click drop-down, enter
pluginRemoteExecuteAPI.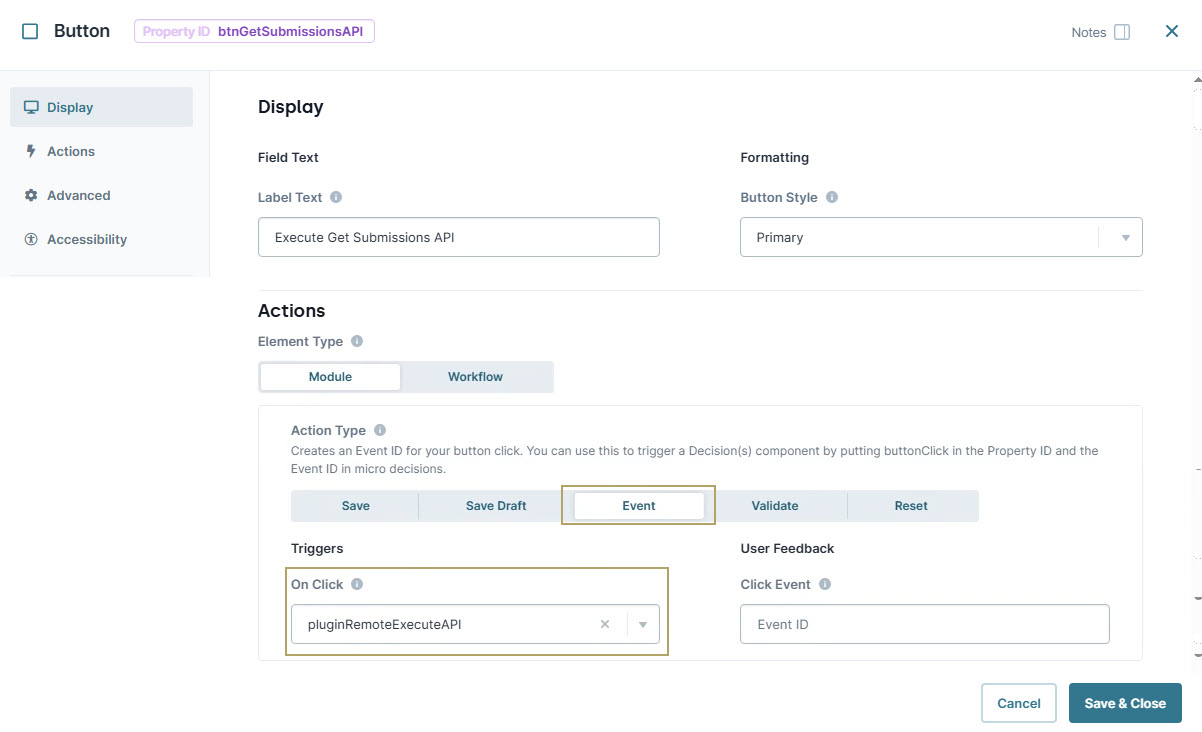
Click Save & Close.
Save your module.
Error Handling Configuration
Now configure pop-up modal error messages for multiple calls on the front-end module. Doing so ensures end-users see error messages if a call fails. Error handling involves both back-end and front-end configuration.
It’s important to note that all pop-up error messages should be configured in the front-end module. This ensures that if any calls fail, the end-user will receive an error message in Express View.
Error Handling the Back-End API Module
Add an Initializer component as the error trigger for the back-end module's API call. Then, add a Hidden component to store the error response if the API call fails.
Configure the Initializer Component
Drag and drop an Initializer component inside the
panelInfoPanel component, below thepluginGetSubmissionsPlug-In component.In the Property ID and Canvas Label Text fields, enter
initError.In the Outputs table, enter the following:
#
Source
Type
Value
1
apiResponseError
value
There was an error with the Get Submissions call.
Click Save & Close.
Update the Plug-In Component's Error Trigger
Next, set initError Initializer component as the error trigger of your pluginGetSubmissions Plug-In component. This configuration indicates that when an error occurs in your Plug-In component, the Initializer component is triggered.
Hover over the
pluginGetSubmissionsPlug-In component.A 5-button toolbar displays above the component on hover-over.
Using the toolbar, click the
(Settings) button.In the Error Trigger field, enter
initError.Click Save.
Configure the Hidden Component
This Hidden component stores the error response for the API call. When the API call fails, the initError Initializer component is triggered and outputs an error response into the Hidden component.
Drag and drop a Hidden component inside the
panelResponsePanel component.In the Property ID and Canvas Label Text fields, enter
apiResponseError.Set Store Data in Database to
(ON). Storing this Hidden component in the database means you can map to it. You'll use mapping when you bring the API's error response to the front-end module.
Click Save & Close.
Save your module.
Error Handling the Front-End Remote Execute Module
Next, set up error handling for the remote execute call in the front-end module.
It’s important to note that all pop-up error messages should be configured in the front-end module. This ensures that if any calls fail, the end-user will receive an error message in Express View.
Configure the Panel Component
Configure a Panel component that acts as a container for the other components.
In the Module Builder, drag and drop a Panel component onto your canvas.
In the Property ID and Label Text field, enter
panelRemoteExecuteError.Click Save & Close.
Configure the Initializer Component
Now, configure an Initializer component as the error trigger for the pluginRemoteExecuteAPI Plug-In component. If the remote execute call fails, the Initializer component outputs the error response to a Hidden component.
Drag and drop an Initializer component inside the
panelRemoteExecuteErrorPanel component.In the Property ID and Canvas Label Text fields, enter
initRemoteExecuteError.In the Outputs table, enter the following:
#
Source
Type
Value
1
remoteExecuteError
value
error
Click Save & Close.
Update the Plug-In Component's Error Trigger
Next, configure the initRemoteExecuteError Initializer component as the error trigger of your pluginRemoteExecuteAPI Plug-In component. So, when an error occurs in your Plug-In component, the initRemoteExecuteError Initializer component is triggered.
Hover over the
pluginRemoteExecuteAPIPlug-In component.A 5-button toolbar displays above the component on hover-over.
Using the toolbar, click the
(Settings) button.In the Error Trigger field, enter
initRemoteExecuteError.Click Save.
Configure the Hidden Component
This Hidden component stores the error response when the front-end module's remote execute fails.
Drag and drop a Hidden component inside the
panelRemoteExecuteErrorPanel component, below theinitRemoteExecuteErrorInitializer component.In the Property ID and Canvas Label Text fields, enter
remoteExecuteError.Click Save & Close.
Configure the Decisions Component
Now, configure a Decisions component to display an error message when the remote execute operation fails.
Drag and drop a Decisions component inside the
panelRemoteExecuteErrorPanel component, below theremoteExecuteErrorHidden component.In the Property ID and Canvas Label Text fields, enter
ruleShowRemoteExecuteError.In the Inputs table, enter the following:
Source
Type
Required
remoteExecuteError
exact
(checked)In the Outputs table, enter the following:
Source
Type
panelRemoteExecuteError
popError
In the Micro Decisions table, enter the following:
remoteExecuteError
panelRemoteExecuteError_popError
Uh-oh, there was an error with your remote execute call.
Click Save.
Save your module.
Now, if your remote execute fails, the end-user sees the message you set in your Decisions component.
Adding a Pop-Up Error Message for the API Call
Next, create a pop-up error message for the back-end module's API call.
It’s important to note that all pop-up error messages should be configured in the front-end module. This ensures that if any calls fail, the end-user will receive an error message in Express View.
Update the Plug-In Component's Output Mapping
Update your pluginRemoteExecuteAPI Plug-In component to map the back-end module's apiResponseError Hidden component to a Hidden component you'll add in the front-end module.
Hover over the
pluginRemoteExecuteAPIPlug-In component.A 5-button toolbar displays above the component on hover-over.
Using the toolbar, click the
(Settings) button.In the Outputs table, enter the following:
Source
Mapping
Option
responseAPIErrorFrontEnd
data.resolved.apiResponseError
replace
The
apiResponseErrorvalue is the name of the Hidden component on the back-end module. Because you setapiResponseErrorto store in the database, you can now map to that field. You can find mapping values using the Angular command in the DevTools Console.Click Save.
Configure the Panel Component
This Panel acts as a container for the components that follow.
In the Module Builder, drag and drop a Panel component onto your canvas, placing it below the
panelRemoteExecuteErrorPanel component.In the Property ID field, enter
panelAPIError. You can leave the Label Text blank.Click Save & Close.
Configure the Hidden Component
This Hidden component stores the error response if the back-end API call fails.
Drag and drop a Hidden component inside the
panelAPIErrorPanel component.In the Property ID and Canvas Label Text fields, enter
responseAPIErrorFrontEnd.Click Save & Close.
Configure the Decisions Component
This Decisions component displays an error message to your front-end user if the back-end's API call fails.
Drag and drop a Decisions component inside the
panelAPIErrorPanel component, below theresponseAPIErrorFrontEndHidden component.In the Property ID and Canvas Label Text fields, enter
ruleShowAPIError.In the Inputs table, enter the following:
Source
Type
Required
responseAPIErrorFrontEnd
exact
(checked)In the Outputs table, enter the following:
Source
Type
panelAPIError
popError
In the Micro Decisions table, enter the following:
responseAPIErrorFrontEnd
panelAPIError_popError
Oh no! Your API call failed!
Click Save.
Save your module.
Test Your Pop-Up Error Messages
You have two different Plug-In component calls, and each has its own error handling. To test the error messages, you must fail each call. When a call fails, the error trigger fires, which triggers a pop-up error message on the front-end module.
An easy way to fail a call is to add a bracket to the Plug-In component's Data Source URL. If the URL is incorrect, the call fails, and you receive a pop-up error message. Once you verify that your error message works, you can remove the bracket from the Data Source URL.
Error Message for the Remote Execute Call
First, force the Plug-In component to fail and return an error. Then, check that the error message displays in Express View.
Open the front-end module in the Module Builder.
Hover over the
pluginRemoteExecuteAPIPlug-In component.A 5-button toolbar displays above the component on hover-over.
Using the toolbar, click the
(Settings) button.In the Data Source URL field, enter a bracket anywhere.
Click Save.
Save your module.
To test that your pop-up error message works:
Open your front-end module in Express View.
Click the Execute Get Submissions API button.
A pop-up displays with the error message that you set in the ruleShowRemoteExecuteError Decisions component.
Error Message for the API Call
You can now test your error handling for the Get Submissions API call. First, cause the Plug-In component to fail and return an error. Then, check that the error message displays in Express View. Remember, you want all error messages to display in the front-end module.
Open the Back-End API Call Module in the Module Builder.
Hover over the
pluginGetSubmissionsPlug-In component.A 5-button toolbar displays above the component on hover-over.
Using the toolbar, click the
(Settings) button.In the Data Source URL field, enter a bracket anywhere.
Click Save.
Save your module.
To test that the pop-up error message works:
Open your front-end module in Express View.
Click the Execute Get Submissions API button.
You'll see a pop-up with the error message that you set in the ruleShowAPIError Decisions component.