How to: Configure Advanced Integration Error Handling
Overview
The Introduction to Error Handling course in the Professional Configurator Learning Path familiarized you with the basics of error handling. You learned about the integratorErrors object, which references error responses from Plug-In components and functions outside of the standard data object. That course also taught you how to reference system-generated error responses. And, you learned how to make those system-generated error responses and codes display in a pop-up.
To review the basics of error handling, search Introduction to Error Handling in our In-Product Help.
In the advanced use case of that course, you learned how to create custom error messages. These error messages describe different types of errors across multiple modules. These error messages clarify application issues when the information from DevTools is difficult to decipher.
To review the error handling advanced use case, search Use Case: Configuring Multiple Error Messages in our In-Product Help.
In this lesson, you'll expand your knowledge from that use case. You'll learn a new way to reference the integratorErrors object. You'll also create custom error messages and learn new ways to display them.
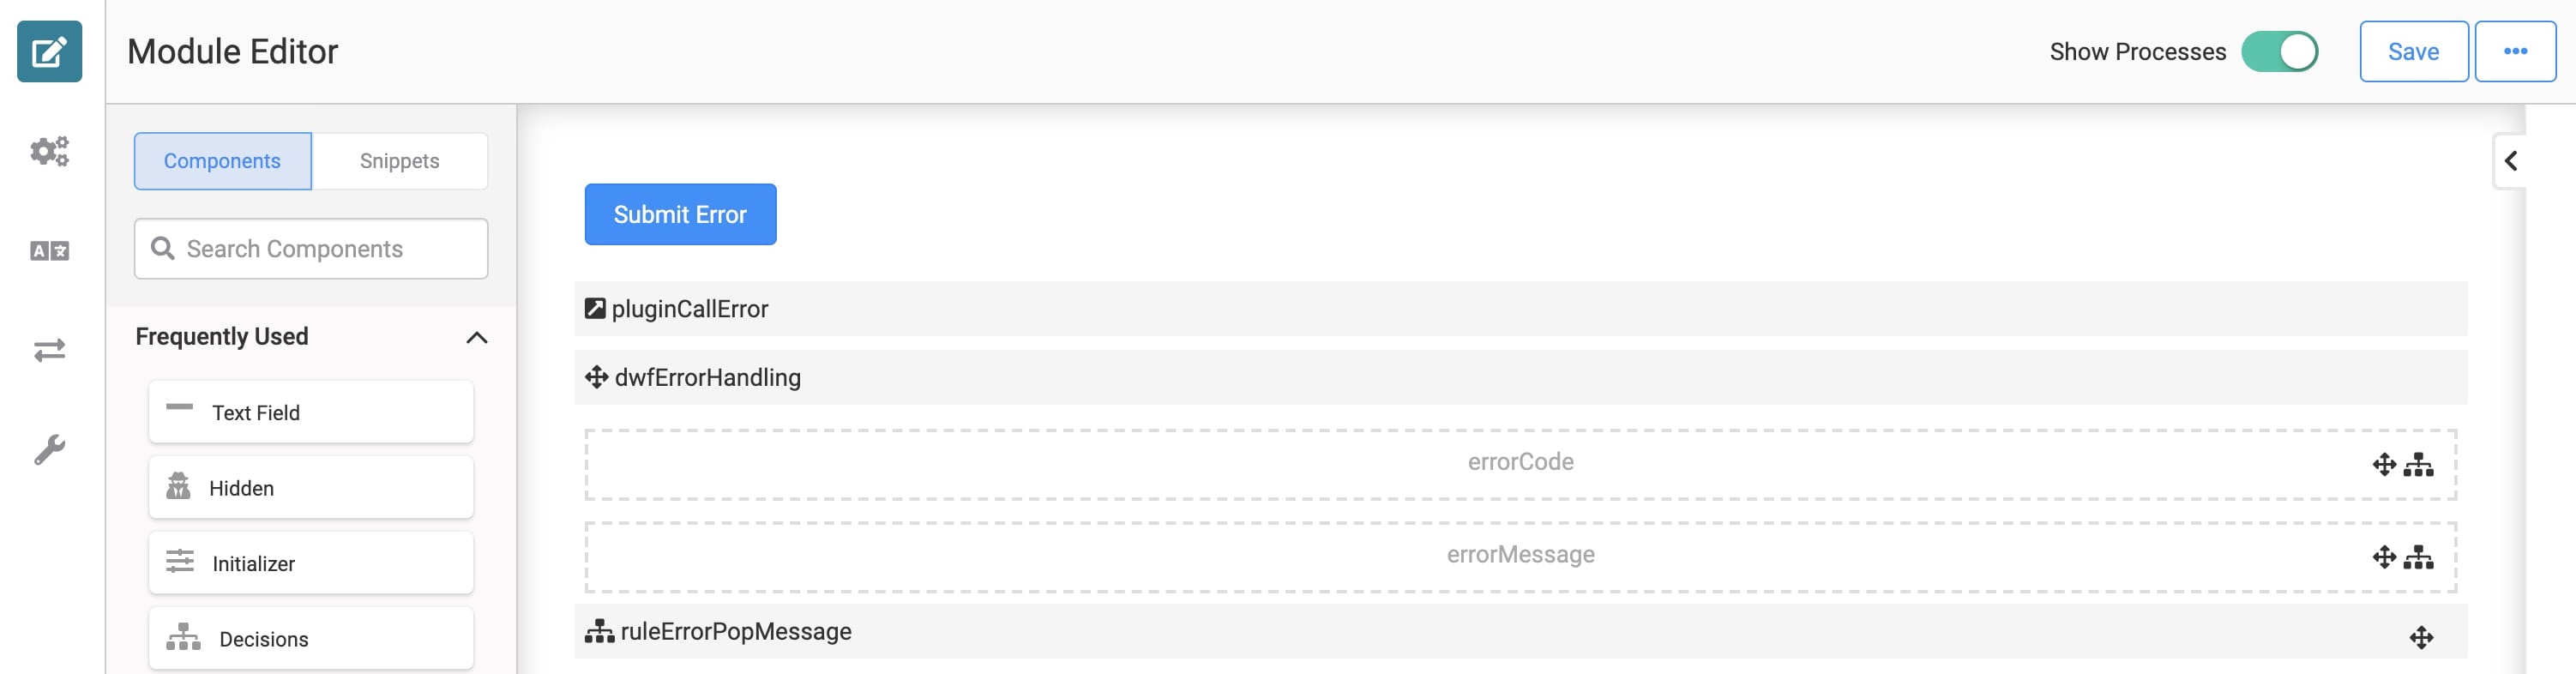
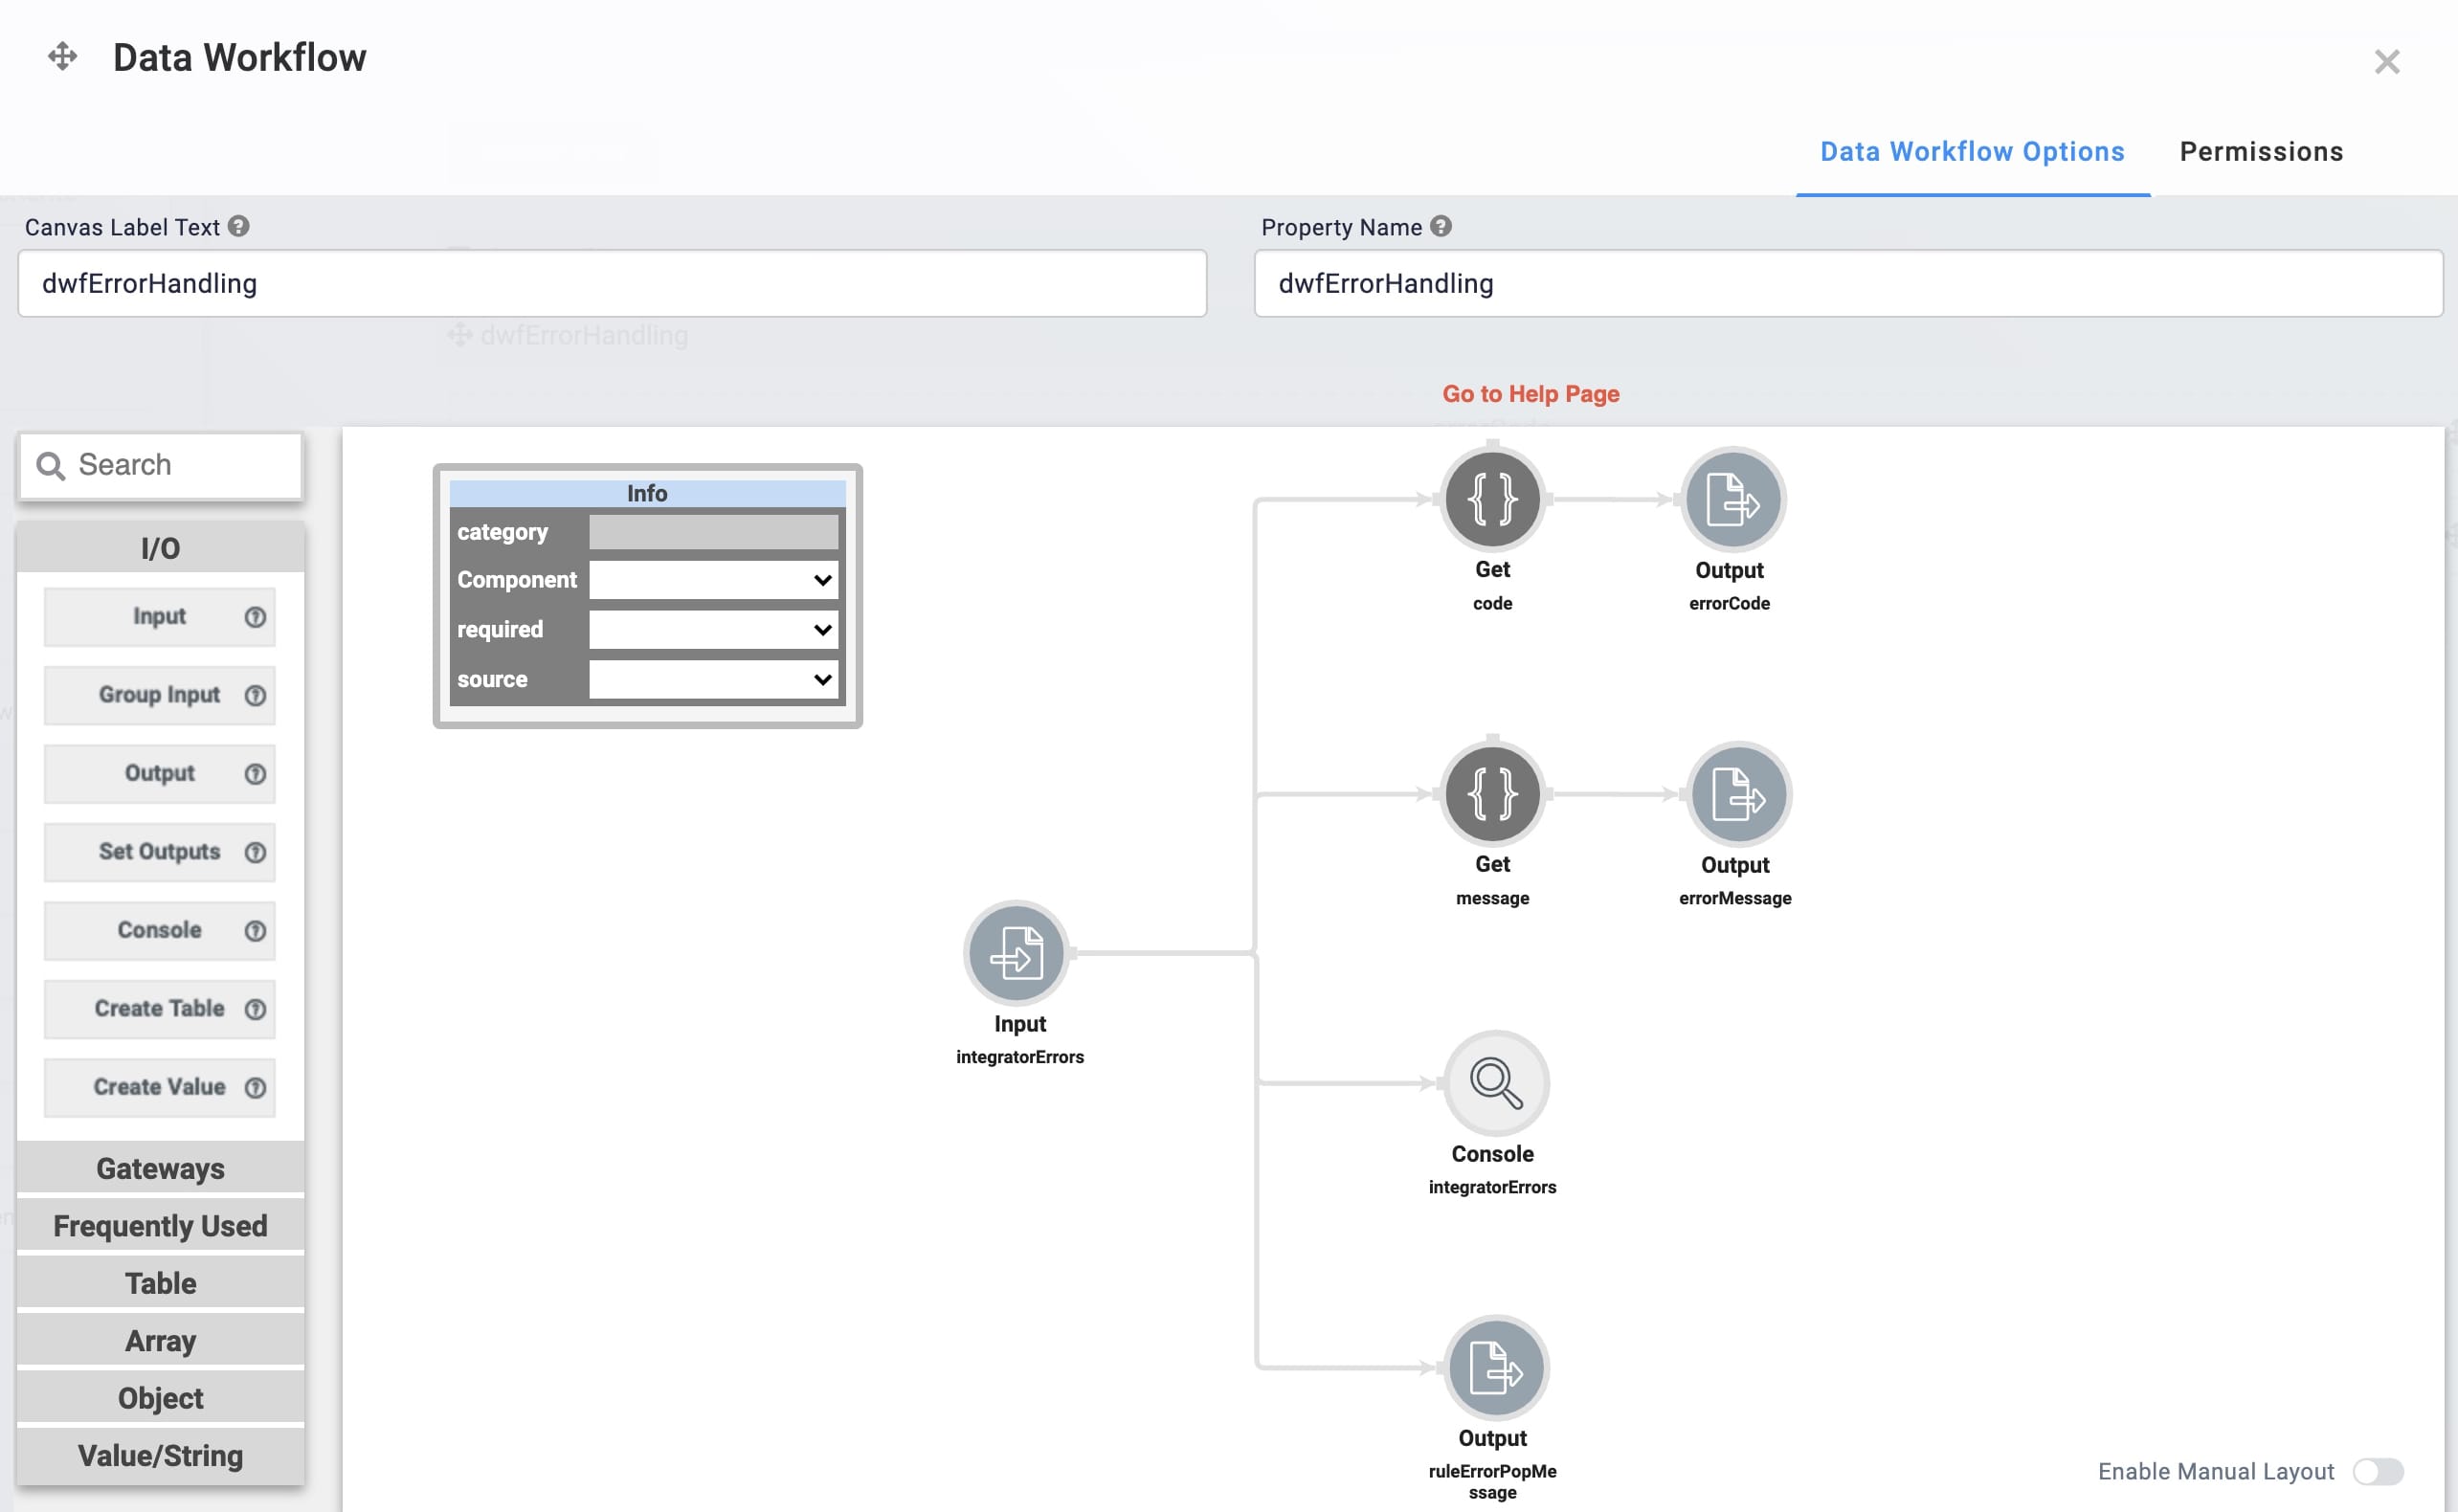
Your completed module looks like this in the Module Builder:
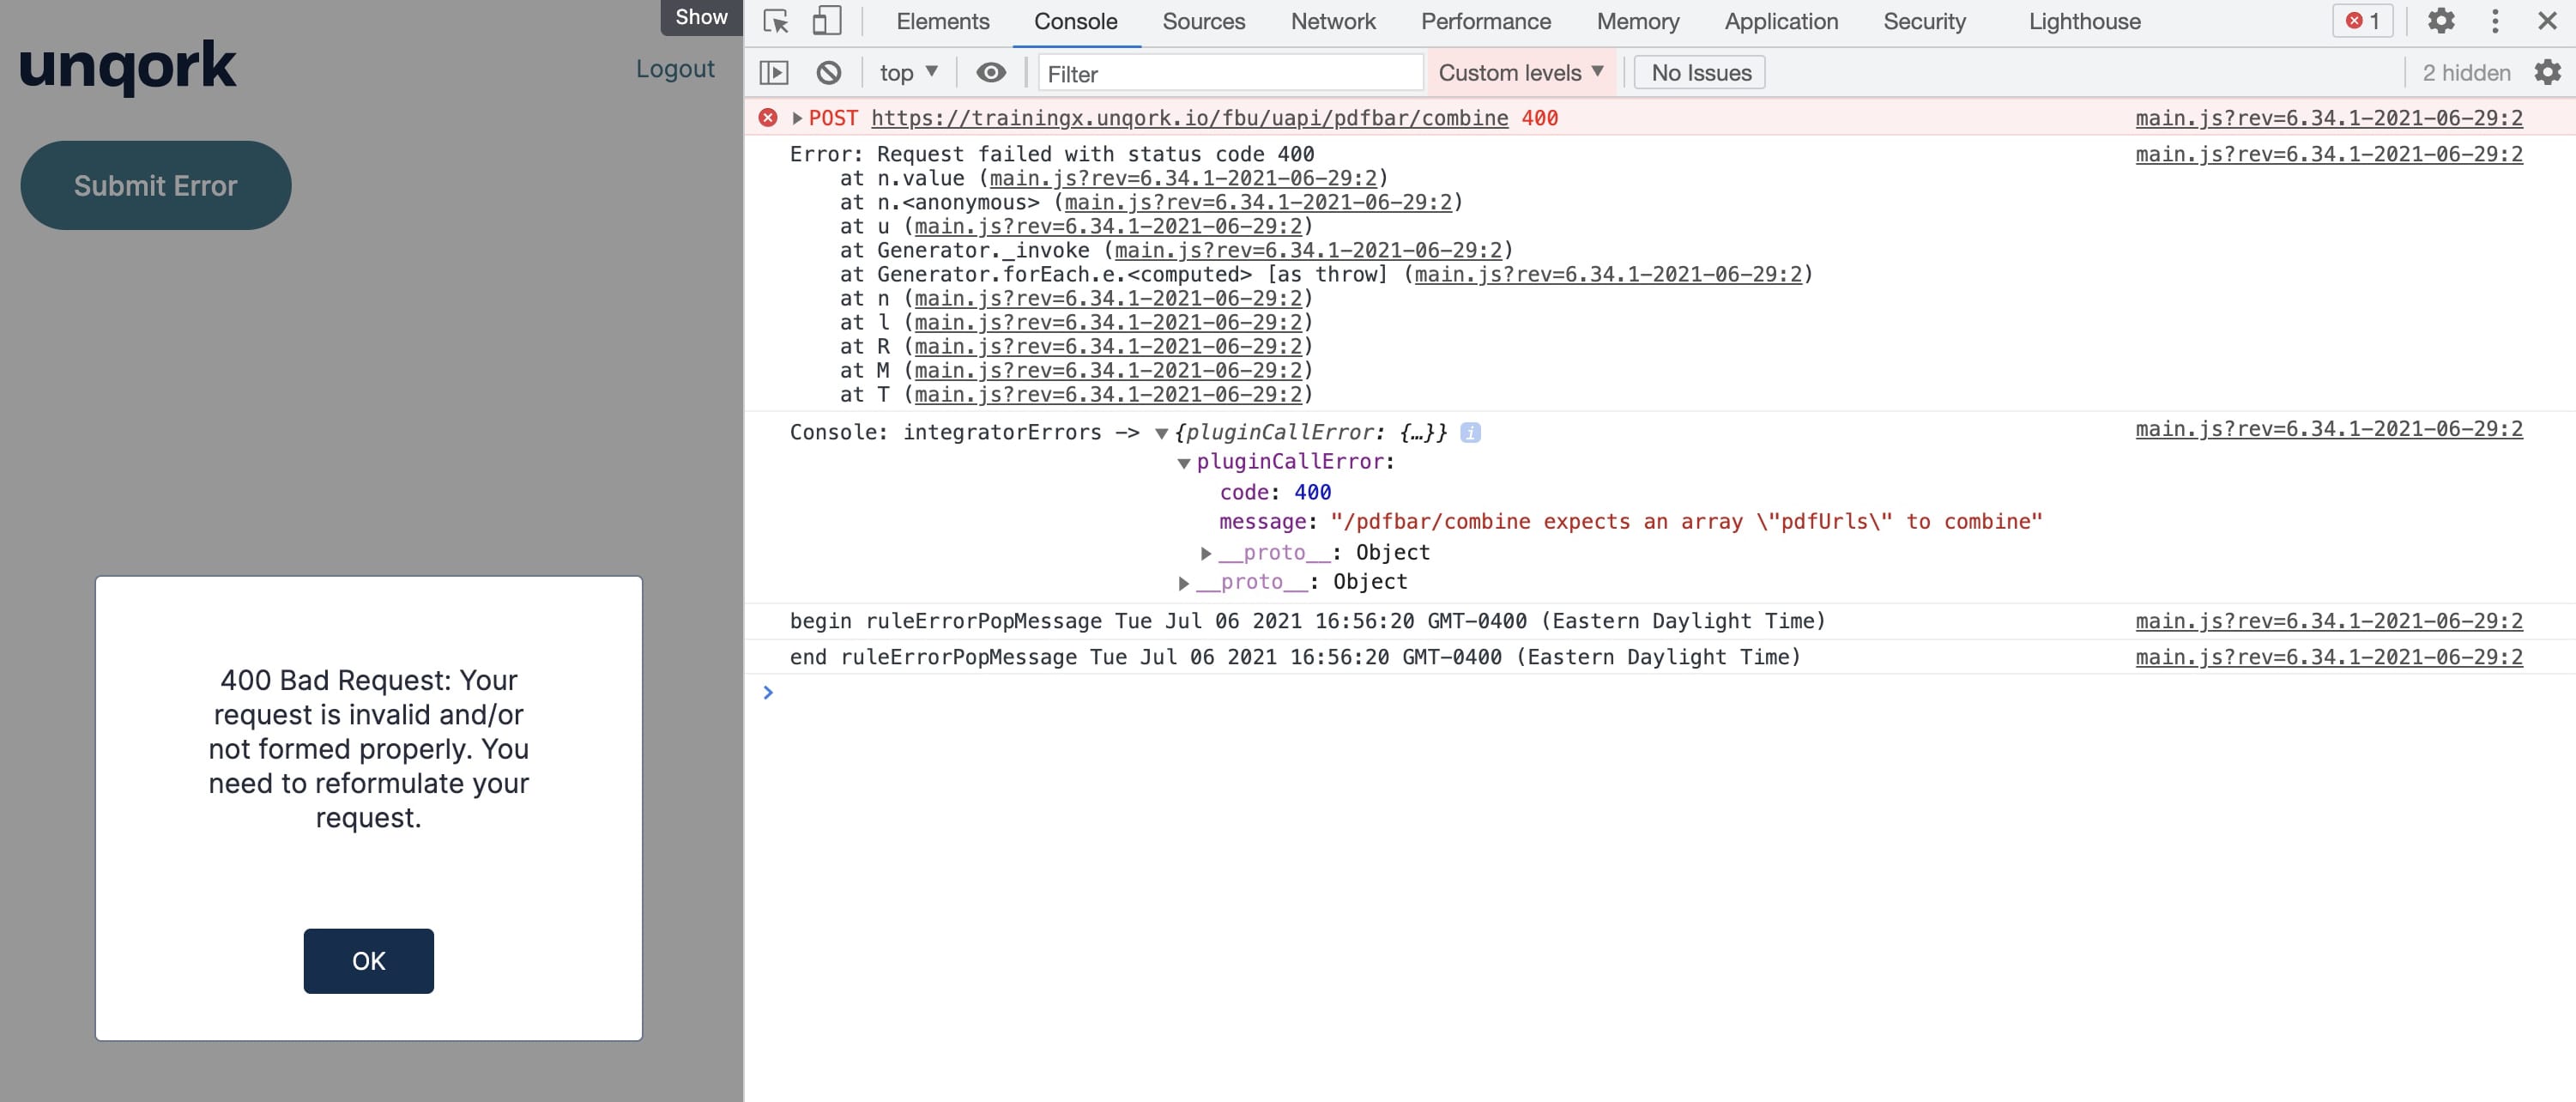
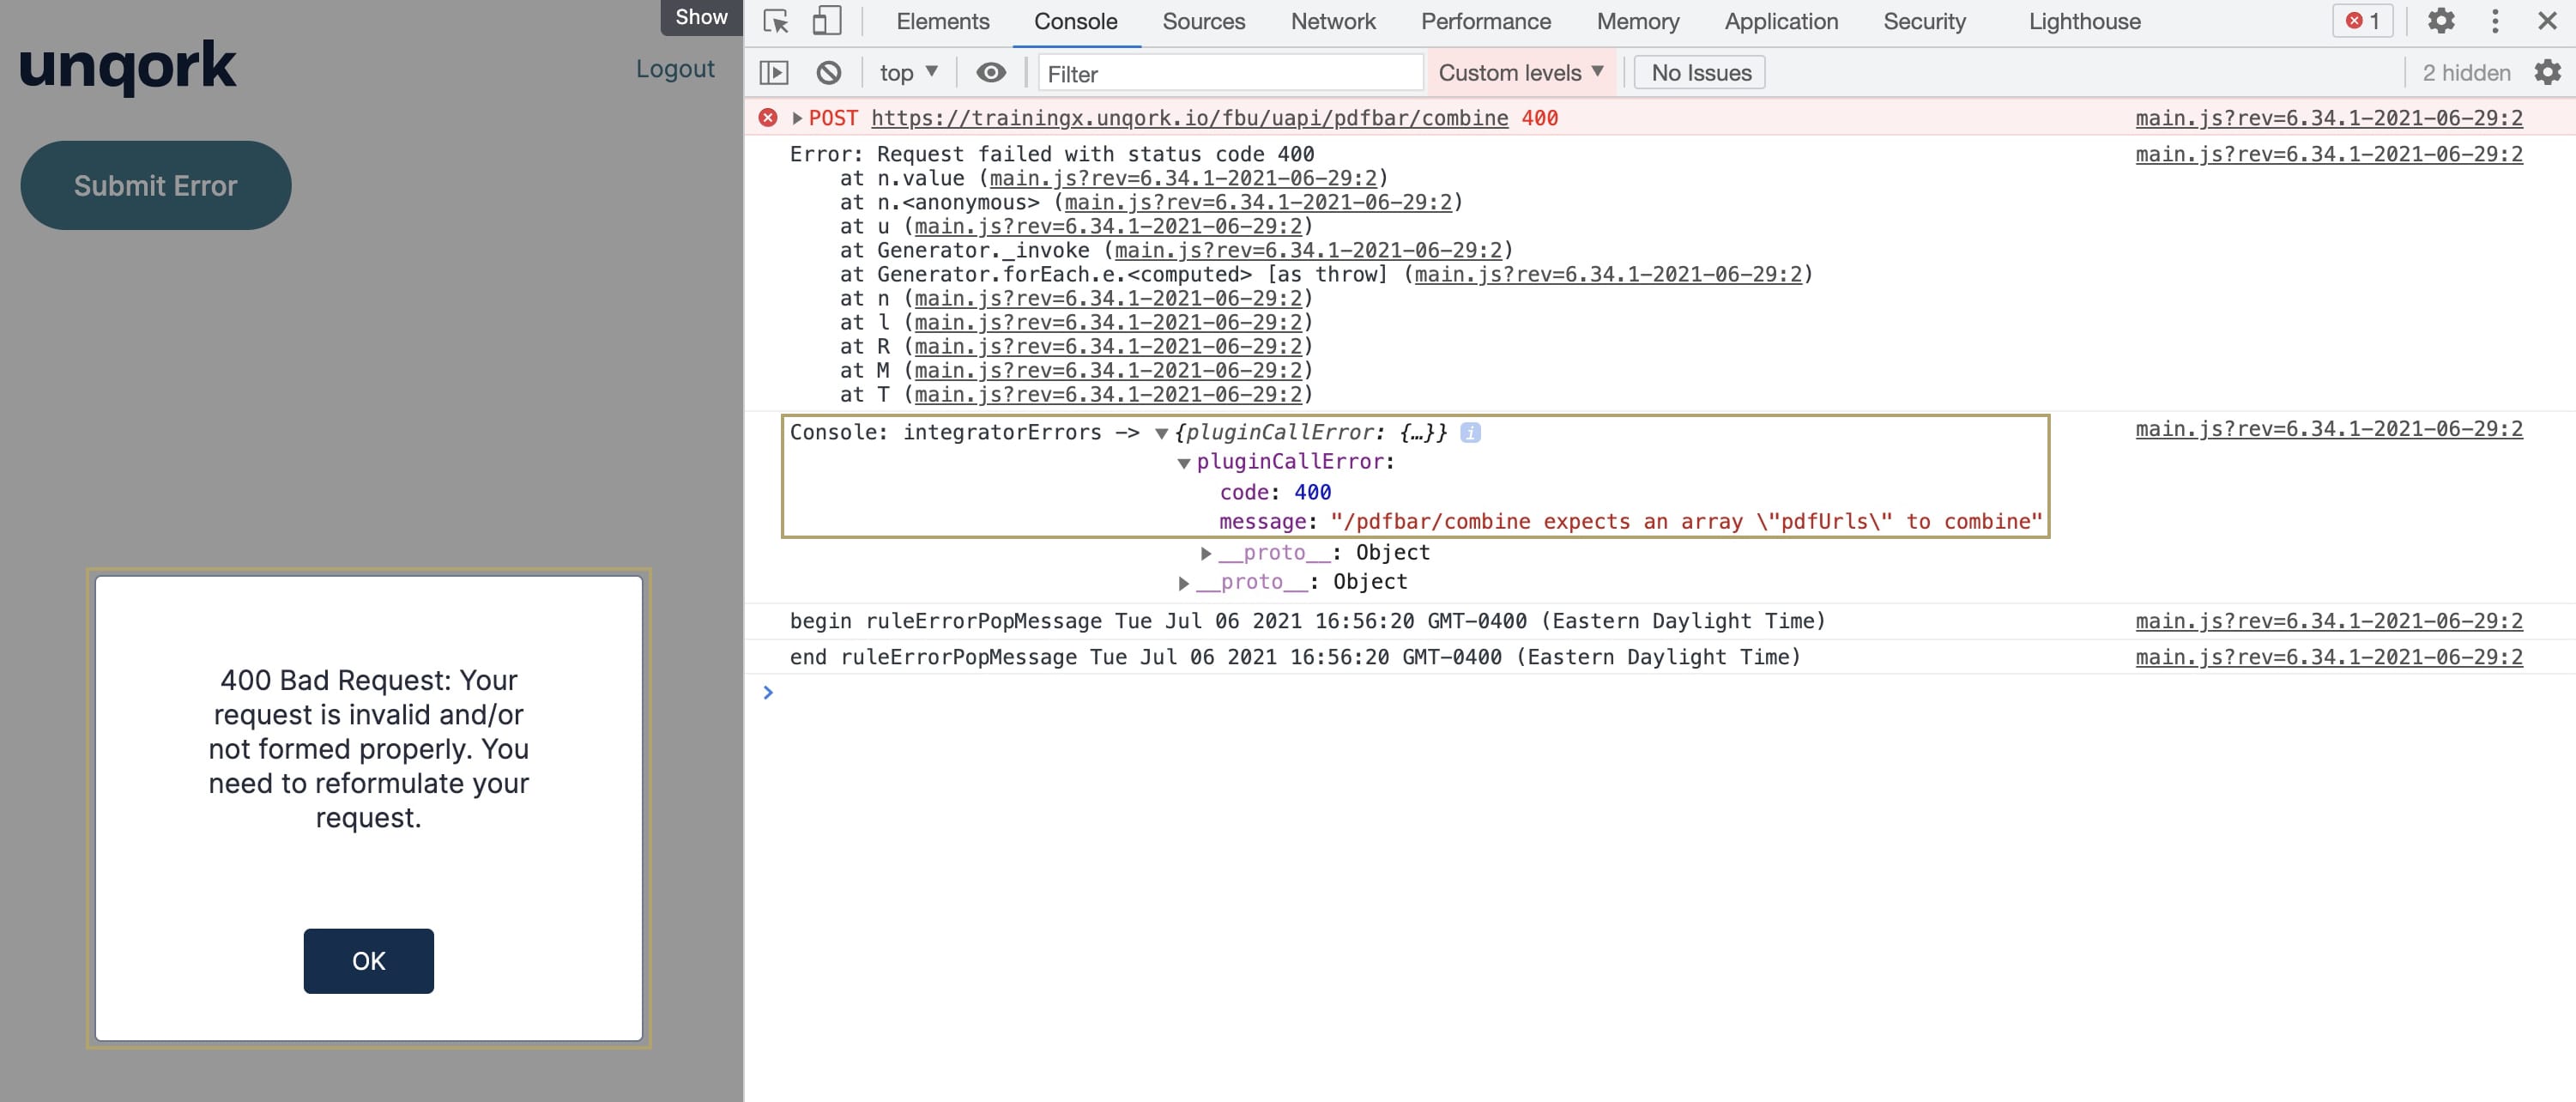
The completed use case looks like this in Express View, including a sneak peek of the console in DevTools:
What You'll Learn
In this article, you'll learn how to:
Using a Data Workflow to Reference integratorErrors
You must implement successful error-handling when you build an application since you need to know when something goes wrong! Adding error triggers to every Plug-in component in your application helps with this. And, the Calculator component allows you to reference integratorErrors. You encountered this method in the Introduction to Error Handling course. Calculators are the most effective option when you work with individual values. But in some situations, it's more effective to incorporate integratorErrors into a Data Workflow, such as:
-
When you need to do data manipulation or modification.
-
When you work with objects and arrays.
In this lesson, you'll use integratorErrors in a Data Workflow instead of a Calculator component. Let's take a look.
What You'll Need
To set up this use case, you'll need:
-
1 Button component
-
1 Plug-In component
-
2 Hidden components
-
1 Decisions component
-
1 Data Workflow component
To set up your Data Workflow, you'll need:
-
1 Input operator
-
2 Get operators
-
3 Output operators
-
1 Console operator
These instructions assume you have a new module open, saved, and with a title.
Configuration
For this use case, you'll configure a Plug-In component with flaws. You'll trigger the Plug-In with a Button component. An error trigger will fire in your Data Workflow when the Plug-In fails to complete its task. Then, the integratorErrors object references the error that occurred, and a specific type of error message displays in a pop-up. The error message pop-up signals success in this use case.
Configure the Button Component
First, configure a Button component to trigger a Plug-In component.
| 1. | Drag and drop a Button component onto your Module Builder canvas. |
| 2. | Enter btnFireError in the Property ID field. |
| 3. | Enter Submit Error in the Label Text field. |
| 4. | Select Event as the Action Type. |
| 5. | Enter pluginCallError in the Trigger on Click field. |
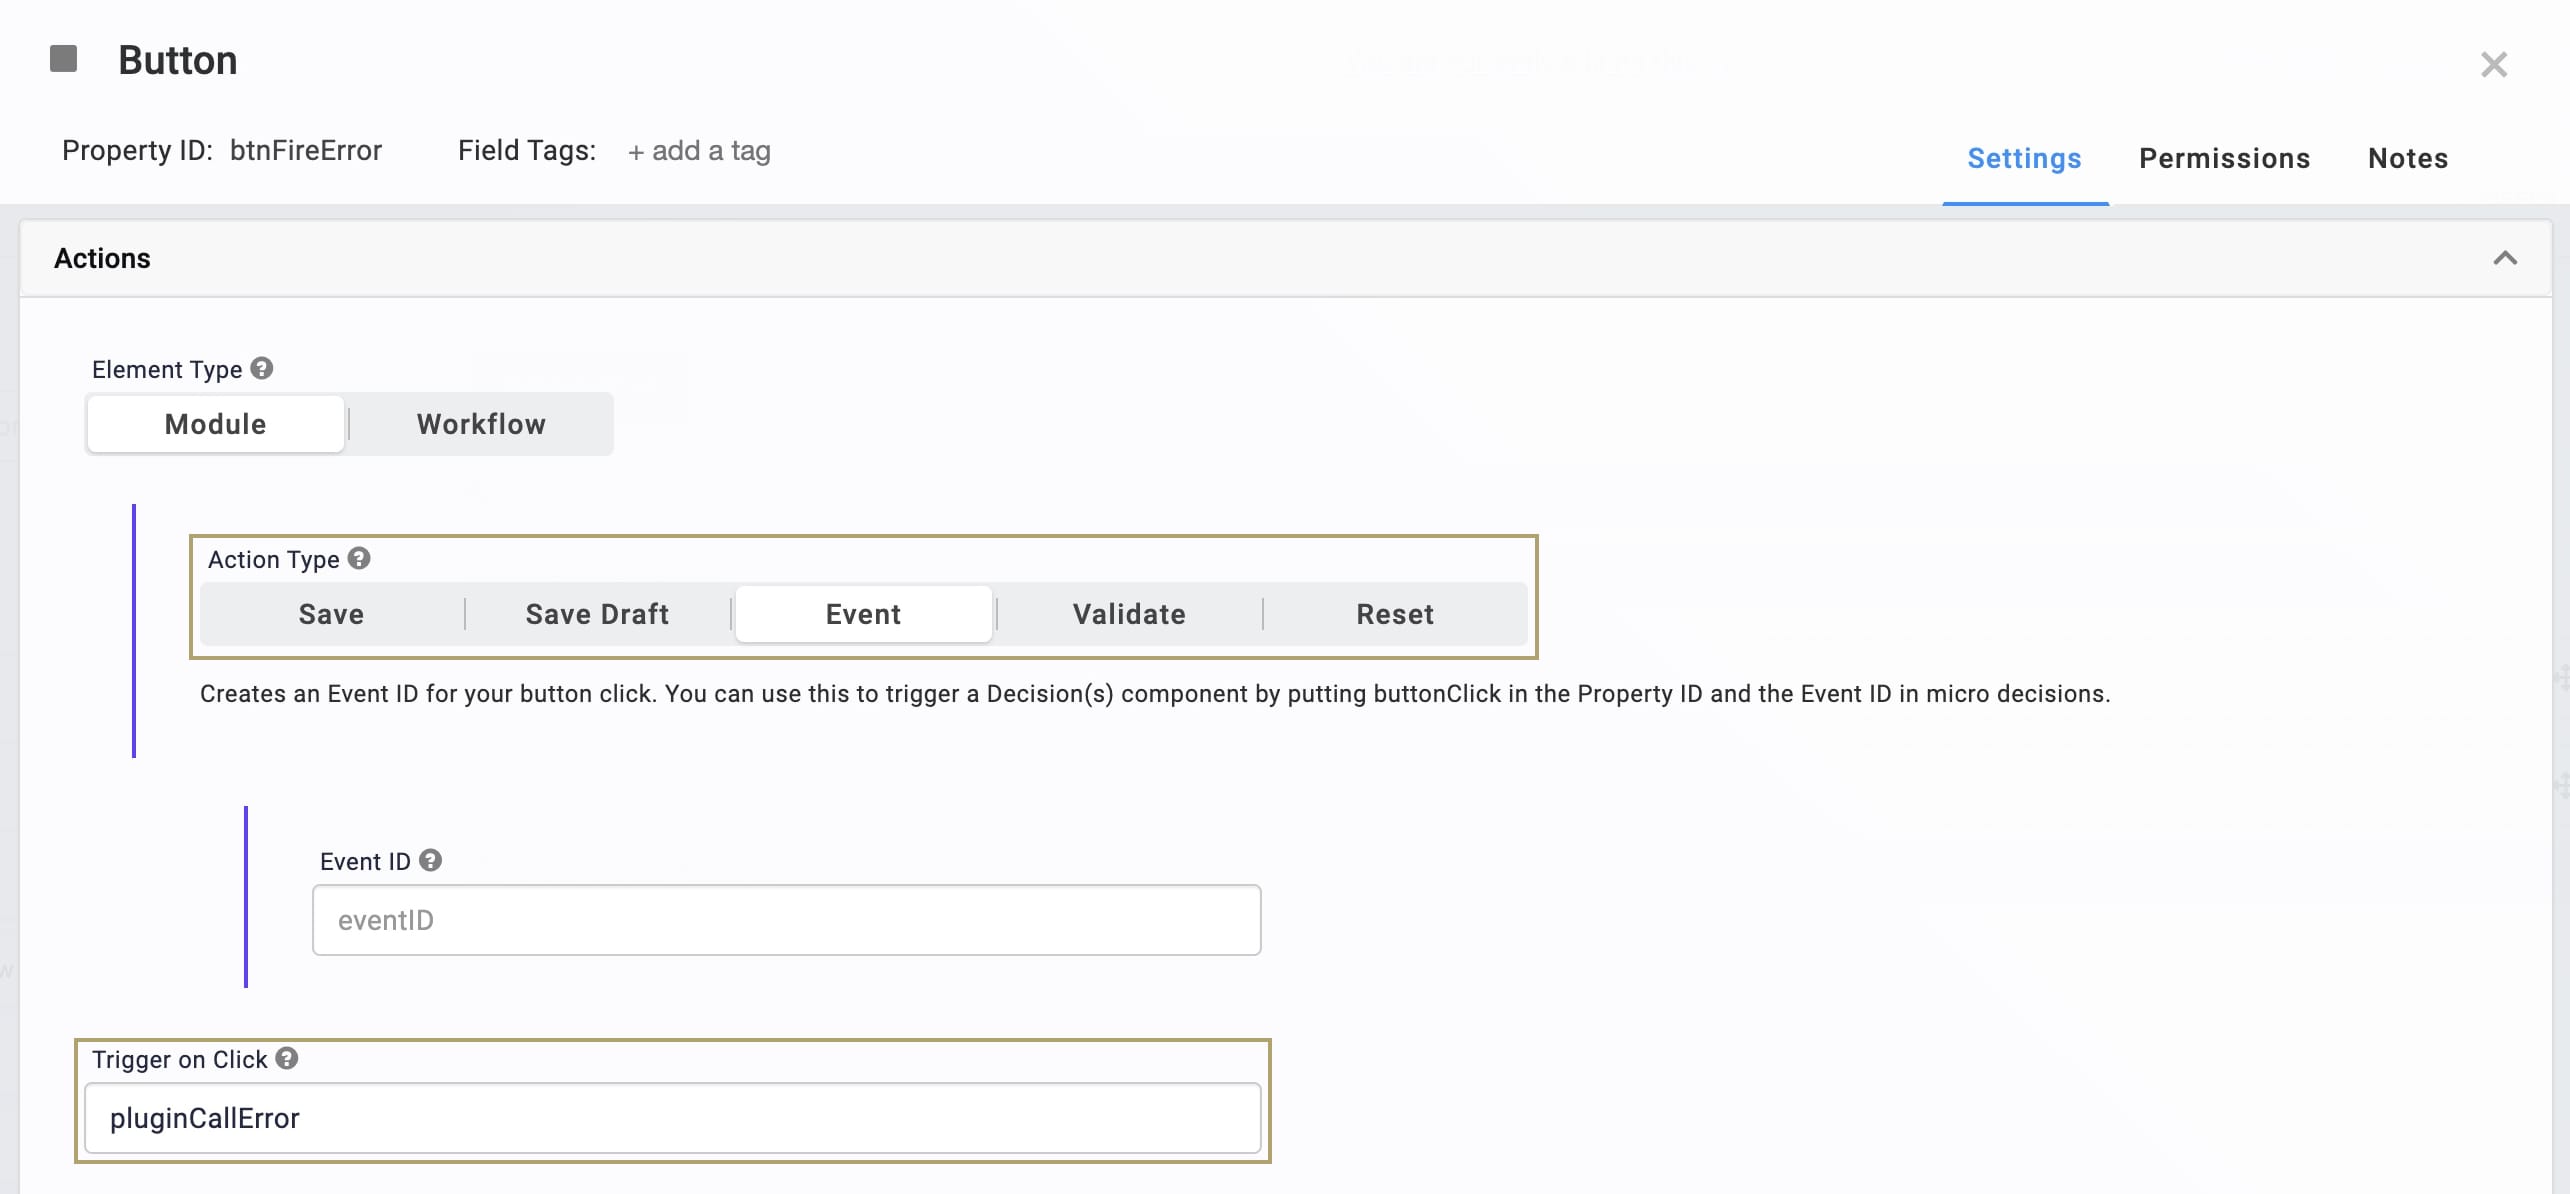
| 6. | Click Save. |
Configure the Plug-In Component
Configure a Plug-In component to run a broken remote execute. Select the first option in the Internal Services drop-down to simplify this use case. Any remote execute that guarantees a broken API call works because it's helpful to see the different error codes and messages you might encounter in the future. Keep the Data Source URL as the default for this configuration. This ensures that the API call doesn't have enough information to function. Then, the Plug-In sends its Error Trigger to run the Data Workflow.
| 1. | Drag and drop a Plug-In component onto your canvas below the Button component. |
| 2. | Enter pluginCallError in the Property ID and Canvas Label Text fields. |
| 3. | Enter dwfErrorHandling in the Error Trigger field. |
| 4. | Select Combine PDFs from the Internal Services drop-down. The Data Source URL populates with /fbu/uapi/pdfbar/combine. Do not change the URL. |
The Plug-In doesn't fire correctly if you do not change the auto-populated Data Source URL.
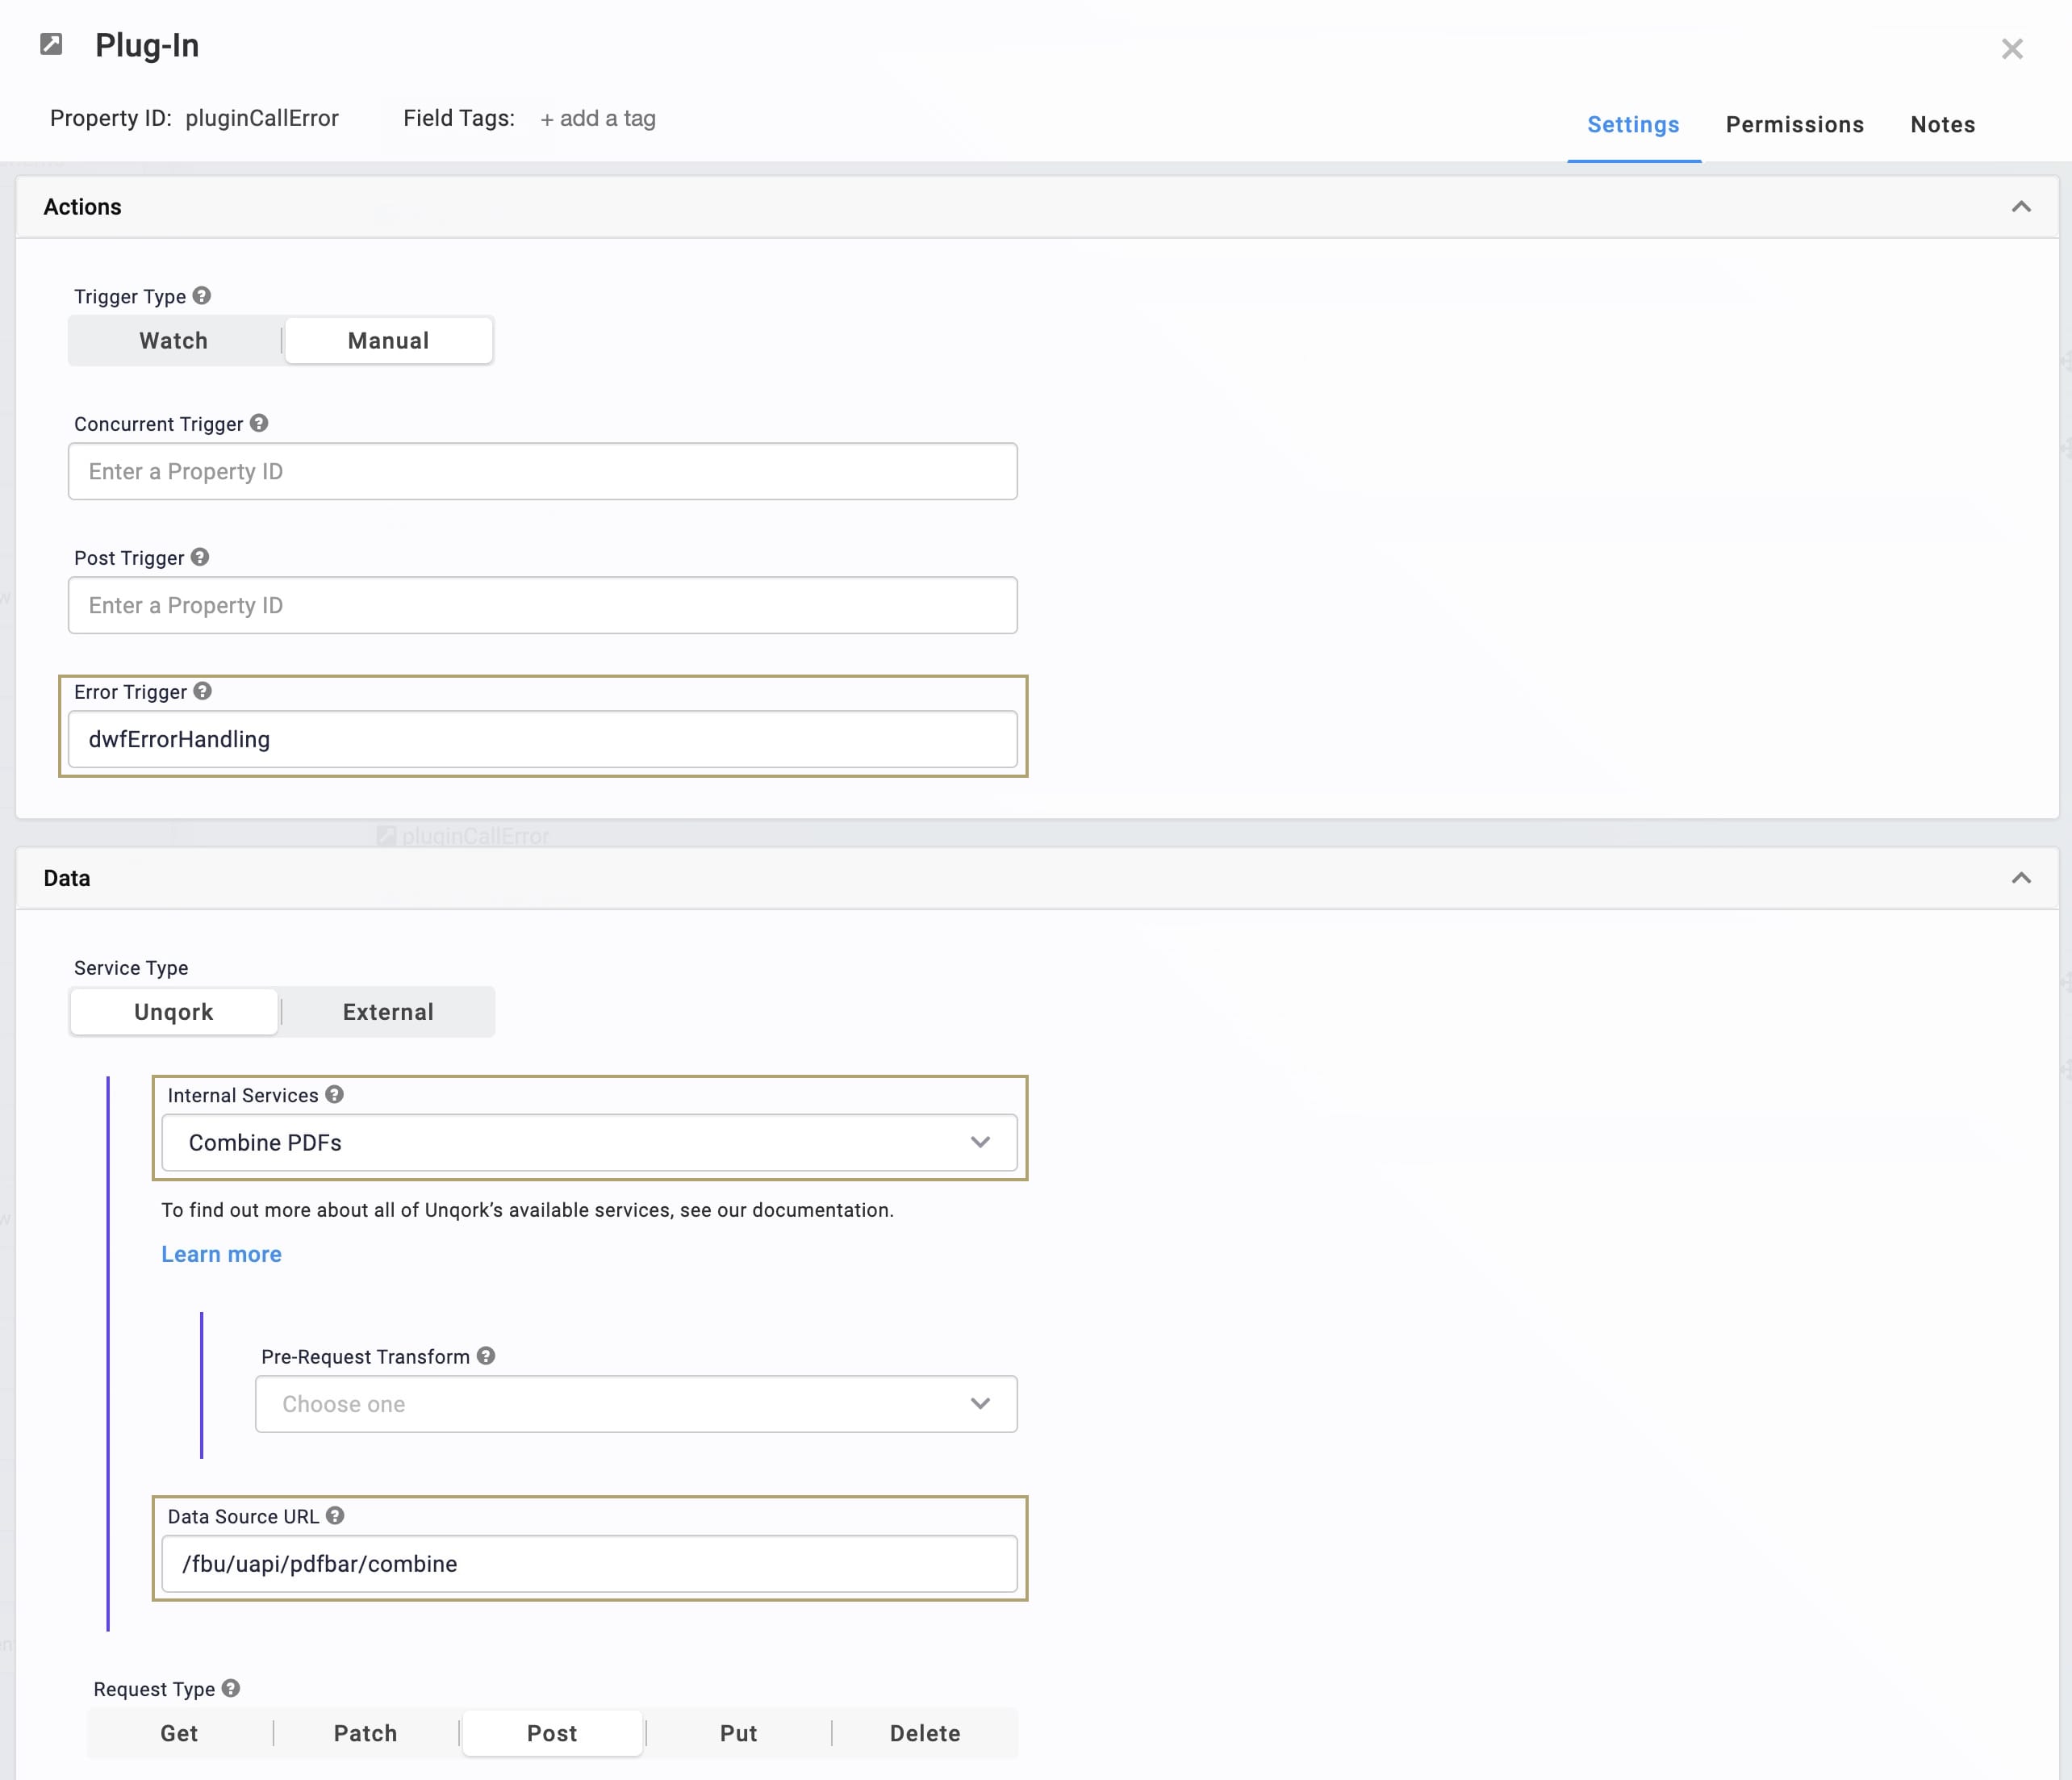
| 5. | Click Save. |
Configure the Hidden Components
The first Hidden component stores the error response codes. The second Hidden component stores the specific error message of the error code.
| 1. | Drag and drop 2 Hidden components onto your canvas, placing them below your Plug-In. |
| 2. | Enter the Property ID and Canvas Label Text as follows: |
| Property ID | Canvas Label Text |
|---|---|
|
errorCode |
errorCode |
|
errorMessage |
errorMessage |
| 3. | Save each component. |
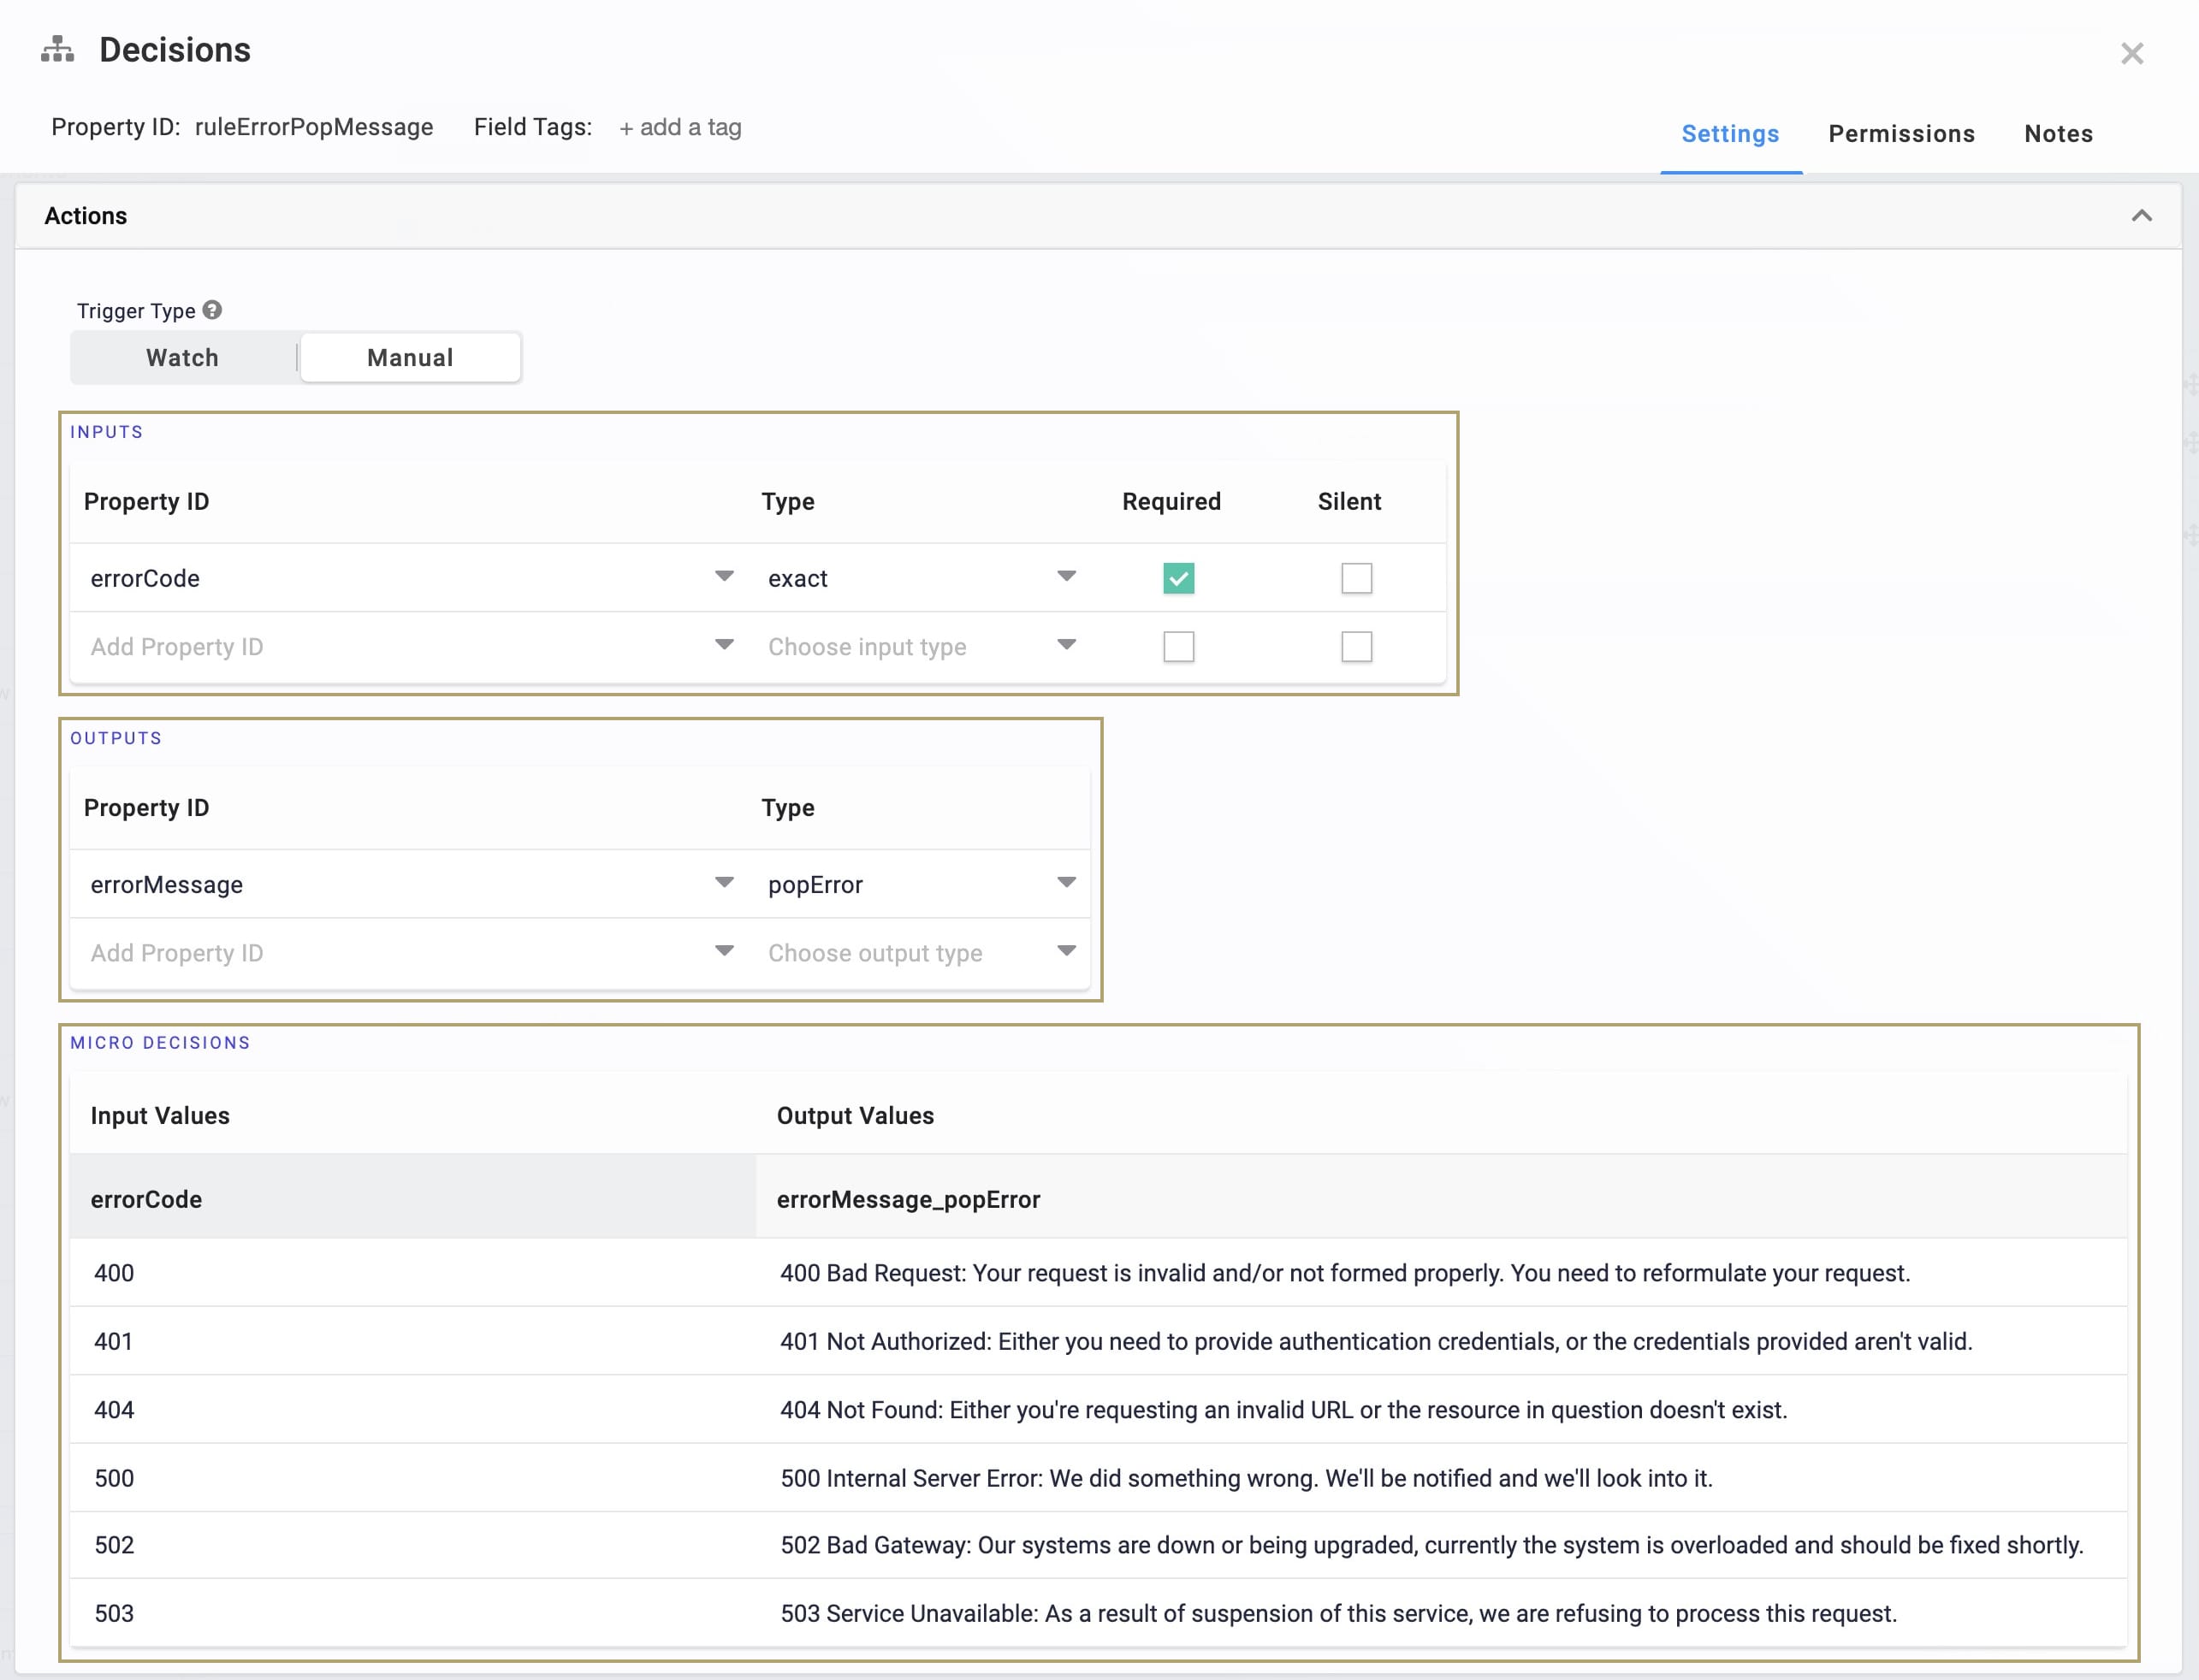
Configure the Decisions Component
You decide which error messages appear based on the error response code. The error codes and messages are customized to ensure you consider every potential error. Configure some rules for your error codes and messages.
| 1. | Drag and drop a Decisions component onto your canvas below your Hidden components. |
| 2. | Enter ruleErrorPopMessage in the Property ID and Canvas Label Text fields. |
| 3. | Enter the following in the Inputs table: |
| Property ID | Type | Required |
|---|---|---|
|
errorCode |
exact |
Yes (checked) |
| 4. | Enter the following in the Outputs table: |
| Property ID | Type |
|---|---|
|
errorMessage |
popError |
| 5. | Enter the following in the Micro Decisions table: |
| errorCode | errorMessage_popError |
|---|---|
|
400 |
400 Bad Request: Invalid request and/or request is not formed properly. Reformulate the request. |
|
401 |
401 Not Authorized: Invalid credentials, or authentication credentials must be provided. |
|
404 |
404 Not Found: Invalid URL request, or the resource in question doesn't exist. |
|
500 |
500 Internal Server Error: Error encountered by the Internal server. A notification is sent, and the error is investigated. |
|
502 |
502 Bad Gateway: Internal systems error or upgrade in progress. Or, the internal system is overloaded and issue will resolve soon. |
|
503 |
503 Service Unavailable: Request cannot be processed as a result of the suspension of this service. |
| 6. | Click Save. |
| 7. | Save your module. |
Configure the Data Workflow Component
Now, set up the Data Workflow. The failed Plug-in triggers the error code and runs the Data Workflow. The Data Workflow outputs the response code and message for that specific error.
| 1. | Drag and drop a Data Workflow component onto your canvas. Place your Data Workflow between your Plug-In and Hidden components. |
| 2. | Enter dwfErrorHandling in the Canvas Label Text and Property Name fields. |
Configure the Input Operator
Configure an Input operator. The Input operator references the input integratorErrors. But, remember, integratorErrors is outside of the data object. So, you can't select it from the operator's Component drop-down. You must manually input the integratorErrors since it doesn't exist in your configuration.
| 1. | Drag and drop an Input operator onto your Data Workflow canvas. |
| 2. | Configure the Input operator's Info window as follows: |
| Setting | Value |
|---|---|
|
Category |
Input |
|
Component |
|
|
Required |
Yes |
|
Source |
Default |
| 3. | Double-click below the Input title of your Input operator. A blinking cursor displays. |
| 4. | Enter integratorErrors. |
| 5. | Press Enter or Return on your keyboard. |
Configure the code Get Operator
Configure a Get operator to retrieve the response code of your error.
| 1. | Drag and drop a Get operator onto your Data Workflow canvas. |
| 2. | Configure the Get operator's Info window as follows: |
| Setting | Value |
|---|---|
|
Category |
Input |
|
Label |
code |
|
Path |
pluginCallError.code |
| 3. | Connect the output port (right) of the Input operator to the input port (left) of the code Get operator. |
Configure the errorCode Output Operator
This Output operator outputs the response code of the error into your errorCode Hidden component.
| 1. | Drag and drop an Output operator onto your Data Workflow canvas. |
| 2. | Configure the Output operator's Info window as follows: |
| Setting | Value |
|---|---|
|
Category |
Output |
|
Component |
errorCode |
|
Action |
value |
| 3. | Connect the output port (right) of the code Get operator to the input port (left) of the errorCode Output operator. |
Configure the message Get Operator
This Get operator retrieves your custom message for the error.
| 1. | Drag and drop a Get operator onto your Data Workflow canvas. |
| 2. | Configure the Get operator's Info window as follows: |
| Setting | Value |
|---|---|
|
Category |
Input |
|
Label |
message |
|
Path |
pluginCallError.message |
| 3. | Connect the output port (right) of the Input operator to the input port (left) of the message Get operator. |
Configure the errorMessage Output Operator
Use an Output operator to output the error message into your errorMessage Hidden component.
| 1. | Drag and drop an Output operator onto your Data Workflow canvas. |
| 2. | Configure the Output operator's Info window as follows: |
| Setting | Value |
|---|---|
|
Category |
Output |
|
Component |
errorMessage |
|
Action |
value |
| 3. | Connect the output port (right) of the message Get operator to the input port (left) of the errorMessage Output operator. |
Configure the ruleErrorPopMessage Output Operator
This last Output operator triggers your Decisions component, which displays the error message pop-up.
| 1. | Drag and drop an Output operator onto your Data Workflow canvas. |
| 2. | Configure the Output operator's Info window as follows: |
| Setting | Value |
|---|---|
|
Category |
Output |
|
Component |
ruleErrorPopMessage |
|
Action |
trigger |
| 3. | Connect the output port (right) of the message Get operator to the input port (left) of the errorMessage Output operator. |
Configure the Console Operator
Connect a Console operator to your integratorErrors Input operator. The integratorErrors object for your error displays, emphasizing the importance of your custom error messages.
| 1. | Drag and drop a Console operator onto your Data Workflow canvas. |
| 2. | Configure the Console operator's Info window as follows: |
| Setting | Value |
|---|---|
|
Category |
Console |
|
Label |
integratorErrors |
| 3. | Connect the output port (right) of the Input operator to the input port (left) of the Console operator. |
Test your complete configuration. Open your module in Express View. Open the DevTools Console and click the Submit Error button. Notice that a 400 response code displays. If you expand your integratorErrors Console and the pluginCallError tab, the following message displays: "/pdfbar/combine expects an array \"pdfUrls\" to combine". Some of these default messages lack information, but the custom message in your pop-up provides more details about the issue. This error alerts you to the incorrectly formatted API request in your Plug-in component.
Lab
You can view this complete use case here: https://training.unqork.io/#/form/60c2364d7d38f64a0979eb9d/edit.
