Overview
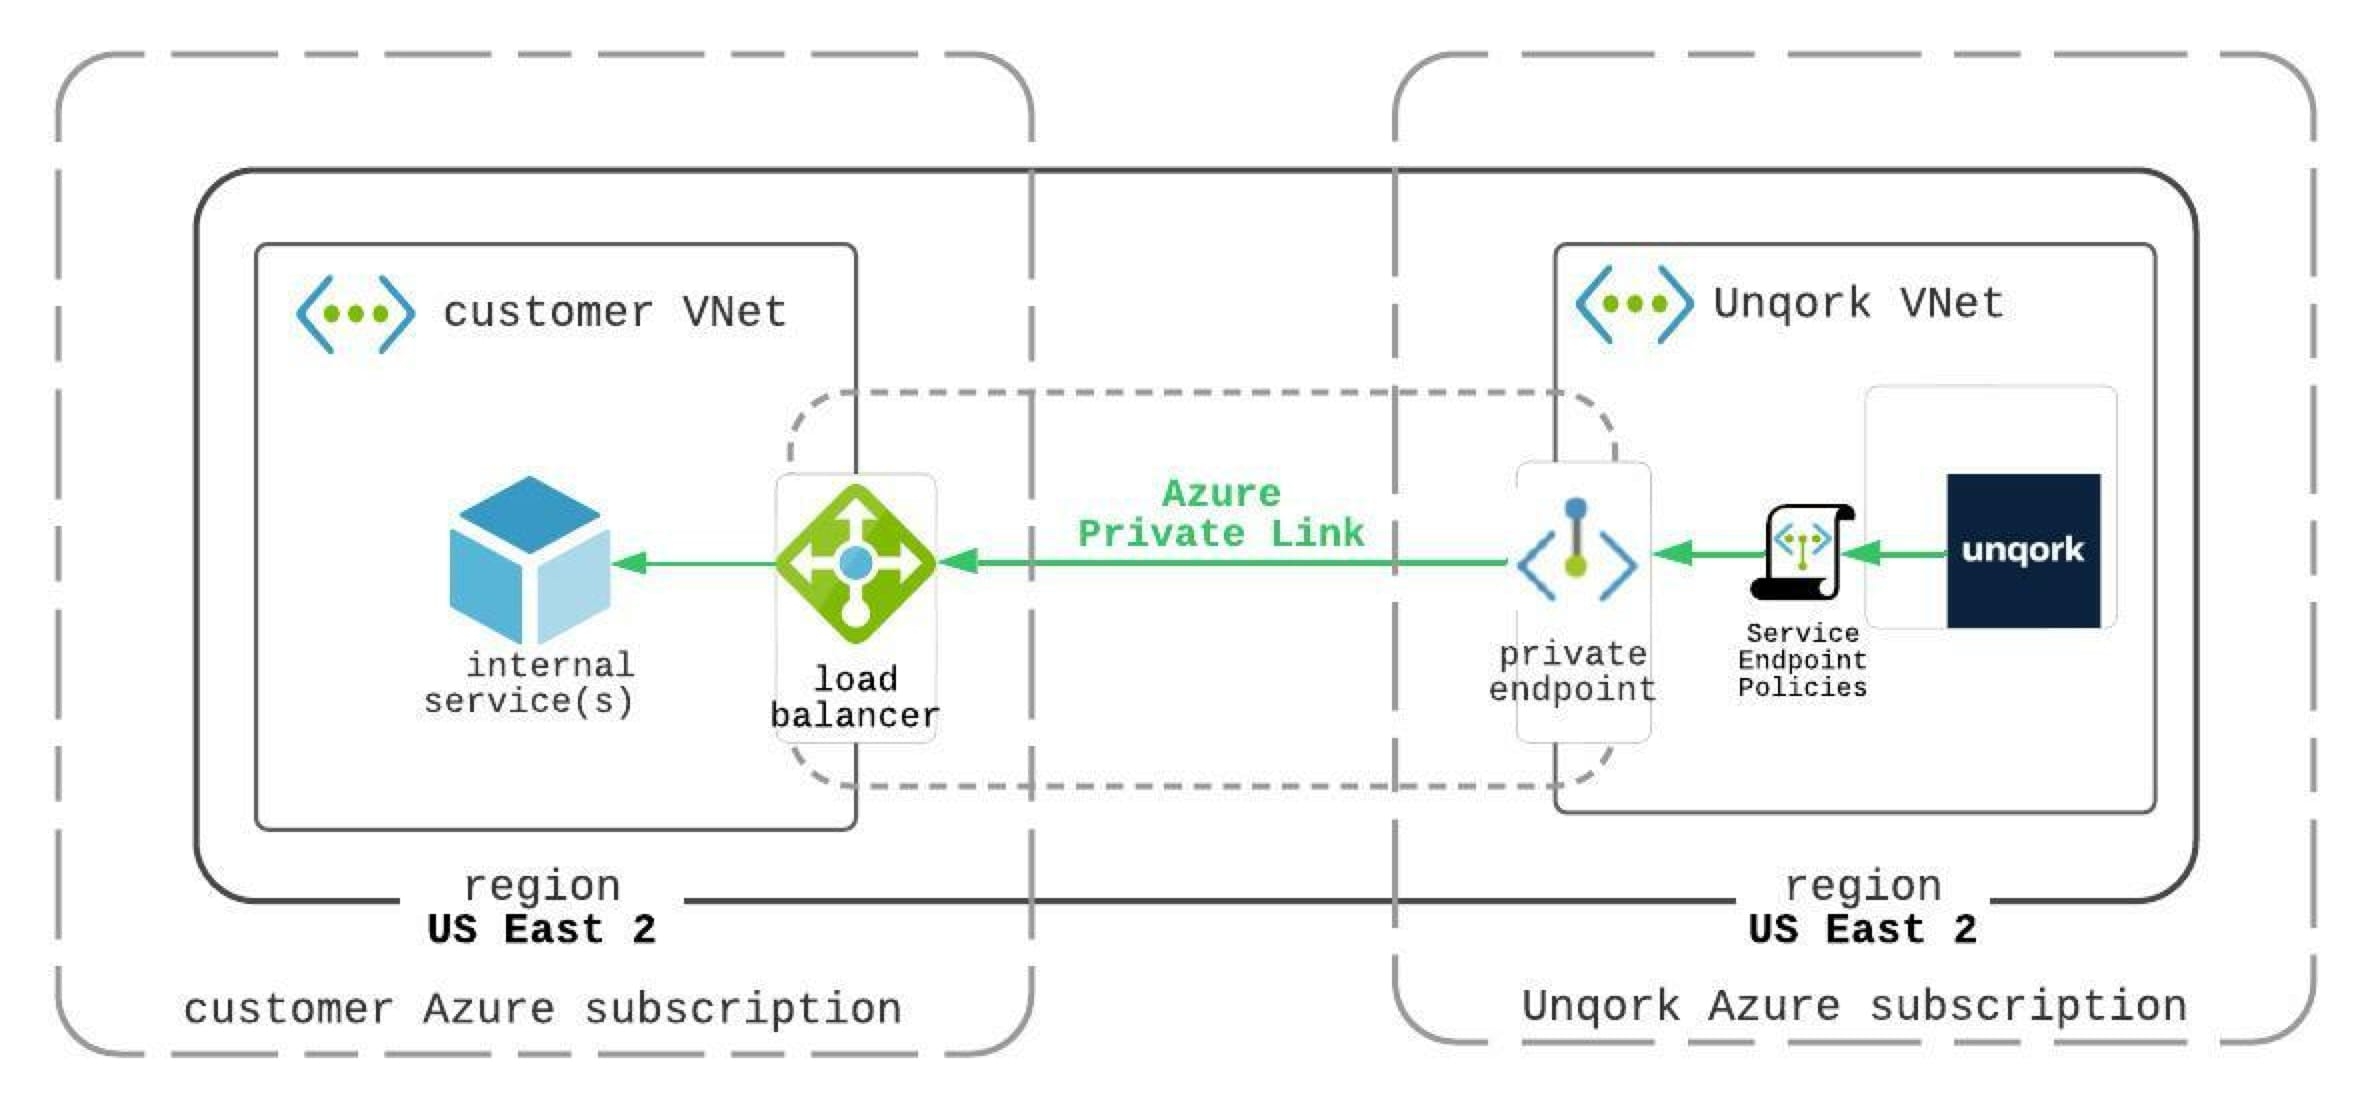
Set up Azure Private Link to connect two VNets (Virtual Networks) in different Azure accounts. The first is a VNet in your Azure account, and the second is the dedicated VNet where your Unqork environment exists. If your Azure resources are connected to on-premises networks, Unqork services can also communicate services in your data center. Similarly, Unqork services can communicate with services in your other VNets, as long as they are peered.
Azure Private Link provides a secure transfer tunnel for data, keeping your traffic safe without traversing the public internet. Typically, services communicate by traveling the internet from one public endpoint to another. With Azure Private Link, communication travels between your endpoint service to a VNet endpoint in your hosted Unqork environment. The endpoint service using Private Link works with a NLB (Network Load Balancer). The endpoint service and NLB act as Unqork's entry point to your infrastructure. You do not need to use any special hardware or software to make this happen because you'll create the VNet endpoint in Azure.
How Azure Private Link Works with Unqork
Unqork acts as the service consumer and your endpoint service acts as the service owner. Unqork initiates the connection to a resource in your cloud account. Then, the service provider can respond to requests from Unqork. To set up Azure Private Link for Unqork, you'll need the following:
Generate a private domain. In Azure, in your VNet (in the same region as your Unqork environment), you’ll set up the endpoint service. That endpoint service is then configured to forward traffic to the NLB.
In Unqork's Services Administration, create an external service integration.
In the Module Builder, configure a Plug-In component calling the external service integration.
How to Set Up Azure Private Link
To set up Azure Private Link, you'll first need to configure settings in Azure. Then, you’ll set up a Plug-In component in Unqork and connect to the service.
What You Need
In your Azure account, you need:
IAM role privileges to create and manage VNets, endpoints, and endpoint services.
A VNet in the same region as the Unqork environment.
VNet subnets where the target resources reside.
An endpoint service, or the PrivateLink.
The endpoint service name from Azure.
In Unqork, you need:
1 Initializer component.
1 Plug-In component.
Create an Azure Private Link (In Azure)
First, you'll set everything up on the Azure side.
Create the VNet, NAT Gateway, load balancer, Private Link Service, and Private Endpoint
Set up the VNet, NAT gateway, load balancer, Private Link Service, and private endpoint.
In the Azure portal, select or create a VNet.
Configure the VNet to include subnet(s) in each Azure subscription.
Select or create the NAT gateway.
Select or create an Azure Virtual Machine (VM).
The VM must be in the same region as the VNet. The VM must be on the same network as the VNet and the subnet(s).
Select or create a load balancer.
Create the Private Link service.
Create the private endpoint.
Copy the Azure Endpoint Service Name
Next, copy the Azure endpoint service name that you created. You'll need this to set up the Azure Private Link connection.
The endpoint service configuration makes the Private Link in Azure.
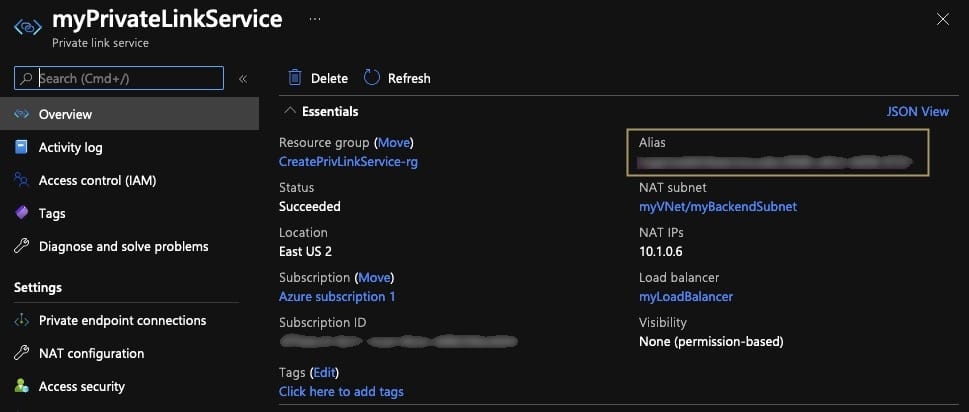
In Azure, go to the Overview tab.
Select the endpoint service that you created in the Create the VNet, NAT Gateway, NLB, the Private Link Service, and the Private Endpoint section.
Copy the Alias. This endpoint service acts as the Azure Private Link to the Unqork environment. You'll enter this service name in Unqork, in PrivateLink Administration.
Connecting to Azure Private Link from Unqork
Now, connect Unqork to Azure Private Link.
Adding an Azure Private Link Service in PrivateLink Administration (In Unqork)
Next, you'll create the Azure Private Link service in Unqork. Your Unqork application connects to your Azure resource with Azure Private Link.
At the top-right of the Unqork Designer Platform, click Administration.
Under Integration, click PrivateLink Administration.
Click Add PrivateLink. The Add PrivateLink page displays.
In the PrivateLink Friendly Name field, enter a name for your Private Link. For example,
myPrivateLinkService.In the PrivateLink Service Name field, enter the alias you copied in the Copy the Azure Endpoint Service Name section.
In the PrivateLink Internal Name field, enter a name for your internal domain. For example,
my.private.link.Click Add PrivateLink.
Finalizing the Azure Private Link Connection in Azure
You've set up the Azure Private Link Connection in Azure and Unqork. Now you’ll complete a couple more steps so the connection can transfer traffic.
In the Azure portal, in the Private link service section, click Private Endpoint Connections.
Next to the request you made through Unqork, select the checkbox.
Click Approve.
Creating a Service Using Azure Private Link in Services Administration
The Azure Private Link configuration makes a connection, but you must connect the target resource or service. So, you’ll create a new integration in Services Administration.
At the top-right of the Unqork Designer Platform, click Administration.
Under Integration, click Services Administration. The Services Administration page displays.
Click + Add a Service.The Create New Service modal displays.
In the Service Title* field, enter a title. For example,
My Private API.In the Service Name* field, enter a name. For example,
my-private-api. This value cannot include spaces or special characters.Click Next.
From the Share To setting, choose to share with the environment or a specific workspace.
Click Create. The new service's configuration page displays.
Click Edit.
In the Service protocol + host field, enter the DNS name. This is the URL under Private Link DNS Name in PrivateLink Administration that you entered in the Adding an Azure Private Link Service in PrivateLink Administration section. For example,
my.private.link.Click Save Changes. The Services Administration page displays.
Navigate to the new API service.
Configuring a Plug-In Component to Call Your Azure Private Link Service
Next, let’s look at how to use a Plug-In component to call your Azure Private Link service using an external API. You’ll also set up an Initializer component to trigger the Plug-In component.
To learn more about configuring an external API call, view our External APIs article.
How you choose to execute the Plug-In component depends on your use case’s needs. Common approaches include:
Using a Button component to trigger the Plug-In component on button-click.
Using an Initializer component to trigger the Plug-In component on page-load. This is a common option when using a remote execute to trigger an API module.
What You Need
For this configuration, you’ll need:
1 API module
1 Initializer component
1 Plug-In component
Configure the Plug-In Component
Configure a Plug-In component that makes the external API call that runs your Azure Private Link service.
In the Module Builder, drag and drop a Plug-In component onto the canvas.
In the Property ID field, enter pluginAzure.
In the Canvas Label Text field, enter
pluginAzure.From the Service Type drop-down, select External..
From the External Services drop-down, enter or select your Azure Private Link service .
Complete the Data Source URL value based on the Azure resource.
From the Request Type drop-down, select an API method. The Request Type is based on the action you're performing.
Complete the Inputs table.
Your inputs are based on your Azure resource.
To learn more about configuring a Plug-In component’s Inputs table, view our Plug-In component article.
Click Save Component.
Configure the Initializer Component
You'll configure this Initializer component to trigger the Plug-In component.
Drag and drop an Initializer component onto your canvas, placing it above your pluginAzure Plug-In component.
In the Property ID field, enter initPlugin.
In the Canvas Label Text field, enter
initPlugin.From the Trigger Type drop-down, select an API method.
The appropriate Trigger Type varies based on your use case needs. To trigger the Initializer component on page-load, select
New SubmissionorEdit Submission. New Submission triggers on page-load when no submission is present. Edit Submission triggers on page-load when a submission is present.Complete the Outputs table as follows, using your Plug-In component's Property ID.
Source
Type
Value
1
pluginAzure
Trigger
GO
Click Save Component.
Save your module.
You've successfully created an Azure Private Link connection between Unqork and your Azure resource.


