NLP Operator
Overview
In this
-
Text dynamically added into the operator. This Text Field or Text Area component inputs into the upper input port of the NLP operator.
-
Text stored in a Data Table. This Data Table component inputs into the lower input port of the NLP operator.
Essentially, when you enter text into the operator, it looks for a keyword match from your data table. Then the operator outputs that keyword and any value associated with it. That associated value is its sentiment.
When you set up your Data Table, you'll create 2 columns of information: a Keyword column and a Sentiment column. Your Keyword column holds text that the operator compares to the input text. Your Sentiment column holds the sentiment text corresponding to the keyword.
The operator compares the input text to the Data Table's keywords. If the operator finds a keyword match, it outputs the results to an array. The results include the matching keyword and its corresponding sentiment text. For example, let's say you have a column of feelings and a column of moods. In the feelings (keyword) column, you have the word Love. Because this feeling makes you happy, let's make the corresponding mood (sentiment) Happy. So, when you input Love into the operator, it outputs an array that includes Love (keyword) and Happy (sentiment). You'll build this use case later in the
Let's say you want to apply that to a real-world scenario. A good example could include collecting feedback on an application. You set up a review template that you ask users to fill out. To gather the results, you use an NLP operator to search for keywords in these reviews. When the operator finds a match, it outputs a sentiment for that keyword. For instance, you can set up a sentiment that identifies positive feedback. If a user mentions the word Helpful in their review, the NLP operator returns Helpful and Positive.
You can find the NLP operator under the Value/String group at the left of the Data Workflow canvas.
What You'll Learn
In this
About the Info Window
Here's what the NLP operator looks like, along with its Info window:
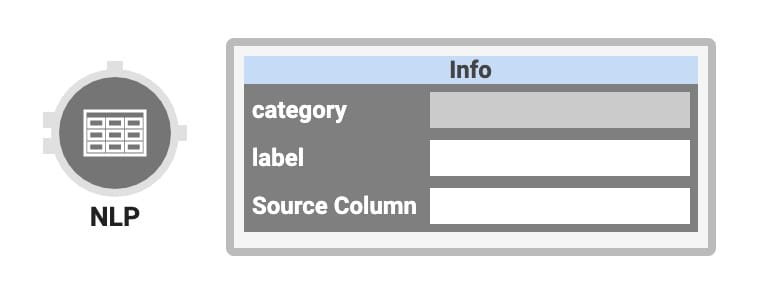
And here's a breakdown of each setting in the Info window:
|
Setting |
Description |
|---|---|
|
Category |
Grayed out and non-adjustable setting indicating the operation type. |
|
Label |
Sets the label for your operator, displaying below the operator on your Data Workflow canvas. This field is optional, but set a label if you use more than one of the same operator type. A label helps you identify your operators without opening any Info windows. |
|
Source Column |
This is the key that lets the operator reference data from your data table. This is typically the header of your keyword table column. |
Adding an NLP Operator
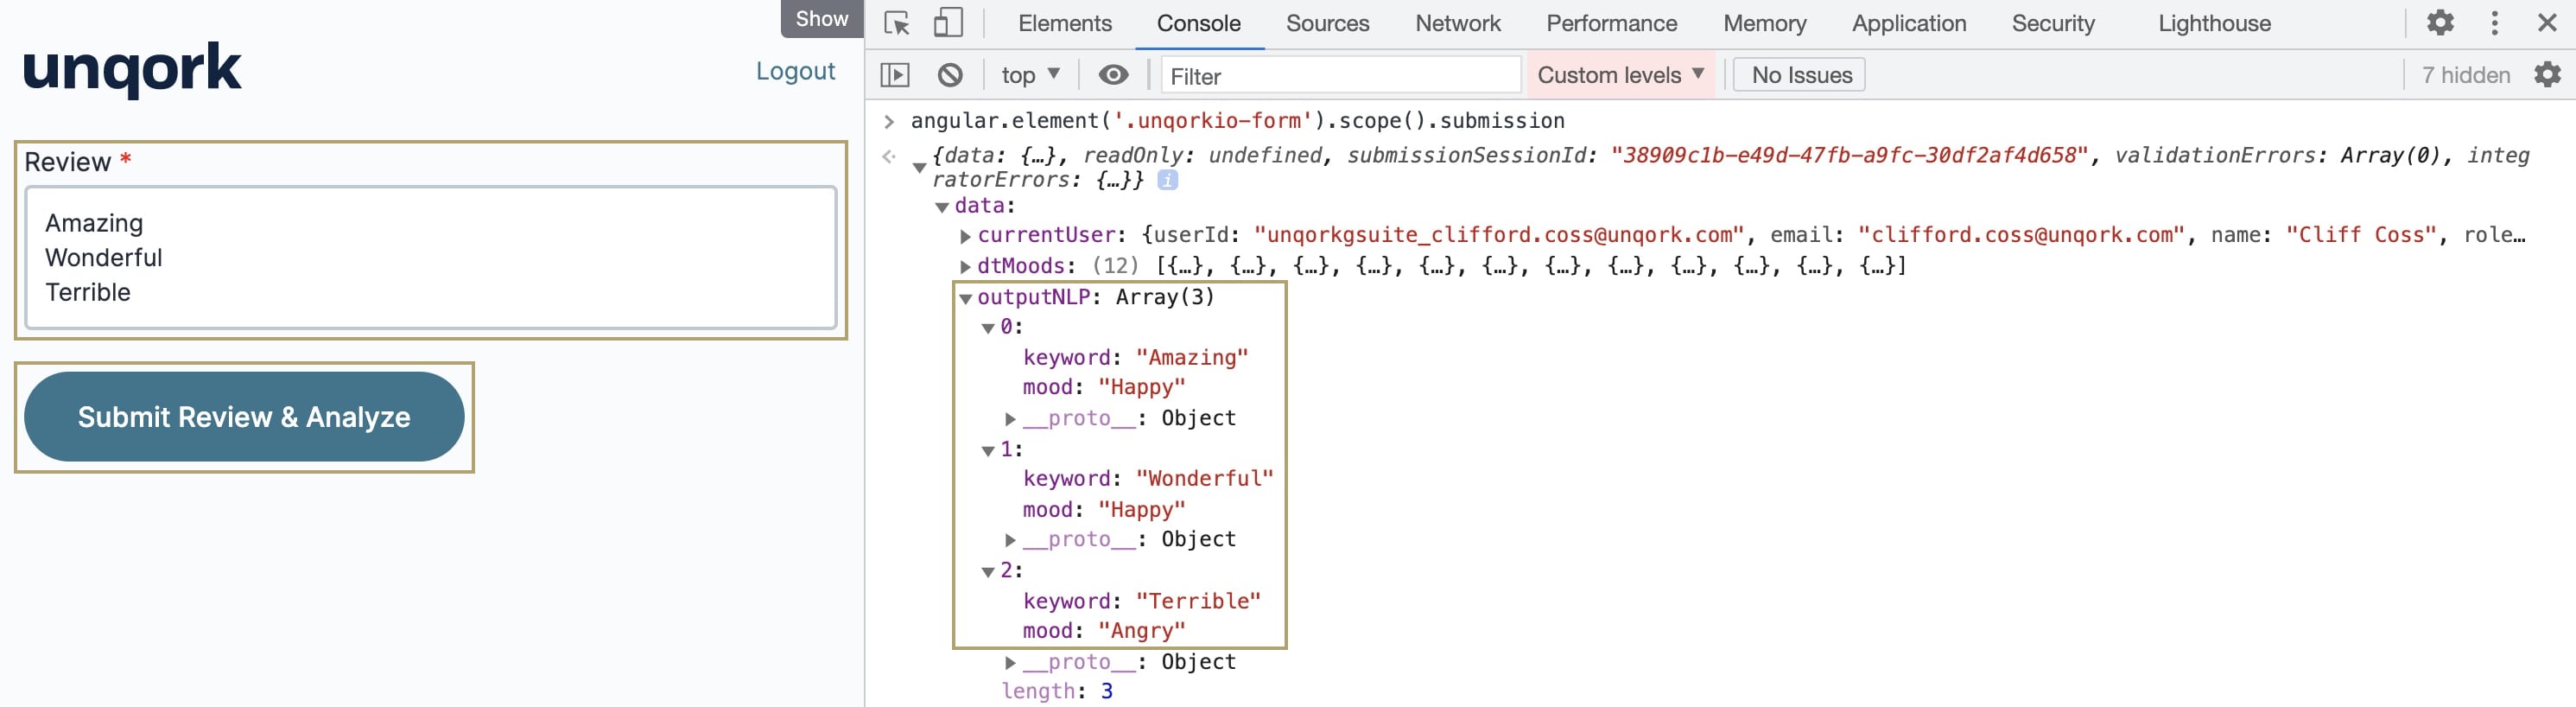
In this use case, you'll use a Data Table component with a variety of feelings (keywords) and moods (sentiments). You'll configure a Text Area so you can input as many keywords as you want into the operator. You'll then set up a Data Workflow with an NLP operator to compare the data. If a match exists between the Text Area and Data Table, the operator outputs the results. You'll configure the Data Workflow so you can see the results in the DevTools Console.
Here's how the completed use case looks in the Module Builder:
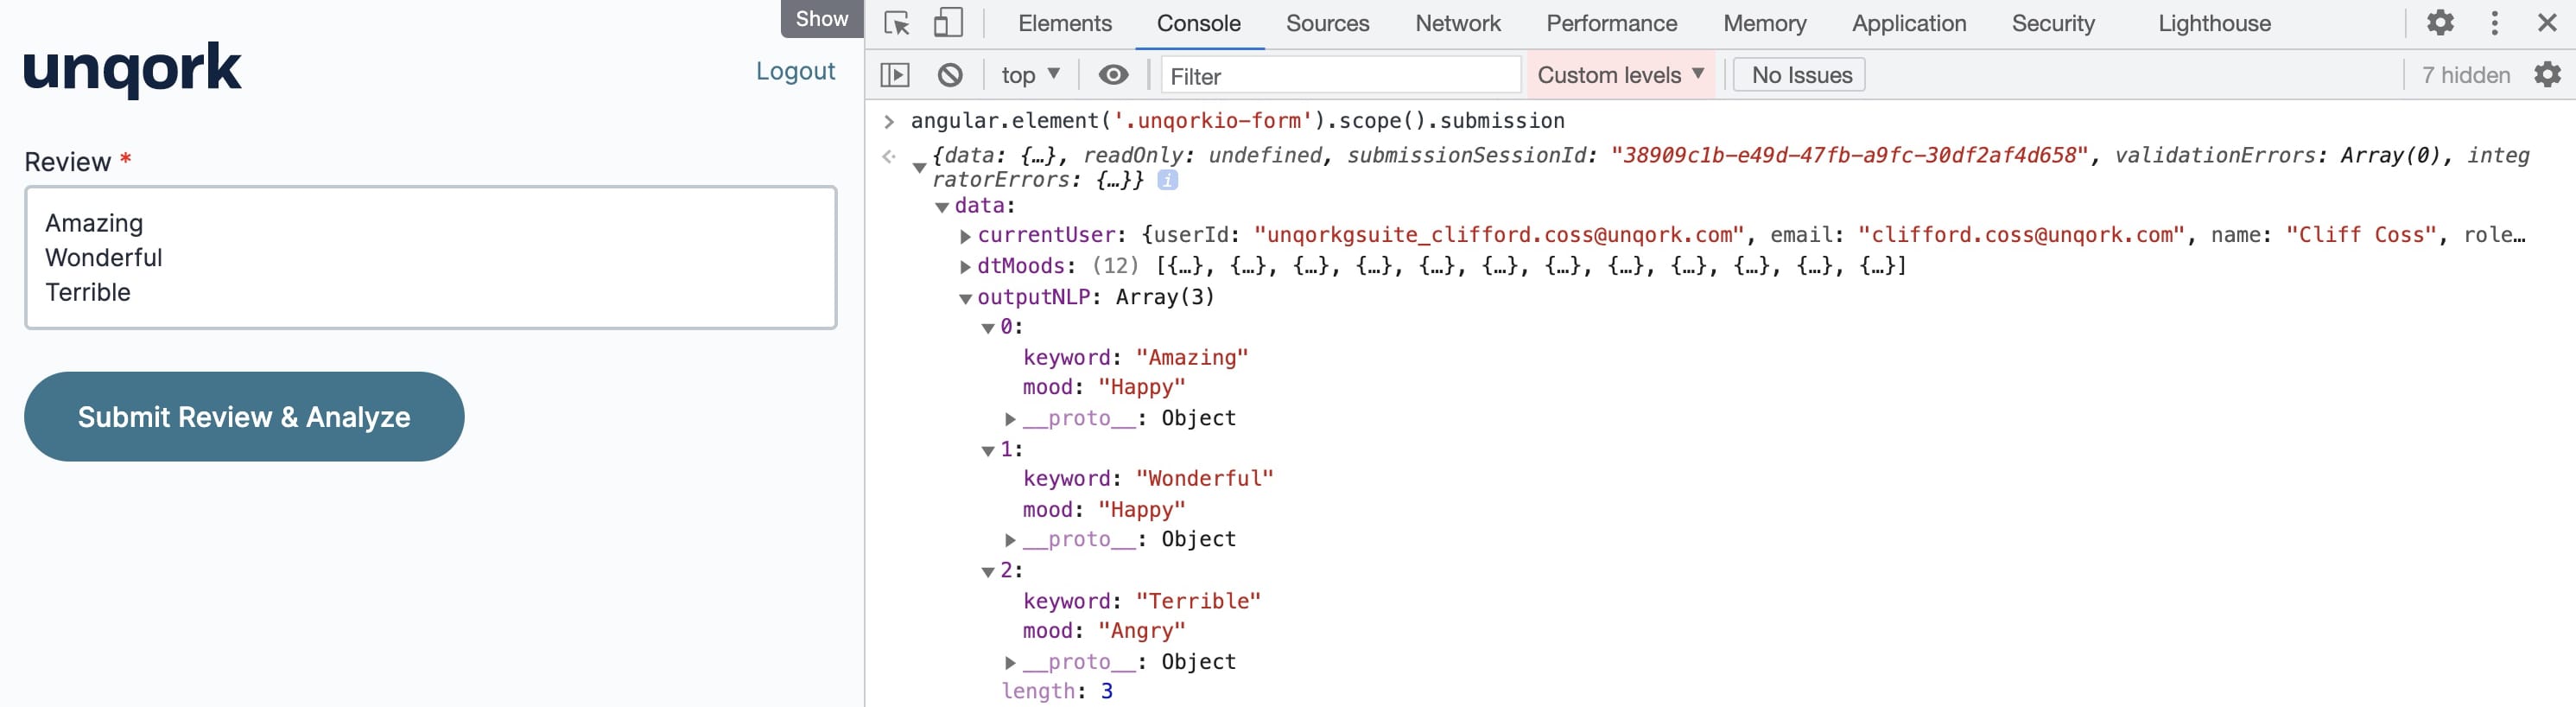
Here's how the completed use case looks in Express View, including a peek at the DevTools Console:
What You'll Need
To set up this use case, you'll need:
-
1 Text Area component
-
1 Data Table component
-
1 Button component
-
1 Hidden component
-
1 Data Workflow component
To set up your Data Workflow, you'll need:
-
2 Input operators
-
1 NLP operator
-
1 Output operator
These instructions assume you have a module open, saved, and with a title.
Configure the Text Area Component
First, let's add a Text Area component. You'll use this component to dynamically enter keywords into your NLP operator.
| 1. | In the Module Builder, drag and drop a Text Area component onto your canvas. |
| 2. | Enter review in the Property ID and Label Text fields. |
| 3. | Set the Required toggle to ON. |
| 4. | Click Save. |
Configure the Data Table Component
Next, you'll set up a Data Table to hold all your keywords and sentiments.
| 1. | Drag and drop a Data Table component onto your canvas, placing it below your Text Area component. |
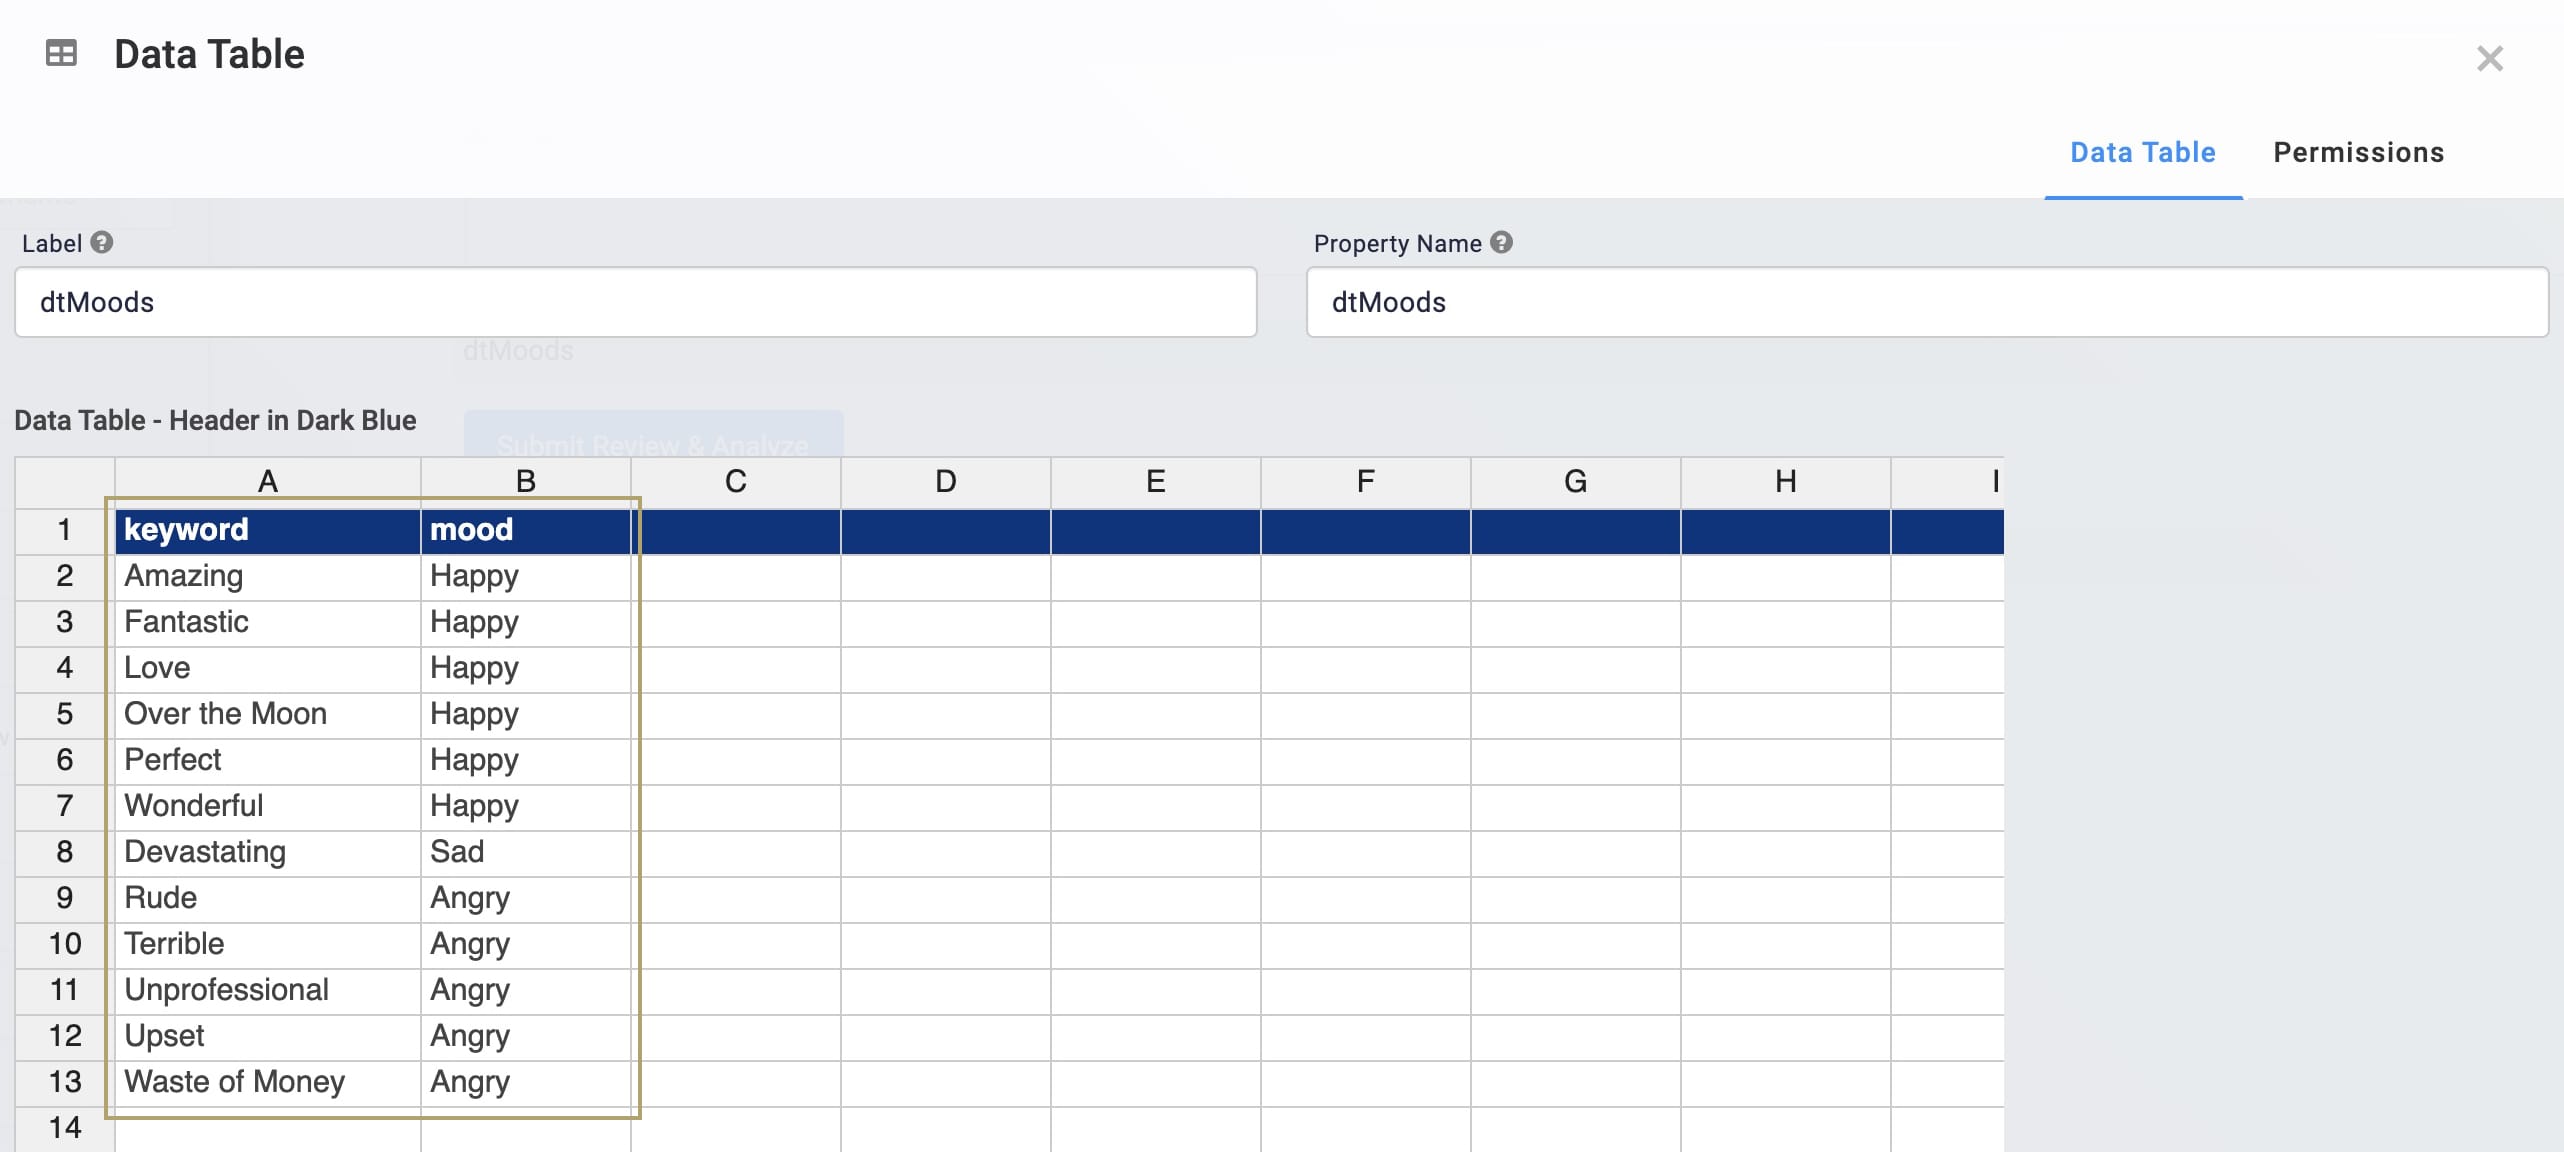
| 2. | Enter dtMoods in the Label and Property Name fields. |
| 3. | In the data table, enter the following: |
| keyword | mood |
|---|---|
|
Amazing |
Happy |
|
Fantastic |
Happy |
|
Love |
Happy |
|
Over the Moon |
Happy |
|
Perfect |
Happy |
|
Wonderful |
Happy |
|
Devastating |
Sad |
|
Rude |
Angry |
|
Terrible |
Angry |
|
Unprofessional |
Angry |
|
Upset |
Angry |
|
Waste of money |
Angry |
| 4. | Click Save. |
Configure the Button Component
Now, set up a Button component to trigger your Data Workflow.
| 1. | Drag and drop a Button component onto your canvas, placing it below your Data Table. |
| 2. | Enter btnNLP in the Property ID field. |
| 3. | Enter Submit Review & Analyze in the Label Text field. |
| 4. | Select Event as the Action Type. |
| 5. | Enter dwfNLP in the Trigger on Click field. |
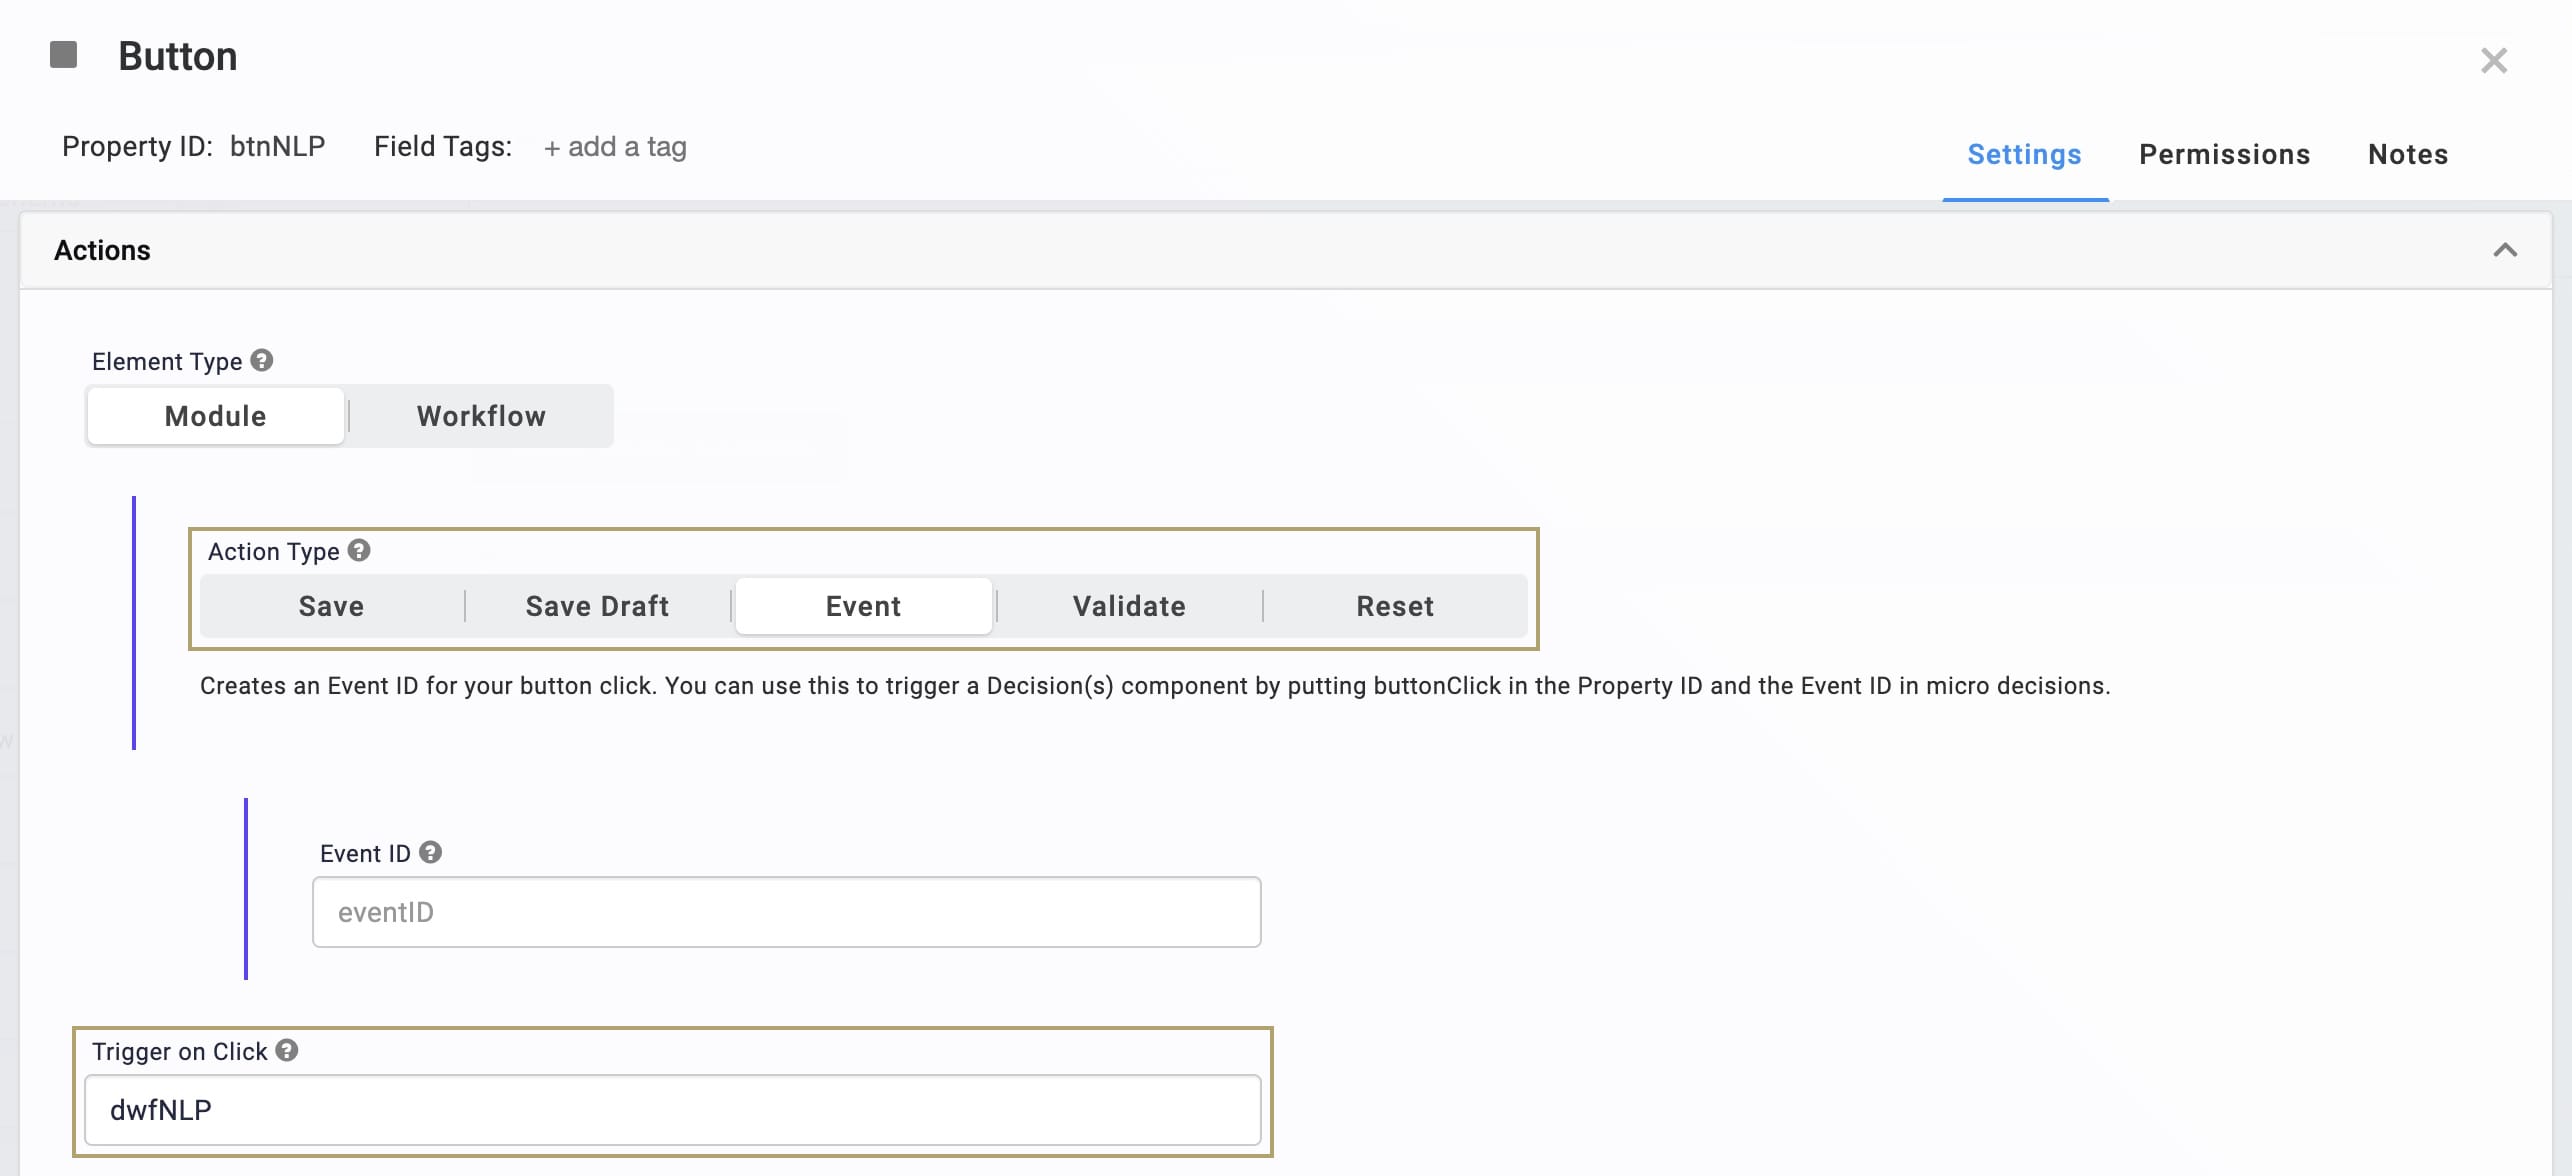
| 6. | Click Save. |
Configure the Hidden Component
Next, let's configure a Hidden component to output the data from your Data Workflow.
| 1. | Drag and drop a Hidden component onto your canvas, placing it below your Button component. |
| 2. | Enter outputNLP in the Property ID and Canvas Label Text fields. |
| 3. | Click Save. |
Configure the Data Workflow Component
Lastly, you'll set up your Data Workflow. Start by configuring an NLP operator and input your Text Area and Data Table components. It's important to set these components up correctly. You'll connect the inputs as follows:
-
Text Area component: upper input port (left)
-
Data Table component: lower input port (left)
This ensures the operator works as expected. Let's give it a try.
| 1. | Drag and drop a Data Workflow component onto your canvas, placing it between your Button and Hidden components. |
| 2. | Enter dwfNLP in the Canvas Label Text and Property Name fields. |

Configure the Input Operators
First, you'll configure 2 Input operators. One operator brings in data from your Text Area component. The other operator brings in data from your Data Table.
| 1. | Drag and drop 2 Input operators onto your Data Workflow canvas. |
| 2. | Configure the first Input operator's Info window as follows: |
| Setting | Value |
|---|---|
|
Category |
Input |
|
Component |
review |
|
Required |
Yes |
|
Source |
Default |
| 3. | Configure the second Input operator's Info window as follows: |
| Setting | Value |
|---|---|
|
Category |
Input |
|
Component |
dtMoods |
|
Required |
Yes |
|
Source |
Default |
Configure the NLP Operator
Next, you'll configure the NLP operator. This operator compares values dynamically entered in the module's Text Area to those stored in the Data Table.
| 1. | Drag and drop an NLP operator onto your Data Workflow canvas. |
| 2. | Configure the operator's Info window as follows: |
| Setting | Value |
|---|---|
|
Category |
NLP |
|
Label |
keyword |
|
Source Column |
keyword |
The Source Column is case-sensitive. Be sure that you enter it exactly as it's written in your Data Table column header.
| 3. | Connect the output port (right) of the review Input operator to the upper input port (left) of the NLP operator. |
| 4. | Connect the output port (right) of the dtMoods Input operator to the lower input port (left) of the NLP operator. |
Configure the Output Operator
The last step is to configure an Output operator. This lets you see the results of your NLP operator in the DevTools Console.
| 1. | Drag and drop an Output operator onto your Data Workflow canvas. |
| 2. | Configure the operator's Info window as follows: |
| Setting | Value |
|---|---|
|
Category |
Output |
|
Component |
outputNLP |
|
Action |
value |
| 3. | Connect the output port (right) of the NLP operator to the input port (left) of the Output operator. |
| 4. | Click Save. |
| 5. | Save your module. |
Now you're ready to test out your NLP operator. Preview your module in Express View and open the DevTools Console. Enter one or more of your created keywords into the Text Area. Then, click Submit Review & Analyze. Run the angular command and expand the data array in the DevTools Console. When you do, you'll see your keywords with their respective moods.
To open the Console in Google Chrome, you can use the Ctrl + Shift + J (Windows/Linux) or Option + Command + J (Mac OS) shortcut.
Changing an NLP Operator's Settings
You can revisit and make changes to this operator.
| 1. | Click the dwfValueData Workflow component. |
A 5-button toolbar displays above the component on hover-over.
| 2. | Click the  (Settings) button to open the Data Workflow canvas. (Settings) button to open the Data Workflow canvas. |
| 3. | Click the operator to open its Info Window. |
| 4. | Make changes to the operator's settings as needed. |
| 5. | Click Save Component. |
| 6. | Save your module. |
Copying an NLP Operator
You can make a copy of your operator using familiar keyboard settings. You can copy and paste an exact copy of your operator, matching all settings.
| 1. | Hover over the dwfValueData Workflow component. |
A 5-button toolbar displays above the component on hover-over.
| 2. | Click the (Settings) button to open the Data Workflow canvas. |
| 3. | Click the operator you want to duplicate. |
| 4. | On your keyboard, press Command + C (Mac OS) or Ctrl + C (Windows/Linux) to copy the operator. |
You can copy more than one operator at a time. Hold Command or Ctrl on your keyboard and click all the operators you want to copy. Follow the rest of the steps as usual.
| 5. | On your keyboard, press Command + V (Mac OS) or Ctrl + V (Windows/Linux) to paste the copied operator(s) to the Data Workflow canvas. |
| 6. | Click Save Component |
| 7. | Save your module. |
Did you know you can copy an operator and paste it into a different Data Workflow? You'll use the same steps outlined above.
Removing an NLP Operator
Lastly, you can delete this operator from your Data Workflow canvas. You can also use these same steps to delete a connection between two operators.
| 1. | Hover over the dwfValueData Workflow component. |
A 5-button toolbar displays above the component on hover-over.
| 2. | Click the (Settings) button to open the Data Workflow canvas. |
| 3. | Click the operator you want to delete. |
| 4. | On your keyboard, press Delete. |
Once you delete this operator, make sure to connect your remaining operators. If your Data Workflow path doesn't end with an Output or Console operator, your Data Workflow won't work. So, once you delete an operator, make sure to update any remaining paths to end at an Output or Console operator.
| 5. | Click Save Component. |
| 6. | Save your module. |
Lab
You can view this complete use case here: https://training.unqork.io/#/form/60d9fea98fb3c31cd4d70c15/edit.
