.png) The Convert Value operator lets you take a specific key from a data set and convert the value to a number, integer, or string. Let's review these three data types:
The Convert Value operator lets you take a specific key from a data set and convert the value to a number, integer, or string. Let's review these three data types:
Number: This data type is only for numbers. To be clear, we wouldn't classify the word ten as a number, but we would classify the number 10 as a number. This data type also allows for the use of decimals to differentiate it from an integer data type. When converting to a number data type, any original values with non-numeric characters will display as
NaN(Not a Number) in your final data. To avoid lost data, ensure that your original data does not contain non-numeric characters.Integer: This data type is also for numbers, but it does not allow for decimals. When converting to an integer, a number will only include the number before the decimal. When converting to an Integer data type, any original values with non-numeric characters display
0in your final data. To avoid lost data, ensure that your original data does not contain non-numeric characters.String: You'll sometimes see strings referred to as text. But this doesn't mean strings can only contain letters. Data stored as a string can include numbers, letters, symbols, and spaces. Strings can be as short as a few letters or contain entire paragraphs.
The Unqork Designer Platform handles each data type differently. And sometimes you'll need to convert the data collected from one data type to another.
You'll find the Convert Value operator under the Value/String group to the left of the Data Workflow canvas.
Similar Data Workflow Operators
The Convert Value operator is similar to the Convert Field operator. Here are the operators compared:
Convert Value operator: Converts a single value passed to it. It’s best used if you're only working with a single key/value pair of data.
Convert Field operator: Converts all values in a specified key of a data set. It’s best used if you're working with large amounts of data that need conversion.
About the Info Window
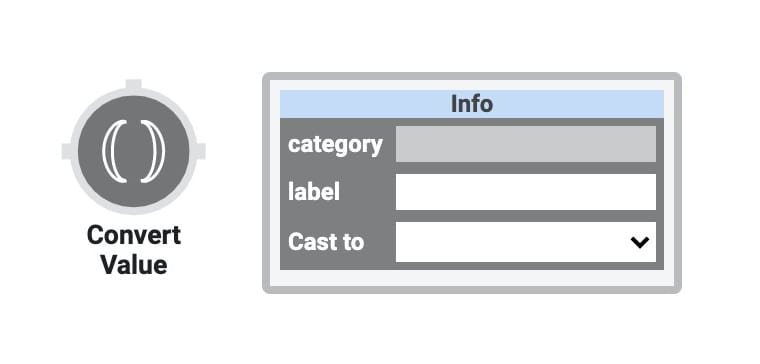
Here's a breakdown of each setting in the Info window:
Setting | Description |
|---|---|
Category | Grayed out and non-adjustable setting indicating the operation type. |
Label | Sets the label for your operator, displaying below the operator on your Data Workflow canvas. This field is optional, but set a label if you use more than one of the same operator type. A label helps you identify your operators without opening any Info windows. |
Cast To | The final data type you want after the operator performs its conversion. Here, you'll find a drop-down with the following options:
|
Adding a Convert Value Operator
In this example, you'll learn how to convert a string into a number using the Convert Value operator. You'll use a Text Field component to ensure that any value you enter will be stored as a string. You'll enter a value in this field in Express View and trigger the Data Workflow with a button. On button-click, the Convert Value operator will convert the string into a number.
These instructions assume you have a module open, saved, and with a title.
Configure the Text Field Component
First, you'll set up a Text Field component so your end-user can enter a string to convert. Remember, anything stored in a Text Field component is automatically a string.
In the Module Builder, drag and drop a Text Field component onto your canvas.
In the Property ID field, enter
stringInput.In the Label Text field, enter
String Input.In the Helper Text field, enter
Enter a Number.Click Save Component.
Configure the Hidden Component
Next, you'll configure a Hidden component to store your Data Workflow component’s output.
Drag and drop a Hidden component onto your canvas, placing it below your
stringInputText Field component.In the Property ID and Label Text fields, enter
numberOutput.Click Save Component.
Configure the Data Workflow Component
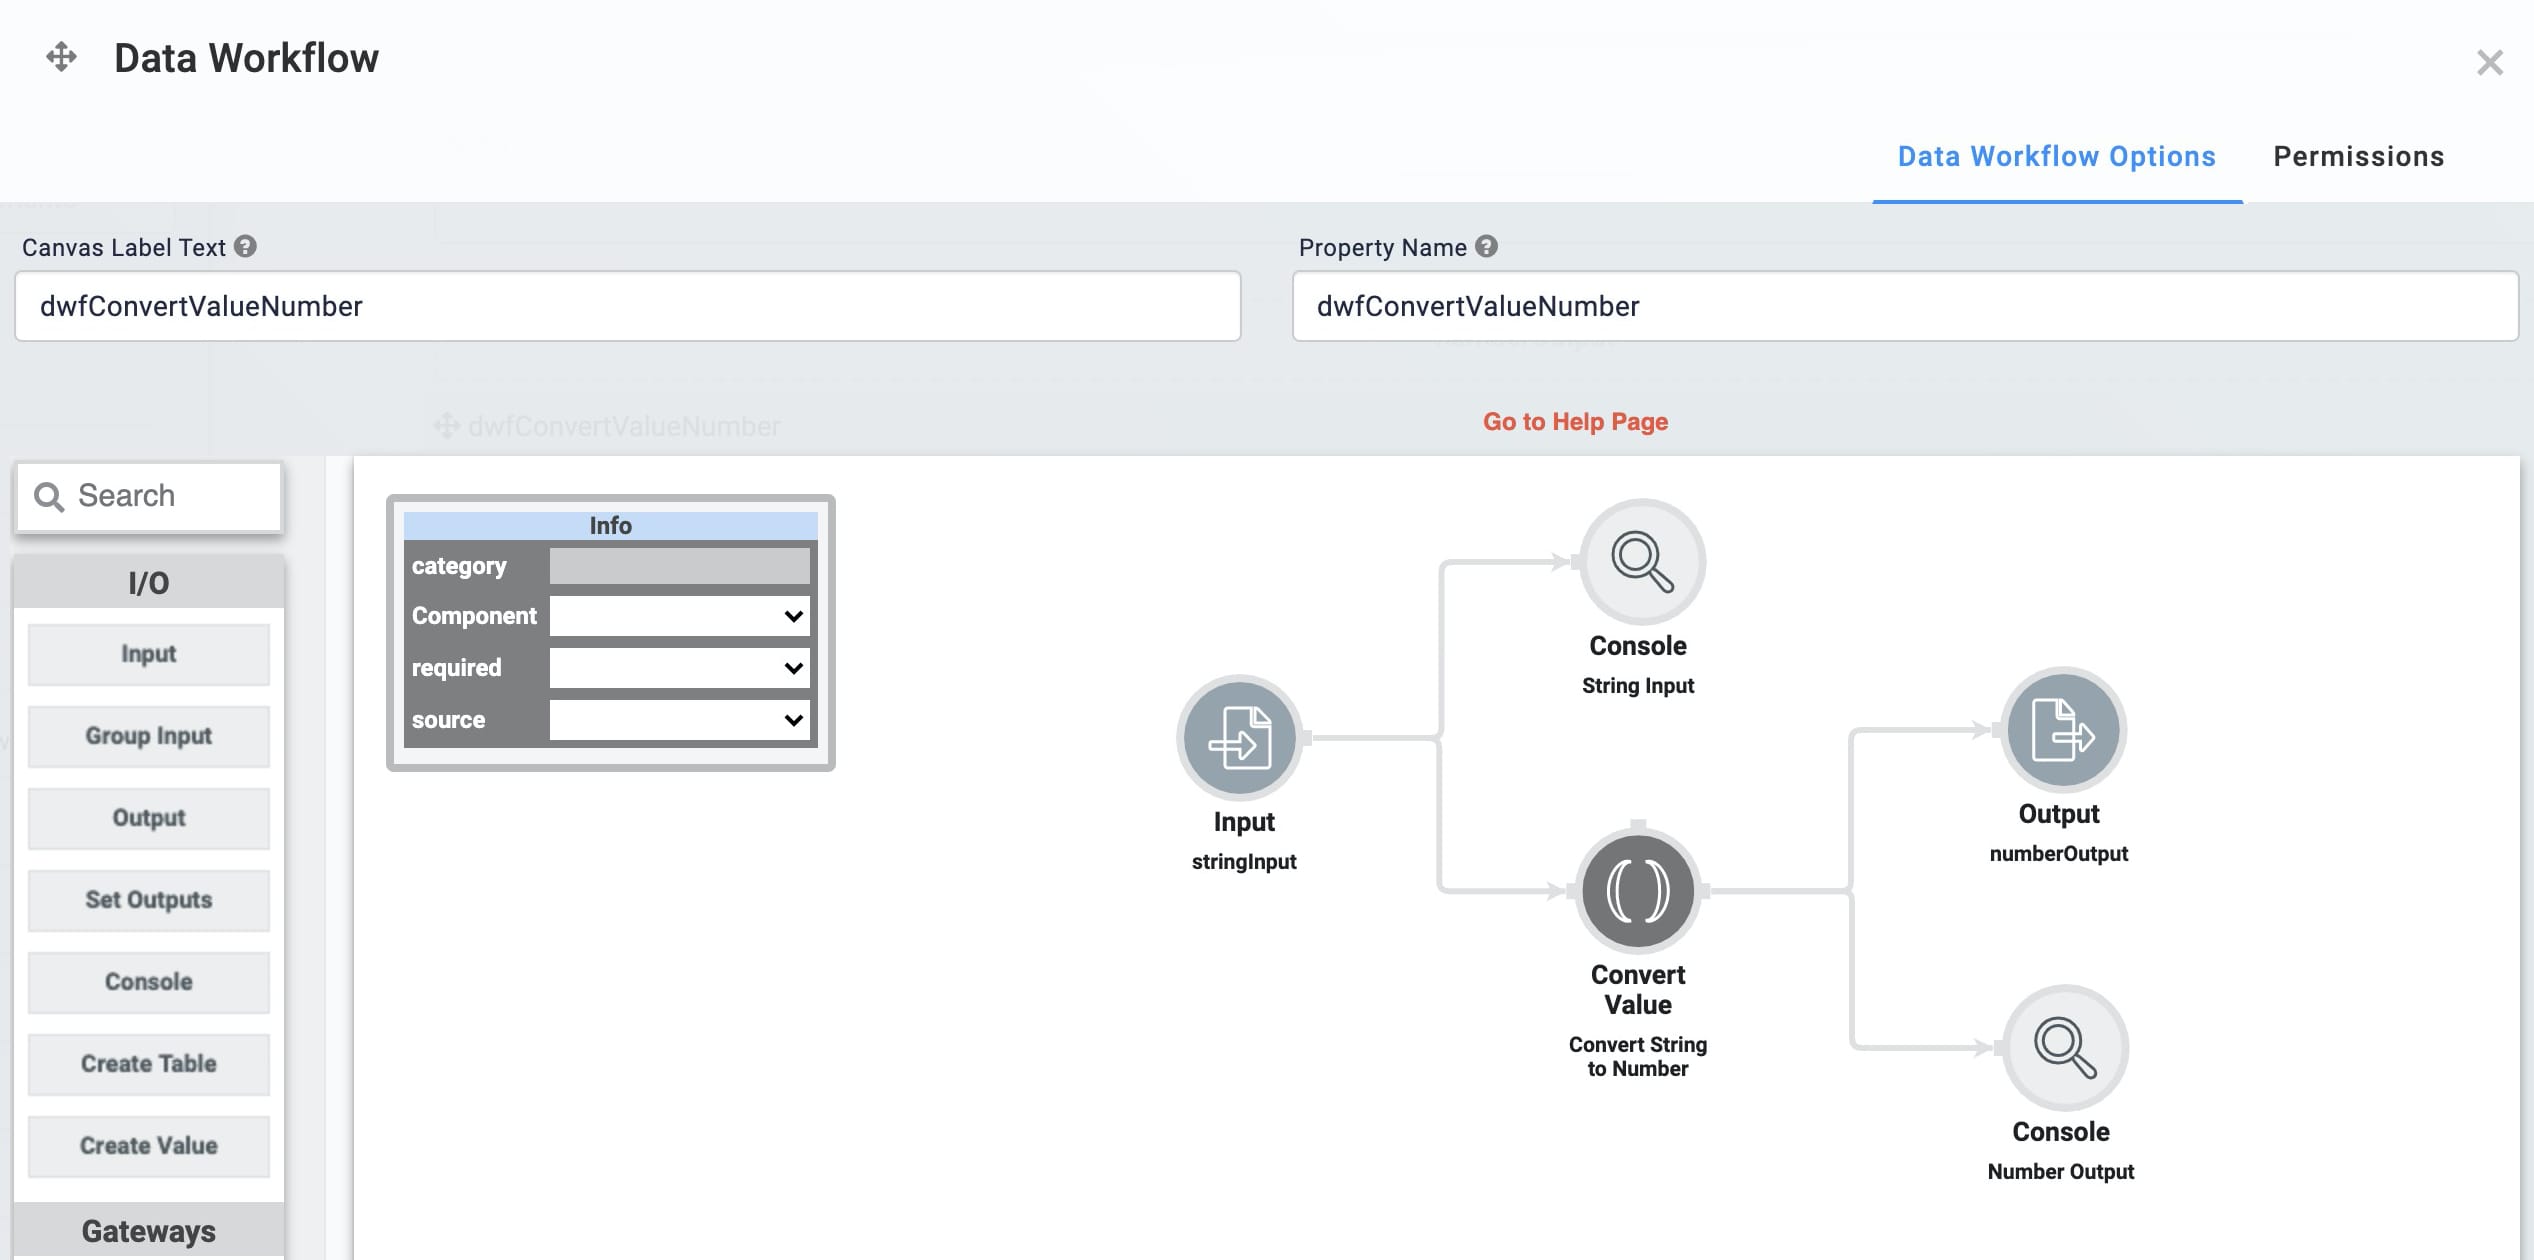
Now, it's time to set up your Data Workflow component. First, you'll input your Text Field component into a Convert Value operator. Then, you'll cast any string entered into the Text Field component as a number and output it into your Hidden component. To help you view the progress of your Data Workflow component, you'll configure two Console operators.
Drag and drop a Data Workflow component onto your canvas, placing it below your
numberOutputHidden component.In the Property ID and Canvas Label Text fields, enter
dwfConvertValueNumber.
Configure the Input Operator
Drag and drop an Input operator onto your Data Workflow canvas.
Configure the operator's Info window as follows:
Setting
Value
Category
Input
Component
stringInput
Required
No
Source
Default
Configure the Convert Value Operator
Drag and drop a Convert Value operator onto your Data Workflow canvas.
Configure the operator's Info window as follows:
Setting
Value
Category
Convert To Value
Label
Convert String to Number
Cast To
Number
Connect the output port (right) of the
stringInputInput operator to the input port (left) of theConvert String to NumberConvert Value operator.
Configure the Output Operator
Drag and drop an Output operator onto your Data Workflow canvas.
Configure the operator's Info window as follows:
Setting
Value
Category
Output
Component
numberOutput
Action
value
Connect the output port (right) of the
Convert String to NumberConvert Value operator to the input port (left) of thenumberOutputOutput operator.
Configure the First Console Operator
Drag and drop a Console operator onto your Data Workflow canvas.
Configure the operator's Info window as follows:
Setting
Value
Category
Console
Label
String Input
Connect the output port (right) of the
stringInputInput operator to the input port (left) of theString InputConsole operator.
Configure the Second Console Operator
Drag and drop another Console operator onto your Data Workflow canvas.
Configure the operator's Info window as follows:
Setting
Value
Category
Console
Label
Number Output
Connect the output port (right) of the
Convert String to NumberConvert Value operator to the input port (left) of theNumber OutputConsole operator.Click Save Component.
.png)
Configure the Button Component
Now, let's add a Button component to trigger your Data Workflow.
Drag and drop a Button component onto your canvas, placing it below the Data Workflow component.
In the Property ID field, enter
btnConvertToNumber.In the Label Text field, enter
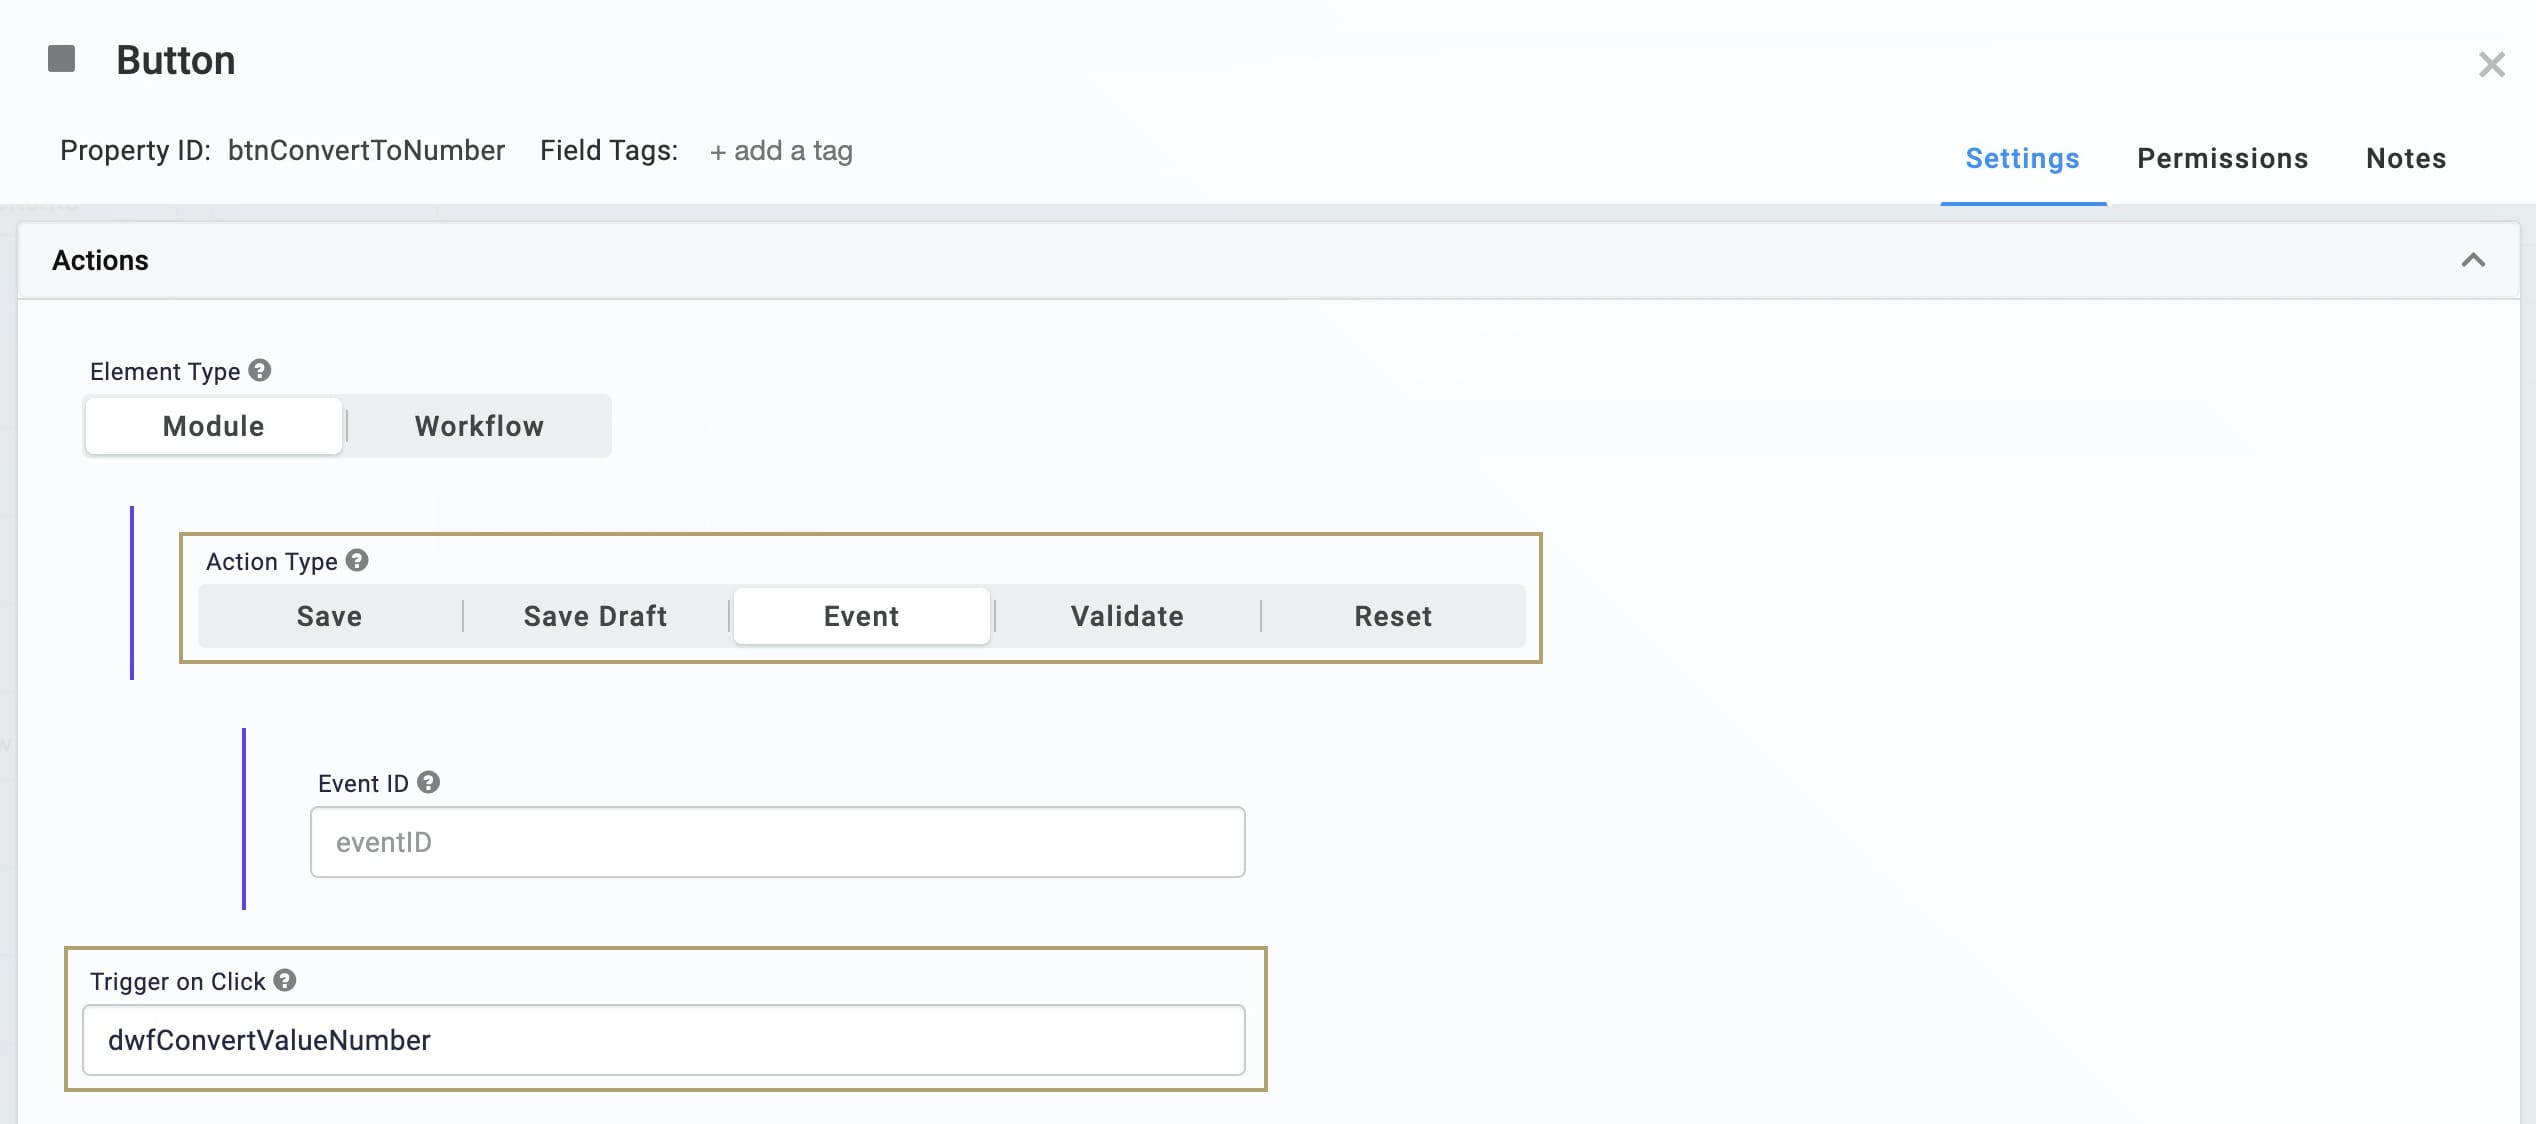
Convert String to Number.From the Action Type drop-down, select Event.
In the Trigger on Click field, enter
dwfConvertValueNumber..png)
Click Save Component.
Save your module.
Here's how the completed example looks in the Module Builder:
.png)
Preview your module in Express View and open the DevTools Console. Enter a number (with and without a decimal point) or text into your Text Field component and click the Convert String to Number button. Each submission will give you a stringInput and numberOutput Console output. Enter a number 500.50 into the field and click the button. Then, run the Angular command. When you expand your data, you'll see 500.50 as your input and 500.5 as your output. Quotation marks around your input show that it's a string. No quotation marks around your output means the conversion was successful.

 The Convert Value operator lets you take a specific key from a data set and convert the value to a number, integer, or string. Let's review these three data types:
Number: This data type is only for numbers. To be clear, we wouldn't classify the word ten as a number, but we would classify the number 10 as a number. This data type also allows for the use of decimals to differentiate it from an integer data type. When converting to a number data type, any original values with non-numeric characters will display as
NaN(Not a Number) in your final data. To avoid lost data, ensure that your original data does not contain non-numeric characters.Integer: This data type is also for numbers, but it does not allow for decimals. When converting to an integer, a number will only include the number before the decimal. When converting to an Integer data type, any original values with non-numeric characters display
0in your final data. To avoid lost data, ensure that your original data does not contain non-numeric characters.String: You'll sometimes see strings referred to as text. But this doesn't mean strings can only contain letters. Data stored as a string can include numbers, letters, symbols, and spaces. Strings can be as short as a few letters or contain entire paragraphs.
The Unqork Designer Platform handles each data type differently. And sometimes you'll need to convert the data collected from one data type to another.
You'll find the Convert Value operator under the Value/String group to the left of the Data Workflow canvas.
Similar Data Workflow Operators
The Convert Value operator is similar to the Convert Field operator. Here are the operators compared:
Convert Value operator: Converts a single value passed to it. It’s best used if you're only working with a single key/value pair of data.
Convert Field operator: Converts all values in a specified key of a data set. It’s best used if you're working with large amounts of data that need conversion.
About the Info Window
Here's a breakdown of each setting in the Info window:
Setting | Description |
|---|---|
Category | Grayed out and non-adjustable setting indicating the operation type. |
Label | Sets the label for your operator, displaying below the operator on your Data Workflow canvas. This field is optional, but set a label if you use more than one of the same operator type. A label helps you identify your operators without opening any Info windows. |
Cast To | The final data type you want after the operator performs its conversion. Here, you'll find a drop-down with the following options:
|
Adding a Convert Value Operator
In this example, you'll learn how to convert a string into a number using the Convert Value operator. You'll use a Text Field component to ensure that any value you enter will be stored as a string. You'll enter a value in this field in Express View and trigger the Data Workflow with a button. On button-click, the Convert Value operator will convert the string into a number.
These instructions assume you have a module open, saved, and with a title.
Configure the Text Field Component
First, you'll set up a Text Field component so your end-user can enter a string to convert. Remember, anything stored in a Text Field component is automatically a string.
In the Module Builder, drag and drop a Text Field component onto your canvas.
In the Property ID field, enter
stringInput.In the Label Text field, enter
String Input.In the Helper Text field, enter
Enter a Number.Click Save & Close.
Configure the Hidden Component
Next, you'll configure a Hidden component to store your Data Workflow component's output.
Drag and drop a Hidden component onto your canvas, placing it below your
stringInputText Field component.In the Property ID and Canvas Label Text fields, enter
numberOutput.Click Save & Close.
Configure the Data Workflow Component
Now, it's time to set up your Data Workflow component. First, you'll input your Text Field component into a Convert Value operator. Then, you'll cast any string entered into the Text Field component as a number and output it into your Hidden component. To help you view the progress of your Data Workflow component, you'll configure two Console operators.
Drag and drop a Data Workflow component onto your canvas, placing it below your
numberOutputHidden component.In the Canvas Label Text and Property Name fields, enter
dwfConvertValueNumber.
Configure the Input Operator
Drag and drop an Input operator onto your Data Workflow canvas.
Configure the operator's Info window as follows:
Setting
Value
Category
Input
Component
stringInput
Required
No
Source
Default
Configure the Convert Value Operator
Drag and drop a Convert Value operator onto your Data Workflow canvas.
Configure the operator's Info window as follows:
Setting
Value
Category
Convert To Value
Label
Convert String to Number
Cast To
Number
Connect the output port (right) of the
stringInputInput operator to the input port (left) of theConvert String to NumberConvert Value operator.
Configure the Output Operator
Drag and drop an Output operator onto your Data Workflow canvas.
Configure the operator's Info window as follows:
Setting
Value
Category
Output
Component
numberOutput
Action
value
Connect the output port (right) of the
Convert String to NumberConvert Value operator to the input port (left) of thenumberOutputOutput operator.
Configure the First Console Operator
Drag and drop a Console operator onto your Data Workflow canvas.
Configure the operator's Info window as follows:
Setting
Value
Category
Console
Label
String Input
Connect the output port (right) of the
stringInputInput operator to the input port (left) of theString InputConsole operator.
Configure the Second Console Operator
Drag and drop another Console operator onto your Data Workflow canvas.
Configure the operator's Info window as follows:
Setting
Value
Category
Console
Label
Number Output
Connect the output port (right) of the
Convert String to NumberConvert Value operator to the input port (left) of theNumber OutputConsole operator.
Configure the Button Component
Now, let's add a Button component to trigger your Data Workflow component.
Drag and drop a Button component onto your canvas, placing it below your Data Workflow component.
In the Property ID field, enter
btnConvertToNumber.In the Label field, enter
Convert String to Number.Set the Action Type as Event.
In the Trigger on Click field, enter
dwfConvertValueNumber.
Click Save & Close.
Save your module.
Here's how the completed example looks in the Module Builder:

Preview your module in Express View and open the DevTools Console. Enter a number (with and without a decimal point) or text into your Text Field component and click the Convert String to Number button. Each submission will give you a stringInput and numberOutput Console output. Enter a number 500.50 into the field and click the button. Then, run the Angular command. When you expand your data, you'll see 500.50 as your input and 500.5 as your output. Quotation marks around your input show that it's a string. No quotation marks around your output means the conversion was successful.
