Overview
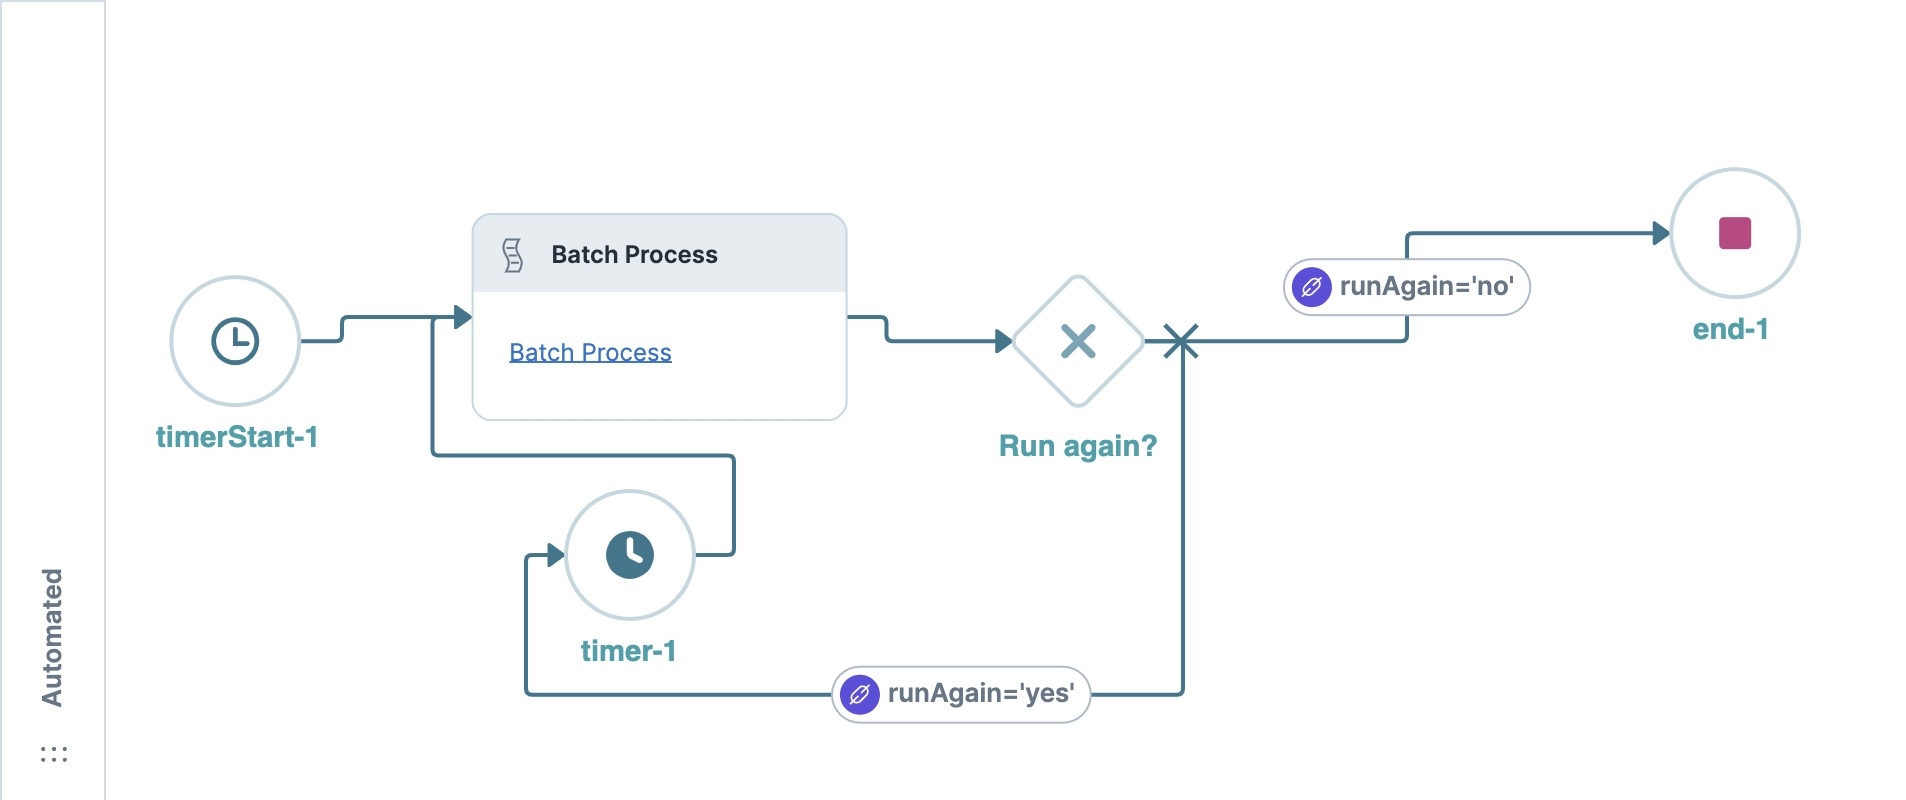
Timeouts can leave processes incomplete and affect the end-user experience. For server-side processes, there is a five-minute runtime limit for automated workflows. Large jobs running in an automated workflow could take longer than five minutes. Thankfully, you can use the Timer node in a large chron job, like a batch processing loop. When the process reaches the Timer node, it resets the five-minute server-side processing limit. That way, if one iteration of your loop exceeds five minutes, it never timeouts.
What You’ll Learn
In this article, you’ll learn about the best practices when using an automated workflow in a batch processing application.
Reviewing the Configuration
To better understand the process, you can find a prebuilt workflow-type application here: https://training.unqork.io/#/form/64f22a1e926ee36c5c18f32f/edit. The remainder of this article will be a review of the configuration and how it prevents timeouts when running large jobs.
When you open these components, you’ll see that many are empty. Copy and paste the module into your workspace and enter the necessary module IDs to test the functionality.
Let’s explore the configuration in each of the Field Group components.
On Load Field Group Component
The module’s first Field Group component contains the on-load logic. This component includes one Initializer component and two Hidden components.
 These Hidden components determine the functionality of the batch-processing module. In one component, you’ll enter a schema module ID as the source for the processed submissions. In the other module, you’ll enter a server-side execution module ID that will process the submissions. The Initializer component triggers a Plug-In component to retrieve the submissions. It triggers the Edit Submission action because it is part of a workflow.
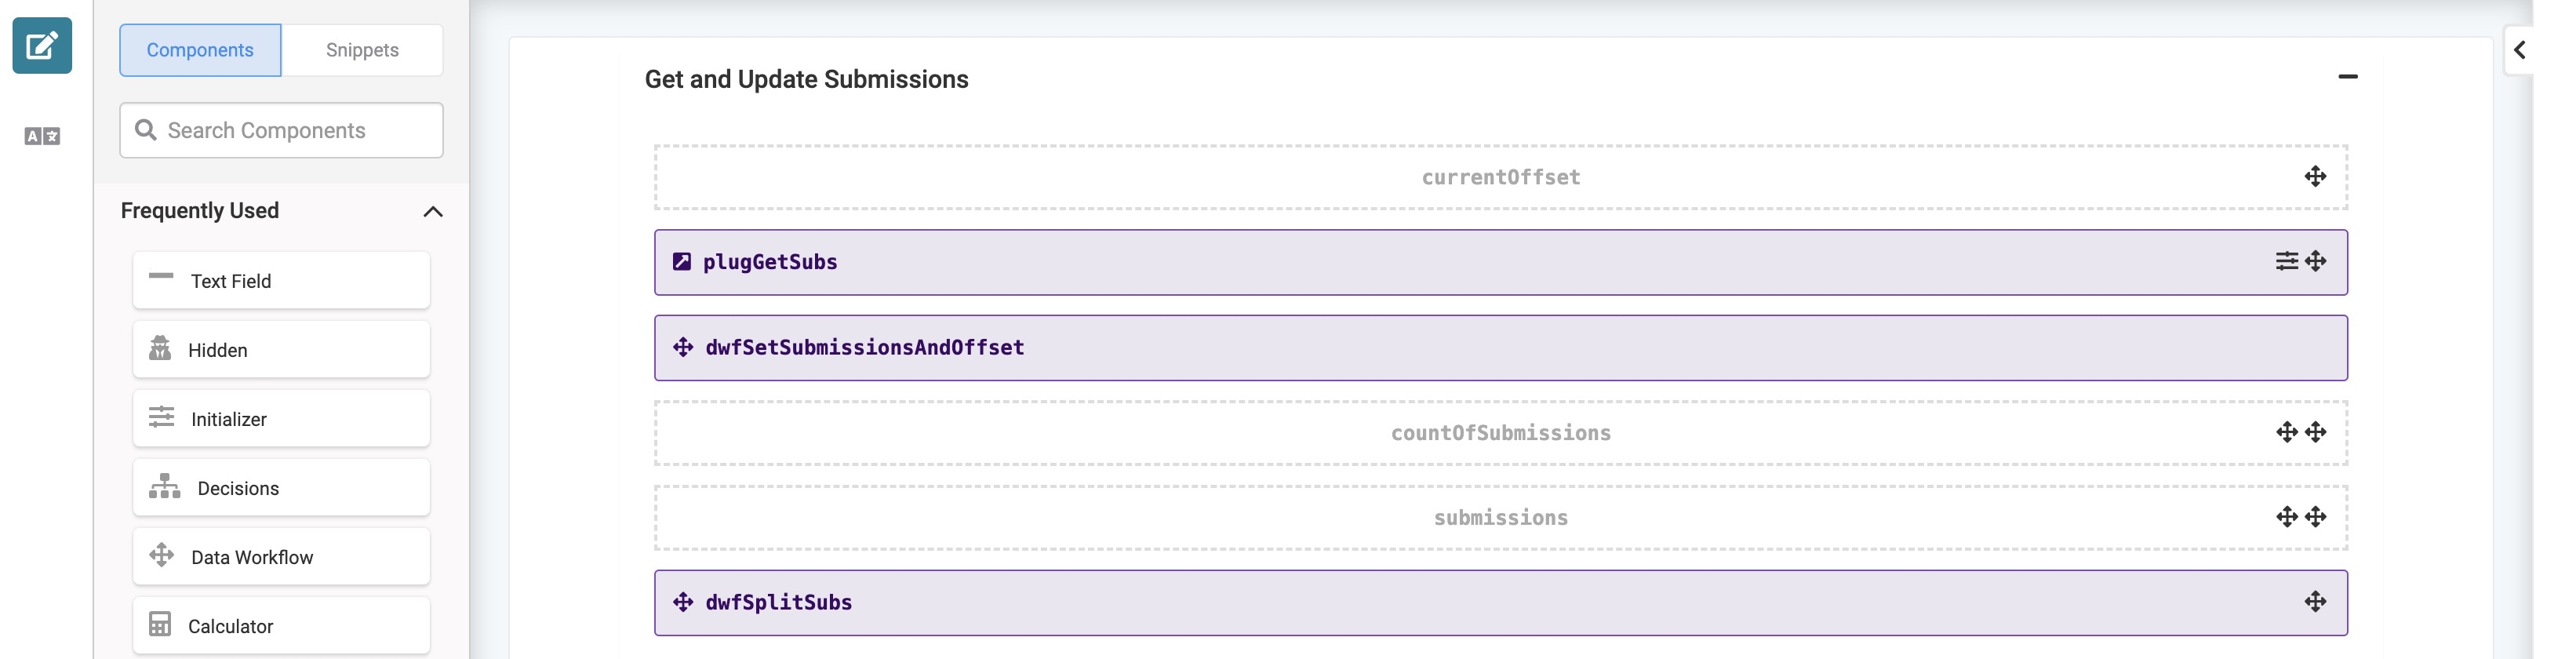
Get and Update Submissions Field Group Component
Now, let’s review the logic necessary to retrieve the correct submissions for each batch.
 The currentOffset Hidden component has a Default Value of
 0. With each batch, it updates and uses the new value in the Get Submissions call. Doing so ensures the module retrieves a new batch of submissions each time it runs. The Plug-In component making the call uses the following Data Source URL: /fbu/uapi/modules/{{data.schemaModuleId}}/submissions?sort=created&offset={{data.currentOffset}}&dataFields=noFields&limit=20. The call uses the schema module ID and a current offset that returns a batch of 20 submissions.
You can use the dataFields=noFields parameter to return the submission IDs only.
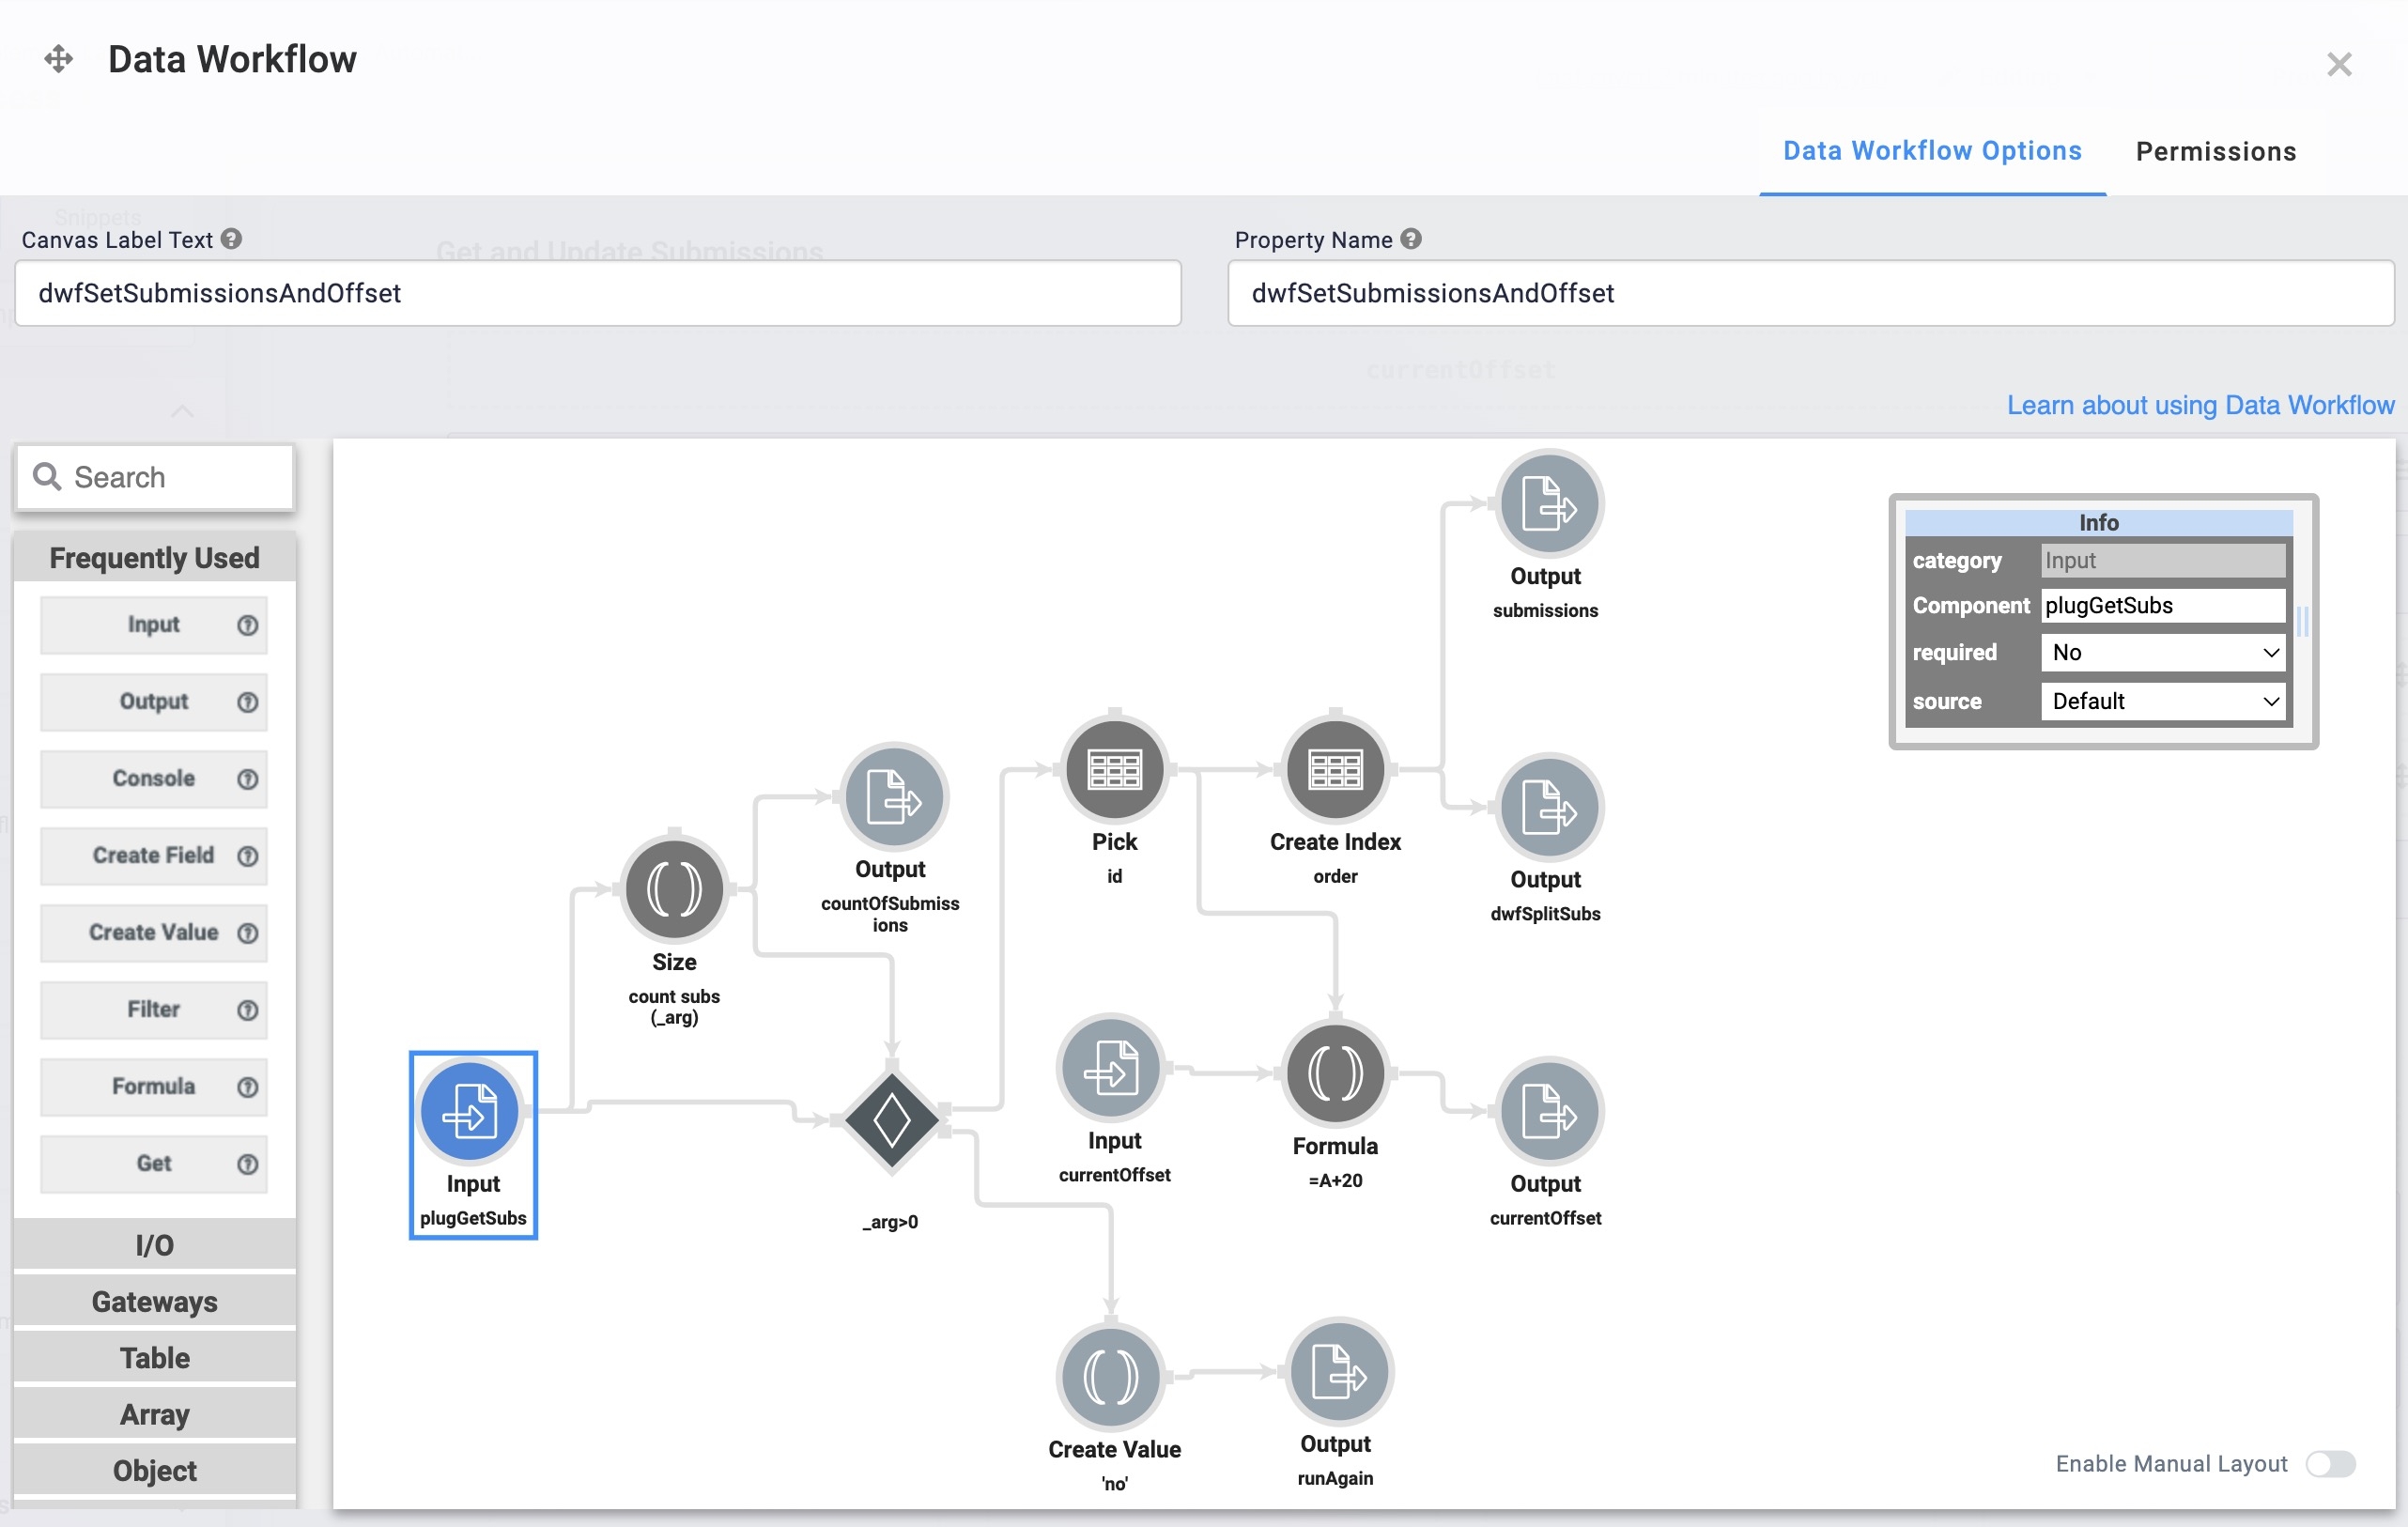
Then, the Plug-In component triggers the dwfSetSubmissionsAndOffset Data Workflow using a post trigger. Next, let’s review the various tasks the Data Workflow performs.
 First, the Data Workflow inputs the submissions returned by the plugGetSubs
  Plug-In component and sets the Default Value of the countOfSubmissions Hidden component. Next, the Data Workflow determines if the number of submissions is greater than zero. If the value is greater than zero, the Data Workflow runs another batch. If it equals zero, it stops and creates a value of 'no', outputting it to the runAgain Hidden component. Retrieved submissions include the submission ID and an index that stores in the submissions Hidden component. The offset of 20 ensures the Plug-In component retrieves the next batch of submissions when it repeats the loop.
After the Data Workflow populates the countOfSubmissions and submissions Hidden components, it triggers another Data Workflow component. The image below suggests the dwfSplitSubs Data Workflow performs some complex tasks. However, the process is quite simple.
 This Data Workflow inputs the submissions with their submission ID and index. It filters for a submission using order=0 to return a single submission. It retrieves the submission ID and stores it in a Hidden component. Then, the Data Workflow triggers a Plug-In component. This process repeats 20 times or as many times as there are submissions. Each submission ID is stored in its Hidden component and triggers its Plug-In component.
SSE Update Plugins Field Group Component
Like the previous Data Workflow, the logic in this Field Group component repeats 20 times. It consists of 20 Panel components, each containing an Initializer, a Plug-In, and two Hidden components. Each Panel component retrieves and stores a single submission. The image below displays a portion of the configuration in the SSE Update Plugins Field Group component.
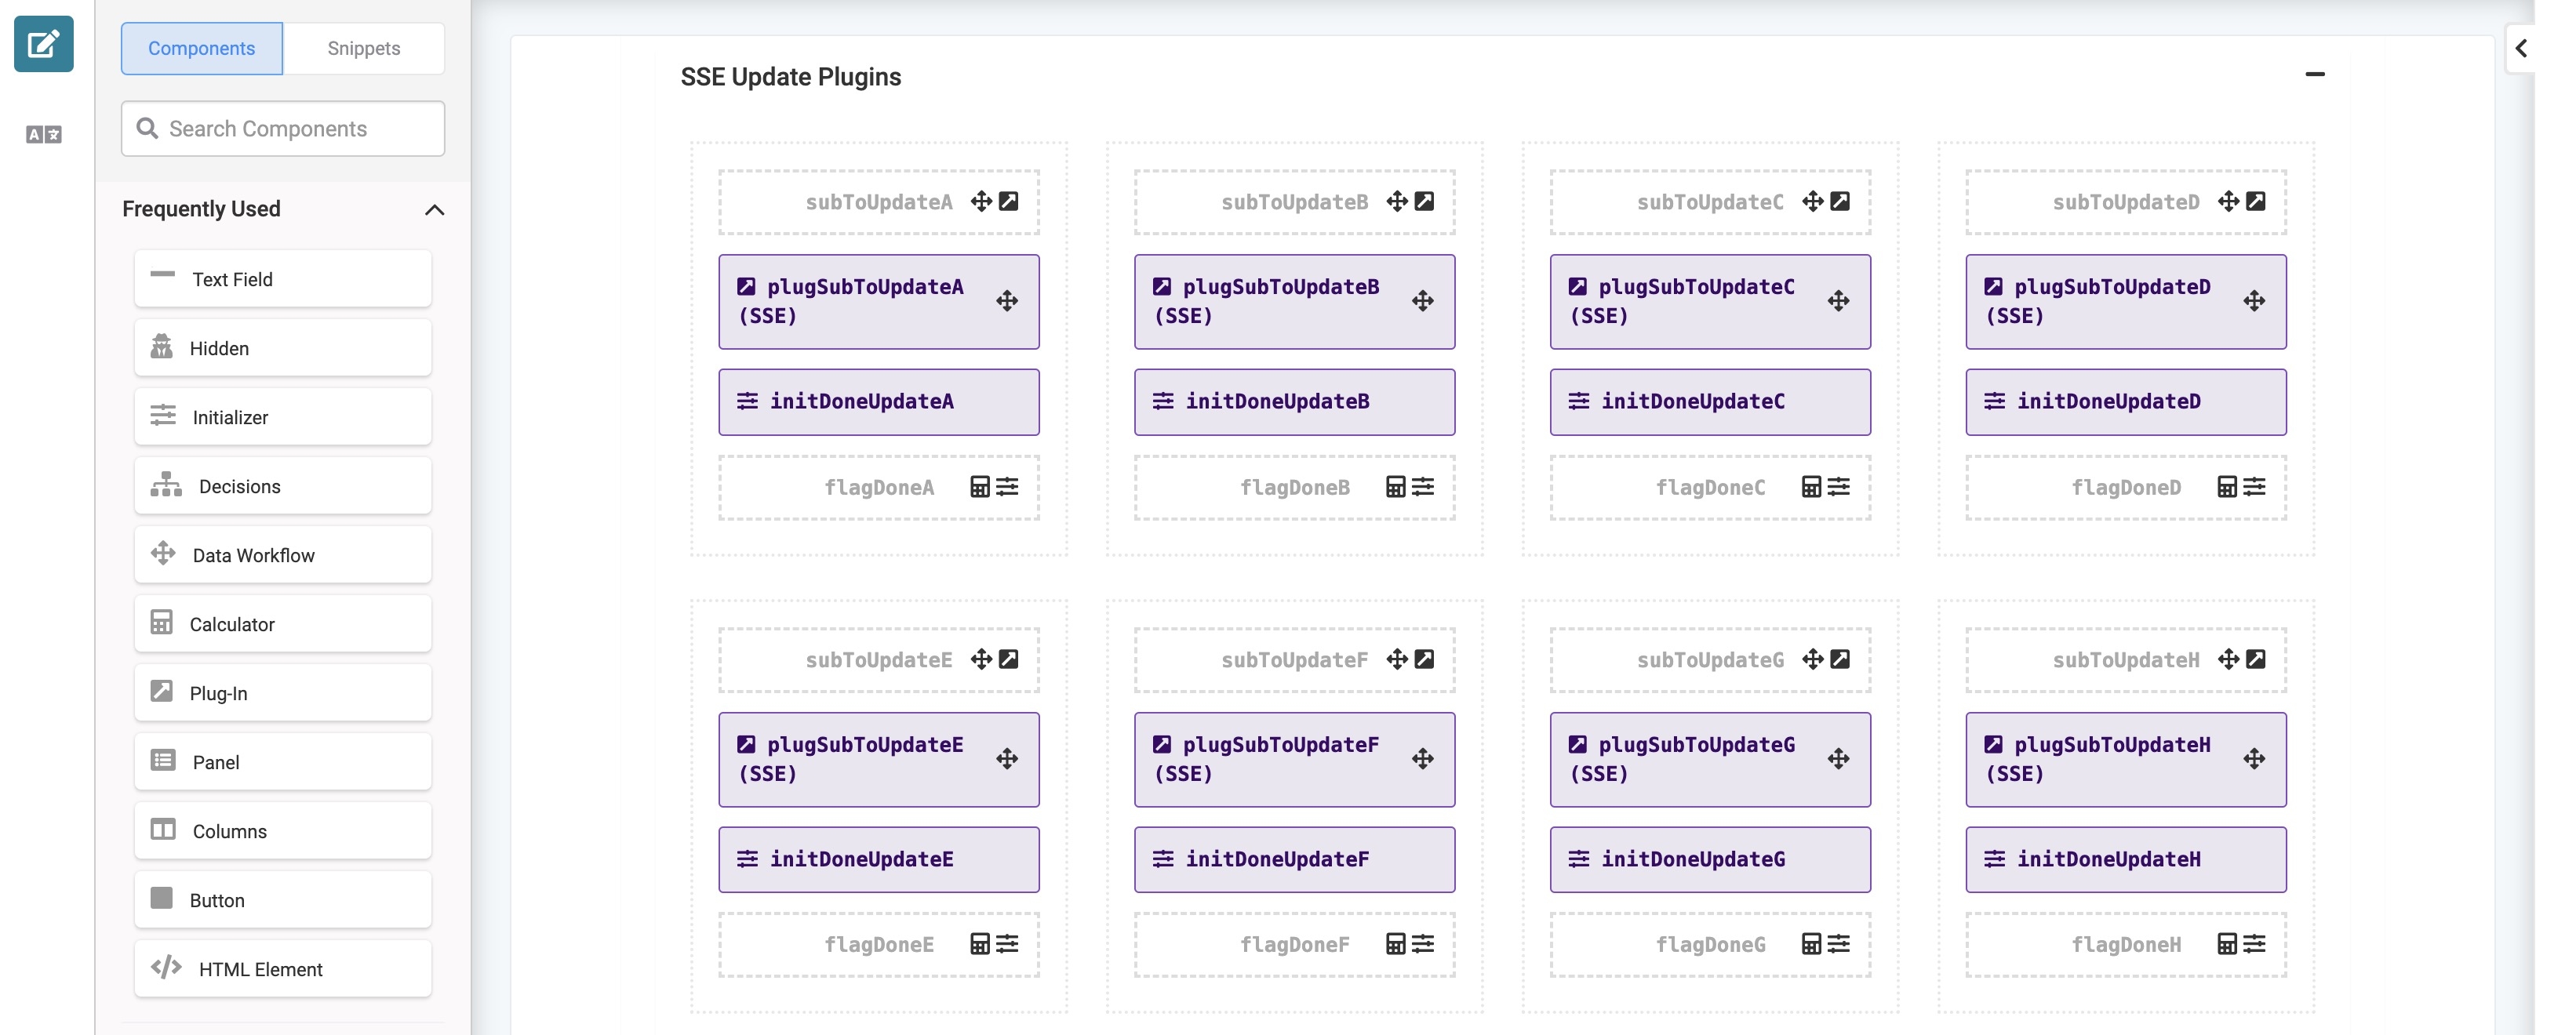 To explain the configuration in these Panel components, let's start with the subToUpdateA Hidden component. The dwfSplitSubs Data Workflow sets the Hidden component's Default Value to the first submission’s submission ID. The Data Workflow also triggers the plugSubToUpdateA Plug-In component. This Plug-In component makes an Execute Module call on the sseModuleId Hidden component and determines the process you want to complete. This Plug-In component also uses a post trigger to trigger the initDoneUpdateA Initializer component. This Initializer component sets flagDoneA Hidden component's Default Value to 1 and triggers the calcAllDone Calculator component. This logic repeats, increasing the value until all submissions are retrieved.
Because the Data Workflow triggers each Plug-In component separately, they run asynchronously. This process improves the application's performance and efficiency. If, for some reason, the plugSubToUpdateA Plug-In component takes a long time to finish, the plugSubToUpdateB Plug-In component does not have to wait before it runs.
While you could create a larger batch with 100 or 1000 submissions, you risk overloading the server when you make so many calls simultaneously. Batches of 20 is a reliable and efficient size.
Response & Retrigger Field Group Component
The final Field Group component contains Calculator and Decisions components that control when the loop should repeat or end.
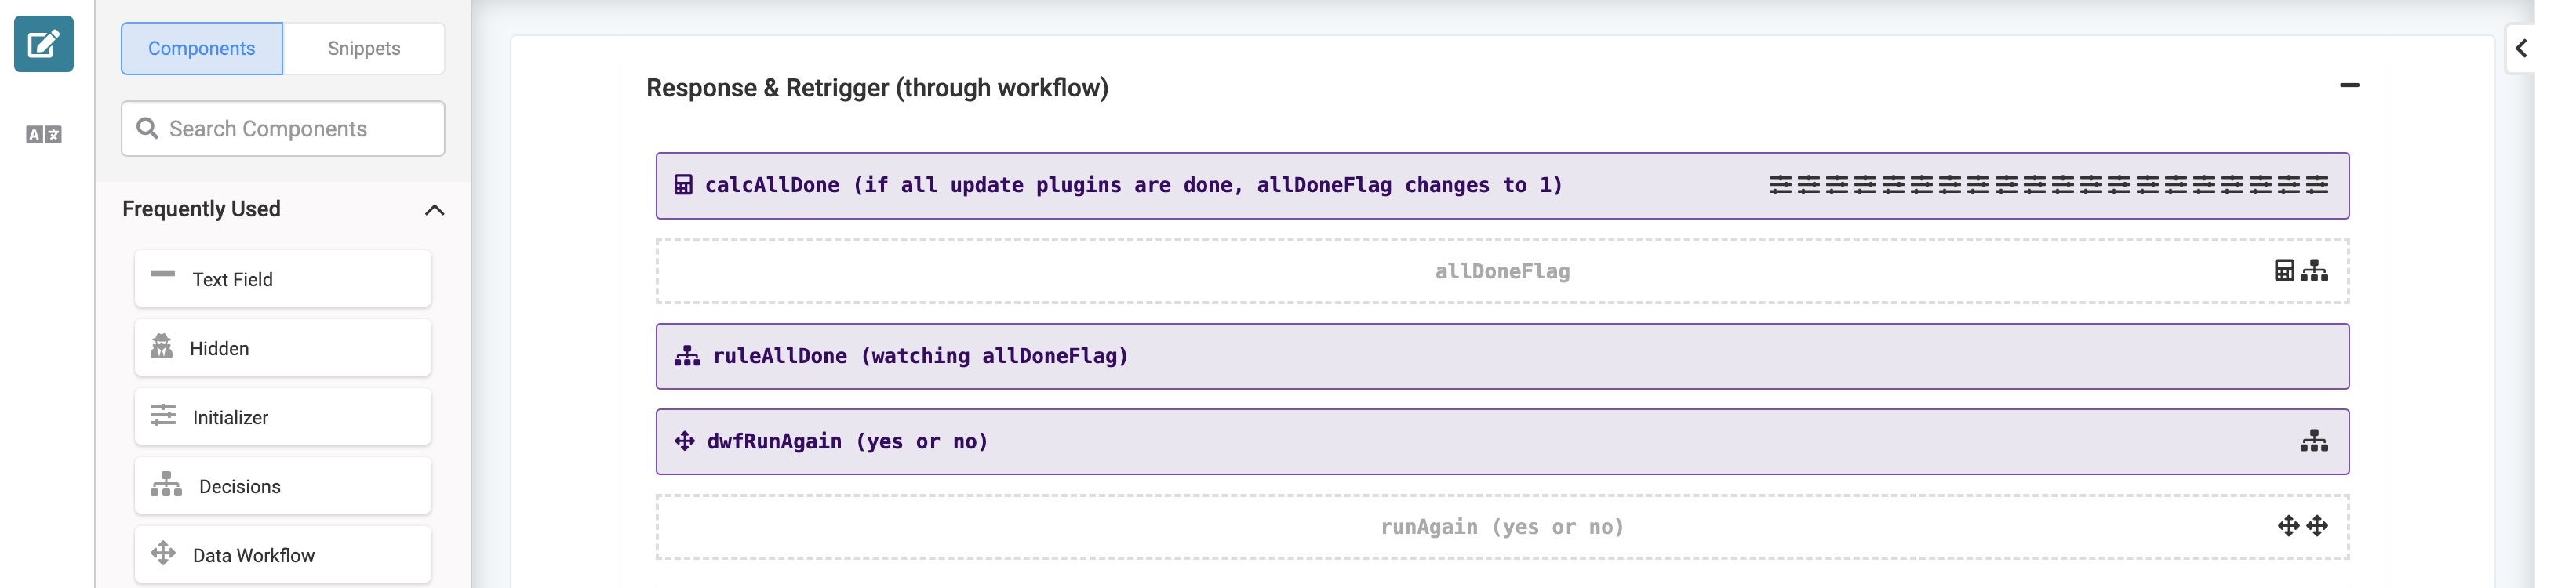 After a Plug-In component runs, the calcAllDone Calculator component determines if they are all finished. It checks each batches’ flagDone Hidden component and determines if they add up to 20. If they do, it sets the allDoneFlag Hidden component’s Default Value to 1. If they do not add up to 20, it sets the Default Value to 0. When all the Plug-In components have finished, the ruleAllDone Decisions component triggers the dwfRunAgain Data Workflow component.
If the countOfSubmissions Hidden component’s value is 20, the Data Workflow sets the runAgain Hidden component’s value to ‘yes’. If the value is less than 20, no more submissions exist and the runAgain Hidden component’s Default Value is set to ‘no’. Then, the workflow checks the runAgain Hidden component’s Default Value. If the value is 'yes', the Batch Process module runs again. If the value is 'no', the workflow ends.